XL 7550 - Dishwasher ORANIER - Free user manual and instructions
Find the device manual for free XL 7550 ORANIER in PDF.
| Product type | Free-standing dishwasher |
| Brand | Oranier |
| Model | XL 7550 |
| Capacity | 12 standard place settings |
| Number of programs | 5 (Soak, Light, Eco, Normal, Intensive) |
| Reference program | Eco (EN 50242 standard) |
| Option 3/1 (all-in-one) | Yes |
| Delayed start | Yes (3, 6 or 9 hours) |
| Water softener | Yes, adjustable (5 positions according to hardness) |
| Water consumption (min - max) | 6 L (soak) - 20 L (intensive) |
| Energy consumption (min - max) | 0.03 kWh (soak) - 1.60 kWh (intensive) |
| Program duration (min - max) | 15 min (soak) - 180 min (eco) |
| Anti-overflow system | Yes (Acquastop on some models) |
| Error codes | E1 to E9 for diagnosis |
| Hot water connection | Possible up to 60°C |
| Power supply | 230 V ~ 50 Hz |
| Maintenance | Regular cleaning of filters and spray arms recommended |
| After-sales service | Contact an authorized center for repairs |
Frequently Asked Questions - XL 7550 ORANIER
User questions about XL 7550 ORANIER
0 question about this device. Answer the ones you know or ask your own.
Ask a new question about this device
Download the instructions for your Dishwasher in PDF format for free! Find your manual XL 7550 - ORANIER and take your electronic device back in hand. On this page are published all the documents necessary for the use of your device. XL 7550 by ORANIER.
USER MANUAL XL 7550 ORANIER
Thank you for choosing one of our products.
You are advised to read this manual carefully; it contains all the information you need about the right conditions for the proper, safe use of your dishwasher.
The individual sections are laid out to provide you with a step-by-step guide to all your appliance's functions; the texts are easy to understand and are complete with detailed illustrations.
This user-friendly manual will provide answers to all your questions about use of the dishwasher.
For any other information about use and maintenance of the dishwasher, read the enclosed manual carefully.

USER INSTRUCTIONS: useful information is provided for the use of the washing programs and all the dishwasher's functions.
1. Description of the controls
1.1 Upper panel
All the dishwasher controls are grouped on the upper panel.

| 1 | ON/OFF BUTTON Pressing this button energises the appliance. |
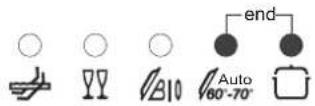
| 2 | SELECTED PROGRAM INDICATOR LIGHTS Illumination of this light denotes the program selected and the occurrence of a fault (troubleshooting). |
| 3 | PROGRAM SELECTION BUTTON By pressing this button in sequence it is possible to select the desired program. |
| 4 | SALT WARNING LIGHT (certain models only) Illumination of this light signals that salt container is empty. |
| 5 | RINSE AID WARNING LIGHT (certain models only) Illumination of this light signals that rinse aid dispenser is empty. |
| 6 | 3/1 OPTION BUTTON (certain models only) Press this button to activate the option for use of 3/1 products. |
| 7 | 3/1 OPTION LIGHT (certain models only) Illuminates to indicate that the function is activated. |
| 8 | DELAYED START BUTTON (certain models only) Pressing this button in sequence delays the start of the program by 3, 6 or 9 hours. |
| 9 | DELAYED START LIGHTS (certain models only) Illuminate to show that start delayed by 3, 6 or 9 hours has been set. |
SETTING THE WASHING PROGRAM AND SWITCHING ON
To select the most suitable program for the dishes to be washed refer to the table below, which indicates the most appropriate program according to dish type and degree of soiling.
After using the table to identify the most appropriate washing program:
- press theON/OFF button (1) and wait for the PROGRAM INDICATOR LIGHT (2) to illuminate;
- keep pressing PROGRAM SELECTION button (3) until the indicator light corresponding to the desired program illuminates;
- close the door; after about 2" the program will start. While it is in progress, the relative LIGHT will flash (indicating that the program is being executed).
| PROGRAMME, NUMBER & SYMBOL | LOAD CROCKERY AND CUTLERY | PROGRAM PROGRESS | DURATION CONSUMPTION | ||||
| MINUTES (2) | WATER LITRES (1) | POWER KWh (2) | |||||
| 1 | SOAK | Pans and dishes awaiting a further wash | Cold prewash | 15' 6 | 0,03 | ||
| 2 | LIGHT | Wash immediately after use for dishes with light dirt | Wash at 45°C Cold rinse Rinse at 68°C Dry | 70' 121,00 | |||
| 3 | BIO(*) EN 50242 | Wash immediately after use for dishes with normal dirt | Cold prewash Wash at 50°C Cold rinse Rinse at 62°C Dry | 180' 15 1,05 | |||
| 4 | NORMAL | Dishes with normal dirt | Cold prewash Wash at 65°C Cold rinse Rinse at 68°C Dry | 90' 171,30 | |||
| 5 | INTENSIVE | Very dirty pans and dishes (except delicate items) | Prewash at 45°C Wash at 70°C 2 cold rinses Rinse at 70°C Dry | 110' 201,60 | |||
Only run the soak program with half loads.
The "3/1" option (6) is available for all programs except the soak program.
(*) Reference program as per EN 50242 standard.
(1) Average power consumption with the softener set on level 2.
(2) The cycle duration and power consumption may vary according to the water and room temperatures, and the type and amount of dishes.

The washing cycle will not take place if the dishwasher door is left open or not properly closed.
TABLE FOR CERTIFICATION BODIES
| Reference standard EN 50242 | |
| Reference program BIO | |
| Load 12 place-settings | |
| Type of detergent B | |
| Amount of detergent 30 g | |
| Rinse aid setting 5/6 |
1.2 Washing programs

Before starting a washing program make sure that:
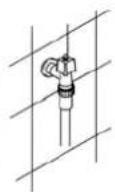
The water supply tap is open.
The correct amount of detergent has been added to the dispenser.
The baskets have been correctly loaded.
The spray arms are able to rotate freely and without obstruction.
The dishwasher door is securely closed.
"3/1" OPTION BUTTON
Pressing this button (6) activates the "3/1" option; the relative light comes on to confirm the selection.
This option is specifically for the use of tablet or powder detergents which already contain salt and rinse aid. If you decide to use a product of this kind, press the button to allow the dishwasher to vary the necessary parameters to ensure the best washing results by making full use of the quantities of detergent, salt and rinse aid these special products contain. At the end of the cycle, the appliance automatically presets for the use of conventional products.
CANCELLING THE CURRENT PROGRAM
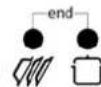
- To cancel the currently selected program, open the door and hold down the PROGRAM SELECTION (3) button for a few seconds until the indicator lights for programs 4 and 5 illuminate simultaneously (the word "end" is displayed on the window).
- Close the door.
- After approximately 1 minute the dishwasher will advance to the end of cycle.
CHANGING THE PROGRAM
To change the program in progress, simply open the door and select a new program. When the door is closed the dishwasher will automatically select the new program.

6 9
DELAYED START (certain models only)
The start of the program can be delayed by 3, 6 or 9 hours.
This allows you to set the dishwasher to work at the times of day most convenient to you.
After setting the program of your choice, press the DELAYED START button (8) to select the delay you require. The corresponding DELAYED START light (9) lights up.
If you wish to exit the procedure without setting delayed start, press the button in sequence until all three lights are out.
At the end of the cycle, the procedure is automatically deleted, so if you also require it for the next program you will have to set it again.
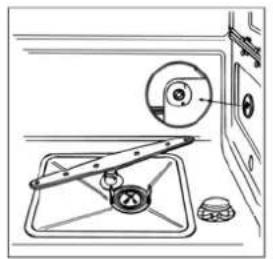
ADJUSTING THE WATER SOFTENING SYSTEM
The dishwasher is equipped with an device for the user to adjust the water softening system according to the hardness of the water supply.
According to the machine model, the selector which acts on the adjustment may be located:
- inside the plastic locking ring located on the right-hand side, inside the dishwasher;
- inside the water softener, just below the cap.
Both allow for adjustment to 5 settings:

WATER HARDNESS TABLE
| WATER HARDNESS | SETTING | |
| German Degrees (°dH) French Degrees (°dF) | ||
| 0 - 4 0 - 7 Setting N. 1 NO SALT | ||
| 5 - 15 | 8 - 25 | Setting N. 1 |
| 16 - 23 | 26 - 40 | Setting N. 2 |
| 24 - 31 | 41 - 60 | Setting N. 3 |
| 32 - 47 | 61 - 80 | Setting N. 4 |
| 48 - 58 | 81 - 100 | Setting N. 5 |
Contact your local water board for information on the hardness of your water supply.

TO SAVE ON ENERGY! ... AND PROTECT THE ENVIRONMENT
Always try to run the dishwasher fully loaded.
- Do not wash the dishes in running water.
- Use the washing program that is most appropriate for each type of load.
- Do not carry out any preliminary rinsing.
- If available, connect the dishwasher to a hot water supply up to 60^ .
TO CUT DOWN ON DETERGENT CONSUMPTION! ... AND PROTECT THE ENVIRONMENT
The phosphates contained in dishwasher detergents are harmful to the environment. To avoid using excessive amounts of detergent and to save on electricity, observe the following:
- separate the more delicate items from dishes that are more resistant to aggressive detergents and high temperatures;
do not pour the detergent directly on the dishes.

If the door has to be opened while washing is in progress, the program will be interrupted. The relative light will keep flashing and a beeper will signal that the cycle has not been completed. You must wait about 1 minute before closing the door to restart the program. When the door is closed the program will continue from where it was interrupted. This operation should only be carried out if strictly necessary, because it might cause problems in execution of the program.
END OF CYCLE
At the end of the washing cycle the dishwasher gives a short acoustic signal and the program indicators nr 4 and 5 start blinking (the word "end" is displayed on the window).


To switch off the dishwasher, open the door and press the ON/OFF button (1).
REMOVING THE DISHES
At the end of the washing program, wait at least 20 minutes before removing the dishes, to allow them to cool down. To prevent any water droplets on the upper basket from falling on the dishes in the lower basket, it is advisable to unload the lower basket first, and then the upper basket.
2. Troubleshooting
The dishwasher is capable of signalling a number of faults through the simultaneous illumination of several indicator lights, with the following meanings:
| FAULT DESCRIPTION | ||||
| E1 | Acquastop failure The anti-flooding system has been activated (for the relevant models only). The system is tripped in case of water leaks. Contact the after-sales service. | |||
| E2 | Safety level The system which limits the water level inside the dishwasher has been tripped. Interrupt the program and switch off the dishwasher. Switch the dishwasher back on, program it again and start the washing cycle. If the problem persists, contact the after-sales service. | |||
| E3 | Water heating malfunction The water is not heated or the heating parameters are not correct. Repeat the washing program; if the problem persists, contact the after-sales service. | |||
| E4 | Water temperature monitoring malfunction Interrupt the program and switch off the dishwasher. Switch the dishwasher back on, program it again and start the washing cycle. If the problem persists, contact the after-sales service. | |||
| E5 | Water intake malfunction The appliance does not take in water or does not do so correctly. Check that the water connections are correct, the water intake tap is turned on and the filter is not fouled. If the problem persists, contact the after-sales service. | |||
| E6 | Water pump-out malfunction The appliance does not pump out the water or does not do so correctly. Check that the drain hose is not kinked or crushed and that the siphon and filter are not fouled. If the problem persists, contact the after-sales service. | |||
FAULT DESCRIPTION
E7


Turbine flow-regulator malfunction (for the relevant models only)
The appliance is not able to "measure" the amount of water loaded accurately. Interrupt the program and switch off the dishwasher. Switch the dishwasher back on, program it again and start the washing cycle. If the problem persists, contact the after-sales service.
E8


Alternate washing system malfunction Interrupt the program and switch off the dishwasher. Switch the dishwasher back on, program it again and start the washing cycle. If the problem persists, contact the after-sales service.
E9


Water intake system malfunction Contact the after-sales service.

Light off Light on Lig flashing

If an alarm occurs the appliance interrupts the program in progress and signals a fault.
- Alarms E1, E2, E3, E4, E8 and E9 interrupt the current program immediately.
- The E5, E6 alarms interrupts the running program once the cause is resolved, it will bring Bach the execution of the program.
The alarm E7 is visualized at the end of the cycle that comes, however, brought to the end since the operation of the dishwasher is not harmed.
To "reset" an alarm is necessary:
- Open and close the door, or turn off and on the machine. At this point is possible to program the dishwasher again.

If the malfunction persists, contact your authorised Service Centre.
ANNULATION DU PROGRAMME EN COURS
DRUKKNOP OPTIE "3/1"
STORING BESCHRIJVING
STORING BESCHRIJVING
E7