
MCC 100 - Car stereo CALIBER - Free user manual and instructions
Find the device manual for free MCC 100 CALIBER in PDF.

User questions about MCC 100 CALIBER
0 question about this device. Answer the ones you know or ask your own.
Ask a new question about this device
Download the instructions for your Car stereo in PDF format for free! Find your manual MCC 100 - CALIBER and take your electronic device back in hand. On this page are published all the documents necessary for the use of your device. MCC 100 by CALIBER.
USER MANUAL MCC 100 CALIBER
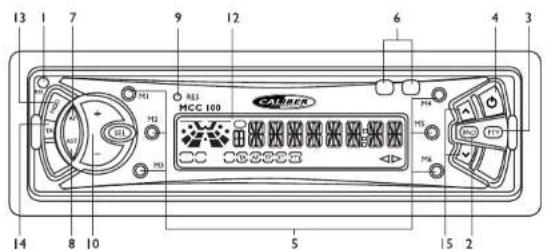
Press it to flip down the front panel from the unit, then you can take away the front panel, insert the tape into the compartment or press EJECT button to eject tape.
2.BAND BUTTON
Press it to change into RADIO mode from TAPE mode, then press it repeatedly to select your desired radio band.
3.PTY(PROGRAMTYPE) BUTTON
Press it to turn on or off PTY mode.
While selecting PTY TYPE, its selection is made by preset buttons as described in preset key item.
When PTY is selected, the radio starts to search corresponding PTY information, and stops if the corresponding PTY information is detected.
If corresponding PTY information does not exist any more, PTY type is automatically exit to normal mode.
4. POWER BUTTON
Press it to turn on or off the unit.
The unit has the function of previously playing TAPE: In spite of any previous playing mode
(RADIO OR TAPE). press it to turn on the unit to always begin to play the tape (If there is a tape in the compartment) after turning off the unit.
USER MANUAL

5. PRESET STATION [1-6] BUTTONS
In normal radio mode:
A) If you press one of the preset buttons more than one second, the current station is stored in the preset memory bank.
B].To recall a preset memory, press one of the preset buttons [1-6].
In PTY radio mode, the function of preset buttons is assigned according to the following list: DIGITAL BUTTON PROGRAM
When in TAPE mode, press RW or FF button to fast rewind or forward the tape, and press one of them again to stop the fast forward or rewind.
When in TAPE mode, press them together at the same time to switch from one side of the tape to the other side.
7.AF [ALTERNATIVE FREQUENCIES]
When pressed short.AF switching mode is selected and the state of AF switching mode is displayed by AF segment in display.
Segment off:AF switching mode off.
Segment on:AF switching mode on, and has RDS information.
Segment flashing:AF switching mode is selected, but no RDS information is received yet. When AF switching mode is selected, the radio checks the signal strength of AF constantly. The interval of checking time of each AF depends on the signal strength of current station, from a few minutes for a strong station to a few seconds for a weak station. Every time that a new AF is stronger than current station, it switches over to that frequency for very short time, and NEW FREQUENCY is displayed for 1-2 seconds. Because the mute time of AF switching or checking time is very short, it is almost inaudible in case of normal program.
When pressed long, regional mode ON/OFF is activated.
REGIONAL MODE ON:
AF switching or PI SEEK is implemented to the station from which all PI codes are similar to the current station. REG of individual segment is turned on also, together with displaying REG ON on numeric display for a few seconds.
- In this double displaying mode, the some type may not be displayed in case of not enough-space type of display.
REGIONAL MODE OFF:
The regional code in the format of PI code is ignored when AF switching or PI SEEK is implemented. REG of individual segment is turned off together with displaying REG OFF on numeric display for a few seconds.
8.AUTO SEARCH TUNING(AS/PS) BUTTON
Press it to display all stations memory for 5 seconds each time, while memory digital and frequency will flash on LCD. If the button is pressed for more than 2 seconds, it will seek station on current band, then write to the preset memories.
When the auto-storage operation is completed, it will automatically display for 5

seconds each time. During the memory station performing, press 1-6 digital buttons to select and stop scanning function.
9.RESET BUTTON
Press it to rehabilitate the state when the program are distorted.
10.1. SOUND MODE AND ADJUSTMENT BUTTONS
Press SEL button repeatedly to select the one mode of BASS, TRE, BAL, FADER and VOL (defaulted), and then press + or - button to adjust level of selected mode.
12.LCD (LIQUID CRYSTAL DISPLAY)
13 MODE
Press it to change into TAPE PLAY mode from RADIO mode.
14.TA function [TRAFFIC ANNouncement] BUTTON
When pressed short, it is activated as TA mode on or off.
When TA mode is on and traffic announcement is transmitted:
1).When the unit is in TAPE mode, it will switch to radio mode temporarily.
2). Temporary switch over to an EON linked station when EON detects a traffic announcement on the other program.
3) If the volume level was under the threshold point, it will be raised to the threshold point. If the volume level was set to more than the threshold point (min.TA volume level), it will be set to the last level.
When pressed long.TA SEEK mode on or off, and TPST ON/OFF will be displayed on LCD.
When the newly tuned station does not receive TP information for 5 seconds, the radio retunes to the next station which has not got the same station (PI) as the last station, but does have the TP information.
In TA seek mode, the current station can be changed to a completely different station because the unit searches TP station when the field strength of the current station is very weak, or when the current station has no TP signal.
15.TUNE UP OR DOWN BUTTONS
In RADIO mode, press or v button shortly and repeatedly to manually tune up or down for the desired radio station. Press or v button for more than 2 seconds to automatically tune up or down for the radio station of a strong signal.
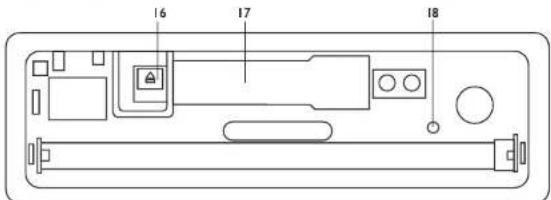
16.EJECT KEY
At TAPE mode, push this key to stop tape playing and eject the tape from the cassette compartment.
17.CASSETTE COMPARTMENT
18. PANEL SIGNAL LAMP
This lamp flashes when the frontpanel of the unit is removed.
SPECIFICATIONS
Power Supply Main Unit DC 13.8 Volts. Negative Ground
Current consumption 10A MAX
Maximum Output Power 35W X 4
Unit Dimensions 178(W) x 160(D) x 50(H)
FM SECTION
Frequency Range 87.5MHz - 108MHz
AM SECTION
Frequency Range 522KHz - 1620KHz
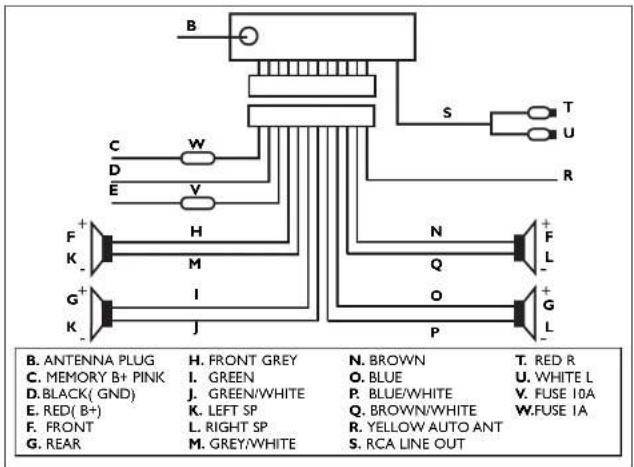
ISO WIRING CONNECTION

CAUTION: Do not install the detachable panel before connecting the unit.
1. The unit is designed for negative terminal of the battery which is connected to the vehicle metal. Please make sure this is connected before starting installation.
2. If the car interior is extremely hot, as after being parked in the sun, do not use the player until the car has been driven for a while to cool off the interior.
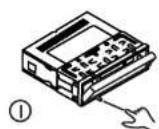
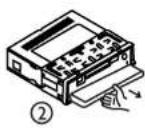
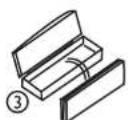
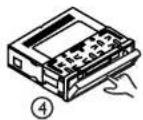
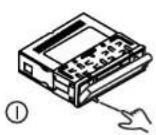
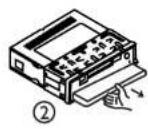
3. Press the RELEASE button to flip down the front panel (see fig.1), then take away the front panel (see fig.2) and put it in the protective case (see fig.3) for safe keeping.
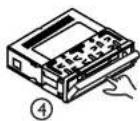
4. Install the front panel back into its bracket and then push it back into position for playing (see fig.4).
NOTE:
You must use 4 ohms impedance of speaker in your speaker system to reduce the distortion during high volume level.
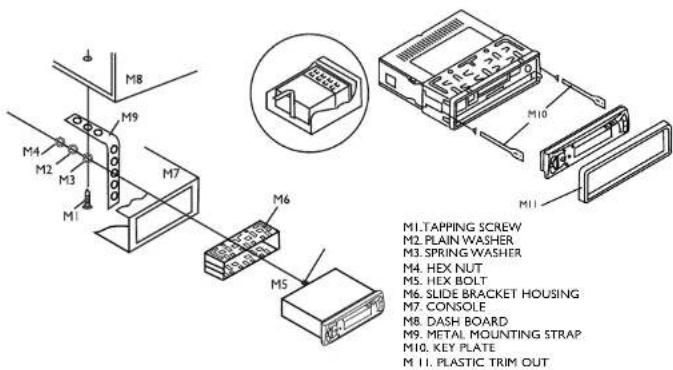
INSTALLATION
- Choose the mounting location that will not interfere the normal driving function of the driver.
- Avoid installing the unit in a place where it would be subjected to dirt, dust, damp, high
temperature and excessive vibration. - Please install appendixes provided by the manufacturer.
NOTE:
If you want to take CHASSIS out of the SLIDE BRACKET HOUSING, remove the PLASTIC OUTLINE first, then insert the two KEY PLATES into left and right side of chassis as above illustration.
PRECAUTIONS AND MAINTENANCE
- This unit is designed for negative ground operation only. The equipment can be used safely, if the negative terminal of the battery is connected to the vehicle metal work.
2.Do not use speakers of impedance less than 4 ohms; and allow the speaker wires to be shorted together when the unit is switched on.
Otherwise it may overload or burn out the power amplifier stage.
-
If the car interior is extremely hot, as after being parked in the sun, do not use the player until the car has been driven for a while to cool off the interior.
-
Take care of your tape cassette to preserve the quality of the recordings. Do not expose them to direct sunlight. Store them in a place protected from dirt and dust and avoid handling with greasy or oily hands. Also, keep the away from magnets, and motors of the permanent magnet type. 5. It is not advisable to use cassette tapes longer than C-60(30 minutes per side) in automobile players, since the tape is too thin and tends to become easily entangled. Always remove cartridge from your tape player as soon as play is finished.
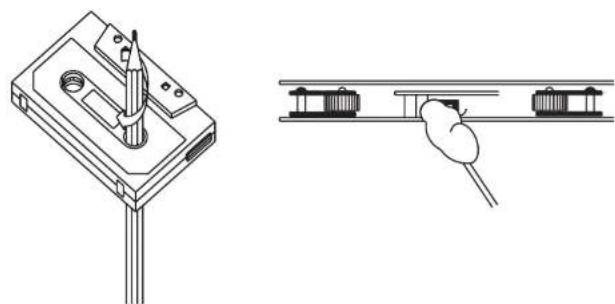
6.The capstan and tape head should be cleaned about once every six months with a soft cloth or cotton-wool swab, moistened with alcohol.
This will serve to maintain the richness and clarity of sound, and prevent loss of volume. Do not use a screwdriver, or ferrous metal rod, in carrying out the above cleaning. See illustration.
7.A loosely wound cassette tape will get damaged. Prior to using such tape, tighten it in a manner as guided by Fig2A carelessly wound cassette tape will cause unnecessary pressure on the tape resulting in the cassette springing out while the tape is running. For prevention, rewind the tape through fast forwarding or rewinding.

MANUEL D'INSTRUCTIONS
EMPLACEMENT ET FONCTION DES COMMANDES
1.TOUCH RELEEASE (OUVERTURE)
MANUEL D'INSTRUCTIONS

MANUEL D'INSTRUCTIONS
MANUEL D'INSTRUCTIONS

Consummation 10A MAX
MANUEL D'INSTRUCTIONS
MANUEL D'INSTRUCTIONS


REMARQUE:
3.PTY (PROGRAMMART)-TASTE
PRECAUÇÖES E MANUTENÇAO
I normal radiolages:
A.)Nar en av knapparna forforinstilling trycks in under langre an en sekund, lagras aktuell station im minnet.
2. KLAWISZ ZAKRESU FAL
2. KOYMI PADI OXYXNOTHTA
Tnntote to yia va npadetere otn tleitoupyia PAADIOΦNOY ano tm tleitoupyia KAZETA,
otuovexia nntote to emvalaubavoeva yia va emeetere mvi emiunnni
paoioxuvotrrta.
3. KOYMI PTY(TYNOY NPOPAMMATO)
Narote to yia va evpyomoiare t anepeyomoiare t me aeitoupyia PTY. Evu emiyeetov TYIO PTY, n euioyou tou epapooctai me ta koumi npoemiloynic. otus nepiypaeotnympaoykoounpooy. Otav emiyeetato PTY, to padihofovo apxiei va xayvei avriotoies mnpoopoePC PTY kai oataqa te nepimtuon Tou evtionou ov airotioies mnpoopoePC. Eev dev unapoxoumvaoivrtioies mnpoopoePC, o turos PTY eepxtai autoujata mtkyavokvki leitoupyia.
4.KOYMNI IEXYO2
PlntoT o yia va evyopnoe n aevyopnoe T m voda. Hovoda exei n aeutopyia ts KAZETA ov avamapnyye nponyouevuac; Aevapmta an toxov nponyouevn aeutopyia avanapayuyng (PAIOΦONHO H KAZETA), tamote To ia va evyopnoiBn e N voda ove naevia maiv st Aeutopyia kaetra (TmApxi Kaeta oTo 8aai) orav aneepyotoukai n ovauda.
ERXEPIIAIO OAHIQN
5.KOYMNIAPPOENIAERMENONSTAOMN[1-6]
12LCD (OONH YFPQN KPYETAAAN)
13.AEITOYPTJA
Tarijote to yia va aalaeet ano aeitoupyia PADIOFONOY oANAPAPGTH KAZETA.
14.KOYMNIIaIoupyiaK [ANAKOINIOEON KYKNOPOIAI
OraV nattnei ouvtoa, evepytonoei nn aeitoupyia AK oe evepyn anavepeyn.
Ora teoupy IA Eiva Evpyn kai petaBIOvTa avakovovcKukofoPiac 1). Ora n vova BpiKetai oT nEteoupy KAETA, aI pepei nppoovipva o teoupyia paioovvou.
DIGITALE KNOPPEN PROGRAMMA
| 1 | News | |
| 2 | Info | |
| 3 | Sport | |
| 4 | Pop | M |
| 5 | Rock | M |
| 6 | Classics | M |