Pressure Vertical Steamer Deluxe 332833 - Steam cleaner PRINCESS - Free user manual and instructions
Find the device manual for free Pressure Vertical Steamer Deluxe 332833 PRINCESS in PDF.
| Product type | Vertical steam cleaner / Garment presser |
| Brand | PRINCESS |
| Model | Pressure Vertical Steamer Deluxe 332833 |
| Usage | Indoor, domestic use only |
| Water tank capacity | Approximately 1.5 liters (markings 10, 30, 40 min) |
| Maximum runtime | 40 minutes with full tank |
| Power | 1800 W (estimated) |
| Voltage | 220-240 V ~ 50/60 Hz |
| Steam levels | 2 (low pressure / high pressure) |
| Indicator lights | Power (red), operation (yellow/green) |
| Cord winder | Yes, integrated |
| Included accessories | Fabric brush, dewrinkler accessory, lint brush, hanger, storage bag |
| Material | Plastic, metal |
| Safety | Manual shut-off, do not immerse, hot surface |
| Maintenance | Descaling with suitable product, cleaning with clean water |
| Storage | Vertical storage with support for steam head |
| Weight | Approximately 4.5 kg (estimated) |
| Dimensions (adjustable height) | Up to approximately 160 cm (estimated) |
Frequently Asked Questions - Pressure Vertical Steamer Deluxe 332833 PRINCESS
User questions about Pressure Vertical Steamer Deluxe 332833 PRINCESS
0 question about this device. Answer the ones you know or ask your own.
Ask a new question about this device
Download the instructions for your Steam cleaner in PDF format for free! Find your manual Pressure Vertical Steamer Deluxe 332833 - PRINCESS and take your electronic device back in hand. On this page are published all the documents necessary for the use of your device. Pressure Vertical Steamer Deluxe 332833 by PRINCESS.
USER MANUAL Pressure Vertical Steamer Deluxe 332833 PRINCESS
You have purchased a Princess product. Our aim is to provide quality products with a tasteful design and at an affordable price. We hope that you will enjoy this product for many years.
Description (fig. A)
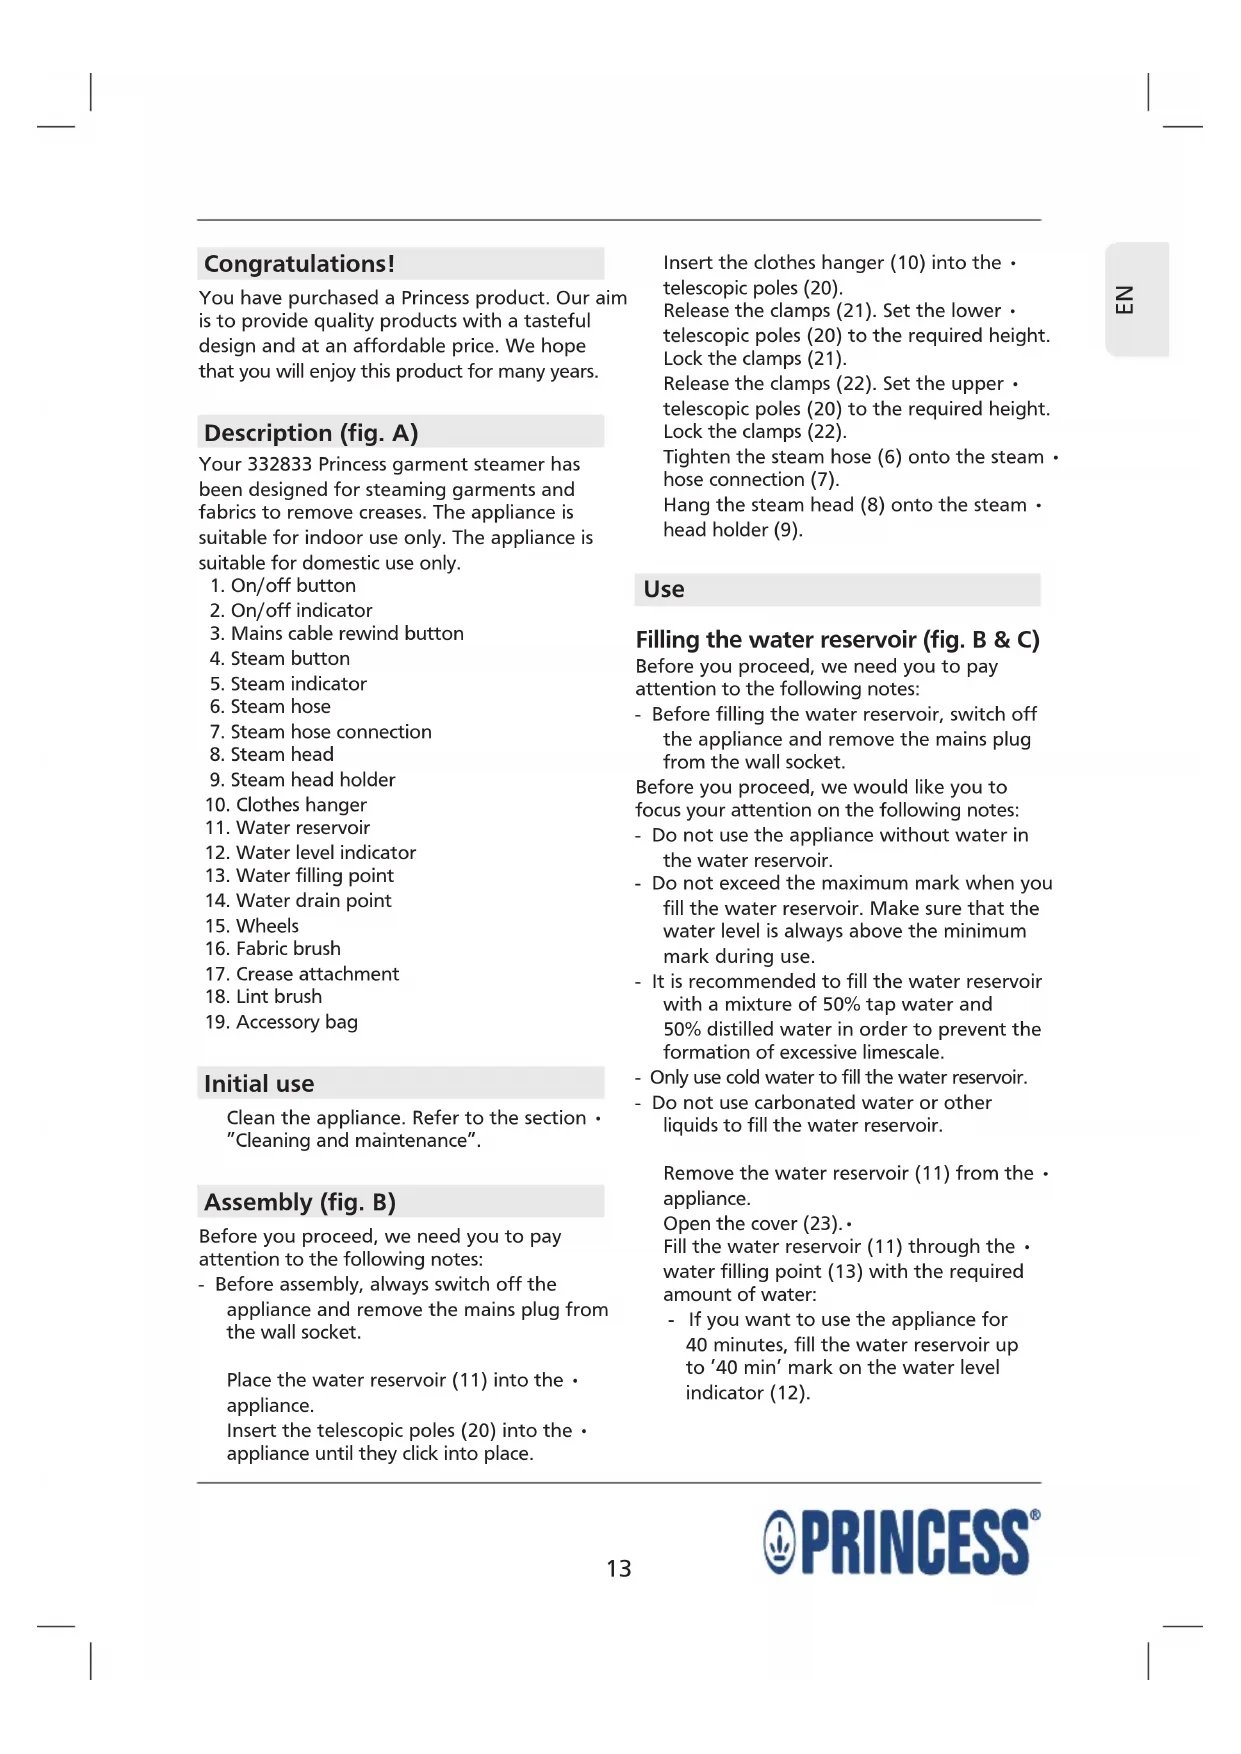
Your 332833 Princess garment steamer has been designed for steaming garments and fabrics to remove creases. The appliance is suitable for indoor use only. The appliance is suitable for domestic use only.
- On/off button
- On/off indicator
- Mains cable rewind button
- Steam button
- Steam indicator
- Steam hose
- Steam hose connection
- Steam head
- Steam head holder
- Clothes hanger
- Water reservoir
- Water level indicator
- Water filling point
- Water drain point
15.Wheels - Fabric brush
- Crease attachment
- Lint brush
- Accessory bag
Initial use
Clean the appliance. Refer to the section "Cleaning and maintenance".
Assembly (fig. B)
Before you proceed, we need you to pay attention to the following notes:
- Before assembly, always switch off the appliance and remove the mains plug from the wall socket.
Place the water reservoir (11) into the appliance.
Insert the telescopic poles (20) into the appliance until they click into place.
Insert the clothes hanger (10) into the. telescopic poles (20).
Release the clamps (21). Set the lower - telescopic poles (20) to the required height. Lock the clamps (21).
Release the clamps (22). Set the upper - telescopic poles (20) to the required height. Lock the clamps (22).
Tighten the steam hose (6) onto the steam - hose connection (7).
Hang the steam head (8) onto the steam - head holder (9).
Use
Filling the water reservoir (fig. B & C)
Before you proceed, we need you to pay attention to the following notes:
- Before filling the water reservoir, switch off the appliance and remove the mains plug from the wall socket.
Before you proceed, we would like you to focus your attention on the following notes: - Do not use the appliance without water in the water reservoir.
- Do not exceed the maximum mark when you fill the water reservoir. Make sure that the water level is always above the minimum mark during use.
- It is recommended to fill the water reservoir with a mixture of 50% tap water and 50% distilled water in order to prevent the formation of excessive limescale.
- Only use cold water to fill the water reservoir.
- Do not use carbonated water or other liquids to fill the water reservoir.
Remove the water reservoir (11) from the appliance.
Open the cover (23).
Fill the water reservoir (11) through the water filling point (13) with the required amount of water:
If you want to use the appliance for 40 minutes, fill the water reservoir up to '40 min' mark on the water level indicator (12).
- If you want to use the appliance for 30 minutes, fill the water reservoir up to '30 min' mark on the water level indicator (12).
- If you want to use the appliance for 10 minutes, fill the water reservoir up to '10 min' mark on the water level indicator (12).
Close the cover (23).
Place the water reservoir (11) into the appliance.
Unwinding and rewinding the mains cable (fig. A)
The mains cable rewind button (3) can be operated by hand or foot.
Before you proceed, we would like you to focus your attention on the following notes:
- Do not unwind or rewind the mains cable while the appliance is switched on.
- Always hold the mains plug to unwind the mains cable. Never pull the mains cable.
Before use, hold the mains plug and unwind a sufficient length of the mains cable from the back of the appliance.
After use, press the mains cable rewind button (3) to rewind the mains cable back into the appliance. Manually guide the mains cable to make sure that it does not swing back. Make sure that the mains plug is correctly located.
Switching on and off (fig. A)
The on/off button can be operated by hand or foot.
Insert the mains plug into the wall socket. The on/off indicator (2) lights red.
To switch on the appliance with a low steam pressure, press the on/off button (1) once. The on/off indicator (2) lights yellow.
To switch on the appliance with a high steam pressure, press the on/off button (1) twice. The on/off indicator (2) lights green.
To switch off the appliance, press the on/off button (1) again. The on/off indicator (2) lights red.
Remove the mains plug from the wall socket
The on/off indicator (2) goes off.
Hints for use (fig. A - D)
Place the appliance on a stable, flat and heat-resistant floor with the steam vents pointing away from the door.
Remove the water reservoir (11) from the appliance. Fill the water reservoir (11) with the required amount of water. Place the water reservoir (11) into the appliance.
Hang the steam head (8) onto the steam - head holder (9).
Insert the mains plug into the wall socket. The on/off indicator (2) lights red.
Switch on the appliance using the on/off button (1). The appliance starts heating.
The on/off indicator (2) flashes during the heat-up process.
Note: Keep the steam head (8) on the steam head holder (9) during the heat-up process.
Wait for approximately 1 minute until the on/off indicator (2) lights continuously.
The appliance is ready for use.
Remove the steam head (8) from the steam - head holder (9) with the steam vents pointing away from you.
Hang the garment on the clothes hanger (10) (fig. D1).
- Hold the steam head (8) with the steam vents pointing away from you.
Press the steam button (4). The steam indicator (5) comes on. The steam head (8) starts emitting steam.
Lightly touch the garment with the steam - head (8). Move the steam head (8) in a vertical direction, starting at the top of the garment and gradually moving downwards (fig. D2).
Note: The appliance may make a gurgling sound during use, which is a normal result of condensation. If a gurgling sound occurs, hold the steam hose (6) in an upright position to drain the excess moisture back into the water reservoir.
If necessary, add more water into the water reservoir (11).
- If the process is completed, press the steam button (4). The steam indicator (5) goes off. The steam head (8) stops emitting steam.
Remove the garment from the clothes - hanger (10) and hang the steam head (8) on the steam head holder (9).
Switch off the appliance using the on/off button (1). The on/off indicator (2) lights red.
Remove the mains plug from the wall - socket. The on/off indicator (2) goes off.
Allow the appliance to cool down completely.
Accessories (fig. A, E & F)
Fabric brush (fig. E)
The fabric brushes (16) are used to open the weave of the fabric for better steam penetration.
Before you proceed, we need you to pay attention to the following notes:
- Before mounting the accessory, always switch off the appliance, remove the mains plug from the wall socket and wait until the appliance has cooled down.
Mount the fabric brush (16) to the steam head (8) by aligning the bottom of the fabric brush with the bottom of the steam head. Gently push the top of the fabric brush (16) on the steam head (8) until it clicks into place.
Gently brush the area to be steamed with the grain or nap of the fabric.
Move the steam head (8) in a vertical direction, starting at the top of the garment and gradually moving downwards.
Remove the fabric brush (16) from the steam head (8) by pressing the tab (24) and pulling the fabric brush (16) forward.
Crease attachment (fig. F)
The crease attachment (17) is used to create straight creases.
Before you proceed, we need you to pay attention to the following notes:
- Before mounting the accessory, always switch off the appliance, remove the mains plug from the wall socket and wait until the appliance has cooled down.
Mount the crease attachment (17) to the steam head (8) by sliding the crease attachment (17) into the holder (25).
Gently push the crease attachment (17) into place (fig. F1).
Press the handle (26) to open the crease - attachment (17) (fig. F2).
Put the fabric between the crease attachment (17) and the steam head (8) (fig. F3).
Release the handle (26).
Move the steam head (8) in a vertical direction, starting at the top of the garment and gradually moving downwards.
Remove the crease attachment (17) from the steam head (8) by sliding the crease attachment (17) from the holder (25) (fig. F1).
Lint brush (fig. A)
The lint brush (18) is used to remove hair, lint and animal fur for a professional finish.
The lint brush (18) cannot be mounted to the steam head (8), but must be used independently from the garment steamer.
Slowly brush the garment with the grain or nap of the fabric.
Clean the lint brush (18) on an old piece of cloth by moving it in the opposite direction.
Cleaning and maintenance
Before you proceed, we need you to pay attention to the following notes:
- Before cleaning or maintenance, remove the mains plug from the wall socket and wait until the appliance has cooled down.
- Do not immerse the appliance in water or any other liquids.
Before you proceed, we would like you to focus your attention on the following notes: - Do not use aggressive or abrasive cleaning agents to clean the appliance.
- Do not use sharp objects to clean the appliance.
Regularly check the appliance for possible damage.
- Regularly check the water reservoir for possible leakage.
Clean the appliance after each use:
- Hold the steam hose in a vertical position so that any condensation can flow back into the water reservoir.
- Remove the steam hose.
- Empty the water reservoir by draining the water through the water drain point into a sink.
Mount the steam hose. - Remove limescale and other contaminants from the steam head with a damp cloth and a non-abrasive cleaning agent.
- Clean the housing with a soft, damp cloth.
Descending the appliance (fig. A)
The appliance must be descaled regularly. If the appliance must be descaled, use a suitable descaling agent. Special descaling agents are available from our service station.
Note: Princess will not be responsible for any damage caused by descending agents. Damage caused by not regularly descending the appliance is not covered by the guarantee.
Before you proceed, we need you to pay attention to the following notes:
- Before descending the appliance, remove the mains plug from the wall socket and wait until the appliance has cooled down.
- Do not immerse the appliance in water or any other liquids.
Before you proceed, we would like you to focus your attention on the following notes:
- Be careful when descending the appliance to prevent damage to furniture or clothing.
- Do not use citric acid to descale the appliance.
Fill the water reservoir (11) with a suitable - descending agent.
Insert the mains plug into the wall socket. The on/off indicator (2) lights red.
Switch on the appliance using the on/off button (1). The appliance starts heating.
The on/off indicator (2) flashes during the heat-up process.
Let the appliance run for 10 minutes without steaming garments.
Switch off the appliance using the on/off switch (1). The on/off indicator (2) lights red.
Remove the mains plug from the wall - socket. The on/off indicator (2) goes off.
Allow the appliance to cool down completely.
Empty the water reservoir (11) by draining the descending agent through the water drain point (10) into a sink.
Thoroughly rinse the appliance with clean - water.
Thoroughly dry the appliance with a clean, dry cloth.
Storage
Put the accessories in the accessory bag.
- Store the appliance in the original packaging when not in use.
Store the appliance in a dry and frost-free place, out of the reach of children.
Safety instructions
General safety
- Read the manual carefully before use.
- Keep the manual for future reference.
- Only use the appliance and the accessories for their intended purposes. Do not use the appliance and the accessories for other purposes than described in the manual.
- Do not use the appliance if any part or any accessory is damaged or defective. If a part or an accessory is damaged or defective, it must be replaced by the manufacturer or an authorised repair agent.
Children should be supervised to ensure that they do not play with the appliance. - The use of this appliance by children or persons with a physical, sensory, mental or motorial disability, or lack of experience and knowledge can give cause to hazards. Persons responsible for their safety should give explicit instructions or supervise the use of the appliance.
- Do not use the appliance near bathtubs, showers, basins or other vessels containing water.
Do not immerse the appliance in water or other liquids. If the appliance is immersed in water or other liquids, do not remove the appliance with your hands. Immediately remove the mains plug from the wall socket. If the appliance is immersed in water or other liquids, do not use the appliance again. This appliance is intended to be used in domestic and similar applications such as staff kitchen areas in shops, offices and other working environments; farm houses; by clients in hotels, motels and other residential type environments; bed-and-breakfast type environments.
Electrical safety
Before use, always check that the mains voltage is the same as the voltage on the rating plate of the appliance.
The appliance is not intended to be operated by means of an external timer or separate remote-control system.
Connect the appliance to an earthed wall - socket. If necessary, use an earthed extension cable of a suitable diameter (at least 3 × 1 ~mm^2 ).
For additional protection, install a residual - current device (RCD) with a rated residual operating current that does not exceed 30mA .
Make sure that water cannot enter the contact plugs of the mains cable and the extension cable.
Always fully unwind the mains cable and the extension cable.
Make sure that the mains cable does not hang over the edge of a worktop and cannot be caught accidentally or tripped over.
Keep the mains cable away from heat, oil and sharp edges.
Do not use the appliance if the mains cable or the mains plug is damaged or defective. If the mains cable or the mains plug is damaged or defective, it must be replaced by the manufacturer or an authorised repair agent.
Do not pull the mains cable to disconnect the mains plug from the mains.
Disconnect the mains plug from the mains when the appliance is not in use, before assembly or disassembly and before cleaning and maintenance.
Safety instructions for garment steamers
Do not use the appliance outdoors.
Do not carry the appliance during use. The appliance is only intended for stationary use.
Only move the steam head in a vertical direction, starting at the top of the garment and gradually moving downwards. Do not move the steam head in a horizontal direction. Do not move the steam head backward.
Always hang the appliance using the steam head. Do not hang the appliance using the steam hose.
- Do not point the steam head at yourself or other persons during use.
- Do not steam garments while you or another person are wearing them. Be careful with hot steam to avoid b
- The accessible surfaces of the appliance can become very hot during use. Do not touch the accessible surfaces. Only touch the handgrips when the accessible surfaces are hot.
- Do not touch the steam head. The steam head becomes very hot during use. Make sure that your hands are dry before touching the appliance.
- Switch off the appliance and let the appliance cool down before leaving it unattended and before replacing, cleaning or inspecting any parts of the appliance.
U.K. Wiring instructions
The wires in the mains lead are coloured in accordance with the following code:
BLUE
NEUTRAL
BROWN
LIVE
GREEN/YELLOW
EARTH
As the colours of the wire in the mains lead of this appliance may not correspond with the colour markings identifying the terminals on your plug, proceed as follows:
The wire which is coloured BLUE must be connected to the terminal which is marked with the letter N or coloured black.
The wire which is coloured BROWN must be connected to the terminal which is marked with the letter L or coloured red.
The wire which is coloured GREEN/YELLOW must be connected to the terminal which is marked with the letter E or ( ) and is coloured GREEN or GREEN/YELLOW.
If a 13Amp (BS1363) plug is used, a 13Amp (BS1362) fuse must be fitted, or if any other type of plug is used, a 13Amp fuse must be fitted, either in the plug or adaptor, or on the distribution board.
Warning! This appliance must be earthed.
Disclaimer
Subject to change; specifications can be changed without further notice.
Felicitations!
ExTe ayopaoEi eva npoiov nC Princess.
Tóxoc mac éiva va aac Tapéxoume TIOIOTiKa Tpoiovtae wpaio xediao o iKovouke Tiec. Eanizouveva anlauaote auto to Tpoiov yia tonlαxpvia.
περιγραφή (εικ. A)
To atmuynxavnua evudumatw 332833 Princess exi oxediaotie yia va atmuiz ei vdu ma t kai uapaumata yia nTv aapieoT oalakwpatw. H ouokeun Tpoopicietai yia eowtepkxpono movo.H ouokeun Tpoopicietai yia oikiakn xpono mvo.
EeapntnmaTa (EK.A,E & F)
Bouptsigmaaoupaatoc (EK.E)
Oi Bouptoeus aouatoc (16) xnpoiotioovtai yia to avoiyta nC uavonc uaoaotoc yia kautepn dieioduan tou atou.
Piv TPOxwpnoTe, TpeTIE va TPOoEeTe TIC Tapakatw onuieooic:
- PIV TIOθεποε To Εαρτημα, θεοTE πáVt Na OUKEUn EKTOS λεIToupyiac, aTIOUvδeOte To βuOμa AtTo Tn V TpiCa KAI TEPiμεVETe μexpvα Kpuωσeɪ n OUKEUn.
ToTIOeTNOTe Tn BOUPToA upaOaTOC (16) Otn KepaAn aTou (8) EueuypaMioVtac to KATW MEPOs Tns BOUPToAc UpaOaTOc ME TO KATw MEPOs Tns KEpAlnc aTou. PAtnoTe aTAA To TAVW MEPOs TNS BOUPToAc UpaOaTOc (16) OTN KEPaAn aTou (8) MExpi va KLEIDOWeI OTN EeON TNS.
BouptoiTe aTaa Ta Tnpiox n Tou 0a oepwEi e To oKAnpo n XvouoWto epoc upaatoc.
Metakivnote Tny Kepaan atou (8) 0e Katheta n.
kateuuvan, EKIVWvTac oTo Tavw Mepoc
EvubatoC kai kATEbaivovTac OtaiaKa
TPOs ta KATW.
ApaipoeTn BouptoUpaoatoc (16) 0tn Kepaan atou (8) TATwVtac n yawooia (24) kai TpaewvTac n BouptoUpaoatoc (16) mppoTa.
Egptma ypaumns (EK.F)
To (17) xpnoiopoioietai yia tn oiuopyia ypauncs.
Piv PPOxwpnoTe, TpeTIE VA PPOeEeTE TIC Tapakatw anmuieoic:
- PIV TOTOTENTOE TO EApTnma, TeOTE TAVTA TNO OOKeUN EKTOS LEIToupyiaC, AIOOUVDEOTE TO Buaa aTTO NTV TpiKa KAI TEPiEvETe MExPI VA KpuwoEIN OOKeUN.
ToTtOeTnOte to EApntma ypaumns (17) Otn Kepaan atou (8) oEvovtaC to EApntma ypaumns (17) Otn Bao (25). Tpiwste Maakto EApntma ypaumns (17) Otn 0eon TNS (EK.F1).
PntnoTe Tn (26) yia va avoiEeTe To - Eaptnua ypaumns (17) (EK.F2).
TToTtOeTnOte To UpaOma avaMeo a OTo agptnua ypaumns (17) kai TnC KepaAlncaTpuou (8) (EK.F3).
jai jia jia jia jia jia jia jia
oai jg slwai oj j 8rall
a
1.4
yulal yolal jolal jolal jolal jolal
.
aiku jglll oylal bwhj j kay
3yall 2
oJalll jaii ojiie iiae jaylaall
a: is
aJzall J 1
1
jglall jla 1
2y1i 1
aaii i 1
jglal jocai jol
a.sirgval
jai jy jy clal gall kay jay jayill
.
Jjiaolal g aolai jglal lpaai p
jiaolal jlaol jslal qaiaolal jSALg
sJlal JSLal gail Sall gaiall
gaiall yji jag aajll Jjiall
JSLALg sJzJyAISLg JSLALg
Jbai g g L
jz-11
Lall a 10000000000000000000000000000000000000000000000000000000000000000000
a1y511 a0xu
Jlill aIbI 10000000000000000000000000000000000000000000000000000000000000000000000000000000000000000000000000
#
aalee
JSSO 15000000000000000000000000000000000000000000000000000000000000000000000000000000000000000
(A Js) jgall m y w glll j!
aipil, pbljy jgljlln m w glll j! j
wgljll j! cq g jn jn jn jn jn jn jn jn jn jn jn jn jn jn jn jn jn jn jn jn jn jn jn jn jn jn jn jn jn jn jn jn jn jn jn jn jn jn jn jn jn jn jn jn jn jn jn jn jn jn j
(16)
g jj j j j j j j j j
alllll j! (18) allllll sllj