Silver Vertical Steamer Deluxe 332732 - Steam cleaner PRINCESS - Free user manual and instructions
Find the device manual for free Silver Vertical Steamer Deluxe 332732 PRINCESS in PDF.
User questions about Silver Vertical Steamer Deluxe 332732 PRINCESS
0 question about this device. Answer the ones you know or ask your own.
Ask a new question about this device
Download the instructions for your Steam cleaner in PDF format for free! Find your manual Silver Vertical Steamer Deluxe 332732 - PRINCESS and take your electronic device back in hand. On this page are published all the documents necessary for the use of your device. Silver Vertical Steamer Deluxe 332732 by PRINCESS.
USER MANUAL Silver Vertical Steamer Deluxe 332732 PRINCESS
Instructions for use
Mode d'emploi
Anleitung
| Identification Parts | Figure 1 | Figure 2 |
| Figure 3 | Figure 4 |

VOOR GEBRUK
LAAT HET STOOMAPPARAAT NIET DROOGSTOMEN
NA GEBRUIK
| Identification Parts | Figure 1 | Figure 2 |
| Figure 3 | Figure 4 |


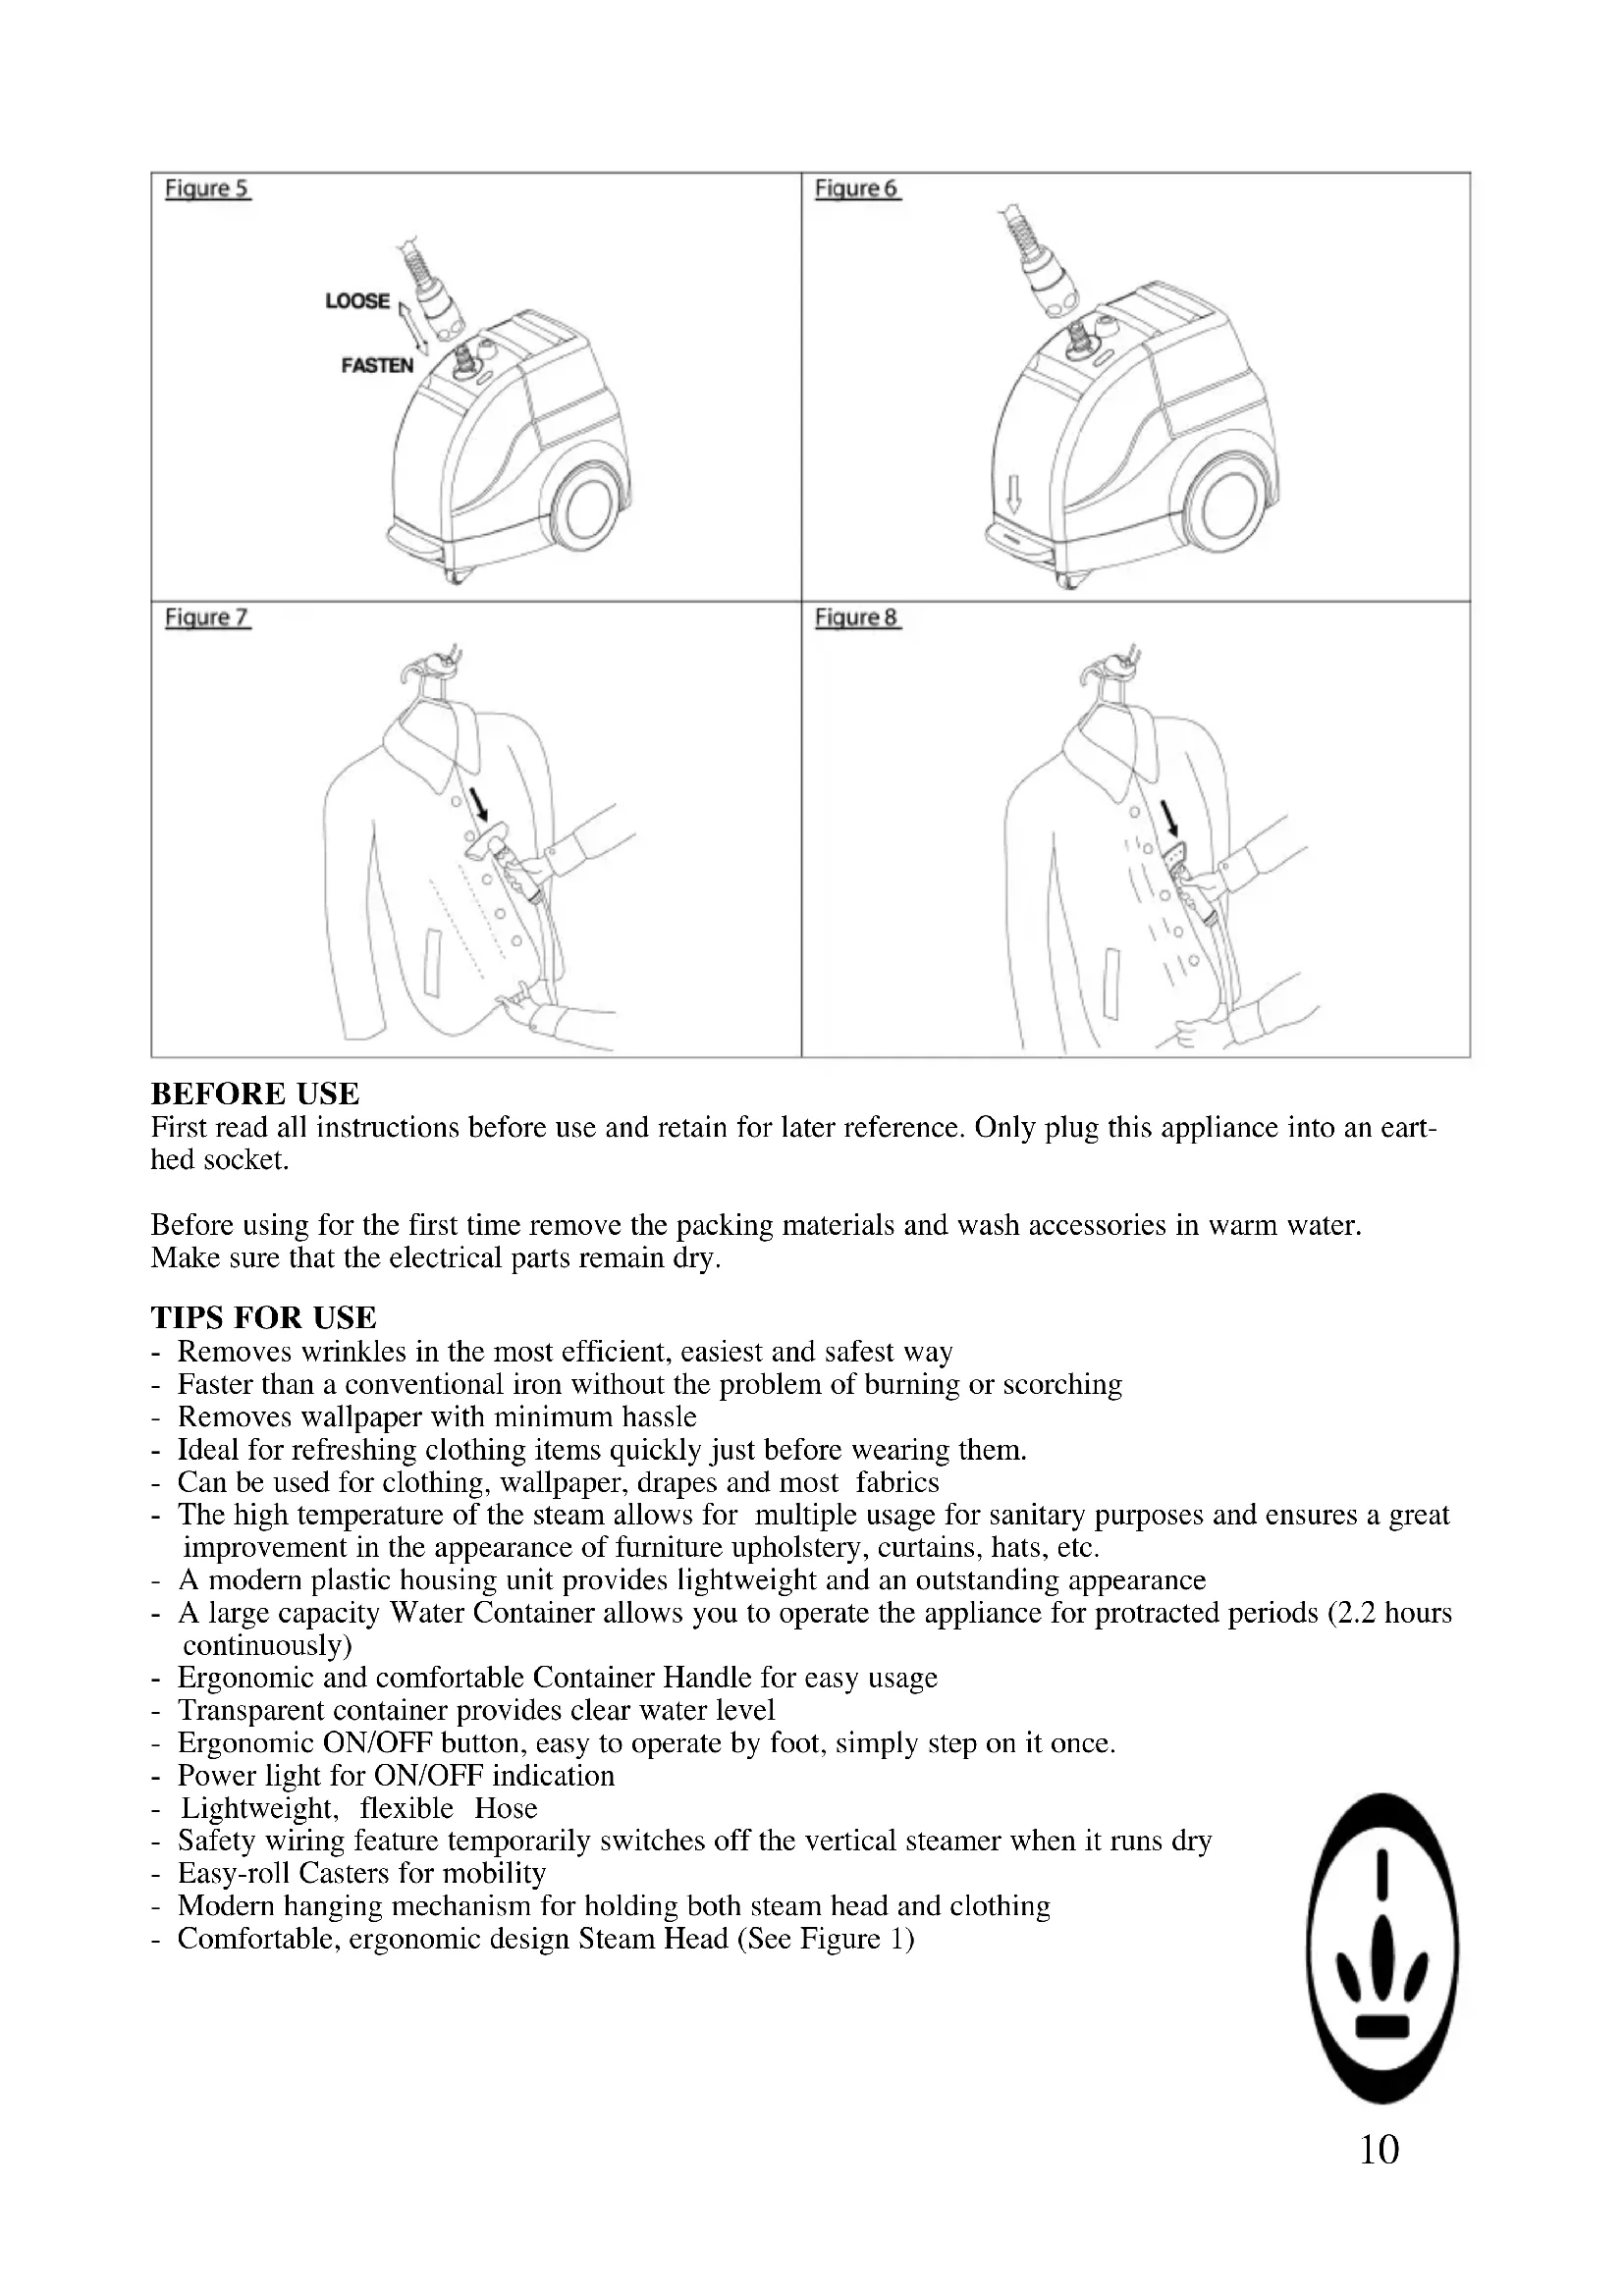
BEFORE USE
First read all instructions before use and retain for later reference. Only plug this appliance into an earth- hed socket.
Before using for the first time remove the packing materials and wash accessories in warm water. Make sure that the electrical parts remain dry.
TIPS FOR USE
- Removes wrinkles in the most efficient, easiest and safest way
- Faster than a conventional iron without the problem of burning or scorching
- Removes wallpaper with minimum hassle
- Ideal for refreshing clothing items quickly just before wearing them.
- Can be used for clothing, wallpaper, drapes and most fabrics
- The high temperature of the steam allows for multiple usage for sanitary purposes and ensures a great improvement in the appearance of furniture upholstery, curtains, hats, etc.
- A modern plastic housing unit provides lightweight and an outstanding appearance
- A large capacity Water Container allows you to operate the appliance for protracted periods (2.2 hours continuously)
- Ergonomic and comfortable Container Handle for easy usage
- Transparent container provides clear water level
- Ergonomic ON/OFF button, easy to operate by foot, simply step on it once.
- Power light for ON/OFF indication
- Lightweight, flexible Hose
- Safety wiring feature temporarily switches off the vertical steamer when it runs dry
Easy-roll Casters for mobility - Modern hanging mechanism for holding both steam head and clothing
-Comfortable,ergonomic design Steam Head (See Figure 1)

LIST OF PARTS
- Steam Head 8. Hanger Rod
- Hose 9. Container Handle
- Hose Adapter 10. Water Container
- Main Unit 11. Power Cord
- Power Indicator 12. Casters
- Power Switch
- Hanger Head
PREPARATION FOR USE
- Insert Hanger Rod (08) in the corresponding hole on top of the unit as described in Figure 2, and screw it in rmly by hand. Then x the Hanger Head on top of rod.
- To ll the Water Container with water proceed as described in Figure 3.
Use fresh water. Distilled or filtered water is recommended to avoid scale and sediments. Never use hot water or any other liquids as these may damage the Water Container and/or the appliance.
Note: Do not put any detergent, soap or other additions into the Water Container as these may damage the internal aluminium parts of the appliance
- Place the Water Container in place. Before detaching the Water Container for refilling, switch off and unplug the appliance. The Handle can be used to carry the Water Container, not the whole unit. (See figure 4)
- Insert Hose (02) in the Hose Adapter (03), and screw in firmly by hand (do not use any tool). (See figure 5)
- The steamer is ready for use.
HOW TO USE
- Plug into a proper voltage outlet, activate Power Switch by hand or foot to ON position as described in Figure 6. (Power Indicator will light up).
Do not switch the steamer on if there is no water in the Water Container because it may get overheated. Wait 2 to 3 minutes for steam to come out.
Note: It is normal to hear a gurgling sound from the steamer while the heater starts to make steam or if condensation forms. If this occurs during operation, just position the Steam Head upwards to allow the excess condensation to drain back into steamer.
- Hold all kinds of shirts, jackets, cardigans, pullovers, up by their regular coat hangers. A trouser hanger is recommended for steaming trousers and ties.
- Then hold the clothing item in place using the appropriate rod located in the Hanger Head.
- Steam with a downward motion to avoid your hand coming into contact with the steam, as described in Figure 7. Use the other hand to straighten the area to be steamed and use your fingers to widen the area.
- Steam slowly by touching material lightly with Steaming Head and wrinkles will vanish instantly. It is very important to combine the touch of the Steaming Head with direct steam. Some clothing items can be steamed better from the underside. Speed and ef ciency can be achieved with a little practice. (See Figure 8)
NOTE: Steam with Hose in an upright position, so any condensation is free to ow back into steamer. If steaming in a low position near oor i.e. steaming under 1m, straighten Hose up and out FREQUENTLY to keep clear of condensation.
Do not touch silk or velvet with the steam head.
DO NOT ALLOW STEAMER TO RUN DRY
AFTERUSE
- After using the steamer, switch to OFF (Power Indicator light will go out) and disconnect the Power Cord from the outlet.
- Hang the Steam Head in an upright position in Hose Hanger Rod when not in use.
- Pour out the water each time after use. This is important as microorganisms may be able to grow in the water and could damage the unit.
Therefore, regular replacement of the water is necessary.
WARNING:
- Never touch the Steam Head until it cools completely
- Never operate without water.
- Unplug after each use.
- Do not use the Water Container Handle to carry the whole unit, as the steamer may tip over.

MAINTENANCE AND CLEANING
- Always unplug before cleaning the unit
- Let the steamer cool down and then use a damp cloth for cleaning.
- Never use harsh or abrasive cleaning agents or solvents
Cleaning the Water Container:
This is to be done regularly to prevent the growth of microorganism inside the Water Container.
- Unplug and detach the Water Container.
- Pour old water out if it has not been used for a period of time.
- Re ll the Water Container and then pour the water out.
From time to time, and depending on the quality of your water supplier, the Water Container has to be disinfected. Proceed as follows:
- Unplug and detach the Water Container.
- Fill it with fresh water and add a half-teaspoon of Chlorine bleach to the water.
- Shake vigorously.
- Pour out the water.
- For rinsing, re ll water to the Water Container, shake it and pour water out.
Periodically, pour old water out of steamer to remove sediment and maintain the correct water level. NOTE: No two water suppliers have the same mineral content. If your steamer begins to cut on and off during normal use, the thermostat is indicating that the heating unit requires descending of the sediments..
Dscaling:
To prevent malfunctioning, your steamer must be descaled regularly. The descending interval will depend on the water quality and the frequency of use. For descending, proceed as follows:
- Unplug, remove the Water Container, ll it with water and shake it vigorously to remove large-scale sediments. Pour out the water and repeat it as necessary.
- Half fill the Water Container with a mix of decalcifying agent and water (follow the instructions from the decalcifying product to discover the correct percentage of water you have to add and the descending time). Close the Water Container.
- Leave the Water Container apart for the time indicated by the decalcifying agent manual. Afterwards turn the Water Container up-and-down to descale the other part for the same amount of time.
- Then, attach the Water Container to the unit, plug in and switch on.
- Let the appliance run until the Water Container is about to empty (do not steam any clothing during this time).
- Unplug, detach and empty Water Container and rinse it with water. Then pour out the water.
- Refill Water Container again with water and repeat steps 4 to 5.
The steamer is now ready for use again.
Note: If after descaling, you believe there is still scale in the boiler, repeat descaling process as necessary. If you always use distilled water, it will not be necessary to descale the boiler.
Tip: The descaling agent is available in most supermarkets and is the same as the one used for espressomachines, stainless steel kettles, or humidiers.
PRINCESS TIPS
When using this appliance, the following basic precautions should always be followed:
- Read the instructions thoroughly before use.
- To reduce the risk of electrical shock, do not immerse the appliance in water or other liquids.
- Children should not use this appliance. Close supervision is necessary when any appliance is used near children. Do not leave the appliance unattended while plugged to outlet.
- Unplug from outlet when attaching or removing the Water Container, before cleaning, re lling water or when not in use. When disconnecting from outlet, grasp and pull plug. Never tug the cord.
- Do not operate any appliance with a damaged cord or plug, or after the appliance malfunctions, or is dropped or damaged in any way. Return appliance to the nearest authorized service facility for examination, repairs or adjustments.

- Do not disassemble or attempt to repair any part of the appliance under any circumstances. Return appliance to the nearest authorized service facility for examination, repairs or adjustments.
- Do not let the Power Cord or the extension cord come into contact with sharp edges or hot surfaces, including the stove.
- Let appliance cool down completely and loop cord loosely around appliance when storing.
- Steam only in an up and down vertical motion.
- Never use steamer in a horizontal position or tilt into a backward position, as this may result in water discharge.
- Do not attempt to hang up the unit by the Hose.
- Avoid contact with hot parts, hot water or steam.
- While operating, do not let the Water Container dry out.
- Use appliance only for its intended use. Indoor use only.
- To reduce the likelihood of a circuit overload, do not operate another high wattage appliance on the same circuit.
- Children should be supervised to ensure that they do not play with the appliance.
- The use of this appliance by children or persons with a physical, sensory, mental or motorial disability, or lack of experience and knowledge can give cause to hazards. Persons responsible for their safety should give explicit instructions or supervise the use of the appliance.
U.K. WIRING INSTRUCTIONS
The wires in the mains lead are coloured in accordance with the following code:
BLUE NEUTRAL
BROWN LIVE
GREEN/YELLOW EARTH
As the colours of the wire in the mains lead of this appliance may not correspond with the colour markings identifying the terminals on your plug, proceed as follows:
The wire which is coloured BLUE must be connected to the terminal which is marked with the letter N or coloured black.
The wire which is coloured BROWN must be connected to the terminal which is marked with the letter L or coloured red.
The wire which is coloured GREEN/YELLOW must be connected to the terminal which is marked with the letter E or ± and is coloured GREEN or GREEN/YELLOW
WARNING: THIS APPLIANCE MUST BE EARTHED

| Identification Parts | Figure 1 | Figure 2 |
| Figure 3 | Figure 4 |

AVANT L'EMPLOI
| Identification Parts | Figure 1 | Figure 2 |
| Figure 3 | Figure 4 |

VOR GEBRAUCH
| Identification Parts | Figure 1 | Figure 2 |
| Figure 3 | Figure 4 |

ANTES DEL USO
| Identification Parts | Figure 1 | Figure 2 |
| Figure 3 | Figure 4 |

PRIMA DELL'USO
| Identification Parts | Figure 1 | Figure 2 |
| Figure 3 | Figure 4 |

INNAN DU BÖRJAR
| Identification Parts | Figure 1 | Figure 2 |
| Figure 3 | Figure 4 |

INDEN IBRUGTAGNING
| Identification Parts | Figure 1 | Figure 2 |
| Figure 3 | Figure 4 |

FOR BRUK
Les alle instruksene for bruk og oppbevar dem til senere bruk. Dette apparatet kan kun kobles til en jordet stikkontakt.
VEDLIKEHOLD OG RENGJØRING
| Identification Parts | Figure 1 | Figure 2 |
| Figure 3 | Figure 4 |

ENNEN KÄYTTÖONOTTOA
| Identification Parts | Figure 1 | Figure 2 |
| Figure 3 | Figure 4 |

ANTES DE USAR
J 1 J 1 J 1 J 1 J 1 J 1 J 1 J 1 J 1 J 1 J 1 J 1 J 1 J 1 J 1 J 1 J 1 J 1 J 1 J 1 J 1 J 1 J 1 J 1 J 1 J 1 J 1 J 1 J 1 J 1 J 1 J 1 J 1 J 1 J
1
J 1
aillg a g jao slai y g aall sall g e jai
JSLa 1
i
g j 1 gall jillll bill l
la jie, cieielljiluill
jgall jgll jglal ydl slwl jiall j
()
Lacgaoaalj
Cg 1
p d 1
a 1
aiee 1 jai i jai i jai jai jai jai jai jai
Jell Jill
()aagg
aeea 0 g uilo A
1j 9
all j1j2.1
1
[\text{解得}1.]
()
p
psb jll lga.
aai jll 2gill.
gjz0
aagglgjieillc
galeill aebv.
a#
y 1
.0gall 15 glc 1aab
.4
IcI 121 pisiui Y. Ia Jy IeLo g I Jbao IeLo pdiiswly ygi yllg jilglo
jglal glall jz jz jz jz jz jz jz
1 1
jglg 1000
J 1
p 1
(J)A
1
(0 kJll)
alisiui jj jale jie jie jie 0
jie jie piai
gLoS()gglg 1y y g jieh jil
()
i 1
jgl jg j
aegj 1 aaii iiei iiae jiee jiee ie eae ee eee
jll jll jll jll jll
1
Jgmal
1
1
g
g g. 100000000000000000000000000000000000000000
y
()aRgJgAeJgAeJgAeJgAeJgAeJgAeJgAeJgAe
J 4
i 1
Jaaal 1
eaoa
1
J 1
c_1 = 26 - 11
jglal 12i 10
4y jao clls 4g gai Ic0 4g C5 jj ai y po jai iia jai aia jai jai jai jai
jie:
alilily clll 1j dle ydlil,
:
Lolai 2yloa 21 121 y
la jlsj1 1jglssy
alil 5 1y jll jao jn jall
aiy jay jalell Jacll jia jao paa
a
jll laii iie 1e ySll mnnn nnnn
jgllll 111111111111111111111
A
:laoljia
jlll 1. (wllgall jll gall clll aalll
i 1