
Kuro KRPS02 - Pregnant PIONEER - Free user manual and instructions
Find the device manual for free Kuro KRPS02 PIONEER in PDF.
| Product type | Passive acoustic speaker |
| Acoustic system | Bass-reflex, 2-way |
| Woofer | Cone type, 4.8 cm × 13 cm |
| Tweeter | Semi-dome type, 2.5 cm |
| Impedance | 6 Ω |
| Frequency range | 55 Hz to 30,000 Hz |
| Sensitivity | 80 dB (1 m, 1 W) |
| Maximum input power | 18 W |
| Rated power | 6 W |
| Crossover frequency | 3 kHz |
| Total weight (pair with stands) | 4.1 kg |
| Power supply | Passive, powered by compatible Pioneer flat panel monitor |
| Main functions | Stereo sound reproduction, compatibility with Pioneer flat panel monitor |
| Maintenance and cleaning | Wipe with a dry or slightly damp cloth (soapy water), do not use chemical products |
| Safety | Do not move the monitor by holding the speakers; use only the provided screws; do not mount on wall |
| Spare parts and repairability | Consult an authorized Pioneer service center for any repairs |
| General information | Designed exclusively for use with the Pioneer flat panel monitor |
Frequently Asked Questions - Kuro KRPS02 PIONEER
User questions about Kuro KRPS02 PIONEER
0 question about this device. Answer the ones you know or ask your own.
Ask a new question about this device
Download the instructions for your Pregnant in PDF format for free! Find your manual Kuro KRPS02 - PIONEER and take your electronic device back in hand. On this page are published all the documents necessary for the use of your device. Kuro KRPS02 by PIONEER.
USER MANUAL Kuro KRPS02 PIONEER
Thank you for buying this Pioneer product.
Please read through these operating instructions before using your speaker system so you will know how to make the most of its performance. After you have finished reading the instructions, put them away in a safe place for future reference.
CAUTION
About compatibility
This product is designed exclusively for use with the flat panel display. For more information on compatibility, please consult with your nearest Pioneer authorized dealer or service center.
About installation and setting
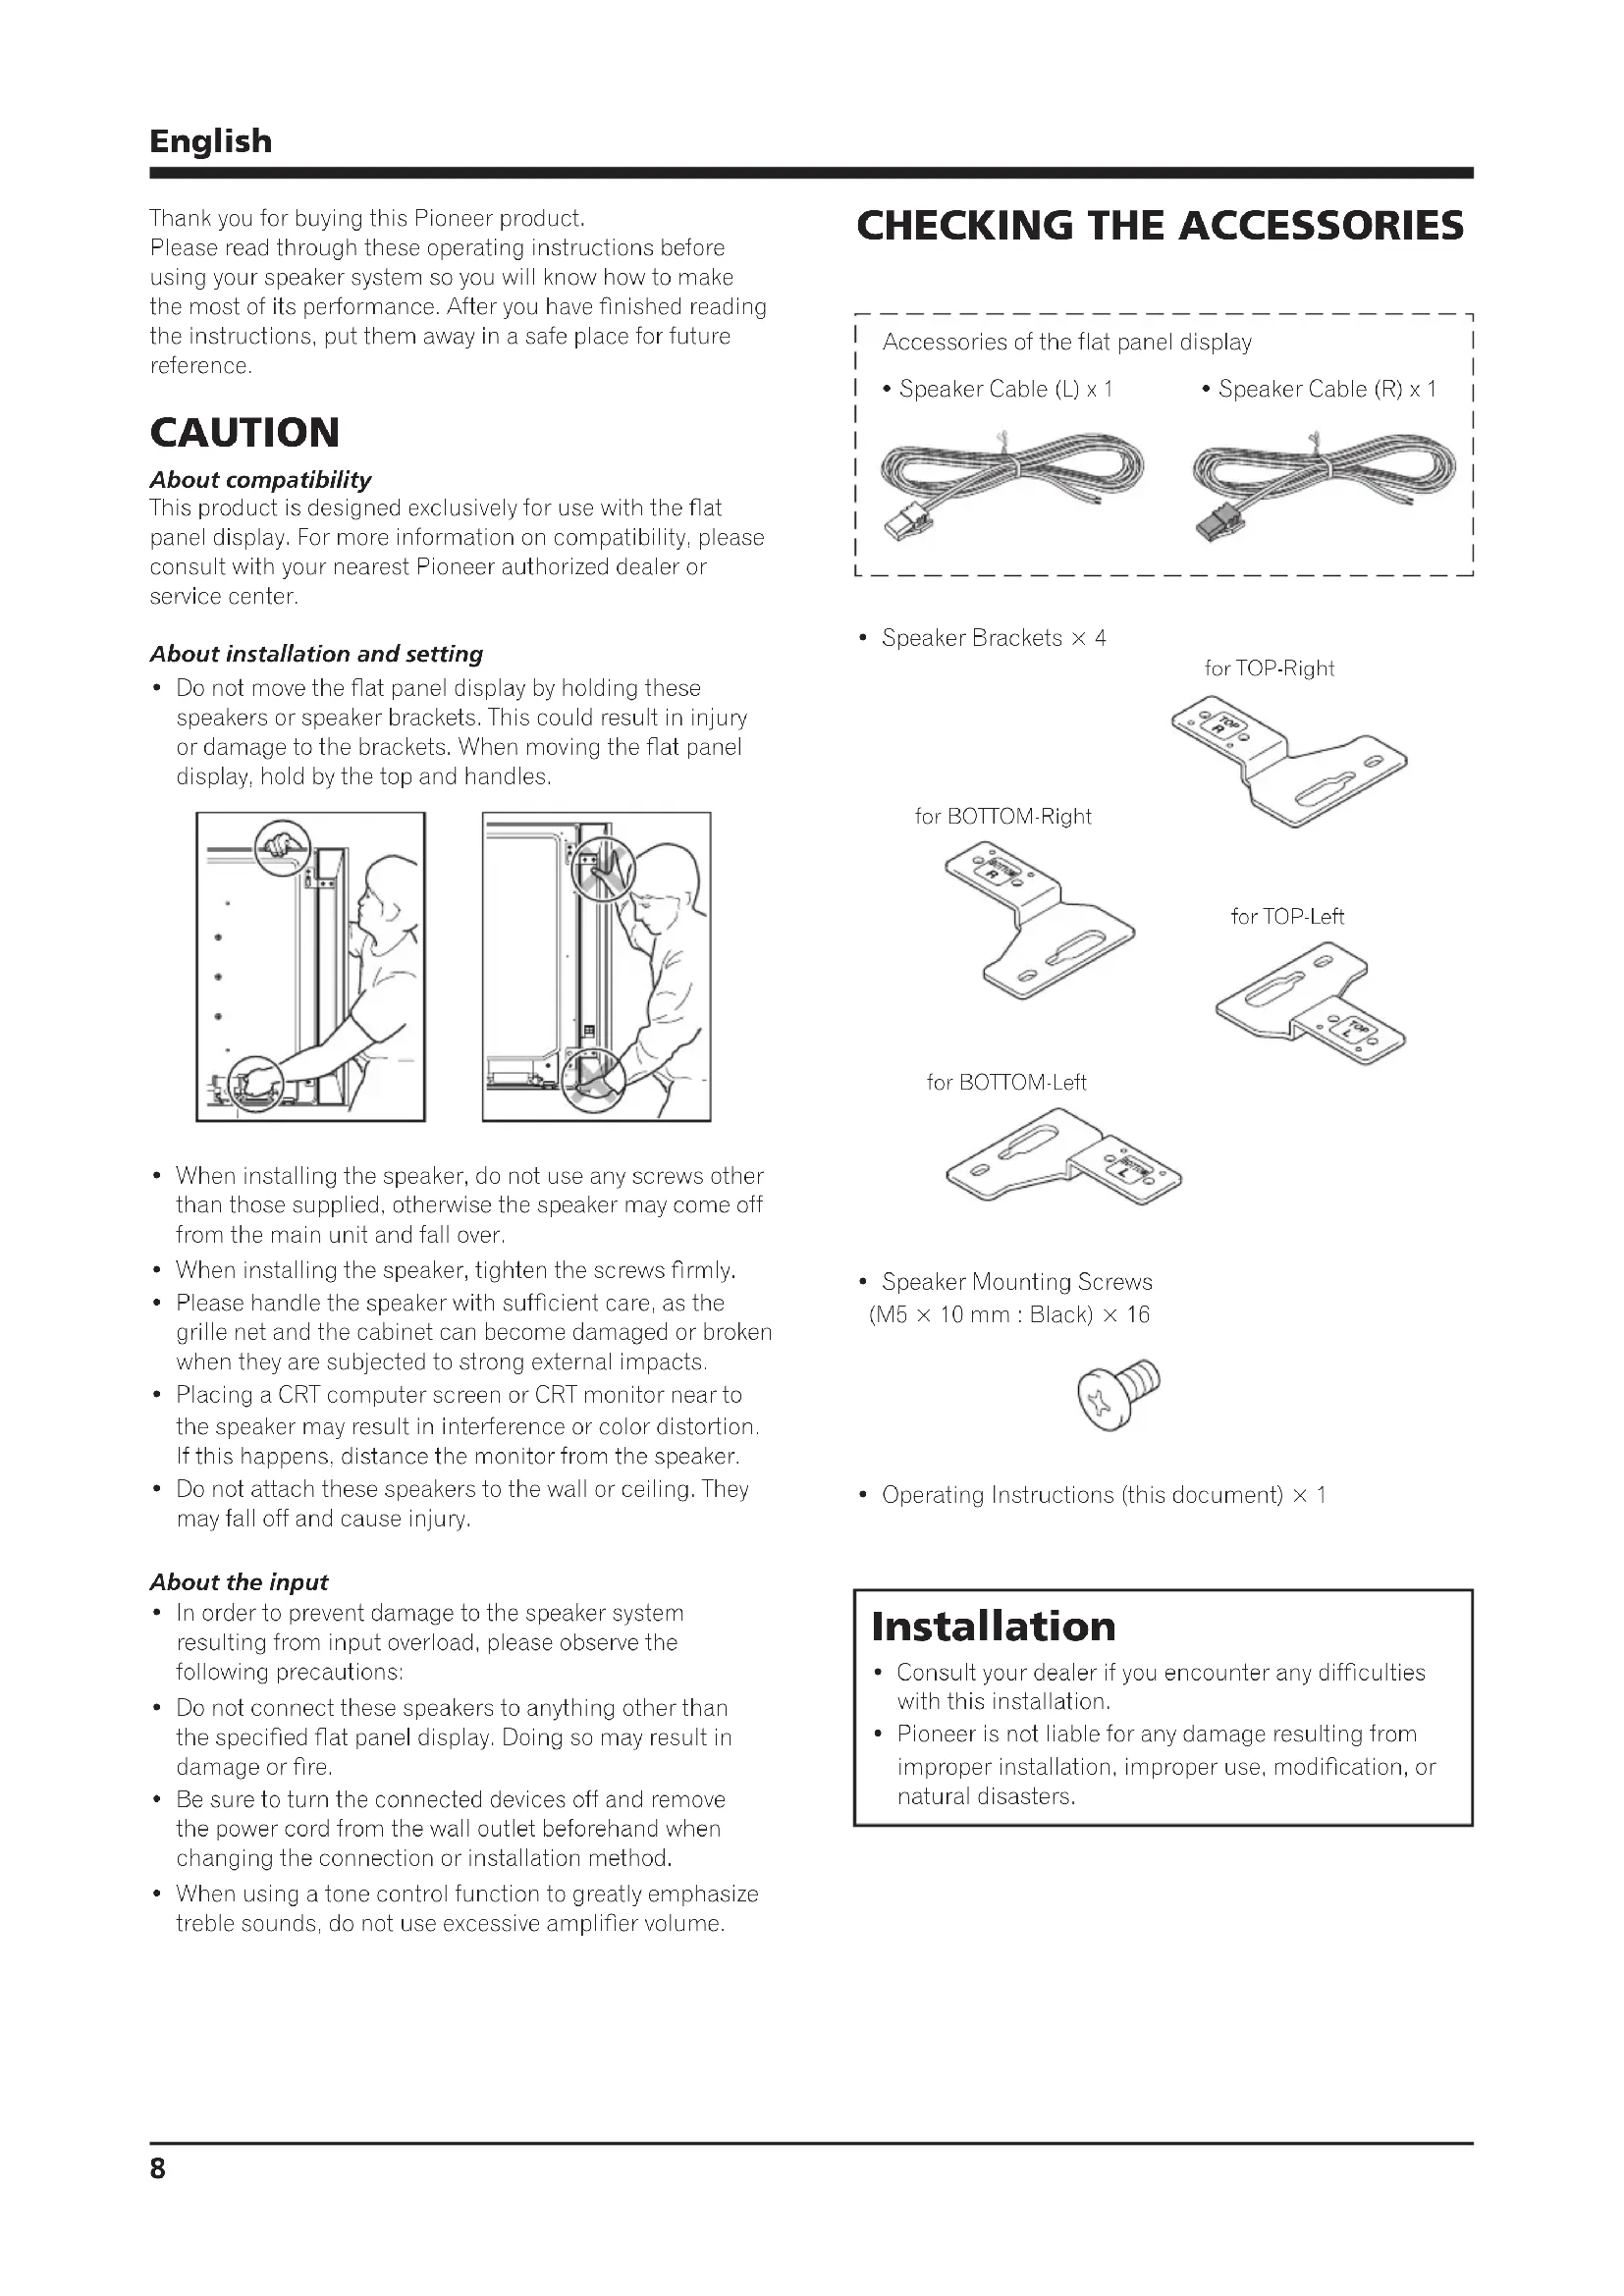
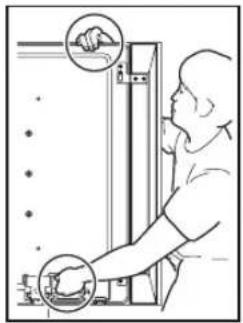
- Do not move the flat panel display by holding these speakers or speaker brackets. This could result in injury or damage to the brackets. When moving the flat panel display, hold by the top and handles.
- When installing the speaker, do not use any screws other than those supplied, otherwise the speaker may come off from the main unit and fall over.
- When installing the speaker, tighten the screws firmly.
- Please handle the speaker with sufficient care, as the grille net and the cabinet can become damaged or broken when they are subjected to strong external impacts.
- Placing a CRT computer screen or CRT monitor near to the speaker may result in interference or color distortion. If this happens, distance the monitor from the speaker.
- Do not attach these speakers to the wall or ceiling. They may fall off and cause injury.
About the input
- In order to prevent damage to the speaker system resulting from input overload, please observe the following precautions:
- Do not connect these speakers to anything other than the specified flat panel display. Doing so may result in damage or fire.
- Be sure to turn the connected devices off and remove the power cord from the wall outlet beforehand when changing the connection or installation method.
- When using a tone control function to greatly emphasize treble sounds, do not use excessive amplifier volume.
CHECKING THE ACCESSORIES
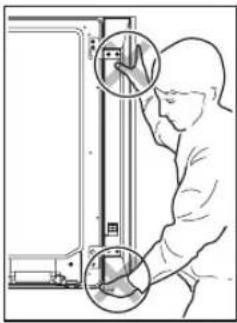
Accessories of the flat panel display
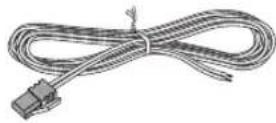
- Speaker Cable (L) x 1
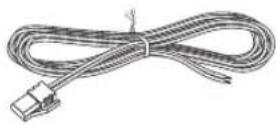
- Speaker Cable (R) x 1
- Speaker Brackets × 4
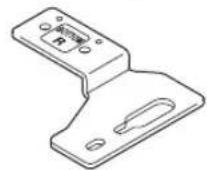
for BOTTOM-Right
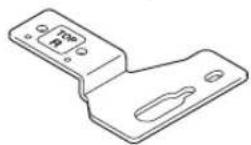
for TOP-Right

for BOTTOM-Left
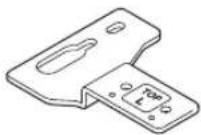
for TOP-Left
- Speaker Mounting Screws (M5 × 10 mm : Black) × 16

- Operating Instructions (this document) × 1
Installation
- Consult your dealer if you encounter any difficulties with this installation.
- Pioneer is not liable for any damage resulting from improper installation, improper use, modification, or natural disasters.
INSTALLATION ON THE FLAT PANEL DISPLAY
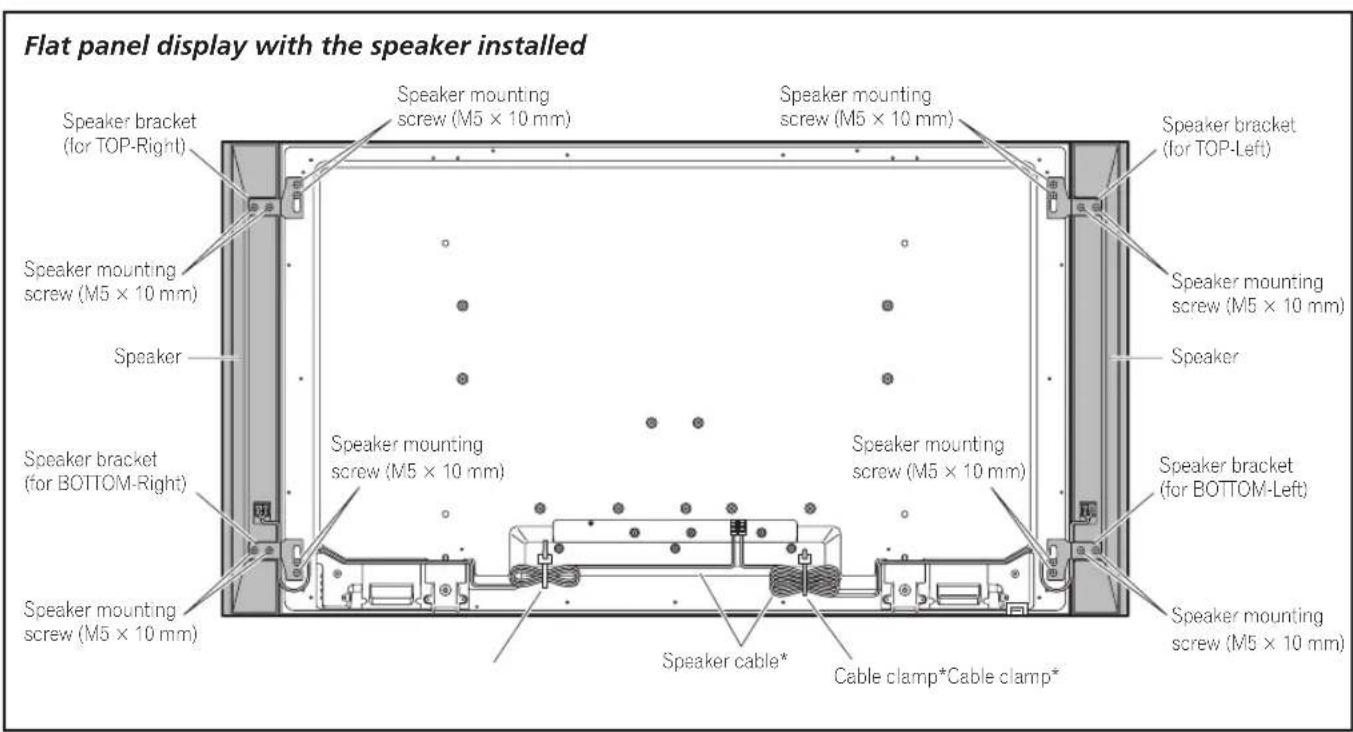
*: Accessories of the flat panel display
When using the table top stand:

NOTE:
Before attaching the speaker, please attach the KRP-TS01 series table top stand (or another flat panel display stand) to the flat panel display.
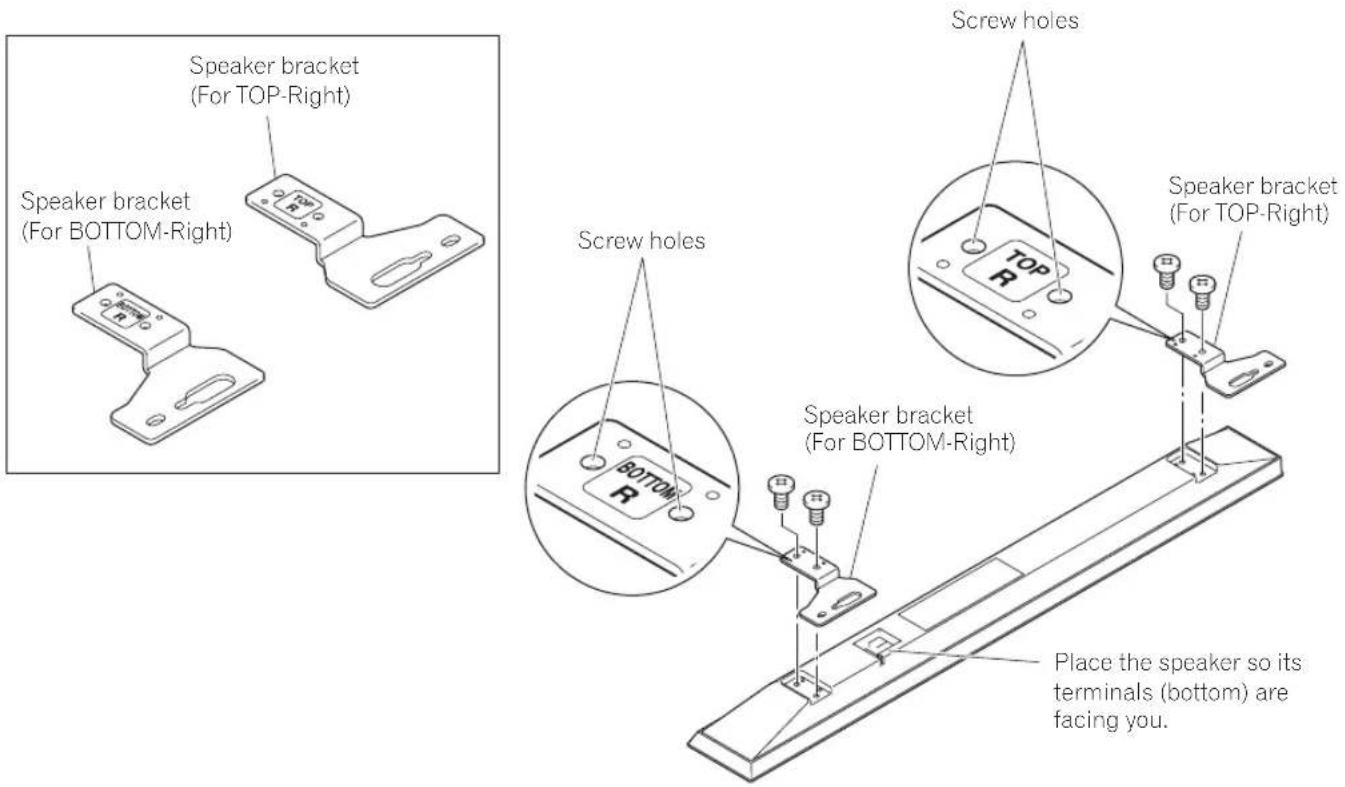
1. Attaching the Speaker Brackets to the Speakers.
There are top and bottom speaker brackets for both the left and the right speakers. Attach the appropriate brackets to the top and the bottom on the back of the speakers using the supplied screws. (It shows the attachment of the bracket on the right side. It is attached on the left side by the same procedure.)
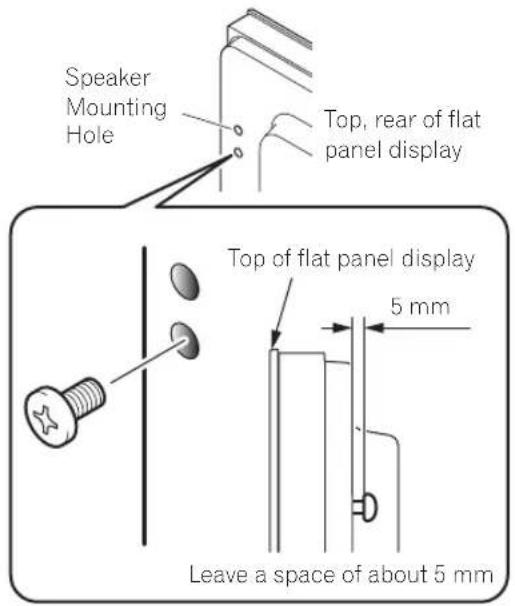
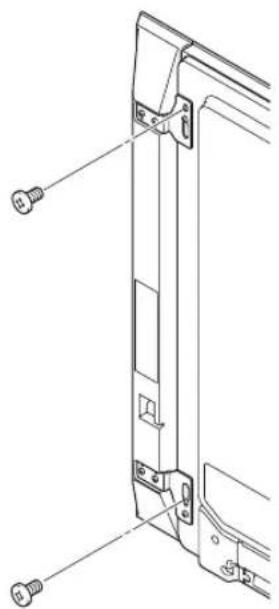
- Screw an supplied screw into the speaker mounting hole (lower of the two) at the top, rear of the flat panel display.
Do not tighten it all the way yet. Leave it loose, with about 5 mm left to tighten.
- Hang the speaker bracket on the screw you installed at the top by passing the wide part over it and lowering into the slot; screw in the lower screw temporarily.
After passing the wide part of the hole of the speaker bracket (top) over the screw, lower the speaker onto it.
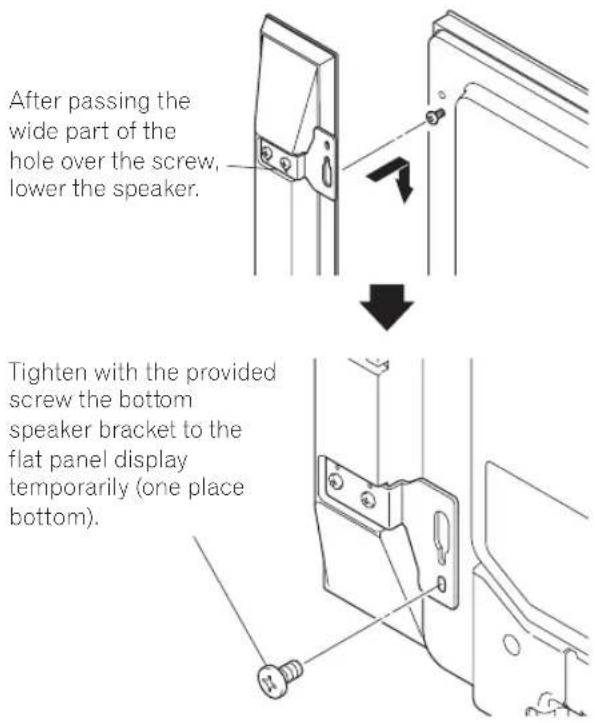
- Adjust the position of the speaker and then tighten the upper and lower screws firmly.
- Tighten the two screws, at the top and bottom for each speaker (total of four screws), thus fixing the speakers to the flat panel display.
- Pass the supplied speaker cable between the speaker and the flat panel display (below the speaker bracket) from below.
- Connect the speaker cables to the speaker (see next page).
- Insert the cable in the groove on the speaker.
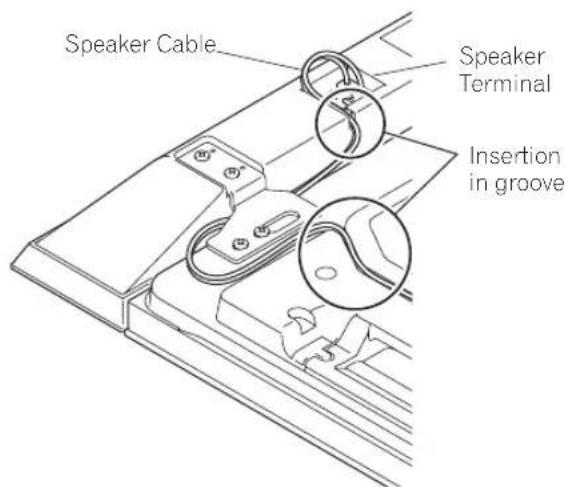
- Connect the other end of the speaker cables to the rear of flat panel display (see next page).
Connect the speaker cables (speaker)
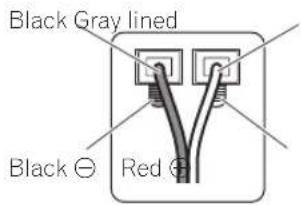
Connect the gray-lined cable to the terminals and the black cable to the terminals.
Connect the speaker cables (flat panel display)
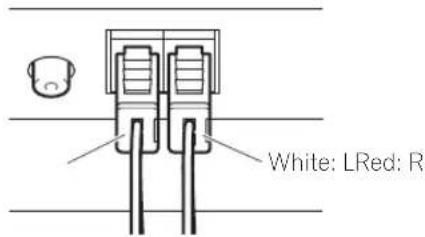
Connect the cable with a red connector to R (right) terminal and the cable with a white connector to L (left) terminal of the flat panel display.

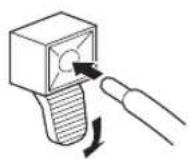
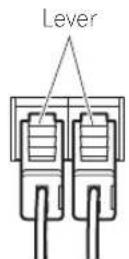
How to connect the speaker cables (speaker)
Press the lever and insert the end of the cable. When you release the lever, it clamps onto the speaker cable. Press and hold the lever when removing the cable.
How to connect the speaker cables (flat panel display)
Insert the speaker cable connector securely into the panel's speaker terminal. To remove the speaker cable, hold and push the lever then remove it.

Caution
- Before connecting the speakers to the flat panel display, unplug the panel from the power outlet. Connecting the speaker cable with the power cord plugged in can cause malfunction or damage to the panel if the cable's bare wire touches other equipment. Plug in the power cord after connecting the speakers.
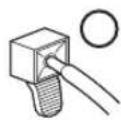
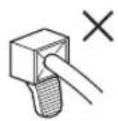
If you insert the speaker cable too far so that the insulation is touching the speaker terminal, you may not get any sound. Please insert it so that the copper wire is still showing.
- Check if the ends of the speaker cables are securely connected to the terminals by slightly tugging on the cables after making connections. Loose connections may result in sound dropouts or noise.
- If there is a short in the and cables caused by an exposed lead wire, excessive load may be applied to the flat panel display, resulting in interrupted operation or malfunction.
- Incorrect connections of the speaker cable to the left or right flat panel display terminals with respect to polarity may result in insufficient stereo sound effects, delivering poor bass sounds or unstable sound image.
- Do not connect any devices to the speaker terminals other than the speakers specified.
- Excessive force exerted on the speaker cable may cause connection failures, sound dropouts and/or connector damage.
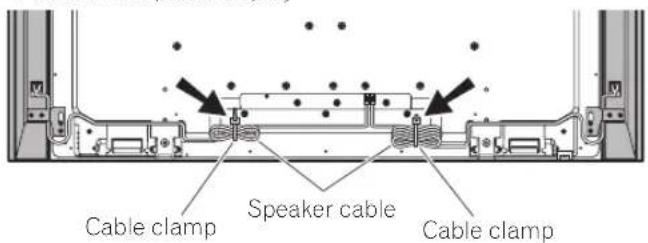
10. Bundling the cables.
Follow the steps below to attach the cable clamp, an accessory of the flat panel display.
1) Thread the clamp band through the holder and bundle the cable(s) in the cable clamp.
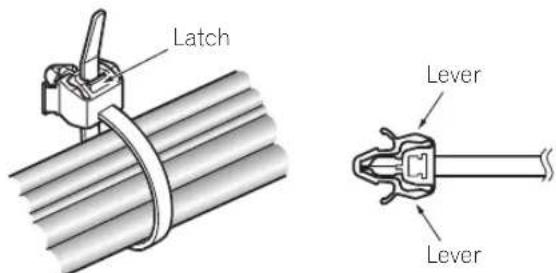
2) Push and hold the levers then insert the hook into an appropriate hole on the rear of the flat panel display.
3) Pull up the clamp band to lock.
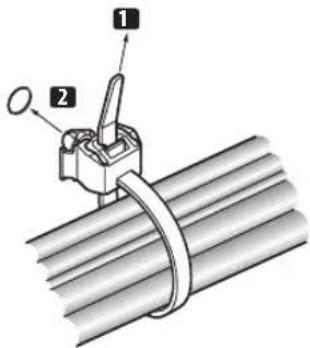
4) Confirm that the cable clamp is seated firmly in the panel.

NOTE:
Avoid pinching or creating pressure points when routing or bundling cables.
To remove the clamp band, pull and hold the latch to release.
To remove the cable clamp, push and hold the levers then pull it out from the hole.

OTE:
The longer a clamp is in place, the better chance of deterioration. An older clamp is more easily damaged while being removed and may not be reusable.
Rear of flat panel display
When using the hung on wall unit:

NOTE:
First lay the flat panel display on top of a soft sheet etc., then attach the speakers.
- Attach the speakers to the flat panel display (See procedures 1 to 10 on pages 9 to 12).
Connect the other cables and power cord to the flat panel display.
- Place the flat panel display on the mounting fittings of the hung on wall unit.
For details, refer to the operating instructions supplied with the hung on wall unit.

Caution
Do not move the flat panel display by holding these speakers or speaker brackets. This could result in injury or damage to the brackets. When moving the flat panel display, hold by the top and handles.
CABINET MAINTENANCE
- Use a polishing cloth or dry cloth to wipe off dust and dirt.
- When the cabinet is very dirty, wipe with a soft cloth moistened with water-diluted cleanser; then wipe again with a dry cloth. Do not use furniture wax or cleaners. They may damage the surface of the cabinet.
- Never use thinner, benzine, insecticide sprays and other chemicals on or near the cabinets, since these will corrode the surfaces.
- When a chemical cloth is used, read the cautions for the chemical cloth carefully.
SPECIFICATIONS
Cabinet........... Bass-reflex type
Used speaker (two-way system):
Woofer (for low tones) 4.8 cm × 13 cm cone type
Tweeter (for high tones) 2.5 cm semidome type
Impedance 6Ω
Frequency Range. 55 Hz to 30 000 Hz
Sensitivity (1 m, 1 W) 80 dB
Permissible input :
Max. input 18W
Rated input 6W
Crossover frequency 3 kHz
External Dimensions
105(W)mm×876(H)mm×64(D)mm
Weight:
Speaker (one piece) 1.75 kg
Speakers (pair) with brackets and screws 4.1 kg
Accessory parts (for two speakers)
Speaker Brackets
TOP-Left X1
BOTTOM-Left X1
TOP-Right × 1
BOTTOM-Right X1
Speaker Mounting Screws (M5× 10mm)× 16
Operating Instructions (this document) × 1
NOTE:
Specifications and design subject to possible modification
without notice, due to improvements.
IMPORTANT NOTICE - RECORD THE MODEL NUMBER AND SERIAL NUMBERS OF THIS EQUIPMENT BELOW. THE NUMBERS ARE ON THE REAR.
MODEL NO.
SERIAL NO.
KEEP THESE NUMBERS FOR FUTURE USE.
D1-4-2-6-2_En
If you want to dispose this product, do not mix it with general household waste. There is a separate collection system for used electronic products in accordance with legislation that requires proper treatment, recovery and recycling.
Private households in the member states of the EU, in Switzerland and Norway may return their used electronic products free of charge to designated collection facilities or to a retailer (if you purchase a similar new one).
For countries not mentioned above, please contact your local authorities for the correct method of disposal.
By doing so you will ensure that your disposed product undergoes the necessary treatment, recovery and recycling and thus prevent potential negative effects on the environment and human health.


Dear Customer:
Selecting fine audio equipment such as the unit you've just purchased is only the start of your musical enjoyment. Now it's time to consider how you can maximize the fun and excitement your equipment offers. This manufacturer and the Electronic Industries Association's Consumer Electronics Group want you to get the most out of your equipment by playing it at a safe level. One that lets the sound come through loud and clear without annoying blaring or distortion-and, most importantly, without affecting your sensitive hearing.
Sound can be deceiving. Over time your hearing "comfort level" adapts to higher volumes of sound. So what sounds "normal" can actually be loud and harmful to your hearing. Guard against this by setting your equipment at a safe level BEFORE your hearing adapts.
To establish a safe level:
-
Start your volume control at a low setting.
-
Slowly increase the sound until you can hear it comfortably and clearly, and without distortion.
Once you have established a comfortable sound level:
- Set the dial and leave it there.
Taking a minute to do this now will help to prevent hearing damage or loss in the future. After all, we want you listening for a lifetime.
We Want You Listening For A Lifetime
Used wisely, your new sound equipment will provide a lifetime of fun and enjoyment. Since hearing damage from loud noise is often undetectable until it is too late, this manufacturer and the Electronic Industries Association's Consumer Electronics Group recommend you avoid prolonged exposure to excessive noise. This list of sound levels is included for your protection.
Decibel
Level Example
30 Quiet library, soft whispers
40 Living room, refrigerator, bedroom away from traffic
50 Light traffic, normal conversation, quiet office
60 Air conditioner at 20 feet, sewing machine
Vacuum cleaner, hair dryer, noisy restaurant
80 Average city traffic, garbage disposals, alarm clock at two feet.
THE FOLLOWING NOISES CAN BE DANGEROUS UNDER CONSTANT EXPOSURE
90 Subway, motorcycle, truck traffic, lawn mower
100 Garbage truck, chain saw, pneumatic drill
120 Rock band concert in front of speakers, thunderclap
140 Gunshot blast, jet plane
180 Rocket launching pad
Information courtesy of the Deafness Research Foundation.


Published by Pioneer Corporation. Copyright © 2008 Pioneer Corporation. All rights reserved.
105 (L) mm × 876 (H) mm × 64 (P) mm
Poids:
Enceinte (une piece) 1,75 kg
Publication de Pioneer Corporation.
© 2008 Pioneer Corporation.
Ubergangsfrequency 3 kHz
AuBere Abmessungen 105 (B) mm × 876 (H) mm × 64 (T) mm
105 (L) mm × 876 (A) mm × 64 (P) mm
Peso :
Altoparlante (pezzo unico) 1.75 kg
Copyright © 2008 Pioneer Corporation.
Copyright © 2008 Pioneer Corporation.
Copyright © 2008 Pioneer Corporation.
DonyctHMMA MOHIOCTb:
MaKcHMaJIbHaM MoIINHOCTb 18BaTT
HomHaJIbHaI NOTpe6JIaEMa MoIOHOCt b 6 BAIT
Yactota pa3JeTnna KaIIaIOB 3K
HapyKHepea3Mepb1.... 105MM(III)×876MM(B)×64MM(Γ) Bec:
ΓρOMKOrOBOpHTeJIb (OHaIITyKa) 1,75 kg
PpOMKOrOBOpHTeH (napa)c depKaTeHMn H BHTaMn ... 4,1 kg
BHTbIy yctAHOBKn rPOMKOrOBOpHreIe
(M5× 10MM) (20 × 16
HctpyKHHIO EKcIIpyaTIN (3OTOKMHT)1
BHIMAHHE:
CHeHΦHKaHH H KOHCTpyKHN MOYr 6bTT MoHΦHINPOBAHb6e3 npdynpckKeHH, BCIECTBHC yCOBcPHECHTBOBAHH.
BAXHO-3AINHINTE IPNBEDEHHB HNXE HOMEPOJN IN CEPINHBHIOHOMEP DAHHOTO YCTPOICTBA. HOMEPA HAXOITCA HA OBOPOTHOI CTOPOHE.
HOMEPMOJEIN CEPIIHBIOHOMEP
COXPAHNTE 3TN HOMEPA JIA DAJIbHEIIEGO HCIOJIb3OBAHNA

EcIn BbI JeNaIeTe yTINuIN3NIOBaTb DaHHe N3dEInne, He BbIbpaCbIBaIte erO BMcTe C O6bIHbIM 6bITOBbIM MycOpOM. CyueCTByET OTDeBnHa CnCTema C6opa HcNoJIb30BaHHbIX 3NeKTPoHHbIX N3dEInn B COOTBeTCTBmN C 3aKHOdaTeJIbCTBOM, KOTopar npednonaraet COOTBeTCTByUoJee o6paueHne, BO3BpA n nepepa60Ky.
HaCTHbIe KInneHTbI-B CtpaHax-Hehax EC, B UBeinucapn HOpBernn MoYr 6ecnnaTHo Bo3BpaAaTb NcNoIb3ObaHHbIe 3JIeKTPoHHbIe I3dEINRA COOTBeTCTByIOUe INHKtbl c6opaaN nn nepy (npn NOKynke CXoDHoro HOBOr O3dEINra).
B ctpaHax, He nepeHcneHHbIX Bblwe, dIra noluyehnIHphiOpMaun O npabInhbx Cnoc6ax ytnn3auu N obaaTecb B COOTBETCTBYIOUne yypeKdEHN.
IocTynar TaKIM 6pa3OM, BbMOKeTe 6bITyBpeHbBTOM, YTO yTHIN3NpyEmbI npOdyKT 6yET COOTBeCTBHyUcM 6pa3OM 6pa60TaH, nepeDaH B COOTBeCTBHyUcM IN Pepepa60TaH 6e3 BO3MOXhbIX HeraTNBbIX NocLeDCTBm IIN OKpyKaIOUe Cpebln 3dOpOBbY IIOe. K058 A
K058_A_Ru
Hiziano Pioneer Corporation.
© Pioneer Corporation, 2008.
Bce paba 3aunuienb.
Приимechаиме:
B COOTBETCTBnC O CTaTbe 5 3aKoHa PocnckOeepaun "O 3aUte npab notpe6nte" n Yka3aHem IpaNTeNbCTBa PocnckOeepaun N720 ot 16 Hohr 1997 roda, Kopnpaun Pioneer Europe NV yctahabnBaet ycIOBE Ha cneDyOuI npOdoNkTeNbHOCTb cPoka clykblofnnnaJIbHO NoCTabJIeMbIX Ha Pocnckn pbHOK TObApOB.
Ayno BnueooobpyObaHne:7IeT
Ipehenochoe ayduoobopydobaHne:6iET
Dpyroe obopydoBaHne (HayuHNK, MKNpOoH N T.D.): 5 net
ABTOMO6nJIbHa 3JIeKtPoHnKa:6JIeT
D3-7-10-6_A_Ru
PIONEER ELECTRONICS (USA) INC.
P.O. BOX 1540, Long Beach, California 90801-1540, U.S.A. TEL: (800) 421-1404
PIONEER ELECTRONICS OF CANADA, INC.
300 Allstate Parkway, Markham, Ontario L3R 0P2, Canada TEL: 1-877-283-5901, 905-479-4411
PIONEER EUROPE NV
Haven 1087, Keetberglaan 1, B-9120 Melsele, Belgium TEL: 03/570.05.11
PIONEER ELECTRONICS ASIACENTRE PTE. LTD.
253 Alexandra Road, #04-01, Singapore 159936 TEL: 65-6472-7555
PIONEER ELECTRONICS AUSTRALIA PTY, LTD.
178-184 Boundary Road, Braeside, Victoria 3195, Australia, TEL: (03) 9586-6300
PIONEER ELECTRONICS DE MEXICO S.A. DE C.V.
Blvd.Manuel Avila Camacho 138 10 piso Col.Lomas de Chapultepec, Mexico, D.F. 11000 TEL: 55-9178-4270
K002_WL
©2008/11/24 2:30:57
Published by Pioneer Corporation.
Copyright © 2008 Pioneer Corporation.
All rights reserved.
Publication de Pioneer Corporation.
© 2008 Pioneer Corporation.