ORC 300B - Radio OK - Free user manual and instructions
Find the device manual for free ORC 300B OK in PDF.
User questions about ORC 300B OK
0 question about this device. Answer the ones you know or ask your own.
Ask a new question about this device
Download the instructions for your Radio in PDF format for free! Find your manual ORC 300B - OK and take your electronic device back in hand. On this page are published all the documents necessary for the use of your device. ORC 300B by OK.
USER MANUAL ORC 300B OK
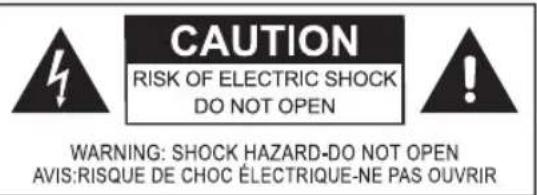
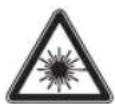
CLASS 1 LASER PRODUCT

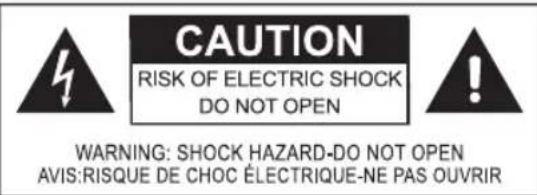
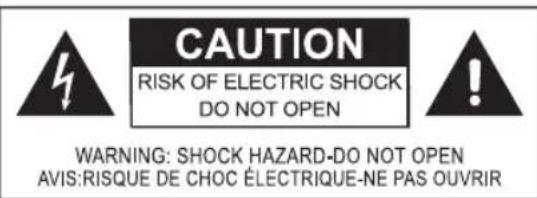
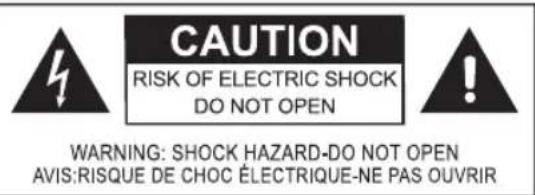
WARNING: SHOCK HAZARD-DO NOT OPEN AVIS: RISQUE DE CHOC ELECTRIQUE-NE PAS OUVRIR
CLASS 1 LASER PRODUCT
Autn n EtiKaTo Tpoiov NAnpOphi To xnoTn OTo POKeTTa Yia eva npoiov λεiερ Kλaoc 1 To oToio πEpiExI eva oToixei λεiερ.
Mny ayyicTe To fako oTo eowtepiKo Tnc
Onknc diokou.
PPOOXH! H xponxepiopnpiw n puO- iou wdiakaiw diapopetikwv aTc Tnou npypapovta oTo npov evTuTO uOpEVAeippeEeIKivduvNekEoN aKtivoBolia.
KINADNOI Aopatn aKtivoBoia IeIcEoTav eivai avoiKTo KAI otav to kLeiotpo aoaaleiac exu unootei aBn n evai EaattwofoeuyeTe Tnv aneUeiaeKkEoN va.Mnv ayicTe to fako.
To onma tou kepauvou eoa 0e eva 1oTnEupo Tpiywvo xpnoiopoieita wC npoeidtoi non yia to xphotn oxetika eyn utapen n movwevnc "tkiivduvcnt aong" oTo EOWTepko Tou kaufouc TNC oukeunc, n Evtaon TnOioac mnpei va eiva tetoia Tou va anotele kivduvo nAekponlaia c ia avpwnouc kalwa.
To auaaotko eoa o eva 1oanlaupo tpiwvo xnoiopoit ietai wc npoeisodoinon yia to xnotn otuapxouv onmuavtkic c obnyie c leitoupyiac kai ouvtnpnonc ota uvoebutika evtuna autnc tncc oukeunc.
KAOAPIESMOKAIΦPONTIDA
Piv ano tov kathetaiopo, anooovseote to kaiwio trophiooiaac. Anote tn ou- okeun va kpuwoe i evtalewc.
KountiTe Tn ouokueun eva oteyvo kal aalno navi.
nAεKTpiKn TpOΦOδOciA
1
2
SuvdsTe To kaWdbio Tpo-phiociaevaalaaoou evou peuatoC otny avtoiyn eoo oTo Niow hpcn novadac.
Pntjote to Eava yia nauon tnc avanapaywync diokou CD/ MP3.
PntnoTe To EaVa yia va ouvexIorei n avantapayyn.
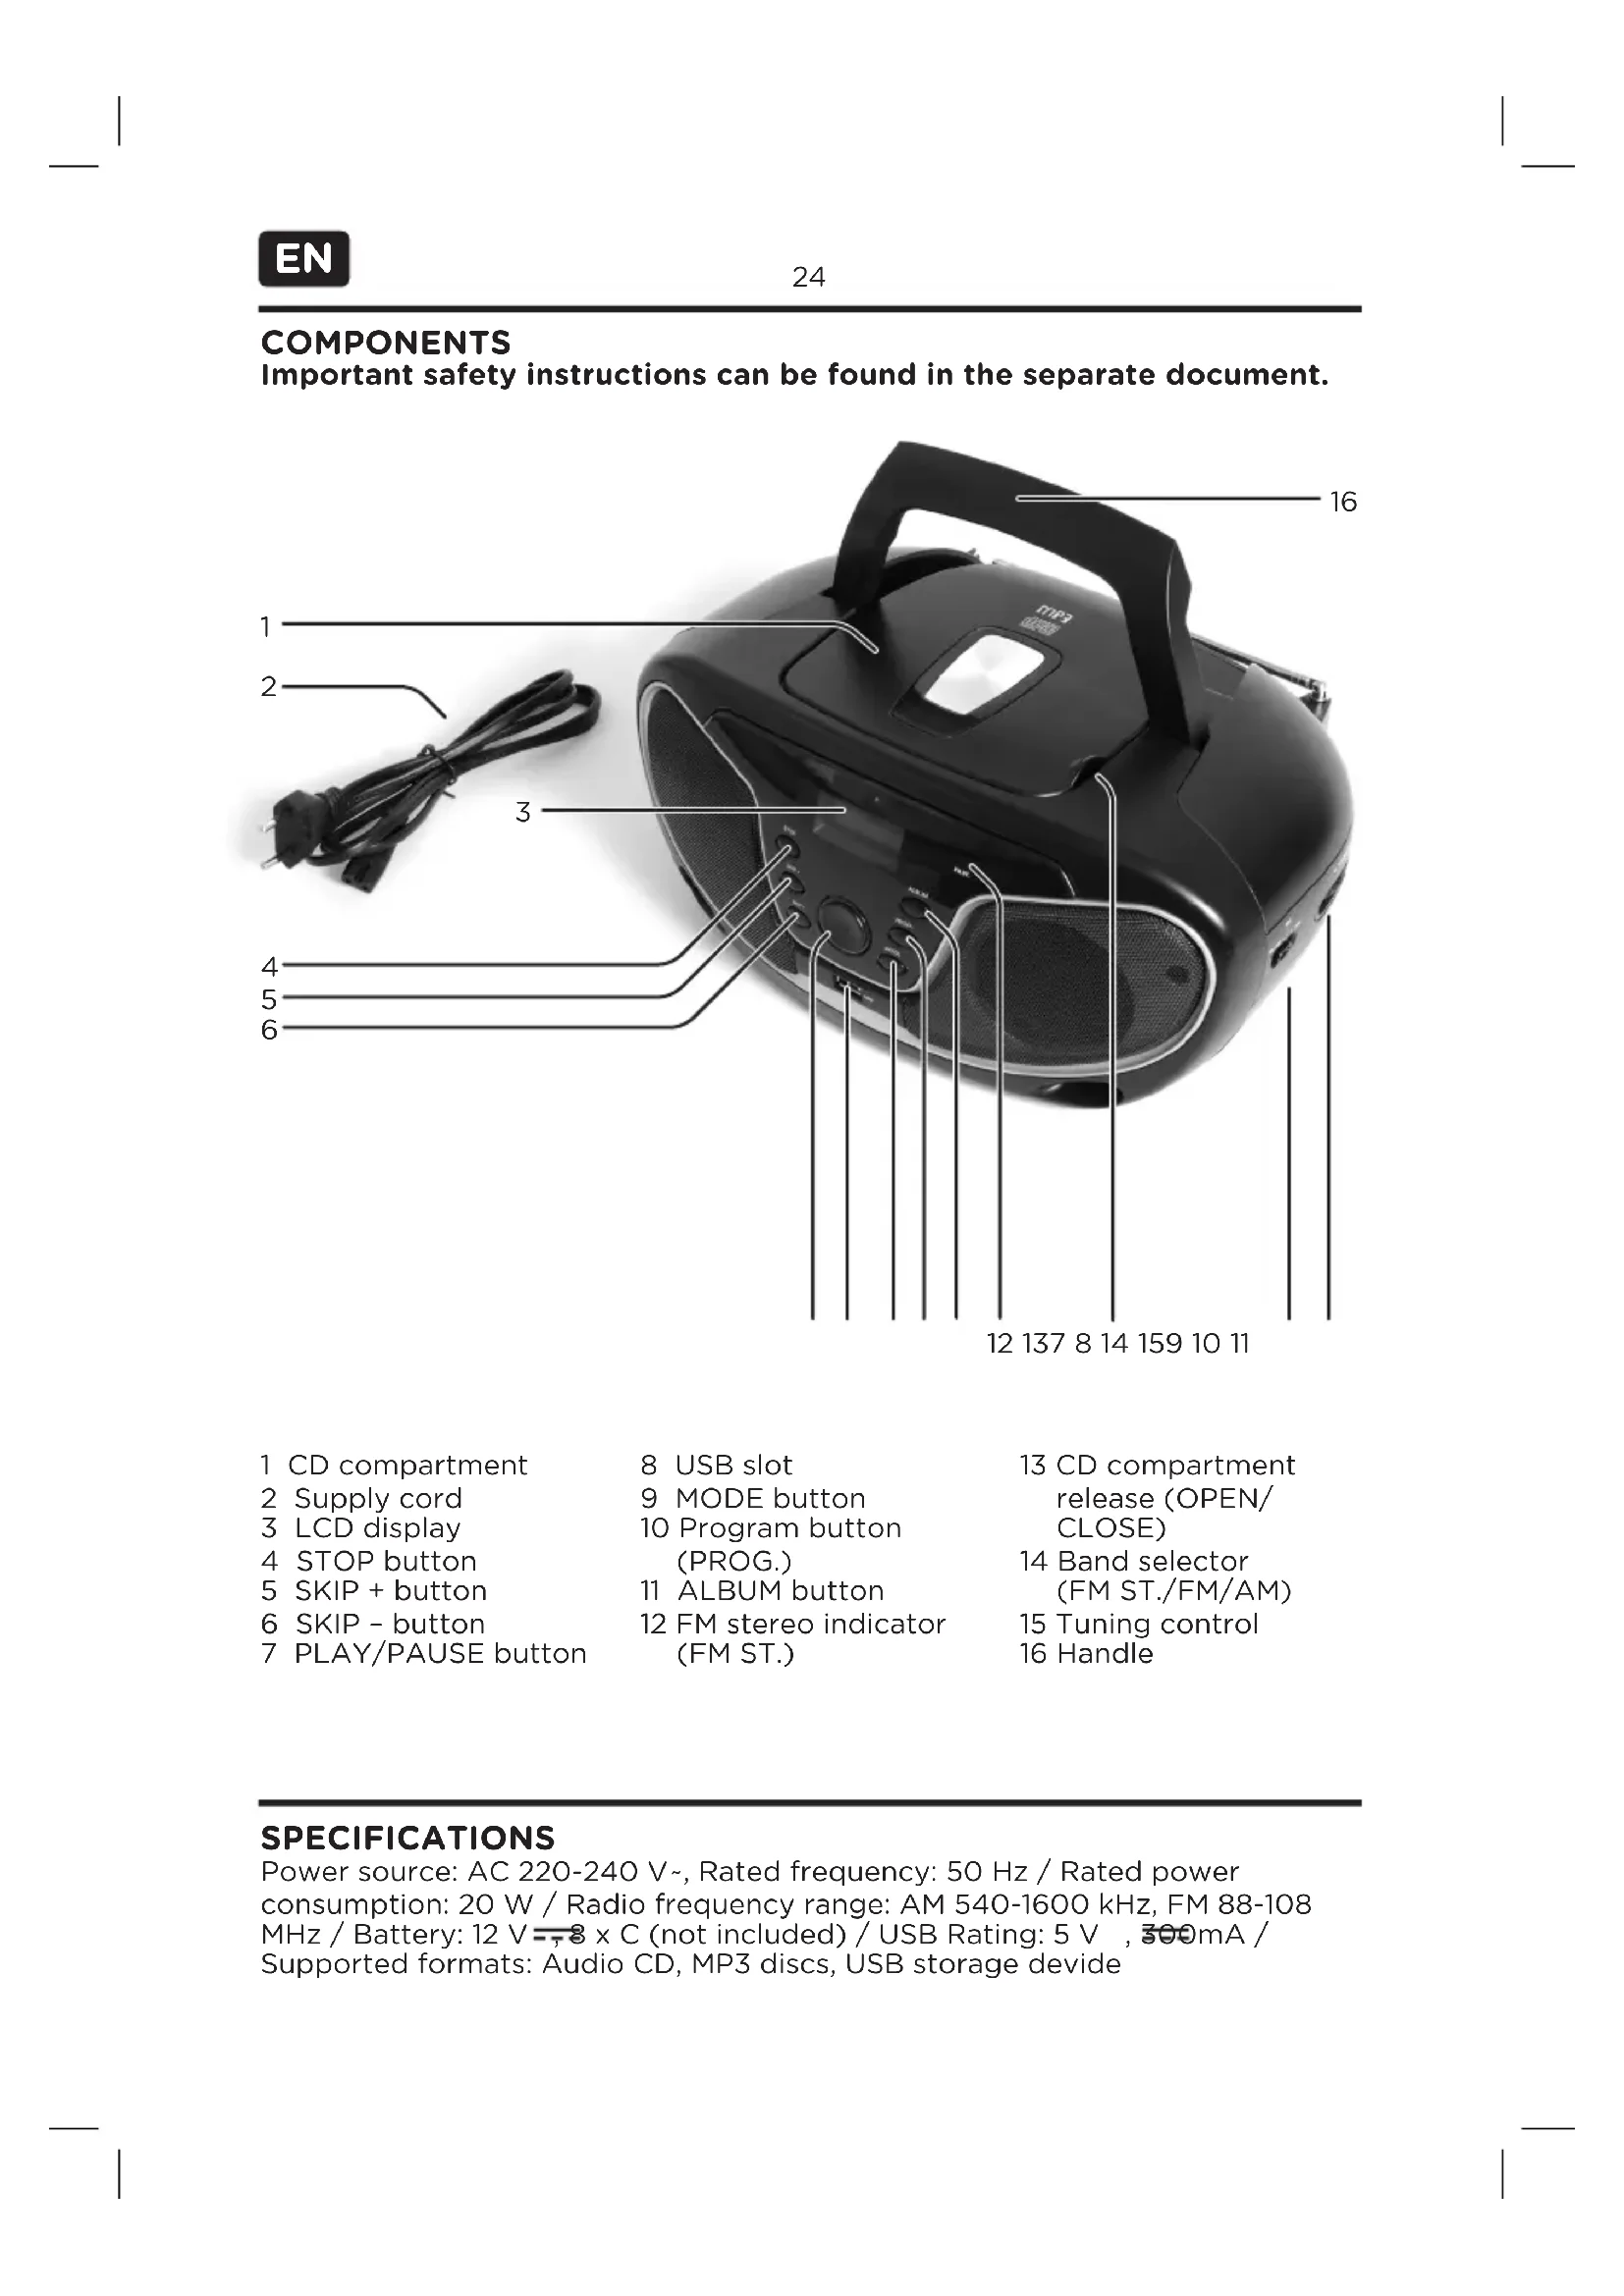
Important safety instructions can be found in the separate document.
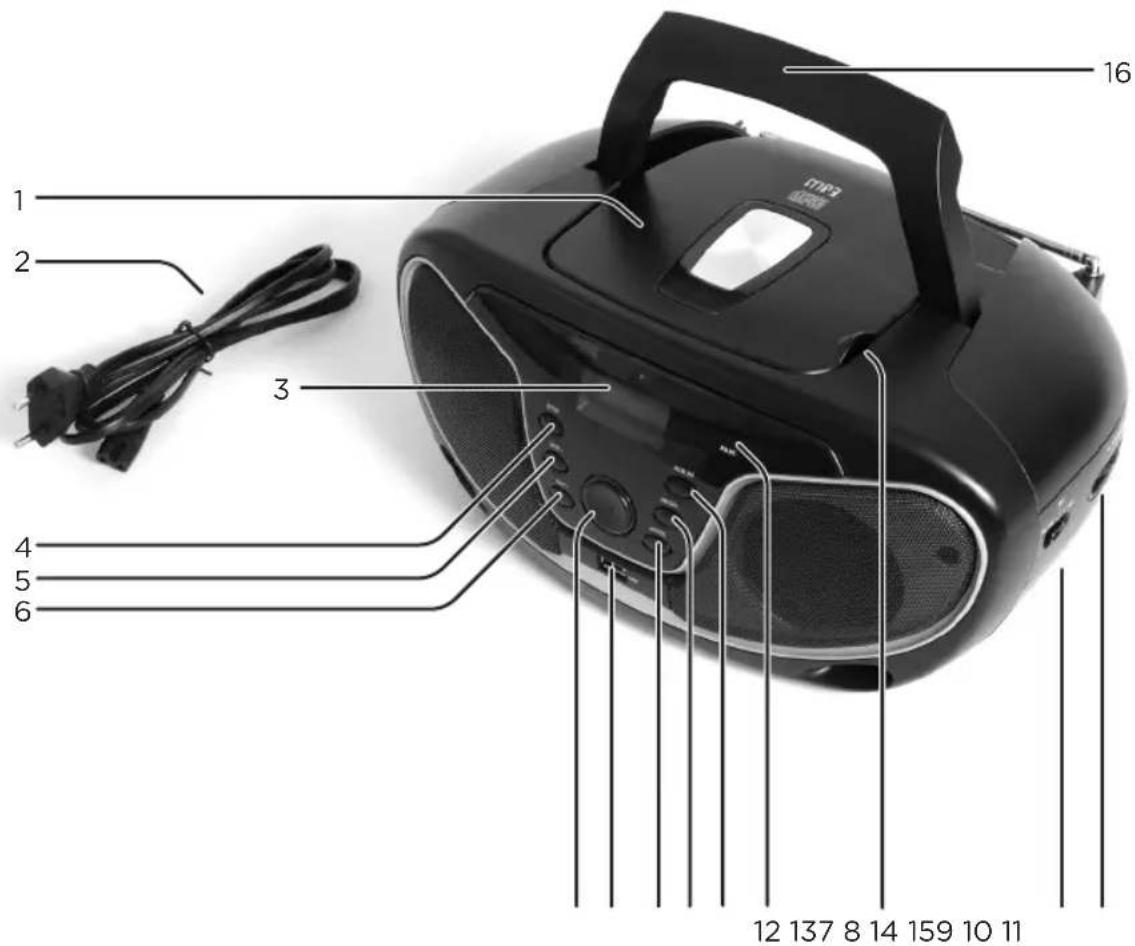
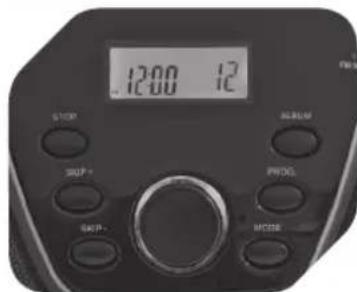
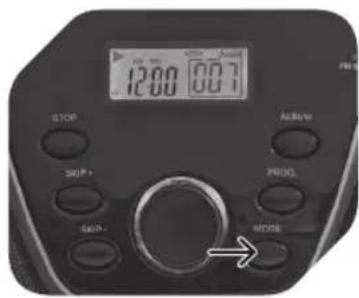
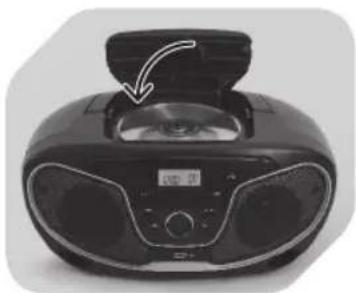
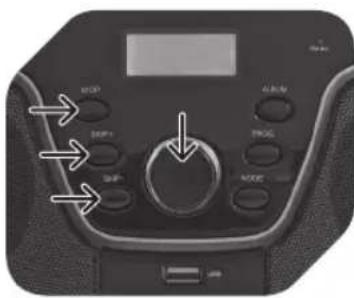
1 CD compartment
2 Supply cord
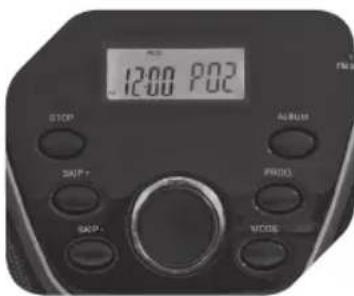
3 LCD display
4 STOP button
5SKIP ^+ button
6SKIP - button
7 PLAY/PAUSE button
8 USB slot
9 MODE button
10 Program button (PROG.)
11 ALBUM button
12 FM stereo indicator (FM ST.)
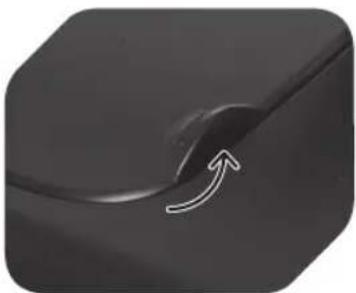
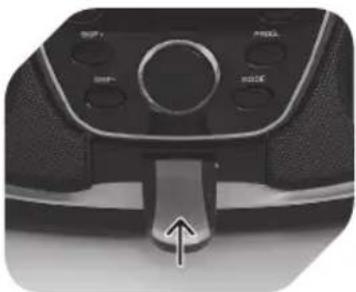
13 CD compartment release (OPEN/ CLOSE)
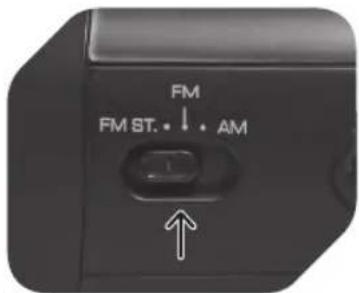
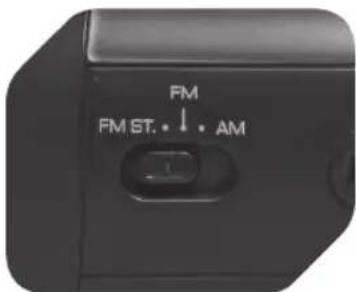
14 Band selector (FM ST./FM/AM)
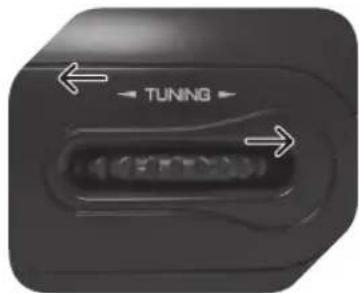
15 Tuning control
16 Handle
SPECIFICATIONS
Power source: AC 220-240 V\~, Rated frequency: 50 Hz / Rated power consumption: 20 W / Radio frequency range: AM 540-1600 kHz, FM 88-108 MHz / Battery: 12V = 8× C (not included) / USB Rating: 5 V , 300mA / Supported formats: Audio CD, MP3 discs, USB storage devide
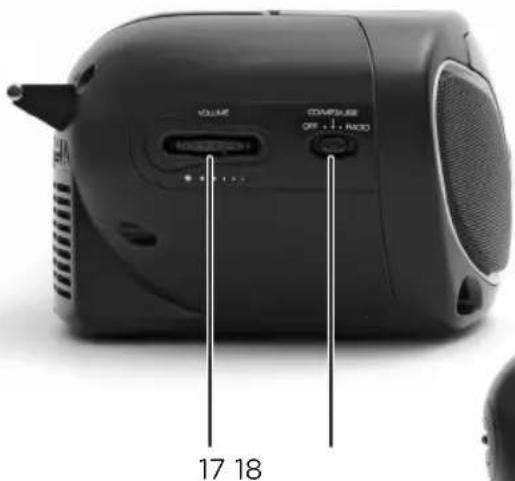
17 Volume control
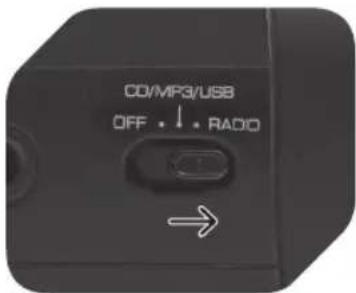
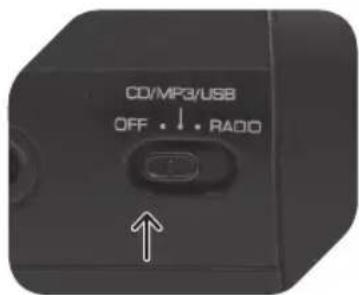
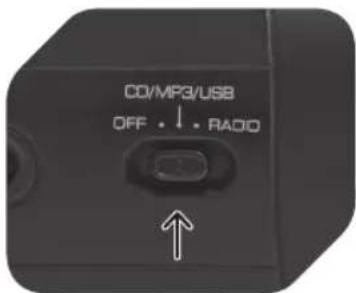
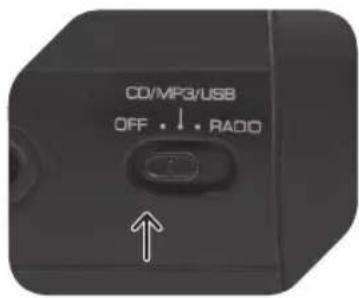
18 Function selector (OFF/CD/MP3/USB/RADIO)
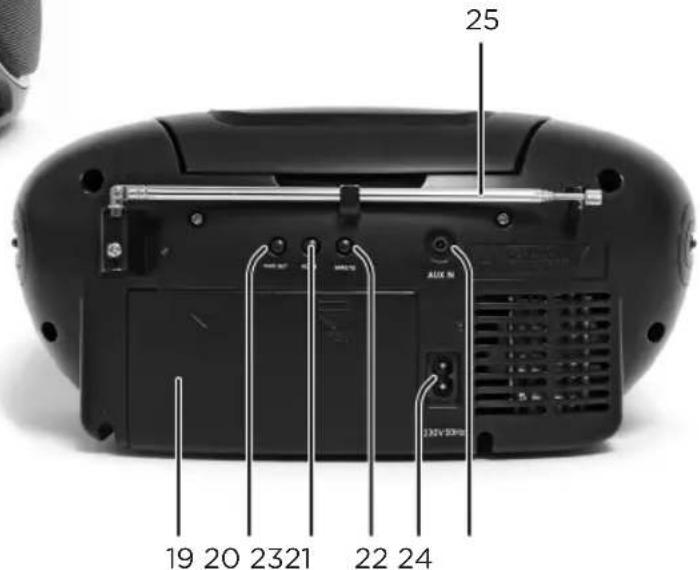
19 Battery compartment
20 Time set button
21 HOUR button
22 MINUTE button
23 AC inlet
24 AUX-IN
25 Telescopic antenna
BEFORE FIRST TIME USE
Carefully read this user manual in order to avoid damage or injuries due to incorrect use. Pay particular attention to safety instructions. Keep for future reference and pass it on to further users.
Carefully remove all packaging and check if appliance is complete and undamaged. In case of damage, do not use the appliance.
IMPORTANT: Before first time use, remove the protective sheet from the disc compartment.
InTEnDEDUSE
This appliance is only intended for audio entertainment. Only use according to these instructions. Improper use is dangerous and will void any warranty claim. For household use only. Do not use outdoors.
IMPORTAnT SAFETY INSTRUCTIONs. READ CAREFULLY AnD kEEP FOR FUTURE REFERENCE.
CLASS 1 LASER PRODUCT
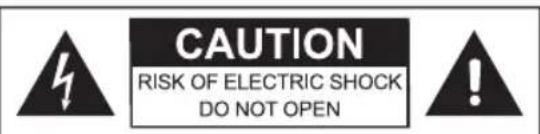
WARNING: SHOCK HAZARD-DO NOT OPEN AVIS: RISQUE DE CHOC ELECTRIQUE-NE PAS OUVRIR
This label on the product informs the user that this is a class 1 laser product containing a laser component.
Do not touch the lens inside the disc compartment.
CAUTION! Use of controls or adjustments of procedures other than those specified herein may result in hazardous radiation exposure.
DAngER! Invisible laser radiation when open and safety interlock failed or defeated. Avoid direct
exposure to the beam. Do not touch the lens.
The lightning flash with arrowhead within an equilateral triangle is
intended to alert the user to the presence of uninsulated "dangerous voltage" inside the enclosure of this appliance, which may be of sufficient magnitude to constitute a risk of electric shock to persons and animals.
The exclamation point within an equilateral triangle is intended to alert the user to
the presence of important operating and maintenance instructions in the literature accompanying this appliance.
CLEAnInG AnD CARE
Before cleaning, unplug the supply cord. Allow the appliance to cool down completely.
Clean appliance with a dry and soft cloth.
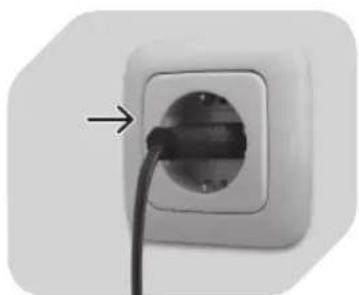
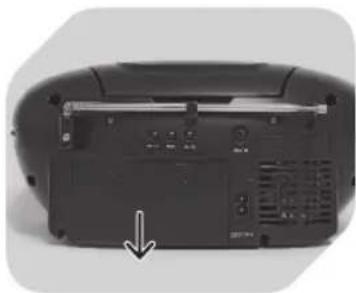
POWER SUPPLY
1
2
or
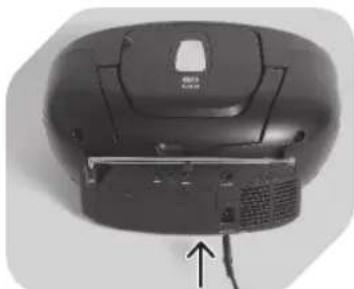
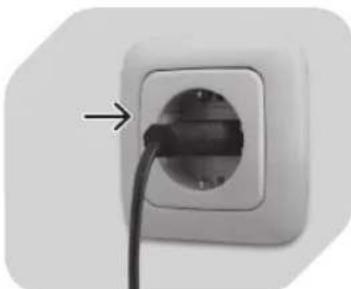
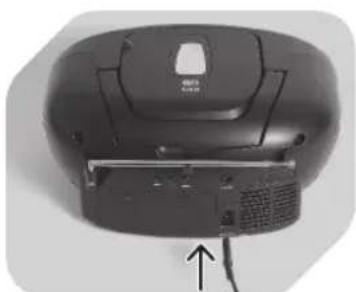
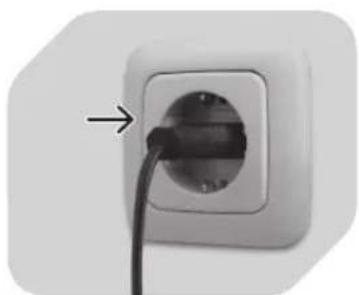
Plug the AC power cord into the AC inlet on the back of the unit.
Plug the unit in.

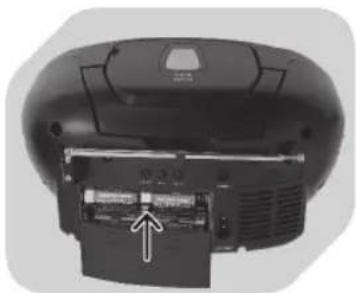
1
2
3
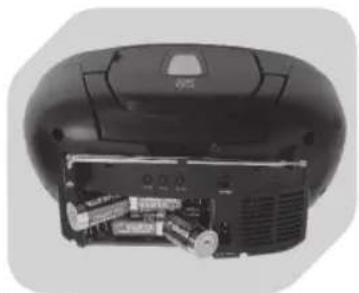
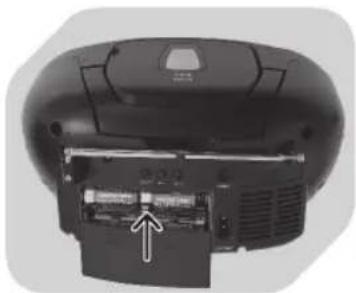
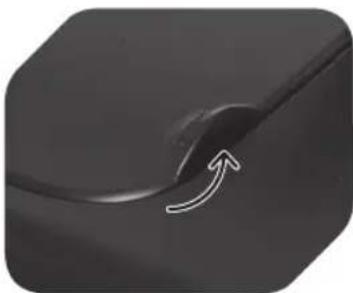
Remove battery compartment door.
Insert 8xC batteries (not included) into battery compartment. Observe + and - markings.
Close battery compartment door.
NOTE
The batteries are not included; please refer to the safety instructions provided by the battery manufacturer.
Always turn function selector to OFF position before plugging/unplugging the appliance or inserting/removing batteries.
When using batteries, unplug the appliance from the mains.
When not using appliance for a long time, remove batteries in order to avoid - leakage.
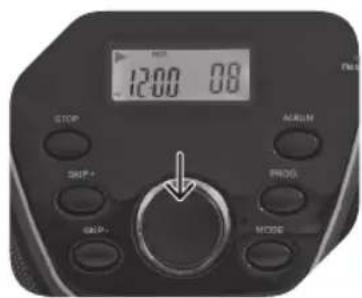
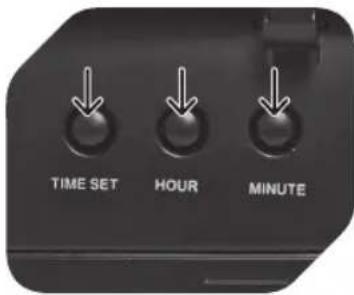
CLOCK SETTING
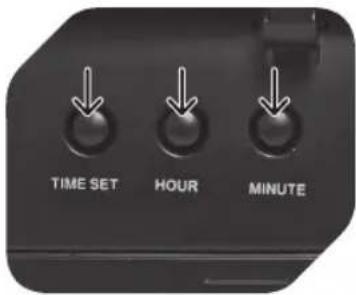
To adjust the clock, enter CD/MP3/USB mode.
- Press TIME SET button and do not release during clock setting.
- Press HOUR button to set hour.
- Press MINUTE button to set minute.
- Release all buttons to confirm setting.
RADIO OPERATION
1
2
3
Set function selector to RADIO mode.
Select desired band (AM/FM) by using the band selector.
Use TUNING control to select desired radio station.
4
5
NOTE
For better FM .
reception, fully
extend and redirect
the antenna at the
back.
For better AM .
reception, reposition
the radio.
Select FM for MONOREception. Select FM ST. for FM STEREOREception; the stereo indicator lights up.
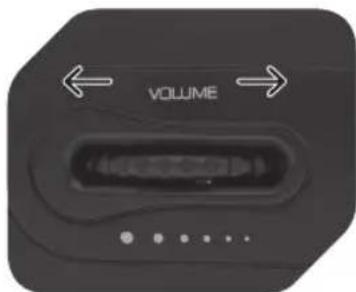
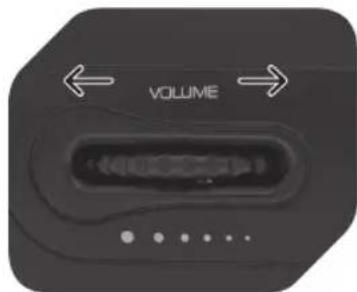
Adjust volume control to desired level.
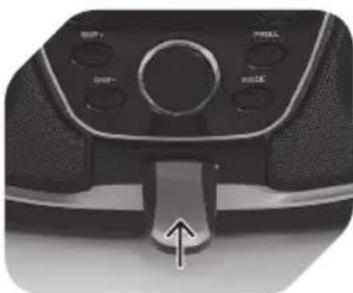
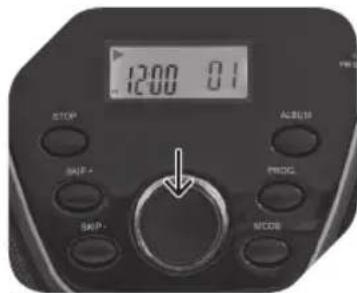
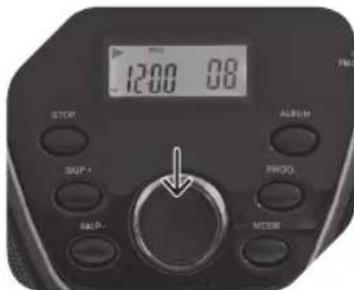
Press to start CD/MP3 disc playback.
Press again to pause CD/MP3 disc playback.
Press again to resume playback.
SKIP + / -
Press to go to next or previous track.
Press and hold during playback to fast-forward or rewind.
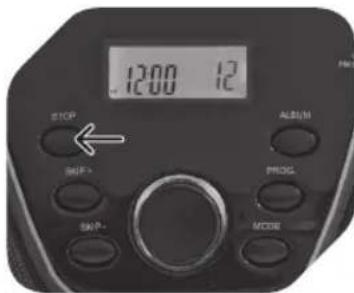
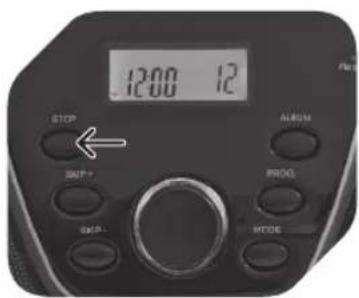
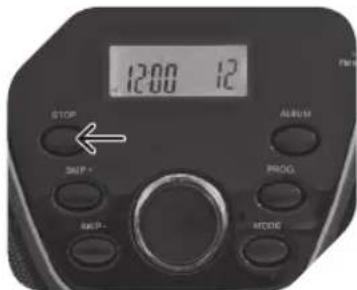
STOP
Press to stop CD/MP3 disc operation.
ALBUM (MP3 only)
Press once to show actual album.
Press twice to go to next album.
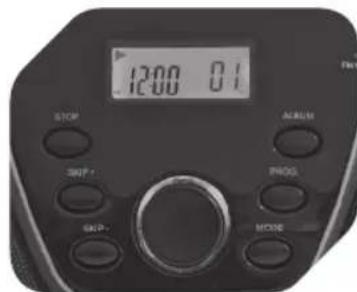
CD/MP3/USB PLAYBACK

1
2
3
CD/MP3/USB mode.
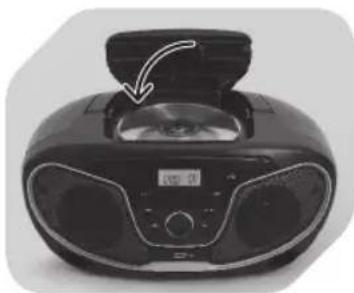
Lift CD door at OPEN/ CLOSE marking and insert a CD/MP3 disc with label facing up.
Close CD door.Set function selecto
or
2
Insert a USB storage device. Observe the correct positioning.
En
30
4
5
6
Focus search is performed, after which the total number of tracks will be shown in the display.
Playback will start automatically from the first track.
Adjust volume control to desired level.
7
8
NOTE
If no disc is inserted, the display will show NO.
Press PLAY/PAUSE to temporarily stop playback; arrow symbol will be flashing.
Press STOP when finished (display showing total number of tracks).
CD/MP3/USB PROGRAM PLAYBACK
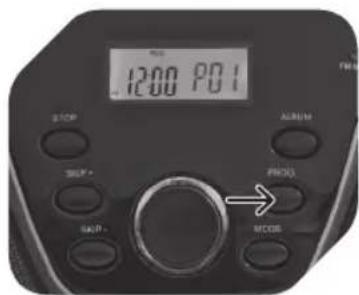
Up to 20 tracks (CD) or 99 tracks (MP3/USB) can be programmed for disc play in any desired order. Make sure to press STOP button before using program function.
1

2
3
Press PROG. button; PROG and P01 will be flashing in the display.
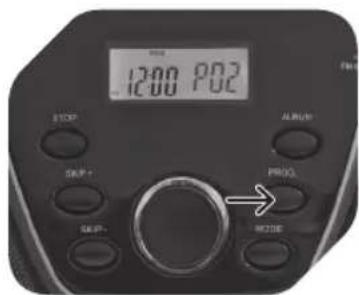
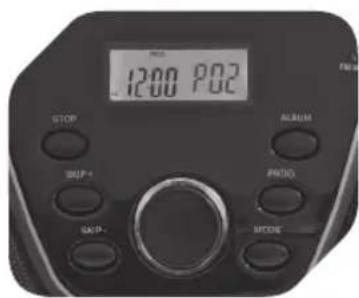
Press SKIP + / - to select desired track. For MP3/ USB, select desired album first using ALBUM button; then use SKIP + / - to select track.
Press PROG. again to store desired track into program memory. P02 will be flashing in the display.
4
5
6
Repeat step 2 and 3 to program additional tracks.
After programming all desired tracks, press PLAY/PAUSE to play selected tracks in programmed order (with program indicator on).
Press STOP once to finish playback. Press STOP second time to cancel program playback (program indicator goes off).
CD PLAYBACK MODES
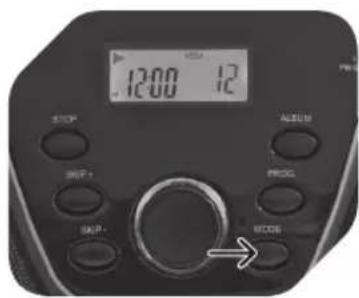
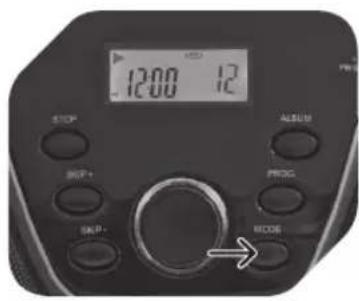
During CD playback, press MODE repeatedly to switch the playback modes as follows:
Press 1x > REP Repeat one track
Press 2x > REP ALL Repeat all tracks
Press 3x > RAND Play a track randomly
Press 4x > Normal playback
MP3/USB PLAYBACK MODES

During MP3 playback, press MODE repeatedly to switch the playback modes as follows:
Press 1x > REP Repeat one track
Press 2x > REP ALBUM Repeat album
Press 3x > REP ALL Repeat all tracks
Press 4x > RAND Play a track randomly
Press 5x > Normal playback
TURnInG APPLIAnCE OFF
After radio or CD operation, slide function selector to OFF position to turn off the appliance. The appliance remains connected to the power supply, unless appliance is unplugged or batteries are removed.
NOTE
Only use CD compact discs with digital audio signals.
The making of unauthorized copies of copyright-protected material, including computer programs, files, broadcasts and sound recordings, may be an infringement of copyrights and constitute a criminal offence under your national law. This equipment should not be used for such purposes The information on the compact disc is read by a laser through an optical lens (do not touch). If you take the appliance from a cold to a warm room, moisture may condense on the lens, and the playback may be hampered. In this case leave the appliance for one hour at room temperature before use. Take the disc out of the appliance. Should the problem persist, have the appliance checked by qualified personnel.
CD MAINTEnAnCE
A small amount of dust or scratches will usually not have an impact on the quality of a disc. The discs should, however, be treated with care.
Protect your compact discs from dust and scratches.
Store your compact discs in their covers when not in use.
To maintain the original quality of sound, you should occasionally. wipe your compact discs with a soft cloth, from the centre to the edge (not with circular movements). Never use gasoline or other solvents.
Only hold a compact disc by its edges!

DISPOSAL
The crossed-out wheeled bin logo requires the separate collection of waste electric and electronic equipment (WEEE). Electric and electronic equipment may contain dangerous and hazardous substances. Do not dispose of this appliance as unsorted municipal waste. Return it to a designated collection point for the recycling of WEEE. By doing so, you will help to conserve resources and protect the environment. Contact your local authorities for more information.

COMPONENTES
CLASS 1 LASER PRODUCT
CLASS 1 LASER PRODUCT
Appuyer 4x> Lecture normale
MODES DE LECTURE MP3/USB

CLASS 1 LASER PRODUCT
CLASS 1 LASER PRODUCT

WARNING: SHOCK HAZARD-DO NOT OPEN AVIS: RISQUE DE CHOC ELECTRIQUE-NE PAS OUVRIR
CLASS 1 LASER PRODUCT
MP3/USB-WEERGAVEMODI
CLASS 1 LASER PRODUCT
CLASS 1 LASER PRODUCT

WARNING: SHOCK HAZARD-DO NOT OPEN AVIS: RISQUE DE CHOC ELECTRIQUE-NE PAS OUVRIR
Este rótulo que acompanha o produit informa ao utiliser de que se tratate de um produit a laser da Classe 1 contentso um componente a laser.
Prima 4x> Reprodcao normal
MODOS DE REPRODUÇÃO DE MP3/USB

CLASS 1 LASER PRODUCT
3TaHaKneKaHaH3dennn HOpMpyeT NOIb3OBaTeJrO TOM, YTO 3TO TnpOdyKT ABLaTc Ja3epHbIM N3lyuataTeJe M Knacca1, CoedePkaUMM Ja3epHbIKOM- IOHeHT.
He npikacaiTecb K JInH3e B OTeKe dIy DnCKa.
PPEOCTEPEXEHNE! McnoIb3oBaHne peryInpOBOK nIIN HAcTpoEK npOeDyp, OTJNUHBIX OT yKa3aHHbIX 3deCb, MoKET CTaTB pNCHNO ONaCHO rpaNaCIOHO HO BO3dEICTBn.

ONACHOCTb! HeBnHmoe na-3epHoe n3nyeHne npn OTKpbiBAHN N BbIXOe n3 CTPOA JINCHRTN 3aunTHoN 6JOKUPOBKN.
I36eAaTe npramo 06nyeHn. He npKacaTecb K JInH3e.

CAUTION RISK OF ELECTRIC SHOCK DO NOT OPEN

WARNING: SHOCK HAZARD-DO NOT OPEN AVIS: RISQUE DE CHOC ELECTRIQUE-NE PAS OUVRIR

Bcblka moHn co cTepkon BHytpn paBHocToPOHHero TpeyrolhNk aClyxnt dna
PnBLeueHn BHMaHn NOb3OBaTeJN K HJIuHIO Heu3OJInpoBaHHoro "Onachoro HAnpXeHn" BHyTpN 3TOrO np6opA, BeJIuHa KOTOpO MoKET 6bITb DOCTaTOH OIJa NopaxeHn IIODeN JxNBOTbIX TOKOM.

3HaK BocknuaHbHyTpna paBHocTopoHrTopeyrolbHNKa CnykNT Dn npBneHn
BHMaHnI NOb3ObaTeJN K HAnuHIO BaKHOI OepaunN Uka3aHm N O6cLyKINBaHIO BInTePaType, COpOBoXKaHaOuSeN 3TOT npi6Op.
YHCTKA N YXOD
Ipeed nCTkO OTCoeHNHTe 5Hyp NITAHnO T cETn. DaIte np60py noJIHOCTbIO OCTbITb.
NCTNTb pnp6op cyxO IN MRAKO TKaHbIO.
3JIEKTPONITAHNE

1
2nn
BOTKHTe cTeBOU shyp nHTaHnB rHe3do AC Ha 3aHNe CTeHKe np6opa.
IopKJIouHTe npu6Op K cETn.
1

2
CHIMTe KpbIuKy OTCeKa ⅡЯбатapesteК.
YcTaHOBnTe 86aTapeeK C (He BXoJrT B KOMnJIeKT) B OTeCk Ira 6aTapeeK. O6paTne BHNMaHne Ha OTMeTKu + H-.
3
3akpoTe OTeKa dJa 6aTaapeek.
ПОНМЕЧАНЕ
БатAPEйкн He BXOДТВ KOMПЛЕKT; CM. yka3aHЯ NO TEXHnke 6e3oNaCHOCTN, npn- BedeHHbI e N3ROTOBnTeJIem 6aTapeek.
Bcerda nepeboDnte nepeKIOuOaTeIb peKIMa B noJIOXKeHne OFF (BbIK.) npei nOJ- coeINHeHnEM/OTcoEINHeHnEM np6opa i yCTaHOBKO/N3BNeueHnEM 6aTaapeek.
Pp npa6oTe Ha 6aTaapeKkax OTcoeHnHTe Pnp6Op OT 3JKeTPOocETn.
Ecn npnbop dnnTeNbHoe BpeM He nCnOJb3yeTcB, BblbTe 6aTaPeuKu BO n36eKa- Hne INX BblTeKaHn.
HactPoIka Yacob
HaKMTe, Yo6bIOCTaHOBNTb peKMM KOMNaKT-DUCKOB/DUNCKOB c MP3-ФaIamn.
ANbOOM (TOJbKO MP3)
HaxmTe oIN pa3, yTo6bI noka3aTb Tekyu annb6om.
HaxmTe DbaXdbI, YTO6bI IpeeHTN K CNeDyUOcEmy aIb6omY.
BOCINPOU3BEDEHNE CD/MP3/USB
1
2
3
YCTaHOBtTe npeKlHouaTeJIb yHKuB peXIM KOMnKaT-DnCKOBMP3/USB.
IOpHIMnTe DBepu OTceKa KOMNaKT-DnCKOB,HaXaB MeTKy OTKpbTnA OTcKa KOMNaKT- dmCKOB (OPEN), n BCTaBbTe KOMNaKT-DnCK/DnCK c MP3- faJnAmn HaDnncbIO BBepx.
3akpoTe DBepu OTCeKa KOMNaKT-ДИСКOB
NIN
2
HaKMTe Ha KhoNky PROG;HaPiNcB PROG n 01 NaHET MIRaTb Ha DnCnnlee.
HaKmTe KHONky npOnycka (SKIP + / - )ДЯ BbI6opa HyXHOJdoPOxKN.ДЯ MP3/USB nepeiHaXkaTneM KHONKa anb6oMa (ALBUM) npedBapntelbHo BbI6epTe Tpe6yeMbI aNb6OM; 3aTeM, INcNoJIb3yR KHONKy npOnycka, Bbl6ePnTe DoPOxKy.
HaKMTe Ha KhoNky PROG.eue pa3,yTo6bI coXpaHnTb HyxHyIO dopoxKy B nAmrTu. Ha dncnlee HaHeT MraTb Hndncb P02.
4
5
6
IobtopnTe 7arn2n3, TTO6bl 3aIpoIpaMMNPOBaTb DOnOJIHNTeJIbHbIE DOPOXKN.
IocJI npOrpAMMnPoBAHnBCEXdoPoxKeHaXMnTe PLAY/PAUSE,HTo6bI HauTb BocnpOn3BeDeHne Bbl6paHHbIXdoPoxKe B 3aIporpAMMnPOBaHHOM NopJKe (INHnKaTOp npOrpAMMbICBeTITcR).
HaKMITE Ha KhoNky STOP OINH pa3, TTo6bI 3aKOHHTb BOCnpon3BeDeHne. HaxMITE STOP eue pa3, TTo6bl OTMeHNtB 3anpo- rpaMMnpOBaHHoe BOCnpon3BeDeHne (HnDKaTOP npOrpAMMbI noracHeT).
PeXIMbl BocnPoI3BeHeHЯ KoMnaKT-ДИckOB
Bo BpemBaOcnpOn3BeDeHnKOMNaKT-DnCKa,HaXMMTe HeckoJIbKO pa3 KhoNkY MODE (PEXIM),IypeKNoUeHnpeXIMOB BocnpOn3BeDeHnCJeDyUOuM 6pa30m:
Haxatne 1 pa3 > REP (IOBT.)
IobTopntb Ondy Dopoxk Ky
Haxatne 2 pa3a > REP ALL (IOBT. BCE)
NoBToB Bce DOpoxKn
Haxatne 3 pa3a > RAND (CJI. IOP.)
CnyaHbI Bb6Op n BocpnOn3BeDeHne DopoxKn
Haxkatae 4 pa3a >
HopmaJIbHoe BocnpOn3BeJeHne
PeXHMbl BocnPoN3BeHeMP3/USB

Bo BpemBocnpo3BeDeHnA DnCKa C MP3-paIamn, HaxmTe HeckoJbKO pa3 KhoNkY MODE (PEKIM), nIpeKJIoueHnpeXnMOB BOCpOu3BeDeHnCneDyUOUM 6pa3OM:
Haxatne 1 pa3 > REP (IOBT.)
IobTopntb Ondy dopoKky
Hakatne 2 pa3a > REP ALBUM (IOBT. AJb6OM)
IobTopuTb aJb6om
Haxatne 3 pa3a > REP ALL (IOBT. BCE)
NoBToB Bce DOpokKn
Haxatue 4 pa3a > RAND (CJI. IOP.)
CnyaHbI Bb6Op n Bocpon3BeDeHne DopoxKn
Hakatne 5 pa3 >
HopmaIbHoe BocIpOu3BeJeHne
BbIKJIOU4eHHe nPNUBoPa
Iocne npocnyuBHaHnpaIIO nIIN BOCnpOn3BeDeHne DnCKOB nepeBnHbTe nepeKlOHTeJIb FyHKnB NOLOXHeNE OFF,TO6bl BBkIOUHTb np6Op.
Pnp6op octaTcnoKIOUeHHbIM K NCTOuHky nTuHn, noka OH He 6ydt OTcoEINHe Hnn noka He 6ydyt n3- BLeuehbl 6aTapeiKn.
nPIMeHaHHe
IcnoJb3yIe ToJIbKO KOMNaKT-DnCKn φOpMaTa CD cIuΦpoBbIMn ayDnOncrHaJaAMn.
HecanKUHOHPOBaHHoe KOHPOBaHne 3aUuUeHHbIX MaTePnaJIOB, B TOM YNCJIe
KOMNbIOTePbIX NpOgpaMM, faiNIOB, TpaHcIaIuN 3ByKO3aIINCeI, MOKeT ABLTbCn HApUWeHHeM aBTOPCKNX npAB u COCTaBOM yrONOBHO ppeTyIeHnC oRJaCHO BaWemy HaUNoHaJIbHOMy 3aKoHOdaTeJIbCTBy. HeJIb3ra IcNoJIb3OBAt b DaHHbI np6Op DnTaknx ceJe
Инфорmaцяс кOMпакт-ДИССКСЧИТБIВАЕТСЯЗЕРОМУЕРESОТПУЕСКУЮЛИЗУ (He - npikacatbca!).Еси Вbl nepeHecnnp6OBpИЗ XOJOHDORO NOMESEHNA BTeNIOE, BlaRa MoKET KOHNDEHCINPOBAtBcRHa JINH3e,B pe3yJIbTaTe YERO BOCPON3BeDEHne MOKET 6bITb 3aTpudHeNo.B ATOM cIyuae OCTaBbTe np6OBp NepeD IcNOLb3OBaHnEM Ha ODNH qac npi KOMHaTHOH TemNepaType.N3BJIeKNTe DnCK n3 np6Opa.EcNi npo6Iema He IcUe3aET,OTdAHTe p6OBp B cepBnCHbI ΒeHTP.
yXoJ 3a KoMnaKT-ДИСkaM
He6oJIbIooe KOJIInueCTBO nbIIN nII IuaPAnH oBlyHO He BnIaTe H KaYe-CTBO BOCpOu3BeDeHne DnCKa. Tem He MeHee, c NcKamN CJeDyET ObaaTaTbCra aKKypaTHO.
ObeperaTe KOMnAKT-DnCKN OT nbINu npapanH.
HencnoJIb3yeMbIe nDCKn xpaHnTe B cyTJraPax.
Дя coхраеня повонального каесва 3Byka седуET nepno丹ue-CKI npOTnpaTb MANKMЯrkOТKaHbIO,OT ueHTpa K kpaIO (He KpyroBbIMN DBNXeHNMA).HkoRa He nCNoJb3yIte 6eH3nH n Dpyrne paCTBOpNTeIN.
CLASS 1 LASER PRODUCT
Välj FM for MONOMottagning. Välj FM ST. for FM STEREO-mottagning. Stereoindikatorn tänds.
Justera volymkontrollent till onskad niva.
nNORMAL AnvAnDnInG Av CD/MP3
PLAY/PAUSE
CLASS 1 LASER PRODUCT

WARNING: SHOCK HAZARD-DO NOT OPEN AVIS: RISQUE DE CHOC ELECTRIQUE-NE PAS OUVRIR
MP3/USBçALMA MODLARI

Calma modunu asagida gosterilen konumlaraGPCir mek icn MP3 calma esnasinda tekrar tekrar MODE tusuna basin:
CLASS 1 LASER PRODUCT