
DAB+ Radio PDR300 - Radio PEAQ - Free user manual and instructions
Find the device manual for free DAB+ Radio PDR300 PEAQ in PDF.

| Product Type | DAB+/FM/Internet radio with iPod/iPhone docking station |
| Brand | PEAQ |
| Model | PDR300 |
| Category | Radio |
| Dimensions (W × H × D) | 360 × 130 × 180 mm |
| Weight | 3 kg |
| Power supply | AC/DC adapter 100-240V~50/60Hz, output 12V 3000 mA |
| Power consumption | 36 W (standby 0.7 W) |
| Reception types | DAB+ (174-240 MHz), FM (87.5-108 MHz), Internet Radio (Wi-Fi), Bluetooth |
| Audio sources | DAB+/FM, Internet, iPod/iPhone, Bluetooth, AUX (3.5 mm), UPnP/DLNA |
| Main functions | Automatic station search, storage of 10 presets, dual alarms, sleep timer, equalizer, remote control |
| Connectivity | Wi-Fi (WLAN), Ethernet (LAN), Bluetooth (A2DP/AVRCP), AUX, iPod/iPhone docking station, UPnP/DLNA |
| Display | Backlit display with station information |
| Output power | 2 × 10 W RMS |
| iPod/iPhone compatibility | iPod touch (1st-4th gen), iPod nano (1st-6th gen), iPhone 4/4S, 3GS, 3G |
| Bluetooth | Version V2.1+ EDR, range 2402-2480 MHz, profiles A2DP 1.2 and AVRCP 1.0 |
| Remote control power supply | 2 AAA batteries (included) |
| Safety | Class II device, double insulation, do not expose to moisture |
| Maintenance | Unplug before cleaning, use a damp cloth, avoid harsh products |
| Spare parts and repairability | Contact authorized after-sales service for any repairs |
Frequently Asked Questions - DAB+ Radio PDR300 PEAQ
User questions about DAB+ Radio PDR300 PEAQ
0 question about this device. Answer the ones you know or ask your own.
Ask a new question about this device
Download the instructions for your Radio in PDF format for free! Find your manual DAB+ Radio PDR300 - PEAQ and take your electronic device back in hand. On this page are published all the documents necessary for the use of your device. DAB+ Radio PDR300 by PEAQ.
USER MANUAL DAB+ Radio PDR300 PEAQ
1st generation 18GB 16GB 32GB

iPod touch 2nd generation 8GB 16GB 32GB

iPod touch 3rd generation 32GB 64GB

iPod touch 4th generation 8GB 32GB 64GB

iPod nano 1st generation 1GB 2GB 4GB

iPod nano 2nd generation (aluminum) 2GB 4GB 8GB

iPod nano 3rd generation (video) 4GB 8GB

iPod nano 4th generation (video) 8GB 16GB

iPod nano 5th generation (video camera) 8GB 16GB

iPod nano 6th generation 8GB 16GB

iPhone 4GB 8GB 16GB

iPhone 3G
8GB 16GB

iPhone 3GS 8GB 16GB 32GB

iPhone4 8GB16GB32GB

iPhone 4S
16GB 32GB 4GB
16.Scroll/Select Regler
DER SETUP-ASSISTENT (WIZARD)
Dynamic Label Segment (DLS)
Signalärke
Programmtyp (PTV)
Ensemblname
Kanal und Frenz
Signalfehlerrate
[Scan setting] (Scan-Funktion)
[Audio setting] (Stereo)
ALARMTON AUSSCHALTEN
[High]
[Medium]
[Low]
Tuning Grid: 0.05 MHz
STROMVERSORGUNG
AC/DC Adapter
Bluetooth Version: V2.1+ EDR
AUX-IN: 3.5 mm
TON
Sound Enhancement: Equaliser
Sound System: Stereo
ABMESSAGE
Produkt (W x H x D): 360 x 130 x 180 mm
Gewicht: 3 kg
Oδnyíες Ασφαλείας
Important Safety Instructions. Please read the instructions carefully and keep them for later use.


The lightning flash with arrow head within an equilateral triangle is intended to alert the user to the
presence of uninsulated "dangerousvoltage" within the product's enclosure that may be of sufficient magnitude to constitute a risk of electric shock to persons and animals.

The exclamation point within an equilateral triangle is intended to alert the user to the presence of
important operating and maintenance instructions in the literature accompanying the device.
To reduce the risk of fire or electric shock, do not expose the device to rain or moisture. Do not expose the device to splashes or moisture. Do not place liquid filled objects, e.g. vases, on top of the device.

For safety reasons, this class II appliance is provided with double or reinforced insulation as indicated
by this symbol.
- This product is only intended for audio entertainment. Do not use the product for any other purpose than described in this manual in order to avoid any hazardous situation. Improper use is dangerous and will void any warranty claim.
- For household use only. Do not use outdoors.
- Danger! Excessive sound pressure from earphones and headphones can cause hearing loss. If you listen to loud music
for a long time, your hearing may be impaired. Set to a moderate volume.
- Danger of suffocation! Keep all packaging material away from children.
Only use under normal room temperature and humidity conditions. - The product is only suitable for use at moderate degrees of latitude. Do not use in the tropics or in particularly humid climates.
- Outdoor antennas should be located away from power lines.
- Do not move the product from cold into warm places and vice versa. Condensation can cause damage to the product and electrical parts.
- Do not use attachments or accessories other than recommended by the manufacturer or sold with this appliance. Install in accordance with this user manual.
- When installing the product, leave sufficient space for ventilation. Do not install in bookcases, built-in cabinets or the like.
- The ventilation should not be impeded by covering the ventilation openings with items, such as newspapers, table-cloths, curtains, etc. Do not insert any objects into the product. Do not place any electronic equipment or toys on the product. Such items could fall from the top and cause product damage and/or personal injury.
- Do not install near any heat sources such as radiators, heat registers, stoves or other appliances (including amplifiers) that produce heat.
- Do not apply excessive force to the front or top, as this could ultimately overturn the product.
- Do not shift or move the product when powered on.
- Do not touch, push or rub the surface of the product with any sharp or hard objects.
- Danger! To reduce the risk of fire or electric shock, do not expose this product to rain or moisture.
The product shall not be exposed to
dripping or splashing and no objects filled with liquids, such as vases, shall be placed on the product.
- Care should be taken so that no objects or liquids enter the enclosure through openings.
- No naked flame sources, such as lighted candles, should be placed on the product.
Refer all servicing to authorised service agent. Do not attempt to repair the product yourself. Servicing is required when the product has been damaged in any way, such as the supply cord or plug are damaged, liquid has been spilled, objects have fallen into the product, the enclosure is damaged, the product has been exposed to rain or moisture, does not operate normally, or has been dropped. - Before connecting the product to a socket outlet, make sure the voltage indicated on the product corresponds to your local mains.
- If the supply cord is damaged, it must be replaced by the manufacturer or its service agent or similarly qualified person in order to avoid hazard.
- Regularly check if the supply cord, product or extension cable is defective. If found defective, do not put the product into operation. Immediately pull the plug.
- Place the supply cord and, if necessary, an appropriate extension cable in such away that pulling or tripping over it is impossible. Do not allow the supply cord to hang down within easy reach.
- Do not jam, bend or pull the supply cord over sharp edges.
Only use the provided adaptor. - The adaptor power plug is used as the disconnect device; the disconnect device shall remain readily operable. To completely disconnect the power input, disconnect the adaptor power plug.
- The product may not function properly or not react to the operation of any control due to electrostatic discharge. Switch off and disconnect the appliance; reconnect
after a few seconds.
- Protect the supply cord from being walked on or pinched particularly at the plug, convenience receptacles and the point where it exits from the product.
- Never pull the adaptor power plug by the supply cord or with wet hands.
- Disconnect the adaptor power plug in case of faults during use, during lightening storms, before cleaning and when not using the product for a longer period of time.
- Danger! Before cleaning, switch the product off and disconnect the adaptor power plug from the socket.
- When the product has reached the end of its service life, make it defective by disconnecting the adaptor power plug from the socket and cutting the cord in two.
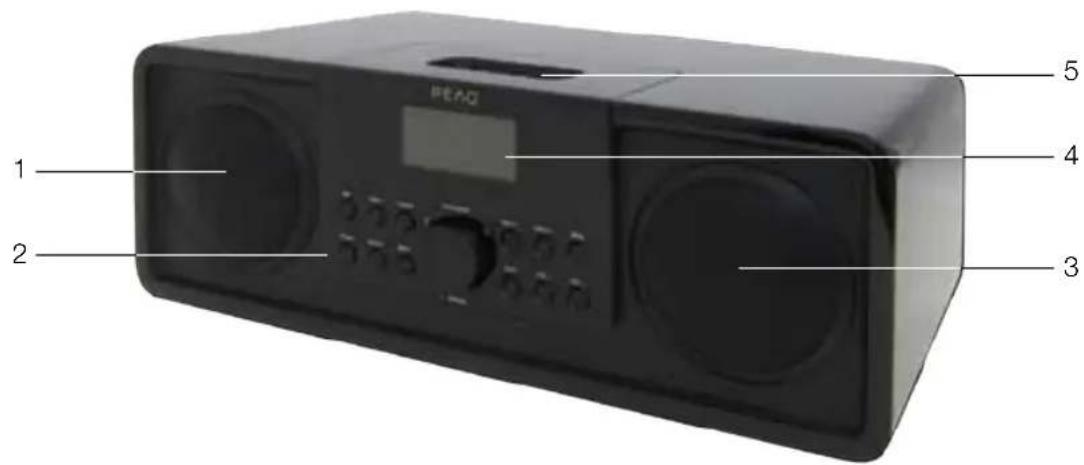
Main unit
1.Left speaker
2. Touch panel
3. Right speaker
- Display screen
- iPod/iPhone input
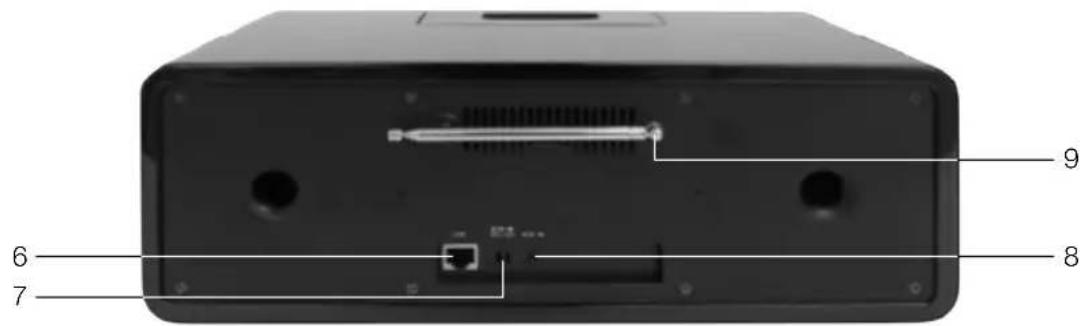
- LAN socket
-
DC-IN Jack
-
AUX-IN Jack
- Telescope antenna
Accessories
1 x AC/DC Adaptor
1 x User manual
1 x Remote control
1 x Quick Manual Guide
Touch panel
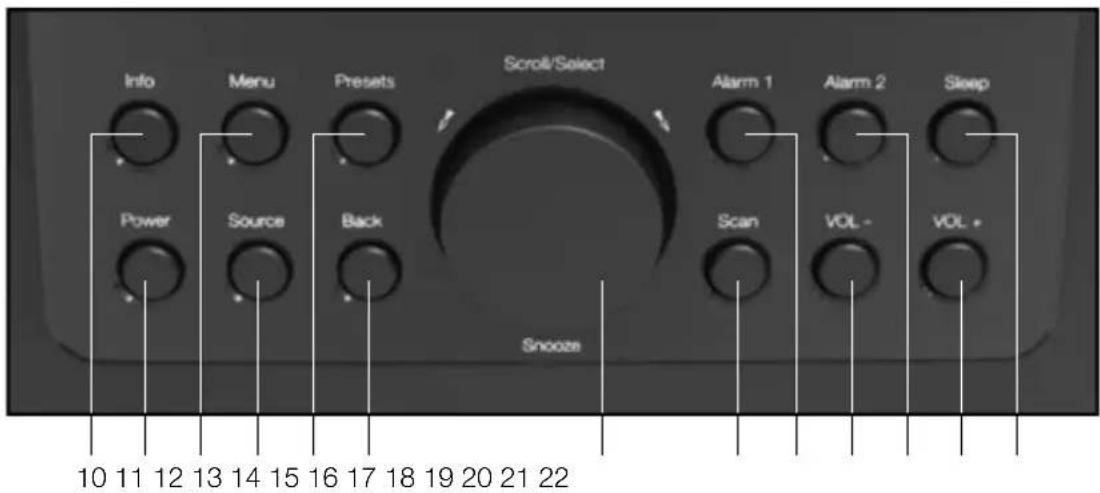
- Info button
Display Playback information.
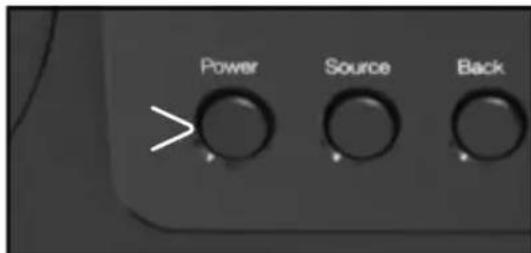
- Power button
Turns the unit on/off.
- Menu button
Accessing the menu.
- Source button
Selection of DAB/DAB+, UKW, iPod,
Bluetooth, Music Player and AUX.
- Presets button
Manual station/title storing.
- Back button
Move to previous menu.
16.Scroll/Select button
Select and confirmation.
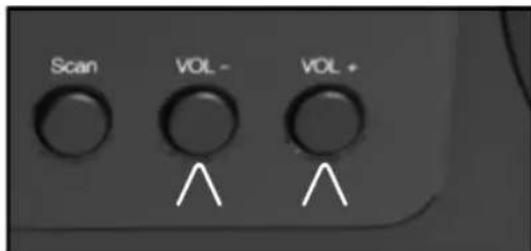
- Scan button
Automatic station search.
- Alarm 1 button
Alarm menu 1.
- VOL - button
Decrease volume.
- Alarm 2 button
Alarm menu 2.
- VOL + button
Increase volume.
- Sleep button
Setting sleep timer.
Remote control
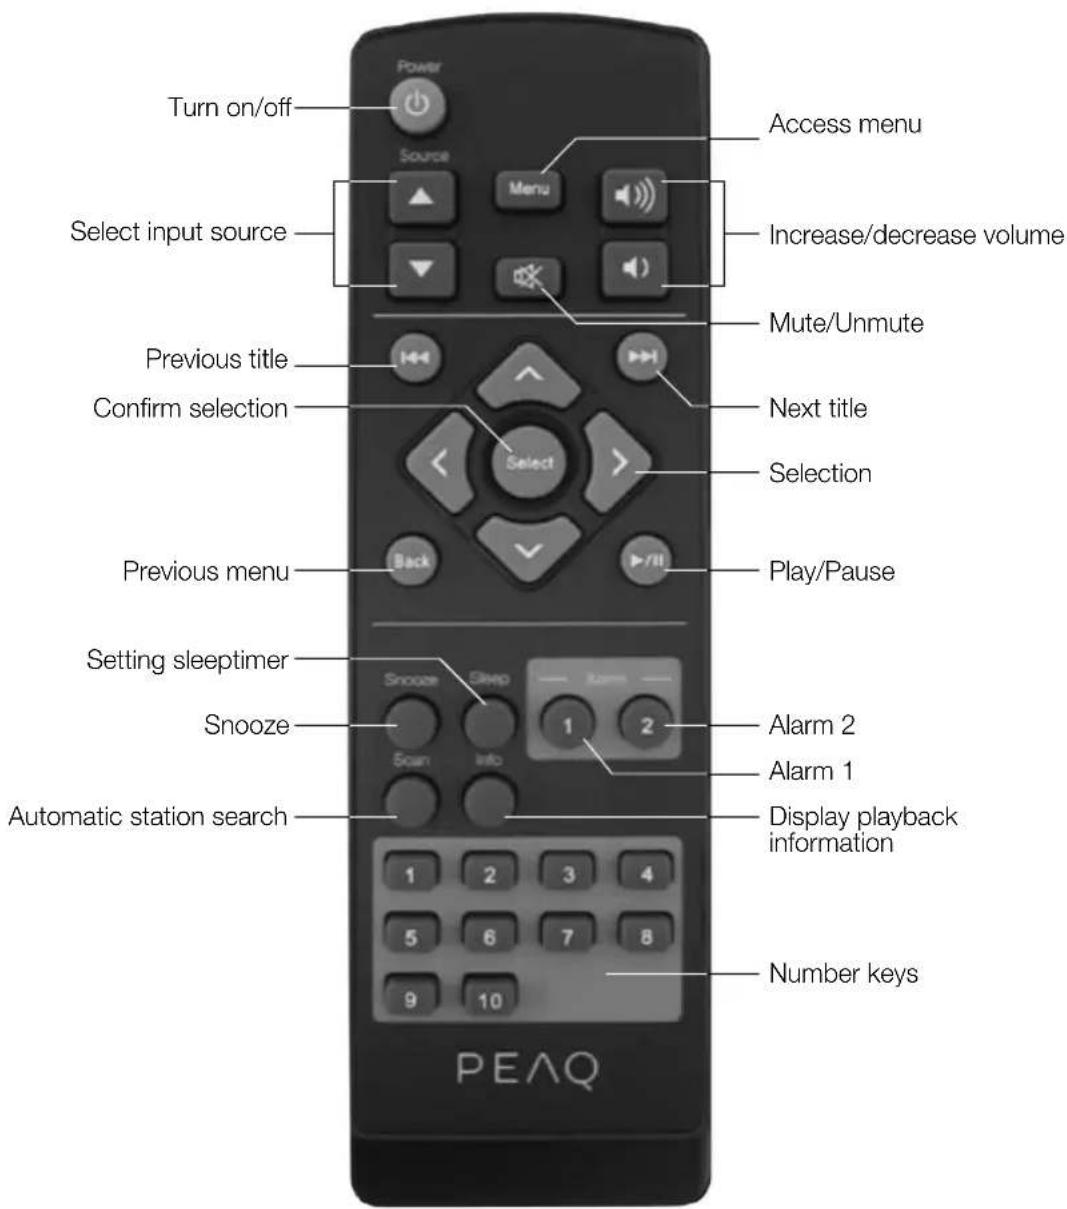
Note
If the remote control does not work, please check the followings:
If there any object between the product and remote control Causing obstruction.
- Batteries are installed with correct polarity (+ to +,- to -)?
- Correct remote operating mode is set.
Try with new batteries.
Connections
POWER SUPPLY
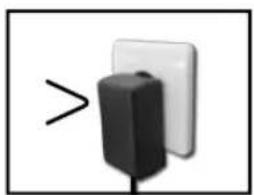
Connect the DC connector of the adaptor to the DC IN-jack. Plug the adaptor to a power socket.
AUX-IN

You can also listen to external audio devices by connecting the cable (not included) to the AUX-IN jack at the back of the product.
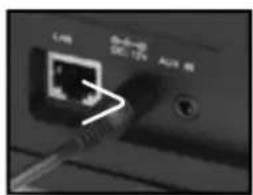
LAN CONNECTION
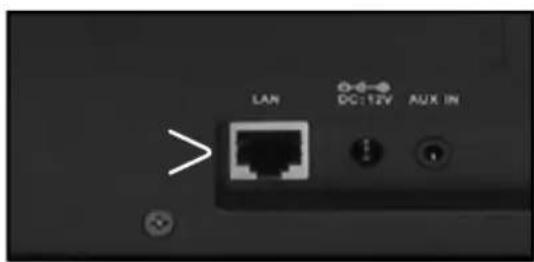
Socket of LAN / Ethernet cable connection for the cable connection of the device with the cable-connected home network.
iPod AND iPhone
Plug the iPod or iPhone into the docking station. If necessary, place the iPod or iPhone dock adapter into the docking station.
Note
If your main unit is connected to the power supply, the connected iPod/iPhone automatically charges.
Compatible iPod/iPhone-Models
This device supports the following iPod-/ iPhone-models:
- iPod touch (1st, 2nd, 3rd and 4th generation)
- iPod nano (1st, 2nd, 3rd, 4th, 5th and 6th generation)
iPhone 4/4S
iPhone 3GS
iPhone 3G
iPhone
INSERTING BATTERY
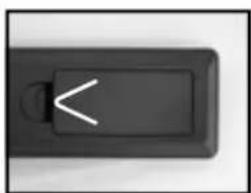
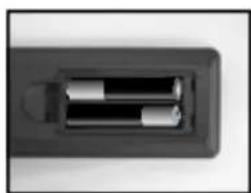
- Open the battery compartment cover.
- Insert the new batteries (included) into the battery compartment while paying attention to the correct polarity.
- Close the battery compartment cover.
For optimal reception, extend the antenna, move to fully extend and adjust it.
TURNING THE UNIT ON
Press the Power button to switch the unit on.
ADJUSTING THE VOLUME
The volume can be adjusted during playback with the volume control.
Internet-radio configurationOperation
There are two ways to connect the radio to the Internet using an Access Point:
- Wireless in WLAN-Mode
The WiFi-antennae of the radio receives your DSL router signals.
- With cable using the radio's LAN connection in LAN-Mode
provided an Ethernet network is available.
WLAN-MODE CONFIGURATION
If you have a wireless network, the WLAN mode is the direct way to connect your radio to the Internet:
- Simply switch the radio on and, as a cable-less network client, it automatically searches all available APs (Access Points).
- When switching on for the first time, you must confirm the AP and perhaps enter the key. After that, the radio will always access this AP. If the AP can no longer be found, it will be registered accordingly.
LAN CONFIGURATION
If you do not have a wireless network but do have a cabled network, you can connect the Internet radio with a network.
- Switch the radio off.
- Connect an Ethernet cable to the LAN socket. Once switched on, the radio will automatically be recognised as a cabled client.
THE SETUP-ASSISTANT (WIZARD)
After switching on for the first time, the wizard will appear. You can set up all settings important for bringing radio into operation.
- Click on the Yes field to start the Wizard.

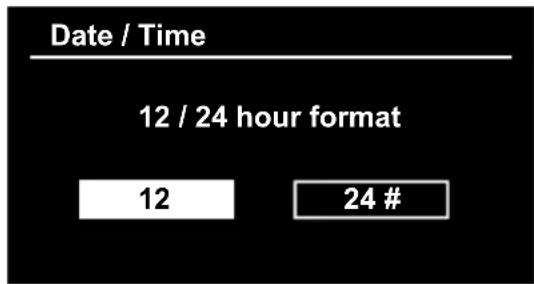
SETTING TIME FORMAT
- Set the time format for the time display to 24h or 12h.
- Select the source for the time synchronization. The time will be set automatically over DAB, FM or Internet for the time synchronisation.
- If you want to set the time manually, select the entry None.
- Then choose the time zone in which you are located.
- Set up accordingly if Daylight Savings Time is to be used.
SELECTING LANGUAGE
Select the menu language and click on the entry to select the language.
- Select the WLAN-Region in which you are located. The device then looks for available wireless networks. If a wireless network is not found, the device shows the notifications
. Please check in this case whether your router and WLAN are switched on.
Note
Make sure that the DHCP-server of your router (Access Point) is activated. Otherwise, the WLAN connection must be configured manually. The WLAN should send out the SSID. If the SSID is not sent out, you must configure the WLAN manually.
- Select the network from which you want to operate Internet radio.
PUBLIC NETWORK CONNECTION
Select the appropriate WLAN-network by clicking on the entry of the network's name. The connection procedure takes place automatically.
Note
In the settings menu > Internet settings, you can manually configure the network.
PRIVATE NETWORK CONNECTION
Select WPS connection type
If a network is protected by a WEP or WPA encryption, the query for constructing a connection over WPS (Wi-Fi Protected Setup) appears. If the router of your wireless network has a WPS function, select whether the WPS connection should be established by entering a PIN code over the WPS key on the router.
WPS connection using PIN entry
A WPS-PIN appears in the Internet radio display. Enter this PIN and confirm the Internet radio with OK. The WPS connection will then be established.
Connection using WPS key
Press the WPS key on the router and then confirm the display on Internet radio with Select. The WPS connection is then established.
CONNECTION USING THE DIRECT ENTROY OF THE NETWORK KEY
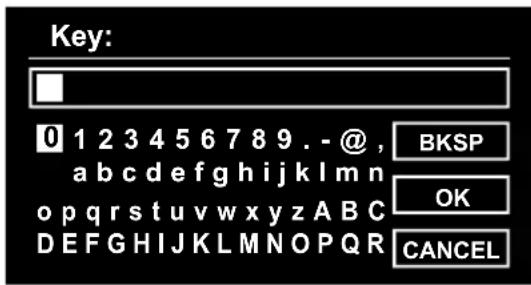
If you do not want to establish any connection using the WPS, select the entry, No WPS and then enter the network key in the following dialogue. Confirm the entry with Select.
COMPLETING THE WLAN CONNECTION
- The connection begins. The device should now establish a connection with the WLAN. Once the connection has been established, the notification
appears. Confirm the display with Select. - If the WLAN cannot be accessed (e.g. locked for new WLAN devices) the failure notification "Connection not successful" appears.
- In this case, check the setting of your WLAN-router.
Note
The entered password (WEP/WPA key) will be saved and will not need to be entered again.
After a successful set-up and connection, the following display appears:
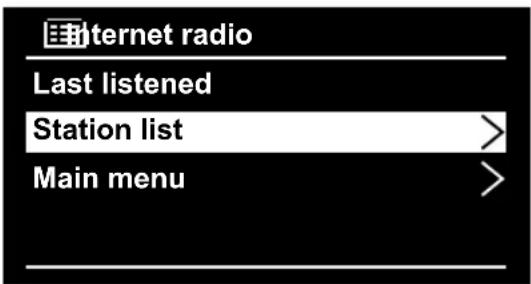
CALLING UP INTERNET RADIO
- Press Menu to call up the main menu.
- Select Internet radio with Select in order to reach the submenu.

MENU IN INTERNET RADIO MODE
MY FAVOURITES
Select stations from the favourites list.
LOCAL STATIONS (REGION)
Here all stations from the selected region are listed according to genre.
- Press Menu.
- Select Local country and press Select to enter.
- Choose from any of the stations.
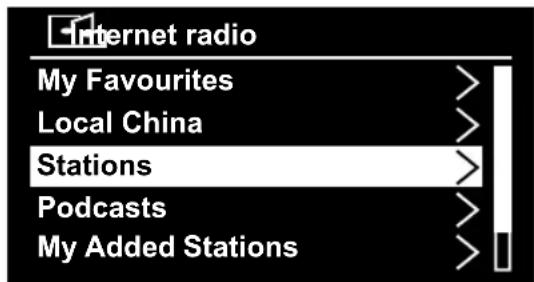
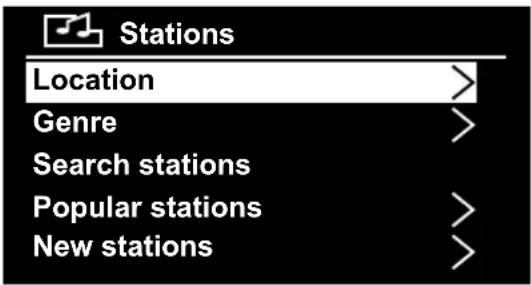
STATIONS (SELECTING STATION)
You can see all available stations by country (countries), popularity (Popular stations) or timeliness list (new stations).
- Press Menu.
- Select Station List and then Stations
- Now you can select your station under the specified options.
SENDER SELECTION VIA PODCAST
Here you can list all Podcasts according to genre and country.
- Press Menu.
- Select Podcast and press Select, in order to confirm the selection
- Select a desired station.
Note
You can register for free via the website http://www.wifiradio-frontier.com. This is where you can register your Internet radio using the access code. You receive the access code in the following menu point "Other". Via this website, you can create groupings for favourites lists, add new Internet radio stations for your Internet radio and synchronise your station lists with other internet radios.
MY ADDED STATIONS
If you have saved Podcasts via the website http://www.wifiradio-frontier.com, you can call them up here.
OTHER (HELP)
Select this entry to receive the access code for your Internet radio with which you can register yourself on the website http://www.wifiradio-frontier.com.
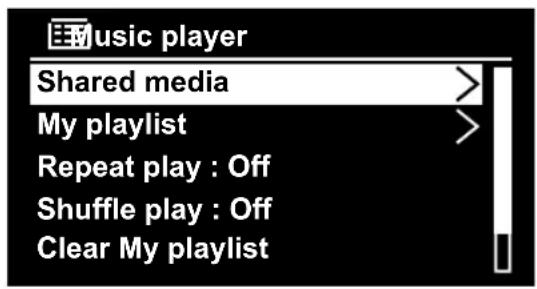
MUSIC PLAYER
Your Internet radio supports the UPnP-Protocol "Universal Plug-and-Play" and DLNA (Digital Living Network Alliance). You can transfer audio files to your PC wirelessly to your Internet radio if a UPnP software is installed. Using the UPnP / DLNA protocol, the Internet radio can be used as Digital Media Renderer (DMR). So you can play music files from UPnP / DLNA compliant devices on the Internet and radio, and, for example, adjust the volume from the computer.
CONNECTING MEDIAPLAYER
Connection Between Internet radio and a Media Server (NAS-Server, UPnP/DLNA Compatible Server)
- Open the main menu and select Media Player.
- Select from there the entry Media Library/Library, in order to find available media servers.
- The radio starts the initialisation process.
- After a few seconds, the media server name is inserted provided it has been found: "PC_Name: Media Server-Name"
- If you want to connect the media server with the radio, click on the entry of the server.
Note
You might need to confirm and allow the connection on your PC.
PLAYING AUDIO FILES
- In order to listen to audio files from the network select the function Music Player in the main menu or press the key on remote control. You can also press the key Source on the remote control and then select the mode using the arrows and confirm with Select.
- Select Shared media to start the music selection.

DAB/DAB+ Radio
- Press Source several times until DAB appears.
- Press the Select key to confirm.
If you switch the radio on for the first time, it automatically conducts a search of the DAB radio stations. The next time it is switched on, a repeated search does not need to take place.
Once the search procedure is complete, the stations are sorted into alphabetical order. The first available station is then played.
Note
If no DAB reception is possible at that time, change the position of the device or re-align the antennae. Press Scan to start a new search procedure.
CHANGING DAB/DAB+ RADIO STATIONS
- Rotate Scroll in DAB mode to navigate through the available DAB/DAB+ radio stations.
- Press the Scroll key to confirm

SAVING DAB/DAB+ RADIO STATIONS
Automatically
Press Scan in DAB mode.
The device searches through all available DAB/DAB+ radio stations and plays the first available station.
Note
New radio stations and services are added to the DAB/DAB+ radio stations. In order to make the new DAB/DAB+ radio stations and services available on your radio, conduct regular searches.
Manually
You can save a maximum of 10 pre-set DAB/ DAB+ radio stations.
- Set the desired DAB/DAB+ radio station.
- Press and hold Presets and rotate Scroll to pre-set a number 1 - 10.
- Press Scroll to confirm the entry.
- The pre-set number of the saved station will be displayed.
- Repeat steps 1 to 4 to save further DAB/ DAB+ radio stations.
DISPLAY STATION INFORMATION
- Select a DAB/DAB+ radio station.
- Press Info repeatedly to get the following information (if applicable):
Channel name
Dynamic Label Segment (DLS)
Signal strength
Program type
Ensemblename
Channel and Frequency
Signal ratio
Bitrate and Audiostatus
Date
SELECTING A DAB/DAB+ RADIO STATION
- Press Source or Menu, to select a DAB/ DAB+ radio station.
- Press Presets, to call up the pre-set menu.
- Use Scroll/Select to select a pre-set number and confirm the choice by clicking on the Scroll/Select key.
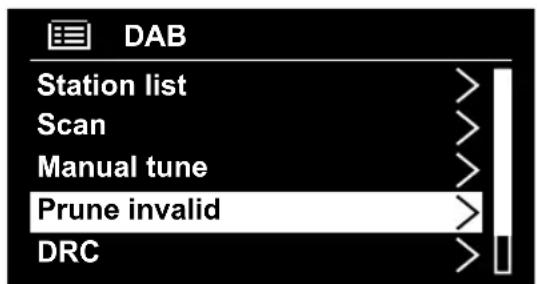
USING THE DAB/DAB+ MENU
- Press Menu in the DAB-Mode to access the DAB/DAB+ menu.
- Rotate Scroll/Select to scroll through the menu options:
[Scan]
Searches all available DAB/DAB+ radio stations.
[DRC]
(Dynamic Range Control) Removes or adds a degree of adjustment for the variations in dynamic range between the radio stations.
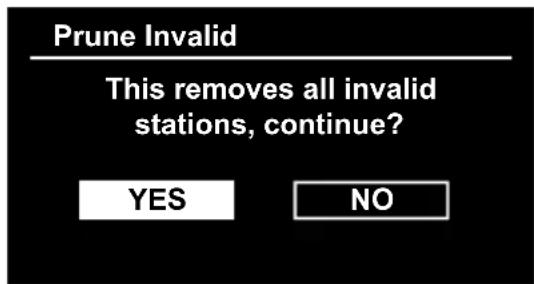
[Prune invalid]
Removes all invalid stations from the station list.
DRC (DYNAMIC RANGE CONTROL)
Removes or adds a degree of adjustment for the variations in dynamic range between the radio stations.
- Press Menu and rotate Scroll/Select until the DRC is displayed.
- Press Scroll/Select to call up the DRC menu.
- Rotate Scroll/Select to select a DRC setting.
| Display Mode | |
| DRC high DRC | RC is switched on; stand- ard setting in loud surround- ings is recommended |
| DRC low DRC | C is set at half of the nor- mal sound |
| DRC off DRC | is switched off |
DELETEING DAB/DAB+ RADIO STATIONS
- Press Menu and rotate Scroll/Select until
is displayed. Press Scroll/Select in order to call up the menu. - Then select
with Scroll/Select and confirm by pressing.
Setting FM radio stations
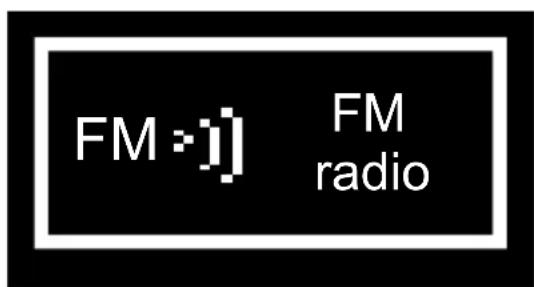
- Press Source or Menu to select FM radio stations.
- The radio changes to the last selected station.
Note
When you switch on the radio for the first time, it conducts an automatic search of FM radio stations.
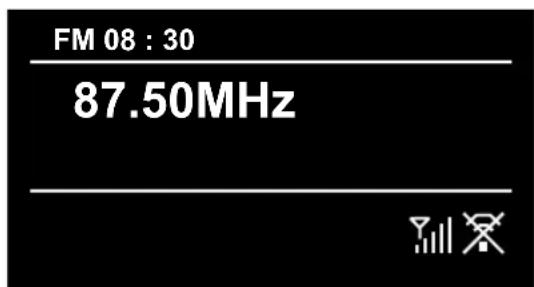
FREQUENCY SETTINGS
Set an FM radio station.
Manual frequency setting
Rotate Scroll/Select to change the frequency in 0.05 MHz steps.
Automatic frequency setting
Press Scan and the radio stops searching if an active station is found.
SAVING FM RADION STATIONS
You can save a maximum of 10 pre-set FM radio stations.
- Set the desired FM station.
- Press and hold Preset and rotate Scroll to pre-set a number 1 - 10.
- Press Scroll to confirm the entry.
- The pre-set number of the saved station is shown.
FM RADIO STATION SELECTION
- Press Source or Menu to select an FM radio station.
- Press Preset to call up the pre-set menu.
- Select a pre-set number with Scroll and confirm the selection by pressing the Scroll key.
FM MENU
- Press Menu in FM mode to access the FM menu.
- Rotate Scroll to scroll through the menu options:
[Scan setting] (Scan-function)
[Audio setting] (Stereo)
- Press Scroll to select an option.
- Repeat steps 2 to 3 to select a suboption within an option.
Playing iPod / iPhone
SCAN SETTING
- Press Menu and Scan Setting will be displayed.
- Press Scroll to confirm the selection.
[Strong stations only]
Search for signals with stong signals.
[All stations]
Search all available radio stations.
- Press Scroll to confirm the selection.
AUDIO SETTING
Selecting Mono or Stereo mode.
- Press Menu.
- Select the Audio Setting with Scroll and confirm this by pressing the Scroll regulator.
[Forced mono]
Selection of Mono transmission
[Stereo allowed]
Selection of Stereo transmission

This device can play the audio contents from an iPod or iPhone.
- Put the iPod or iPhone in the docking station.
- Press the Source key repeatedly in order to select the iPod mode.
Note
If you are switching on the device for the first time, you will be asked to install an application to your iPod/iPhone. Click on Yes to install the application.
- To pause or play, press the key
- To skip to a certain track, press the key
- To conduct a search while unit is playing, keep the key .
- To return to a previous place in the menu, press the Menu key.
- To confirm a selection, press the Select key.
AUX Mode


- Connect the audio cable (not included) into the AUX IN jack (3.5mm) at the rear side of the device.
- Press Source to select AUX as a source.
- Start playing from the device.
Attention
Before an external playing device is connected, these Instructions for Use and the Safety Notes, and, if applicable, information on use with other devices must be adhered to closely.
BLUETOOTH MODE

- Press the Source several times to select Bluetooth.
- Activate the Bluetooth function of the AV source and combine it with the Radio.
Note
Before coupling a Bluetooth-AV source, pay attention to instructions for use with respect to safety notes and use with other devices.
- The Bluetooth ID of the loudspeaker is PDR300.
- Enter the password of 0000 if required.
- Once both devices have been coupled, this lights up steadily.
COUPLING ADDITIONAL DEVICES
You can couple up to 8 devices using Bluetooth. Follow steps 1 to 5, if you would like to couple more devices.
General Settings
DELETING COUPLED DEVICES
- Hold the select key depressed about 10 seconds.
- All Bluetooth couplings will be separated.
Note
If you couple more than 8 devices, then the first coupled devices are automatically separated.
TIME SETTING
- Press Menu and select
with Scroll. - Select
- Press Scroll to confirm the selection.
-
Select the desired submenu with Scroll:
-
Set 12/24 hour:
Selection between 12/24 hour format
- Set Time/Date:
Manual time and date setting
Auto update:
Selection between update from DAB, Network and No update
- Set date format:
Select between DD-MM-YYYY and MM-DD-YYYY
SETTING ALARM
Alarm times 1 and 2 (Alarm 1 or Alarm 2)
- Press on Alarm 1 or Alarm 2 to access the alarm settings.
- Select one of the two waking times in order to save it:
Activating
Select how the alarm clock should be switched on:
- Select off to deactivate the alarm.
- Select daily, once, weekend or week days to activate the alarm.
Time
Set the time at which the alarm should be set.
Mode
Select the mode for the alarm clock here:
FM: Wake up with FM-Radio
DAB: Wake up with DAB Radio
- Internet Radio: Wake up with Internet radio
- Ipod: Wake up with Ipod Music
- Buzzer: Wake up with alarm tone
Volume
Here you can set the volume with which the alarm clock will be switched on.
Save
Save the alarm setting.
SWITCHING OFF THE ALARM TONE
Once the alarm sounds, press Power and the alarm is switched off.
SETTING THE SLEEP-TIMERS
This device can be switched over to Standby mode after a period of time.
Press Sleep and select a period of time:
[15 minutes]
[30 minutes]
[45 minutes]
[60 minutes]
[off]
If the sleep timer is not pre-selected, the default setting is 20 minutes.
SYSTEM SETTINGS
Menu > Main menu > System settings
- Press Menu and select with Scroll/Select to
. - Select System settings under main menu. The submenu will then be displayed.
EQUALISER
Here you can select pre-set sound formats or create one of your own.
Select a sound format:
Normal, Classical, Jazz, Pop, Rock, Language or User Defined
The sound setting is accepted right away. In User Defined setting, you can create your own setting for the sound.
BACKLIGHTING
- Press Menu and use Scroll to select the submenu BACKLIGHT. Press Scroll to reach the submenu.
- Select with Scroll/Select
. - Select a light setting in the submenu:
[High]
[Medium]
[Low]
- Press the Scroll/Select key to confirm selection.
Network Selection
Select this entry to display the list of networks with which the Internet radio can establish an automatic connection or select the entry network assistant to search available networks.
SETTING TIME
Follow the instructions in the section on setting time.
LANGUAGE SELECTION
-
Press Menu and use Scroll to select the submenu LANGUAGE. Press Scroll to reach the submenu.
-
Select a language with Scroll.
FACTORY SETTING
Press Menu and use Scroll to select the submenu FACTORY RESET. Press Scroll to confirm the selection.
UPDATING THE SOFTWARE
You can search software updates with the PDR300. Once you have accepted the conditions for use, the download and installation procedure for the new software updates begins automatically.
Note
Make sure that the PDR300 is connected to the Internet.
SETUP WIZARD
After switching on for the first time, the wizard will appear. You can set up all settings important for bringing radio into operation
INFO
Here you can find the version number of the currently used software.
Cleaning and care
Always pull the power plug from the power outlet before cleaning.
- Caution! Water must not enter the device.
- Clean the housing with a slightly damp cloth.
- Do not use any sharp, abrasive or aggressive cleaning agents.
- Do not use any chemicals (e.g. gas, alcohol) to clean the housing.
Disposal

Do not dispose of this appliance as unsorted municipal waste. Return it to a designated collection point for
the recycling of WEEE. By doing so, you will help to conserve resources and protect the environment. Contact your retailer or local authorities for more information.
"Made for iPod" and "Made for iPhone" mean that an electronic accessory has been designed to connect specifically to iPod or iPhone respectively, and has been certified by the developer to meet Apple performance standards. Apple is not responsible for the operation of this device or its compliance with safety and regulatory standards. Please note that the use of this accessory with iPod or iPhone may affect wireless performance. iPod and iPhone are trademarks of Apple Inc., registered in the U.S. and other countries.
The unit supports the listed iPod / iPhone devices
(iPod / iPhone devices shown are not included)
Technical Data
MAIN UNIT
Tuner DAB
Tunning Range: 174-240 MHz
Tuner FM
Tuning Range: 87.5-108 MHz
Tuning Grid: 0.05 MHz
POWER SUPPLY
AC/DC Adaptor
Input: 100-240 V~50/60 Hz
Output: 12 V 3000 mA
Operation Power Consumption: 36 W
Standby power Consumption: 0.7 W
Batteries (Remote Control): AAA x 2
COMPATIBILTY
iPod touch (1st, 2nd, 3rd and 4th generation)
iPod nano (1st, 2nd, 3rd, 4th, 5th and 6th generation)
iPhone 4/4S
iPhone 3GS
iPhone 3G
iPhone
Bluetooth
Bluetooth Profiles: A2DP1.2 and AVRCP1.0
Bluetooth range: 2402-2480 MHz
Bluetooth version: V2.1+ EDR
AUX-IN: 3.5 mm
SOUND
Output power (RMS): 10 Wrms x 2
Sound Enhancement: Equaliser
Sound System: Stereo
DIMENSION
Unit (W x H x D): 360 x 130 x 180 mm
Weight: 3 kg
MIS EMISORAS ANADIDAS
[Éve]
Moyen]
[Faible]
- Nyomja meg a Scroll/Select (Gorgetes/
SETUP WIZARD (INSTALLAZIONE GUIDATA)


- DER SETUP-ASSISTENT (WIZARD)
- ALARMTON AUSSCHALTEN
- STROMVERSORGUNG
- AC/DC Adapter
- TON
- ABMESSAGE
- Oδnyíες Ασφαλείας
- Accessories
- Touch panel
- Remote control
- Note
- Connections
- POWER SUPPLY
- AUX-IN
- LAN CONNECTION
- iPod AND iPhone
- Compatible iPod/iPhone-Models
- INSERTING BATTERY
- TURNING THE UNIT ON
- ADJUSTING THE VOLUME
- Internet-radio configurationOperation
- - Wireless in WLAN-Mode
- - With cable using the radio's LAN connection in LAN-Mode
- WLAN-MODE CONFIGURATION
- LAN CONFIGURATION
- THE SETUP-ASSISTANT (WIZARD)
- SETTING TIME FORMAT
- SELECTING LANGUAGE
- PUBLIC NETWORK CONNECTION
- PRIVATE NETWORK CONNECTION
- Select WPS connection type
- WPS connection using PIN entry
- Connection using WPS key
- CONNECTION USING THE DIRECT ENTROY OF THE NETWORK KEY
- COMPLETING THE WLAN CONNECTION
- CALLING UP INTERNET RADIO
- MENU IN INTERNET RADIO MODE
- MY FAVOURITES
- LOCAL STATIONS (REGION)
- STATIONS (SELECTING STATION)
- SENDER SELECTION VIA PODCAST
- MY ADDED STATIONS
- OTHER (HELP)
- MUSIC PLAYER
- CONNECTING MEDIAPLAYER
- PLAYING AUDIO FILES
- DAB/DAB+ Radio
- CHANGING DAB/DAB+ RADIO STATIONS
- SAVING DAB/DAB+ RADIO STATIONS
- Automatically
- Manually
- DISPLAY STATION INFORMATION
- SELECTING A DAB/DAB+ RADIO STATION
- USING THE DAB/DAB+ MENU
- DRC (DYNAMIC RANGE CONTROL)
- DELETEING DAB/DAB+ RADIO STATIONS
- Setting FM radio stations
- FREQUENCY SETTINGS
- Manual frequency setting
- Automatic frequency setting
- SAVING FM RADION STATIONS
- FM RADIO STATION SELECTION
- FM MENU
- Playing iPod / iPhone
- SCAN SETTING
- AUDIO SETTING
- AUX Mode
- Attention
- BLUETOOTH MODE
- COUPLING ADDITIONAL DEVICES
- General Settings
- DELETING COUPLED DEVICES
- TIME SETTING
- SETTING ALARM
- Alarm times 1 and 2 (Alarm 1 or Alarm 2)
- Activating
- Time
- Mode
- Volume
- Save
- SWITCHING OFF THE ALARM TONE
- SETTING THE SLEEP-TIMERS
- SYSTEM SETTINGS
- EQUALISER
- BACKLIGHTING
- Network Selection
- SETTING TIME
- LANGUAGE SELECTION
- FACTORY SETTING
- UPDATING THE SOFTWARE
- SETUP WIZARD
- INFO
- Cleaning and care
- Disposal
- Technical Data
- MAIN UNIT
- Tuner DAB
- Tuner FM
- AC/DC Adaptor
- COMPATIBILTY
- Bluetooth
- SOUND
- DIMENSION
- MIS EMISORAS ANADIDAS
- SETUP WIZARD (INSTALLAZIONE GUIDATA)
Brand : PEAQ
Model : DAB+ Radio PDR300
Category : Radio