PDR150BT - Radio PEAQ - Free user manual and instructions
Find the device manual for free PDR150BT PEAQ in PDF.

| Product type | DAB/FM Radio and Bluetooth speaker |
| Brand | PEAQ |
| Model | PDR150BT |
| Weight | 773 g (unit only) |
| Battery | Lithium 3.7 V, 2100 mAh (non-replaceable) |
| Power supply | AC/DC adapter: input 100-240 V~, 50/60 Hz, 0.3 A; output 5 V = 1.5 A |
| Power consumption | 7.5 W |
| Radio reception | DAB (174-240 MHz) and FM (87.5-108 MHz) |
| Speaker | Output power: 2 x 3 W, Mono/Stereo system |
| Bluetooth | Version 2.1+EDR, Class 2, range min. 8 m, A2DP and AVRCP profiles |
| NFC | NFC chip for quick pairing |
| Audio inputs | AUX IN (3.5 mm jack), Micro-USB (charging) |
| Audio output | 3.5 mm headphone jack |
| Antenna | Telescopic deployable antenna |
| Functions | DAB/FM auto search, presets (10), equalizer (Normal, Classic, Jazz, Pop, Rock, Speech, My EQ), time setting, language, auto update |
| Cleaning and maintenance | Unplug before cleaning; use a slightly damp cloth; do not use chemical or abrasive products |
| Safety | Do not expose to rain or moisture; do not open; do not use with non-recommended accessories; suffocation risk (packaging); do not listen at high volume for long periods |
| Spare parts and repairability | Battery not user-replaceable; any intervention must be entrusted to an authorized service center |
| General information | Household use only; normal ambient temperature and humidity; do not install near a heat source |
Frequently Asked Questions - PDR150BT PEAQ
User questions about PDR150BT PEAQ
0 question about this device. Answer the ones you know or ask your own.
Ask a new question about this device
Download the instructions for your Radio in PDF format for free! Find your manual PDR150BT - PEAQ and take your electronic device back in hand. On this page are published all the documents necessary for the use of your device. PDR150BT by PEAQ.
USER MANUAL PDR150BT PEAQ
natural_image
Two PEAQ-branded audio speakers with orange and black buttons, displayed against a neutral background (no visible text or symbols on devices)Portable DAB+ Radio PDR150BT-B/W
DE Bedienungsanleitung Manuale dell'utenteT
EL Oδηγίες χρήσης Gebruiksaanwijzing NL
A. Trageschlaufe
B. Taste VOLUME -
C. Taste MODE
D. Taste INFO/MENU
E. Taste VOLUME +
F. Display
G. Taste TUNE -
H. Taste PRESET
I. Taste SELECT
natural_image
Close-up of a network device connected to a laptop via USB cable, with an inset showing a plug inserted into a socket (no visible text or symbols)natural_image
Close-up of a computer tower panel with indicator lights and a white arrow pointing to a button (no readable text or symbols)natural_image
Close-up of a computer tower panel with indicator lights and ports (no readable text or symbols)natural_image
Close-up of a metallic tool and a grid-patterned object on a plain surface (no text or symbols visible)natural_image
Close-up of a network device connected to a plug and USB cable, with a laptop visible outside (no text or symbols)natural_image
Close-up of a computer tower panel with ventilation slots and a highlighted button (no readable text or symbols)natural_image
Close-up of a computer keyboard interface with buttons and ventilation slots (no readable text or symbols)natural_image
Close-up of a metallic tool and a grid-patterned object (no visible text or symbols)Important Safety Instructions. Please read the instructions carefully and keep them for later use.
To reduce the risk of fire or electric shock, do not expose the device to rain or moisture. Do not expose the device to splashes or moisture. Do not place liquid filled objects, e.g. vases, on top of the device.
- This product is only intended for audio entertainment. Do not use the product for any other purpose than described in this manual in order to avoid any hazardous situation. Improper use is dangerous and will void any warranty claim.
- For household use only. Do not use outdoors.
- Danger! Excessive sound pressure from earphones and headphones can cause hearing loss. If you listen to loud music for a long time, your hearing may be impaired. Set to a moderate volume.
- Danger of suffocation! Keep all packaging material away from children.
- Only use under normal room temperature and humidity conditions.
- The product is only suitable for use at moderate degrees of latitude. Do not use in the tropics or in particularly humid climates.
- Outdoor antennas should be located away from power lines.
- Do not move the product from cold into warm places and vice versa. Condensation can cause damage to the product and electrical parts.
- Do not use attachments or accessories other than recommended by the manufacturer or sold with this appliance. Install in accordance with this user manual.
- When installing the product, leave sufficient space for ventilation. Do not install in bookcases, built-in cabinets or the like.
- The ventilation should not be impeded by covering the ventilation openings with items, such as newspapers, table-cloths, curtains, etc. Do not insert any objects
into the product. Do not place any electronic equipment or toys on the product. Such items could fall from the top and cause product damage and/or personal injury.
- Do not install near any heat sources such as radiators, heat registers, stoves or other appliances (including amplifiers) that produce heat.
- Do not apply excessive force to the front or top, as this could ultimately overturn the product.
- Do not shift or move the product when powered on.
- Do not touch, push or rub the surface of the product with any sharp or hard objects.
- Danger! To reduce the risk of fire or electric shock, do not expose this product to rain or moisture.
- The product shall not be exposed to dripping or splashing and no objects filled with liquids, such as vases, shall be placed on the product.
- Care should be taken so that no objects or liquids enter the enclosure through openings.
- No naked flame sources, such as lighted candles, should be placed on the product.
- Refer all servicing to authorised service agent. Do not attempt to repair the product yourself. Servicing is required when the product has been damaged in any way, such as the supply cord or plug are damaged, liquid has been spilled, objects have fallen into the product, the enclosure is damaged, the product has been exposed to rain or moisture, does not operate normally, or has been dropped.
- Before connecting the product to a socket outlet, make sure the voltage indicated on the product corresponds to your local mains.
- If the supply cord is damaged, it must be replaced by the manufacturer or its service agent or similarly qualified person in order to avoid hazard.
- Regularly check if the supply cord, product or extension cable is defective. If found defective, do not put the product into operation. Immediately pull the plug.
- Place the supply cord and, if necessary, an appropriate extension cable in such away that pulling or tripping over it is impossible. Do not allow the supply cord to hang down within easy reach.
- Do not jam, bend or pull the supply cord over sharp edges.
- Use only power supplies listed in the user instruction.
- The adaptor power plug is used as the disconnect device; the disconnect device shall remain readily operable. To completely disconnect the power input, disconnect the adaptor power plug.
- The product may not function properly or not react to the operation of any control due to electrostatic discharge. Switch off and disconnect the appliance; reconnect after a few seconds.
- Protect the supply cord from being walked on or pinched particularly at the plug, convenience receptacles and the point where it exits from the product.
- Never pull the adaptor power plug by the supply cord or with wet hands.
- Disconnect the adaptor power plug in case of faults during use, during lightening storms, before cleaning and when not using the product for a longer period of time.
- Danger! Before cleaning, switch the product off and disconnect the adaptor power plug from the socket.
- When the product has reached the end of its service life, make it defective by disconnecting the adaptor power plug from the socket and cutting the cord in two.
- Please refer the information on exterior bottom enclosure for electrical and safety information before installing or operating the apparatus.
- Rating label position: On the bottom of the radio.
- Never expose rechargeable batteries to excessive heat (e.g. bright sun, fire), and never throw them into fire. The rechargeable batteries could explode.
- The rechargeable battery is permanently built into the product and cannot be replaced
- Never short-circuit the contacts of the rechargeable battery. Do not throw the rechargeable battery or the product into fire. There is a danger of fire and explosion!
- Never charge the rechargeable battery of the product unattended.
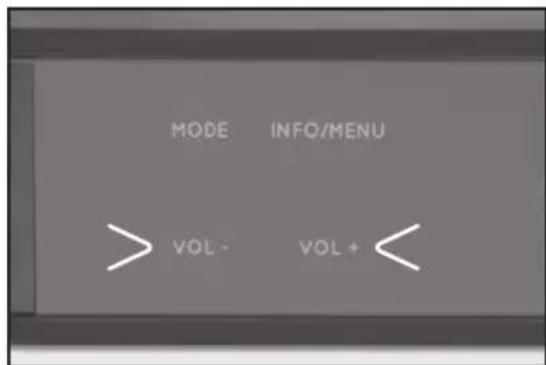
Parts
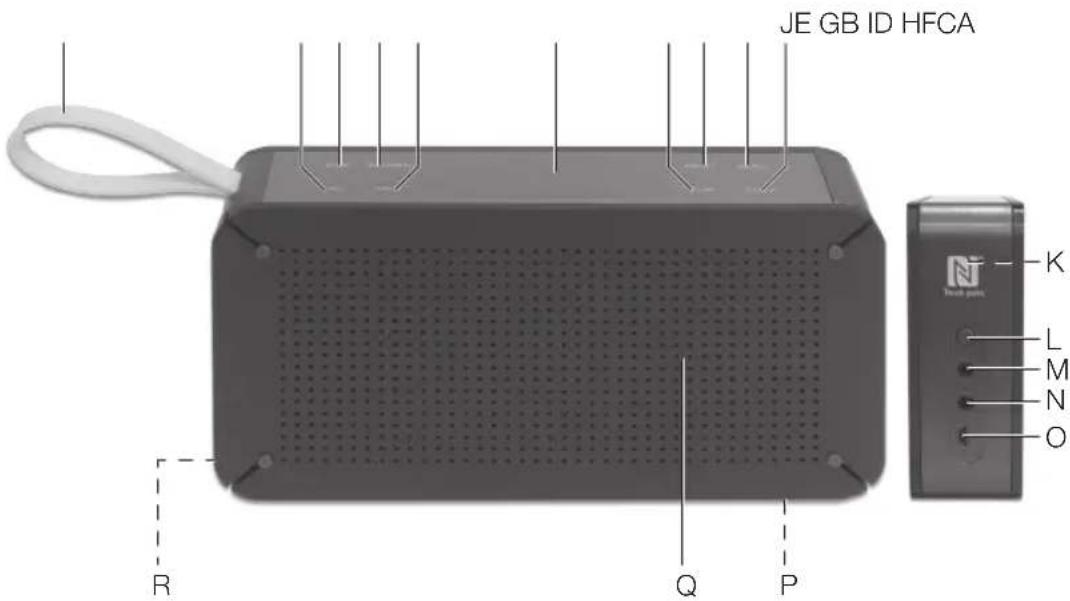
A. Carrying loop
B. VOLUME - button
C. MODE button
D. INFO/MENU button
E. VOLUME + button
F. Display
G. TUNE - button
H. PRESET button
I. SELECT button
J. TUNE + button
K. NFC chip
L. ON/OFF button
M. Audio-IN (AUX IN)
N. Headphone jack (3.5 mm)
O. Micro USB power input
P. Stand feet (not shown)
Q. Loudspeaker
R. Antenna (not shown)
Accessories
1 x DAB/FM radio and Bluetooth speaker
1 x Power adaptor with DC cable and plug
1 x Instruction manual
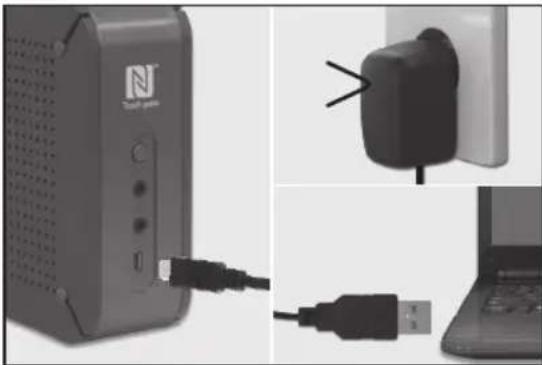
Connections
CHARGING BATTERY
natural_image
Close-up of a network device connected to a plug and USB cable, with a laptop on the side (no visible text or symbols)Plug the Micro USB connector into the Micro USB charging socket on the radio. Connect the USB A connector with an active USB port or to the provided adaptor. Plug the adaptor to an outlet.
Note: The radio can be operated via the in-built batteries. Playing time is dependent on parameters such as mode, volume, etc.
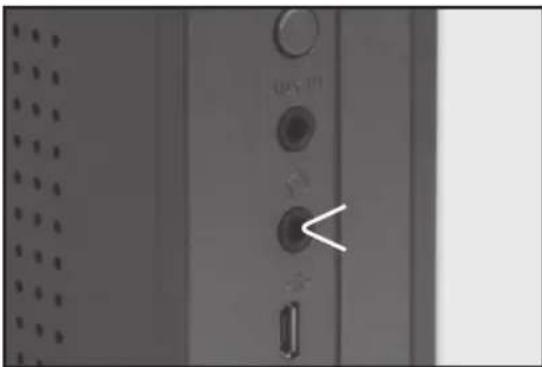
HEADPHONES
natural_image
Close-up of a server rack with indicator lights and a highlighted button (no readable text or symbols)Headphones with a 3.5 mm jack can be connected to the headphone output. Note: When headphones are connected the loudspeaker will be silent.
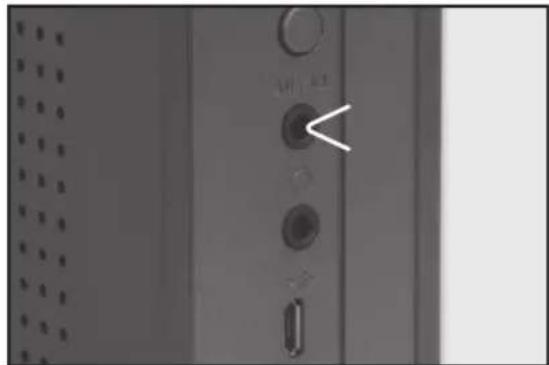
AUX IN
natural_image
Close-up of a server rack with indicator lights and buttons (no readable text or symbols)You can also listen to external audio devices by connecting the cable (not included in delivery) into the AUX IN jack.
Settings
ADJUSTING THE AERIAL
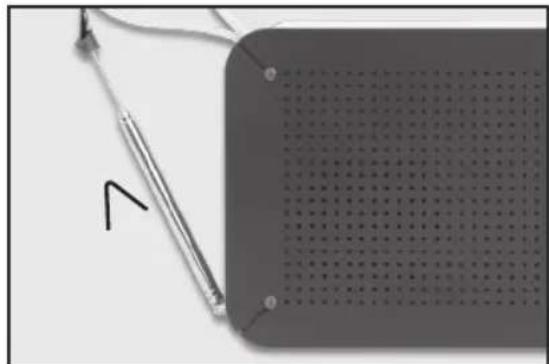
natural_image
Close-up of a pen resting on a grid notebook with a ruler beside it (no visible text or symbols)Pull out the aerial, turn and swivel it so it faces upwards for best reception.
VOLUME
You can adjust the volume of the speaker or headphones (if connected) using the VOL-/+ button.
LANGUAGE
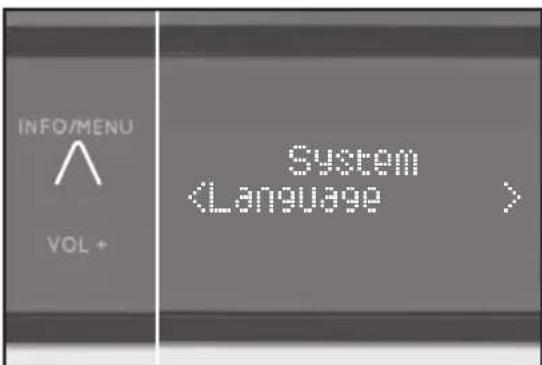
You can set the language for the menu navigation here.
- Press and hold the INFO/MENU button, using the TUNE +/- button switch to System appears in the display and confirm by pressing SELECT.
- Using the TUNE +/- button, scroll down the menu until you reach Languages and confirm by pressing SELECT.
- Choose the language required using the TUNE +/- button and confirm by pressing SELECT. Press the INFO/MENU button to exit settings mode.
CLOCK
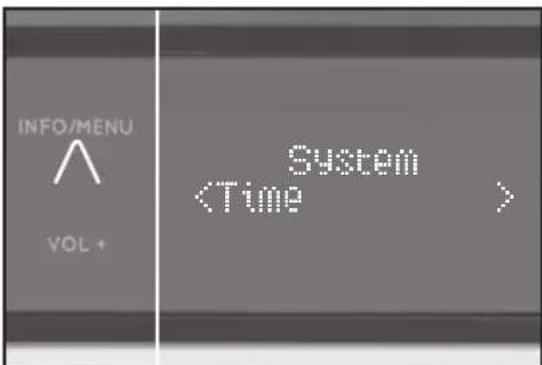
You can set the time and date here.
- Press and hold the INFO/MENU button, using the TUNE +/- button switch to
System appears in the display and confirm by pressing SELECT.
- Using the TUNE +/- button, scroll down the menu until you reach Time and confirm by pressing SELECT.
-
Choose the required sub-menu and confirm by pressing SELECT.
-
Set 12/24 hour: Choose between 12/24 hour format
- Set time: manual setting,
• Auto update: Choose between Update from Any, Update from DAB, Update from FM and No update, - Set date format: Choose between DD-MM-YYYY and MM-DDYYYY
Choose your settings by using the TUNE +/- button and confirm by pressing SELECT.
Press the INFO/MENU button to exit settings mode.
SOUND
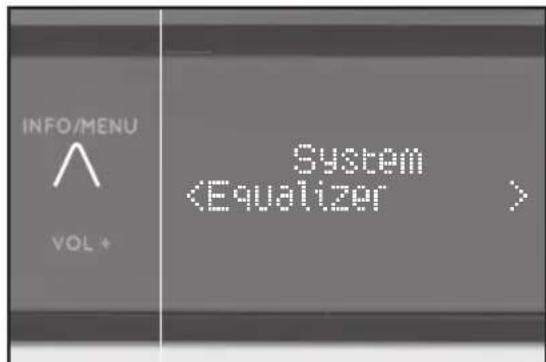
The sound settings can be accessed in each mode.
-
Press and hold the INFO/MENU button, using the TUNE +/- button switch to System appears in the display and confirm by pressing SELECT.
-
Scroll through the menu using the TUNE +/- button until you reach Equaliser and confirm by pressing SELECT.
• Normal, Classic, Jazz, Pop, Rock, Speech
- < My EQ...>: here you can individually adjust the treble and bass. Confirm your selection by pressing SELECT.
OPERATION IN VARIOUS MODES
- Press the INFO/MENU button to exit settings mode.
FACTORY RESET

This section allows you to restore all original settings.
- Press and hold the INFO/MENU button, using the TUNE +/- button switch to System appears in the display and confirm by pressing SELECT.
- Scroll through the menu using the TUNE +/- button until you reach Factory Reset and confirm by pressing SELECT.
- Using the TUNE +/- button, choose between
and and confirm by pressing SELECT.
OPERATION
To use the device, press the on/off switch.
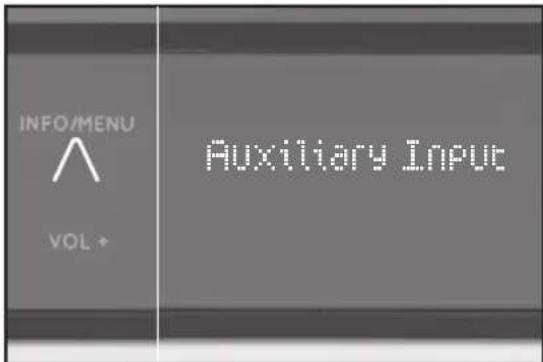
AUX IN
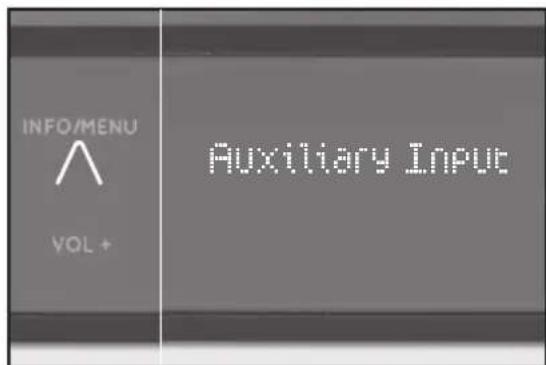
This mode allows you to use the radio as a speaker for an external device (e.g. mobile phone or MP3 player).
Warning! Observe the relevant safety information for use with other devices when connecting an external device.
Press the MODE button several times until Auxiliary Input is shown on the display. The device is now in AUX IN mode.
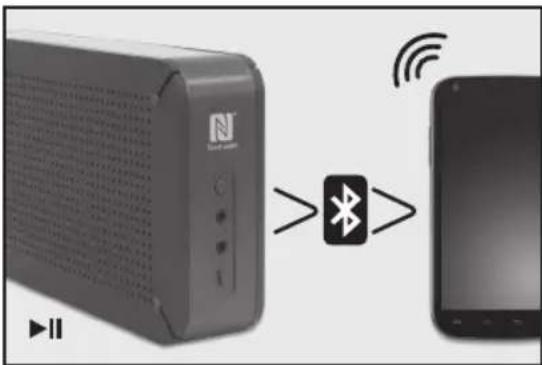
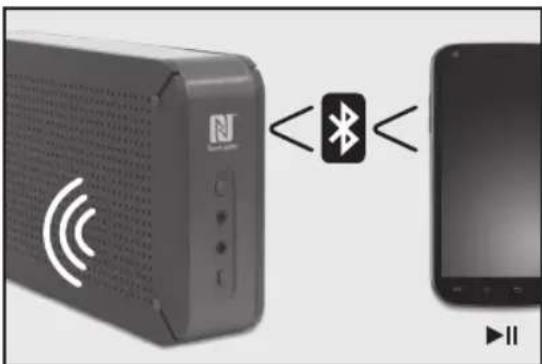
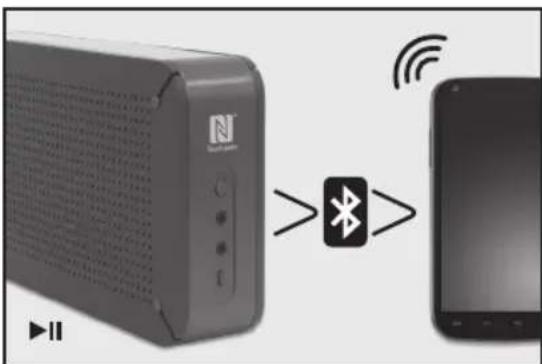
BLUETOOTH PLAYBACK MODE
This mode allows you to use the radio as a speaker for an external device (e.g. mobile phone or MP3 player). The signal is transmitted wirelessly via Bluetooth.
Note
Before playback, you must pair the radio (in this case the Bluetooth receiver) and the device (transmitter).
COMPATIBILITY
This product is compatible with Bluetooth enabled mobile phones and music devices. It features Bluetooth version 2.1+EDR. It also works with devices featuring other Bluetooth versions that support e.g.
Wireless stereo listening
• A2DP (Advanced Audio Distribution Profile)
• AVRCP (Audio/Video Remote Control Profile)
Wireless music control
PLAYBACK DEVICES WITH NFC

- Press the MODE button until Smart Device appears on the display. The device is now in Bluetooth mode.
- If your playback device has an NFC chip, turn on NFC and Bluetooth on your play-back device.
- Place your playback device's NFC chip near the NFC chip on the radio. A Bluetooth connection between both devices will be automatically established.
- Begin playback.
Note:
By pressing the INFO/MENU button, information is displayed about the track being played.
- To end the Bluetooth connection, once again place your playback device's NFC chip next to the NFC chip on the radio. The connection and playback through the radio will be suspended.
PLAYBACK DEVICES WITHOUT NFC
- If your playback device does not contain an NFC chip, turn on Bluetooth only on your playback device.
- Press and hold the SELECT button on the radio for 2 seconds until Discover-able appears on the display.
- Start your playback device or begin a search for Bluetooth devices.
- Pair your playback device with PDR150BT. The devices will now be connected.
- Begin playback.
Note:
By pressing the INFO/MENU button, information is displayed about the track currently being played.
- To end the Bluetooth connection, turn off Bluetooth on the playback device.
DAB RADIO MODE
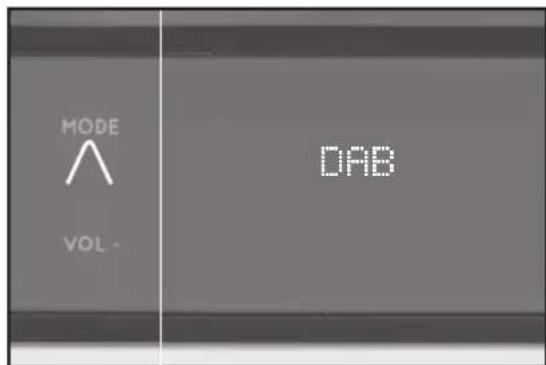
In this mode, the radio receives a digital signal and displays information about the radio station, music title, etc.
- Press and hold the MODE button until DAB appears on the display.
Note
When you turn on the radio for the first time, an automatic DAB channel search is carried out. The channel list is saved so that a new search does not need to be carried out when you next turn on the radio. Once the search is completed, the channels are saved in alphabetical order. The first available channel will be selected.
Note
If no DAB reception is currently available, change the position of your device or adjust the aerial. Press and hold the TUNE + button to start a new search.
- In DAB mode, press the TUNE + button to navigate through the available DAB channels.
- You can store the DAB channels in the program memory. In DAB/channel list mode, press and hold the PRESET button for 2 seconds. Use the TUNE +/- button to select a program memory between 1 and 10 and then press the SELECT button to assign the channel.
- Using the PRESET button, you can choose between your saved program list and the automatically created channel list.
- For additional settings in DAB radio mode, press the INFO/MENU button. Choose the required menu item by pressing the TUNE +/- button and confirm your chosen settings by pressing SELECT.
• Full Scan: Automatic channel search of all channels in the channel list
- Manual tune: Frequencies can be manually selected
• DRC (Dynamic Range Control): Adjust and change the dynamic range
- Prune: Removes all invalid channels from the channel list
• System: see section on Settings
VHF RADIO MODE
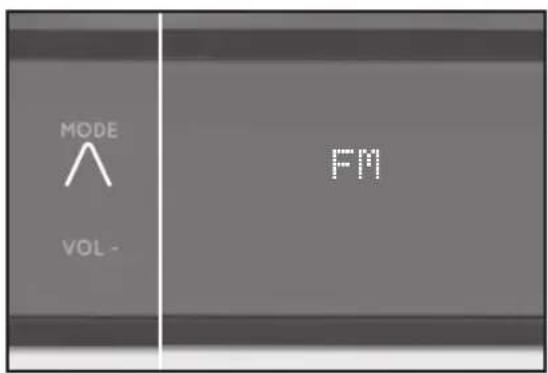
In this mode, the radio receives a VHF signal and displays information about the radio station, etc.
- Press and hold the MODE button until FM appears on the display.
- Press the TUNE +/- button to search through the entire frequency band.
Note
If you hold the TUNE +/- for longer, this begins a search which stops automatically once the next station has been found.
- Assign your chosen channel to the program memory between 1 and 10. In FM mode, press and hold the PRESET button for 2 seconds. Using the TUNE +/- button, choose a program memory between 1 and 10 and press the SELECT button to assign the channel.
- Using the PRESET button, you can switch between your saved program list and the VHF frequency band.
Cleaning and care
- Unplug the adaptor from the socket before cleaning the unit.
- Attention! Do not let water penetrate into the unit.
- Clean the housing with a lightly dampened cloth.
- Do not use sharp, scouring or aggressive cleaners.
- Do not use chemicals (such as gasoline or alcohol) to clean the housing.
Disposal

Do not dispose of this appliance as unsorted municipal waste. Return it to a designated collection point for the recycling of WEEE. By doing so, you will help to conserve resources and protect the environment. Contact your retailer or local authorities for more information.

Please dispose of batteries in an environmentally friendly manner Do not put batteries into the household waste. Please use the return and collection systems in your community or contact the dealer where you purchased the product.
Specification
POWER ADAPTOR
AC/DC adaptor
Input : 100 - 240 V\~, 50/60 Hz, 0.3 A
Output : 5 V
= 1.5A ,USB-A
Model : TEKA006-0501500EUU
Supplier : TEKA
Radio
Lithium Battery : 3.7 V 2100 mAh
Input : 5 V
= 1.5 ~A
Power consumption : 7.5 W
DAB-Tuner
Tuning range : 174 - 240 MHz
FM tuner
Tuning range : 87.5-108 MHz
Tuning grid : 0.05 MHz
Speaker
Output power : 2 x 3 W
Sound system : Mono/Stereo
Connection
USB : Micro-USB
Headphone : 3.5 mm-jack
Bluetooth
Bluetooth Profile : A2DP and AVRCP
Bluetooth Range
: Min. 8 m
Bluetooth Version
: v2.1+EDR, class 2
Dimension (W x H x D)
: 250 × 137 × 50 mm
Weight : 773 g (unit only)
natural_image
Close-up of a network device connected to a plug and USB cable, with a laptop partially visible (no text or symbols)natural_image
Close-up of a server rack with indicator lights and a close button (no readable text or symbols)natural_image
Close-up of a door panel with circular buttons and a white arrow pointing to the button (no text or symbols visible)natural_image
Close-up of a metallic tool and a grid-patterned object on a plain surface (no text or symbols visible)A. Dragonne
B. Bouton VOLUME – (VOLUME –)
C. Bouton MODE (MODE)
D. Bouton INFO/MENU (INFO/MENU)
E. Bouton VOLUME + (VOLUME +)
F. Ecran
G. Bouton TUNE - (REGLER -)
H. Bouton PRESET (PREREGLE)
I. Bouton SELECT (SELECTION)
natural_image
Close-up of a network device connected to a plug and USB cable, with a laptop visible in the background (no text or symbols)natural_image
Close-up of a server rack with a circular button and indicator lights (no readable text or symbols)natural_image
Close-up of a server rack with indicator lights and ports (no readable text or symbols)natural_image
Close-up of a metallic tool and a grid-patterned object on a plain surface (no text or symbols visible)Dimensions (I x H x P)
: 250 × 137 × 50 mm
Poids
natural_image
Close-up of a network device connected to a plug and USB cable, with a laptop on the side (no visible text or symbols)natural_image
Close-up of a server rack with indicator lights and a highlighted button (no readable text or symbols)natural_image
Close-up of a server rack with indicator lights and buttons (no readable text or symbols)natural_image
Close-up of a pen resting on a grid notebook with a ruler beside it (no visible text or symbols)A. Cinturino per il trasporto
B. Pulsante VOLUME – (VOLUME-)
C. Pulsante MODE (MOD)
D. Pulsante INFO/MENU (INFO/MENU')
E. Pulsante VOLUME + (VOLUME +)
F. Display
G. Pulsante TUNE - (SINT -)
H. Pulsante PRESET (PREIMP)
I. Pulsante SELECT (SEL)
natural_image
Close-up of a network device connected to a laptop via USB cable, with a close-up of its plug inserted into a wall socket (no visible text or symbols)natural_image
Close-up of a server rack with indicator lights and a close button (no readable text or symbols)natural_image
Close-up of a door panel with three circular buttons and a white arrow pointing to the button (no text or symbols visible)natural_image
Close-up of a metallic tool and a grid-patterned object on a surface (no visible text or symbols)natural_image
Close-up of a computer control panel with a white arrow pointing to the button (no readable text or symbols)Dimensioni (L x H x P)
: 250 x 137 x 50 mm
A. Draaglus
B. VOLUME - (VOLUME-) knop
C. MODE (MODUS) knop
D. INFO/MENU (INFO/MENU) knop
E. VOLUME + (VOLUME+) knop
F. Display
G. TUNE – (AFSTEMMEN-) knop
H. PRESET (VOORKEUZE) knop
I. SELECT (SELECTEREN) knop
natural_image
Close-up of a network device connected to a laptop via USB cable, with a close-up of its plug (no visible text or symbols)natural_image
Close-up of a server rack with indicator lights and ports (no readable text or symbols)natural_image
Close-up of a server rack with indicator lights and ports (no readable text or symbols)natural_image
Close-up of a metallic tool interacting with a grid-patterned object (no visible text or symbols)AFSPEELAPPARATEN MET NFC
natural_image
Close-up of a network device connected to a plug and USB cable, with a laptop partially visible (no text or symbols)natural_image
Close-up of a server rack with ventilation slots and a close button (no readable text or symbols)natural_image
Close-up of a server rack with three buttons and a circular button, no visible text or symbolsnatural_image
Close-up of a pen resting on a grid notebook with a ruler, no visible text or symbolsnatural_image
Close-up of a computer control panel with a dial indicator and 'MPT_KT' label (no readable text beyond labels)Wymiary (SZ X WYS X GŁ)
: 250 x 137 x 50 mm
Waga
A. Fita de transporte
B. Tecla VOLUME – (reduzir volume)
C. Tecla MODE (modo)
D. Tecla INFO/MENU
E. Tecla VOLUME + (aumentar volume)
F. Ecrã
G. Tecla TUNE – (sintonizar para baixo)
H. Tecla PRESET (predefinir)
I. Tecla SELECT (seleccionar)
natural_image
Close-up of a network device connected to a plug and USB cable, with a laptop partially visible (no text or symbols)natural_image
Close-up of a server rack with indicator lights and a highlighted button (no readable text or symbols)natural_image
Close-up of a server rack with indicator lights and buttons (no readable text or symbols)natural_image
Close-up of a pen and a grid notebook with printed text, no visible modern symbols or labels.natural_image
Close-up of a computer control panel with a dial and button, no visible text or symbolsPara utilizar o aparelho, prima o interruptor ON/OFF (ligar/desligar).
AUX IN (entrada auxiliar)
A. Bärslinga
B. VOLUME - (VOLYM -) knapp
C. MODE (FUNKTIONS) knapp
D. INFO/MENU (INFO-MENY) knapp
E. VOLUME + (VOLYM+) knapp
F. Skärm
G. TUNE - (INSTÄLLNINGS -) knapp
H. PRESET (FÖRINSTÄLLNINGS) knapp
I. SELECT (VAL) knappen
J. TUNE+ (INSTÄLLNINGS+) knappen
K. NFC-krets
L. PÅ/AV-knapp
M. AUX IN (INGÅNG)
N. Hörlursuttag (3,5 mm)
O. Mikro USB-ingång
P. Stativfötter (visas inte)
Q. Högtalare
R. Antenn (visas inte)
Tillbehör
natural_image
Close-up of a network device connected to a laptop via USB cable, with a close-up of its plug inserted into a wall socket (no visible text or symbols)natural_image
Close-up of a server rack with indicator lights and a close button (no readable text or symbols)natural_image
Close-up of a server rack with three buttons and a white arrow pointing to a button (no text or symbols visible)natural_image
Close-up of a metallic tool and a grid-patterned object on a surface (no visible text or symbols)natural_image
Close-up of a control panel with a white arrow pointing to the button (no visible text or symbols)natural_image
Close-up of a network device connected to a laptop via USB cable, with a close-up of its plug inserted into a wall socket (no visible text or symbols)natural_image
Close-up of a server rack with indicator lights and a close button (no readable text or symbols)natural_image
Close-up of a server rack with three buttons and a white arrow pointing to a button (no text or symbols visible)natural_image
Close-up of a pen and a grid notebook with a ruler, no visible text or symbolsnatural_image
Close-up of a door with a white arrow pointing to the button (no visible text or symbols)BLUETOOTH OLMAYAN AYGITLARLA ÇALMA
PDR150BT-B / PDR150BT-W
Model/ Modell:
is in conformity with the following directives:
Subsidiary of Media-Saturn Group