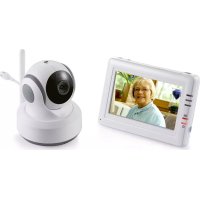
BCF 850 - Baby monitors SWITEL - Free user manual and instructions
Find the device manual for free BCF 850 SWITEL in PDF.
| Product type | Video baby monitor |
| Brand | Switel |
| Model | BCF 850 |
| Camera dimensions (W x H x D) | 7.0 x 7.6 x 7.0 cm |
| Camera weight | 90 g (without tripod or housing) |
| Monitor dimensions (W x H x D) | 7.7 x 12.5 x 2.9 cm |
| Monitor weight | 120 g (with battery, without microSD card) |
| Monitor screen | 2.4 inches (6.1 cm), color, resolution 320x240 |
| Power supply | 5V / 1A via USB cable (power adapters included) |
| Battery life | Up to 8 hours |
| Outdoor range | Up to 200 m |
| Indoor range | 10 to 30 m (depending on obstacles) |
| Night vision | Yes, 8 infrared LEDs (range not specified) |
| Sound and motion detection | Yes, with vibration |
| Walkie-talkie function | Yes, from monitor to camera |
| Lullabies | 5 built-in melodies, playable via camera |
| Video recording | Yes, locally (64 MB) or on microSD card (max 2 GB) |
| Digital zoom | Yes, 1 level |
| Cleaning and maintenance | Soft lint-free cloth, no solvents |
| Warranty | 2 years |
Frequently Asked Questions - BCF 850 SWITEL
User questions about BCF 850 SWITEL
0 question about this device. Answer the ones you know or ask your own.
Ask a new question about this device
Download the instructions for your Baby monitors in PDF format for free! Find your manual BCF 850 - SWITEL and take your electronic device back in hand. On this page are published all the documents necessary for the use of your device. BCF 850 by SWITEL.
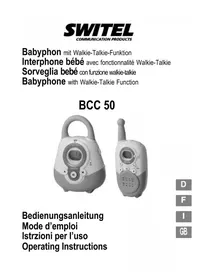
USER MANUAL BCF 850 SWITEL
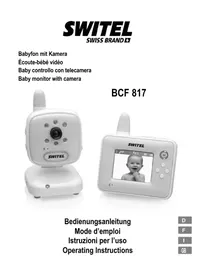
Baby controlled on telecamera
Baby monitor with camera
BCF 850
Bedienungsanleitung
Mode d'emploi
Operating Instructions
D
F
1
GB
SWITEL
Operating Instructions 60.
Icone accu rechargeable, 26
Icone de portee, 26
Icône du canal, 26
1 Safety Information 61.
2 Operating Elements and Indicators 62.
3 Menu Structure 65.
4 Putting the Units into Operation 67.
5 Operating the Camera 70.
6 Operating the Monitor 71.
7 In Case of Problems 75.
8 Technical Properties 76.
9 Maintenance/Guarantee 77
10 Index 78
1 Safety Information
- Please read this operating manual thoroughly.
- Always keep this operating manual near the equipment and hand it over to every user or subsequent owner.
The appliance is not waterproof. Keep it dry.
Intended use
The baby monitor serves to monitor a baby/child in a room. The camera transmits audio and video signals from its current location to the monitor. The monitor may only be installed indoors. Any other use is considered unintended use.
| The use of this equipment does not substitute personal supervision, e.g. of a baby/child. Users are not relieved of their personal liability. |
| The devices are not intended for medical purposes. Warning and signal tones from respiratory or heartbeat monitoring equipment are not transmitted. |
| Unauthorized modification or reconstruction is not permitted. Under no circumstances open the devices or complete any repair work yourself. All rights to claims for damages beyond the scope of legal provisions are excluded. |
| The equipment only serves to support supervision of babies/children. Do not use the equipment for the illegal observation of other persons. |
Medical equipment
Attention: Never use the devices in the vicinity of medical equipment. Effects on such equipment cannot be fully ruled out.
Rechargeable batteries
Attention: Only use a rechargeable battery of the correct type. Risk of explosion!
Attention: Pay attention to the correct polarity! Never throw the battery into a fire.
Power supply
Attention: Only use the charging cable supplied and do not obstruct access to the charging cable by furniture or other objects!
Attention: When using the equipment with the charging cable, pay attention that the plug and cable are in perfect condition. Kinked or worn cable represents the risk of a fatal accident.
Power failure
Pay attention that the camera and monitor are always sufficiently charged, otherwise the equipment cannot function in the case of a power failure.
Installation location
- Ensure that when the camera is in operation, it is at least 20cm away from the person(s) being observed.
- Never lay the camera unit in a baby's/child's bed or playpen.
- Ensure that the cable and equipment are always out of reach of babies/children.
- Babies/Children must not play with the cables and equipment. Risk of suffocation!
- Pay attention that cables are laid so they cannot be tripped over resulting in equipment being pulled onto the floor.
- Pay attention that the components are sufficiently well-ventilated when in operation. Do not lay a cushion, towel or such over the devices.
Operating Elements and Indicators
- The installation location plays a decisive role in ensuring proper operation. Maintain a minimum distance of one meter to other electronic equipment, such as microwave ovens or hi-fi systems, since they could cause mutual disturbance.
- Prevent excessive exposure to smoke, dust, vibration, chemicals, moisture, heat and direct sunlight.
- Do not use the equipment in aircraft, near medical equipment or in potentially explosive areas.
Disposal
In order to dispose of your device, take it to a collection point provided by your local public waste authorities (e.g. recycling centre). According to laws on the disposal of electronic and electrical devices, owners are obliged to dispose of old electronic and electrical devices in a separate waste container. The adjacent symbol indicates that the device must not be disposed of in normal domestic waste!
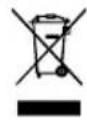
Risks to health and the environment from batteries!
Never open, damage or swallow batteries or allow them to pollute the environment. They could contain toxic and ecologically harmful heavy metals. You are legally obliged to dispose of batteries at the point-of-sale or authorised collection points where the corresponding containers are provided. Disposal is free of charge. The symbols indicate that the batteries must not be disposed of in normal domestic waste and that they must be brought to collection points provided by local public waste authorities.

Packaging materials must be disposed of according to local regulations.
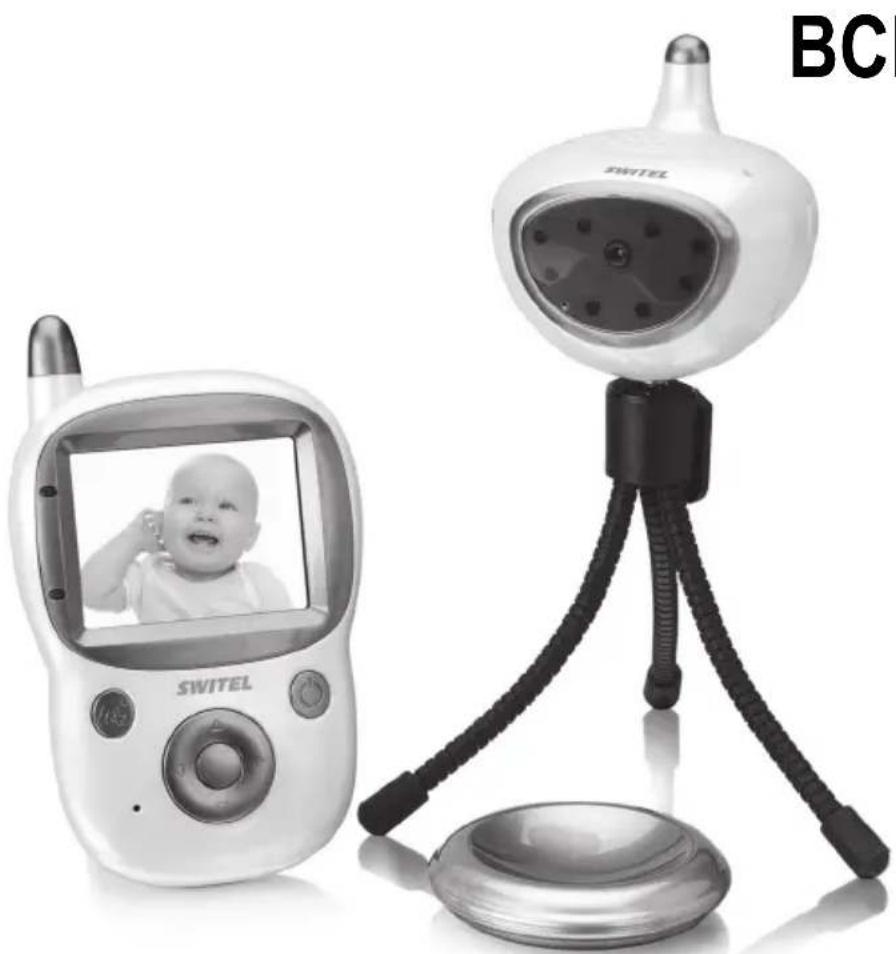
2 Operating Elements and Indicators
Camera unit
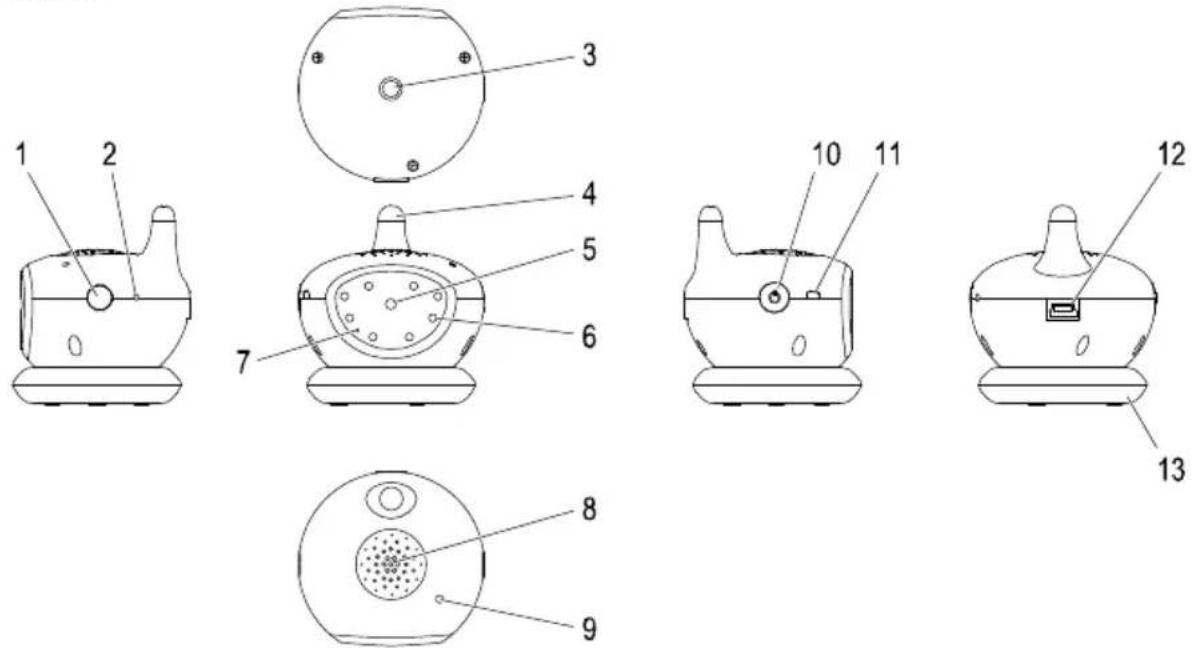
1 Registration button 8 Loudspeaker
2 Reset button 9 Microphone
3 Internal thread to screw in the stand 10 On/Off button
4 Antenna 11 LED
5 Camera lens 12 Mini-USB connection port
6 Infrared LEDs (8 lamps) 13 Camera base
7 Sensor for light, sounds and movements
1
GB
1 green, flashing: communication with monitor OK. red, continuously on: no communication with a monitor. red/green flashing: charging process and communication with a monitor.
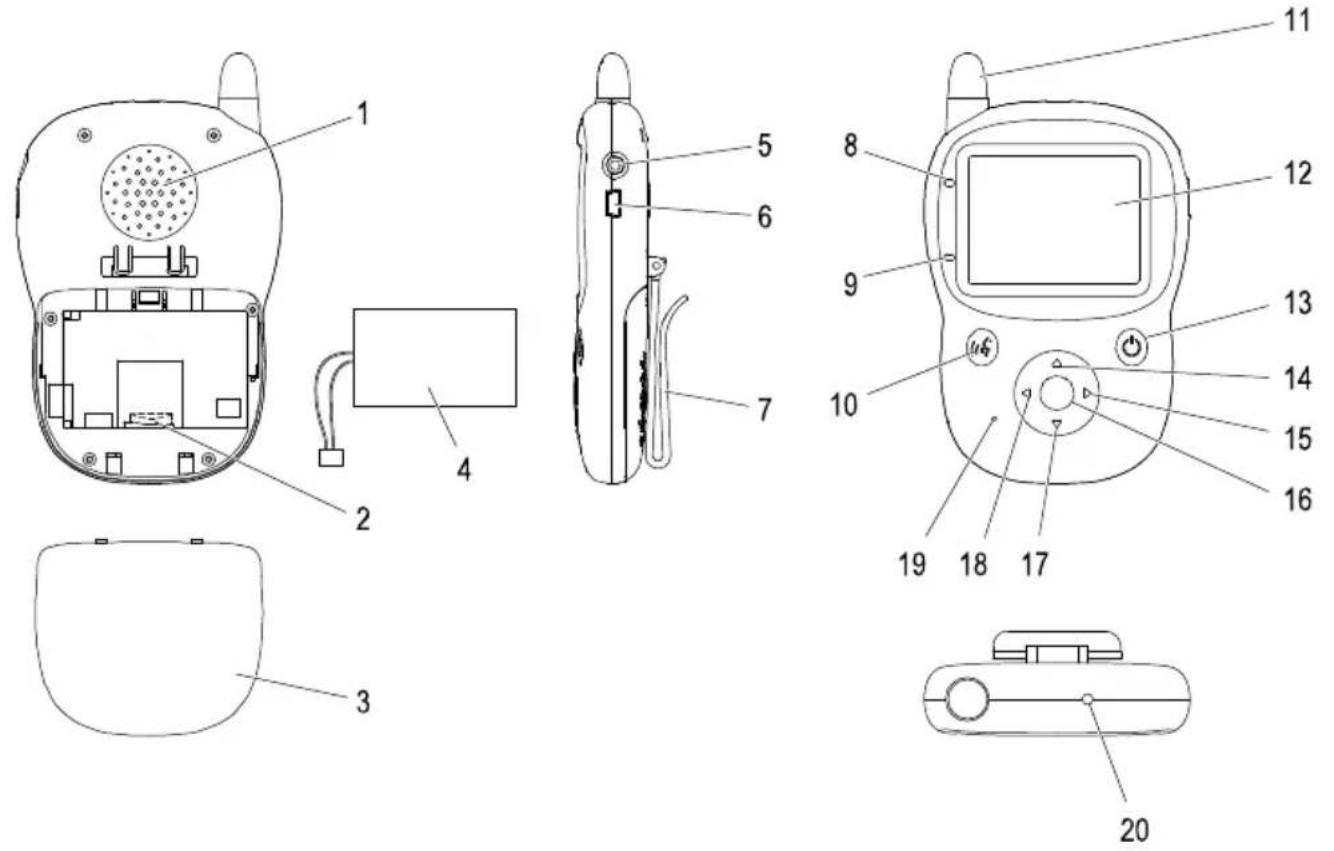
Monitor unit
1 Loudspeaker 11 Antenna
2 MicroSD card slot 12 Display
3 Battery compartment cover 13 On/Off / Back button
4 Battery 14 Scroll up button
5 Headphone connection port 15 Scroll right button
6 Mini-USB connection port 16 Menu / OK button
7 Stand with clip 17 Scroll down button
8 LED, charging process 18 Scroll left button
9 LED, power on 19 Microphone
10 Speak/Delete button 20 Reset button
Icon bar in the display
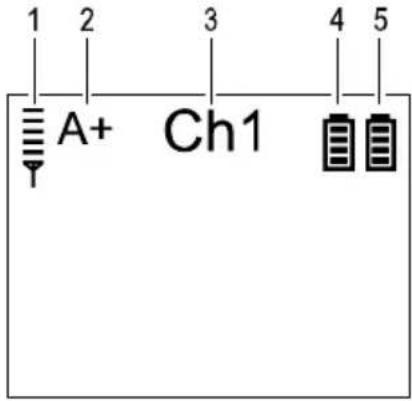
Icon Significance
1 Range icon Indicates the connection quality to the camera:
Range icon with 5 green bars: Connection is very good.
Range icon with no bars: No connection available. A message also flashes in the display stating that there is no connection to the camera.
2A + (-) icon Indicates the transmission direction for sounds.
A+ indicates that sounds are being transmitted from the camera to the monitor.
A- indicates that sounds are being transmitted from the monitor to the camera.
3 Channel icon
Indicates which camera is currently connected to the monitor or which channel is currently set on the monitor.
4 Battery icon (blue) Indicates the battery capacity of the camera:
- Battery icon partly filled in blue: The battery is no longer fully charged. The blue segments roughly indicate the battery charge status (a total of 4 blue segments).
- Battery icon with blue running through the 4 segments: The battery is being charged.
- Battery icon fully filled in blue: The battery is fully charged.
5 Battery icon (green) Displays the battery capacity of the monitor:
- Battery party filled green: The battery is no longer fully charged. The green segment give a rough indication of the battery charge status (a total of 4 green segments).
- Green segments run though the 4 battery segments: The battery is being charged.
- Battery icon filled completely green: The battery is fully charged.
3 Menu Structure
To navigate in the menus, open the main menu (level 1) by pressing the Menu/OK button, use the Scroll right button or Scroll left button to select a menu option and confirm the selection by pressing the Menu/OK button. This procedure applies to all the other menu levels.
When the "Setting" menu option is open, you can then press the Scroll right button or Scroll left button to select between the options. This is always the case when there are two arrow icons displayed behind the menu options.
There are several ways with which to exit from the menu:
Press the On/Off/Back button to move one menu level back with each press.
The menu closes automatically if there is no movement within the menu for a period of 5 seconds.
Exception: You have opened the "Setting" menu option.
| Zoom In/Out | |
| Image Moment | |
| Record | |
| Playback Local | |
| Micro SD | |
| Lullaby Lullaby 1 to 5 | |
| Setting Register Camera 1 to 4 | |
| Switch1 Local | |
| PC link | Micro SD |
| Power Saving OFF | |
| Language Deutsch | 10s |
| 30s | |
| Backlight 1 (dark) to 7 (light) | |
| Voice Control OFF | |
| Motion Control OFF | ON2 |
^1 = memory location for video recordings
2 = ON
GB
| Camera Control CH 1 to 4 | |
| Brightness 0/1/2/3/4/5 | |
| Contrast 0/1/2/3/4/5 | |
| Saturation 0/1/2/3/4/5 | |
| Frame Rate 5/10/15/20 FPS | |
| Infrared OFF/ON 3/Auto | |
| Capacity4 Total5 | |
| Total Free6 | |
| Micro SD7 | |
| Used8 | |
| Total Free9 | |
| Local10 | |
| Used11 | |
| Free12 | |
| Version13 | Parent |
| Child | |
| Manufacturer | |
| Default | |
3 = ON
4 Memory capacity for video recordings
5 Total memory capacity available in the device (local and on microSD card) (in MB)
6 Total memory capacity free (in MB)
7 Total memory capacity available on microSD card (in MB)
8 Memory capacity used on microSD card (in MB)
9 Free memory capacity on microSD card (in MB)
10 Total memory capacity available locally (64 MB)
11 Local memory capacity used (in MB)
12 Local memory capacity available (in MB)
13 This menu option contains information on the device, e.g. the precise type designation.
4 Putting the Units into Operation
Safety information

Attention: It is essential to read the Safety Information in Chapter 1 before starting up.

The data transmitted (image and/or sound) can be received publicly in the reception range!
Checking the package contents
The box contains:
1 camera unit 1 camera base
1 monitor unit 1 stand
1 lithium-ion battery for the monitor 1 operating manual
1 charging cable
(to charge the camera and monitor)
Putting the camera into operation
Charging the camera
Connect the camera as illustrated in the diagram. The integrated battery (cannot be removed) is charged.

n: Only use the charging cable supplied for the camera.

h the camera on, press and hold the On/Off button.
Mains power outlet
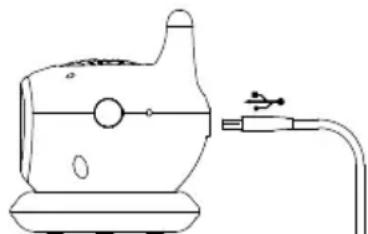

When charging the battery for the first time, it should be charged for at least 4 hours without interruption. This lengthens the service life of the battery!
Positioning and aligning the camera
There are several ways and means of positioning and aligning the camera:
- Place the camera (without the stand mounted) in the camera base and align the camera in it as required.
- Screw the stand in the camera. The three stand legs are flexible. Bend the stand legs as necessary and align the camera as required.
- Screw the stand in the camera and use the clip on the stand to attach the camera to other objects.

Attention: The camera must not be set-up less than 1 m from the baby/child.

Attention: Position the camera unit with a minimum distance of 1m to other electronic devices, otherwise there is a risk of mutual disturbance.
Putting the Units into Operation
Putting the monitor into operation

Attention: Position the monitor unit with a minimum distance of 1 m to other electronic devices, otherwise there is a risk of mutual disturbance.
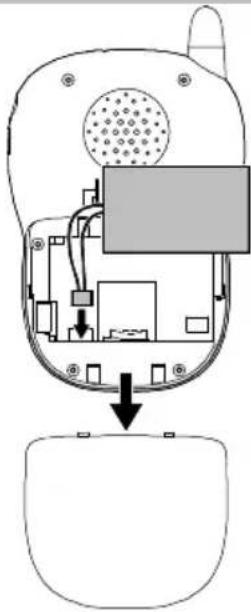
Inserting and removing the battery
If you want to use the device to save video recordings on a microSD card, insert the microSD card first, refer to Section "Inserting or removing a microSD card".
- Pivot the stand away from the device.
- Open the battery compartment on the rear side of the monitor: Slide the battery compartment cover off.
- Connect the battery plug to the connector in the housing, ensuring correct polarity: the red cable to the positive pole, the black cable to the negative pole.
- Insert the battery. Pay attention that the cables are not kinked or under strain.
- Slide the battery compartment cover back on in the opposite direction until it latches in place.
To remove the batteries, proceed in the reverse sequence.
Switch the monitor off before removing the battery.
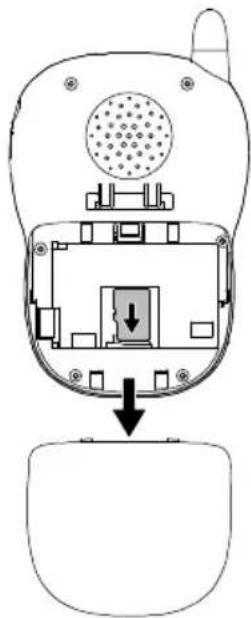
Inserting or removing a microSD card
In order to save video recordings, you can insert a microSD card of max. 2 GB.

Switch the monitor off before inserting or removing a microSD card.
- Switch the monitor off.
- Remove the battery if one is installed.
- To insert the microSD card, slide it in the microSD slot with the bare contacts facing towards the device until it audibly snaps into place.
The correct end position of the microSD card is indicated in white on the green board.
- To remove the microSD card, press it slightly further into the device in the direction it was inserted and then release it. The microSD card springs out of the microSD card slot a little and can be removed.
- Replace the battery in the device and close the battery compartment cover, refer to Section "Inserting and removing the battery".
Charging the monitor
Connect the monitor unit as illustrated in the diagram.
Attention: Only use the charging cable supplied for the monitor.
Charging of ther battery begins immediately the charging cable is connected to the monitor unit and power outlet. As soon as the battery is fully charged, the "Charging process" LED lights up green.
To switch the monitor on, press and hold the On/Off / Back button.

Mains power outlet
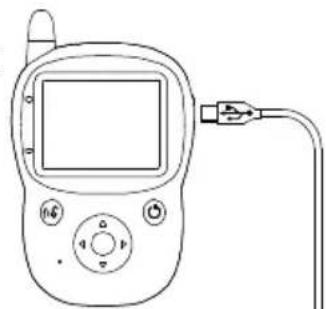

When switched on, the icon bar on the monitor screen indicates the battery charge status of the camera (blue) and monitor (green).
The colors run through the segments in the battery icons in the display during charging. When the battery is fully charged, the respective battery icon is filled fully.

When charging the battery for the first time, it should be charged for at least 4 hours without interruption. This lengthens the service life of the battery!
Stand with clip
Take hold of the stand on the rear side of the monitor at the bottom and pull it away from the unit a little to position the monitor.
- You can use the clip on the stand to attach the monitor to other objects.
Defining the language
The language is defined using the menu, refer to "Menu Structure" (Language), Page 65. There are 4 languages available for selection.
Registering the camera on the monitor (registration process)
The monitor and camera are already registered with each other at the factory.
However, up to 4 cameras can be registered on the monitor. Other cameras can be registered on the monitor as follows:
- Switch the monitor on.
- Switch the (new) camera on.
- Press the Menu/OK button on the monitor to open the menu.
- Use the Scroll right button or Scroll left button to select the Setting menu option.
- Use the Scroll up button or Scroll down button to select the Register menu option.
- Press the Menu/OK button to confirm your selection.
- Use the Scroll up button or Scroll down button to select the channel to which the new camera should be set.
- Press the Menu/OK button to confirm your selection. Information appears in the display on how to proceed:
- Press the Menu/OK button to continue with the registration process. Or: Press the On/Off/Back button to cancel the registration process.
- Press and hold the Registration button on the camera until a message indicating successful registration appears in the display.

If a camera is connected to the monitor, a "Y" appears behind the associated camera name in the Register menu option. If a camera is not connected to the monitor, an "N" appears.
- Exit from the menu by pressing the On/Off/Back button, several times if necessary.

If the registration process is unsuccessful, check the battery charge status. Charge the battery, if necessary.
Operating the Camera
Deregistering the camera from the monitor (deregistration process)
- Switch the monitor on.
- Press the Menu/OK button on the monitor to open the menu.
- Use the Scroll right button or Scroll left button to select the Setting menu option.
- Use the Scroll up button or Scroll down button to select the Register menu option.
- Press the Menu/OK button to confirm your selection.
- Use the Scroll up button or Scroll down button to select the channel on which the camera to be deregistered is set.
- Press the Menu/OK button to confirm your selection. Information appears in the display on how to proceed:
- Press the Menu/OK button to continue with the deregistration process. Or: Press the On/Off / Back button to cancel the deregistration process.

If a camera is connected to the monitor, a "Y" appears behind the associated camera name in the Register menu option. If a camera is not connected to the monitor, an "N" appears.
- Exit from the menu by pressing the On/Off/Back button, several times if necessary.

If the deregistration process is unsuccessful, check the battery charge status of the monitor and camera. Charge both units, if necessary.
5 Operating the Camera

Check the camera and monitor units are working properly each time before the equipment is put into operation.
Switching on the camera
- Press and hold the On/Off button on the camera.
The LED lights up/flashes according to the configuration (refer to Page 62).
- Adjust the camera alignment again, if necessary.
Switching the camera off
Press and hold the On/Off button on the camera until the LED goes out.
Night vision function
The camera is equipped with 8 infrared LEDs. This enables the transmission of pictures from areas which are not illuminated.
You can use the menu to define whether the night vision function should be permanently switched on or off or whether the unit should switch the night vision function on automatically when the sensor detects poor light conditions. Refer to "Menu Structure" (Infrared), Page 66.

When the night vision function is activated, the display on the monitor turns to black and white.
Restarting the camera
If the camera no longer behaves as described, restart the camera:
Press the Reset button using a thin, firm object, e.g. a straightened paper clip, to restart the camera.
6 Operating the Monitor

Check the camera and monitor units are working properly each time before the equipment is put into operation.
Switching the monitor on
Press and hold On/Off / Back button. The "Power on" LED lights up.
The icon bar appears in the display. The monitor is now in Monitoring mode and is operational.
Switching the monitor off
Press and hold the On/Off / Back button until the "Power off" LED goes out.
Selecting the camera
Up to 4 cameras can be registered on the monitor.
Press the Scroll up button or Scroll down button, several times if necessary, to switch between the various image transmissions from the registered cameras.
After the image transmissions of all the cameras registered on the monitor have appeared in the display in succession, the display is divided into quarters and the transmissions from all the registered cameras can be viewed in the display in a scaled-down size.

If all the camera transmissions are displayed in miniaturised form on the screen, there is no sound transmission to the monitor.
Adjusting the volume on the monitor
Use the Scroll left button or Scroll right button to adjust the volume with which the sounds detected in the room in which the camera is mounted are played. There are 5 volume levels available. The volume can also be switched off.
- Press the Scroll right button to increase the volume.
Press the Scroll left button to lower the volume or switch it off.
The volume level currently selected is indicated in the display while altering the volume. If the volume is switched off, no bar appears in the display.
Walkie-talkie function
You can speak into the monitor unit and be heard from the camera unit, e.g. to calm the baby/child or speak to a person in the room being monitored.
- Press the Speak/Delete button on the monitor.
- Speak into the microphone on the monitor.
- Press the Speak/Delete button on the monitor again to end the walkie-talkie function and return to monitoring the room.
Zooming the image section in and out
In order to be able to see more details, you can enlarge (zoom) a section of the image in the display. One zoom level is available.
- Press the Menu/OK button on the monitor to open the menu.
- Use the Scroll right button or Scroll left button to select the Zoom In/Out menu option. The icon displays a magnifying glass with plus sign.
- Press the Menu/OK button to confirm your selection.
- Use the Scroll right button or Scroll left button to select the image section to be zoomed.
- Press the Menu/OK button to confirm your selection.
- To zoom out, press the Menu/OK button on the monitor to open the menu.
- Use the Scroll right button or Scroll left button to select the Zoom In/Out menu option. If an image section is enlarged, the icon displays a magnifying glass with minus sign.
- Press the Menu/OK button to confirm your selection.
Operating the Monitor
Playing lullabies
The baby monitor system has 5 different melodies available which can be played, once, on the camera unit. The lullabies are switched on and off via the menu; see "Menu Structure", Page 65.
| The Lullaby submenu is indicated in the main menu by means of a note icon. When a lullaby is being played, the Note button turns red. |
| When a lullaby is being played, no sounds are transmitted from the camera to the monitor. You can only hear the lullaby via the monitor. Switch the volume off if you do not want to hear the lullaby. However, do not forget to turn the volume back on again when the lullaby has ended, if necessary. |
Recording videos
You can record videos in order to keep a record of special moments in picture and sound.
Defining the memory location for videos
Videos can be recorded locally on the monitor or on a microSD card. Use the menu to define the location for storing videos, refer to "Menu Structure", Page 65.
Recordings stored in Local can take up a maximum of 64 MB.
Recordings in the local memory folder can only be transferred to a computer via a USB data cable (not included with the equipment), refer to section "Connecting the monitor to a computer".
Recordings stored in Micro SD cannot be transferred to a computer via a USB data cable. Remove the microSD card and transfer the recordings to the computer using a card reader.
Due to the capacity of the microSD card (max. 2 GB), more data can be stored on one than in the local memory.
If you select Micro SD as the storage location, ensure that a microSD card (not included with the equipment) is inserted in the monitor, refer to Section "Inserting or removing an microSD card".
Recording a video
- Press the Menu/OK button on the monitor to open the menu.
- Use the Scroll right button or Scroll left button to select the Record menu option. The icon represents a video camera.
- Press the Menu/OK button to start recording a video. The icon represents a video camera with a red dot.
- Press the Menu/OK button to stop recording the video. The red dot in the icon disappears.
Video recordings must be at least 4 seconds and maximally 40 minutes long (when storing on a microSD card).
Do not switch the equipment off while a video is being recorded and do not restart the camera or monitor. This would cause errors in the video recording so that it cannot be played.
Playing videos on the monitor
- Press the Menu/OK button on the monitor to open the menu.
- Use the Scroll right button or Scroll left button to select the Playback menu option.
- Use the Scroll up button or Scroll down button to select the storage location.
- Press the Menu/OK button to confirm your selection. The recordings available are listed.
- Use the Scroll up button or Scroll down button to select the recording to be played.
- Press the Menu/OK button to start playing the video recordings. The video recordings are played in succession.
- Press the Menu/OK button to make a pause when playing a video recording. Press the Menu/OK button again to resume playing the video recordings.
Deleting videos
- Press the Menu/OK button on the monitor to open the menu.
- Use the Scroll right button or Scroll left button to select the Playback menu option.
- Use the Scroll up button or Scroll down button to select the storage location.
- Press the Menu/OK button to confirm your selection. The recordings available are listed.
- If you only want to delete one recording: Use the Scroll up button or Scroll down button to select the recording to be deleted.
- Press the Speak/Delete button. Information appears in the display on how to proceed:
- Use the Scroll up button or Scroll down button to select whether to delete the selected recordings only or all the recordings.
- Press the Menu/OK button to confirm your selection.
- Press the Menu/OK button to execute the deleting process. Or: Press the On/Off / Back button to cancel the deleting process.
Connecting the monitor to the computer
Connect the monitor to a computer using a suitable USB data cable (not included with the equipment) in order to transfer data stored in the monitor (Local) memory to the computer.

If you also want to view, edit or store the recordings on a computer, for example, it is recommended to save the recordings on the monitor on a microSD card (not included with the equipment), refer to Section "Inserting or removing the microSD card".
Defining personal settings on the monitor
Various settings can be defined according to your personal requirements using the menu:
Language
The menu guidance is available in 4 different languages, refer to "Menu Structure" (Language), Page 65.
Display brightness
The brightness of the display can be adjusted to one of 7 levels; see Menu Structure (Backlight), Page 65.
Camera settings
You can set the following features separately for each camera registered on the monitor with regard to the transfer. The setting is defined via the menu, refer to "Menu Structure" (Camera Control), Page 66.
- Brightness
- Contrast
- Saturation
Frame Rate (number of frames transferred per second)
(Infrared (use of infrared radiation for the night vision function, refer to Section "Night vision function", Page 70)
Energy-saving mode
When energy-saving mode is activated, the monitor displays and the audio/video transmission from the camera unit to the monitor unit are deactivated after a defined time. This helps lengthen the battery charge times of the camera and monitor.
Use the "Power Saving" menu option to define the number of seconds after which the equipment should switch to energy-saving mode, refer to "Menu Structure" Page 65.

Press any button on the monitor to end energy save mode.

If the voice operated transmitter (VOX) and/or the motion detector have been activated, the system ends energy-saving mode automatically immediately it detects a voice, sound and/or movement, refer to the following sections.
Operating the Monitor
Voice operated transmitter (VOX) and vibration alarm
If the equipment is operated in energy-saving mode, the system starts transmitting automatically from the camera to the monitor immediately a voice or sound is detected (VOX1). The monitor starts to vibrate at the same time (vibration alarm).
If no voice or sound is detected for longer than one minute, transmission is automatically interrupted.

There is a slight delay in the transmission before the monitor can reproduce the voice/sound and picture.
VOX transmission is activated via the menu, refer to "Menu Structure" (Voice Control), Page 65.
Motion detector and vibration alarm
If the equipment is operated in energy-saving mode, the system starts transmitting automatically from the camera to the monitor immediately the camera detects a movement in the area being observed. The monitor starts to vibrate at the same time (vibration alarm).
If no further movements are detected for a certain time, transmission is ended automatically.

There is a slight delay in the transmission before the monitor can reproduce the voice/sound and picture.
The motion detector is activated via the menu, refer to "Menu Structure" (Motion Control), Page 65.
Restarting the monitor
If the monitor no longer behaves as described, restart the monitor:
Press the Reset button using a thin, firm object, e.g. a straightened paper clip, to restart the camera.
Resetting the default settings on the monitor
You can use the menu to reset all the settings to their default state, refer to "Menu Structure" (Default), Page 66.
Displaying the memory capacity
You can use the menu to display the memory space available:
in total
on the microSD card and
- locally in the device
Refer to "Menu Structure", (Capacity), Page 66.
7 In Case of Problems
Service hotline
Should problems arise with the equipment, please refer to the following information first. In the case of technical problems, you can contact our hotline service, Tel. 0900 00 1675 within Switzerland (Swisscom fees at time of going to print: CHF 2.60/min). In the case of claims under the terms of guarantee, contact your sales outlet. There is a 2 year period of guarantee.
Problems and possible causes
| Problem Possible causes and/or solutions | |
| Equipment cannot be switched on - The batteries are empty or defective. - The On/Off button or On/Off / Back button was not pressed long enough. | |
| The batteries have not been charged - The charging cable is not plugged in properly. | |
| Equipment does not work - The camera and/or monitor are not switched on. - The batteries are empty or defective. - If the problem persists, reset and restart the camera and/or monitor. | |
| Equipment "freezes" - Reset and restart the camera and/or monitor. | |
| Reception interference and noise - Other electronic devices are causing interference in the field of transmission. - The monitor and camera are too far apart. - The battery power is too low. | |
| Beeping noise (acoustic feedback) - The monitor and camera are too close to each other. - Increase the distance between the monitor and camera. Reduce the volume on the monitor. | |
| No image transmission - Ensure that the batteries are sufficiently charged and that the camera is registered on the monitor. If necessary, switch to a camera already registered on a different channel, refer to Page 71. | |
| No image transmission, display is black - Energy-saving mode is active, refer to Page 73. | |
| No image transmission, antenna icon flashes in centre of display | - The camera is not switched on. |
| No image transmission, message appears in the centre of the display indicating that no camera has been registered | - Register the camera. |
| Image transmission but no sound transmission | - The volume is switched off or set too low. - A lullaby is being played. - On the monitor, all the image transmissions are displayed on screen, refer to Page 71. |
Picture is in black and white - The night vision function is active.
Technical Properties
| Problem Possible causes and/or solutions | |
| A microSD card has been inserted but not detected | - The microSD card inserted is larger than 2 GB. The microSD card inserted may have a max. capacity of 2 GB. |
| A video recording cannot be played on the monitor | - The video recording was shorter than 4 seconds. - The video recording was too long. - The monitor and/or camera were switched off while a video was being recorded. - The monitor and/or camera was restarted while a video was being recorded. |
8 Technical Properties
Technical data
| Feature Value | |
| Camera WxHxD: 7.0 x 7.6 x 7.0 cm | Weight: 90 g (plus stand (26 g) or camera base (18 g)) Switch: I/O Socket: Mini-USB Sensors: For light, sound and motion IR LEDs: 8 |
| Monitor WxHxD: 7.7 x 12.5 x 2.9 cm | Weight: 120 g (without microSD card, with battery) Screen: 6.1 cm (2.4") color display, resolution 320x240 Memory: 64 MB (lokal) Switch: I/O Socket: Mini-USB |
| Power supply, camera | Charging cable 5 V / 1 A |
| Power supply, monitor | Charging cable 5 V / 1 A |
| Charging duration | 2 hours |
| Operating time | Max. 8 hours |
| Range | Up to 200 meters outdoors under optimum conditions. Range is reduced in buildings through walls, doors etc.; 10-30 m. |
| Frequency range | 2.4 GHz |
| Permissible ambient temperature | 0°C to 40°C |
| Permissible relative humidity | 20% to 75% |
The camera is equipped with an energy-efficient power adapter plug (input 230VAC output 5VDC 1A). The zero load is approx. 0.14 W. The average efficiency is approx. 70% . The power consumption in operation is maximally approx. 2.8 W.
The monitor is equipped with an energy-efficient power adapter plug (input 230VAC output 5VDC 1A).
The zero load is approx. 0.14 W. The average efficiency is approx. 70% The power consumption in operation is maximally approx. 2.55 W.

We reserve the right to make technical and visual modifications to the product during the course of product improvement.
Declaration of Conformity
This device fulfils the requirements stipulated in the EU directive:
1999/5/EU directive on radio equipment and telecommunications terminal equipment and the mutual recognition of their conformity. Conformity with the above mentioned directive is confirmed by the CE mark on the device.
To view the complete Declaration of Conformity, please refer to the free download available on our web site at www.switel.com.

9 Maintenance / Guarantee
Maintenance
- Clean the housing surfaces with a soft, fluff-free cloth.
- Never use cleaning agents or solvents.
Guarantee
SWITEL equipment is produced and tested according to the latest production methods. The implementation of carefully chosen materials and highly developed technologies ensure trouble-free functioning and a long service life. The terms of guarantee do not apply to the batteries or power packs used in the products. The period of guarantee is 24 months from the date of purchase.
All deficiencies related to material or manufacturing errors within the period of guarantee will be redressed free of charge. Rights to claims under the terms of guarantee are annulled following tampering by the purchaser or third parties. Damage caused as the result of improper handling or operation, normal wear and tear, incorrect positioning or storage, improper connection or installation or Acts of God and other external influences are excluded from the terms of guarantee. In the case of complaints, we reserve the right to repair defective parts, replace them or replace the entire device. Replaced parts or devices become our property. Rights to compensation in the case of damage are excluded where there is no evidence of intent or gross negligence by the manufacturer.
If your device does show signs of a defect within the period of guarantee, please contact the sales outlet where you purchased the SWITEL device, producing the purchase receipt as evidence. All claims under the terms of guarantee in accordance with this agreement can only be asserted at the sales outlet. No claims under the terms of guarantee can be asserted after a period of two years from the date of purchase and hand-over of the product.
10 Index
A
Adjusting the volume on the monitor, 71
B
Battery icon, 64
Brightness, 73
C
Camera, 62
Camera settings, 73
Channelicon,64
Charging the camera, 67
Charging the monitor, 68
Contrast, 73
D
Declaration of Conformity, 77
Default settings, 74
Defining personal settings on the monitor, 73
Defining the language, 69
Defining the memory location for videos, 72
Deleting videos, 73
Deregistering the camera from the monitor, 70
Deregistration process, 70
Display brightness, 73
Displaying the memory capacity, 74
Disposal, 62
E
Energy-saving mode, 73
F
Frame rate, 73
G
Guarantee, 77
1
Icon bar in the display, 64
Icons in the display, 64
Infrared LEDs, 70
Infrarot radiation, 73
Inserting a microSD card, 68
Inserting the battery, 68
Installation location, 61
Intended use, 61
L
Language, 73
M
Maintenance, 77
Medical equipment, 61
Memory capacity, 74
Monitor, 63
Motion detector, 74
N
Night vision function, 70, 73
0
Operating elements, 62
Operating the camera, 70
Operating the monitor, 71
P
Package contents, 67
Pairing, 69
Playing lullabies, 72
Playing videos on the monitor, 72
Positioning and aligning the camera, 67
Power failure, 61
Power supply, 61
Problems, 75
Problems and possible causes, 75
Putting the camera into operation, 67
Putting the monitor into operation, 68
R
Rangeicon,64
Rechargeable battery, 61
Recording videos, 72
Registering the camera on the monitor, 69
Registration process, 69
Removing a microSD card, 68
Removing the battery, 68
Restarting the camera, 70
Restarting the monitor, 74
S
Safety information, 61
Saturation, 73
Selecting the camera, 71
Service hotline, 75
Stand, 69
Starting up, 67
Structure of the menu, 65
Switching on the camera, 70
Switching the camera off, 70
Switching the monitor off, 71
Switching the monitor on, 71
T
Technical data, 76
Troubleshooting, 75
V
Vibration alarm, 74
Viewing all camera transmissions in one display, 71
Voice operated transmission, 74
Voice operated transmitter (VOX), 74
W
Walkie-talkie function, 71
Z
Zooming, 71
Zooming in the image section, 71
Zooming out the image section, 71
SWITEL
Declaration of Conformity
This equipment complies with the European R&TTE directive.
To view the complete Declaration of Conformity, please refer to the free download available at our web site:
www.switel.com.
Service Hotline
In the event of technical problems, you can contact our hotline service, Tel. 0900 00 1675 within Switzerland (cost via Swisscom at time of going to print: CHF 2.60/min).