
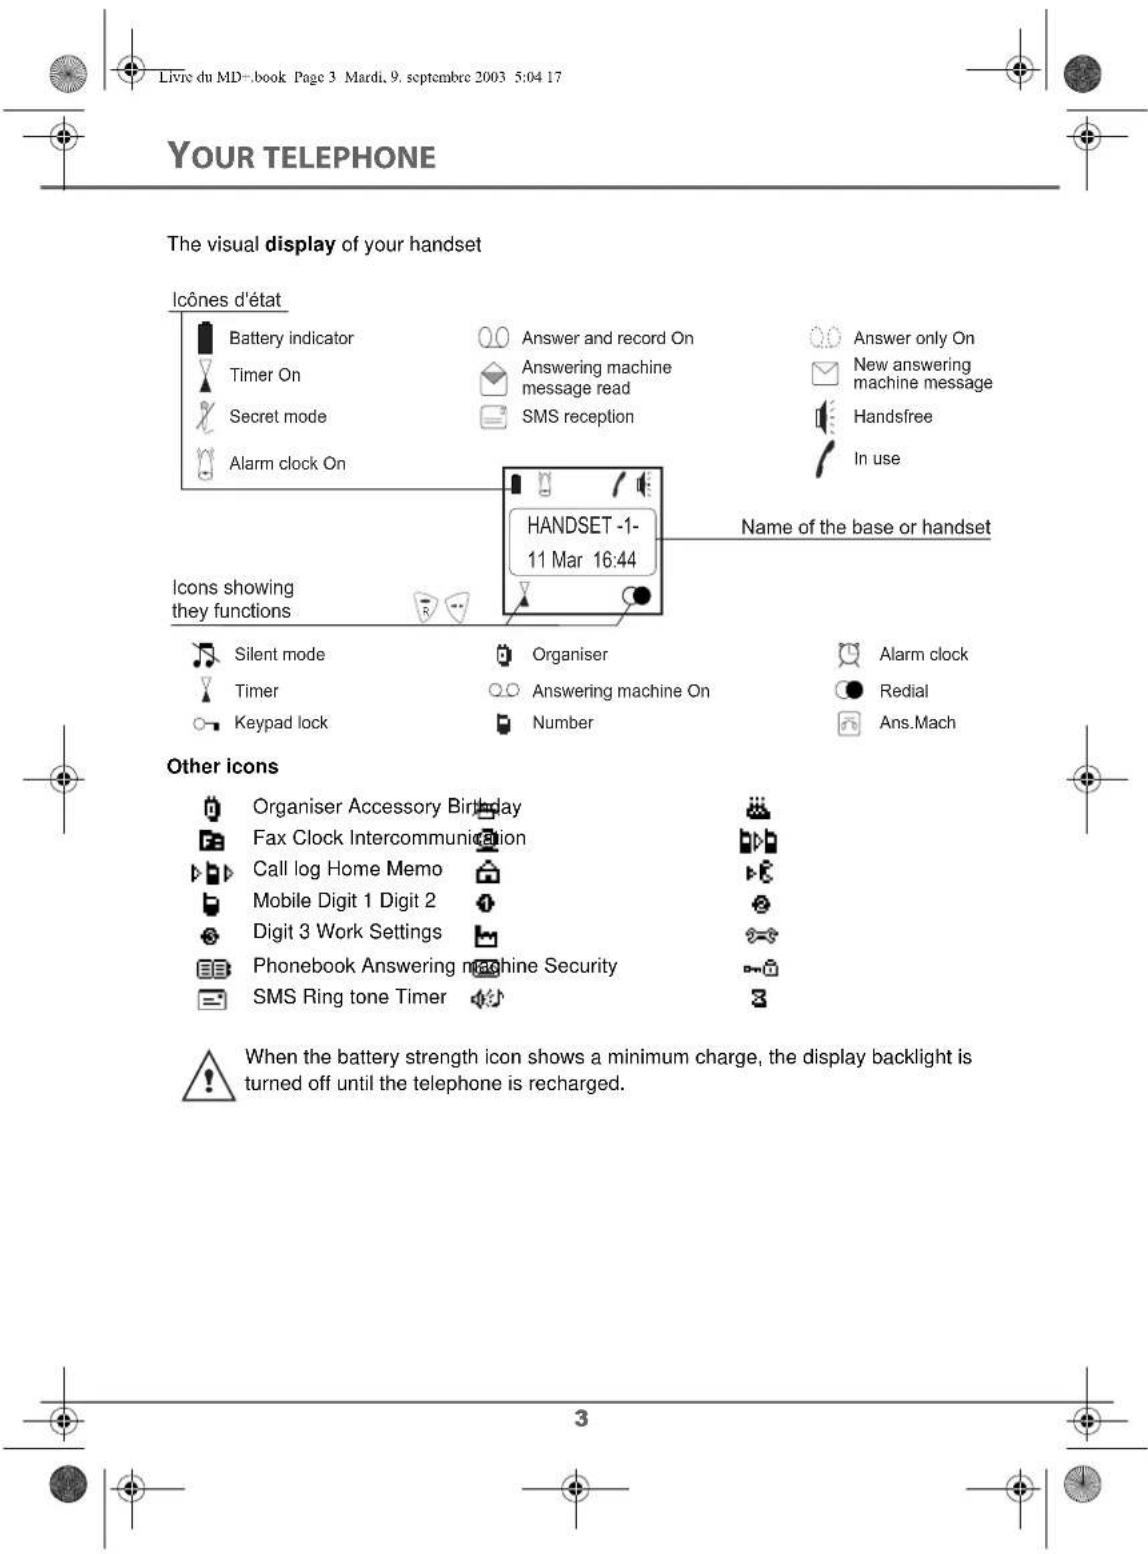
D80V2 - Telephone SAGEM - Free user manual and instructions
Find the device manual for free D80V2 SAGEM in PDF.
| Brand | Sagem |
| Model | D80V2 |
| Type | DECT phone (additional handset) |
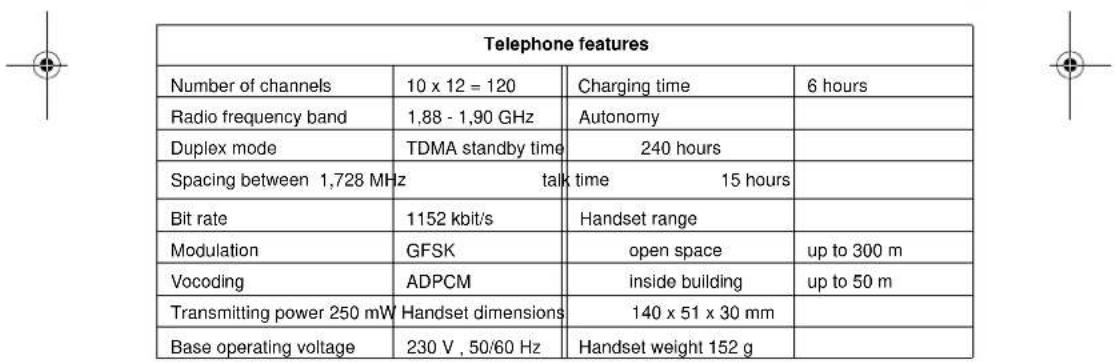
| Dimensions (handset) | 140 x 51 x 30 mm |
| Weight (handset) | 152 g |
| Base power supply | AC adapter (230 V, 50 Hz) |
| Batteries | 3 x AAA rechargeable (supplied) |
| Standby time | 240 hours (10 days) |
| Talk time | 15 hours |
| Charging time | 6 hours |
| Outdoor range | Up to 300 m |
| Indoor range | Up to 50 m |
| Radio frequency | 1.88 - 1.90 GHz |
| Number of channels | 120 |
| Modulation | GFSK |
| Voice coding | ADPCM |
| Transmission power | 250 mW |
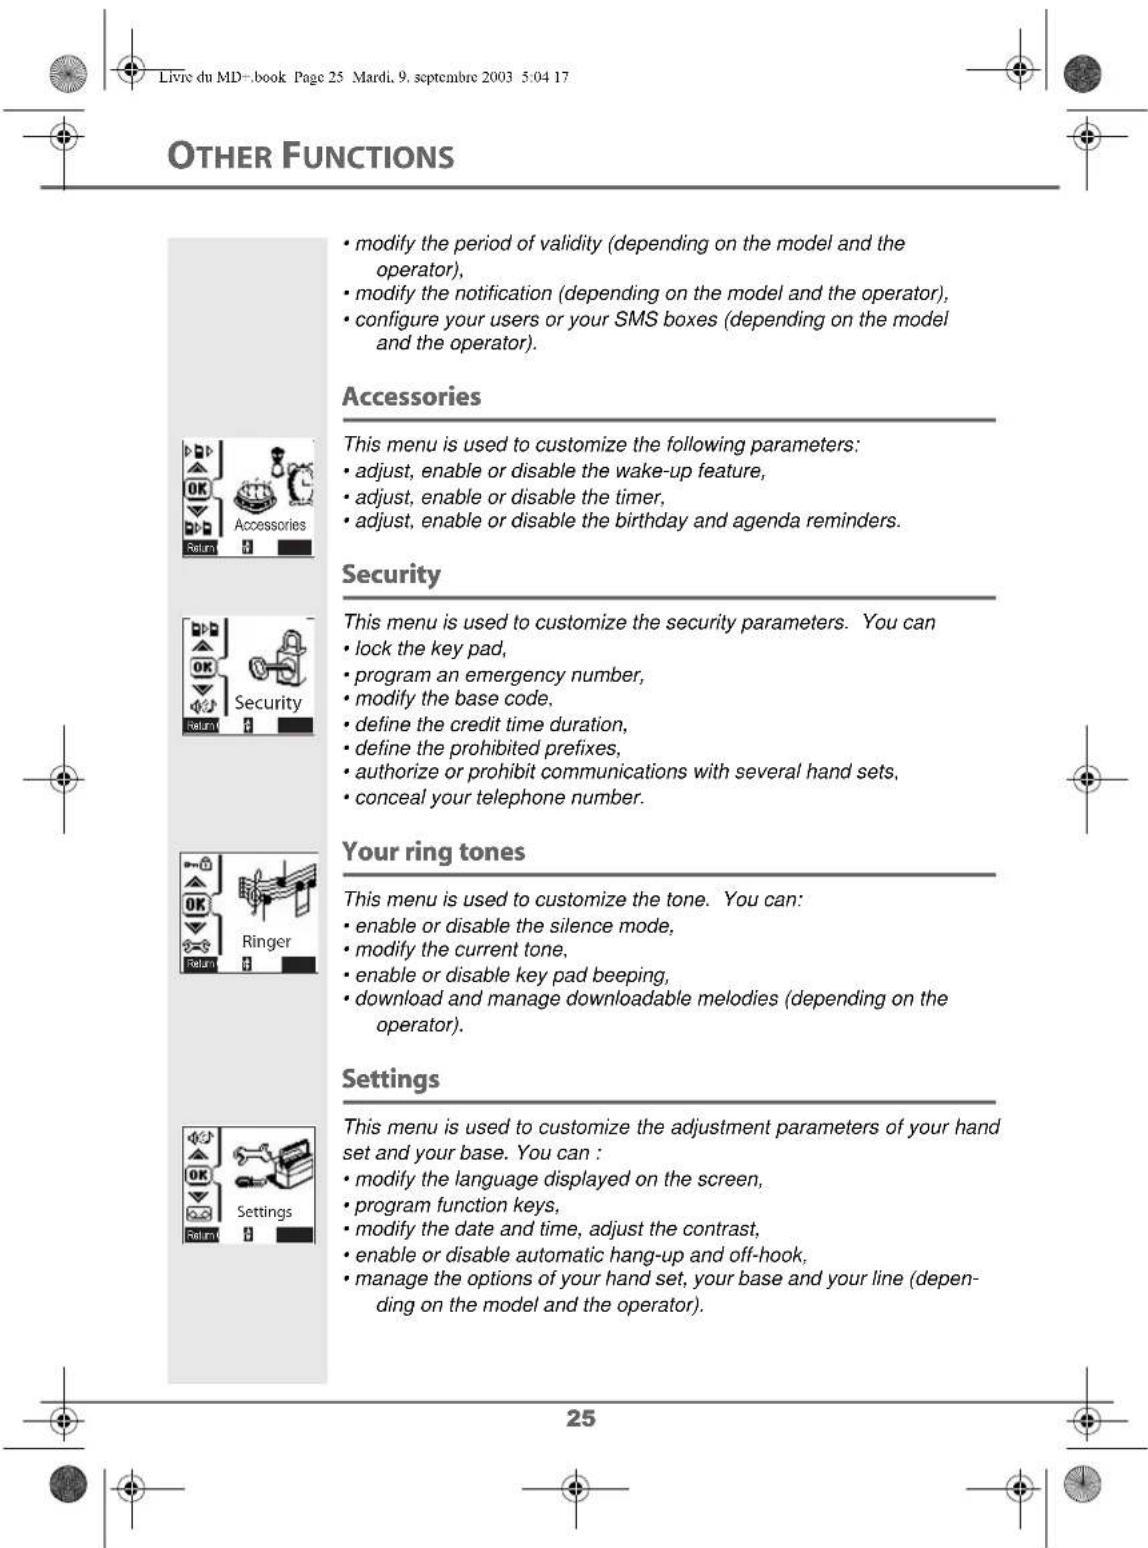
| Main functions | Phonebook, Intercom, Phonebook transfer, Room monitoring, SMS, Alarm, Timer, Keypad lock, Call restriction, Intrusion |
| Compatibility | GAP standard, Sagem D70T/V and D50T/V bases |
| Maintenance | Clean with a slightly damp cloth |
| Safety | Only use approved rechargeable batteries, do not expose to moisture |
| Spare parts | Replacement batteries available from retailer |
| Recycling | Used batteries to be recycled, packaging recyclable |
| General information | CE marking, compliant with R&TTE Directive 1999/5/EC |
Frequently Asked Questions - D80V2 SAGEM
User questions about D80V2 SAGEM
0 question about this device. Answer the ones you know or ask your own.
Ask a new question about this device
Download the instructions for your Telephone in PDF format for free! Find your manual D80V2 - SAGEM and take your electronic device back in hand. On this page are published all the documents necessary for the use of your device. D80V2 by SAGEM.
USER MANUAL D80V2 SAGEM
Information in this user brochure concerns units from the D70T/V SAGEM range. Information will or will not be displayed on your screen depending on your type of base and your operator.
The SAGEM D70H hand set can also be registered with other compatible bases for simple telephone functions in compliance with the European GAP standard.
Unpacking
Place the box in front of you, open it and make sure it contains the following items:
- a desk charger fitted with its power supply unit,
- one handset,
- one battery compartment cover,
- three rechargeable batteries,
- this user guide.

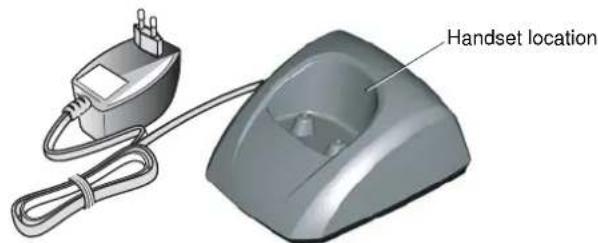
Your desk charger


Your handset
With its user-friendly design, you will appreciate how easy it is to hold and its quality during conversations.
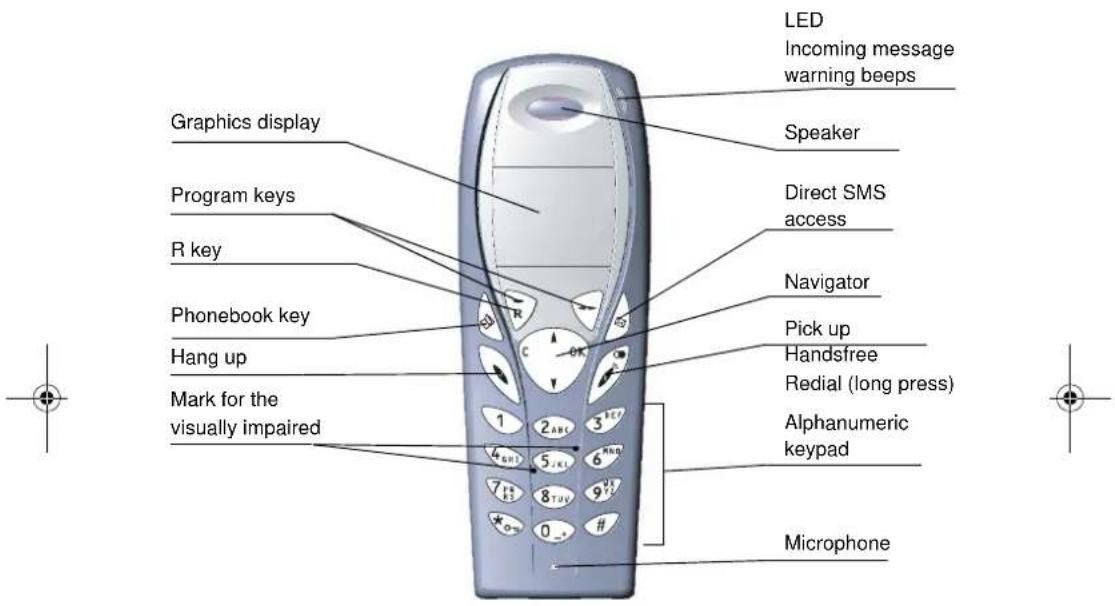
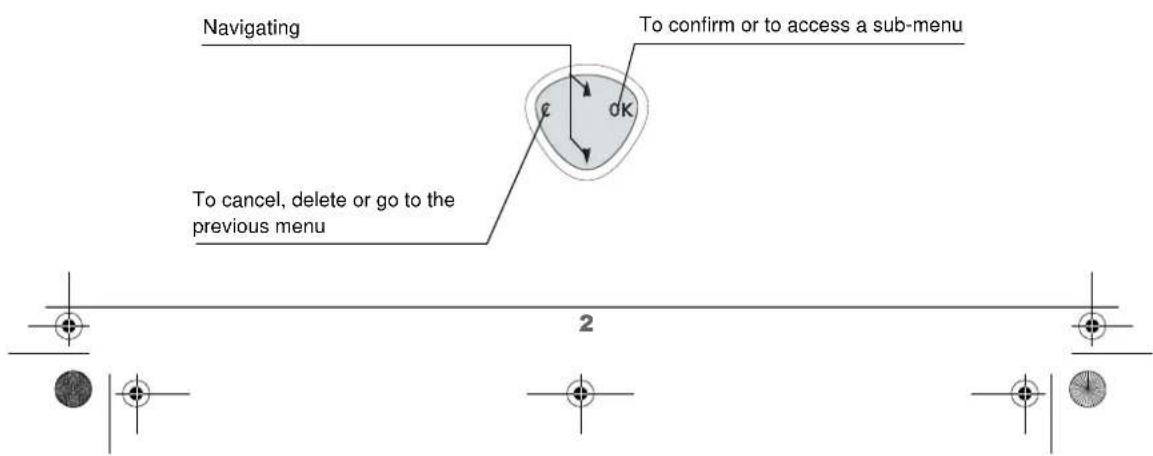
The navigator key, a rapid selection tool.

Connection

Before making any connections, please refer to the safety instructions presented at the beginning of this user guide.
Starting your desk charger
Put the support where you want it and connect the power lead to the mains plug.
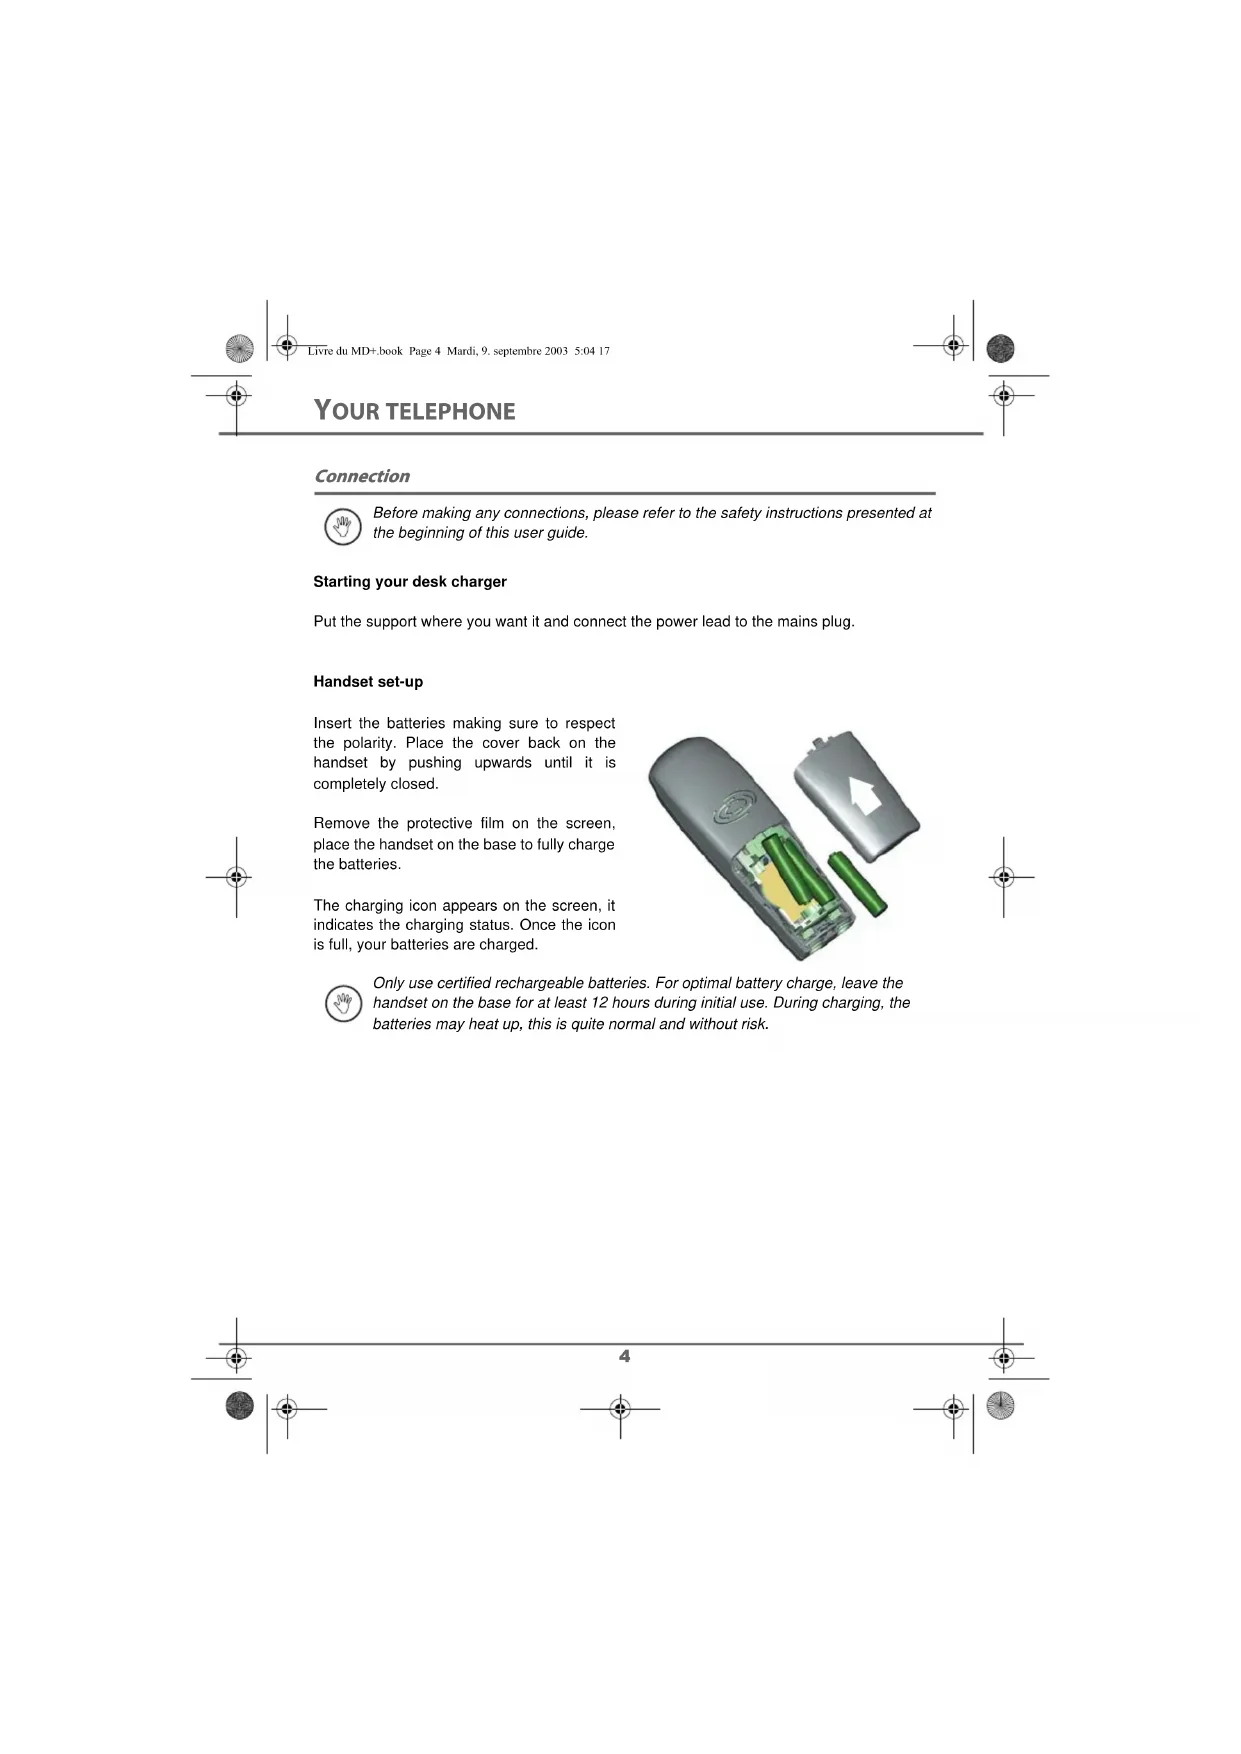
Handset set-up
Insert the batteries making sure to respect the polarity. Place the cover back on the handset by pushing upwards until it is completely closed.
Remove the protective film on the screen, place the handset on the base to fully charge the batteries.
The charging icon appears on the screen, it indicates the charging status. Once the icon is full, your batteries are charged.
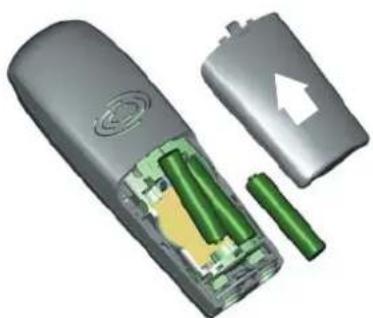

Only use certified rechargeable batteries. For optimal battery charge, leave the handset on the base for at least 12 hours during initial use. During charging, the batteries may heat up, this is quite normal and without risk.


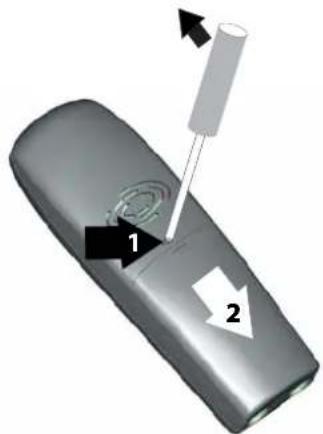
Replacing the batteries
Rechargeable batteries must be used with your handset. Proceed as follows:
Take the handset and turn it around so that the battery compartment is accessible.
Insert a sharp object (pen, paper clip...) perpendicularly in hole 1 as shown in the illustration and lift it upwards, slide it downwards as shown by marker 2 and do exactly what is explained in the previous paragraph.
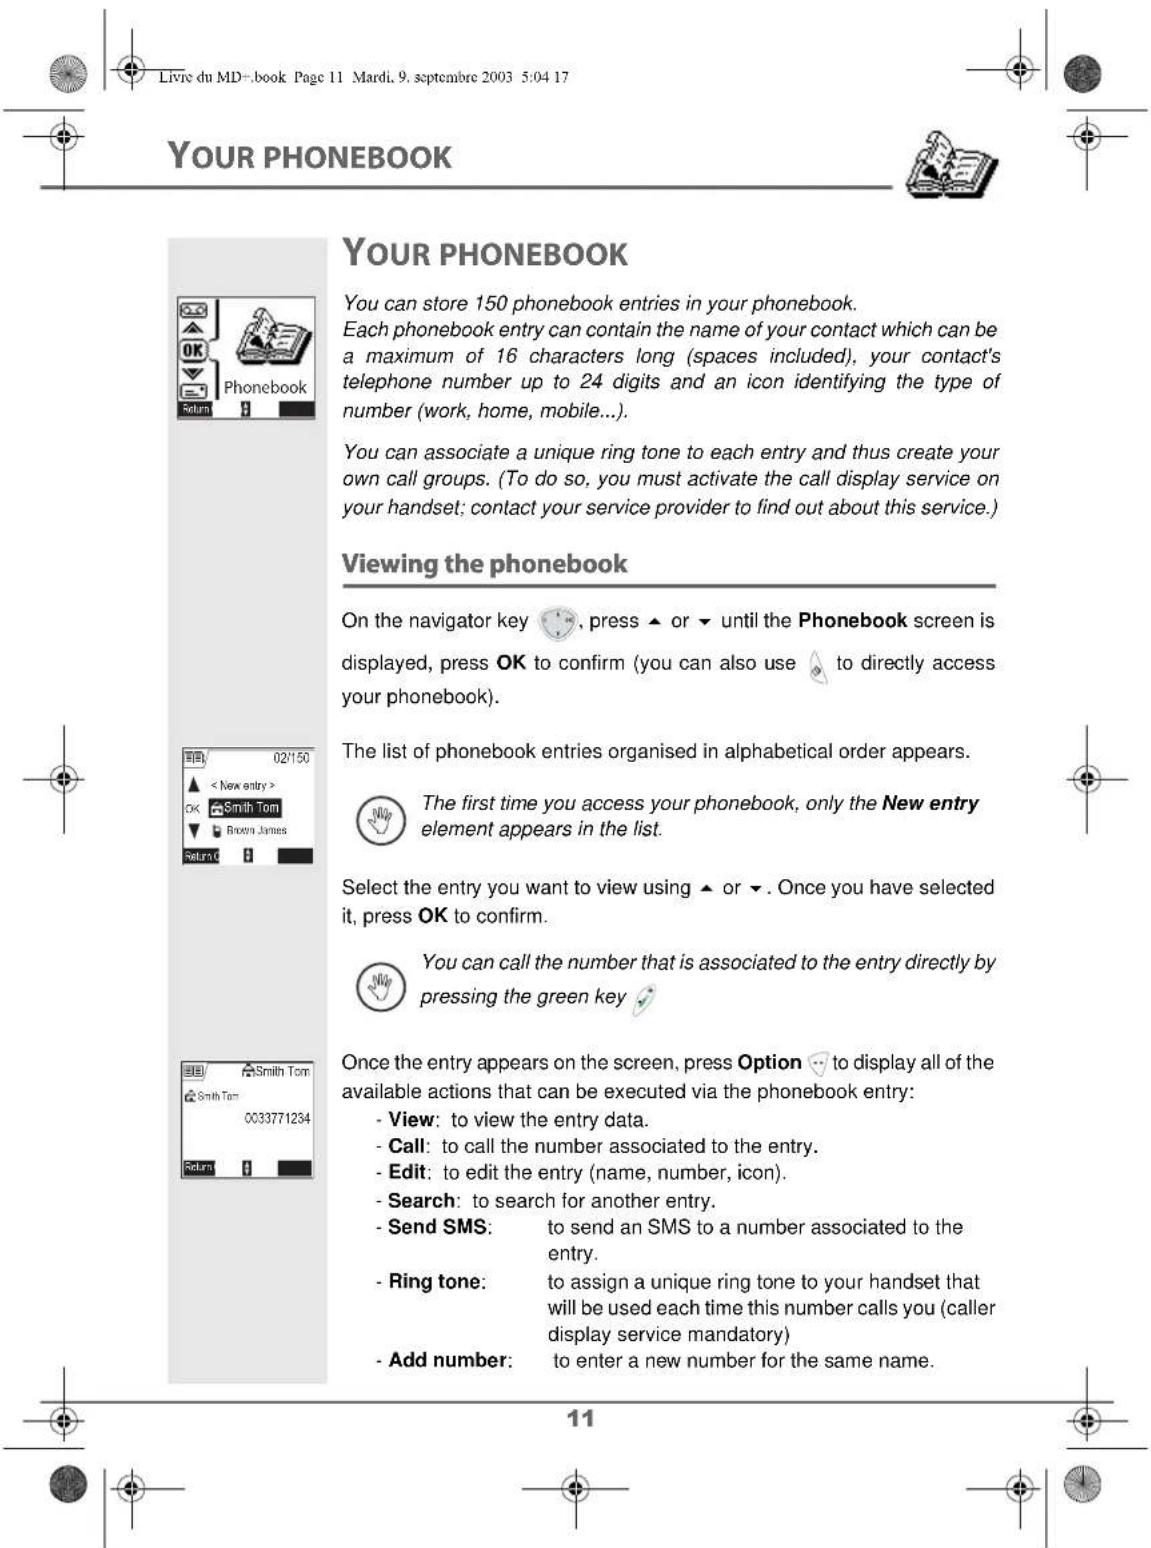
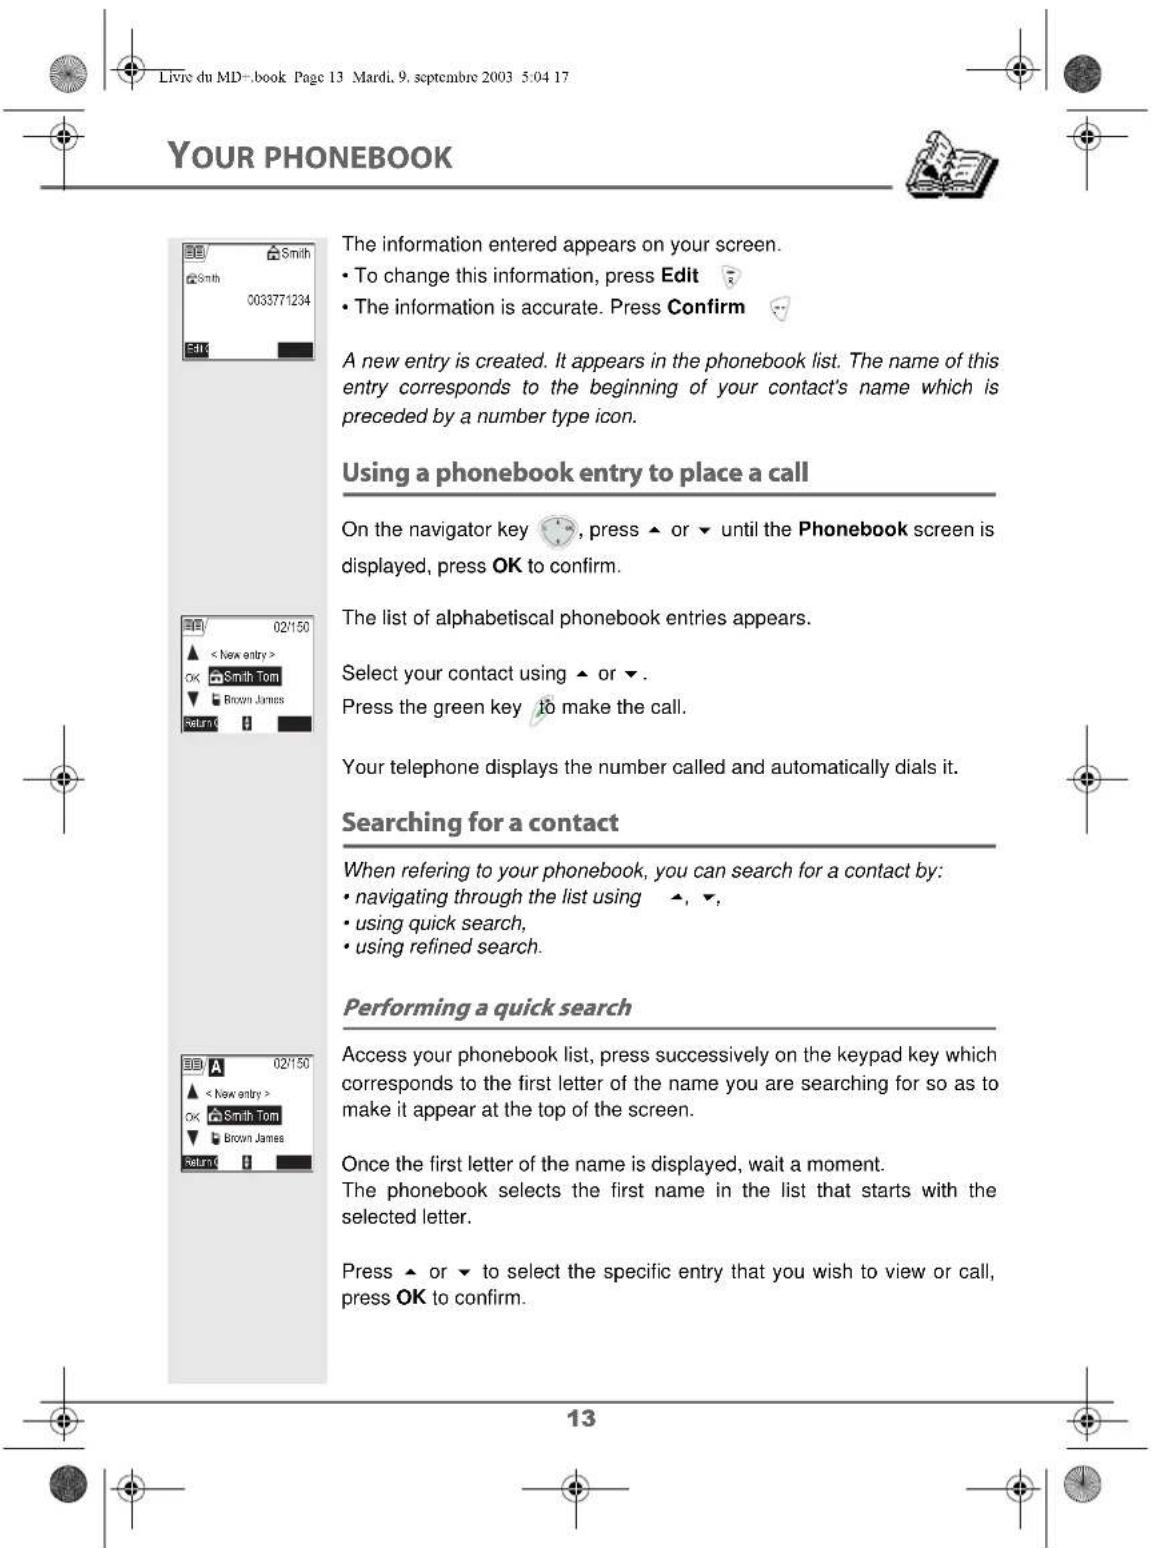
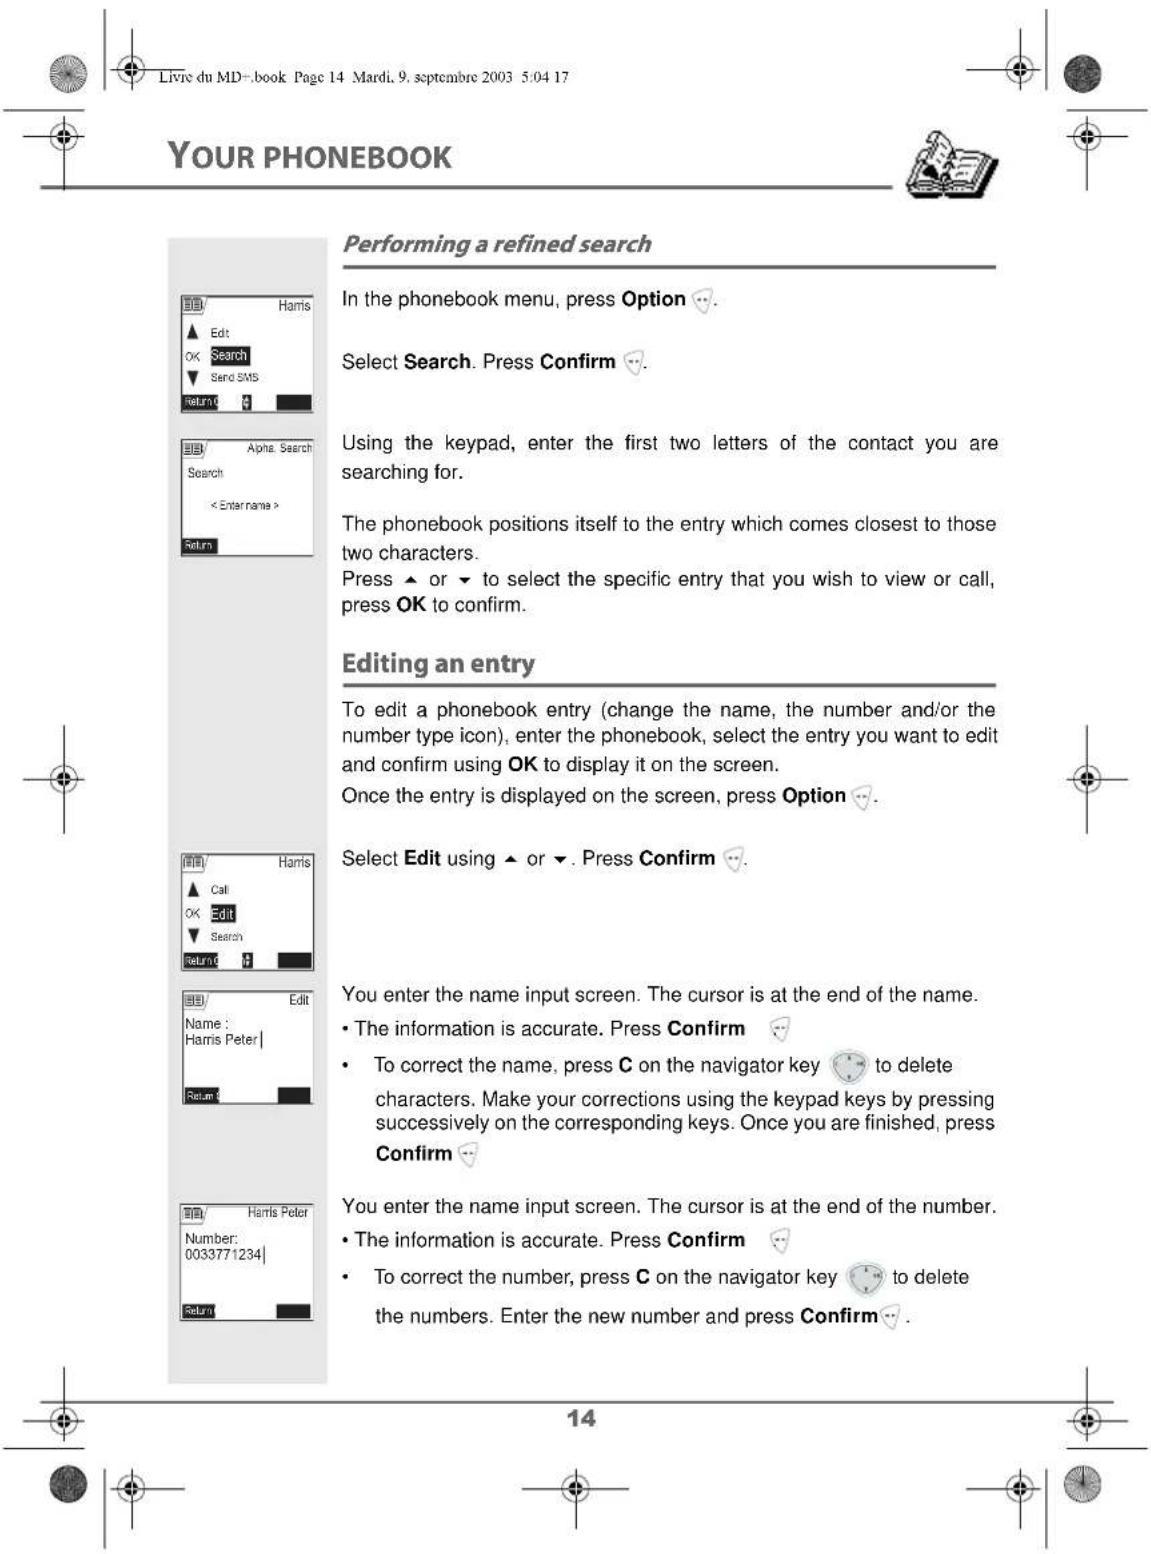

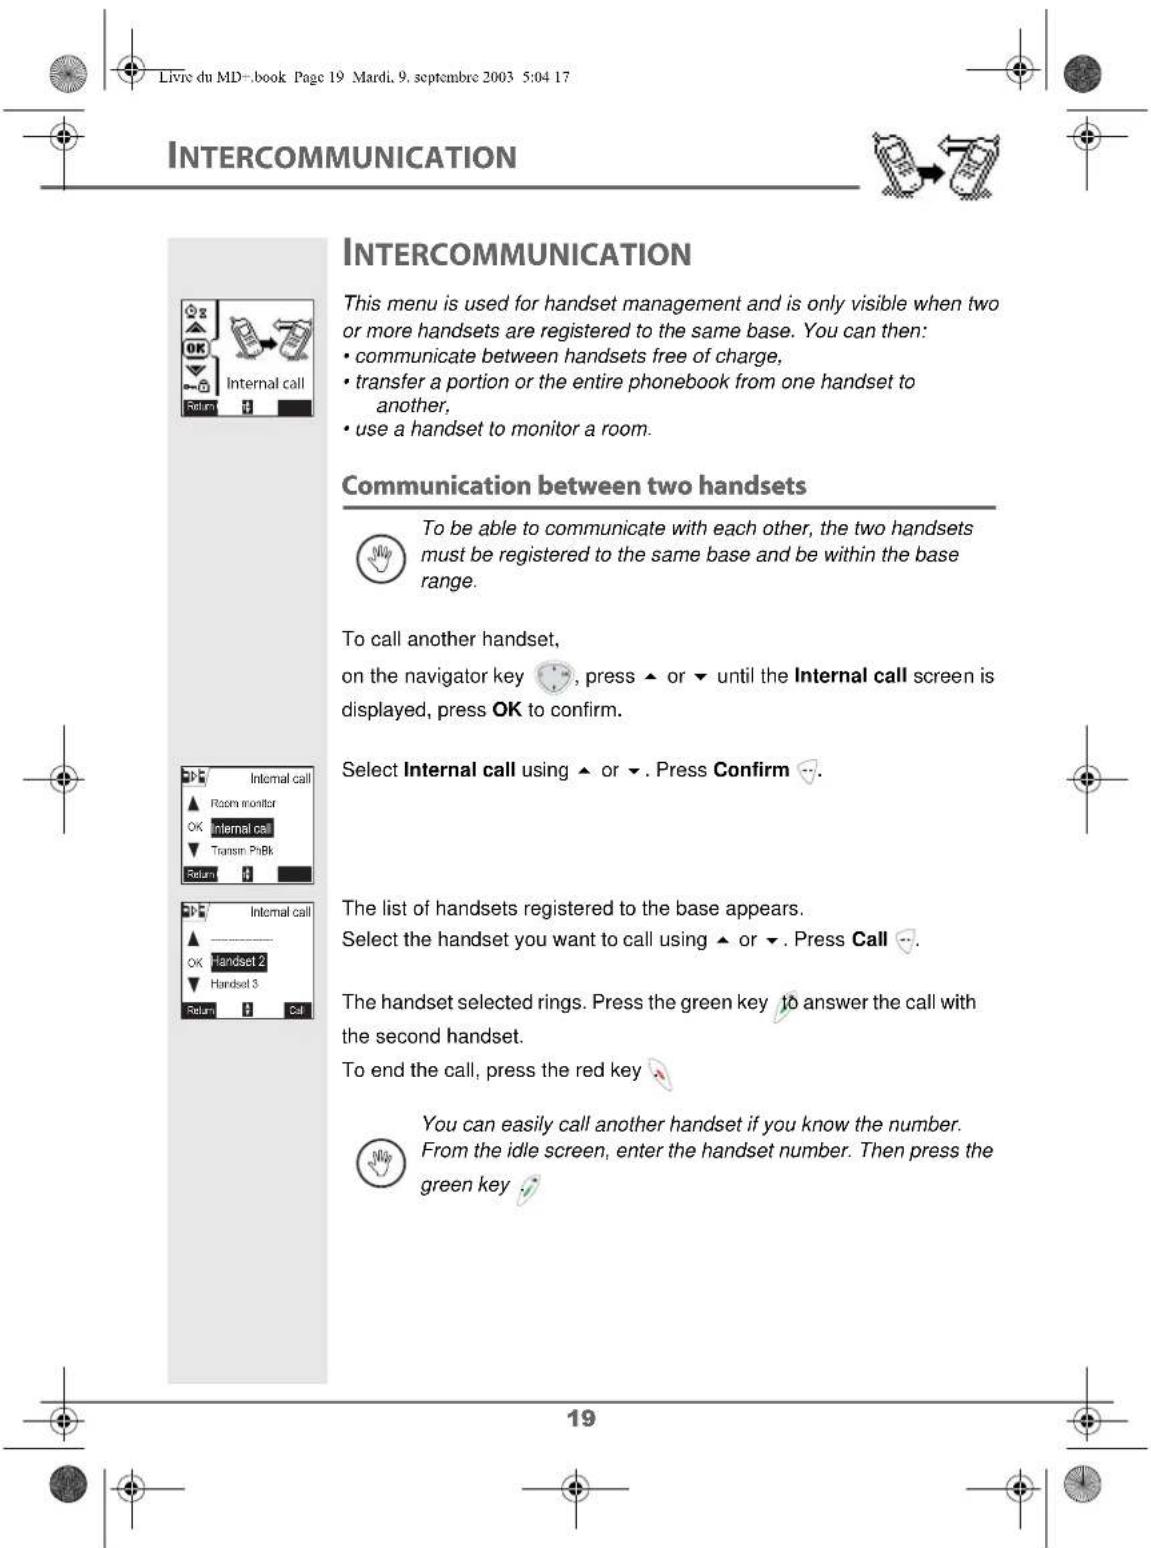
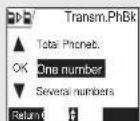
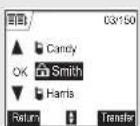
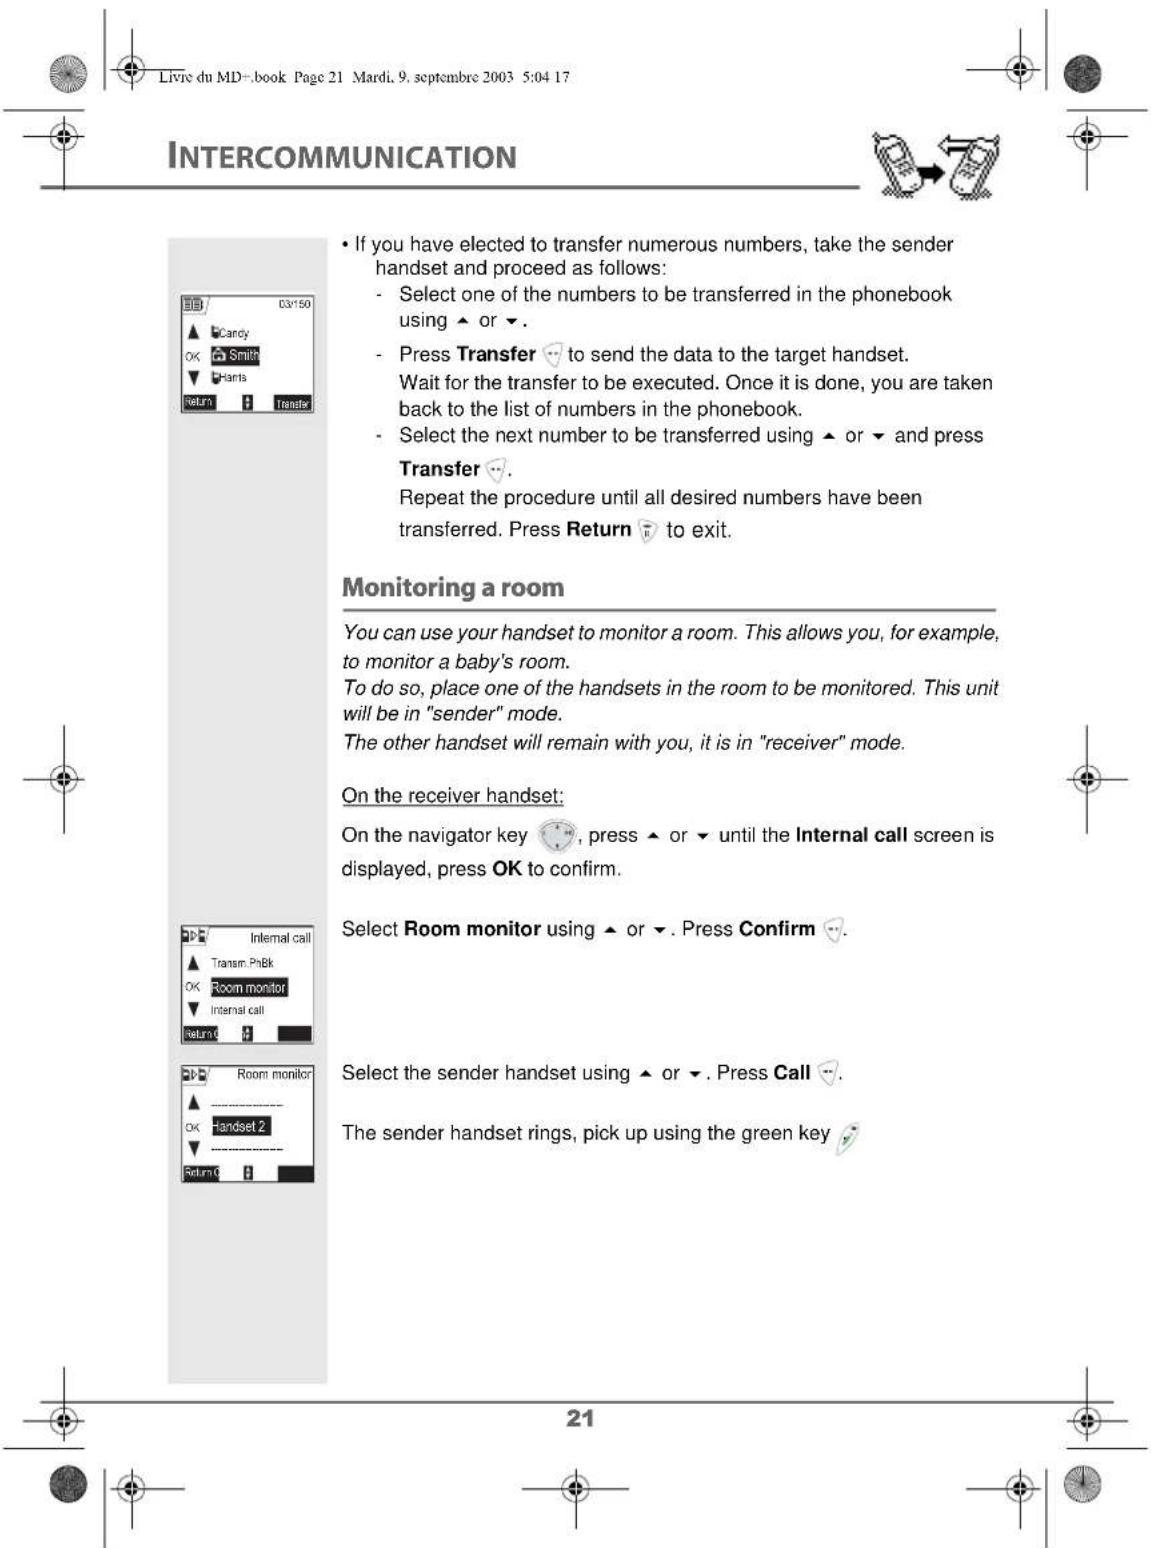
Transferring a part of or the entire phonebook to another handset
Each one of your handsets has its own phonebook. However, if you do not wish to enter the same contact list several times, you can use the transfer function to easily make handset-to-handset phonebook transfers.
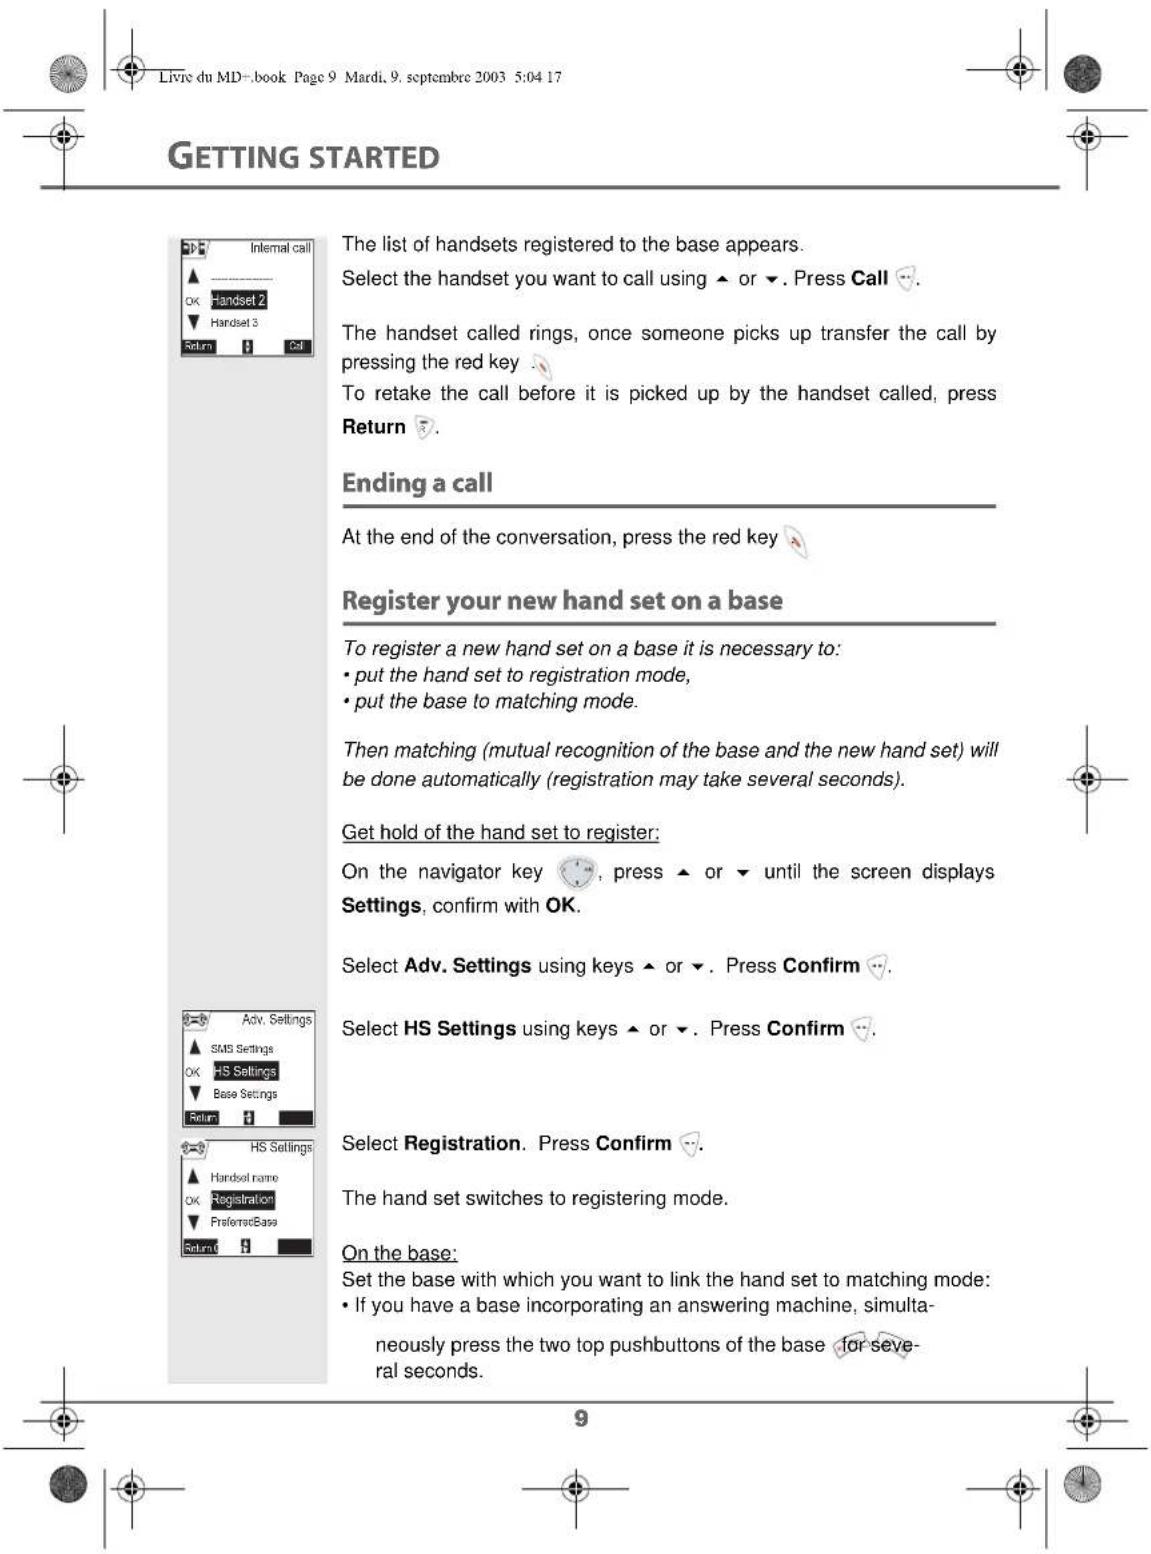
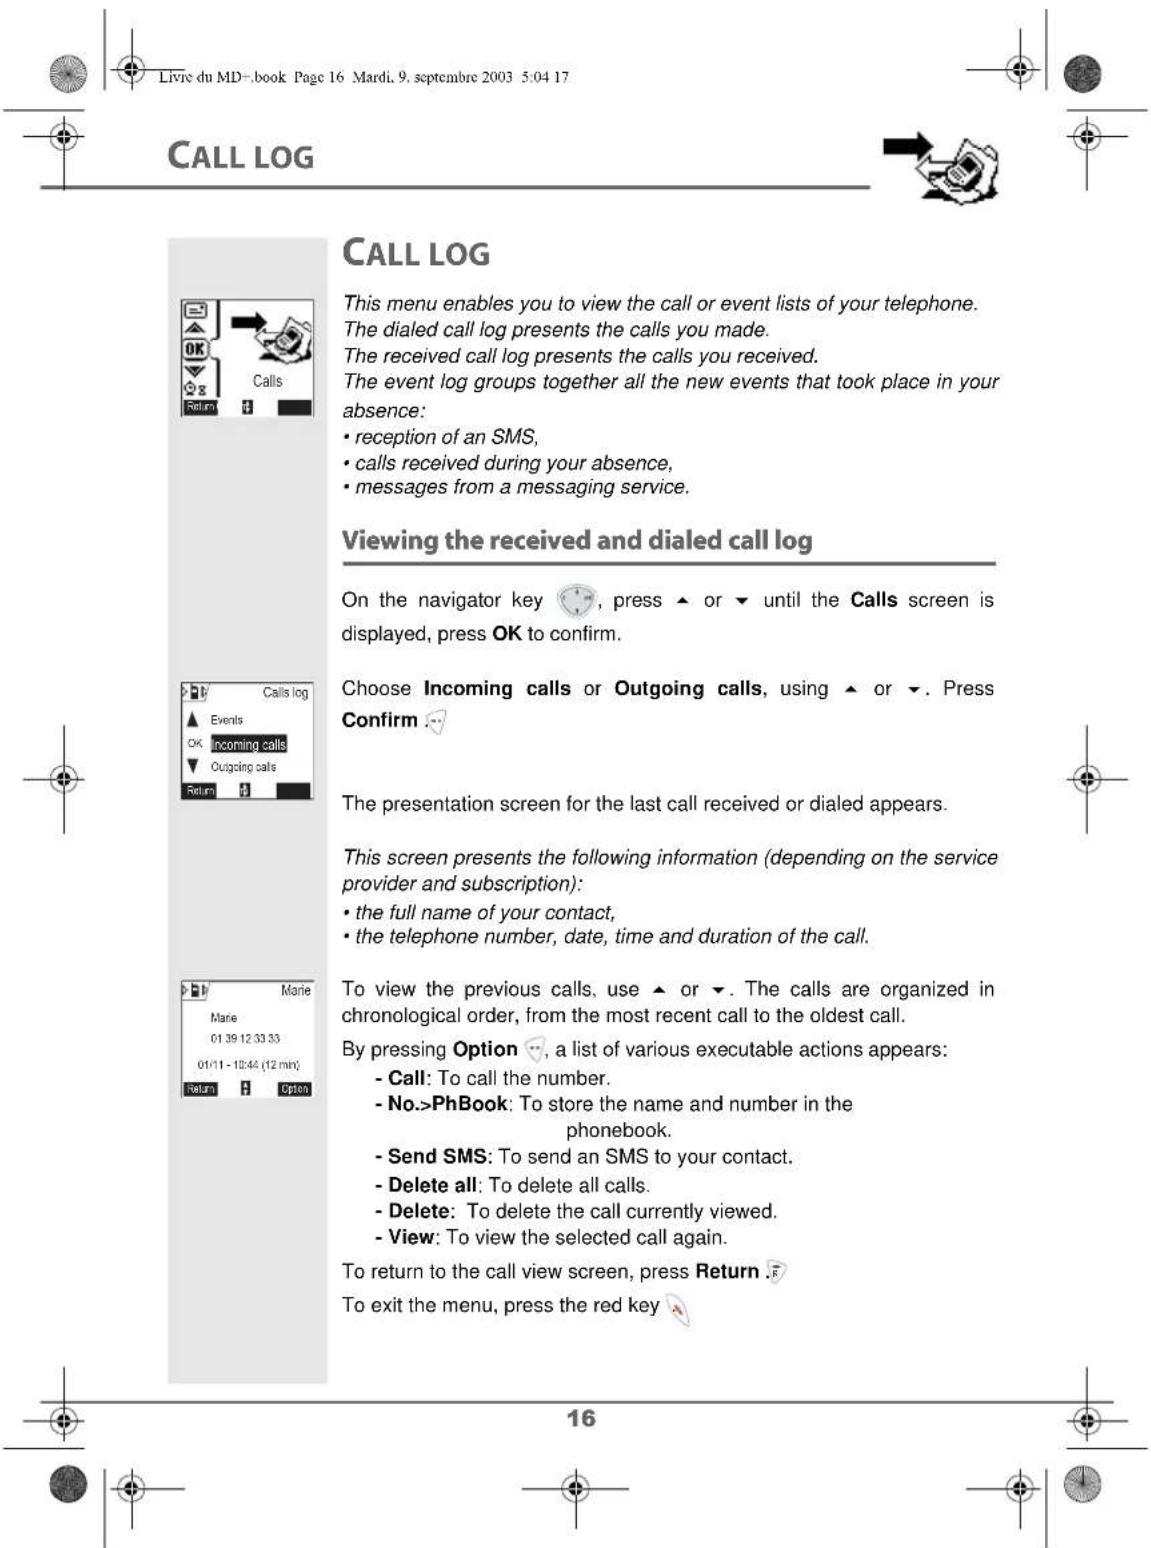
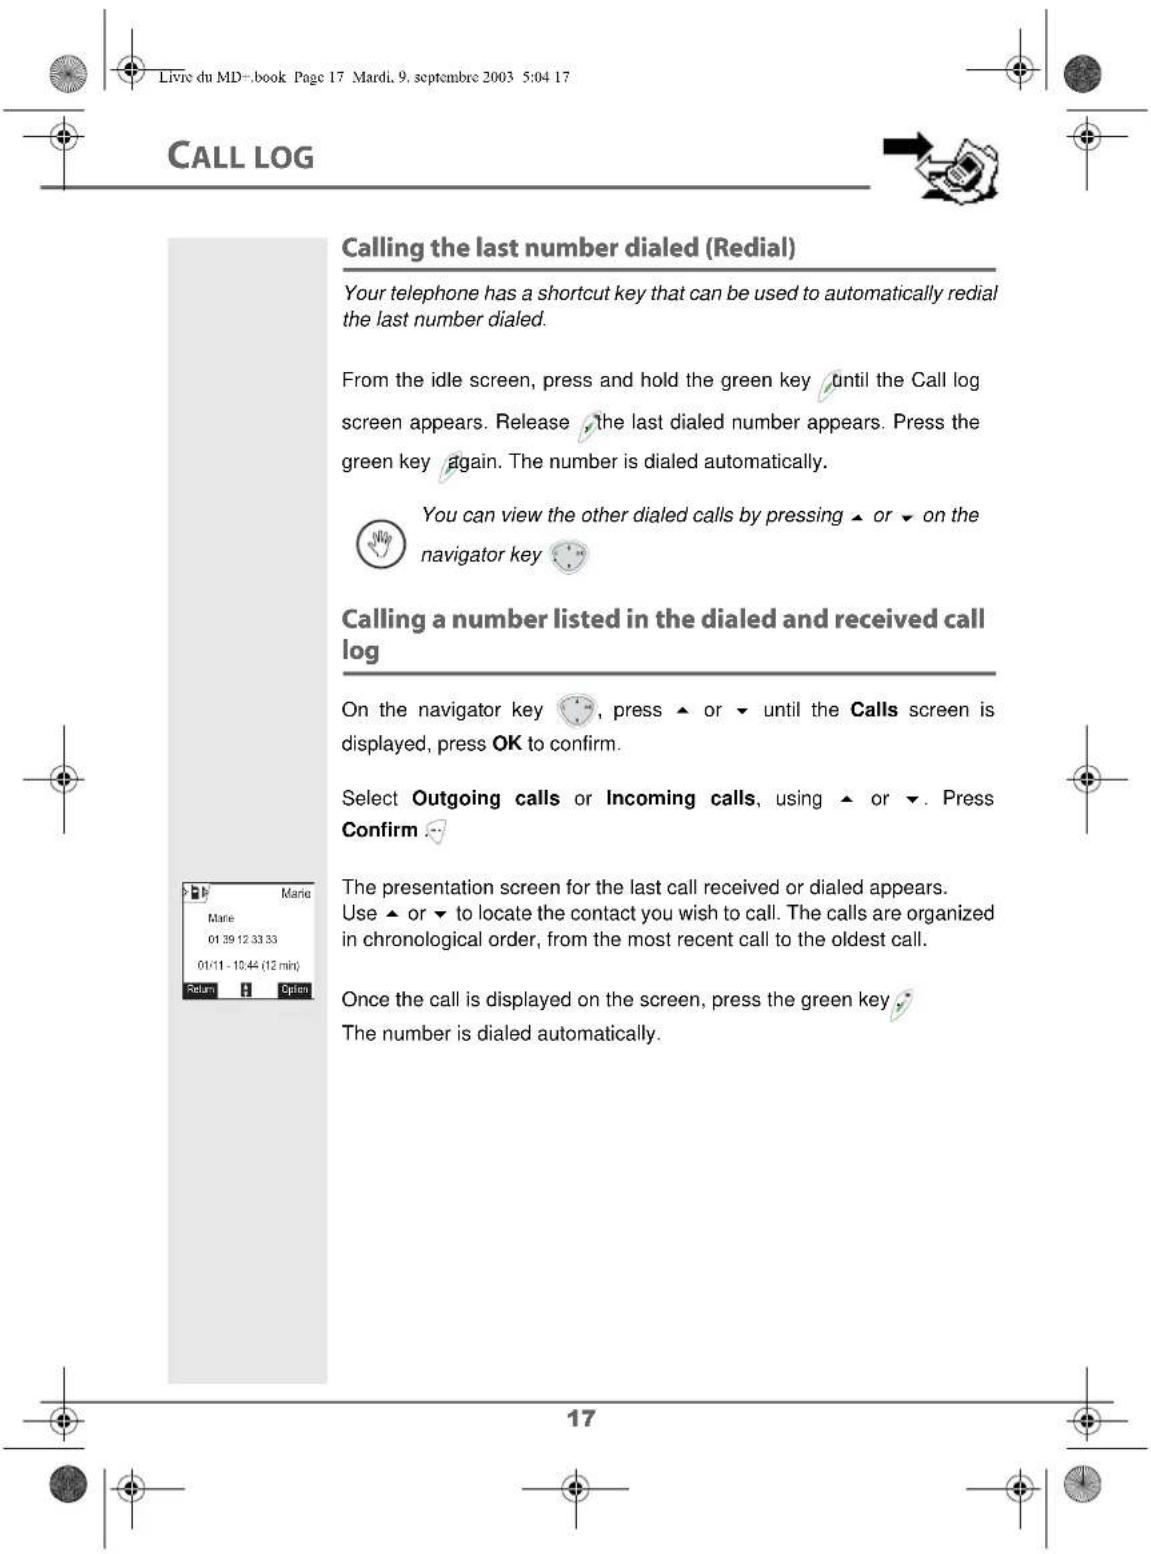
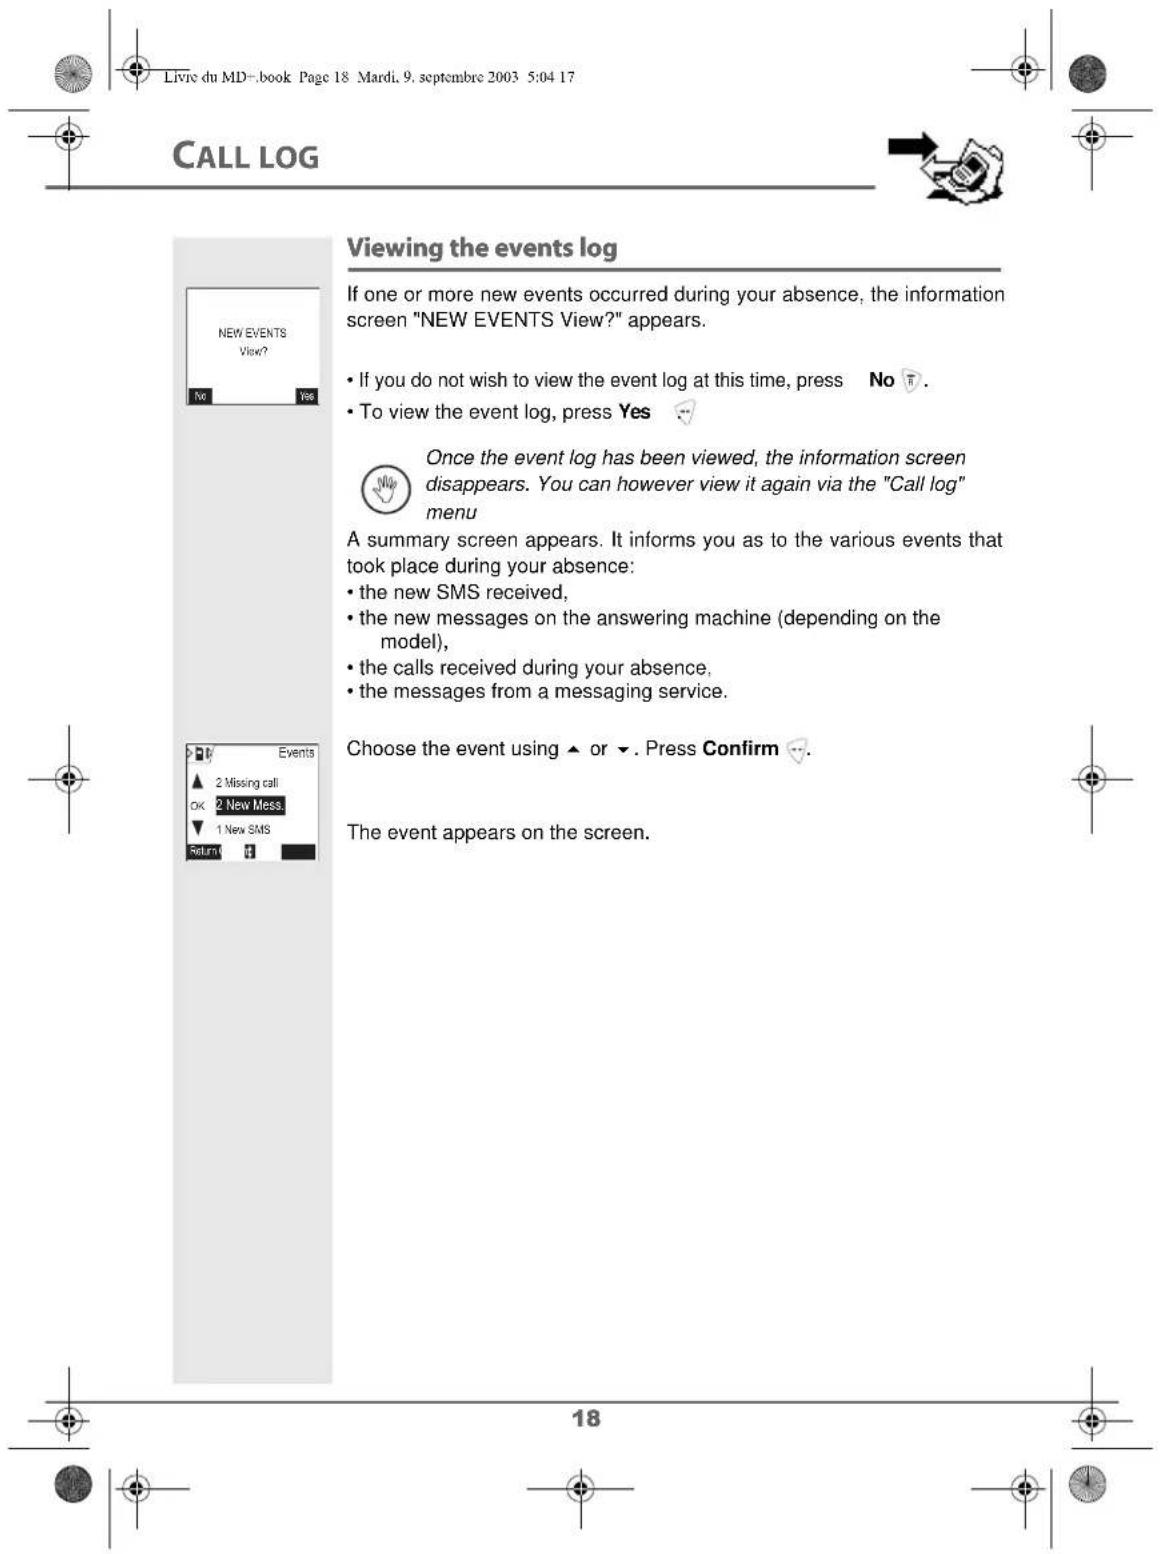
On the navigator key, press or until the Internal call screen is displayed, press OK to confirm.
Select Transm.PhBk using or . Press Confirm

You can choose to transfer:
the entire phonebook,
- a number in the phonebook,
- or numerous numbers,
using or . Press Confirm .
Press or , select the handset to which you would like to transfer the phonebook. Press Call
The target handset rings. Pick up by pressing the green key
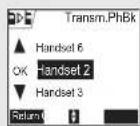
A screen appears prompting you to accept the transfer mode. Press Yes
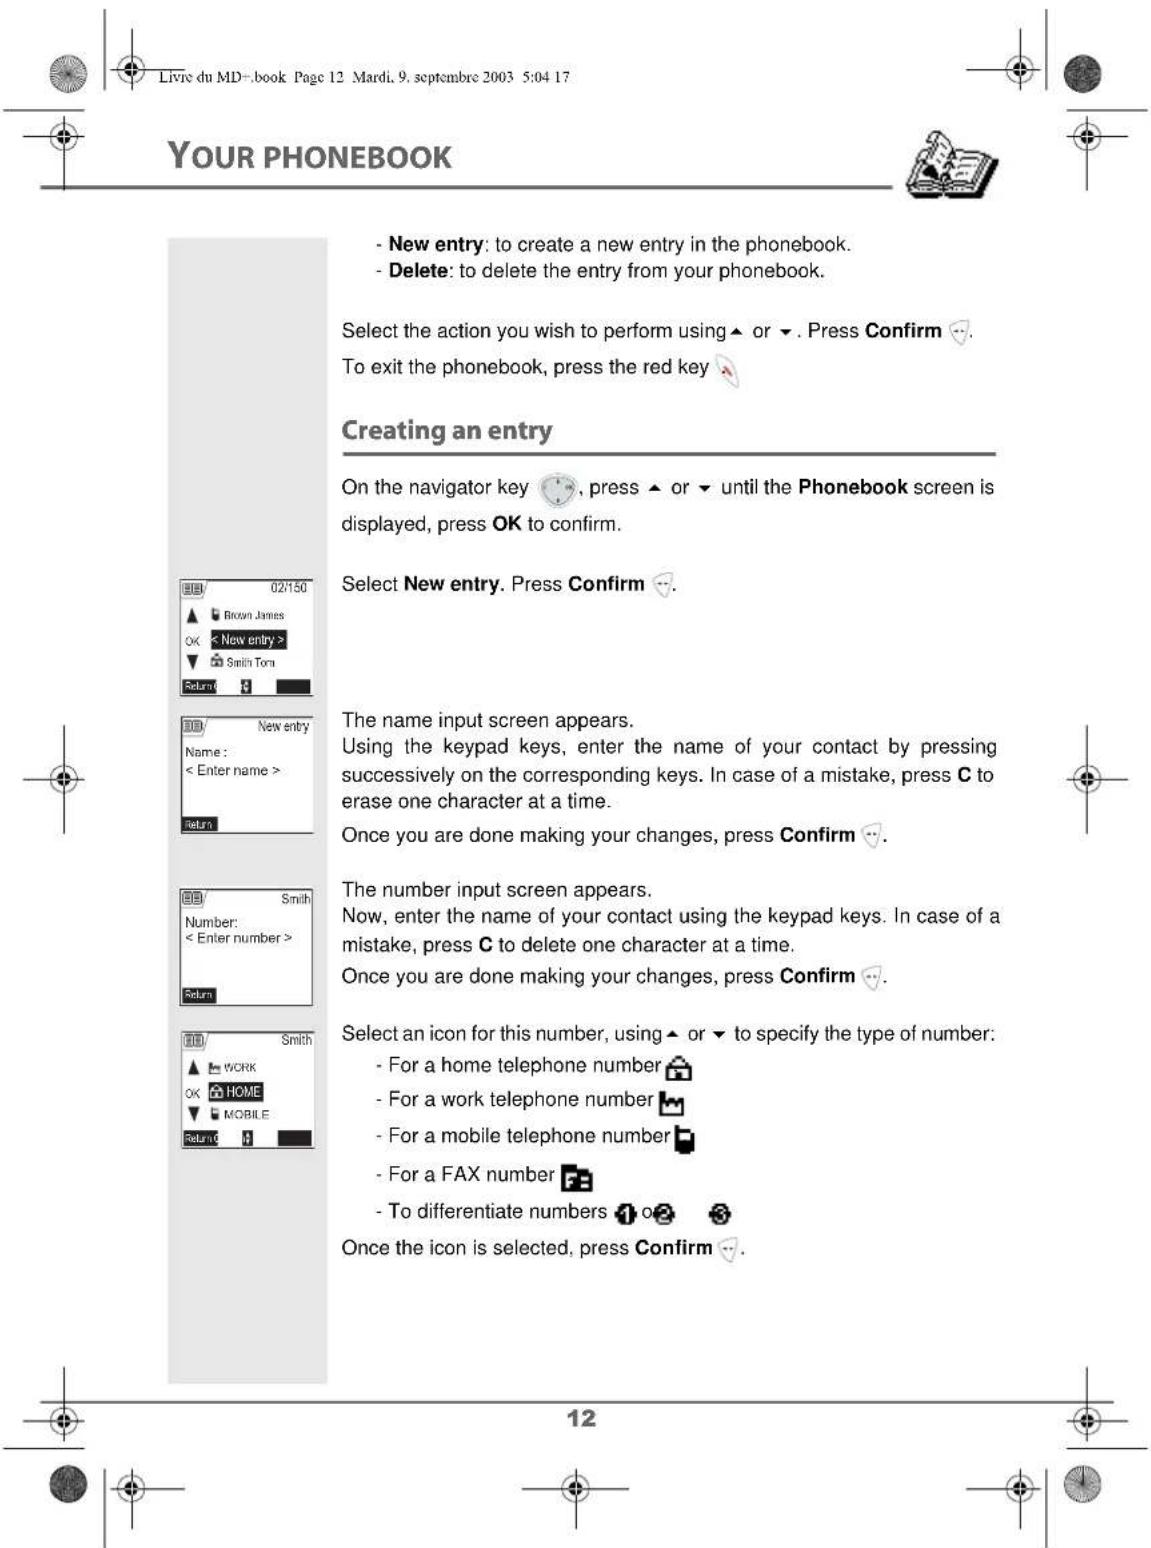
Depending on the type of transfer you selected, follow one of the procedures below:
-
To transfer the entire phonebook, wait a few seconds. Once the operation is done, a screen indicating the end of the transfer will appear.
To transfer a single number, take the sender handset and proceed as follows: -
Select the number to be transferred using or .
-
Press Transfer to send the data to the target handset.
Wait until the transfer is done. Once it is done, a screen indicating the end of the transfer will appear.


Care and Maintenance
Use a slightly damp cloth to wipe the base and handset, do not use a dry cloth as this may cause electrostatic charges.
Problems
Refer to the table presented below in case of an operational malfunction:
| Problems Remedies | |
| The base indicator light is not lit | Make sure that: • the power adapter is properly connected to a power socket. • your fuse and circuit-breaker are in working order and that the power socket is powered. |
| The handset display is blank Make | sure the batteries are properly installed. Place the handset on the base and fully charge the batteries. To increase the life of your batteries, you can perform this operation about every two months. If these precautionary measures do not resolve this issue, replacement batteries are available through your reseller. As time goes by, you may notice a slight decrease in battery performance. Use your handset until the battery is fully discharged, and then charge it for at least 12 hours. |
| The handset does not ring during an incoming call | Make sure that the telephone is properly connected and that you have a dial tone. Make sure your telephone is not set to silent mode. Make sure you are not in the privileged access mode. |
| No radio link between the handset and base The network indicator icon flashes | Make sure the handset is registered by moving closer to the base, if it is registered correctly, the handset screen should display its own handset number. Otherwise, register the handset to the base. See "Register your other hand set on a base", page 23. |
| You obtain a "busy" dial tone for each dialed number | Make sure no one else is using another handset (if the intrusion mode is active). Make sure that the dial mode (tone or pulse dialing) is compatible with your telephone line or your automatic branch exchange. Make sure your time limit has not run out (if activated). Make sure you are not on call restriction (if activated) |
| You cannot send or receive SMSs | Make sure you have subscribed to a caller display service. Find out if the SMS service is in fact activated on your line. Obtain the server numbers from your service provider and make sure they are identical to the numbers on your handset. Have you provided your contacts with the right terminal number? |


| Functions Default settings Functions Default settings | ||
| SMS Confidential Off | ||
| SMS sending centre | Depending on the service | RING TONES |
| SMS reception centre | Depending on the service | Ringer (Ext/Int) Actualites / Carmen |
| ACCESSORIES Silent mode Off | ||
| Alarm clock Off Beeps All active | ||
| Timer Off SETTINGS | ||
| SECURITY Program keys Silence/Alarm clock | ||
| Keypad lock Off Date/Time 00:00 // 01/01/03 | ||
| Emergency Off Auto Hang up Off | ||
| Base code | 0000 | Auto Pick up |
| Time limit | Off Language | |
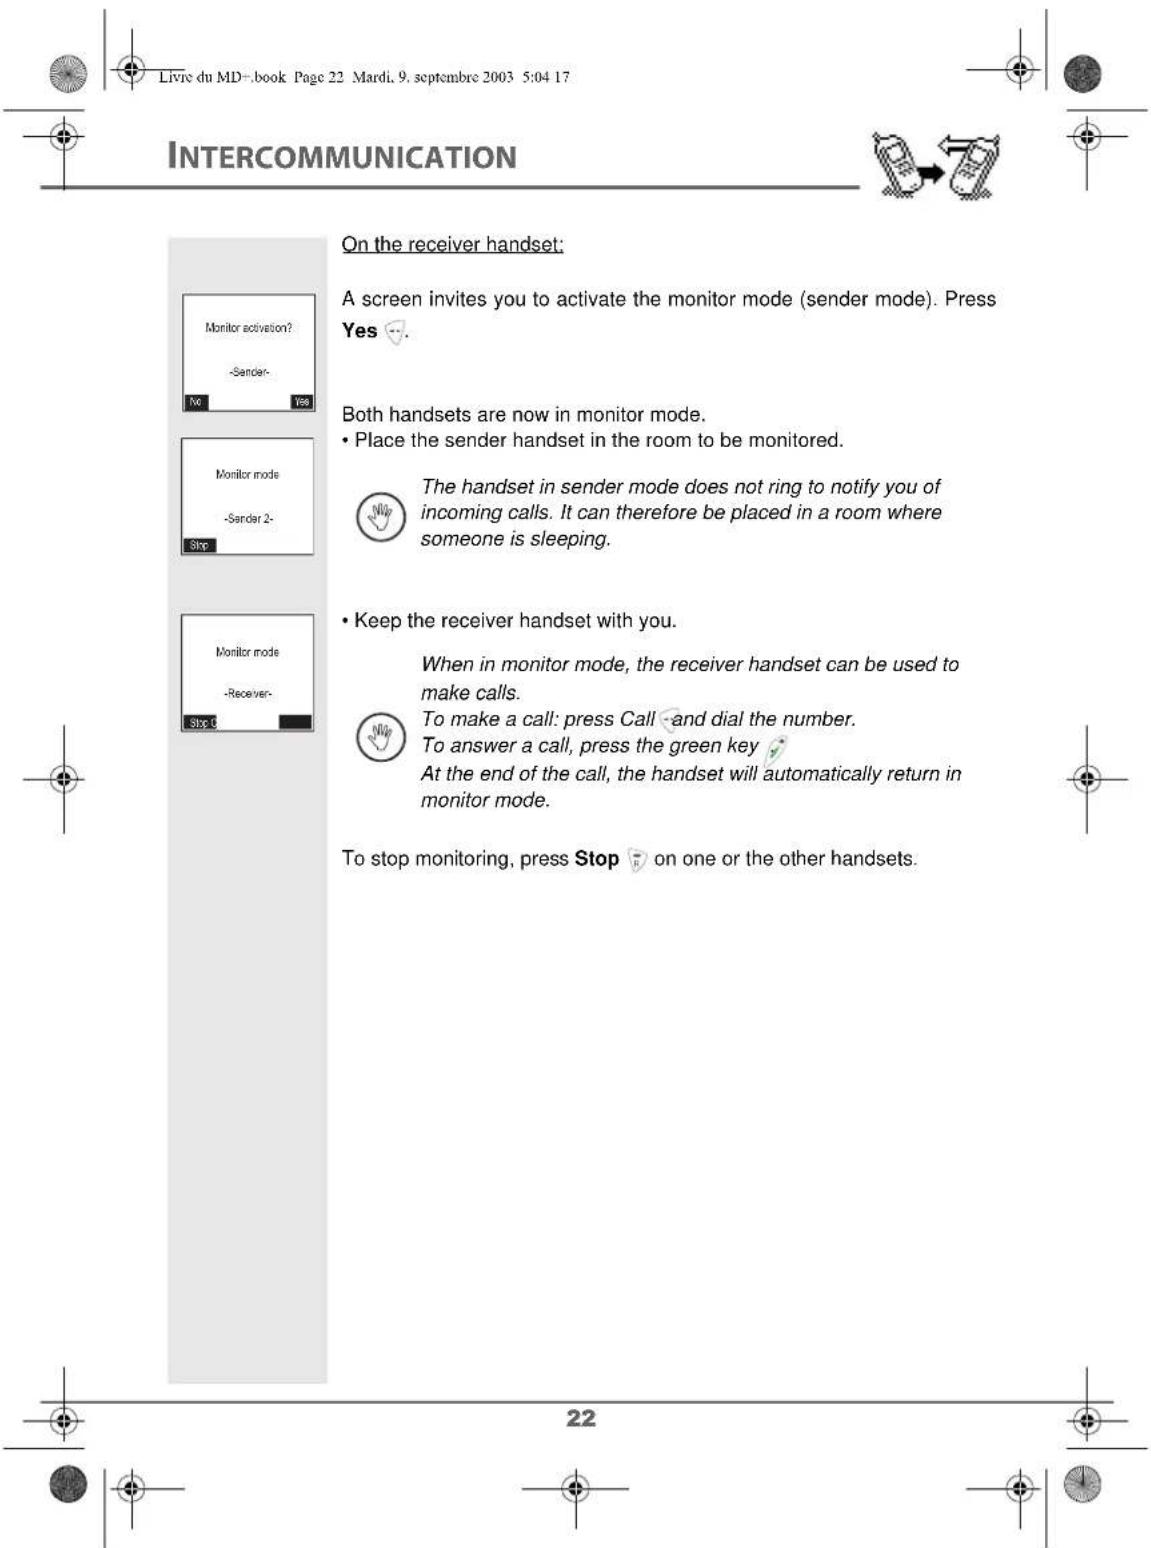
| Restriction | Off | INTERCOMMUNICATION |
| Intrusion | Off Room monitor | Off |


Preserving the environment in a durable developmental logic is a primary concern for SAGEM SA.
SAGEM SA industrial sites comply with the environmental standards for emissions produced by all of its activities.
Design guidelines for this product were put into place to minimize the environmental impact during its life cycle.
The improvement axes defined in the eco-design program during the development of the D70T/V product were as follows:
Defining environmentally friendly packaging:
- Optimizing the packaging size in order to use a minimum of raw material.
- Using recycled and recyclable materials.
Improving the recyclable character of the product at the end of life:
- Reducing the number of materials used in making the product.
- Taking into account, during the design phase, the dismantling of the used product for recycling.
- Avoiding the use of PBDE flame retardants.
This user guide is printed on recycled paper.

The presence of this logo on the packaging indicates that SAGEM SA pays a contribution to the ECO-EMBALLAGES company. This contribution allows ECO-EMBALLAGES to develop infrastructures working with local authorities to improve package recovery and recycling.

The batteries found in the product must never be discarded in the environment or in refuse containers used for other waste. Waste collection points are made available in town halls, retails stores, and large surface stores for the disposal of such products.


- Unpacking
- Your handset
- Connection
- Starting your desk charger
- Handset set-up
- Replacing the batteries
- Transferring a part of or the entire phonebook to another handset
- Care and Maintenance
- Problems
- Defining environmentally friendly packaging:
- Improving the recyclable character of the product at the end of life:
- This user guide is printed on recycled paper.
Brand : SAGEM
Model : D80V2
Category : Telephone