
WSN 1412 LT - Fridge BLOMBERG - Free user manual and instructions
Find the device manual for free WSN 1412 LT BLOMBERG in PDF.
User questions about WSN 1412 LT BLOMBERG
0 question about this device. Answer the ones you know or ask your own.
Ask a new question about this device
Download the instructions for your Fridge in PDF format for free! Find your manual WSN 1412 LT - BLOMBERG and take your electronic device back in hand. On this page are published all the documents necessary for the use of your device. WSN 1412 LT by BLOMBERG.
USER MANUAL WSN 1412 LT BLOMBERG
UK Instructions for use
Get to know your wine cooler. 3
Installation and start-up. 4
Reversible door. 7
Electrical connection 8
Operation and function. 9
Defrosting, cleaning and maintenance...11
Fault finding. 12
Warranty, spare parts and service 13
Disposal 14
Thank you for purchasing your new wine cooler from Blomberg. Please note that these instructions apply to all wine coolers in the WSN range. Illustrations and fittings may therefore not necessarily correspond exactly to your model.

WARNING: - keep ventilation openings, in the appliance enclosure or in the built-in structure, clear of obstruction.
WARNING: - do not use mechanical devices or other means to accelerate the defrosting process, othet than those recommended by the manufacturer,
WARNING: - do not damage the refrigerant system.
WARNING: - do not use electrical appliances inside the refrigerated storage compartments, unless they are of the type recommended by the manufacturer.
The appliance shall not be exposed to rain.
- Keep always the keys in separate place and out of reach of children.
- Before servicing or cleaning the appliance, unplug it from the mains.
As the appliance contain a refrigerant which is flammable (Isobutane R600a) it is essential to ensure that the refrigerant pipes are not damaged. If damage does occur, avoid sparks or naked flame in the vicinity of the appliance, ensure that the room is well ventilated, disconnect the power supply, and contact your supplier. The unit must only be serviced by qualified technicians from an approved service centre.
This appliance is not intended for use by young children or infirm persons unless they have been adequately supervised by a responsible person to ensure that they can use the appliance safely".
"Young children should be supervised to ensure that they do not play with the appliance".
Old appliances
Old refrigerators and freezers are often fitted with complicated latches that can only be opened from the outside. If you have one of these old units stored away somewhere, or if you scrap one, remember to destroy the latch first in order to prevent children from being exposed to great danger by getting locked inside the unit.
Before use
Before operating your new appliance, please read the following instructions carefully as they contain important information on safety, installation, operation and maintenance. Keep the instructions for future reference.
On receipt, check to ensure that the appliance has not been damaged during transport. Transport damage should be reported to the local distributor before the wine cooler is put to use.
Remove the packaging. Clean the inside of the cabinet using warm water with a mild detergent. Rinse with clean water and dry thoroughly (see cleaning instructions). Use a soft cloth.
If during transport the appliance has been laid down, or if it has been stored in cold surroundings (colder than +5^ ), it must be allowed to stabilise in an upright position for at least an hour before being switched on.

Placement
For safety and operational reasons, the appliance must not be installed outdoors.
The appliance should be placed on a level surface in a dry, well ventilated room (max. 75% relative air humidity). Never place the appliance close to sources of heat such as cookers or radiators, and avoid placing it in direct sunlight.
Room temperature
The climate class is stated on the nameplate (see fig. 1 on page 3 and fig. 11 on page 13). This specifies the optimum room temperature.
Wine coolers with winter position, however, function at room temperatures as low as 5^ .
| Climate class | Optimum room tem- perature |
| SN | +10 °C to +32 °C |
| N | +16 °C to +32 °C |
| ST | +18 °C to +38 °C |
| T | +18 °C to +43 °C |
Installation
The surface on which the appliance is to be placed must be level. Do not use a frame or similar.
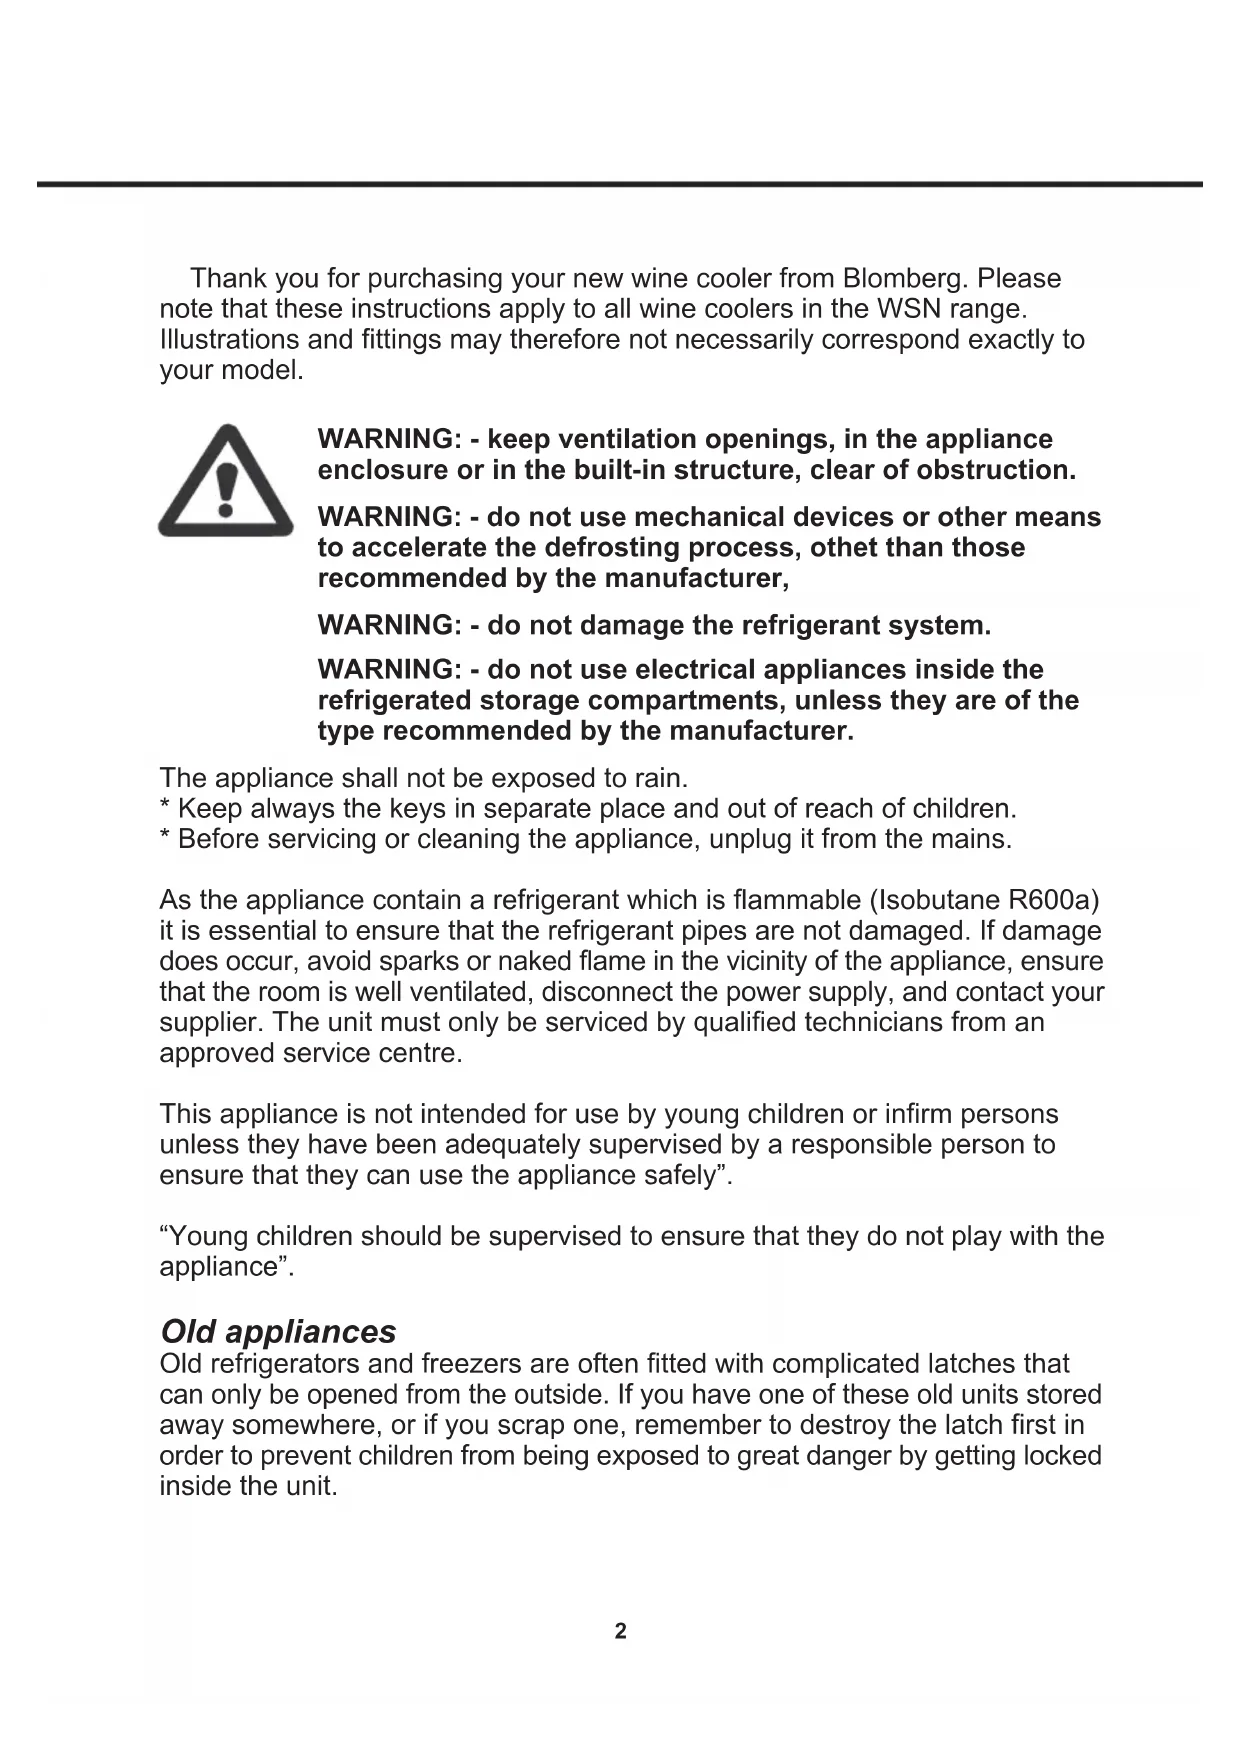
The appliance can be installed as a freestanding unit against a wall, built into a kitchen element, or lined up with other appliances (figs 2-3).
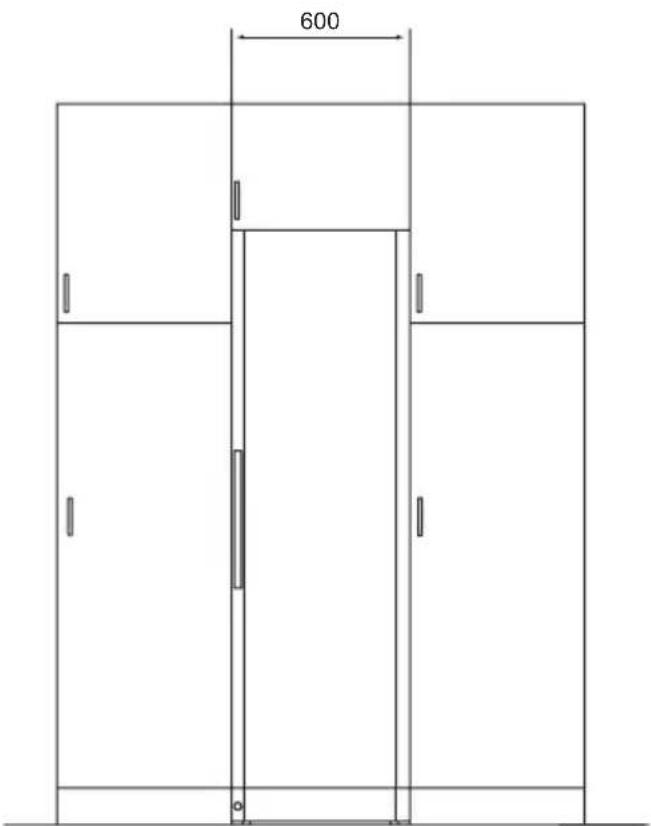
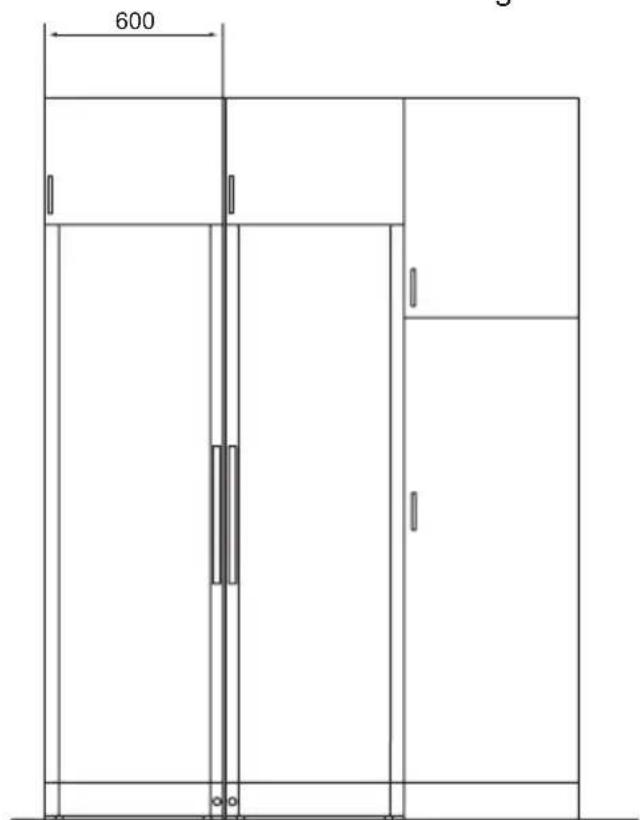
Fig. 2
Fig. 3
The appliance viewed from above
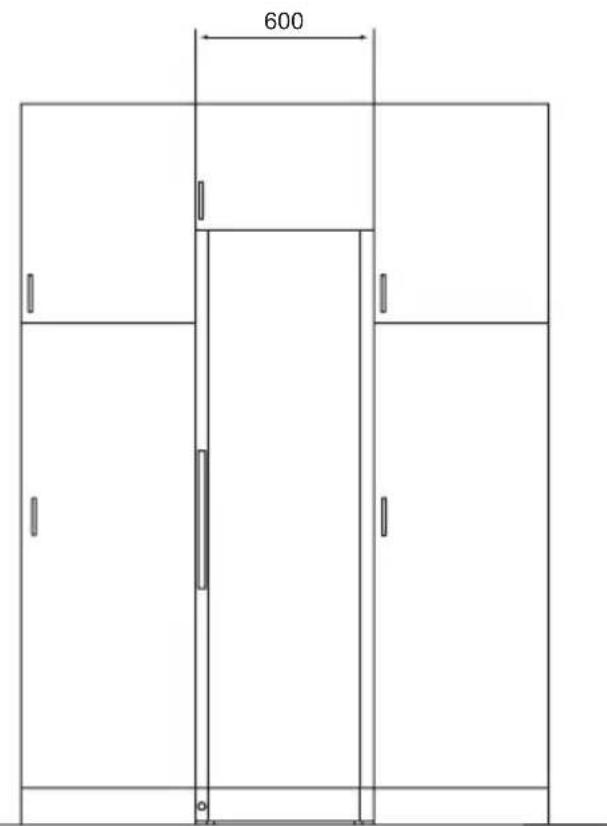
If the appliance is placed beside a wall, there must be sufficient room for its door to be opened wide enough to allow the shelves to be pulled out (fig. 4).
Fig. 4
Ventilation
It is important that the appliance be well ventilated and that air can circulate unhindered above, below and around it. The figures below illustrate how the necessary air circulation around the appliance can be ensured (figs 5-6).
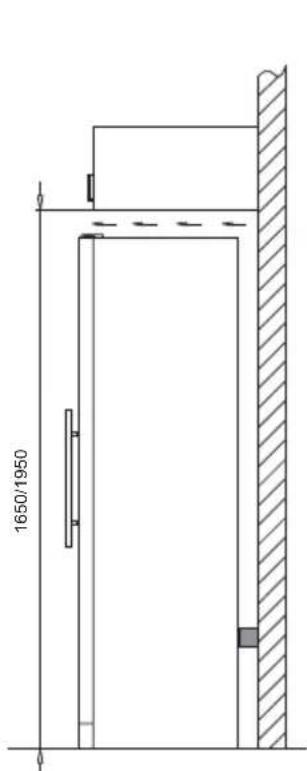
Fig. 5
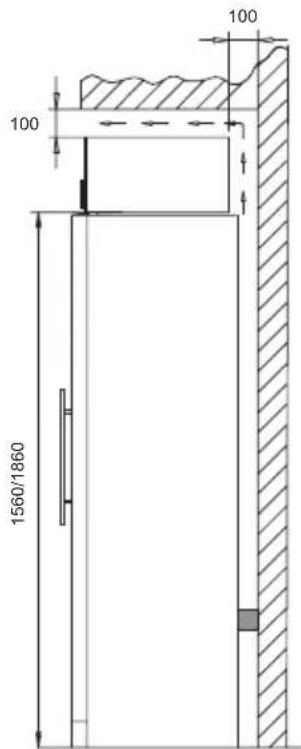
Fig. 6
The distance pieces on the rear of the appliance ensure sufficient air circulation. Fit the two caps supplied with the appliance as shown in fig. 7.
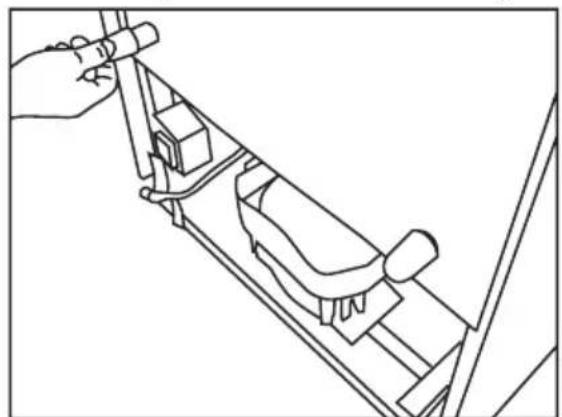
Fig. 7
Setting up
It is important that the appliance be absolutely level. It can be levelled by screwing the adjustable feet at the front of the appliance up or down (figs 8-9). Use a spirit level to check that the appliance is absolutely level sideways.
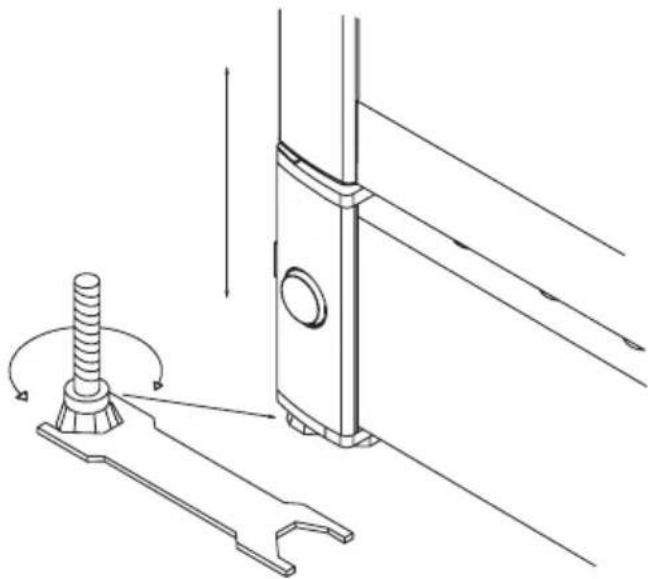
Fig. 8
The door can be changed from right-hinged to left-hinged and vice versa as follows:
1. Lay the appliance on its back and loosen the upper hinge.
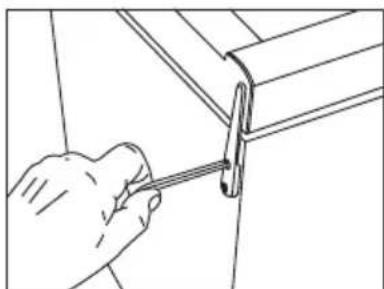
2. Remove the upper hinge. 3. Rotate the glass door through 180^ (on WSN 1412 LT, pull the handle to loosen it on the inside from beneath the sealing strip).
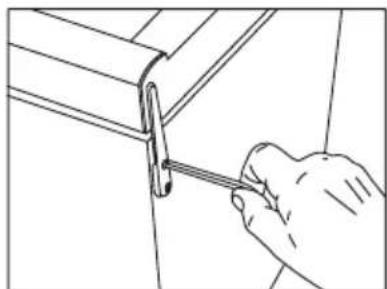
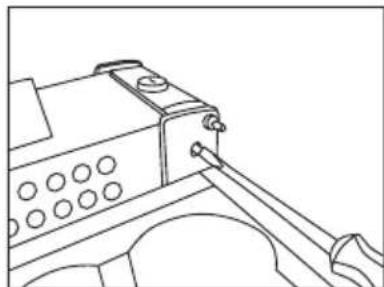
4. Carefully remove the covers on the side of the plinth using a flat-headed screwdriver.
5.Pull up the hinge pin... ...and fit it on the opposite side.
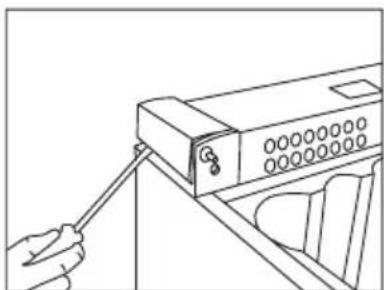
6. Unscrew the lock pin using a flat-headed screwdriver.
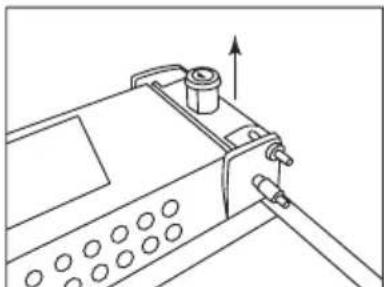
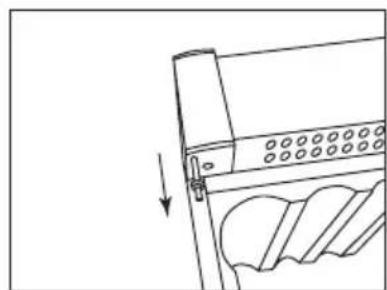
7. When the lock pin has been loosened completely, pull it up together with the lock cylinder and refit on opposite side.
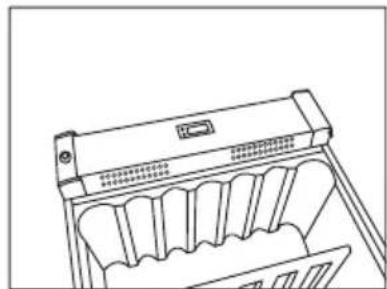
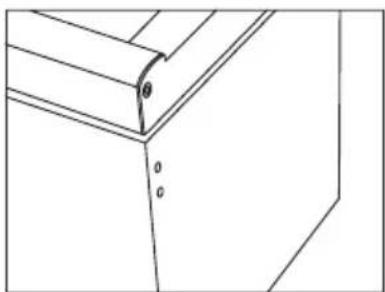
8. Click the covers into place on the plinth sides on the opposite side.
9. Fit the door onto the bottom pin, fit the top hinge and tighten securely.
- After reversing the door, it is important to check that the sealing strip provides a tight seal all the way round. If it does not, carefully heat the strip all the way round using a hair dryer. Then ease the strip outwards slightly so that it forms a tight seal against the cabinet. Be careful not to heat the strip so much that it melts!
The appliance is intended for connection to alternating current. The required voltage (V) and frequency (Hz) are stated on the nameplate inside the appliance. Power must be connected via an independent wall socket outlet.
If the supply cord is damaged, it must be replaced by the manufacturer, its service agent or a similar qualified person in order to avoid a hazard.
Technical data
This appliance complies with CE marking regulations, directives and standards. Low Voltage Directive 73/23/EEC. EMC Directive 89/336/EEC.
Electronic controls
The electronic controls ensure that the set temperatures are maintained at the top and bottom of the cabinet. This is accomplished by complex control of the refrigerating system the heating element and the fan. Following any power failure, the temperature settings are automatically recalled.
The electronic controls have the following functions:
- Temperature setting
- Temperature display
Automatic defrosting - Fault-finding, emergency and service programs
- Low-temperature alarm
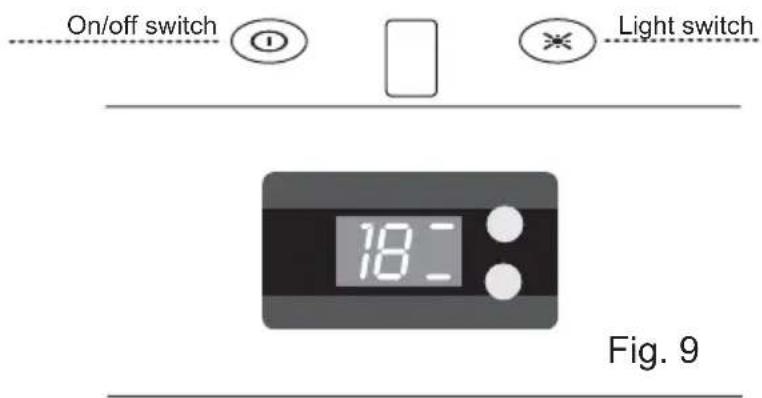
On/off switch
The light switch is used to select either continuous illumination or illumination only when the door is opened.
Temperature display
The display shows the actual temperature at the top or bottom of the cabinet. To switch the display between the top and bottom sections, short-press the top and bottom buttons respectively, which section is shown is indicated by a line of light in the display just beside the buttons. The temperature display has a built-in filter that simulates the actual temperature in the bottles. The displayed temperature is therefore not affected by transient fluctuations in air temperature.
Temperature setting
The temperature is set using the two buttons on the control panel. The upper button is used to set the temperature at the top of the cabinet. The lower button is used to set the temperature at the bottom. Deactivate the childproof lock by pressing the button for 3 seconds. The display then starts flashing
and shows the current temperature setting for the zone concerned. This applies to both buttons/sections. When the display starts flashing, the temperature can be set by scrolling the setting between 22 and 5^ . When the desired setting is displayed, release the button for 3 seconds. The setting will then be stored and the childproof lock reactivated.
Note that the bottom section cannot be given a higher temperature setting than the top section. The highest available temperature setting for the bottom section is therefore identical to the actual setting for the top section.
Low-temperature alarm
If the temperature has been below 2^ for more than 1 hour, the display flashes and Lo/actual temperature are alternately shown. Wine cannot mature properly at sub-zero temperatures.
Two-zone setting for serving temperature
Typical serving temperature settings for the top and bottom sections are 16^ and 6^ respectively. With these settings, a suitable temperature gradient will be achieved in the cabinet for the storage of various types of wine distributed from top to bottom as follows:
- heavy red wines +16 to +19°C
- rosé and light red wines +12 to +16°C
- white wines +10 to +12°C
- champagne and sparkling wines +6 to +8°C
It is recommended that wine be served at a temperature which is a couple of degrees lower than the desired drinking temperature as the wine will be warmed slightly when it is poured into the glass.
Single-zone setting for long-term storage.
For long-term wine storage, the top and bottom sections should both be set at 12^ . With identical settings for the top and bottom sections, the controls will maintain an even temperature throughout the cabinet. However, the temperature in the room will gradually affect the temperature in the cabinet through its door and sides, creating a slight temperature gradient from top to bottom. The controls will maintain the set temperature at the bottom of the cabinet, and any deviation from the setting will therefore occur at the top. The difference will vary from 0 to 3^ , depending on the ambient temperature.
Automatic defrosting
The wine cooler is defrosted automatically. Defrost water runs through a pipe and is collected in a tray above the compressor where the heat generated by the compressor causes it to evaporate. The defrost water tray should be cleaned at intervals.
Cleaning
Before cleaning the appliance, unplug it from the main supply. The cabinet is best cleaned using warm water (max. 65^ ) with a little mild detergent. Never use cleaning agents that scour. Use a soft cloth. Rinse with clean water and dry thoroughly. The defrost water channel, in which condensation from the evaporator runs, is located at the bottom of the rear inside wall of the cabinet and must be kept clean. Add a few drops of disinfectant, e.g. Rodalon, to the defrost water drain a couple of times a year, and clean the drain using a pipe cleaner or similar. Never use sharp or pointed implements. The sealing strip around the door must be cleaned regularly to prevent discolouration and prolong service life. Use clean water. After cleaning the sealing strip, check that it continues to provide a tight seal. Dust collecting on the condenser on the rear of the cabinet, the compressor and in the compressor compartment is best removed using a vacuum cleaner.
Replacing the light tube
Before replacing the light tube, unplug the appliance from the main supply. Remove the lamp cover using a small flat-headed screwdriver. Replace the PLC tube (11 W). Refit the lamp cover, reconnect the power supply and start the appliance by pressing the on/off switch.
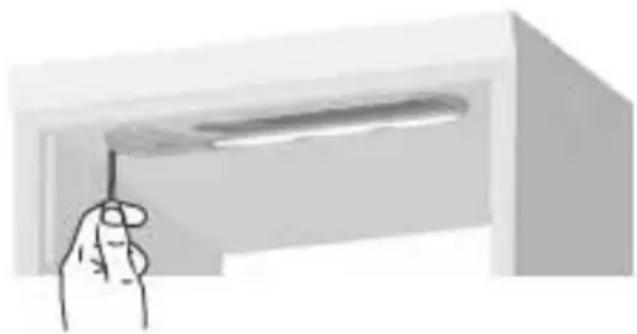
Fig. 10
| Fault Possible cause | Use Remedy | |
| The appliance is "dead"! | The appliance is switched off. Power failure; the fuse is blown; the appliance is not plugged in correctly. | Press the on/off switch. Check that power is connected. Reset the fuse. |
| Water collects in the bottom of the cabinet. | The defrost water pipe is blocked. | Clean the defrost water channel and the drain hole on the rear wall of the cabinet. |
| Vibration or bothersome noise. | The appliance is not level. The appliance is resting against other kitchen elements. Containers or bottles inside the cabinet are rattling against one another. | Level the appliance using a spirit level. Move the appliance away from the kitchen elements or appliances it is in contact with. Move containers and/or bottles apart. |
| Compressor runs continuously. | High room temperature. Ensure | adequate ventilation. |
| E1 is shown on the display. | The upper sensor is disconnected or short-circuited. | Call for service. The temperature within the entire cabinet is maintained at the higher of the two setpoints until the fault has been corrected. |
| E2 is shown on the display. | The lower sensor is disconnected or short-circuited. | Call for service. The temperature within the entire cabinet is maintained at the higher of the two setpoints until the fault has been corrected. |
| ULO is shown on the display. | The mains voltage is lower than 184 V. | |
| UHI is shown on the display. | The mains voltage is higher than 255 V. |
Warranty disclaimer
Faults and damage caused directly or indirectly by incorrect operation, misuse, insufficient maintenance, incorrect building-in, installation or mains connection, fire, accident, lightening, voltage variation or other electrical interference, including defective fuses or faults in mains installations, or repairs performed by others than service centres approved by Blomberg, and any other faults and damage that the manufacturer can substantiate are caused by reasons other than manufacturing or material faults are not covered by the warranty.
Transport damage discovered by the buyer is primarily a matter to be settled between the buyer and the distributor, i.e. the distributor must ensure that such complaints are resolved to the buyer's satisfaction.
Before calling for technical assistance, please check whether you are able to rectify the fault yourself (see Fault finding). If your request for assistance is unwarranted, e.g. if the appliance has failed as a result of a blown fuse or incorrect operation, you will be charged the costs incurred by your call for technical assistance.
Note: Always use approved service centres when your appliance is to be repaired or replaced!
Environmental regulations on disposal must also be observed. When disposing of the appliance you should contact your local authority technical department who will inform you of how collection and recycling of such units take place in your area.
This appliance is marked according to the European directive 2002/96/EC on Waste Electrical and Electronic Equipment (WEEE).
By ensuring this product is disposed of correctly, you will help prevent potential negative consequences for the environment and human health, which could otherwise be caused by inappropriate waste handling of this product.
The symbol on the product, or on the documents accompanying the product, indicates that this appliance may not be treated as household waste. Instead it shall be handed over to the applicable collection point for the recycling of electrical and electronic equipment.
Disposal must be carried out in accordance with local environmental regulations for waste disposal.
For more detailed information about treatment, recovery and recycling of this product, please contact your local city office, your household waste disposal service or the shop where you purchased the product.
Bcerda depxnte KJIIOH N OTeNbHO I TaM, rDe IH He CMOryT HaHTN DeTN.
Ipeed Tem KaK MbITb INn peMOHTnpOBaTb np6Op, OTKJIIOHTe np6Op ot
ceTN.
Ecnn XnaJaareH, nCnoJb3yEmB B 3Tom npn6ope - orHeonacHbI ra3 (N3o6yTaH R600a), BaxKnO y6eAnTbcra, YTO Tpy6kn C XnaJaareHToM He NOBpeKdEnbI. Ecnn NOBpeKdEnne Bce Je npOn3oUNo, N36eRaTe BO3HNKHOBeHn ICKp IIN OTKpbIToro PnAmEH OKOLO npn6opa, yDOCTOBepbTEcB B TOM, YTO NOMEseHne Xopo7O PPOBeTppeHo, OTKJIouHTe 3JIeKTponITaHne, IN CBAXNTecb C Ba7mM NOCTABuNKOM.
I3dJIeNo OJxHO 6cJyKuBaTbCra TOnbKO KOMPeTeHTHbIMn TEXHKaMn I3 aBTOpN3OBAHHORo cepBnCHORo cHTpa.
3TO n3dJIne MoKeT 6bITb NCNoIb3OBAHO DeTbMn IJIH HeDeeCNOcO6HbIMN IINzAMN TOIbKO IOd HABIOJeHNEM OTBETCTBEHNORO IINca, CNOCo6HOrO OBeCeuNTb 6e30NaChOcTB npn erO NCNoIb3OBAHm. Heo6xoJIMo CNeiHTb 3a MaJIeHbKIMN DeTbMn IN He pa3peWAtb IM INrpaTb C XOJOnIbHNKOM.
CTapbI XOJODnJIbHnK
CTapbIe xOJIOJIbHnKIn MOpO3JIbHnKn 3aUacTyIO OCHAueHbI CLOXHbIMN 3aMKaMn, KOTOpbIE MOxHO OTKpbITb TOlbKO C BHeuHne CTopoHbI. EcIy y Bac xpaHntc TaKoJ xOJIOJIbHnK nIi Bbl cObnpaTeEc bero Bbl6pAcbIBaTb, He 3a6yDbTe cIOMaTb 3amOK, YTO6bl OrpaNTb DeTei OT OnaCHocTN 6blTb 3aNEptbIMN B HEM.
Ipeed nCnoJb3OBaHneM
Ipeepncnoj3OBaHnem BaJero HOBORO XoJOnJIbHnka, NOXaJyNCTa, TuaTeJIbHO npouHTaIe 3Tu INcTpyKUIO, NocKoJIbKY B Hei CoOpJKTcB BaxHaN IHOpMaun OTHCnTeJIbHO 6e3ONaCHOCTN, YcTaHOBKn, Onpaun I o6CnyXnBaHHn npnbopa.
CoxpaHnte nHcTpyKcIuO, UTO6bI oBpaTaBcR K HeN B ByDyUeM.
IIO npolyeHn npOBepbTe, YTO6bl npBOp He 6bl NOBpeKDeH npr TpaHCnOpTnpOBKe. Ecnn npBOp 6bl NOBpeKDeH npr TpaHCnOpTnpOBKe, 06 3Tom cIeDyET COO6uNTb MeCTHOMy DnCTpN6bIoTepy Do TOrO, KaK BUNHbI XOJOnJIbHNk 6yDet yCTaHOBJeH dIra NCNOJIb3OBAHnI.
YdaIte ynaKOBky. IOMoTe BHyTpEHHIO IOBepXHOCTb XOJOnIbHOJ KaMepbl TeNIOB BOIO C MOIOUM CpeDCTBOM. ONoIOChNTe YnCToB BOIO N HAcyxo BbITPTE (CM. INHcTpyKUnn no y6OpKe). IVcNoJIb3yIte MmRKyU TkaHb.
Ecn np TpaHcnpTIpOBKe np6op 6blB rOpn3OHTaIbHOM NOIOXeHN nJH HaxoDnnc Ha XoNoDe (Hxke Yem +5^) ,HyxHO N03BOJNTb EMy NocToTb KaK MInHMym Yac B BepTKKaJIbHOM NIOXeHN npN KOMHaTHOH TempeType, He BKIOUaERo B Cetb.

Pa3MeueHne
Дя 6e3oNaChOCTn n n3-3a эКСПЛУАТациОньIx Tpe6OBaHn, np6Op ДOLЖЕн 6bIb yCTaHOВЛeH B CyXOM, Xopoшо npOBeTpNBaEOM NOMEseHn (MakcmaJIbHa OTHOCHTeJbHa BlaXHoCTb BO3dYxa He 6OJee 75%). HnkOrda He yCTaHaBnBaIte erO B6ln3n HaPpeBaTeJbHbIX np6OpOB, HApnpMep, ПИNT ИИ PaINaTOpOB, I NOCTapaIteCb n36ExKaTb nONaDaHnЯ Ha np6Op pPmblx COJIHeuHbIx nUyei.
KomhaTHaTeMnepaTypa
KlImMaTnueckn Klnacc yKa3aH Ha Ta6nUcKe C 3aBOdCKm HomepOM (CM. pnc. 1 ha cTpaHnue 133 n pnc. 11 ha cTpaHnue 143). Oh onpeJeIeR oNTMaJIbHyO TemnepaTypy KOMHaTbl. BHHbIe XoJIoNlbHnKn IJI INCNoB3OBaHnI npn Hn3Knx TemnepaTypax, OndaKO, fYHKuOHnpYOT npn KOMHaTHoH TemnepaType Hnke 5^
pnc.2
UK Blomberg reserves the right to alter specifications without prior notice.