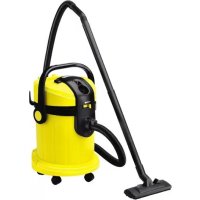
USER MANUAL A 2534 PT Kärcher
Register and win! www.kaercher.com
Please read and comply with these original instructions prior to the initial operation of your appliance and store them for later use or subsequent owners.
tial operation of your appliance and store them for later use or subsequent owners.
The appliance is intended for use as a Multi-Purpose Vac corresponding to the descriptions given in these operating instructions and the safety notes.
The appliance is intended for use as a Multi-Purpose Vac, corresponding to the descriptions given in these operating instructions and the safety notes.
Further, the appliance also has a connection for the blower function and a plug for automatic operations when the electric tool is connected.
- This device may not be used to suck in ash and soot.
- This device may not be used to suck in ash and soot.
Use a preliminary separator while sucking in ash or rust particles (order no. 2.863-139).
Original filter bag. - Original spare parts, accessories and special accessories.
Original filter bag. - Original spare parts, accessories and special accessories.
The manufacturer is not responsible for any damages that may occur on account of improper use or wrong operations.
The packaging material can be recycled.

Please do not place the packaging into
Please do not place the packaging into
the ordinary refuse for disposal, but arrange for the proper recycling.
Old appliances contain valuable materials that can be recycled. Please arrange for the proper recycling of old appliances.
Please dispose your old appliances using appropriate collection systems.
Notes about the ingredients (REACH)
You will find current information about the ingredients at:
Disposing the filters and filter bags
Filters and filter bags are made from environment-friendly materials.
They can therefore be disposed off through the normal household garbage provided you have not sucked in substances that are not permitted to be thrown into household garbage.
Safety instructions
- This device is not intended for use by persons (including children) with reduced physical, sensory or mental abilities or lacking experience and/or knowledge, unless they are supervised by a person responsible for their safety or are instructed by these persons on the use of the device. Children should be supervised, to ensure that they do not play with the device.
- Keep packaging film away from children - risk of suffocation!
- Switch the appliance off after every use and prior to every cleaning/maintenance procedure.
- Risk of fire. Do not vacuum up any burning or glowing objects. The appliance may not be used in areas where a risk of explosion is present.
Electrical connection
The appliance may only be connected to alternating current. The voltage must correspond with the type plate on the appliance.
riangle Risk of electric shock
Never touch the mains plug and the socket with wet hands.
Do not pull the plug from the socket by pulling on the connecting cable.
Check the power cord with mains plug for damage before every use. If the power cord is damaged, please arrange immediately for the exchange by an authorized customer service or a skilled electrician.
To avoid accidents due to electrical faults we recommend the use of sockets with a line-side current-limiting circuit breaker (max. 30 mA nominal tripping current).
Caution
Certain materials may produce explosive vapours or mixtures when agitated by the suction air!
Never vacuum up the following materials:
- Explosive or combustible gases, liquids and dust particles (reactive dust particles)
- Reactive metal dust particles (such as aluminium, magnesium, zinc) in combination with highly alkaline or acidic detergents Undiluted, strong acids and alkalies
Organic solvents (such as petrol, paint thinners, acetone, heating oil).
In addition, these substances may cause the appliance materials to corrode.
Start up
Description of the Appliance
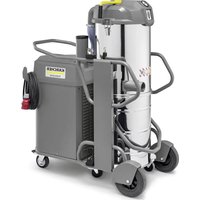
These operating instructions describe the basic models of the Multi-Purpose Vacs shown on the front cover. The illustrations show the maximum equipment; depending on the model, there are differences in equipment and supplied accessories.
When unpacking the product, make sure that no accessories are missing and that none of the package contents have been damaged. If you detect any transport damages please contact your dealer.
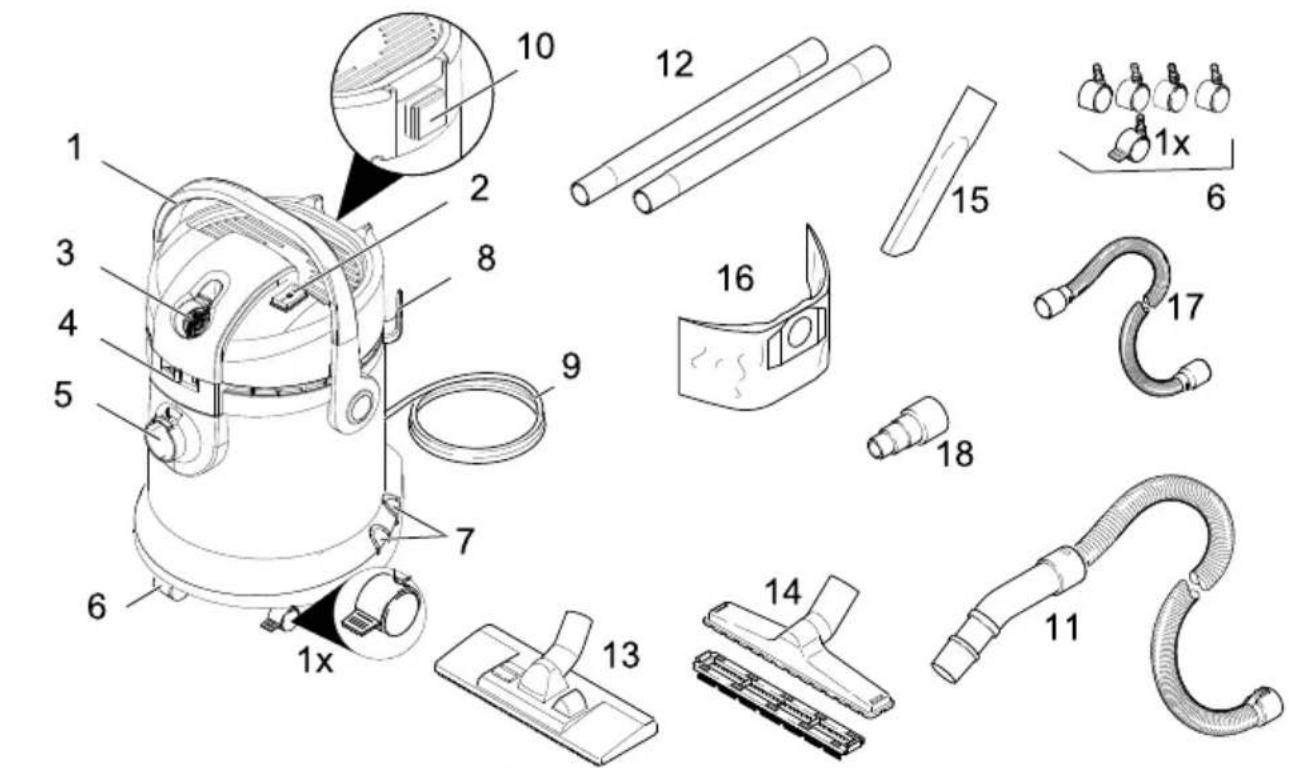
Illustrations on Page 2
1 Carrying handle 2 ON/OFF switch for appliance 3 Blowing connection 4 Air regulation of the blowing function 5 Suction hose connection 6 Swivel casters 7 Accessory mount 8 Storage, power cord 9 Power cord with plug 10 Machine socket 11 Suction hose 12 Suction tubes 2 x 0.5 m 13 Floor nozzle, reversible (A 2534 pt / A 2574 pt) 14 Floor nozzle with hard surface insert (A 2234 pt) 15 Crevice nozzle 16 Filter bag 17 Hose Flex-Tool 18 Adapter
Attaching the Accessories
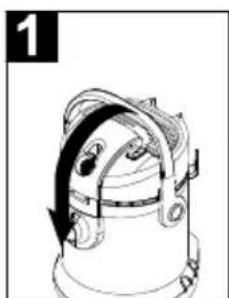
Illustration 1
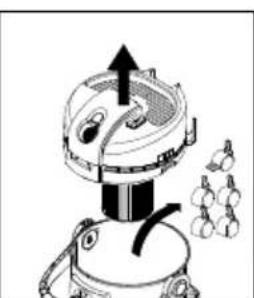
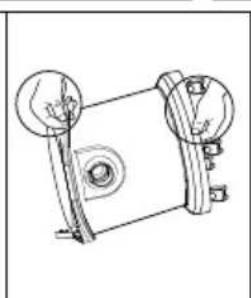
Fold down the carrying handle. Remove the motor casing and take accessories out of the container.
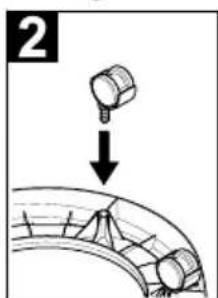
Illustration 2
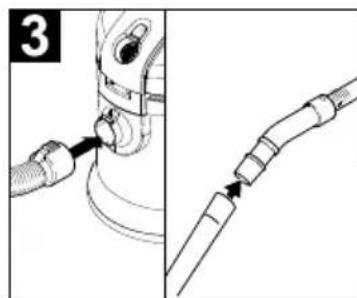
Fit the swivel casters on the container bottom. Insert filter bag if required. Put motor casing onto container and lock it. Illustration 3 Connect accessories.
Operations
Always work with an inserted cartridge filter - during wet as well as dry vacuum cleaning!
Turning on the Appliance
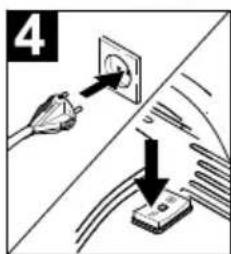
Illustration 4
Plug in the main plug. Switch on the appliance using the ON/OFF switch.
Position I: Normal operations, suction or blowing
Position II: Automatic operations with connected electric tool
Position 0: Appliance and the connected electric tool are switched off
Dry vacuum cleaning
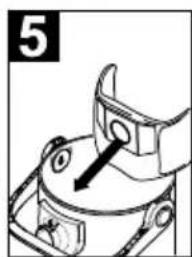
Illustration 5
For a dust-free disposal of the vacuumed material, we recommend inserting the paper filter bag as well. This provides the additional advantage that the cartridge filter will not become contaminated as quickly.
Work only with a dry cartridge filter! Therefore: Always let the cartridge filter dry thoroughly before using it! Added filter bags can burst! Therefore: Change the filter bag at the appropriate time! Always use a filter bag while sucking in fine dust! The filling level of the filter bag depends on the dirt that is sucked in.
The filter bag needs to be replaced more frequently while sucking in fine dust, sand, etc.
Use a preliminary separator while sucking in ash or rust particles (order no. 2.863-139).
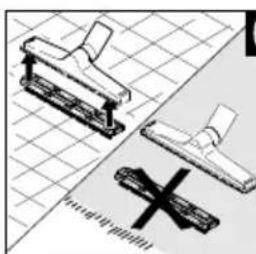
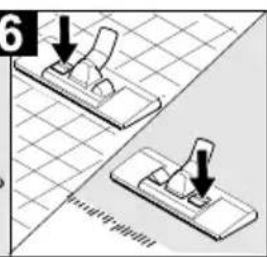
Illustration 6
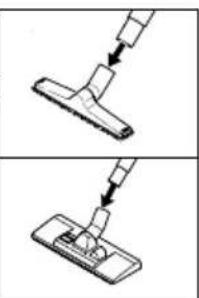
Vacuuming hard surfaces
A 2534 pt / A 2574 pt:
Use your foot to press the reversing switch of the floor nozzle. The brush strips at the bottom of the floor nozzle are extended.
A 2234 pt:
Insert the hard surface inlay into the floor nozzle.
The bristles should point towards the front.
Vacuuming carpeted floors
A 2534 pt / A 2574 pt:
Use your foot to press the reversing switch of the floor nozzle. The brush strips at the bottom of the floor nozzle are retracted.
A 2234 pt:
Work without the hard surface insert.
Blowing function
Use this function, for example, to blow out leaves or dust from the garage, workroom, or workshop.
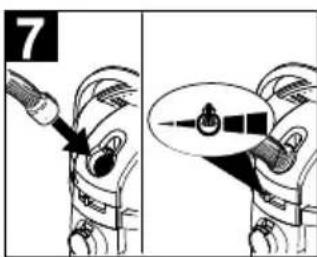
Illustration 7
Connect the connection hose. Open the slide of the air regulation, and select the desired blowing performance.
Wet vacuum cleaning
Caution:
Do not use a filter bag!
Immediately switch the appliance off if foam forms or liquids escape!
Note: If the container is full, a float closes the suction opening and the appliance works at a higher speed. Switch off the appliance immediately and empty the container.
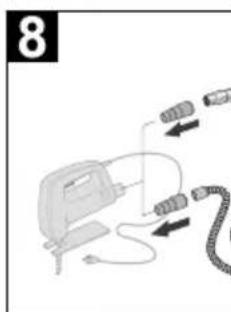
Adapt the adapter to the connection diameter of the electric tool using a knife if necessary.
Illustration 8
Electric power tools with a power consumption of 100-2100 W can be connected.
| A 2234 pt A 2534 pt |
| | A 2574 pt |
| EU 100 | - 2100 W 100 - 210 | 0 W |
| CH 100 | - 1100 W 100 - 900 | W |
| GB 100 | - 1800 W 100 - 160 | 0 W |
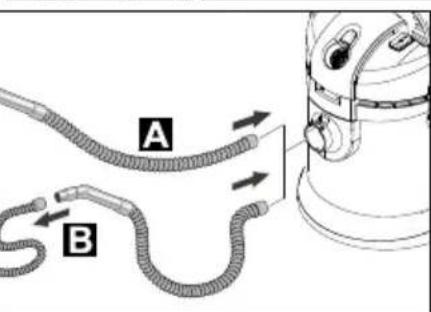
A) Plug the enclosed adapter onto the suction hose and connect the electric tool with the connection.
or
B) Use the Flex-Tool hose; attach the thicker end directly to the suction hose and the other end to the enclosed adapter, then connect it to the electric tool.
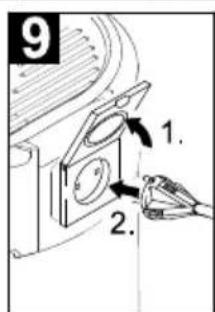
Illustration 9
Connect the mains plug of the electric power tool to the vacuum cleaner. Switch the vacuum cleaner to Position II and start working.
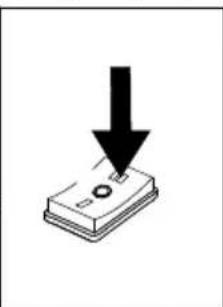
Note: The suction turbine starts with a delay of 0.5 seconds after the electric tool has been switched on. After the electric tool has been switched off, the suction turbine will continue to run for approx. 5 seconds to suck in the remaining dirt from the suction hose.
Finish operation
Turn off the appliance and disconnect the mains plug.
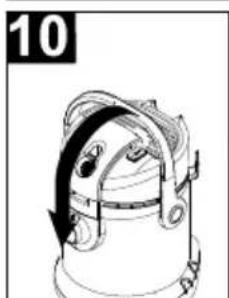
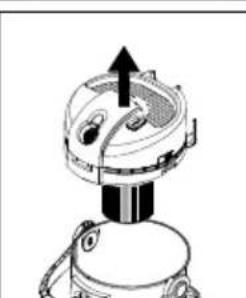
Empty the container
Illustration 10: Remove the motor casing and empty the container.
Storing the Appliance
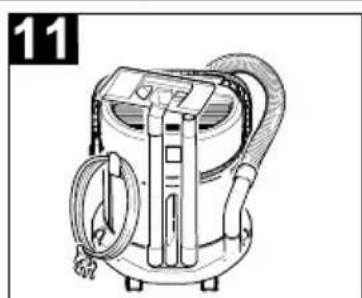
Illustration 11
Place the accessories in the appropriate compartments at the appliance and store the appliance in a dry room.
Transporting the device
The device is to be fastened properly before transporting the device in the car.
Maintenance and Care
Risk of injury
Always switch off the appliance and pull out the mains plug before care and maintenance work.
Cleaning the appliance and accessories
Caution
Do not use abrasives, glass or universal cleaners! Never immerse the appliance in water.
→ Clean the appliance and accessory parts made of plastic with a commercial plastic cleaner.
→ If required, rinse the container and accessories with water properly and dry them before reuse.
General notes
Warranty
The terms of the guarantee applicable in each country have been published by our respective national distributors. We will repair possible faults on your unit free of charge within the warranty period, insofar as the faults are caused by material defects or defective workmanship. Guarantee claims should be addressed to your dealer or the nearest authorized customer service centre, and supported by documentary evidence of purchase.
(See address on the reverse)
Customer Service
Our KARCHER branch will be pleased to help you further in the case of questions or faults. (See address on the reverse)
Ordering spare parts and special attachments
At the end of the operating instructions you will find a selected list of spare parts that are often required.
You can procure the spare parts and the attachments from your dealer or your KÄRCHER branch office.
(See address on the reverse)
Troubleshooting
Suction power decreases
Attachment, suction hose or suction pipe are blocked
Remove the blockage with the help of a stick.
Filter bag is full
Insert new filter bag.
Cartridge filter is dirty
Take out the filter and shake it. If the dirt does not come off, then clean it under flowing water and let it dry thoroughly before fitting it back. Replace it if the dirt is stubborn or if the filter itself is damaged.
Appliance does not suck in water
Container is full
Switch off the appliance and empty the container.
Helpline
KARCHER UK Limited operate a helpline allowing customers to discuss any problems experienced with our products.
The helpline operates during normal business hours and may be busy at peak periods. If you have difficulty getting through we would ask that you try to contact us again later in the day.
The helpline number is 01295 752200, open from 8.30 am to 5.00 pm
Monday to Friday.
It helps us if you have the model number and data plate details to hand before making your call so that we can assist you with your query more effectively.
Alternatively you may write to us at the address below:
KARCHER UK Ltd
Kärcher House
Beaumont Road
Banbury
Oxon, OX16 1TB
or E-mail us:
info@karcher.co.uk
Specifications
Subject to technical modifications!
| A 2234 pt | A 2534 pt
A 2574 pt |
| Voltage | 220-240V |
| Current type | 50/60 Hz |
| Mains fuse EUR (*GB) (slow-blow) | 16 (*13) A |
| Container capacity | 18 | 25 | |
| Water volume | 8 | 13 | |
| Output Pnom | 1200 W | 400 W |
| Output Pmax | 1400 W | 600 W |
| Power cord | H 05VV-F3G1,5 |
| Sound pressure level (EN 60704-2-1) | 75 dB(A) |
Dear customer,
Transport the machine
Insert a new filter bag.
The cartridge filter is dirty.
UncTka KOBPOBbIX NOKpbITn
A 2534 pt / A 2574 pt:
Press the floor nozzle switch. The colored stripes on the underside of the nozzle are retracted.
A 2234 pt:
Work without accessories for hard surfaces.
Clean the appliance and accessories.
△ Caution
Do not use abrasive cleaners, glass cleaners, or all-purpose cleaners! Do not immerse the appliance in water.
→ Clean the appliance and accessories made of synthetic materials with standard detergents for synthetic materials. → If necessary, rinse the tank and parts with water and dry them before the next use.
Here are the instructions
Warranty
In each country, the respective warranty conditions issued by our authorized distributor in that country apply. We will repair any possible malfunctions of the device free of charge during the warranty period, provided that the defects are due to material or manufacturing errors. In the event of a claim during the warranty period, please contact, with the purchase receipt, the retail organization that sold you the device or the nearest authorized customer service center.
(Address indicated on the back)
Customer service
If you have any questions or malfunctions, our KARCHER branch will be happy to help you resolve them.
(Address indicated on the back)
Ordering spare parts and special accessories
You will find the selection of the most frequently needed spare parts in the operating instructions. You can obtain spare parts and accessories from your dealer or from the KARCHER branch.
(Address indicated on the back)
Troubleshooting
Reduced suction power
Clogged accessories, suction hose, or suction tube
→ Remove the clog with the help of a stick.
Insert a new filter bag.
The filter is dirty.
→ Remove the filter and empty it. If the dirt cannot be removed, rinse the filter under running water and let it dry completely before reinstalling. Replace it if the dirt has hardened or if damage occurs.
The appliance does not draw water
The reservoir is empty
→ Turn off the appliance, remove the contents from the reservoir.
Technical data
Dear customer,

Safety instructions
This device is not intended for use by persons (including children) with reduced physical, sensory or mental capabilities, or lack of experience and knowledge, unless they have been given supervision or instruction concerning use of the appliance by a person responsible for their safety. Children should be supervised to ensure that they do not play with the appliance. - Keep the packaging material away from children, there is a risk of suffocation! - The appliance must be disconnected from the power supply before cleaning or maintenance. - Fire hazard. Do not cover hot or glowing objects. It is forbidden to operate in explosive atmospheres.
Electrical safety
Connect the appliance to the mains supply. The voltage must correspond to the voltage indicated on the rating plate of the appliance.
Danger of electric shock
Never touch the plug and the appliance with wet hands.
Do not pull the appliance by the power cord to disconnect it from the socket.
Before connecting the cable to the socket of the electrical installation, check the cable for damage. Always have damaged connection cables replaced by an authorized service/electrical technician. To avoid electrical hazards, we recommend using sockets that are protected by a residual current device (max. 30 mA nominal current).
Never vacuum substances that can form explosive vapors or mixtures! Never vacuum the following substances:
- Explosive or flammable gases, liquids and dusts (reactive dusts) Reactive metal dusts (e.g. aluminum, magnesium, zinc) in combination with strong alkaline and oxidizing cleaning agents
- Undiluted strong acids and bases, organic solvents (e.g. benzene, paint thinners, acetone, naphtha).
In addition, these substances can damage the materials used in the manufacture of the device.
Explosion hazard.
Description of the device
This instruction for use describes the basic models of the supplied vacuum cleaner for dry/wet vacuuming. The figures show the maximum equipment; depending on the model, there may be differences in the equipment of the delivered accessories.
When unpacking, check that the packaging is complete and undamaged. If there is damage due to transport, notify the dealer from whom you purchased the device.
See figures on page 2
1 Handle 2 On/off switch 3 Suction hose connection
4 Air regulation in vacuum cleaner mode 5 Suction hose connection 6 Carrying handle 7 Storage/attachment of accessories 8 Cable storage 9 Cable with plug 10 Device contact 11 Blow nozzle 12 Suction hose 2x0.5 m 13 Nozzle for joints, with possibility of switching (A 2534 pt / A 2574 pt) 14 Floor nozzle with integrated option for vacuuming hard surfaces (A 2234 pt) 15 Nozzle for dry vacuuming 16 Filter bag 17 Flexible suction hose Flex-Tool 18 Adapter
Mounting of accessories
Press the release button. → Pull the motor housing and remove the accessories from the reservoir.
Figure 2
→ Mount the guide rail for suction to the bottom of the reservoir. Optionally, place a filter bag. → Place the motor housing on the reservoir and close it.
Figure 3
→ Attaching accessories
Maintenance
▲ Work only with the supplied filter, both for wet and dry vacuuming!
Switch on
Figure 4
→ Connect the plug to the electrical mains. Use a socket with a protective contact.
Position I: Normal mode, vacuuming for suction
Position II: Automatic mode with electrical tool switched on
Position 0: Tool and electrical tool switched off
Dry vacuuming
To pick up what you have vacuumed without spreading dust, we recommend using a filter bag. This is especially useful for fine dust and debris, as the filter bag does not clog so quickly.
Work only with a dry filter! → Before use, dry the wet filter well! The supplied filter bags can be used! Therefore: Change the filter bag in time! When vacuuming fine dust, a filter bag should be used! → The degree of filling of the filter bag depends on the dirt that is being vacuumed.
If the filter is dirty, it must be replaced.
The suction hose must be connected using the coarse pre-filter (part no. 2.863-139).
Figure 6
Checking the hard floor nozzle A 2534 pt / A 2574 pt:
The brushes wear down over time. Replace them when they are worn from the bottom side of the nozzle.
A 2234 pt:
The hard floor nozzle must be pressed into the nozzle. The brushes must be replaced.
Checking the nozzle with brush A 2534 pt / A 2574 pt:
The brushes wear down over time. Replace them when they are worn from the bottom side of the nozzle.
A 2234 pt:
Work without the hard floor nozzle.
Working as a blower
Attach the accessory for blowing out dust or dirt from garages, workshops, etc.
Figure 7
Switch on the suction turbine. Select the desired suction power using the air regulator.
Mokpo n3cmyKBaHe
△ BHUMAHue:
He u3non3eaume pfunmbnpa mop6uka! Ako ce o6pa3yea npHa unu u3muca mehocm, u3knqueme ypeda bedhaa!!
3a6eJekka: Ako pe3epeoapbme nIbneH, nonlaebk 3ambaepcmykameHnue om0p u ypeb m pa6omu c nouweHu obopomu.
Bedhaa u3kIIOyeme ypea u u3npa3Heme pe3ep6oapa.
Pa6oTa c eJeKtpnueckn HnCtpyMeHTn
→Пин hyжда пиrodeTe aanTopa c HOX KbMДиametbpa Ha CBbp3BaHe Ha eNeKtpuecknIHHCTpyMeHT.
Φnγpa 8
Morat da ce nodBp3BaT eJeKtpnueckn HcTpymeHTN C Notpe6yBaHa MoUHocT OT 100- 2100 W.
| A 2234 pt A 2534 pt |
| | A 2574 pt |
| EU 100 | - 2100 W 100 - 2100 | W |
| CH 100 | - 1100 W 100 - 900 | W |
| GB 100 | - 1800 W 100 - 1600 | W |
A)ПocTaBeTe BkIIOueHnB OKOMJIeKToBkata aIaANTep KbM BCMyKaTeJIHnMa MapKyu n CbbpKeTe eJIeKTpUeCKnI INCTpyMeHT. JIN B)ИЗПОЛЗВайтЕ ГБКаВИС CMYKaTeJIeH
Mapkyu Flex-Tool, no-ДeбелЯ Край
ЮCTавETe ДИРЕKTHO Ha CMYKaTeJIHЯ
Mapkyu, ДPyгЯ Край ДИРЕKTHO Ha
ДОCTавеня с урEDA aДАпТер и CBbPжete с
eLEKТprUчecКИ ИНСТPyМЕТ.
Фигура 9
CmykateJIHata MoUHOCT HamaJIyBa
PpHnHaJIeJXHOCTNe, CMyKaTeJIHHa MapKyu I BcMysKBaunTe Tpb6n ca 3anyuHeH
OTctpaHete 3anyuBaHeTo c npbka.
ФитбраТа Top6nUka e nbIHa
→ Drain the fuel tank.
Fuel filter clogged
→ Replace the filter and start again. If the problem does not separate, rinse with warm water, before mounting let it dry completely. In case of persistent clogging or damage, replace it.
Water inlet filter
Dust reservoir
→ To switch off, empty the reservoir.
Technical data
| A 2234 pt | A 2534 pt
A 2574 pt |
| Нарlexене 220-240 | V |
| Вид тok 50/60 Hz | |
| Прedingител
(Инертын) | 16 A |
| Осem на peзервара | 18 | | 25 | |
| Повета вoda 8 | 13 | | |
| Мошист P_HOM. | 1200 W | 1400 W |
| Мошист PMAKC. | 1400 W | 1600 W |
| Зхсанвашец的服务 | H 05VV-F3G1,5 |
| Доручимо Нево на
шу(mEN 60704-2-1) | 75 dB(A) |
We reserve the right to make technical changes!
Installing the accessory
Figure 1
Fold down the carrying handle. Remove the motor housing and take the accessory from the container.
Figure 2
Cartridge filter is dirty
Karcher Limited Unit 10, 17/F. APEC Plaza 49 Hoi Yuen Road Kwun Tong, Kowloon (02) 357-5863
1
Karcher S.p.A. Via A. Vespucci 19 21013 Gallarate (VA) 848-998877
1
Karcher Limited 12 Willow Business Park Nangor Road Clondalkin Dublin 12 (01) 409 77 77
KOR
Karcher Co. Ltd. (South Korea) Youngjae B/D, 50-1, 51-1 Sansoo-dong, Mapo-ku Seoul 121-060 032-465-8000
MAL
Karcher Cleaning Systems Sdn. Bhd. No. 8, Jalan Serindit 2 Bandar Puchong Jaya 47100 Puchong, Selangor (03) 5882 1148
MEX
Karcher Mexico, SA de CV Av. Gustavo Baz No. 29-C Col. Naucalpan Centro Naucalpan, Edo. de Mexico C.P. 53000 Mexico 01 800 024 13 13
NZ Karcher Limited 12 Ron Driver Place East Tamaki, Auckland (09) 274-4603
P Neoparts-Com.e Ind. Automóvel, S.A. Av. Infante D. Henrique, Lote 35 1800-218 Lisboa 218558300
PL Kärcher Sp. z o.o. Ul. Stawowa 140 31-346 Kraków (012) 6397-222
PRC Kärcher Cleaning Systems Co., Ltd. Part B, Building 30, No. 390 Ai Du Road Shanghai Waigaoquiao 200131 (021) 5046-3579
RO Karcher Romania s.r.l. Sos. Odaii Nr. 439 013606 Bucuresti 0372709001
RUS OOO «Karcher» 109147, Moscow, ul. Talanskaya, d. 34, str. 3 +74952283945
S Kärcher AB Tagenevagen 31 42502 Hisings-Karra (031)577-300
SGP Karcher Asia Pacific Pte. Ltd. 5 Toh Guan Road East
01-00 Freight Links
Express Distripark Singapore 608831 6897-1811
SK Kärcher Slovakia, s.r.o. Beniakova 2 94901 Nitra 037 6555 798
TR Kärcher Servis Ticaret A.S. 9 Eylül Mahallesi 307 Sokak No. 6 Gaziemir / Izmir (0232) 252-0708
TWN Karcher Limited 5F/6. No.7 Wu-Chuan 1st Rd Wu-Ku Industrial Zone Taipei County (02) 2299-9626
UA Karcher Ukraine Kilzeva doroga,9 03191,Kyiv (044)5947575
UAE Karcher FZE Jebel Ali Free Zone RA 8,XB1,Jebel Ali,Dubai (04)8836-776
USA Alfred Karcher, Inc 2170 Satellite Blvd Suite 350 Duluth, GA 30097 678-935-4545; 877-527-2437
ZA Kärcher (Pty.) Limited 144 Kuschke Street Meadowdale Edenvale 1614 (011) 574-5360
KARCHER www.kaercher.com