6H197AX - Electric oven FAGOR - Free user manual and instructions
Find the device manual for free 6H197AX FAGOR in PDF.
| Brand | Fagor |
| Model | 6H197AX |
| Product type | Built-in electric oven |
| Power supply | Single phase |
| Cooking functions | Pulsed traditional cooking, Turbo plus, Strong pulsed grill, Strong grill, Gentle grill, Intensive bottom heat, Pulsed bottom heat, Traditional cooking, Defrost |
| Programmed cooking modes | Immediate start, delayed start |
| Automatic shut-off | Yes (10h under 100°C, 3h above 100°C) |
| Celeris function | Rapid preheating |
| Child lock | Yes |
| Cleaning | Pyrolysis (2 modes: Pyrolysis and Pyrolysis ECO) |
| Included accessories | Standard tray, deep tray, standard grid, telescopic slides (depending on model) |
| Accessory positions | 5 levels |
| Lighting | Yes, replaceable lamp |
| Door | Lockable during pyrolysis, removable panes |
| Safety | Pyrolysis door lock, automatic shut-off, child lock |
| Maintenance | Cleaning of removable panes, enameled surfaces |
| Display | Clock and timer |
Frequently Asked Questions - 6H197AX FAGOR
User questions about 6H197AX FAGOR
0 question about this device. Answer the ones you know or ask your own.
Ask a new question about this device
Download the instructions for your Electric oven in PDF format for free! Find your manual 6H197AX - FAGOR and take your electronic device back in hand. On this page are published all the documents necessary for the use of your device. 6H197AX by FAGOR.
USER MANUAL 6H197AX FAGOR
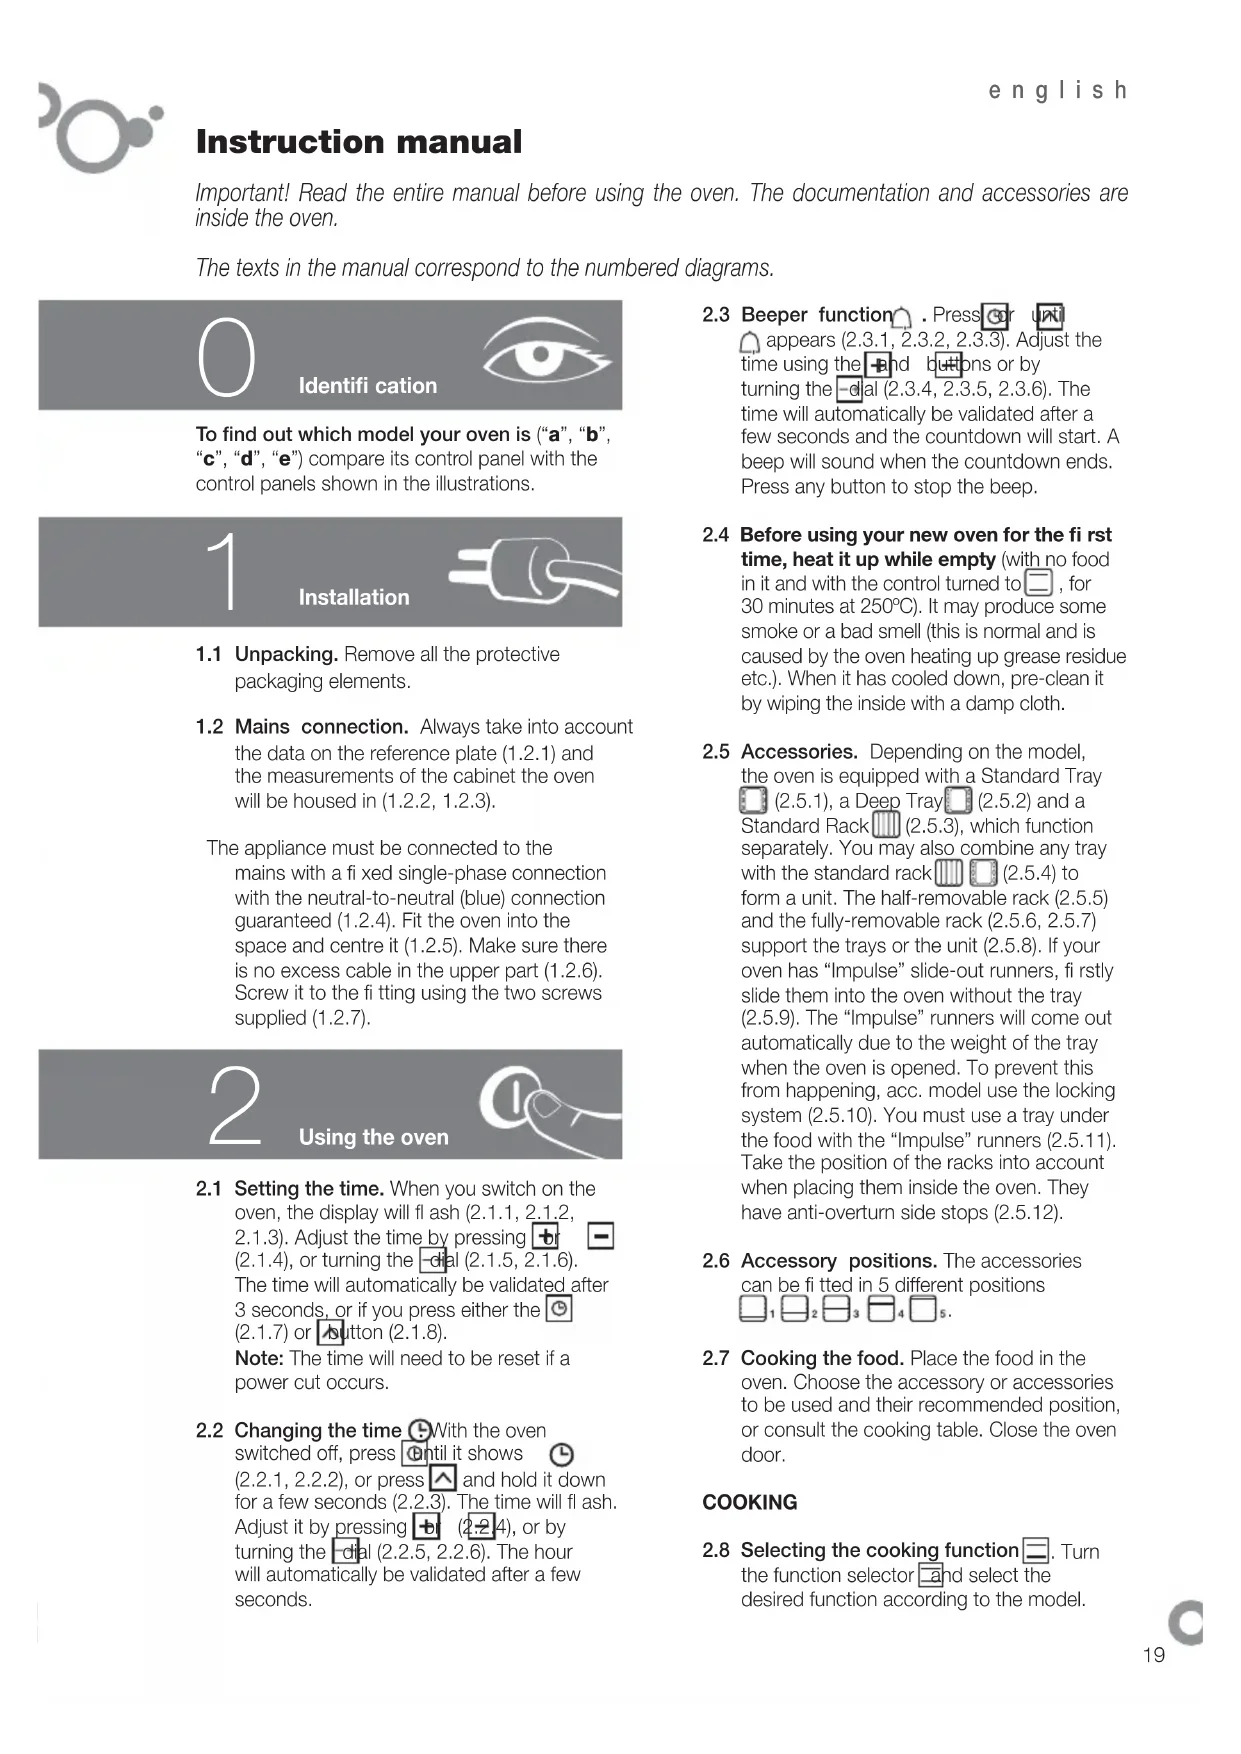
Important! Read the entire manual before using the oven. The documentation and accessories are inside the oven.
The texts in the manual correspond to the numbered diagrams.

Identification

To find out which model your oven is ("a", "b", "c", "d", "e") compare its control panel with the control panels shown in the illustrations.
1
Installation

1.1 Unpacking. Remove all the protective packaging elements.
1.2 Mains connection. Always take into account the data on the reference plate (1.2.1) and the measurements of the cabinet the oven will be housed in (1.2.2, 1.2.3).
The appliance must be connected to the mains with a fixed single-phase connection with the neutral-to-neutral (blue) connection guaranteed (1.2.4). Fit the oven into the space and centre it (1.2.5). Make sure there is no excess cable in the upper part (1.2.6). Screw it to the fitting using the two screws supplied (1.2.7).
2
Using the oven

2.1 Setting the time. When you switch on the oven, the display will flash (2.1.1, 2.1.2, 2.1.3). Adjust the time by pressing (2.1.4), or turning the dial (2.1.5, 2.1.6). The time will automatically be validated after 3 seconds, or if you press either the (2.1.7) or button (2.1.8).
Note: The time will need to be reset if a power cut occurs.
2.2 Changing the time With the oven switched off, press until it shows (2.2.1, 2.2.2), or press and hold it down for a few seconds (2.2.3). The time will flash. Adjust it by pressing (2.2.4), or by turning the dial (2.2.5, 2.2.6). The hour will automatically be validated after a few seconds.
2.3 Beeper function
appears (2.3.1, 2.3.2, 2.3.3). Adjust the time using the end buttons or by turning the dial (2.3.4, 2.3.5, 2.3.6). The time will automatically be validated after a few seconds and the countdown will start. A beep will sound when the countdown ends. Press any button to stop the beep.
2.4 Before using your new oven for the first time, heat it up while empty (with no food in it and with the control turned to , for 30 minutes at 250^ ). It may produce some smoke or a bad smell (this is normal and is caused by the oven heating up grease residue etc.). When it has cooled down, pre-clean it by wiping the inside with a damp cloth.
2.5 Accessories. Depending on the model, the oven is equipped with a Standard Tray (2.5.1), a Deep Tray (2.5.2) and a Standard Rack (2.5.3), which function separately. You may also combine any tray with the standard rack (2.5.4) to form a unit. The half-removable rack (2.5.5) and the fully-removable rack (2.5.6, 2.5.7) support the trays or the unit (2.5.8). If your oven has "Impulse" slide-out runners, firstly slide them into the oven without the tray (2.5.9). The "Impulse" runners will come out automatically due to the weight of the tray when the oven is opened. To prevent this from happening, acc. model use the locking system (2.5.10). You must use a tray under the food with the "Impulse" runners (2.5.11). Take the position of the racks into account when placing them inside the oven. They have anti-overturn side stops (2.5.12).
2.6 Accessory positions. The accessories can be fitted in 5 different positions
2.7 Cooking the food. Place the food in the oven. Choose the accessory or accessories to be used and their recommended position, or consult the cooking table. Close the oven door.
COOKING
2.8 Selecting the cooking function. Turn the function selector and select the desired function according to the model.
Traditional fanned heat. For any kind of dish. Several dishes may be cooked at once without their fl avours or smells mixing.
Turbo plus. The heat is produced by the central element.
Fanned high grill. This browns the food, distributing the heat evenly. Ideal for large-sized roasts.
High grill. For browning pasta, soufflés and bechamel sauce.
Low grill. For hamburgers, toast and food with a small surface area.
High base heat. The heat from the oven base is evenly distributed. Ideal for paellas or pizzas.
Fanned base heat. The fan distributes the base heat evenly. Suitable for paellas.
Traditional heat. For bread, cakes, cakes with flling and lean meat.
Defrost. Rapidly thaws any kind of food.
2.9 Selecting the temperature. Turn the temperature selector dial to the desired setting (2.9.1).
If the oven suggests an optimum temperature when you select the cooking function, the cooking process will start immediately. You can change this temperature during the 3 seconds the temperature is flashing, or as follows: press the button (2.9.2). The temperature will flash. Change the temperature by turning the dial (2.9.3). Alternatively, press the button until appears (2.9.4). The temperature will flash. Change it by turning the dial (2.9.5).
If the ^ C button is pressed and held down, the real temperature inside the oven will appear on the display.
2.10 Switching off the oven. In all cases, when the cooking process is complete, turn the function selector dial (2010.1). If your oven has a temperature selector dial (C) you should also turn it to 02.10.2).
TIME FUNCTIONS
2.11 Selecting the cooking time or Select the cooking function and the desired temperature. Press or un or starts to flash (2.11.1, 2.11.2, 211.3). Adjust the cooking time by pressing + or 11.4), or by turning the dial (2.11.5, 2.11.6). After a few seconds the time will automatically be validated and the countdown will begin. When cooking is complete, a beep will sound. To stop the
beep, press any button and switch off the oven.
2.12 Select the end time or Select the cooking function, the temperature and the cooking time. Press or until is flashing (2.12.1, 2.12.2, 2.12.3). Adjust the cooking end time by pressing + or - (2.12.4), or by turning the dial (2.12.5, 2.12.6). The start of cooking will be delayed so that it finishes at the time shown. When the end time is reached, the oven will beep. To stop the beep, press any button and switch off the oven.
2.13 Automatic switch-off (b, c, d, e). If you forget to switch off the oven, it will switch off automatically after a certain time. If the temperature is lower than 100^ , the oven will switch off after 10 hours. If the temperature is higher than 100^ , it will switch off after 3 hours.
2.14 Celeris Function. For pre-heating the oven. Turn the function selector dial to and enter the desired temperature (2.9). The oven will quickly reach the temperature selected. When it has been reached, place the food inside the oven and select the cooking function and cooking time required.
2.15 Child lock. For preventing children from playing with the oven. It is activated by pressing and simultaneously until appears (2.15.1). Alternatively, press the and buttons simultaneously until appears (2.15.2). To unblock it, repeat the operation.
2.16 Residual heat. This shows that the oven is still hot after it has been switched off. The thermometer will appear on the display while the temperature inside the oven is over 60^ .
3
Maintenance and cleaning

3.1 Cleaning the accessories. The accessories are dishwasher-safe. To wash them up by hand, use ordinary detergent. Leave them to soak for easier cleaning.
Non-pyrolytic ovens
3.2 Smooth-walled models. Clean the oven while it is warm, wiping the walls with a cloth soaked in hot soapy water.
3.3 Self-cleaning rough-walled models. On these models, the rear plate and side panels are covered with a self-cleaning enamel that removes the grease while the oven is functioning. The side panels are reversible, doubling the lifetime of the coating.
If the panels are not performing the self-cleaning process sufficiently, they will need regenerating. To do this, remove all the accessories and utensils from the inside of the oven. Thoroughly clean the oven surfaces that are not self-cleaning. Select the function.
Set the temperature to 250^ and set the time between 30 and 60 minutes, depending on how dirty the oven is.
When the cleaning programme ends and the oven has cooled down, wipe the self-cleaning elements with a damp sponge. They will then be totally functional again.
Pyrolytic ovens
3.4 Pyrolysis cleaning.
- The cleaning process consists of the dirt being burnt at high temperatures.
- The smoke and smells are eliminated by a catalyser.
- There is no need to wait until the oven has accumulated a large amount of grease to perform the cleaning process.
After pyrolysis, when the oven has cooled down, wipe it with a damp cloth to remove the white ash residue. - Before starting the pyrolysis process, take all the accessories out of the oven, including the cooking accessories and the telescopic runners.
- If any substances are stuck to the inside of the oven due to spill-overs, remove them before carrying out the pyrolysis process as they could catch fire or give off large amounts of smoke.
- During the pyrolysis process the surfaces become hotter than during normal use. Keep children away from the oven.
Depending on how dirty the oven is, you can choose between two types of pyrolysis.
Pyrolysis : This type of pyrolysis should only be used when the oven is very dirty. The cleaning process takes 2 hours. To activate it, turn the function selector dial to (3.4.1).
Note: Pyrolysis cleaning is possible with this option, with the enamelled tray accessory. Place it at level 2. First remove the excess grease accumulated.
ECO pyrolysis : The cleaning process takes 1 hour 30 minutes. To activate it, turn the function selector (3P2).
Note: The time and temperature parameters are set parameters and cannot be altered.
When the process begins, the oven reaches very high temperatures, the door safety lock is activated and the pilot light beside the symbol comes on (3.4.3). When the oven has cooled down, the pilot light switches off and the door can be opened.
3.5 Delayed pyrolysis. You can programme the pyrolysis end time. Turn the function selector dial and select (3.5.1) Press (3.5.2) or (3.5.3) until begins to flash. Adjust the pyrolysis end time by turning the time selector dial (3.5.4, 3.5.5).
3.6 Cleaning the inside walls. Take out the side runners and clean off any grease or ash that has been left after the cleaning processes. Depending on the models, the side runners are fixed in two ways, either without a support (3.6.1, 3.6.2) or with a support (3.6.4, 3.6.5). When you have removed them, use a damp cloth to clean the side walls (3.6.3, 3.6.6). When you have cleaned the oven walls, replace the runners. If your oven has a fold-down grill, pull upwards and press to fold it down (3.6.7) and clean the top wall with a damp cloth (3.6.8).
3.7 Cleaning the glass.
Cleaning the outside of the glass: Use a soft cloth soaked in a glass cleaning product.
Cleaning the inside of the glass: If the inside of the glass is dirty, you can remove it for cleaning.
When the oven has cooled down, open the door as far as it will go (3.7.1) and fix it in place with the red stops supplied in the accessory bag (3.7.2). Insert the two
remaining accessories so that they provide leverage to lift up the glass (3.7.3). Remove the glass (3.7.4), clean it and dry it with a cloth (3.7.5). If necessary, remove the whole glass panel unit inside the door. This unit consists of either one or two glass panels, depending on the model, with a black stop in each corner. To remove them, place your hand under the door and pull upwards (3.7.6). When you have taken out the unit, remove the stops to clean the glass panels (3.7.7).
When the glass panels are clean (3.7.8) fit them onto the rubber stops again, with the stud facing upwards (3.7.9) and replace the glass panels so that the letters "L" (left) and "R" (right) are beside the hinges (3.7.10). Lastly, place the remaining glass panel so that the word PYROLYTIC can be read (3.7.11). Remove the stops (3.7.12) and close the door.
Warnings:
- Make sure the oven is switched off.
- Allow the glass to cool down before removing it.
- Never use steam cleaning machines.
3.8 Cleaning the outside of the oven. Use neutral cleaning products. Dry the oven well with a soft cloth.

Troubleshooting

You can solve the following problems yourself:
4.1 4.1 The oven is not heating up. Check it is plugged in and switched on and that the fuse has not blown. Select a higher temperature setting.
4.2 The interior light is not working. Change the bulb or replace the fuse.
4.3 Smoke is coming out during cooking. Tun the temperature down and/or clean the oven.
4.4 The pyrolysis cleaning process is not being carried out. Ensure the door is correctly closed. Locking system or temperature sensor failure. Call the Technical Service.
4.5 A beep is sounding. The selected temperature setting has been reached. The
cooking cycle is complete.
4.6 The oven makes a noise after cooking.
This is normal, as the fan keeps running until the temperature inside and outside the oven is reduced.
4.7 Failure warnings.
FT Temperature sensor failure.
FO2 Door blocked (4.7.1).
F03 Pyrolysis cannot be carried out.
FO4 Door block failure.
F05 Software Failure
F Power cut during cooking.
The oven automatically switches off as it has been functioning for several hours (4.7.2).
Do not try to repair the oven yourself. Call the technical assistance service.

Safety

- The oven must be installed by an authorised installer in accordance with the manufacturer's instructions and diagrams.
- The electrical installation must be dimensioned for the maximum power indicated on the reference plate and the electrical socket must have a regulatory earth connection.
- The mains circuit supplying the oven must have a single-pole cut-off switch with at least 3mm between contacts.
- If the power cord is damaged, it must be replaced by the after-sales technical service or by similarly qualified staff, to avoid hazard.
- Ensure the appliance is unplugged from the mains before replacing the oven lamp, to avoid electric shock.
-
Do not use abrasive cleaning products or metal scouring pads to clean the oven door, as they could scratch the surface and cause the glass to shatter.
-
Keep small children away from the oven. It has accessible parts that can heat up during functioning.
- Do not touch the heating elements inside the oven.
- This appliance is not intended for use by people (including children) whose physical, sensory, or mental capacities are reduced or who lack experience or knowledge, except under supervision or after receiving instruction regarding use of the appliance from a person responsible for their safety. Use by children should be supervised to prevent them playing with the appliance.

The Environment

This oven has been designed with environmental protection in mind.
Respect the environment. Only preheat the oven when necessary (see table). Use dark coloured cake tins whenever possible. For long cooking times, switch off the oven 5 or 10 minutes before the end of cooking time.
Management of waste electrical and electronic equipment.
The symbol indicates that the appliance must not be disposed of in traditional bins for domestic waste.
Take your oven to the a special collection centre. Recycling domestic appliances will prevent negative consequences for health and the environment and will allow savings on energy and resources.
For further information, contact the local authorities or the shop where you bought the oven.
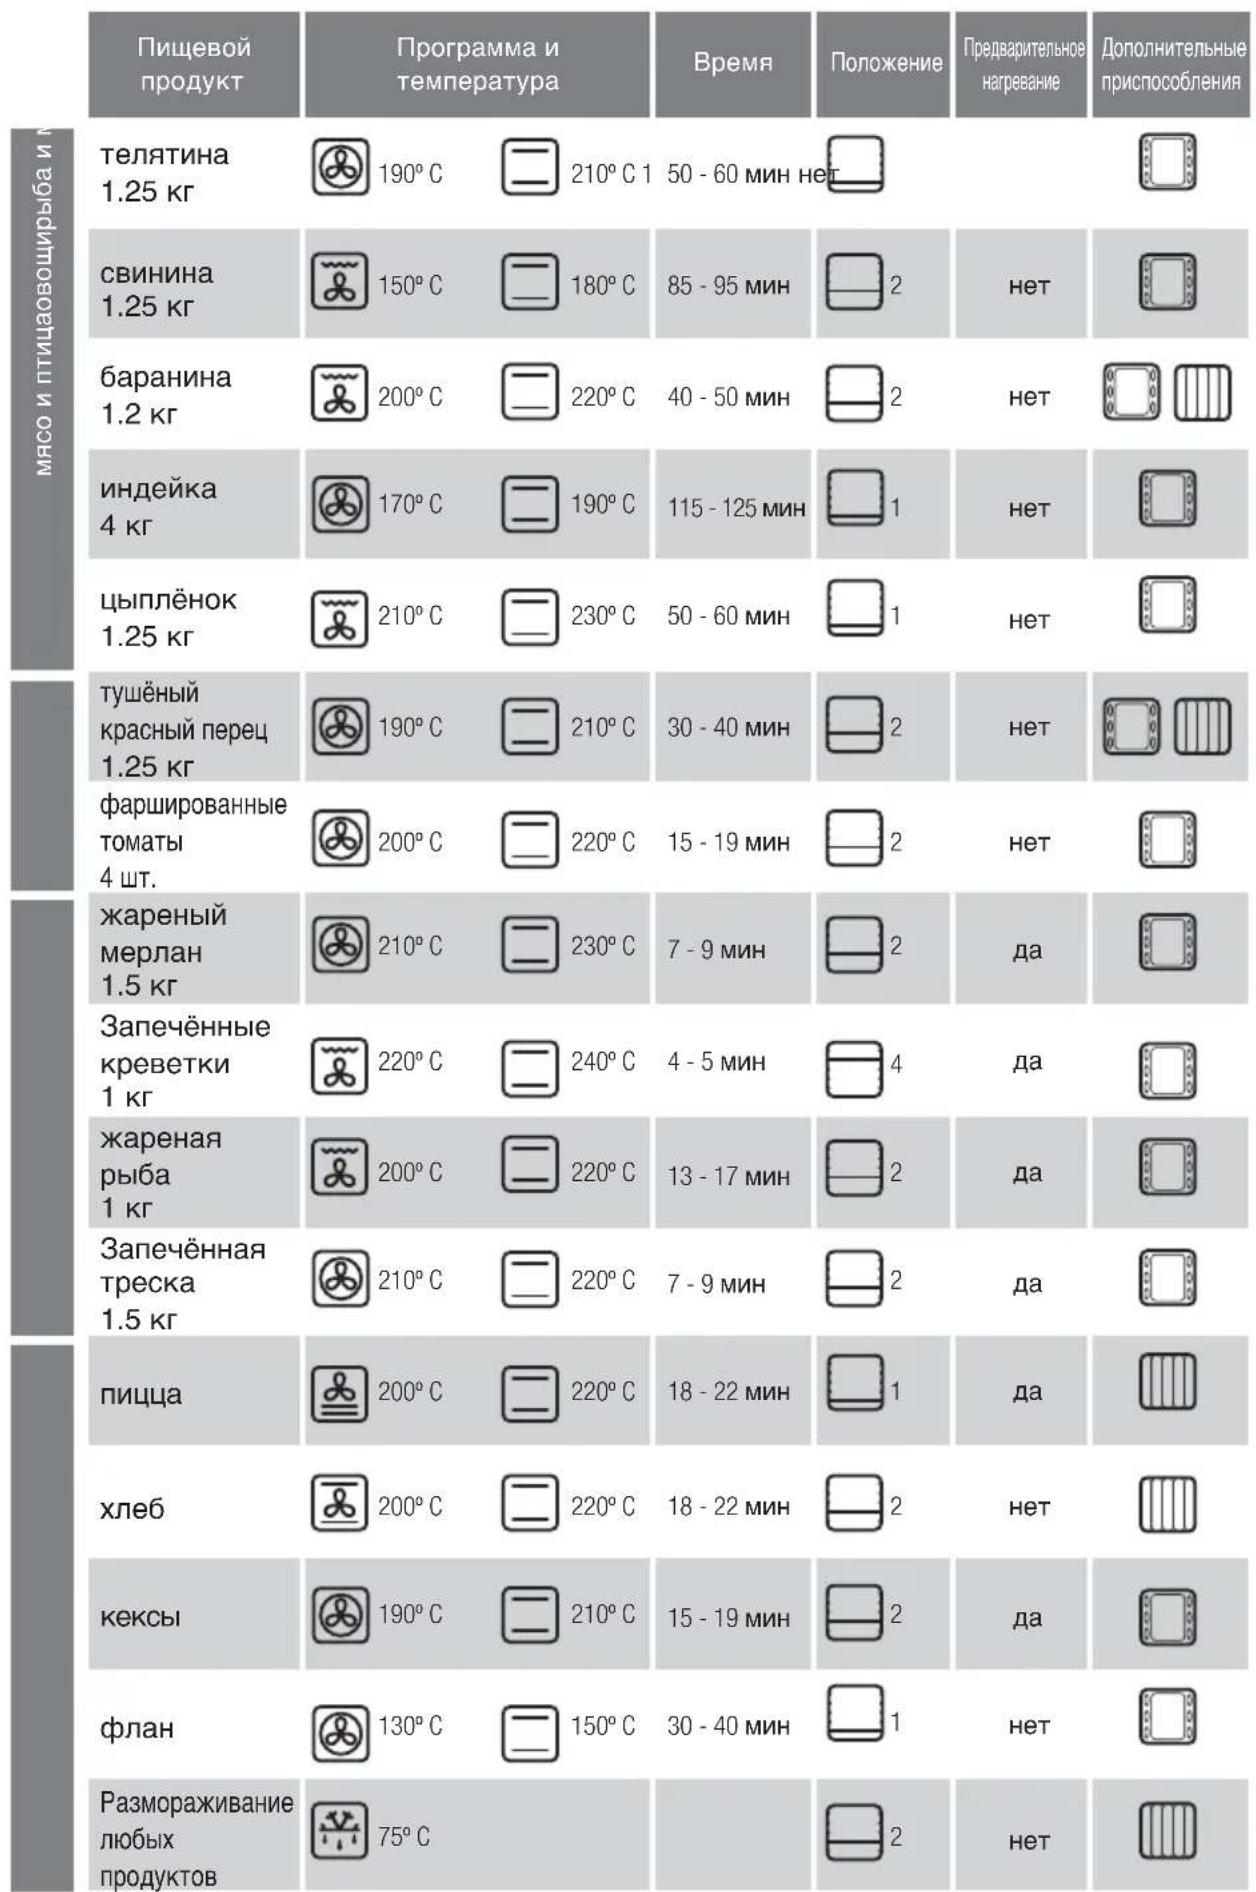
Cooking Table
| Food | Programme and temperature | Time | Position | Preheat | Accessories |
| beef 1,5 Kg | 190°C | 210°C 1 | 50 - 60 min no | ||
| pork 1,5 Kg | 150°C | 180°C | 85 - 95 min | 2 | no |
| lamb 1,2 Kg | 200°C | 220°C | 40 - 50 min | 2 | no |
| turkey 4 Kg | 170°C | 190°C | 115 - 125 min | 1 | no |
| chicken 1,25 Kg | 210°C | 230°C | 50 - 60 min | 1 | no |
| roasted red peppers 1,25 Kg | 190°C | 210°C | 30 - 40 min | 2 | no |
| stuffed tomatoes 4 servings | 200°C | 220°C | 15 - 19 min | 2 | no |
| baked hake 1,5 Kg | 210°C | 230°C | 7 - 9 min | 2 | yes |
| roasted lobster 1 Kg | 220°C | 240°C | 4 - 5 min | 4 | yes |
| baked fish 1 Kg | 200°C | 220°C | 13 - 17 min | 2 | yes |
| baked cod 1,5 Kg | 210°C | 220°C | 7 - 9 min | 2 | yes |
| pizza | 200°C | 220°C | 18 - 22 min | 1 | yes |
| bread | 200°C | 220°C | 18 - 22 min | 2 | no |
| sponge cakes | 190°C | 210°C | 15 - 19 min | 2 | yes |
| flan | 130°C | 150°C | 30 - 40 min | 1 | no |
| defrosting, all types of food | 75°C | 2 | no |
Bedienungsanleitung
FOH Storing deuvergrendeling.
F05 Softwarefout.
2.8 BbIepeTepeXm npiroToBHeHn
Heo6xOJIMO NOBepHybIpeKJIouHaTeIb peKIMOB
, BbIbpaB Tpe6yeMbI peXMM B 3aBNCIMoCTN OT MoJeIN npu6opa.
TpaHIOHHbI Tn IOnaH TeNa C
PnHynteBHOuR KyIaNeB O3dyxa B KaMepe
kaopa.3TOTpeKIM NOxOINT nI npiroTOBneHn6JIIOIIO60rTnA.BI moKeTe roTOBtB HeckoJbKO6JIIOI OHOBPemHeHNO, INX 3aAnxN BkycbI He 6ydyT CMEINBaTcR.
PexnM «Typ6o nIoc».TeIIO BbIpaBaTaBaeTcA
LcHTpaIbHbIM HaIpeBaTeIbHbIM 3NEMeHTOM.
PexnIM nHTeHCNBHO nprirotOBJIeHn Ha rpnIe c npHyDnteBHOU pKpyIeN Bo3dyxa B Kamepe Ikaopa. B 3TOM pexnME Bbl MoXete TOTOBNTb Ha rpNIpaBHomepno paCnpEeJrA TeINo. PexnM Oeyb XopAN DnI npriTOBHeHn XaDEHO RMaCa KVDNbIM KyCKAn
PexkIM HHTeHCBHOrO pIroTOBJIeHnHa rplne.
3aenekaembe 6nOda: MyuHbIe n3dEInna, cyfpe n coyc 6eWamelb.
Pexim MmKoro npuroToBHeHnHa rpHne.
rAm6yprepI, rpeHKn I npOdyKtbl C He6oJbIoNIOBepxHOCTbIO.
HHTeHCNBbH HIXHM NoDorpeB. HHTeHCNBHa
noa Ta Tnna Ch3y C paBHomepHbIM er0
pacpepehenem. Pekm Oeyb xopoOxOoNT nn
piroTOBNEHNA naJIb NIN NINcbl.
HnKnnnoIPOORpeBc npHynteHbHO npKpyLne
B03dyxa B Kamepe Wkaopa. 3a cHT pa60tBeHTnIaTopa oecneHbAeTcpaBHOMepHOe pacnpedeHHe HTeNla, noDaBaemoro CHN3y.PekIM
pekoMeHdyeIChdHnPiHIOTOBJIeHNHaJIbN.
TpaHnOHHb Tnnpoau nTeIIa. Xle6obyIOuHbIe
I3dJIIN, INPOrN, INPOXKn C HauHHKOIN IOCTHOE MRCO.
Pa3MopaxnBaHne.Испоьзуг 3TOТ ржIM,ВblcMOxKeTe B KpaTcauIWe cPOkN pa3MOpO3NtB JIO6bIe pOdyKTbl.
2.9 YcTaHOBKa TemnepaTpybI. NObepHyTb pyChy nepeKJIIOUaTeNa TemnepaTpybI B TpEbyEmoe noJoxHe (2.9.1).
Ecni nocne Bb6opa pexkma npiroTOBJIeHn np6op cam npedIOXHT ONTImaIbHbI ypoBeHb TeMNEpaTypb, TO npiroTOBJIeHne HaHTcPc3y Xe. PpeIOXeHHyo np6bOpom TempePaTyPOxHO u3MeHtB TceHHe 3 cekHyd, NOKa ee o6o3HaueHne MIRaET, INN Xe OJHM m3 HIXKeONcaHNbIX CnOc6OB.HaxaTB KnaBNIy (2.9.2); o6o3HaueHne TempePaTybHaHTet MIRaTb; ypoBeHb TempePaTyb MOxHO u3MeHtB Bpaaar pyKy -+ (2.9.3). AInbTePhATNBHO MOxHO HaxaTB KnaBNIy uYdePXIBaTb ee Do DCCTNKeHnnoLOXeHnra (2.9.4); o6o3HaueHne TempePaTyb HaHTet MIRaTb; ypoBeHb TempePaTyb MOxHO u3MeHtB Bpaaar pyKy -+ (2.9.5).
EcIn yepkBaTb HkaToH KhoKy C,TO MOxHO yBnTeB pKaTnueckyTo TEMpepaTyBHyTpN dyXOBKn.
2.10 BbIKNoeHne DyXOBOro WkaFa.Bo BCex CnyaJx nO 3aBepWeHn PnIroTOBHeHn pyKv NepeKIOuTeJIpeXIMOB HcO6xoIMo NpeBecTn B NoIOKeHne O
(2.10.1).EcnB npno6peTeHHo BAMM MoedeN uka pa
mMeetc pyka nepeKIOUaTeN TaMEnpaTypbTO erToKaXe Heo6xOIMO yCTaHOBTb B NOIOKeHnE
(2.10.2).
ФУHKLIMПОТРAMMIMPOBAHAЯВБPEMEHIN
2.11 YctahOBka dIInTeBHOCTn pnproTOBneHn
HIN Cnayana Heo6xOIMBOB6paTb pexim npiroTOBNEHNu YCTaHOBTb Tpe6yEmbI yPOBEh TEMepaTpby.3aTEM HaxMNTe KnaBmUy IN, ydepXUBaB ee Do TEX NOp, NOKa HE HaHcET MIRATb HIN (2.11.1.2.11.2, 211.3).IITrTO UTO6bI 3aB BpEM npiroTOBNEHNu HaxMmaTe KnaBUN + (2.11.4) INBpaauTe pyKy-(2.11.5, 2.11.6).
Yepe3 HeckoJIbKO CekyHd yCTaHOBJIeHHOE BpEMy 6byET pInHrTO npIbOpOM KaK IODTBePjXJdeHHOE, IN HauHeTcER oO6paTHbI OTCHT. IIO 3aBepSeHm IpN6Op IOaCT BBICOKOAcToTHbI 3ByKOBo CNHaI; IJIa ERO OTKnIOUeHn HAxMITE JIO6yIO KNaBUNy IN BbIKIOHTe DxyOBKy.
2.12 YctahOBKa BpeMeHH 3aBepSeHn npriTOBJIeHHN
Hnn:Chauana Heo6xOIMMO BbI6paTbpexKmIPnIROBNeHnN yCTaHOBNTppe6yEmbl npOBHehTEMnepaTpybl NnNTeNBHOCTb npIROBNEHn.3aTEMNaKMITE KJIaBnU 0nn
nop, noka He HaHET MInrTaB (2.12.1, 2.12.2, 2.12.3).ДяТОуТоБы yCTaHOBnTb BpeMЯЗаВePseHIN npiroTOBHeHRAHaxIMaTe KnaBmU+ (2.12.4) mI IN BpaAaIte pyky (12.5, 2.12.6).BknIOueHne dYXOBKn 6yJET OTcPOeHTo TaKIM O6pa3OM, YTObI npiroTOBHeHRe 3aBePwIoCb B yCTaHOBNeHHoe BpeMЯ. IIO 3aBePseHm Pn6Op NODACT BBICOKOAcTOThBm 3ByKOBoI CnHaI.ДЯ ERo OTKIIOeHIN HaxMIne LIO6yIO KnaBmUy N BbIKNIOHTe DxyOBKy.
2.13 ABTomatueckoe OTKIOUeHne (b, c, d, e). Ecnn Bbl 3abbln BblKIOuHTb DxyOBoi uKaΦ, uepe3 HeKOtOpoe Bpemr OH BblKIOuHTcA ABTomATueckn. Pnp TemnepaType Hxke 100°C npIbop BblKIOuHaTcA uepe3 10 Yacob. Ecnn DxyOBka pa6oTaet pnp TemnepaType Bblie 100°C, ee BblKIOUeHne npOnCxOJIT uepe3 3 Yaca.
2.14 Pexm Celeris. 3TOT pexm IpeHa3HaueH dI npedBapntbHoro pa3oRpeBa dyxOBKn. Ira erO nIOJIb3OBAHn Heo6XODIMO NOBepHyTB pyuKy nepeKIOUaTeI npexmOB B noIOKeHne H 3aDaTb Tpe6yEmbI yPOBeHb TEMpepaTpybl (2.9.). IIkaFbICTpO HarpeETcNo yCTaHOBHeHOB BeINuHNb TEMpepaTpybl. IocNe TORO KAK DyoxBka npedBapntbHo pa3oRpeETcN Do yCTaHOBHeHOB Bam NTempeTaPbybl, NOMeCTNTe B Hee pnirotabInBaemoe 6IIOoN 3aJaTe Tpe6yEmbl pexmPiPIrTOBHeHnI ERO BpEMr.
2.15ФункияблOKИРБКИ.NICNoJIb3OBAHHe 3ToIФункиIN NO3BOJnRET NpeDIOBpATnTb BkIIIOUeHne npIbopa DeTbMn INN INX BMeIaTeIbCTBO B erO pa60Ty.ДЯВKIIIOUeHnA DAHHoФункиIN HeO6xODmO HaxTaB ODHOBpeMeHNO KJIaBUNI ,YePKNIBa INx DO TEX NOP, NOKa HA INcJIpeE He IOBnTc3HaOc (15.1). AЛьТeРНaTHBnHO Bbl MOxete HaxKaTb ODHOBpeMeHNO KJIaBUNI ,YePKNIBa INx DO TEX NOP, NOKa HA INcJIpeE He IOBnTc3HaOc LOC (2.15.2).ДЯ pa36LoknIPOBKn pIbOPa HeO6xODmO NOBtOpNTb 3Tu npOueDpy.
2.16 OctatoHoe TenNo. YKa3bIbaeT Ha To, YTO NocJIe BbIKIOueHn I dyXOBKn OHa BCE eUe OCTaTeC rOpRyEi. Ha DnCJIe ee OTobpaKaTc3HaOcK TepMometpA Do Tex nop, Noka TemnepaTpya B WkaCyHe OOnCTNTc HnKe 60°C.
3
Yxod n uhcTa
3.1 YnctKa npHaJnxHocte. PnHaJnxHocTn MOxHO OuNtB B NocyDOMoeYbIX MaunHax.ДЯ MbyTB BpyHyIO Bbl MOxTe PnIMeHTb 6bITOBoe MOIOOee CpeIcTBO, KOTOpbIM O6bHNO MoTe NocUy. EcII 3aPra3HeHn He ydaETcR IerKo ydaNTb, IpoueCC MbyTB MoXHO O6JIeHTb IpeDbapntelbHo 3AMOINB PnHaJnxHocTn.
DyXOBbI uKaΦbI 6e3 ΦyHKcN NpOJIHTnueckoI OuHCTK
3.2 MoJIeN C rIaKnMn CTeHkAmN. DyXOBky CneNyETMbITb CJIeRka HaIpeToN, IpOMbIBaT TAnKy TOrpAeN BOIOI N MOIOUcM CpeCTBOM IIN MbJlOM.
3.3 MoJIeN CpeJIbeΦHbIMn CTeHKaMn (camooUHaOuIeCЯ).B dyXOBkax TaKnx MOJIeN 3aJHЯИ bokOBbIe naHeJI NOKpbITbl
camoouuaioeC3MaJbIO,6laOapra HeMy XnUp ydaJIaReTcC OCTeHOK BO Bpempa6oTbI npnbopa. Eokobie naHEn MOxHO nepeBopaunBaTb Ha dpuyIO CTOPoHy,TO npOJeBaET cPOK cnYX6bl 0bnIOBOOHOrO CnOBA p3a.
Korda nahanen nepectaHT obecneuBaTb DOCTaTOHyIO ONUCTKY 3a CHT CBONX CBOINCTB, Heo6xOJIMo npov3BecTN IX pereHepauMIO. Jnra 3tOrO n3 uKaopa HxNHO N3BLey BCE npHaNDNeXHOCTn IEMKocTN. Pocne 3tORo TuaTeNbHO ONUCTNTb NOBepxHOCTN DUXOBKN, He RnIIOUneCeCAmooUHnAIOUHMNC. 3aTeM 3aJaTe peXMM
YcTaHOBInTe TemnepaTyPHa YpOBe 250 ^ C n BpEmBaIaIa3OHe 30-60 MmHT B 3aBNCIMoCTn OT CTeHn3aPr3HeHHocTn np6opa.
Iocne toro kak nporpaMMa OuHCTKN 3aBepnIT paBOTy n DxOBkA OCTbHET, CaMOOHNsauOUIeCn 3NEMeHTb HEO6XODmO IpOTepeTb BIAJXHOI r6KoI. IIO 3aBepseHmN 3TOI pOueDpybl OH NOLHOCbIO BOCCTaHaBnBAIoT CBOIO pPiroDHOCTb K EKcPiyaTaUIM.
DyXOBbIe ⅢKaΦbI c ΦyHKcnei npoJIHTnueckO OYNCTKI
3.4 OuHCTKa MeTODOM NIpOIN3a.
OcYIeCTBJIeTc3aCETyJaJIeHn 3aIp3HeHn npn BbICOKnx TEmpeAtypax.
-ДыIMO6pa3yIOUne BeueCTBa n 3aIaxn ydaJIaIOTc npn npoxkJeHH Yepe3 KaTaN3aTOp.
-Дя Вылолпеня Такочн STK He Huxho XdaTb, noka duyxOBka 3arpa3HITc60JIbIIM KONUcheTBOM Jupa.
-ПослЕ BынOLненя поцудрbl OчNTКИ ПиPoJIN3OM
N OCTыВаHЯ DУХОВКИ NOВЕРхHOCTN CNeДуET
пpoTepeТь BLnЖнОТТРЯнКО, yДалЯ OCTaTKn
БeLOrO HANeTa.
-пелд Tem Кak Bкнluочь ржим Oчистkn
пролизOM, ИЗ Шкаба Heobхоюmo ИЗВлесь Вс
принадлжхости,В TOM УСпЕ Принадлжхости
Ддг пriготовленny и Телесковские
Нарравлише.
- EcIn B KaMepy neu npOnnncb 60JIbWne KOINueCTBa KINKoCTeN 3 rotOBuBwIXcR 6IIOJ, NepeD OYNCTKO INpONn3OM INx Heo6XoIMBOBIMaKaTb, TaK KaB B IpOTNBOM Cnyae TaKHe 3aRpa3HEnMa MOrTy BOCnPaMeHHTbcr INI pINBecTNI K O6pa3OBAHnIO 60JIbWoTO KOINueCTBa DbIMa.
BoBpema npoeDpybl npoTnueckOOnCTKNOBepxHocTHnHarpeBaIOCT60JIbSe,HeMnpi
ObHOM npiroTOBHeHH. Po3Tomy BO Bpemr 3Toi npoeDpybI detn DoJXhbl HaxoDntbcn noaIbSe ot WkaFa.
B 3aBnMocTn OT CTeHEn 3aRpa3HeHHoCTn DyXOBKn MOxHO BbI6paTb OINH IN3 DBYx TINOB OHNCTKN NIpOIN3OM.
Пироиз : 3TIN npIMeHЯETcnpN CnIbHoi 3aPra3HeHHoCTn DyXOBKn, N OChNTKaДЛNTcR 2 Yaca.ДЯ BKJIIOUeHInpeXUMa OCHCTKN 3TOrO Tnna NOBepHHTe pyKу NepeKJIIOuHaTeJn peXUMOB B NOLOXKeHne R3.4.1).
ПиMuMaHHe.ВЗToMоДeн 3MaIInpoBaHHbI npOTnBHeH MoXHo YnCTHTb NpOJIncOM, yCTaHOBvB erO Ha yPoBeHb 2 nпpeDabPteMbHO ydaJIbN u3nIshKnHaKoINBWeeroCЯИра.
Пиролиз EC0 :СТаДNTсЯ 1 yapac 30
МИнут. Ддя ВКлюЧеня ржима OчNTКи 3TOrO TINа
ПОвернITE рчky пeрклioчateЛя ржимов
ПОLOЖЕпe [34.2).
Прмочан.НастpoКВБремиI TempepaTpybI YBJIHOTcФИКСИРОBAHHbIM,ИИЗМEHHTb IX HEBO3MOXHO.
Iocne hauana npocecca oucnctkn Tempeatypa B DuxOBKe DoCTnraet OyeHb 60JIbwx BEnuH. IocToMy B cenx 6e3oNaChOCTn DBepca 6NoKpyETc, a pAdom CO 3HaKOM aRopaETC npEduynpeDntelhBni CBetoHNdkaTOp (3.4.3).Iocne toro ka Tempeatypa CHN3NTc, CBetoHNdkaTOp rachet, n DBepuy MOXHO OTKpbITb.
3.5ПиронисOTcpoко.ИМeETcR BO3MOxHOCtB nporpaMMnPOBaTbВpeM3aBepseHnIpocecca ПирONITnueckoOCHCTKn.ChaJaNIOBOPOTOMpyKIN peEKNIOUATEJIPEKIMOB HOB6XODIMOBbIBpaTb peKIM OUChTkn (3.5).3aTeM HAKMNTE (3.5.2) nII (3.5.3) nYdEpXNBaIte, noka He NaHT MInrTaB.YCTaHOBNTe BpeM 3aBepseHnI npOceCCA OCHCTKnПирOnI3OM BpaAaJ pyKny peEKNIOUATEJI BpeMeHn-(3.5.4,3.5.5)
3.6 OuNTKa BHyTpEHnX CTeHok.ДЯуDAJIeHIN
OCTaKOB KIPA HJN HAIeta, KOToPbI MOKeT
OCTaTBcH NocJe IpoUeDyp OUnCTKn, Heo6xOJIMO
CHrTB 6OKOBbIe HAnpABJIHOUe. B 3aBNCIMOCTN OT
MOeJIyDxOBOrO ukaFa 6OKOBbIe HApBaBJIHOUe
MOrY T KpeNTbCOnHMM 3 DBYx CInOCOB: 6e3
ONOpbl (3.6.1, 3.6.2) nII c OnopoI (3.6.4, 3.6.5).
IocNe I3BLeueHn HApBaBJIHOUeX 6OKOBbIe CTeHKn
CneDeYer IpoTepeTb BlaxHoN TrpIKoN (3.6.3, 3.6.6).
IocNe 3aBepSeHn PpoUeDpybI OUnCTKn CTeHOK
HaNPabJIIOUe CneDeYet yCTaHOBHTb Ha MecTO.
EcInI dyXOBKa IMeET CbeMhBi TprnJIb,TO HyXHOpnIOHaTb Ero, HaxKaTb Ha Hero N BbiHyTb BHIN3 (3.6.7), nOChTne BepxHIO CTeHKy BnaXHO TpAnKoI (3.6.8).
3.7 OuNCTka cTeKoN
HApXhIX NOBepxHOCTeI: Ia YnCTKn HApXhIX NOBepxHOCTeI CTeKoI BOCNOJIb3yIITcB MArKO TpAnKO IN CpeDCTBOM DIA MbITbA CTeKoI.
YnCTKa BHyTpEHHnX NOBepxHOcte: EcIn 3aPra3HNIMCb BHYTpEHnE NOBepxHOCTn CTeKOJI, DJI TuaTeIbHO OCHCTKN IX MOXHO CHATb.
Духовka дожна 6ыт bхлоанов.ОТкроч Деруdo конca (3.7.1)иЗakpenite ee ynpamn (Kpac HoroцBetа),пocтавлernbIMВпakete c пинаджнocTamn (3.7.2).Вставte Двдугх Зем enta,TakчTOбblnoHЯтбCTeKNo,обраурpbihar (3.7.3).ИЗьнeКиTe CTeKNo (3.7.4),очисте erои OCyшte TrpIKNOK (3.7.5).EcIn HeOBxOДМо,MOXHO N3BNeYb BCE CTeKIIa N3Дерцbl ueIbHbIM PaKeTOM. ПakET MoKET COCTOrb N3 ODHORO ININ DBvX CTeKON B 3abcIMOCtN OT MoeJIIN shKaФa.В кадom erOуглу mEeTcHypOP YepHOrO zBeta.DЯн ИЗВeueHnI CTeKOn HeOBxOДМо BBeCTn pykU cheP3 HIXHIOU qactb Дерцbl nNotAHyTb HanpaBneHnBepx (3.7.6).Пocne TORO KaK CTeKla 6byT N3BNeueHbI,ДЯ INx OChCTKn ynopbl cneDyet ChA Tb (3.7.7).
Iocne oucCTkn CTekoJ (3.7.8) CHOBa BCTaBtBnxB pe3HOBbIe ORpaHUnTEJI N BbICTyNOM BBepx (3.7.9) n pacnoLoXknte TaK, YTO6bl Obo3HaueHnE "L" cIeBa n "R" cnpaba haoDJIncb PAnOM C wapHnPaMn (3.7.10). IpoceDpya 3abepwaeTcN yCTaHOBKO CTekNa Ha MeTo TaKIM o6pazom, YTO6bl CIOBO PYROLYTIC 6blO paCnoLoXKeHO B KOppeKTHOM DnA YTeHn NOLOKeHN (3.7.11). Iocne 3TORO ynpbl MoXHo y6paTb (3.7.12) n 3akpbITb DBepu.
Baxhble npdeynpekdeHn OTHOCHTbHo 3Kcnnyatau:
He 3abBaIte BbIKIOuATb DyXOBky nocne OKOHaHn IpNROTOBJeHn.
CTeKMOXHO BbIHMaTb N3 DBePcbl TOJIbKO IocJIe NOHOrO OCTbIBaHnI dyXOBKn.
Kateropnueckn 3anpeaaetc npmehTb dna YnCTKn DaHHoro np60pa ycTpoNCTBa napOBOn OHnCTKn.
3.8 Ouchka HapyXhBIX NOBepxHocTe AYXOBOro Uka: ПуIMeHЯTe HeItpaIbHbIe cpeIcTbA. Nocne YnCTKn NOBepxHocTn CJIeIyEt TuaTeNbHO OcyuHTb MrkOu TpAnKOi.

Bo3MOxHbIe npo6JIemblnX yCTpaHeHne

Bo3MOxHOb3HNKHOBeHne pRJa npo6Jem, KOToPbIe MOrYT 6bItb yCTpaHeHbI NOJIb3ObaTeJeM CaMoCTOrTeJIbHO.
4.1 Duyobka He Harpebaetc. IpoBepbTe noKluoyHne K cETn PHTaHnI COCToHHe PnaBKO TpeOxpaHtTeJyBeJIbTe ypoBHeYcTAHOBJIeHON TeMnpaTybl.
4.2 He pa60aet BHytpenHHe ocBeseHne kamepbI.
3amHnTe lamnoKy nn nnaBkn npedoxpaHntelb.
4.3 Bo Bpem npirotoBneHn n3 KamepbI dYxOBKn BbIXoNT dbIM. Heo6xoImmo yMeHbWntb Tempepatyp npirotoBneHn w/nn pOn3BcTn OChCTky dYxOBKn.
4.4 He BbINOJIHReTcOuHCTKa NpOJIIN3OM. PpOBepbTe, DOCTaTOUHO JN IIOHTHO 3aKpbITa DBePca. PpHHoH MOKeT 6bITb TaXKe HEICnPabBHOCTb CnCTeMbl 6IOKIpOBKn IIN TEMpepaTyphoro DaTuHa. B 3tOM Cnyuae Heo6xOIMO 6bPaTnTBcB Cnyj6y cepBNCHO INI TEXHNueCKOrO O6CnykmbAHnR.
4.5 DuyxobKa nOaET BbICOKoAcTOTHbI 3ByKOBoi CnHaI. OocturHyTa 3aDaHHa BeINuHHa TempeaTypbl. 3aBepseH Bb6paHHb IuKl pnproTOBHeHn.
4.6 103aBepueHn npiroTOBHeHn n3DyXOBKn CbIeH yM.3To HOpMaJIbHO n CBra3aHO C TEM, YTO BEHTINrTOp IpoDoJIkaET paOToTaB Do BbIPaBHnBaHHN TEMpePaTybl BHyTpN KAmepbl DxyOBKn C BHeuHem TEMpePaTyoi.
4.7 PpeynpeKdHnO HeNCpabHOCTAX.
FO1HeicnpabBHOCTb TempepatypHoro DaTnka
F023aboknpoBaHaDbepca(4.7.1)△
F03 HeBO3MOXHO BbIOnHHTb OYNCTKy NIpOJIIN3OM
F HnCnpaBHOCTb CNTeMbI 6NOKIpOBKn DBepu
F05 OTKa3 nporpamMHO o6epeHnA
F OTKJIIOUeHHe 3NeKTpOnNTaHnB Bo BpeMa npIroTOBJIeHnA.
A To ABTomatHeCKoe BbIKJIOueHne Iocne HeckOJIbKnx YacOB HnpepbIBHO pa6oTbI (4.7.2).
BmeaTeJIbCTBO BpaOTo npIbopaB daHbIMOMeHT 3anpeueHo. TTo6bl OTpeMOHTnpoBaTb npIbOp,6paTInTEcB CnyK6y cepBnCHOrO IIN TEXHNueCKOR06CnyKnBAHH.

Be30nachoctb

- YCTaHOBka DyXOBKn IOnJxHa OcyUeCTBJIrTbCk KBaINΦuINpOBAHHbIM CneuaJIInCTOM NO MOHTaxy B COOTBeTCTBnC INHCTpyKlIaMm N CXEMAMN N3ROTOBtEnI.
3JIeKTPoyCTaHObKa DOJXHa IpnOIm3BOJNTbCBA COOTBeTCTBm C MaKcMuaJIbHOI MOUHOCtBu, YKa3aHHoHa NIDeHTnФkaUNOHHO TabNmuKe, IN CNOJIb3OBaHNEM
3NEKTPnueckoP03eTKnC3a3EmneHnEM, COOTBETCTBHyOuIM HOpMaM.
- LcB3JKeTpueckoro ToKa, nTaioUeO dyXOBky, DOnJxHa 6bItb Cha6keHa OMHNIOJIaRbHbIM npepbIbATEJIcM C MHNImAlhBbIM paCCTOHHMeKdY KOHTaKTamN 3 MM.
- Ecnn nIHTaIOU KAbEnb NOBpeKdEHN, OH dONXeH 6bITb 3aMeHn HEPcOHaIOM OTDeN aocTnpOdaXHO 06ClyXuBaHn IIN CneuaIInCTAMn TaKoJ Xe KBaIINpKaun C cJIbIO oBeCneueHn Be3onacHOCTN.
- PpexJe Yem 3aMeHHTb IaMnY yIOCTOBepbTecB TOM, QTO annapa BbIKIOUeH, UTO6bl N36ExKaTb yDapa TOKOM.
He nCnoB3yIte abpa3nBhIe cpeCTBa nn JxctKne MeTaNIIueckNe Moaankn IJN CNTKN DBePcBi DYXOBKn, TAK KAK 3TO MOKeT PnBecTn K NOBpeKdEHIO NOBepxHocTn N Ka3pyUeHIO CTekNa. - He pa3pewaIte MaIeHbKIM DeTAM HaxOJITbCRA pAOM c pa6oTaIOUe IyXOBKO.HekOTOpBle HApYXHbIe HaCTN 3dJIIN MOrYT HarpeBaTcR.
- Ⅲ36eraIte DoTpaIbBaTbCn Do HArpeBaTeIbHbIX 3NEMeHTOB BHYTpN dYXOBKn.
Даньприбор He npeHa3haueH nIЯ 3KcNpyatauIMnIaMn(B TOM YHCNE DeTbMn) C OPAHHeHHbIMnФИЗМССКIMM,CEHCOPHbIMN IyMCCTBeHHbIMNBO3MOxHOCTaMn,a TaKke JInLqAMn,HE IMEHOUIMNIOCTaTOHORO ONbITA n 3HaHm.ПОьБОВАнeпriбopOMTaKIM JInLqAMn pa3peWaaETCnToBko nOd npICMOTpOMnIa,OTBETCTBEHHORO 3a TEXHNky 6e3OnaCHOCTu,IINIOncI pROBeDEHnIM COOTBETCTByUoTe rO INCHPTyKTaKaNo 3KcNpyatauIM.PnIeKcNpyatauIM npi6opa DeTbMn 3aHIMN Heo6xoJMo npICMaTPNBatb,He nO3BOJIra INPpATb Cnpi6Opom.

Okpyxkaouza npeda

KoHCTpyKUNyDxOVBKn OCHOBaHa Ha npHnIax 3aunTbI OKpykaUoien cpebl.
Co6IIOaIe TpHcunbl3aunblOkpykaioe
CpeBbI. PpOu3BOUnte npEaBapnteJIbHoe HArpeBaHne DxyOBKn, TOnbKO ecN 3TO Heo6xOJIMo (CM.Ta6nUy).
PnDnTeBHOpaOte dyXOBKn BbIKHouaHTe e3a 5-10 MNHyTdo yCTaHOBNEHHORo BPemeHN.
Ipo6Jema Otpa6oTaHHbIX 3JIeKtpnuecknx IN 3JIeKTPoHHbIX annapaTOB.
O6o3haeHne yka3bIbaet Ha TO, YTO daHHbI np6Op HEnb3R Bbl6paCbIbAtb B 06bUHbIE KOHTeHepbl n86bITOBbIX OTXOIOB.
IpepaTeBaWyDxOBkyB CneuaJIbHbN CEHTP npEeMKn. Ytnn3aun6bITOBbIX 3NEKTPoPnp6OpOB n03BOJnReT u36ExaTb HeaTnBHbIX NocJeCTBn Dn8 3DOpOBb, OKpyXaIOUe CpeDbI IN NOMoAET 3KOHOOMtB 3NEKTPo3HeprnIO n pecypcbI.
IJIIOJUeyHnI DOnONHITeBHOINHOpMaUNO6paTntecb K MeCTHBIM BIACTAM NIN B OpraHn3aUIO, IDe BBI npNo6peN BAuy dyXOBKy.
Ta6nca npiroTOBJeHna