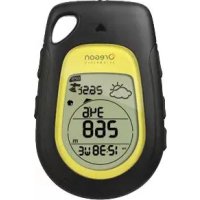
GP123 - Sports Watch OREGON SCIENTIFIC - Free user manual and instructions
Find the device manual for free GP123 OREGON SCIENTIFIC in PDF.



| Product type | GPS sports watch |
| Brand | Oregon Scientific |
| Model | GP123 |
| Power source | 2 AAA 1.5 V batteries (UM-4) |
| Display | Digital LCD with backlight |
| Main functions | Altimeter, barometer, 16-point digital compass, GPS, 12/24h real-time clock, alarm, weather forecast, LED light, key lock |
| Operating temperature range | -5 °C to 50 °C (23 °F to 122 °F) |
| Altitude range | -400 m to 9,000 m (-1,312 ft to 29,520 ft) |
| Barometric pressure range | 300 to 1,100 hPa (8.86 to 32.48 inHg) |
| Sea level pressure range | 900 to 1,100 hPa (26.58 to 32.48 inHg) |
| Weather forecast | Sunny, variable, cloudy, rainy (12-24 h forecast) |
| Position memory | Up to 3 positions (parking, home, favorite place) |
| Backtrack function | Return to saved positions with distance indication |
| Water resistance | Splash resistant only |
| Backlight | Yes, 3 seconds |
| LED light | Yes, press and hold |
| Compass calibration | Yes, before first use and after battery change |
| Magnetic declination | Adjustable from 0° to 30° East/West |
| Care and cleaning | Soft cloth, warm water and mild soap; do not use abrasive products |
| Safety | Do not disassemble, do not expose to shocks, dust, extreme temperatures; remove batteries if not used for long periods |
| Storage temperature | -10 °C to 70 °C (14 °F to 158 °F) |
Frequently Asked Questions - GP123 OREGON SCIENTIFIC
User questions about GP123 OREGON SCIENTIFIC
0 question about this device. Answer the ones you know or ask your own.
Ask a new question about this device
Download the instructions for your Sports Watch in PDF format for free! Find your manual GP123 - OREGON SCIENTIFIC and take your electronic device back in hand. On this page are published all the documents necessary for the use of your device. GP123 by OREGON SCIENTIFIC.
USER MANUAL GP123 OREGON SCIENTIFIC
Battery replacement ....3
Displays ....4
Operation modes ....4
Time / date / alarm 4
To set clock and alarm ....5
Altimeter and barometer modes ....5
About the altimeter - barometer ....5
To set and reset altimeter ....5
To set sea level pressure 6
Compass mode 6
About the compass ....6
Compass sensor calibration 7
Declination angle ....7
True North calibration ....8
GPS mode 8
LED light 10
Backlight / keypad lock ....10
Water resistance ....10
Specifications ....10
Precautions ....10
About Oregon Scientific ....11
EU declaration of conformity ....11
INTRODUCTION
Thank you for selecting the Oregon Scientific™ GPS Scout Backtrack Altimeter (GP123). Useful for any outdoor activity, the GP123 comes equipped with GPS, altimeter, barometer, compass and alarm.
With easy-to-view display and sturdy yet comfortable palm-grip design, the GP123 is useful when venturing outdoors. View at a glance temperature, time and weather forecast information as well as data relating to altitude, barometer, compass and GPS depending on your selection.
Store up to 3 locations and use the backtrack function to easily navigate your way back.
IMPORTANT
- The measurement functions built into the GP123 are not meant to substitute professional measurement or industrial precision devices. Values produced by this device should be considered as reasonable representations only.
- Oregon Scientific ^TM assumes no responsibility for any loss, or any claims by third parties that may arise through the use of this device.
OVERVIEW
FRONT VIEW
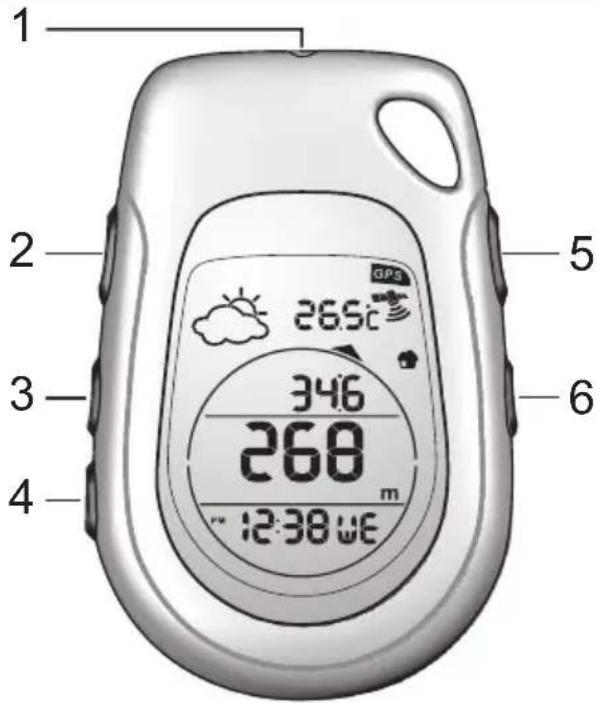
- LED light
- :select location (/ / ); store location
into memory; increase value of the setting; toggle setting options
- DISP/-: toggle between modes; enter time setting mode; decrease value of the setting; toggle setting options
- SET: confirm setting; toggle bottom line display (time / date / alarm); enter settings for altitude/ barometer / compass
- : turn on LED light
- turn on backlight; lock / unlock keypad
LCD SCREEN
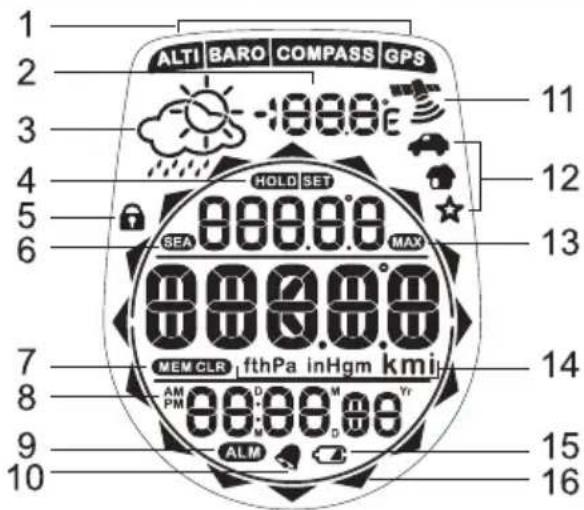
- Indicates which mode (ALTI / BARO / COMPASS / GPS) is displayed: altitude / barometer / compass / GPS
-
Temperature
-
Weather forecast
- Key press prompt: SET - press SET; Helpless and hold SET
- 🔒 teypad is locked
- S31a level is displayed
- Make the memory is being deleted
- AM/PM: 12 hour format
- Airarm time is displayed
- .daily alarm is on
- : GPS signal quality indicator
- 🎨 / : stores location (parking space / home / favourite spot)
- Maximum altitude reached / exceeded
- Measurement units (hPa, m, km / ft, inHg, mi)
- Flow battery indicator
- : direction indicator
BATTERY REPLACEMENT
The GP123 uses 2 x AAA batteries which have already been installed.
If the battery power of the unit is low, and 'need new batt' are displayed. Promptly replace the battery to ensure continuous operation of GPS and other functions.
To replace battery:
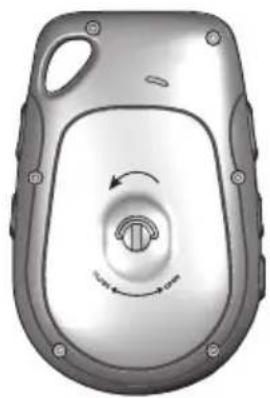
- Lift up the ring lever part of the screw and rotate counter clockwise to open battery compartment.
- Remove battery compartment cover.
- Insert the batteries, matching the polarities.
- Close the battery compartment and rotate screw clockwise to secure.
natural_image
3D rendering of a mechanical component with a central knob and circular arrow indicating rotation (no text or symbols)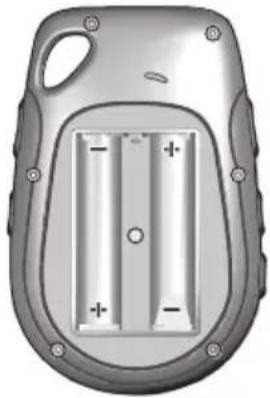
natural_image
Top-down view of a gray handheld device casing with two internal battery cells (no text or symbols visible)DISPLAYS
OPERATION MODES
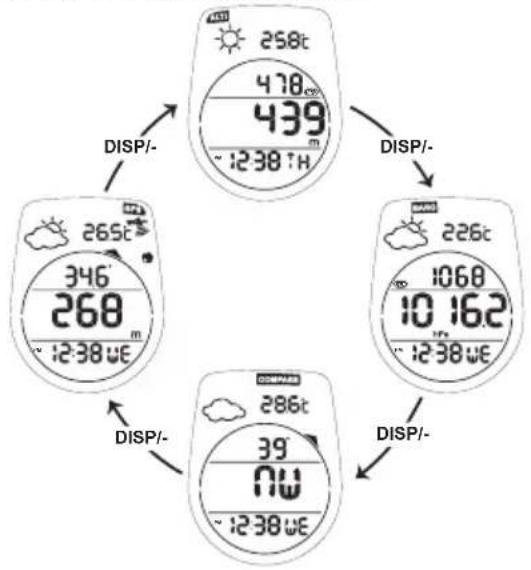
Press DISP/- to toggle between modes:
flowchart
graph TD
    A["258t 478°C ~12:38 TH"] -->|DISP/-| B["265t 346° ~12:38 WE"]
    B -->|DISP/-| C["268° ~12:38 WE"]
    C -->|DISP/-| D["1068° ~12:38 WE"]
    D -->|DISP/-| E["286t 39° ~12:38 WE"]
    E -->|DISP/-| F["1016.2° ~12:38 WE"]
TIME / DATE / ALARM
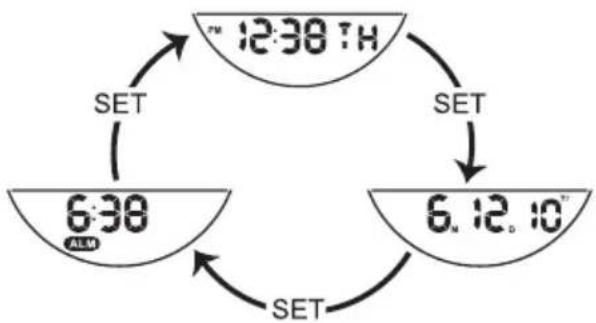
Press SET to toggle between time / date / alarm in any mode.
flowchart
graph TD
    A["12:30:1H"] -->|SET| B["6:30:10"]
    B -->|SET| C["6:30:ALM"]
    C -->|SET| A
TO SET CLOCK AND ALARM
- Press and hold DISP/- to enter time setting mode.
- Set clock and alarm by pressing the following buttons:
• ♡/+ to increase value or toggle options
• DISP/- to decrease value or toggle options
- SET to confirm
The setting options are: hour format, hour, minute, year, calendar format, month, date, alarm time (hour / minute), alarm on/off, measurement unit.
NOTE For your convenience, measurement units have been programmed to automatically follow the same format (imperial / metric).
will appear when alarm has been enabled.
To disable alarm:
Press any key.
ALTIMETER AND BAROMETER MODES
ABOUT THE ALTIMETER - BAROMETER
The altimeter measures altitude in either meters or feet. The device is equipped with an intelligent barometer that determines altitude by the built-in sensor and advanced Baro-compensation technology. It also distinguishes the differences between pressure caused by the changes in physical altitudes and pressure caused by weather conditions. This eliminates discrepancies and makes the altimeter more accurate than most of the average devices available on the market. Maximum altitude and instant sea level pressure readings are also provided.
TO SET AND RESET ALTIMETER
The altitude is automatically measured from the moment you switch on the device. It will provide both barometer readings and maximum sea level pressure readings.
To set and reset altimeter:
- Press DISP/- repeatedly to navigate to altimeter mode.
- Press and hold SET to enter settings.
- Press F/+ or DISP/- to change current altitude, then SET to confirm.
- Press /+ or DISP/- to select whether to clear
maximum altitude record (yes / no), then SET to confirm.
TO SET SEA LEVEL PRESSURE
- Press DISP/- repeatedly to navigate to barometer mode.
- Press and hold SET to enter settings.
- Set the following options (sea level pressure, weather forecast icons) by pressing the following buttons:
• +/+ to increase value or toggle options
• DISP/- to decrease value or toggle options
- SET to confirm
TIP To help device quickly detect weather conditions after its turned on for the first time or after battery reset, you are recommended to manually set the weather icon. If weather icon has not been set, the unit will simply take longer to detect current weather conditions.
This device forecasts the next 12 to 24 hours of weather.
 | 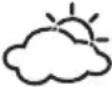 | 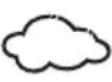 | 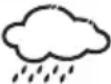 |
| Sunny | Partially cloudy | Cloudy Rainy | |
COMPASS MODE
IMPORTANT Although the compass has been calibrated during the manufacturing process, it is highly recommended to calibrate the compass before first use to take into account location factors which may affect the compass.
For more accurate readings, it is strongly recommended to calibrate the compass whenever outdoors.
The compass should be calibrated:
- Before first use.
• After the battery has been replaced. - Before you leave for an extended outdoor activity.
- Whenever it is exposed to strong magnetic sources, extreme cold, or you suspect that other environmental conditions have affected the compass readings.
- If you notice that the compass is not showing the direction correctly.
ABOUT THE COMPASS
The compass shows the bearing in degrees due North together with 16 cardinal / ordinal points. The outer circumference of the display consists of 16 segments that graphically show the bearing. The last lit segment indicates North as shown below.
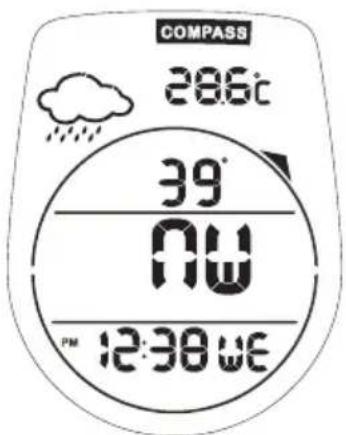
NOTE If no key has been pressed in any 5 minute period, the compass will time out and return to Altimeter mode (default display).
COMPASS SENSOR CALIBRATION
NOTE
• Always take bearings in the open air, not inside buildings, tents, caves, or other shelters.
- Compass readings should be performed away from magnetic materials. Avoid large magnetic objects, power lines, loudspeakers, electric motors etc.
IMPORTANT Compass calibration should be done on a flat horizontal surface. If there is no flat stable surface available, place it on the palm of your hand so that it is perpendicular to your body. Using the other hand, turn the unit to calibrate.
To calibrate the compass sensor:
- Press DISP/- repeatedly to navigate to compass mode.
- Press and hold SET. Display will show CALI and smart prompt SET
- Press SET to start calibration.
- Rotate the unit clockwise at a constant speed. The moving segments around the circumference of the display act as a guide. The rotation will be finished once you have performed 2 turns.
NOTE OK indicates calibration has been successfully completed. Repeat steps 2-4 if FAIL is displayed.
DECLINATION ANGLE
Declination is the angle between where a compass needle points (magnetic North Pole) and the true North Pole. The declination angle can vary from 0-30 degrees East (E) or West (W) and can be found on most maps or on the Internet.
For declinations in the United States:
http://www.ngdc.noaa.gov/geomagmodels/Declination.jsp
- Enter your zip code in the text box.
- Click "Get Location".
- Scroll down and click "Compute".
For declinations in Canada:
http://geomag.nrcan.gc.ca/apps/mdcal-eng.php
For places elsewhere in the world, visit the website:
http://www.magnetic-declination.com
When you set the declination angle on the compass you compensate for the difference between true and magnetic north. This makes the compass reading more accurate.
To set the declination angle:
- Press DISP/- repeatedly to navigate to compass mode.
- Press and hold SET. Display will show CALI.
- Press DISP/- to toggle to declination option. Display will show DECLI.
-
Press SET to confirm.
-
Set the following options: on / off; West / East (only if ON is selected); degree of declination angle by pressing the following buttons:
• +/+ to increase value or toggle options
• DISP/- to decrease value or toggle options
- SET to confirm
TRUE NORTH CALIBRATION
When you do not know the declination angle, the true north calibration function can be used to compensate for the difference between magnetic and true north. All you need to know is the direction of true north (this can be found from landmarks in your immediate vicinity). Setting the true north calibration makes the compass reading more accurate.
To set True North calibration:
-
Press DISP/- repeatedly to navigate to compass mode.
-
Press and hold SET. Display will show CALI.
- Press DISP/- to toggle to True North option. Display will show NORTH.
- Press SET to enter settings.
- Press 12 /+ to select on / off, then press SET to confirm.
If 'ON' has been selected, rotate the unit to align direction indicator to true north when prompted, then press SET to confirm.
NOTE If the declination angle is turned ON, the True north function will automatically turn itself OFF and vice-versa.
GPS MODE
TIP Go outdoors and move to an open area for best GPS signal quality. Stand still when device searches for GPS signal.
Press DISP/- repeatedly to navigate to GPS mode.
When in GPS mode, the device automatically searches for GPS.
NOTE Upon exiting GPS mode, GPS signal will remain locked for 60 seconds to allow navigating to other modes.

The signal quality is as follows:
| Excellent | |
| Good | |
| Poor | |
| “No icon” No signal | |
For GPS function to operate, signal quality needs to be good or excellent.
Once GPS signal has been found, the device can store up to 3 locations at any one time. For your convenience, each location is represented by an icon:
| Icon Suggested use | |
| Parking space | |
| Home | |
| Favourite spot | |
To mark location:
- Press ↗/+ repeatedly to select desired icon.
- Press and hold ↓/+ to save location into memory.
To search for stored location (backtrack function):
- Press DISP/- repeatedly to navigate to GPS mode.
-
Once GPS signal has been successfully found, press 📁/+ repeatedly to select the symbol which represents the location you wish to return to.
-
Walk according to the arrow direction as shown on the LCD display.
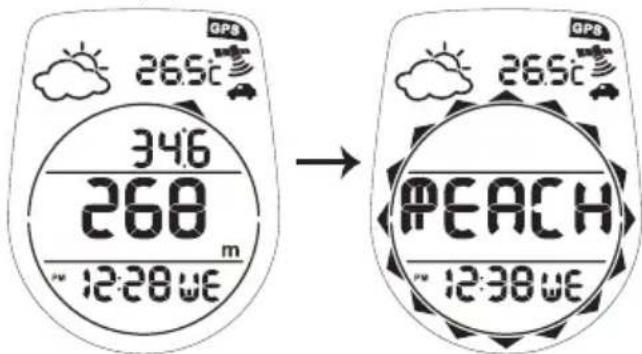
The display will also show the remaining distance. When REACH appears, you have arrived at the desired location.
NOTE REACH will appear when you are close to the saved location.
NOTE If no key has been pressed in any 15 minute period, SLEEP will appear on the display indicating GPS has timed out. Press any key to return to GPS mode.
NOTE Prolonged usage of backtrack function will shorten battery life.
LED LIGHT
To turn on LED light:
- Press and hold

(light will remain on for the duration it is pressed)
To activate backlight:
- Press torque on backlight for 3 seconds.
NOTE The backlight function will not operate if is displayed.
To toggle keypad lock On or Off:
- Press and hold


indicates keypad is locked.
WATER RESISTANCE
The GP123 is splash proof only.
SPECIFICATIONS
| Real time clock 12/24 hour with hour, minute | |
| Temperature range | -5°C to 50°C(28°F to 116°F) |
| Altitude range | -400 to 9,000 m(-1312 to 29,520 ft) |
| Barometric pressure range | 300 to 1,100 hPa(8.86 to 32.48 inHg) |
| Sea level pressure range | 900 to 1,100 hPa(26.58 to 32.48 inHg) |
| Weather forecast Sunny, partially sunny, cloudy, rainy | |
| Digital compass 16 | cardinal / ordinal points |
| Power 2 x UM-4 (AAA) 1.5V batteries | |
| Operating temperature | -5°C to 50°C(28°F to 116°F) |
| Storage temperature | -10°C to 70°C(1°F to 135°F) |
PRECAUTIONS
To ensure you use your product correctly and safely, read these warnings and the entire user manual before using the product:
- Use a soft, slightly moistened cloth. Do not use abrasive or corrosive cleaning agents, as these may cause damage. Use luke warm water and mild soap to clean the unit thoroughly after each training session. Never use the products in hot water or store them when wet.
- Do not subject the product to excessive force, shock, dust, temperature changes, or humidity. Never expose the product to direct sunlight for extended periods. Such treatment may result in malfunction.
-
Do not tamper with the internal components. Doing so will terminate the product warranty and may cause damage. The main unit contains no user-serviceable parts.
-
Do not scratch hard objects against the LCD display as this may cause damage.
• Take precautions when handling all battery types. - Remove the batteries whenever you are planning to store the product for a long period of time.
- When replacing batteries, use new batteries as specified in this user manual.
- The product is a precision instrument. Never attempt to take this device apart. Contact the retailer or our customer service department if the product requires servicing.
- Do not touch the exposed electronic circuitry, as there is a danger of electric shock.
- Check all major functions if the device has not been used for a long time. Maintain regular internal testing and cleaning of your device.
- When disposing of this product, ensure it is collected separately for special treatment and not as normal household waste.
- Due to printing limitations, the displays shown in this manual may differ from the actual display.
- The contents of this manual may not be reproduced without the permission of the manufacturer.
NOTE The technical specifications for this product and the contents of the user manual are subject to change without notice.
NOTE Features and accessories will not be available in all countries. For more information, please contact your local retailer.
ABOUT OREGON SCIENTIFIC
Visit our website (www.oregonscientific.com) to learn more about Oregon Scientific products.
If you're in the US and would like to contact our Customer Care department directly, please visit:
www2.oregonscientific.com/service/support.asp
For international inquiries, please visit:
www2.oregonscientific.com/about/international.asp
EU DECLARATION OF CONFORMITY
Hereby, Oregon Scientific, declares that this GPS Scout Backtrack Altimeter (model: GP123) is in compliance with the essential requirements and other relevant provisions of Directive 1999/5/EC. A copy of the signed and dated Declaration of Conformity is available on request via our Oregon Scientific Customer Service.




COUNTRIES RTTE APPROVAL COMPLIED
All EU countries,S
and Norway N
witzerland


natural_image
3D rendered image of a mechanical component with a central circular feature and rotational arrows (no text or symbols)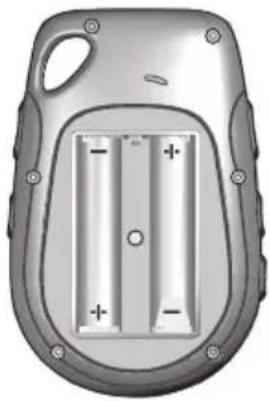
natural_image
3D rendering of a handheld device casing with two internal battery cells and mounting holes (no text or symbols visible)ANZEIGEARTEN
BETRIEBSMODI
flowchart
graph TD
    A["12:30:4H"] -->|SET| B["6:38"]
    B -->|SET| C["6:12:10"]
    C -->|SET| A
http://geomag.nrcan.gc.ca/apps/mdcal-eng.php
natural_image
3D rendered image of a mechanical component with a central circular feature and rotational arrows (no text or symbols)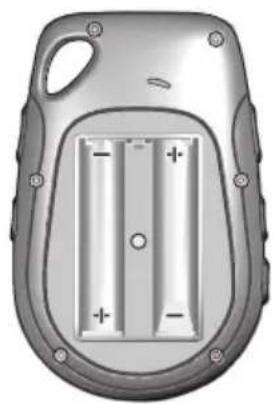
natural_image
3D rendering of a device casing with two internal battery cells and mounting holes (no text or symbols)PANTALLAS
http://geomag.nrcan.gc.ca/apps/mdcal-eng.php
http://www.magnetic-declination.com
natural_image
3D rendered image of a mechanical component with a central knob and rotational arrow (no text or symbols)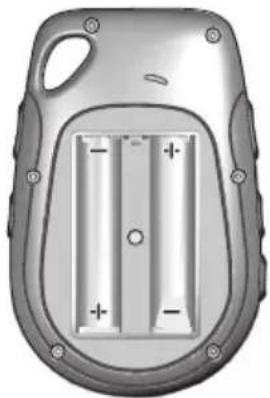
natural_image
3D rendering of a handheld device casing with two internal battery cells and mounting holes (no text or symbols visible)AFFICHAGES
MODES DE FONTIONNEMENT
http://geomag.nrcan.gc.ca/apps/mdcal-eng.php
EUROPE – DÉCLARATION DE CONFORMITÉ
natural_image
3D rendering of a mechanical component with a central circular feature and rotational arrow (no text or symbols)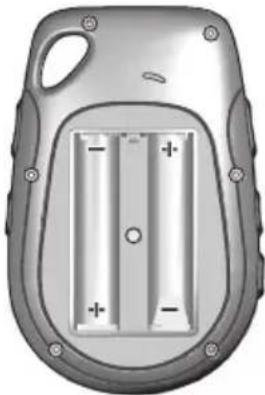
natural_image
3D rendering of a handheld device casing with two internal battery cells and mounting holes (no text or symbols visible)VISUALIZZAZIONI
http://www.magnetic-declination.com
natural_image
3D rendered image of a mechanical component with a central circular feature and rotational arrow (no text or symbols)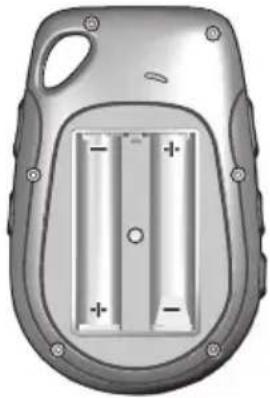
natural_image
3D rendering of a handheld device casing with two internal battery cells and mounting holes (no text or symbols visible)WEERGAVE
BEDIENINGSMODI
http://geomag.nrcan.gc.ca/apps/mdcal-eng.php
http://www.magnetic-declination.com
natural_image
3D rendered image of a mechanical component with a central circular feature and curved arrow indicating rotation (no text or symbols)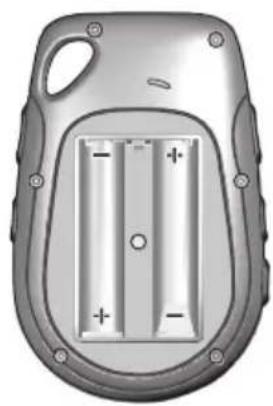
natural_image
3D rendering of a handheld device casing with two internal battery cells and mounting holes (no text or symbols visible)DISPLAYS
http://geomag.nrcan.gc.ca/apps/mdcal-eng.php
natural_image
3D rendering of a mechanical component with a central knob and circular arrow indicating rotation (no text or symbols)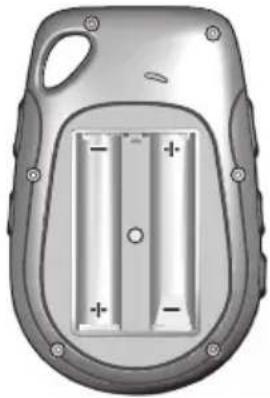
natural_image
3D rendering of a handheld device casing with two internal battery cells and mounting holes (no text or symbols visible)DISPLAYER
FUNKTIONSLÄGEN
flowchart
graph TD
    A["12:30:14"] -->|SET| B["6:30"]
    B -->|SET| C["6:12:10"]
    C -->|SET| A
ATT STÄLLA KLOCKA OCH ALARM
http://www.magnetic-declination.com
© 2010 Oregon Scientific. All rights reserved.
P/N:300102793-00003-10

- INTRODUCTION
- IMPORTANT
- OVERVIEW
- BATTERY REPLACEMENT
- To replace battery:
- DISPLAYS
- OPERATION MODES
- TIME / DATE / ALARM
- TO SET CLOCK AND ALARM
- ALTIMETER AND BAROMETER MODES
- ABOUT THE ALTIMETER - BAROMETER
- TO SET AND RESET ALTIMETER
- To set and reset altimeter:
- TO SET SEA LEVEL PRESSURE
- COMPASS MODE
- The compass should be calibrated:
- ABOUT THE COMPASS
- COMPASS SENSOR CALIBRATION
- NOTE
- To calibrate the compass sensor:
- DECLINATION ANGLE
- For declinations in the United States:
- For declinations in Canada:
- For places elsewhere in the world, visit the website:
- To set the declination angle:
- TRUE NORTH CALIBRATION
- To set True North calibration:
- GPS MODE
- To mark location:
- To search for stored location (backtrack function):
- LED LIGHT
- WATER RESISTANCE
- PRECAUTIONS
- ABOUT OREGON SCIENTIFIC
- EU DECLARATION OF CONFORMITY
- COUNTRIES RTTE APPROVAL COMPLIED
- ANZEIGEARTEN
- BETRIEBSMODI
- PANTALLAS
- AFFICHAGES
- MODES DE FONTIONNEMENT
- EUROPE – DÉCLARATION DE CONFORMITÉ
- VISUALIZZAZIONI
- WEERGAVE
- BEDIENINGSMODI
- DISPLAYER
- FUNKTIONSLÄGEN
- ATT STÄLLA KLOCKA OCH ALARM
Brand : OREGON SCIENTIFIC
Model : GP123
Category : Sports Watch