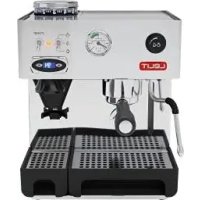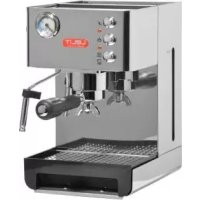
PL41EM - Coffee machine Lelit - Free user manual and instructions
Find the device manual for free PL41EM Lelit in PDF.


User questions about PL41EM Lelit
0 question about this device. Answer the ones you know or ask your own.
Ask a new question about this device
Download the instructions for your Coffee machine in PDF format for free! Find your manual PL41EM - Lelit and take your electronic device back in hand. On this page are published all the documents necessary for the use of your device. PL41EM by Lelit.
USER MANUAL PL41EM Lelit
text_image
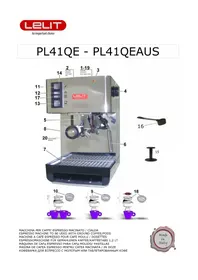
Made in ItalyЕВЬАВЗЫЗКУ:
БП Indicator light: steam read;
HΠ SteamMhot water knob
5Π Filter holder retaining ring
6Π SteamMhot water tube
7П Removable water drainage trat
8Π Filter holder
9Π Single cup filter
ЫТП Two cup filter
ЫЫП OnMoff switch
ЫИП Steam switch
ЫБП CoffeeMhot water switch
ЫНП Indicator light: machine on
Ы5П Coffee press
Ы6П Measuring spoon
Ы7П Manometer
Ы8П Filter for pods
Ы9П Removable water tank cover
ИТП Water level indicator
уовіп УЗокпуЕкУВЗо:
ЫП Remove the machine from its packing and make sure all packing parts have been taken off Aincluding the protection bagsРП
ИП Laş the machine on a flat and steadş surface far awat from hot places and from the water tapsΠ
БП Remove the water tank cover Abl9P on the back of the machine and take out the water tank AblP pating attention not to damage the water tubes inside itП
HΠ Fill the tank AblP with cold waterΠ
5π Replace the water tank back in the machine and check that the water tubes are not bent and that the filter is well set on one of themπ
6Π Plug in the machine in the mainsΠ Make sure that the wall socket is of the right voltageΠ
7π Place the filter holder under the brewing group A5P and turn it from the left to the rightπ Leave it there so that it can get warm and it gets read‡ for useπ
8П Turn the machine on bt pushing the on Moff switch AblbIPП The indicator light: machine on AblHP comes on to confirm the power suppltП
9П Open the steamMhot water knob АНРП
ЫТП Press the steam switch АЫИР and the coffeeMhot water switch АЫБРП
ЫЫП When water comes out of the steam spout АБРЯ press the coffeeMhot water switch АЫБР and the steam switch АЫИР again and close the steamMhot water knob АНРП
ЫИП After completing all these operationsЯ leave the machine onП
АЩгЧФЩГХм фХ гБЧЩгББЖ:
ЫБП Check that the water tank АЫР has been filled in with water by looking at the water level indicator АИТРП
ЫНП Press the onMoff switch АЫЫР: the indicator light "machine on" АЫНР will come onП Do this operation only if the machine is offП If it's on pass to the following pointП
Ы5П As soon as the indicator light steam read ^t АБР goes onЯ the machine is read ^t for use Athe indicator light steam read ^t goes off on the modП PLHЫЕАUSMPLHЫЕМАУСП Fit the single cup filter A9P or the two cup filter АЫТР into the filter holder A8P that has been warmed up b ^t leaving it attached to the brewing group as described in point НП
Ы6П Fill the filter with the ground coffee b t means of the supplied measure spoon Abl6P: ЫЛ ^1/2 measuring spoonful Abl6P = BI coffee cup C Б measuring spoonful Abl6P = И coffee cupsП Ever t time thou fill the filter with a spoonful of coffeeЯ press the coffee with the coffee press Abl5P before proceeding to fill it with the next spoonful and make sure that there are no coffee rests on the filter borderП
Ы7П Insert the filter holder A8P in the brewing group ring A5РЯ turn it from left to right with forceЯ then put the cup on the removable water drainage trat А7РП
Ы8П Press the coffeeMhot switch АЫБРП The manometer АЫ7P will show the reached pressureЯ between 8 and БІН bar Aonlt for model PLНЫЕМРП
Ы9П Once thou get the coffee desired Quantity push the coffeeMhot water switch АЫБР againП
ИТП Remove the filter holder A8P and throw awat the coffee groundsП Make sure that the filter holder is clean and replace it in the brewing group to warm up againП
ИЫП Check that the water tank АЫР has been filled in with water by looking at the water level indicator АИТРП
ИИП Press the onMoff switch АЫЫР: the indicator light "machine on" АЫНР will come onП Do this operation only if the machine is offП If it's on pass to the following pointП
ИБП As soon as the indicator light: steam readt АБР goes onЯ the machine is readt for use Athe indicator light steam readt goes off on the modп PLHЫEAUSMPLHЫEMAUSPП
ИНП Fit the pod filterAbl8P into the filter holder A8P that has been warmed up by leaving it attached to the brewing group as described in point НП
И5П Open the single packed pod not damaging the podП
И6П Place the pod in its filter АЫ8РП
И7П Insert the filter holder A8P in the brewing group ring A5РЯ turn it from left to right with forceЯ then put the cup on the removable water drainage trat A7РП
И8П Press the coffeeMhot switch АЫБРП The manometer АЫ7Р will show the reached pressureЯ between 8 and BYH bar Aonlt for model PLHЫEMP
И9П Once thou get the coffee desired βuantittЯ push the coffeeMhot switch АЫБР againП
БТП Remove the filter holder A8P and throw awa; the used podП
otrфй:
БЫП Check that the water tank АЫР has been filled in with water bt looking at the water level indicator АИТРП
БИП Press the onMoff switch АЫЫР: the indicator light "machine on" АЫНР will come onП. Do this operation only if the machine is offП. If it's on pass to the following pointП
ББП Press the steam switch АЫИРП
БНП As soon as the light: steam read; АБР goes onЯ the machine is read; for use Athe indicator light steam read; goes off on the modП PLHЫЕАUSMPLHЫЕМАUSPП
B5Π Open the steamMhot water knob AHPΠ First some water will flow out and then the steamΠ
Б6П Put the cup with the desired infusion under the steam tube A6P and turn the knob completelt.
Б7П When the drink has been suitable frothedЯ close the steamMhot water knob AHP and press the steam switch АЫИР againП
Б8П IMPORTANT: after thou have frothed tour milkЯ reopen the steamMhot water knob АНР and repress the steam switch АЫИР and the coffeeMhot water switch АЫБР againП When the water flows out of the steam tube А6РЯ close the steamMhot water knob АНР again and at the same time press the steam switch АЫИР and the coffeeMhot water switch АЫБР againП Clean carefult the steamMhot water tube А6РП
РЖт wфтрЩ:
Б9П Check that the water tank АЫР has been filled in with water by looking at the water level indicator АИТРП
HTP Press the onMoff switch AblbIP: the indicator light "machine on" AblHP will come on! Do this operation only if the machine is off? If it's on pass to the following point?
НЫП As soon as the light: steam read; АБР goes onЯ the machine is read; for use Athe indicator light steam read; goes off on the modП PLНЫEAUSMPLНЫЕМАУСП
НИП Open the steamMhot water knob АНРП
НБП Press the steam switch АЫИР and the hot coffeeMhot water switch АЫБРП Hot water will flow out from the steam tube А6P immediateltп
ННП Once you have got the desired Quantity of water repress the steam switch АЫИР and the coffeeMhot water switch АЫБР again and close the steamMwater knob АНРП
H5П After obtaining hot water from the tubeЯ make sure that there is still water in the tank АЫРП
уовынул кУАо:
- The single cup filter A9PЯ the two cup filter AЫТР and the pod filter AЫ8Р do not need to be washed after each use but check that the holes are not blockedП
- For best resultsЯ we suggest warming the cups up on the cup warmer АИР which works only when the machine is onП
- It is recommended to cleanA after each useA the steam tube and the strainer holder carefully
- For cleaning it is recommended the use of a wet damp cloth
C Do not leave the machine outdoor And do not immerse the machine in water
C The machine can be used only adults and must be kept away from children
C Do not wash strainer and strainer holder in dishwasher
кЫЕЗУЕПЛ ТПКП:
Voltage: ИБТ V - 5ТМ6Т Нă С ЬИТ V - 6Т Нă
Power: bIT5T W
Heating time: caП Б minП
Pump pressure: bl5 bar
Water tank: ИЯ7 litres
Dimensions AHxLxDP: БНДИБДИ7 cm
Weight: 9 kg
To be operated with ground coffee and coffee pods
кпВуНЛЫоРВВКУЗС:
We thank you for buying one of our products ^R projected and assembled in accordance with the most upCto date technological innovations ^II
Following carefully the simple operations described in this manual, which respect all essential safety regulations you will get the best performances and will appreciate the remarkable reliability of this product in the tears to come. Please find below the description of the most frequent problems and of their solution:
| PROBLEM CAUSE | SOLUTION | |
| Coffee is not creamt | ЫП Coffee blend not suitable for machineИП Improper grindingБП Too little coffee in filter; the pressure indicated bt the manometer АЫ7Р is under 8 barНП The filter holder has not be tightened under the brewing group ring | ЫП Use a different coffee blendИП Adjust coffee grindingБП Put more coffee in the filter and press it properlt;НП Tighten better the filter holder |
| The coffee is too cold | ЫП The machine had not reached the proper temperatureИП FilterCholder has not been preheatedБП Cups have not been preheatedНП Thermostat malfunctionП | ЫП See section "Starting the Machine" and "Making an Espresso Coffee"ИП FilterCholder must be heated together with the water - see section "Starting the Machine"БП Properlt heat the cups on the cupC warmer AИРНП Contact the nearest SERVICE CENTER |
| The coffee comes out too βuicklt | ЫП Coffee too coarselt groundИП Too little coffee in the filterБП Coffee has not been pressed enoughНП CoffeeMpod old or unsuitable | ЫП Use a finer grindingИП Put more coffee in the filterБП Press the coffee more firmlt;НП Use a different coffee blend |
| Coffee comes out between the coffee group and the filterCholder | ЫП FilterCholder not properlt insertedИП Too much coffee in the filterБП Edge of the filterCholder not cleanНП The douche seal is worn or damaged | ЫП Insert the filterCholder correctlt;ИП Put less coffee in the filterБП Clean the edge of the filterCholder and the brewing group sealНП Contact the nearest SERVICE CENTER |
| Coffee comes out in drops | ЫП Coffee too finelt groundИП Too much coffee in the filterБП Coffee too firmlt pressed | ЫП Use a coarser grindingИП Put less coffee in the filterБП Press the coffee more gentlt |
| The machine does not produce steam | ЫП The water tube hole mał be obstructedИП Lack of water in the tankБП The steam noäåle has been improperlt positioned | ЫП Clean the hole with a needleИП See section "Starting the Machine"БП Reposition the steam noäåle |
| No coffee produced during the coffee ctcle; the manometer indicates T bar pressure | ЫП Lack of water in the tankИП Steam switch on | ЫП Fill the tankИП Turn off the steam switch |
| No coffee produced during the coffee ctcle; the manometer indicates more than bIH bar pressure | ЫП Coffee too finelt groundИП Too much coffee in the filterБП Coffee too firmlt pressedНП The brewing group douche is dirtt | ЫП Use a coarser grindingИП Put less coffee in the filterБП Press the coffee more gentlt;НП Contact the nearest SERVICE CENTER |
| The machine does not work and the ON light does not come on | ЫП No electricitt;ИП The power cable is not properlt plugged inБП The power cable is damaged | ЫП Restore electrical powerИП Plug in the power cable correctlt;БП Contact the nearest SERVICE CENTER for a replacement cable |
| The ON light is on but the readt steam indicator does not go off within bIT minutes | ЫП Thermostat malfunctionИП Heating element malfunction | ЫП Contact the nearest SERVICE CENTERИП Contact the nearest SERVICE CENTER |
The inserted data and pictures can be subject to changes without previous notice for the improvement of the machine's performances.
ТЫоЕнУАкУВЗ :
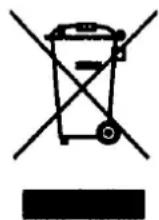
At the end of its working life, the product must not be disposed of as urban waste. It must be taken to a special local authority, differential waste collection centre or to a dealer providing this service. Disposing of a household appliance separately avoids possible negative consequences for the environment and health deriving from inappropriate disposal of enables the constituent materials to be recovered to obtain significant savings in energy and resources. As a reminder of the need to dispose of household appliances separately, the products is marked with a crossed Cout wheeled dustbin.
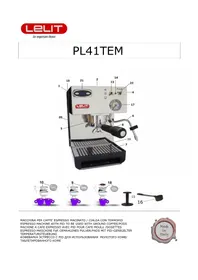
Gemme Italian Producers srl declares under its own responsibility that the products АЛ41Ы ФХЫ АЛ41ЫЬЯ to which this declaration relates are in accordance with the provisions of the specific directives:
CEI EN 6ТББ5СЫЯ CEI EN 6ТББ5СИСЫ5
It also declares that the above mentioned products conform with the electromagnetic compatibiliti test EMCP
NB: The present declaration voids should the machine be modified without our specific authorization.
FRANÇAIS

ПавіпкУообылызк АВуп Л'ЕЛУЬУЗПКУВЗ ЕВппЫЕкЫ Ту АпВТуУк Пye кпььло ТЫ ЛП ТУпыЕкУабы ылнВАЁЫЗЫ 200/96/ЫЕ
natural_image
Simple line drawing of a trash bin with no text or symbols
tICHkIGEn HINTEIo FÜn DIE KOppEKke ENkoOnGyNG DEo PnODyKko IN ÜBEnEINokIMMyNG MIk DEn EG-nICHkLINIE 2002/96/EG
This product is covered by the warranty laws valid in the country where the product has been sold; specific information about the warranty terms can be given by the seller or by the importer in the country where the product has been purchased. The seller or importer is completely responsible for the product.
The importer is completely responsible also for the fulfillment of the laws in force in the country where the importer distributes the product, including the correct disposal of the product at the end of its working life.
Inside the European countries the laws in force are the national laws implementing the EC Directive 44/99/CE.
Françaisi
CONDIKIONo DE GANANkIE
GAπANκIE LEGALE
Gemme Italian Producers srl