
CHD3NET - Server CONCEPTRONIC - Free user manual and instructions
Find the device manual for free CHD3NET CONCEPTRONIC in PDF.
| Product Type | Network Attached Storage (NAS) with SATA 3.5" hard disk drive |
| Dimensions (approx.) | 180 x 130 x 50 mm |
| Weight (approx.) | 500 g (without disk) |
| Power Supply | 12V power adapter, included |
| Network Interface | Ethernet 10/100, LAN port |
| USB Interface | USB 2.0 for use as external drive |
| Supported Protocols | SMB (Samba), FTP, DHCP (client/server) |
| File System | FAT32 (NTFS not supported) |
| Maximum number of FTP users | 5 simultaneous users |
| Media Server Function | Stream music and photos to XBOX 360 |
| Configuration | Web interface via browser (default IP address 169.254.0.1) |
| Default Credentials | Username: admin / Password: admin |
| Default Hostname | STORAGE-xxxx (xxxx = last 4 digits of MAC address) |
| Default Workgroup | WORKGROUP |
| Security | Password protection of shared folders, anonymous FTP access can be disabled |
| Maintenance | Firmware update, restart, reset to factory settings |
| OS Compatibility | Windows 2000, XP, Vista |
| Package Contents | 1x NAS, 1x LAN cable, 1x USB 2.0 cable, 1x 12V power supply, 4x mounting screws, 1x product support |
Frequently Asked Questions - CHD3NET CONCEPTRONIC
User questions about CHD3NET CONCEPTRONIC
0 question about this device. Answer the ones you know or ask your own.
Ask a new question about this device
Download the instructions for your Server in PDF format for free! Find your manual CHD3NET - CONCEPTRONIC and take your electronic device back in hand. On this page are published all the documents necessary for the use of your device. CHD3NET by CONCEPTRONIC.
USER MANUAL CHD3NET CONCEPTRONIC
Conceptronic CHD3NET
Installation Guide
Congratulations on the purchase of your Conceptronic Grab'n'GO Network Harddisk.
This Installation Guide gives you a step-by-step explanation of how to install the CHD3NET.
When problems occur, we advise you to go to our support-site (go to www.conceptronic.net and click 'Support'. Here you will find the Frequently Asked Questions Database.
When you have other questions about your product and you cannot find it at our website, contact us by e-mail: support@conceptronic.net
For more information about Conceptronic products, please visit the Conceptronic Web Site: www.conceptronic.net
The hardware Installation as described below may be slightly different from the installation on your computer. This depends on the Windows operating system you are using.
1. Introduction
The Conceptronic Grab'n' GO Network Disk is a simple, flexible, economical and powerful device for your existing network environment.
The main function is to provide you Hard Disk Storage in your network. A second functionality is the availability to create a simple FTP server.
1.1 Key Features Conceptronic Grab'n'GO Network Harddisk
Support for 3,5 SATA Hard Disk
- 480Mbps USB 2.0 Specification
- Compatible with Windows 2000, XP & Vista
- DHCP Server Support (Client / Server)
- SMB (Samba Server) Support
FTP (File Transfer Protocol) Server support (max. 5 simultaneous users)
- Password management functionality
ENGLISH
2. Package Contents
The following items are present in the package of the Conceptronic Grab'n'GO Network Harddisk:
1x Grab'n'GO Network Harddisk
4x HDD Assembly screw (Not included if you bought the CHD3NET with an included Harddisk).
1x Product Stand
1x LAN Cable
1x Power Supply. 12V
1x USB 2.0 Cable
3. Product Assembly
If you bought the Conceptronic Grab'n'GO Network Disk without a Harddisk installed, you can follow the steps of this chapter to install your own SATA Harddisk.
Note: If you bought the Conceptronic Grab'n'GO Network disk with a Harddisk installed, you can skip this chapter and continue with Chapter 4.
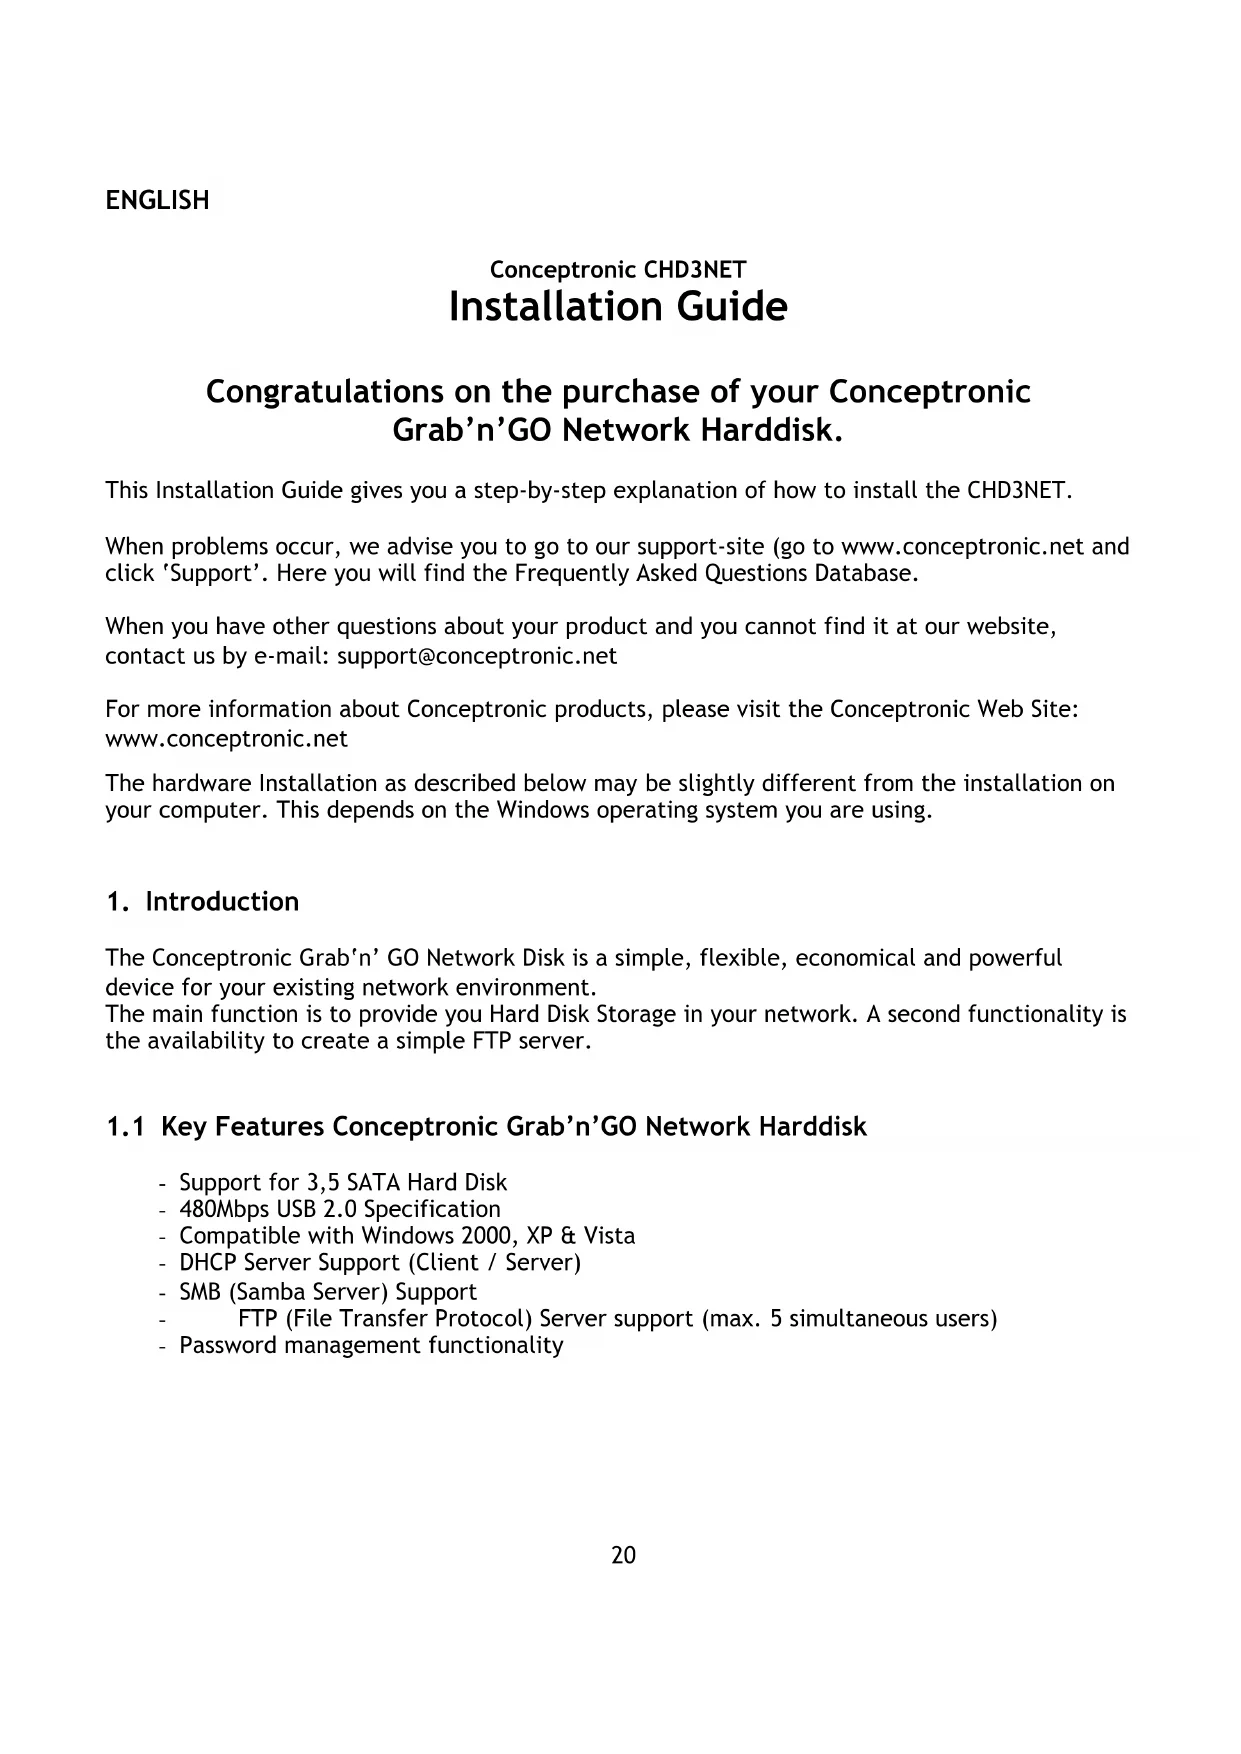
A. Remove the 2 screws from the back panel of the CHD3NET and remove the back panel from the device.
B. Gently remove the Harddisk tray from the housing by pulling at the front panel of the CHD3NET while holding the case.
C. Insert your SATA Harddisk gently in the Harddisk tray until it is fastened correctly on the SATA connector of the tray.
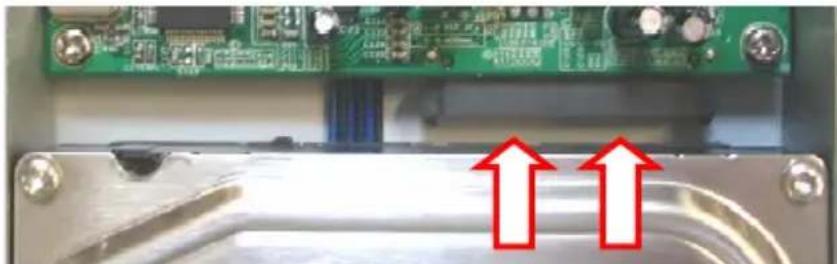
D. Use the included screws to fasten the Harddisk to the Harddisk tray.
E. Insert the Hardisk tray back in the case.
F. Replace the back panel on the CHD3NET and fasten the back panel with the 2 screws removed at step A.
Your CHD3NET is now assembled and ready to use. You can continue at Chapter 4 for the hardware installation instructions.
ENGLISH
4. Hardware Installation
The Grab'n'GO Network Harddisk can be used in 2 ways:
- As external Harddisk for your computer; in this mode, the Harddisk only works as external storage, not as Network Harddisk.
- As Network Harddisk; in this mode, the Network Harddisk is connected to your network and is accessible through the network environment.
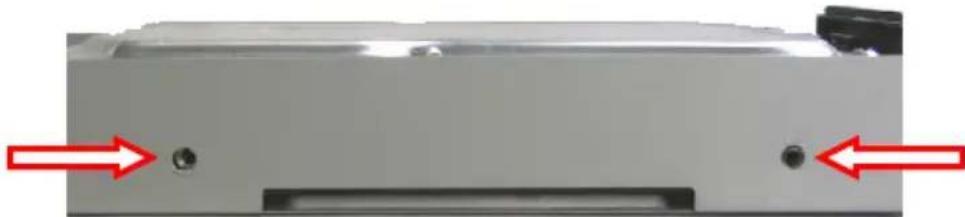
4.1 Using the device as USB 2.0 Harddisk
- Connect the Power Supply to the device and to a free AC power outlet.
- Connect the delivered USB 2.0 cable to the Conceptronic Grab'n'GO Network disk and insert the cable into a free USB 2.0 port at the front or back side of your computer.
- Turn the power on by switching the power connector (backside of the device).
- Power-on your computer and the device will automatically detected by your computer.
Note:
If the LAN Disk is delivered with Harddisk it is already pre-formatted to FAT32 and you can use it directly as external Harddisk.
4.2 Using the device as Network Harddisk
- Connect the Power Supply to the device and to a free AC power outlet.
- Connect the delivered LAN cable to the Conceptronic Grab'n'GO Network disk and to your Network Switch or Router.
- Turn the power on by switching the power connector (backside of the device).
- Follow the steps of Chapter 5 to configure the CHD3NET.
ENGLISH
5 Configure your Conceptronic Grab'n'GO Network Harddisk
The Conceptronic Grab'n' GO Network Harddisk needs to be configured through your web browser.
The default settings for the Conceptronic Grab'n' GO Network Harddisk are:
| HOSTNAME | : | STORAGE-xxxx (the last four digits is MAC address) |
| GROUP NAME : WORKGROUP | ||
| IP ADDRESS : 169.254.0.1 | ||
| USERNAME | : | admin |
| DATABASE | : | admin |
| HARDDISK : FAT-32 (NTFS CANNOT BE READ) |
Open your WEB Browser or your Windows Explorer.
The CHD3NET can be accessed through the IP address or by the Hostname.
Enter "Storage" in the address bar and press enter.
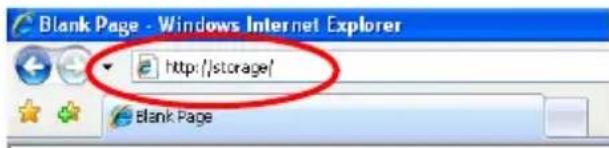
A Login screen will appear:
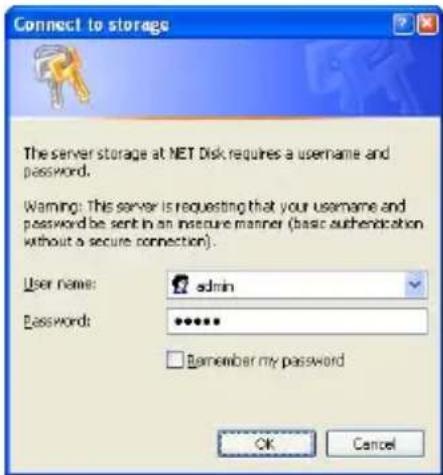
Enter the username and password and click "OK" to login to the web configuration pages.
Note: The default username and password are:
Username : admin
Password : admin
Note: If your Conceptronic Grab'n' GO Network Disk is provided with a Harddisk it is already pre-formatted in FAT32, you can directly configure and/or use the device.
If you change or use your own new hard disk you first need to format the drive through the 'Disk Utility' screen.
ENGLISH
If the entered username and password are correct you will see the Status screen of the Conceptronic Grab'n' GO Network Harddisk:
The main features of the Conceptronic Grab'n' GO network disk are displayed at the left side.
- Status
- SMB Server
-
Disk Utility
-
IP Config - FTP Server
-
Maintenance
- Media Server
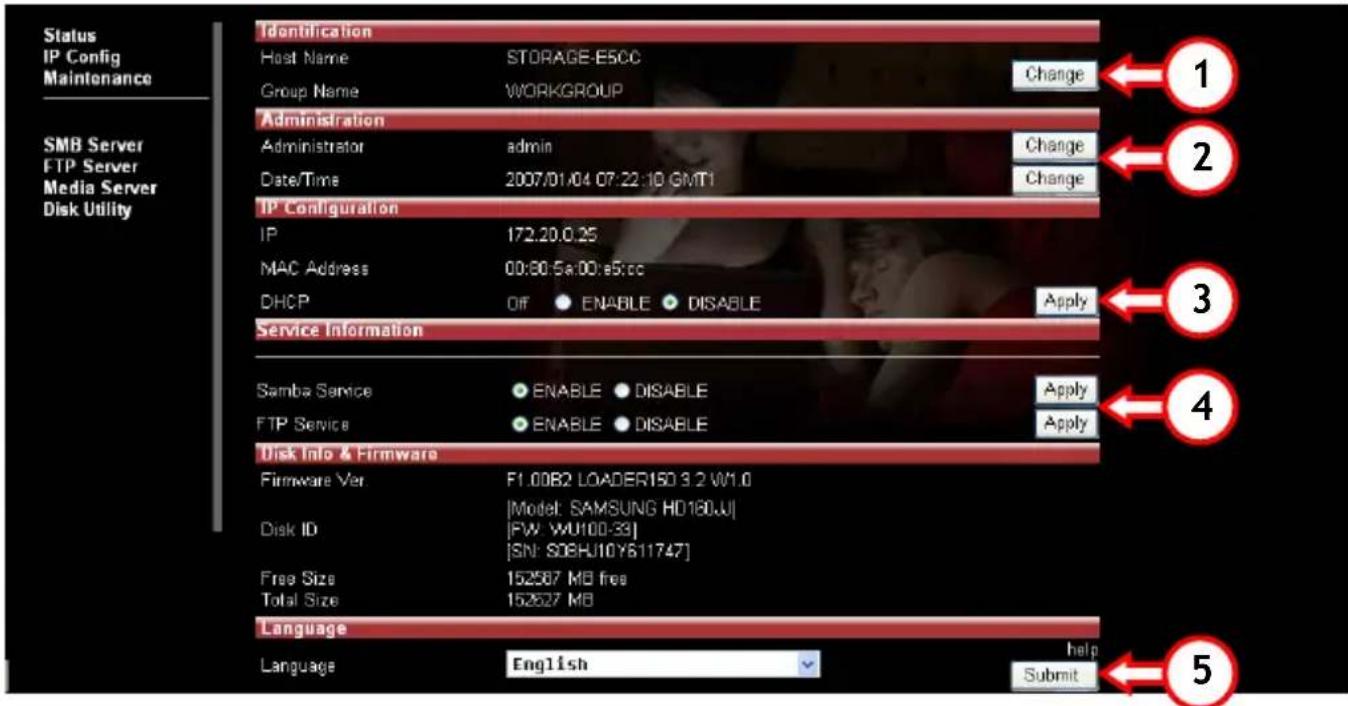
5.1 Status
When you select Status, you will see the main features and settings of the Conceptronic 'Grab'n' GO network disk. In this setup screen you can find a number of functionalities, which are explained in this chapter.
5.1.1 Identification
At the section "Identification", you can view or change the Host and Groupname.
O Hostname :STORAGE-xxxx (Default hostname)
Groupname:WORKGROUP (Default Workgroup-name)
Press the "Change" (1) button to change above settings, "OK" to modify.
ENGLISH
5.1.2 Administration
At the section "Administration", you can change the password of the Administrator or set the Date and Time.
To change the password, press "Change" (2) behind the "Administrator" line and enter your new password. Verify your new password and press "OK" to save.
Note: After changing the password you need to use your new password directly when opening new pages. It's not possible to change the name of the Administrator.
To change the date and Time, press "Change" (2) behind the "Date/Time" line:
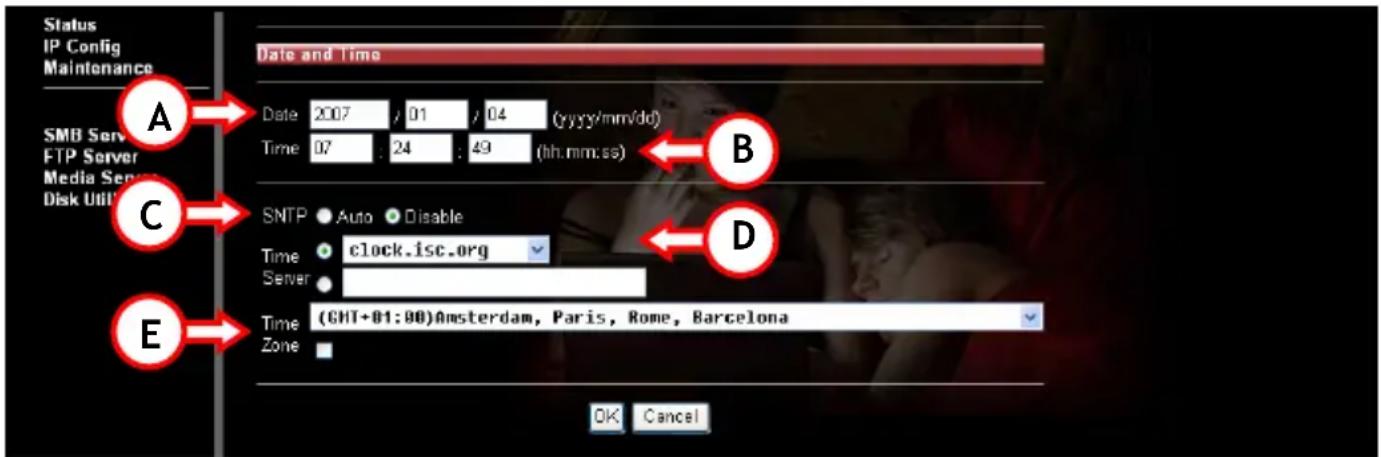
A. Enter the correct Date (year, month, day)
B. Enter the correct Time (hours, minutes, seconds)
C. Enable or Disable the SNTP functionality (SNTP = Simple Network Time Protocol)
D. Select a Time Server (to use the Time Server Feature, the device must have a correct gateway IP/DNS address to connect through The Internet to that server, Or enter a Time Server of your own choice.
E. Select the correct Time Zone where you are in.
To save the configuration, press "OK" or press "Cancel" to return to the Status page without making changes.
ENGLISH
5.1.3 IP Configuration
At the section "IP Configuration" on the Status Screen, you can change the DHCP feature.
DHCP Server can be enabled or disabled. Please note that this feature needs to be turned off if you have already a DHCP server within your network environment. If enabled the Conceptronic Grab'n' GO Network disk will act as DHCP server
Press 'Apply' (3) to activate this functionality.
5.1.4 Service Information
At the section "Service Information", you can check the current status of the Samba and FTP Service.
The Samba and FTP Service can be enabled and disabled. Select the configuration of your choice and press 'Apply' (4) to activate your changes.
5.1.5 Disk Info & Firmware
At the section "Disk Info & Firmware", you will find information about:
- Product firmware information
Information about the used Harddisk - Free Amount of Mega Bytes on Hard Disk
- Total Size of Hard Disk (In Mega Bytes)
5.1.6 Language
At the section "Language", you can see the current code-table language for the file system. Change the language to the language corresponding with the file system on your computer and press 'Apply' (5) to activate your changes.
Note: The Language option does not change the language of the configuration interface.
ENGLISH
5.2 IP Config
Select at the left side "IP Config" to enter the IP Config setup Page
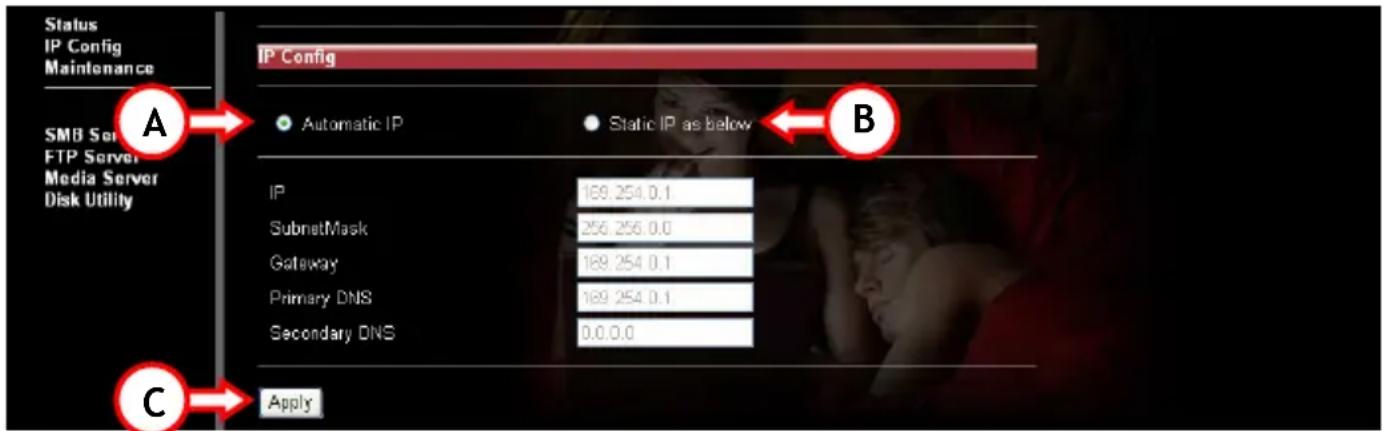
If you select "Automatic IP" (A), the device will receive an IP address from the DHCP server automatically.
If you select "Static IP" (B), you can enter the network settings manually:
- IP (The IP Address you want to assign to the CHD3NET)
- SubnetMask (The Subnet where the CHD3NET is placed)
- Gateway (The Gateway in your network to the Internet; this can be the IP Address of your router or Broadband modem)
- Primary DNS (The Primary DNS Server needed to access the internet)
- Secondary DNS (The Secondary DNS Server needed to access the internet)
Please contact your Network Administrator for your local network details.
Click "Apply" (C) to save the settings.
ENGLISH
5.3 Maintenance
Select at the left side "Maintenance" to enter the Maintenance setup Page.

Options to select in the Maintenance setup Page:
- Firmware Upload
If there is new firmware released through the webpage of Conceptronic you can upload it from this page into the Conceptronic Grab'n' GO network disk.
"Browse" (A) the location of the firmware file and press "Upload" (B) to update the Network disk.
- System Reboot
o After you have updated the firmware you need to reboot the device. A reboot can take up to 1 minute before you can logon again.
Press "Reboot" (C) to reboot the device.
Factory Defaults
You can reset the device back to factory defaults. After the reset you need to reboot the Network disk again with the option 'System Reboot'.
Press "Reset" (D) to reset the device back to factory settings.
ENGLISH
5.4 SMB Server - Sharing files through the Network
Select at the left side "SMB Server" to configure the folders to be shared through your network environment.
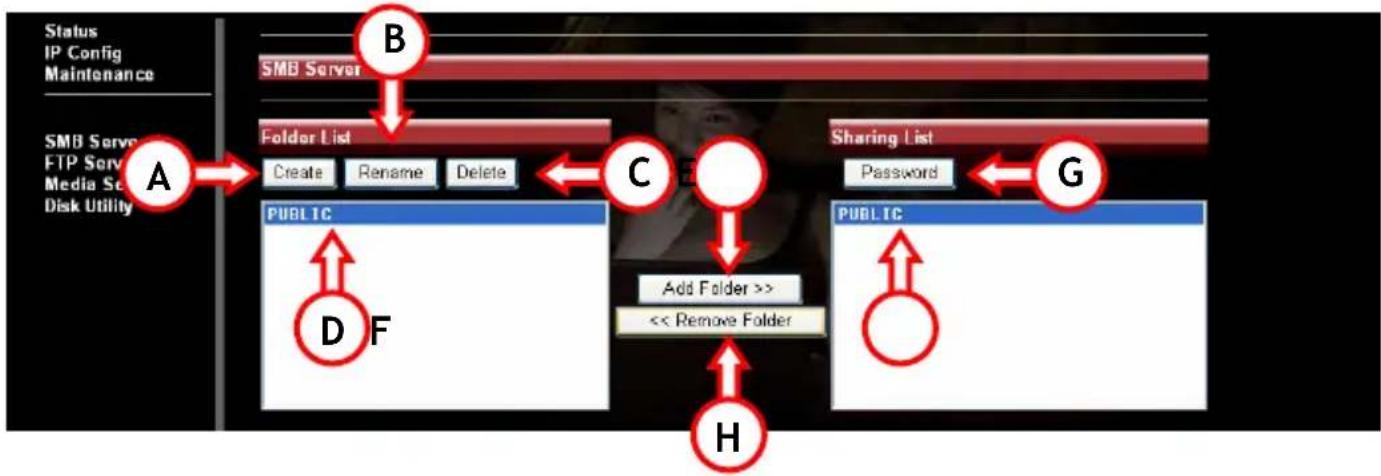
The SMB server option will display folders in the "Folders List", read from the ROOT directory of the Conceptronic Grab'n' GO network disk. Sub-Folders will not be displayed.
Options available:
A. Create Create a new folder.
Enter a Folder Name (Max. 12 characters) and press "OK"
B. Rename Change the name of an existing folder.
Enter a New Folder Name (Max. 12 characters) and press "OK".
C. Delete Delete the selected folder from the CHD3NET.
Confirm the deletion of the folder by pressing "OK".
Note: Contents of the folder will be deleted as well. Please backup first your data before deleting it!
5.4.1 Sharing a folder
D. Select the folder to be shared.
E. Press the "Add Folder" button.
F. The selected folder will be displayed in the Sharing List window.
If you want to delete a folder from the Sharing List, select it and press "Remove Folder" (H). The selected Folder will be removed from the Sharing List.
ENGLISH
5.4.2 Add a Password to the shared folder(s)
Every folder in the Shared List can be password protected.
By default every folder is unprotected and can be accessed by anyone through the whole network.
If you want to protect a Shared Folder with a Password, select the Shared Folder (F) and press "Password" (G).
Type your password and also enter the same password in the verify section. By Pressing "OK" the folder will be password protected.
5.5 FTP Server
Select at the left side "FTP Server" to configure the FTP server option of the Conceptronic Grab'n' GO Network disk.
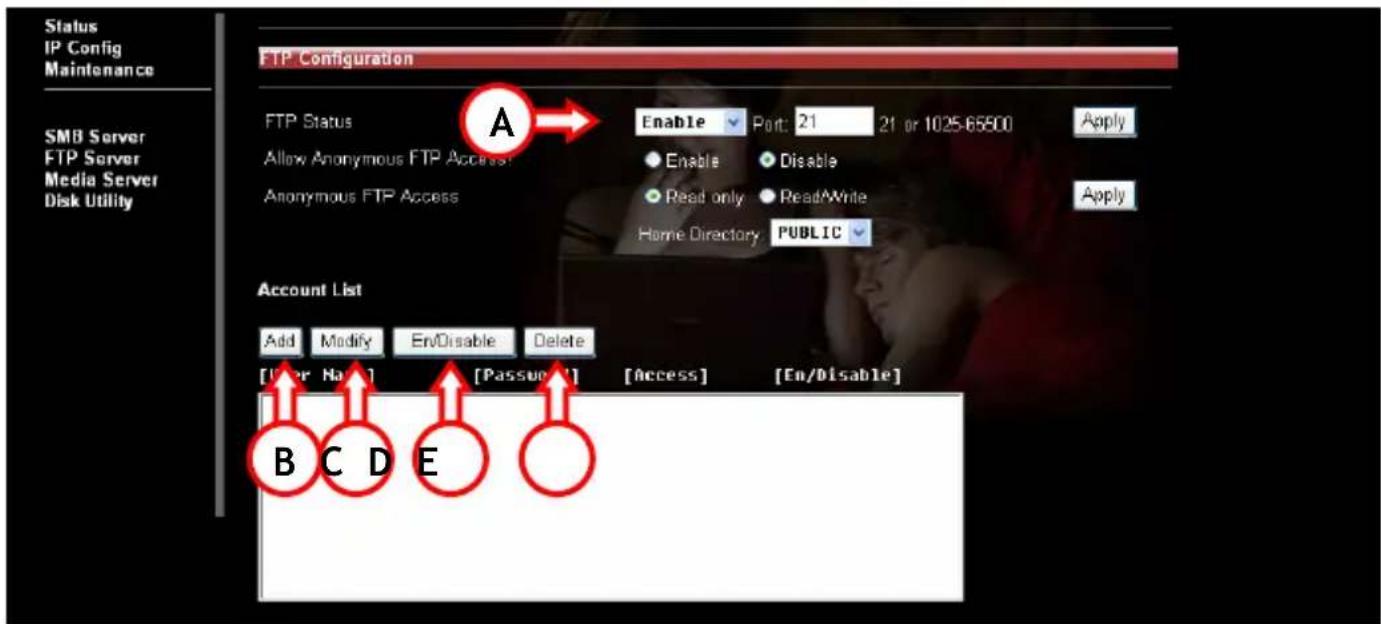
To use the FTP server feature, the FTP Status must be "Enabled" (A) (Enabled by default).
Anonymous access can have Read Only access or Read / Write Access
Select the option you want. For anonymous access you can setup a Home Directory (this can be any Folder from the Shared Folder list)
Note: We strongly suggest you to disable anonymous access to prevent unauthorized access to your FTP Server. This will secure your device and data more.
ENGLISH
5.5.1 Account List
A. Add
Add a new FTP User (Max. 5 users). Enter the Account Name (Max. 12 characters) and press "OK". When a new FTP User is created, click "Modify" (C) to change the settings for the FTP User.
B. Modify
Enter the "Modify FTP Account" menu.
C. En/Disable
enable or Disable the selected FTP User.
D. Delete Del
be the selected FTP User.
5.5.2 "Modify FTP Account" Menu
When a user is created and you press "Modify" (C), you will see the following screen:
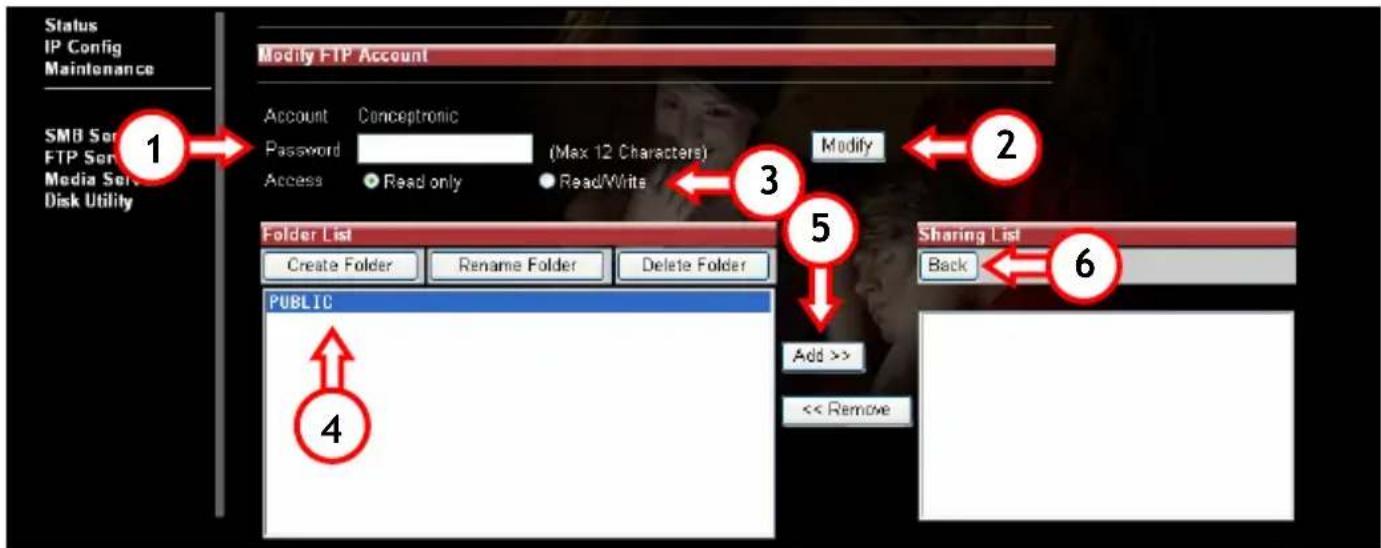
- Enter or change the Password of the user.
- Save the configured Password of the user.
- Decide if this user has Read Only or Read / Write Access
a. Read only means: the user can only download content from that folder
b. Read /Write Access means: the user can upload and download to and from the FTP server
- Select the folders to be shared through FTP for this user.
- Press "Add" to put them in the sharing List
- After all settings are made, press "Back" to return to the FTP Screen.
Note:
The FTP server is using TCP port 21 by default. If you want to enable people outside your network to logon to your FTP server, you need to open port 21 in your router through the NAT / Virtual Server settings. The IP address in the NAT / Virtual Server setting which is connected to port 21 must be the IP address of your Conceptronic Grab'n' GO network hard disk. Check the documentation of your router how to setup NAT / Virtual Server.
ENGLISH
5.6 Media Server
Select at the left side Media Server to enter the Media Server screen of the CH3NET.
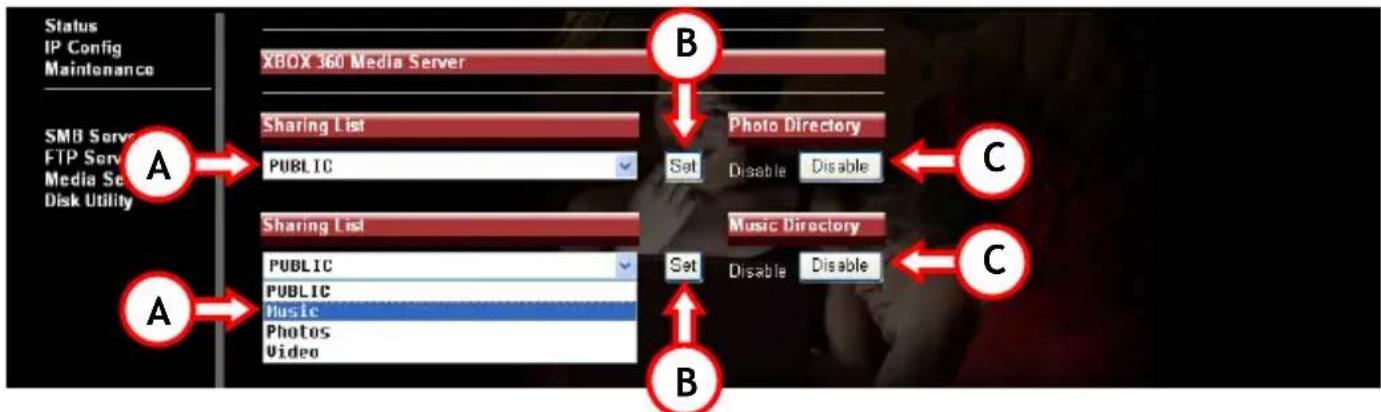
The Media Server feature enables you to play Music or view Photo's, stored on your CHD3NET, on your XBOX360.
Select a folder on the CHD3NET (A) which contains your photos / music. Press "Set" (B) to save the selection.
To disable the feature, press "Disable" (C).
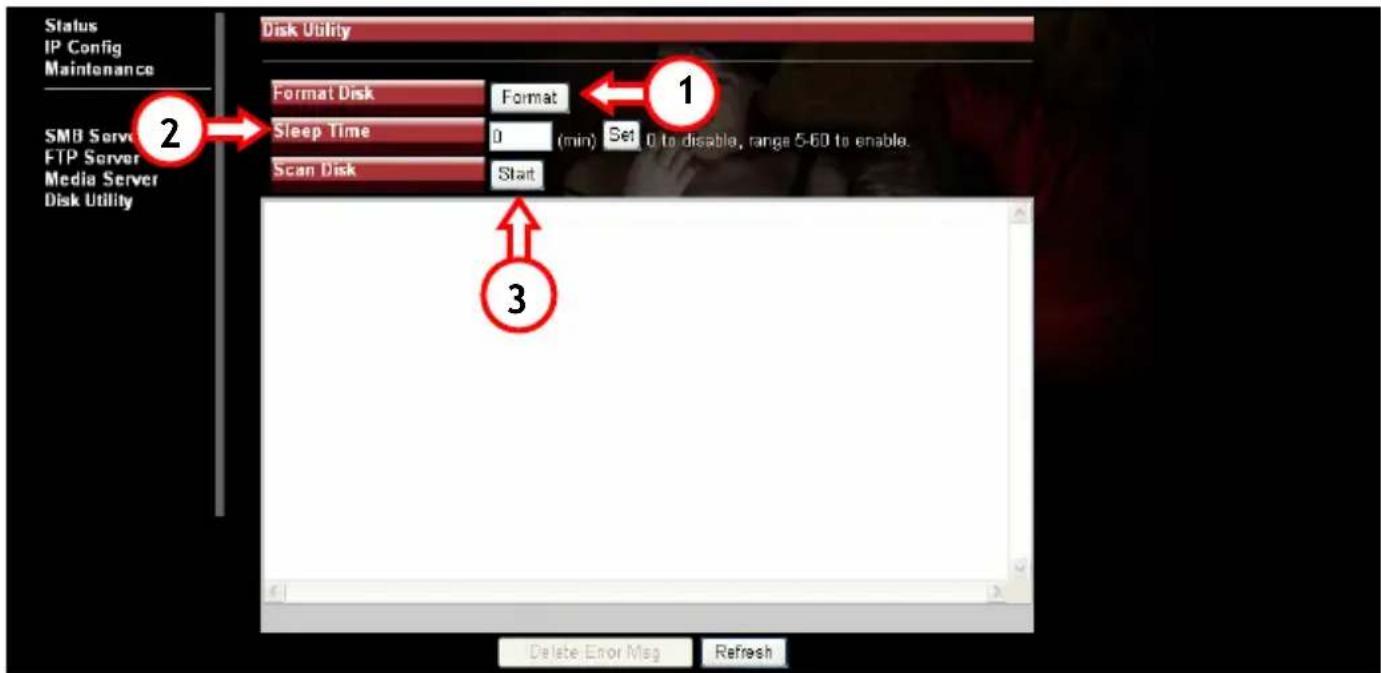
5.7 Disk Utility
Select at the left side Disk Utility to enter the Disk Utilities of the CHD3NET.
ENGLISH
Note: The Conceptronic Grab'n' GO Network Hard Disk only supports FAT32 Format!
The following options are available:
- Format When formatting the Hard Disk all your data and partitions will be deleted. Pressing the "Format" button will show a dialog box with the message: All data will be lost! Are you sure to format disk now? Press "OK" to format the Hard Drive.
Note: After the hard disk is formatted you need to reboot the Conceptronic Grab'n' Go network disk.
- Sleep Time When the CHD3NET is not in use, the Hard Disk can be turned off automatically. Enter the amount of Idle Minutes before the Hard Disk turns into idle mode (5 - 60 Minutes). Press "Set" to save the entered value.
- Scan Disk After the reboot you can select the Scan Disk feature by pressing "Start". This Scan Disk feature will check the file system. If there are any errors found it will try to correct them. This feature should be used on a regularly bases. The results of the Scan Disk will be shown in the column.
Note: Scanning the HDD can take some time. (Depending on the size of your HDD).
ENGLISH
6 Mapping the CHD3NET Network Folders
(Give network folders a drive letter)
It is possible to add the Network Share as a mapped drive letter, for easier access. To add a drive letter to the Network Disk is rather easy:
Note: The steps explained are based on Windows XP. If you use another operating system, some settings / options can be different.
A. Press "Start", "Search", "For Files or Folders".
B. Press "A computer on the network". A new window will open.
C. Type 'storage' in the Computer Name Column and press the "Search" button.
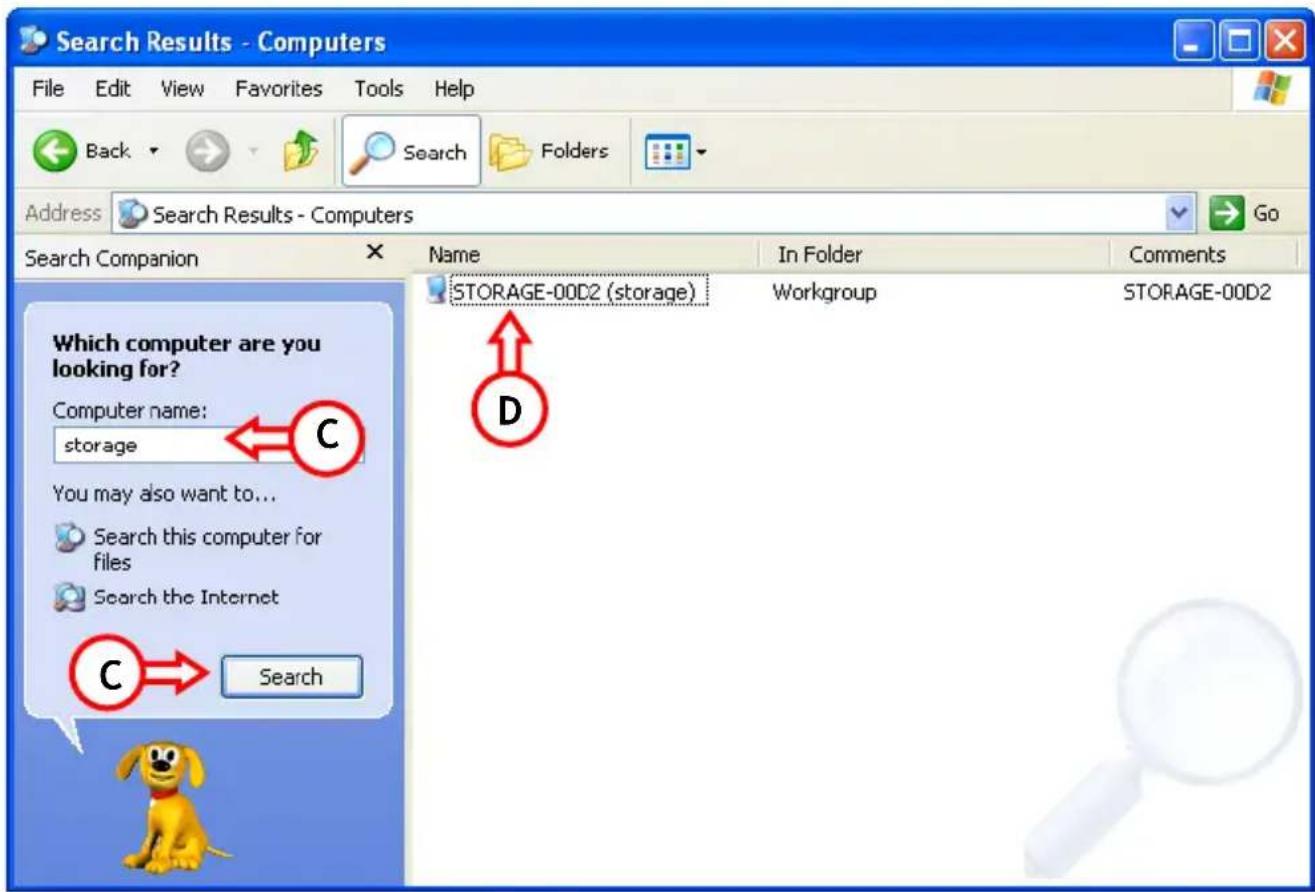
D. Select the 'Storage-xxxx' and double click your mouse. The shared folder list will appear.
E. Select the folder you want to map. Click the right mouse button and select 'Map Network Drive'
ENGLISH
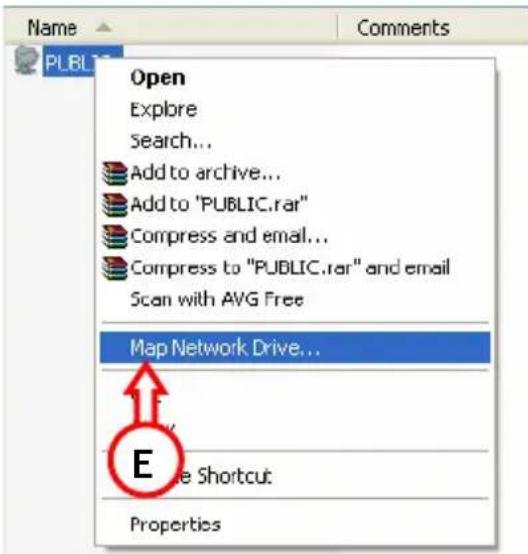
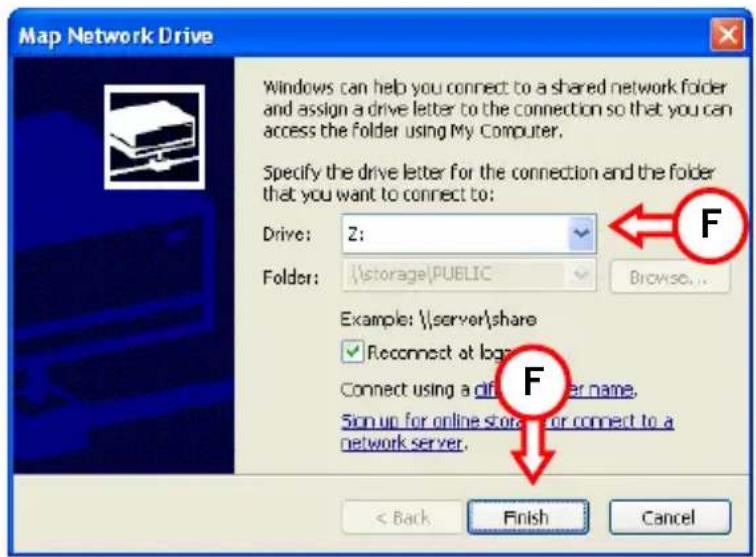
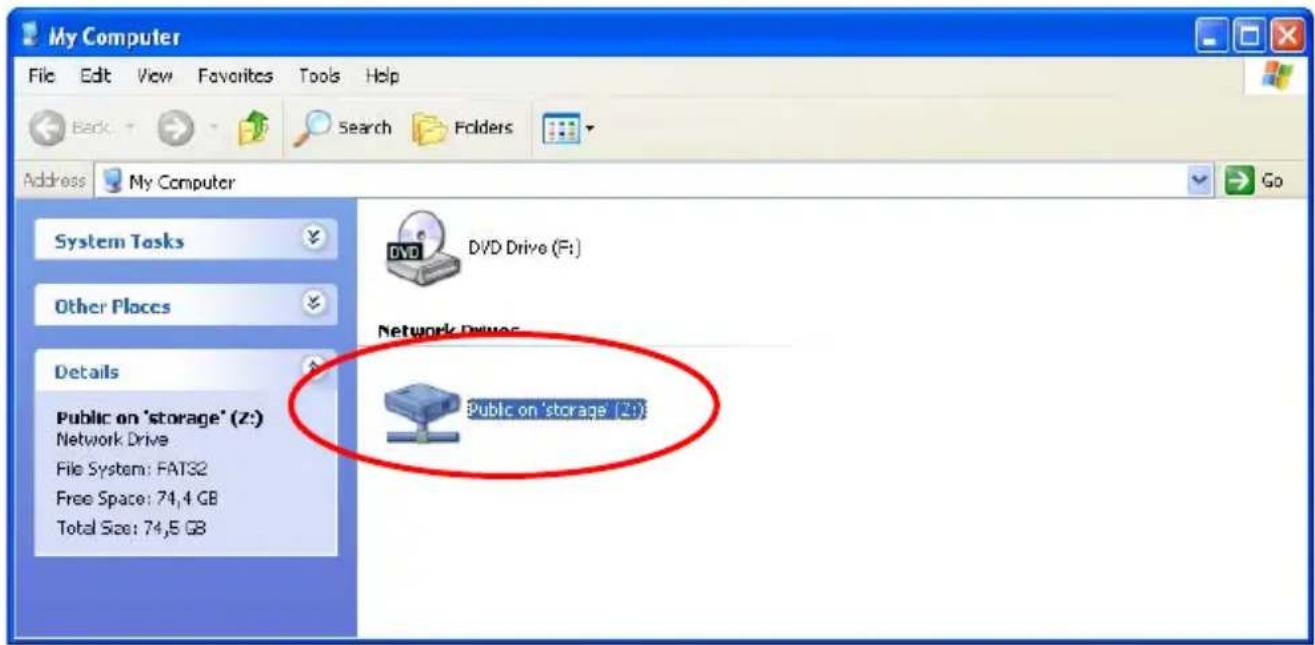
F. Select a Drive letter and press "Finish".
This specific folder is now accessible on your computer through a Drive letter you assigned:
ENGLISH
! Windows Vista Ultimate - Network Note !
The security policies which are being used by Windows Vista Ultimate are not supported by the Samba software in the CHD3NET.
Therefore, to use file shares/folders of the CHD3NET, you need to change the security policies of Windows Vista.
Note: This option is only available in Windows Vista Ultimate.
Changing the security settings.
- Click "Start" -> "All Programs" -> "Accessories" -> "Run".
- Type "secpol.msc" and click "OK".
- Allow Windows to open the Security Policies window by clicking "Continue".
- Click "Local Policies" and choose "Security options".
- Right click on "Network security: LAN Manager Authentication level" and select "Properties".
- Change the value "Sent NTLMv2 response only" to "Send LM&NTLM - use NTLMv2 session security if negotiated".
- Click "Apply" and "OK" and close the Security Policies screen.
- Reboot your computer.
You can now map a network drive to your computer with the steps below:
- Right click on "Computer" and select "Map network drive...".
- Select the drive letter you want to use (for example "Z:").
- Type the folder which you want to map (for example "\\Storage\Public").
- Click "Different user name" and type the username "Guest" (or another username) and the password which is configured for the CHD3NET share.
- Click "OK" and Click "Finish".
Your CHD3NET share is now mapped to a drive letter on your computer.
ENGLISH
7 Setting up a Static IP Address
If the DHCP server in the Grab'n'GO Network Disk is disabled, and you are using Static IP Address assignment in your network, you need to change your IP Address to the range of the Network Disk to access it. By default, the Grab'n'GO Network Disk works at the IP: 169.254.0.1
To change your settings, follow the steps below:
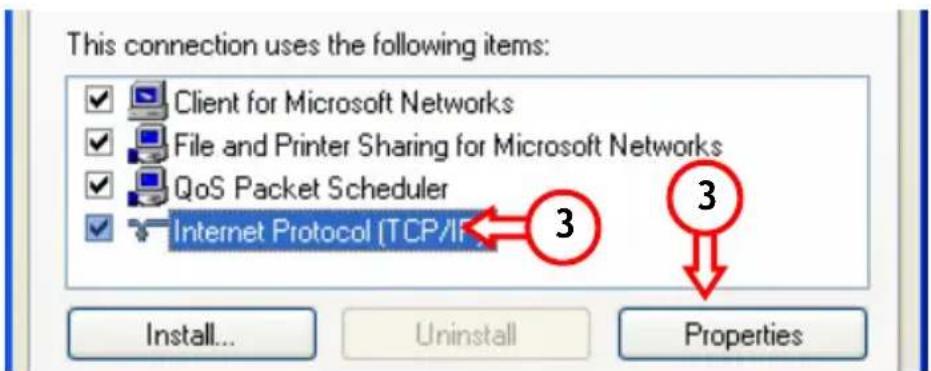
- Click "Start", "Run", and enter: NCPA.CPL
- Right click your Local Network connection and choose "Properties".
- Select "TCP/IP" and choose "Properties".
- Select the option "Use the following IP address:"
- Enter an IP Address in the range 169.254.0.xxx (Where xxx can be between 2 - 254). Set the subnet to 255.255.0.0
Obtain an IP address automatically
Use the following IP address:
IP address:
Subnet mask:
Default gateway:
5
6
169.254.0.124
255.255.0.0
169.254.0.1
- Enter the Default Gateway. If you have an active Internet Connection, enter the IP Address of the Gateway. Otherwise, enter the IP Address of the Grab'n'GO Network Disk.
- Press "OK" to return to the General Properties. Press "OK" to save the settings.
Your computer is now ready to use with the Grab'n'GO Network Disk.
ESPANOL
DECLARATION OF CE CONFORMITY
- Directa EMC 2004/108/CE EMC
Herman Looijen, Director de marketing
DEUTSCH
Conceptronic CHD3NET Installationsanleitung
- Maintenance [Pflege]
Media Server
5.1 Status
:STORAGE-xxxx (Standard-Hostname)
Groupname [Gruppenname]
: WORKGROUP [ARBEITSGRUPPE]
5.3 Maintenance [Pflege]
Conceptronic CHD3NET
Conceptronic CHD3NET
Conceptronic CHD3NET
Guia de Instalação
6. Mapear as pastas de rede do CHD3NET
Conceptronic CHD3NET
Telepítési utmutató
Conceptronic CHD3NET
Kurulum Kīlavuzu
DECLARATION OF CE CONFORMITY
The manufacturer 2L International BV
Address
Databankweg 3821 AL
7 Amersfoort,
the
Netheri
Hereby declares that the product
Type 3,5" LAN HARD DISK
Product CHD3NET
Brandname Conceptronic
Complies with following directives:
2004/108/EEC
EMC
directive:
Electromagnetic Compatibility
73/23/EEC Low Voltage Directive:
Electrical equipment designed for use within certain voltage limits
The following standards were consulted to assess conformity:
EN55022/9.98 Class B
EN55024/9.98
EN50081-1/1994
EN 61000-3-2/3/4/1995
EN50082-1/1994
EN 60950/1995
The symbol confirms that this product conforms to the above named standards and regulations.

Place and date of issue: Amersfoort, July 27, 2007

Herman Looijen, Product Marketing Manager
