
MC7000 - Keyboard ModeCom - Free user manual and instructions
Find the device manual for free MC7000 ModeCom in PDF.

User questions about MC7000 ModeCom
0 question about this device. Answer the ones you know or ask your own.
Ask a new question about this device
Download the instructions for your Keyboard in PDF format for free! Find your manual MC7000 - ModeCom and take your electronic device back in hand. On this page are published all the documents necessary for the use of your device. MC7000 by ModeCom.
USER MANUAL MC7000 ModeCom
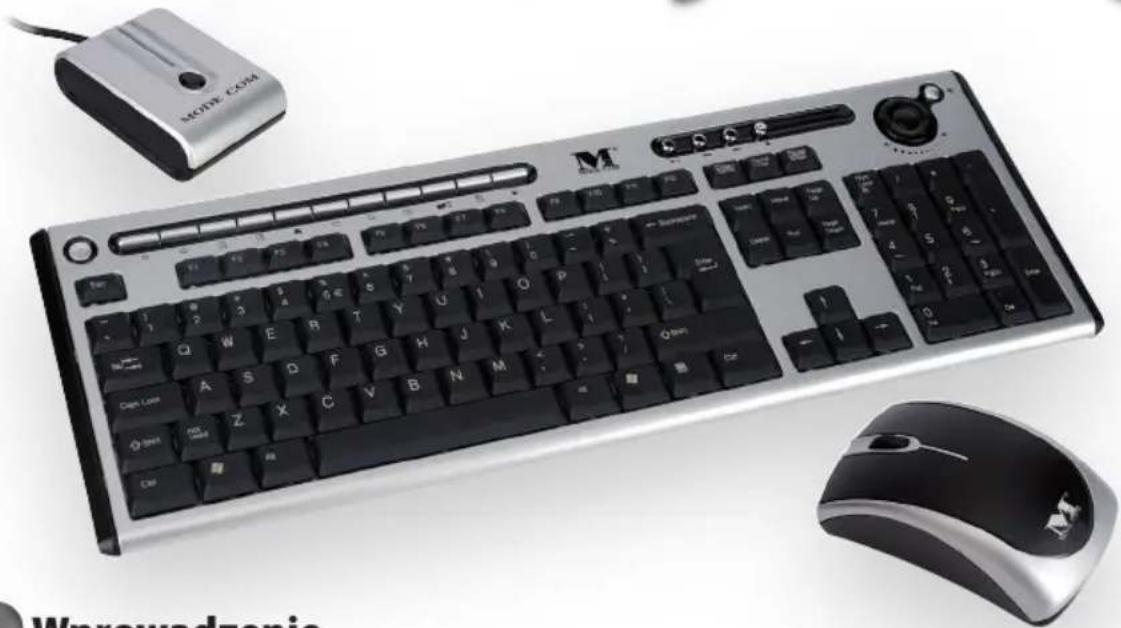
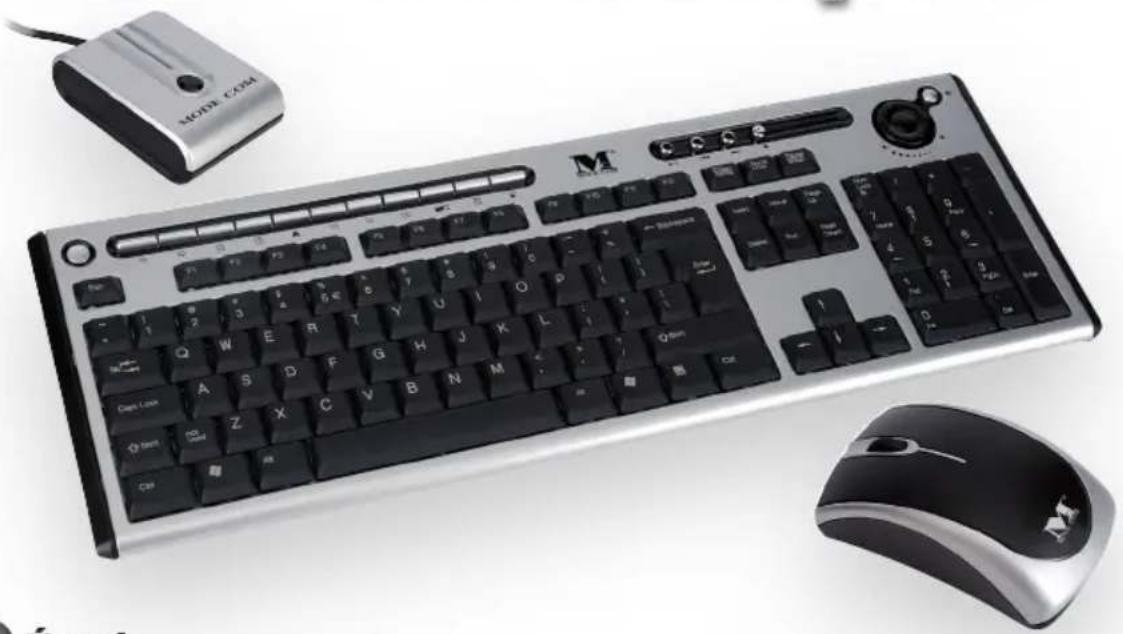
WIRELESS KEYBOARD AND WIRELESS MOUSE KIT
MC-7000
User Manual
Thank you for choosing MC-7000 kit. Mode Com® guarantees full satisfaction of its usage. MC-7000 is technologically advanced kit consisting of wireless optical mouse and wireless keyboard. It operates with digital radio technology to ensure no hinder communication between the devices and your computer without connecting troublesome cables. The transmission and receiving of keyboard and mouse are free from angle restriction. There are two frequency channels each for keyboard and mouse to prevent malfunctions when you operate several radio transmission devices simultaneously.
This user friendly desktop enables perfect wireless performance from a range of up to 1,1-1,4 m from your computer. Instead of complicated operations it provides one touch access through 19 hotkeys function.
Exceptional precision of the optical mouse (800 DPI) ensures immediate response of the device. Enjoy using MC-7000 desktop.
To take a full advantage of the kit please take a few moments to read the instruction manual.
Choose better future - choose Mode Com!
Copyright©2006 Mode Com Ltd. All rights reserved. The Mode Com logo is registered trademark of Mode Com Ltd.

PRODUCT SPECIFICATION
- Frequency band : Two channels for keyboard and two channels for mouse.
Keyboard-27.145,27.195MHz
Mouse-27.045,26.995MHz
-
Frequency modulation: FSK mode
-
Radio power: < 1 mW
-
Power rating:
Keyboard: 3 V, 30 mA (MAX.)
Mouse: 3V 50 mA (MAX.)
Receiver: 5 V, 100mA (MAX.) for USB / 200 mA (MAX.) for PS/2
- Battery:
Keyboard: 2 pieces of AA Batteries
Rechargeable Mouse: 2 pieces of AAA Rechargeable
Batteries (Ni-MH, 1.2V, 800mAh)
- Battery life time :
Keyboard: 500 hours reference (operating mode)
Mouse: 28 hours reference (operating mode)
- Operation distance :
Keyboard: 1,4 m without signal disturbance and no direction limit.
Mouse: 1,1 m without signal disturbance and no direction limit.
-
Mouse resolution : 800 DPI
-
Operating temperature: 5^ 40^ .
-
Storage temperature: -10^ 60^ .

Features:
- Complies with Directive 1995/5/EC of the European Parliament and Commission.
- Complies with the mutual recognition of conformity 1999 for radio and telecommunications Equipment
Manufactured with environmental friendly recycled materials. - Fully compliant with original USB version 1.0 and 1.1.

Preparing Keyboard, mouse and receiver
Before working with your new keyboard and mouse, look at the "Hardware Installation", and take a few one-time preparations.

Hardware Installation
- Place the receiver at least 20cm from other electrical devices (e.g. monitor) to achieve optimum performance.
The distance between the keyboard, mouse and receiver should not exceed 1,1 m. - Do not place the receiver on metal surfaces.
- Do not move optical mouse on following surface - glass or any transparent materials, dark surface, mirror or reflecting surface, mouse pad with too many colors, rough surface.
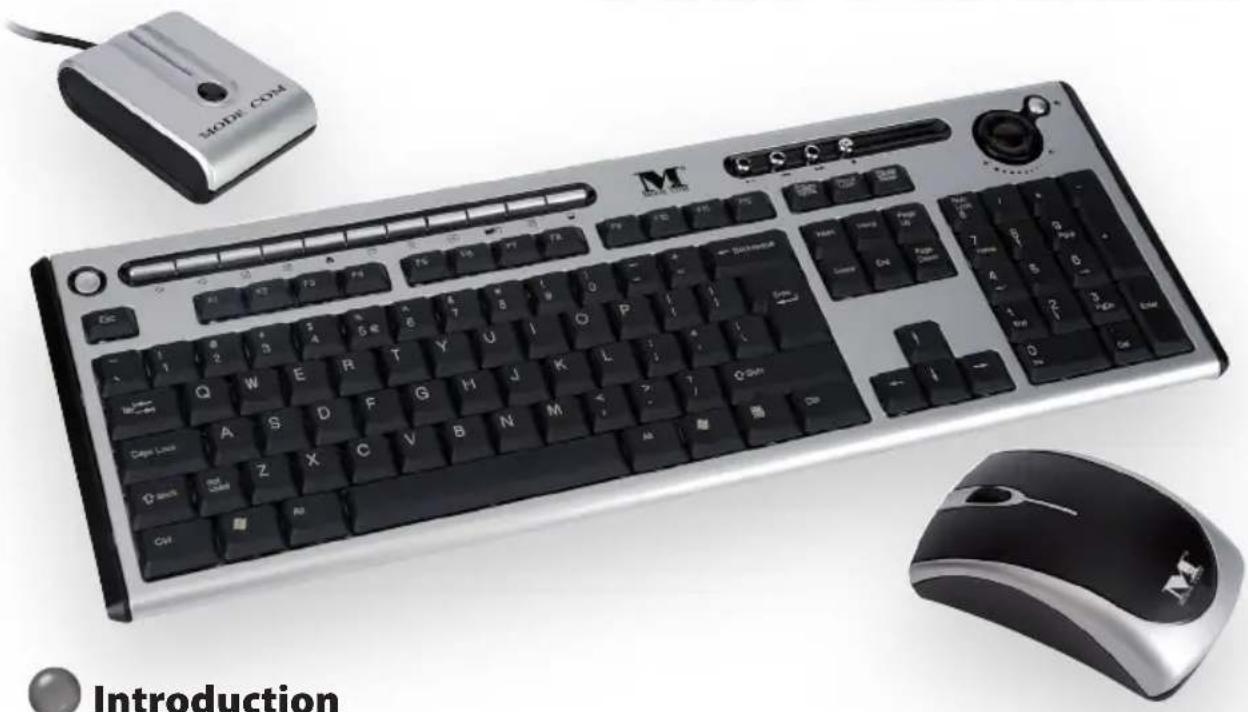
Step 1: Connect the receiver
Choose your receiver interface, and follow it.
PS/2 Interface (optional)
- Turn off your computer.
- Plug the receiver connector in purple into keyboard port on your computer and locate the other connector in green to mouse port.
- Place the receiver horizontally and keep approx.
8 inches (or 20 centimeters) pace from other electrical devices.
4. Load two batteries into battery chamber on the back of keyboard and two batteries into battery chamber of mouse.
5. Turn on your computer.
Note: If the interface is PS/2, please remember to Turn off your computer first.
USB Interface
- Plug the receiver connector into an USB port.
- SYSTEM will take around 10 sec to find your keyboard and mouse automatically.
(PS: If your OS is Windows® 98, please follow the screen instruction to complete your keyboard and mouse installation)
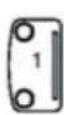
Step 2: Insert batteries
Inserting batteries in mouse
The mouse requires two NiMH AAA batteries.
(1) Please remove the battery compartment cover on the bottom of the mouse.
(2) Insert the two NiMH AAA batteries in the battery compartment.
(3) Fix the battery compartment cover (1) on the bottom of mouse again
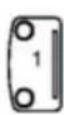
1= Cover
2= Battery compartment
3= Channel setting button
Dangerous!! Please only use batteries of the same type.
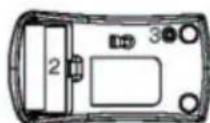
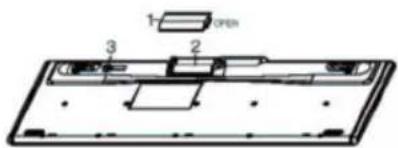
Inserting batteries in keyboard
The keyboard requires two alkaline batteries (AA).
- Please keep your receiver from the other electrical devices about 8 inches. The other electrical devices may influence your receiver sensitivity.
- Put two batteries into your keyboard battery chamber, and another two batteries into your mouse battery chamber.
1= Cover
2=Battery compartment
3= Channel setting button
- Remove the battery compartment cover (1) on the bottom of the keyboard by pushing it in the direction of arrow.
- Insert two AA batteries. The illustration in the battery compartment (2) shows how to insert the batteries properly.
- Recover the battery compartment by pushing the locking lug (2) under the battery compartment.
Note: Please do not push the channel setting button (3) at one side of the battery compartment cover. It may cause the channel or ID change. It is the same to mouse and keyboard.
Step 3: Setting frequency channel or ID
For the radio connection, set the keyboard to receiver, and mouse to receiver, with the same frequency channel and ID. Different ID can keep the keyboard and mouse working well with the same frequency channel. There are 255 IDs each for keyboard and mouse. Change the frequency channel may prevent interference between two devices.
Setting frequency channel on keyboard and mouse
(1) Push the connect button on the top of receiver. The indicator will be blinking.
(2) Push the button on the bottom of keyboard or mouse. The channel will be changed after the button released.
Note: Please do not hold the button until 3 seconds. It will change the ID, instead of channel.
Setting ID on keyboard and mouse
(1) Push the connect button on the top of receiver. The indicator on the top of receiver will be blinking.
(2) Hold down the button on the bottom of keyboard and mouse until 3 seconds. The ID will be changed after the button released.

Software Installation
Installing software for Mouse
The software provided for the mouse, supports only Windows 98, Windows ME, Windows 2000, Windows XP. Install the software to use all mouse functions
- Start the computer and insert the data carrier in the corresponding drive.
Installing software for keyboard
- Start the computer and insert the CD ROM.
-
Start the "Setup" program from the CD ROM and follow the instruction on the screen.
-
Start the "Setup" program from the data carrier and follow the instructions on the screen.
You may also use any standard mouse software. However, it is possible that (depending on the software used) not all mouse functions are available.
Once you have installed the software, the following symbols will display on Windows taskbar, the multimedia keys can be activated.

Displaying keyboard Modes
The symbols indicate which keyboard mode is active. They match the displays on ordinary keyboards. The symbol is green when the respective mode is activated and light grey when it is deactivated.
A Uppercase mode (Caps Lock)
1 Virtual numeric keypad (Num Lock)
Stop screen output (Scroll Lock)
Keyboard battery low indicator
Mouse battery low indicator

Working with keyboard and mouse
The following sections contain information on using the keyboard and the mouse. Using mouse wheel
In addition to two buttons, the mouse also has a wheel that can be used as follows:
- As a 3rd button: press on the wheel.
- For scrolling, e.g. in documents or on Internet pages: turn the wheel forward or back.
Keyboard
a. Multimedia-keys
The following description of keys applies for the operating systems that support these functions (e.g. Windows ME, Windows 2000 and Windows XP).
To use the multimedia keys in Windows 98 you must install the software provided.

Refresh
Use this key to refresh the web page.

Internet
With this key you can start the standard browser for your system.

Use this key to start the standard e-mail program for your system.

Favorites
Open my favorites folder.

Calculator
Activate the Windows default calculator.

Search
Activate the OS default search function.

Backward
Switch to the previous web page.

Forward
Switch to the next web page.

Previous Track
Use this key to skip to the forward title in the active player.

Stop
Use this key to end the playback of a title.

Play/Pause
Use this key to start or pause for a short time the playback of a title just as you would with a normal CD player.

ext track
Use this key to skip to the next title in the active player.

Decreasing the volume
This key decreases the volume of the connected loudspeakers.

Mute
Use this key to switch on/off the connected loudspeaker.

Increasing the volume
This key increases the volume of the connected loudspeakers.

Standby mode
Depending on the setting in the BIOS setup or operating system, the computer switches to a standby mode (not under Windows NT).

Stop (For Web Browser)
Use this key to end website connection.

Multimedia
Use this key to start multimedia program.

My computer
Use this key to find files easily.
b. Special features of multimedia keys
The proper function of the multimedia keys is dependent on your system.
c. System board (motherboard) and BIOS
The "Standby mode" key only functions correctly when the system board, BIOS and operating system of your computer fully support the ACPI function.
d. Keyboard battery indicator
The battery indicator on the screen shows you the charging state of the batteries. If the battery indicator lights up when a key is pressed, the batteries are gradually becoming weaker. Replace them in the near future.
e. Mouse on/off control
To save the battery from power consumption, keep pressing the left and right button simultaneously for around 3 seconds to turn off the Mouse. If you want to turn the mouse on, please also press the left and right button of the mouse simultaneously for about 3 seconds.

How to use the keyboard properly
The keyboard is ergonomically designed to ensure ease-of-use.
Inconvenient arrangement of the input and output devices, awkward arm movements or posture, or working with the keyboard or mouse for lengthy periods without a break can lead to tenseness, fatigue, and damage to the locomotors system (nerves, muscles, tendons, and joints).
You can considerably reduce the risk of this happening if you follow the advice given below.
-
Arrange your workplace in accordance with the recommendations for an ergonomic workstation provided in the PC Operating Manual.
-
Position the keyboard so that you can use it without any noticeable strain. The keyboard should be level with the upper part of you body. This prevents
any tension in the shoulders and arms.
-
The distance between the keyboard and the edge of the desk should be 5 to 10cm
-
When typing, hold your hands and forearms so that they form as natural a line as possible. Do not turn your hands too far to the left or right.
-
Keep your wrists straight while typing. Do not an
gle your hands upwards or downwards.
-
Do not rest your hands on the balls of your thumbs while typing, and do not strike the keys too hard.
-
Relax your hands by occasionally taking a break from typing. During these breaks you should rest your hands on the balls of your thumbs or place your arms on the armrests of your chair.

How to charge your rechargeable optical Mouse
-
Please do make sure the batteries have been inserted correctly according to the polarity.
-
Plug the USB connector of a charge cable into the USB downstream Port in your PC.
-
Plug the DC plug of the charge cable into the mouse front DC jack.
-
During the charging progresses, you still can use the mouse as a wire mouse.
Warning: Please notify the receiver still needs to be plugged into USB port in PC.
- Your mouse will complete the charging process after around eight hours.
Cleaning the keyboard and the mouse
-
Use disinfectant wipes to clean the keyboard and the mouse.
-
Do not use any dissolvent, which may damage the surface of your keyboard and mouse.

Troubleshooting and tips
The keyboard or mouse does not operate following installation or is not recognized.
-
Make sure that the batteries have been inserted correctly according to the polarity and the receiver is well connected.
-
Check that your USB port is configured properly.
-
Check whether the respective channels and ID are set on the receiver and the keyboard or mouse.
-
Make the connection between the receiver and the keyboard and mouse. Press a mouse button and then the connection button on the receiver.
-
Make sure the batteries are not too weak.
-
Remove the batteries from the device. Please press any button on the device several times to prevent any unexpected failure after batteries being put in.
-
Change the location of the receiver to have a best sensitivity.
To determine whether the keyboard, mouse or computer causes the problem test the keyboard and mouse on a second computer if possible; or test another keyboard and mouse on your current computer.
If you are still unable to solve the problem, please contact your point of sale or your dealer.
If you need to exchange the keyboard, please note that you must return it to your dealer in its original packaging and also a produce proof of purchase (receipt). Keep your receipt in a safe place after purchase.

Note
Do not attempt to charge non-rechargeable batteries.
MODE COM
MC-7000
Instrukcja obstrugi

Wprowadzenie
Mysz - 27.045, 26.995 MHz
A Duze literacy (Caps Lock)

Ciszew (Decreasing the volume)
Bb6epnte cootbetCTbyuounn nHTepfecn Baawero npneMHnka n noctynaTe corlacho pykoOoCTBY.
Hmepfeuc PS/2 (onuouHO
- BbIKIOHTe KOMNBIOTep.
2.Bctabte fnoIeTobb pa3bEm B KnaBnAtypHbIn npT KOmbIOTepa, a 3aTe mOppeDenite NIOJKeHne BTOPOrO, 3eNEHO ra3bema nI npTaMbIuN.
3.YctaHOBNTe npHemHK B rOpu3oHTaIbHOM NOOJxHn,co6JIIOJa paCtOraHHe He MeHee 20 cm OT dpyrnx 3neKtpoycTpoiCTB.
4.BctabbTe DBe 6aTapeKn B OTceK, pacnoJoxKeHbI B HxKHeu cactn KlaBnaTypbI, n DBe-B 6aTapeHbI OTcEK MbIuN.
5.BkJIIOUHTe KOMNbIOTep.
BHMaHne: Ecnn nHTepfemc om aBnaretca PS/2, NOMHnte, TTo6 B nepByo oupeepb BbIKIOuHTb KOMNbIoTe.
HHTepcnc USB
1.Bctabte pa3bem npnemnka B nopT USB.
2. Ypees 10 cekyHc nCtema o6hApxHt HOBoe yctpoiCTBO. (Ecn Bbl nonb3yetecb onepaunOHn HcTcTeMoN Windows98, dIra 3abepseHn yCTaHOBKn Mblu N KlaBnaTpyb IocTyNaIte CoTlacHO NOBJIIOUUMcYka3aHnM).
- PacnonaraTe npneMHNK Ha pacCToHn OkOIO 20cmOTdpyrnx 3NeKtpoyctpoiCTB, KOtOpbIe MOrTy NOBnArybHa eRo YyBCTBnteJbHOcTb.
4.BCTaBbTe DBe 6aTapeuKn BOTceK,HaxoJaunncB HnXHeJyactN KlaBnaTypbI, N DBe-B 6aTapeHbIOTCEKMblu
War 2: YctahOBka 6aTapeek
YcmaHO6ka 6amaapeek Mblub
Tpe6yioTcBne NiMH AAA 6aTaepenKn.
(1) Chmnte KpbuKc cnHxHe yactn MbuH.
(2) BCTaBbTe DBe NiMH AAA 6aTapeuKn B OTCek, co6JIIOJa Ix NIONpHOcTb.
(3)HaedeHbTe KpbIiKy (1) Ha HxKHOU qAcTb MbIiN.
1=KpbiWka
2=BaTapeiHbIOTcEK
3=KhONKaHaCTpOKN KaHaJa
Bhumahue!! Pumehaune oohomunhhe bamapeku.
YcmaHoska6amapeek KnaBuaampy
1=KpbiWka
2=БатAPEHbI OTeK
3=KHOIIKaHaCTpOuKN KaHana
Tpe6yOTcBbe aKaNIOHObbIe 6aTaPeuKn (AA).
- CHIMITE KpbiKy 6aTapeHoro OTeka (1) B
HnKHe YactN KnaBnAtypbI No HnpaBneHIO CTpeKN.
BCTaBbTe DBe 6aTapeu Ka AA.
Ha pucyHke yka3aHa npabnIbHna yctaHObKa 6atapeek B OTCEKe.
- HaendeThe Kpbuikky 6aTaapeHoro OTeKa npJxMma depkaTeIb (2) paCnoJoxKeHHbI B dHe KpbuKn.
BHMaHHe: 6yIbTe OCTOpOxHbl, BO BpeM yTaHOBKn He HaxIMaIe KhoNky HaCTpoiKn KaHana (3) c oHOn CTOpOHbI 6aTapeHoro OTceKa.3TO MoXeT Bbl3BaTb N3MeHeHne KaHana nn ID. Bbiweyka3aHHoe kacaetcKak KnabNaTypbl, TaK nMbIuN.
Iar 3: Hactpoika kaHana qactOtbl nn ID
IyctaHOBHeHn paHOCB3n HactpoTe KnaBnAtypy,MbIbN npMeMHK Ha OIN N TOr JKe KaHaN IID.KnaBnAtpaN MbIb MOry Pa6OtaTb Ha ONDOM KaHane Yactotbl npn pa3hbx ID.CuJeCTByeT 255 pa3hbx ID nraKnaBnAtpybN mbiin.
I3meHHe IDMoKETnpedotBpaTntb nomexmExdy 3TNIM DByM yCTpoiCTBaMn.
Hacmpouka kahana yacmombi dnaMbiuu u Knaeumypbl.
(1)HaxMMTe KHOKNy Ha BepxHei CTOpOHe npnEMnKa. HnKAtOP CtAHeT MnRaTb.
(2) HaxmTe KhONKy Ha HnXHei CTopoHe Mblu nn KnaBnaTypbl. KaHan n3MeHntc, KOrda OTnyCTnte KhONKy.
BHMaHne: He depKnte KhoNky HaxaToi 60one 3-x cekyHd. B npOTuBHOM cnUyae BMecTo n3MeHeHnHaKaHa, npOn3oJTe n3MeHeHne ID.
Hacmpouka ID mbiuu u knaubampybI
(1)HaKmTe KhONky Ha BepxHei CTOpOHe npEmHnka. HnKaTOp cTaHET MrraTb.
(2)ПидерхиTe HaxaToH KONky Ha HnXHei CTOpopHe KJIaBnaTypbI NmMbIu B TeueHne 3-x ceKyHd. ID n3MeHntc, Korda OTnyCTnte KONky.

YcTaHOBKa nporpamMHoro o6ecneueHnJaKnaBnAtypb
BkIIOUHTe KOMNbIOTeP n BCTaBBte CD.
- Bыберп Te Ha CD onцию «Setup „ n noctу naite corlacho pykoBoDCTBy.
Iocne yctahOBKn nporpaMMHoro 06ecneueHHa NaHeN 3aDaay NOBbTcra CnEduOuNe NIKTOrgpAMMbI, YTO 06o3Haaue TOTOBHOCTb MybTmMeHNhIX KlaBnUb KaKTNBUPOBAHIO.

YcTaHOBKa nporpamMHoro o6ecneueHnMaBliu
Ipnnoxehoe nporpamMHOe oecneueHne MbIu B3aMOneIcByeT TOnbKO c Windows 98,Windows ME, Windows 2000,Windows XP.YctahOBn nporpaMMHOe oecneueHne,YTO6bl MoXHO 6bIO NOJIb3OBAtbcr BCEMN yHKUAMMbIu.
BKNIOU KOMNBIOTep N BLOXH HOCINTeJb DaHHbIX B COOTBeTCTBYIOU IN PnBOID.
- 3anyctn,setup" c HocnteJn pykoOIOCTbYncn IHCTpyKUJMN, BbcBceuBaembIMn Ha ekpaHe.
MoXeIb BOCnOJIb3OBaTbCra IIO6bIM npOrpamMhBm O6ecneueHHeM MbIu. Ho eCTb pNcK, YTO (B 3aBNCUMocTn OT nCNoJIb3yEmo npOrpamMbI) He BCE yHKcUN 6yDyT IOCTynHbl.

BbICBeuBaHne peXIMOB KlaBnaTypbl
NtKtorpmbI ONpeDEnHOT DeHCTBYIOUIN peXIM KnaBnAtypbl. NkTOrpMa CBETNTc 3eJIbIM UBeTOM,ecnn DaHHbI pEXMM HAXODITcB DeNC- TBm, INI cepbIM -ecnn peXIM HeaKTNBHeH.
A 3aIaNbIe 6yKbI (Caps Lock)
HomepHaj KnaBnAtypa (Num Lock)
CTaHOBnTb npOKpyTKy n3o6paXeHnA (Scroll Lock)
HdNkaTop cTaTyca 6aTapeuKn KnaBnAtypbI
HdNKaTOP cTaTyca 6aTapeKmMbIu

AknBpye KaIbkyJrTOp no yMOnuHaHIO nn Windows.

Nonck (Search)
AKTUBPpyETyHKUIO NOUCKa no yMOnuHaHIO.

Ha3aA (Backward)
PepexoK npebdyuemy Be6-caityy.

BnepeA (Forward)
IpehexoK cneyUOemy Be6-caTy.

PpebIyuaa Iopoxka
(Previous Track)
IpehexoK BocnpOn3BedeHnIO
npedbidyuei dopoxxn.

Cron
OctaHaBnBaet Bocnpoun3BeDeHne 3annc.
Bocnpoun3BeDenne/Play3a (Play/Pause)
Bocnpo3BODNTnHaKopotKoe BpemOCTaHaBnBaET Bocnpo3BeDeHne,KaB O6bIuHOM CD-npepe.
CleyuouaIopoxka (Next Track)
KhoKa nepexoJa K cneIyUoSeI dopoxKe 3aIncu.
Tnue (Decreasing the volume)
KhONka y6abnraT rPOMKOCTb B NOkIIOueHbIX KOJOhKaX.
Pexm MojuHna (Mute)
BbIKIOaET NIN BKNIOaET 3BYK B KOIOHkX.
+Γpomue (Increasing the volume)
KhONka npu6abnaet rpoMkoCTb B NOkNIO-ueHHbIX KOJOhKaX.
OxuaHne
B 3aBnCmOCTn OT yCTaHOBOK setup BIOS nnn OnpaunOHNo CNTeMbI KOMnbIoTepepeKIOUaETc B pexIM OxuHaHna (3Ta yHKsra OTCyTCTByet B Windows NT).
Cton (nla npocmotpa Web-cetn)
Ponb3yucra 3toi KnaBnwe, yTo6bl 3aKoHcHTb coeHNHeHne c Web-ctpaHncaMn.
MynbTmMedna
Ponb3yncra 3toi Knabuwei, yTO6bl 3anyCTnTb MylbTmEma-npOprpaMMy.
Moi KommbioTep
Ponb3yncn 3TOHKnO, yTO6bl npocntb HaxoJdeHne aINOB.
2. Mamepuhckaa nnama u BIOS
Khonka «Standby mode" ("Ждуши реким") pa6oTaet npabnIbHo torda, korda cnCTeMHa nIATA, BIOS onepaunOHH na cStema KOMnbItepa cotpydHuayotc fynkne ACPI.
3.Инданоморсамуcaбамеukклавamypbl
NndkaTOp cTatya 6aTapeKn noka3bBaet ypoBHe ee 3apra. Ecnn nHdkaTOp 3aropaeTc npn HkaTn KnaBnI -3TO O3Haaye, TTO 6aTapeKn pa3pKaIOTCr. Ckopo cneDyET nx 3aMeHHTb HOBbIMN.

BkIIOueHne/BbIKIOueHneMbIuN
Bo n36eXaHne nCepnHaHn 6aTapei CneIyET HaxmTaB OndHOBpeMeHNO npaByIO NLeByIO KHNKMBIIN 3ceKyHdbI, YTO6bI ee BbIKNoHTb. YTO6bI BKIOuHTb MbiUb CHOBa, HaxmAm OndHOBpeMeHNO npaByIO NLeByIO KHNKn 3ceKyHdbI.

Kak npabnblno noIb30BaTbcra KnaBnaTypoi
KnaBnAtypa 3proHOMuHo CnpoeKtnpObaHa dIy o6ecneueHn KOMΦoPaTnNoJb3OBAHn.
Heyo6hoe paonoloxeHne yctpoCTB BBOda/BbI-BOda, HeecTeCTBeHHbIe DBHXeHn PneueH, HenpaBnIbHaOcaHka, a TaKxpe NOnb3OBaHne KNaBnAtyPoR n MblbIO dNITeJIbHOe Bpem 6e3 peryJrphbIX
pepebBOB,MOyT npuBeCTN K HnpanjKeHIO, n3HypeHIO NnIOBpeKdEHNIO ONOpHO-DBnraTeIbHOcCTeMbI (HePBoB, MblU, cyxoxnnn u cycTaBOB) Bo3MOxHO 3NaHTeNbHoe yMeHbWeHne pnca npuco6JIoDeHN HIXeCNeDyIoUx ykaaHn:
- Bcerda opraHn3yIe cBOe MeTo pa60tbl COOT
BETCTBnCpeKomeHdaaunMn 063proHOMuHOM pa6ooyem MeTe,coepkaunmcaBpykoBoDCTBe nO6cnykmbahnIO PC.
Pa3mecntte KnaBnAtpy B IerKoOcTynHom MeTe. KnaBnAtypa DoJxHa HaxOntbcn Ha yPobHe BepxHn Yactn BaWero Tena. 3To npedotbpaNT HanpXeHne nIeU npK.
PacctoHne MeKdy KnaBnAtypoi n Kpaem cToNa dONXHO COCTaBnTb OT 5 do 10 cm.
- Bo Bpem neuataHn Iepxnte IaOnHn B eCTeBehHom nOJKeHN. He OTbOInTe pyKn cNtKOM DaJIeKO HappaBO nn HaJeBO.
- Ppi neyataHnn ĀpXknte KnCTn npAmo. He otKNOHnTe NaOHO n CnUWKOM daNEKO BBepx nnBHN3.
BoBpMa neaTaHn He 6nokauBaIte pyKn HaNoDyWeKax 6oIbux NanbueB,He HaxmamTe CnUKOM CNJbHO Ha KnaBnH.
-Делаитpeperларпьпе nepebbIbI BO BpemЯпсатань.ВпeретвоблokачBaIte laOnH NaodyuweKn 6oJIbuxn naIbueB nII Ha nepuJa cTyna.

KakapjkaTb onTnueckyU MbIwb
-6eBbB npabunbHOCTn BCTaBHeHna 6aTapeB B COOTBeCTBnC NOJrpN3aUne.
-Подкlioу контakT USB-ka6eЯ K USB-nopTy CBOero kOMnbioTepa.
Bknou DC-Bunky ka6eIa3apIKn B nepeIHee DC-rHe3doMbIiN.
-BoBpem3apRkM0KeIb npOJOLKaTb NJIb3OBaTcMbIbIO KaK npOBOHOH.
PnmeHne: Cnei 3a TeM, yTo6bl npHeMHK ocTabaIcN noKnIOeHHbIM K USB-nOpTy KOMnbTepa.
- 3apЯДka 3aKOHHTc npIMepHo Yepe3 BOceMb YacOB.
YnCTKaMbIuN KJIaBnaTpybl
-ДячNTК KJIaBnAtypbI Mblu NOB3yTecb De3HΦeUPOUMM CaΦeTKamN.
- I36eraaTe npimHeHnpaCTbOpnteJe, KOtOpBle MOryT NOBpeDHTb NOBepxHOCTb yCTPOINCTB.

Pazpeшени поблим
KnaBnAtypa nnMbIb He COtpyHnuaT C yCTaHOBOuHO nporpaMMo nn OHn He 6HapxKBAOTcKOMNbIOTEpOM.
- y6eHntecb, yTo 6aTapeKn yCTaHOBJeHbI npaBUNbHO, B COOTBeTCTBUN C INX NOJAPHOCTbIO.
- Пюоверът, правиьна лл конфигуразия порт USB.
- Поберпс На Кдньх Канов ID В пиемнke, КларType И Мьш.
- Поберпс coeINHeHneMbIu IN KlaBnAtypbI c npHmHKOM. HaxMnte KhoNky HaMbIu, a 3aTeMHKHOKNy HA npHemHnKe.
- y6eintecb, He pa3pXeHbI nn 6aTapeuKn.
- N3BJIeKInTe 6aTapeKn n3 yCtpoNCTBa. HaxMnte Ha IIO6yO KnaBnSy Bo n36exHne KaNX-JI6o NOBpeXdEHH, MORYux BO3HNKHHTb NocJe yCTaHOBKn 6aTapeek
-Дяобсесенca COOTBETCTBye CBa3n,ИЗMeHNTe NOLOXeHne npIeMHNka.
C zenbIO onpeJeHnI, KOtOpoe n3 yctpoiCTB Bbl3bBaET nomExn, nonbTaHTecb coeHNHTb erO c HbIM KOMnbIOTePOM UJI Xe npOBepuTb dpyryIO KlaBnaTy pU Nm MbIb Ha BaWem KOMnbIOTepe.
EcnBbIeepnBedeHHbIe yka3aHnI He nOMOrn B pa3peWeHN np6neMbI, CBxNtEc b Caunm dIePOMnn ToproBoi Touko. Ecn coUTeHeo6xoDmbIM 3ameHntb KnaBnAtpy, cNoXnTe yctpoiCTBO B NOJIHyu yNaKOBky I BO3BMITE C CO6OIOATBepKdHne NOKyKN (kaccobbl ueK).

BHUMAHNE:
- N35EΓΑΙΝΕ ΠΙΝΙTEΙβHΟΓΟ, ΒΕCΠPEPBIBHΟΓΟ ΠΟΙβ3ΟΑΗΝΑ KΑΙΒΙAΤΟΥΙ.
CtapaTecb denaTb peryIapHbIe nepepbIbIu I depKaTb npabunbHyIO ocaHky. B cnyae hapyuWeHnO onopHO-DbIraTeJbHOI CNCTeMbI NII OUYSeHn60JI B 3aIaCTbX BO BpemI PONb3OBaHnKlaBnAtypo, npOKOHcyIbTIpyuTEcB C BpaOM.
He cneyuTe 3apKaTb 6bIKHOBeHHbIe 6aTapeKn, KpOme 6aTapeE npEHa3HaueHHbIX nna 3apAKn.
MODE COM
MC-7000
Námod k použití

Uvod
Dekujeme Vam za nakup vyrobku MC-7000 od firmy Mode Com. Zarucujeme Vam, ze bude s jeho pouzivanim budete spokojeni.
Klavesnice-27.145,27.195MHz
My5-27.045,26.995MHz
2.Modulace kmitoctu:FSK
3.Vykon vysilace: < 1mW
- Nominálí vykon:
Klavesnice: 3V 30mA MAX.)
MyS:3V,50mA(MAX.)
Prijima: 5 V, 100mA (MAX.) pro USB / 200 mA (MAX.) pro PS/2
- Baterie:
Klavesnice: 2xbaterie AA
Nabijena mys: 2 Nabijene baterie AAA (Ni-MH, 1.2V, 800mAh)
- Zivotnost bateri:
Tiseji (Decreasing the volume)
Tlačitko snizuje hlasitost v pripojenych reproduktorech.

ztlumit (Mute)
Vypína hlasitost.

Hlasitéji (Increasing the volume)
Tlacitko zesilujehlasitostv pripojenych reproduktorech.

Bdeni
CHARACTERISTIQUES DU PRODUIT
Souris rechargeable: 2 pilles rechargeables AAA
Raton - 27.045, 26.995 MHz
Maus-27.045,26.995MHz
Leiser (Decreasing the volume)
+ Lauter (Increasing the volume)
Elofo sáv (Previous Track)
Elózó sáva lépés

Aljj (Stop)-Aljj

Hangerot le (Decreasing the volume)
Hangerócsökkentese

Pillanat csend (Mute)
Pillanat csend

Hangerőt fel (Increasing the volume)
Hangeró novelese

Keszénlet
Mouse - 27,045, 26,995 MHz
This symbol on our product nameplates proves its compatibility with the EU Directive2002/96 concerning proper disposal of waste electric and electronic equipment (WEEE). By using the appropriate disposal systems you prevent the potential negative consequences of wrong product take-back that can pose risks to the environment and human health. The symbol indicates that this product must not be disposed of with your other waste. You must hand it over to a designated collection point for the recycling of electrical and electronic equipment waste. The disposal of the product should obey all the specific Community waste management legislations. Contact your local city office, your waste disposal service or the place of purchase for more information on the collection.
Weight of the device: 1370g

OCHRONA ŚRODOWISKA:
Mode Com Ltd holds leadership position among the producers of computer cases, power supplies, sound speakers, cartridges, toners, keyboards, mice, mobile phones, network devices and multimedia players. The company owns two factories located in Korea and China as well as the European representative in Poland.
Mode Com places a high value on constant investing in company's success and broadening of products offer.
Currently, with the company's own design facilities Mode Com introduces over 30 new, unique models both into home and international markets. By integrating distinctive design, highest quality materials and warranty of quality Mode Com increases its turnover up to 200% annually.
Mode Com brand grew its sales worldwide through expansion of strong distribution channels in over thirty countries of Asia, Europe, America, Australia, Africa and the Middle East.
Mode Com's focus on high quality and exclusivity of products resulted in investment of enormous amount of money in design and production.
Its constant investment is based on increasing the reliability and quality of its products to meet or ever surpass customers' expectations.
According to the research of Mode Com brand, it is regarded as substantial and reliable. Although it offers little more expensive products, the company's strategic focus is technological advancement, remarkable design and added values.
MODE COM
M MODE COM
Mode Com Ltd.
03-301 Warsaw, Poland
82 Jagiellonska St.
www.modecom.eu