HRT 8300 - Digital decoder XORO - Free user manual and instructions
Find the device manual for free HRT 8300 XORO in PDF.
User questions about HRT 8300 XORO
0 question about this device. Answer the ones you know or ask your own.
Ask a new question about this device
Download the instructions for your Digital decoder in PDF format for free! Find your manual HRT 8300 - XORO and take your electronic device back in hand. On this page are published all the documents necessary for the use of your device. HRT 8300 by XORO.
USER MANUAL HRT 8300 XORO
FREE TO CHOOSE INNOVATIONS
XORO®
HRT 8300
text_image
XORO H2O 109 HDMI® Time-Shift Function FVR Ready 20:00 +USBtext_image
Two warning symbols: a triangle with a downward arrow and an exclamation mark inside, likely indicating hazard or caution.natural_image
Cartoon illustration of a man sitting at a desk holding a TV, pointing at the screen (no text or symbols present)natural_image
Symbol of a trash bin with crossed lines indicating no waste or discharge, and a solid black rectangle below (no text or labels)natural_image
Green recycling symbol with three chasing arrows forming a triangle (no text or labels)natural_image
Circular icon with a green and yellow curved arrow design, resembling a refresh or recycling symbol (no text or symbols)Batterien
natural_image
Two identical line drawings of a trash bin with cross symbol, no text or labels presentnatural_image
Diagram of a battery pack with an open lid and internal components, showing battery structure and wiring (no text or symbols)Hinweise:
text_image
Diagram of a TV network connection showing antenna, monitor, and cable connections with labeled ports and connectorstext_image
Diagram showing audio equipment connections with speakers, audio jack, and external ports labeled in Chinesenatural_image
Close-up of a black electronic device with a USB button and a rectangular slot (no text or symbols visible)Hinweise:
text_image
Stop recording MDR FERNSEHEN? Ja Noim_text_image
Stop recording? Rec1: [MDR FERNSEHEN] Rec2: [NDR FS NDS*] Rec1 Rec2 AbbrechenEXIT Media Player beenden
Bilder
LCN (Logical Channel Numbering)
text_image
PVR-Gerät einricht. USB Disk A: 74.53G bytes Volume: [uda1]NO NAME Total Size: 54.97G bytes Free Size: 25.05G bytes Rec Size: 25.05G bytes TMS Size: 0 bytes File System: FAT32text_image
DVR Set Disk Type < REC & TMS > OK AbbrechUSB und PVR
Formatieren
text_image
Format Disk Mode ← FAT → OK AbbrechAchtung
FREE TO CHOOSE INNOVATIONS
XORO®
HRT 8300
text_image
XORO HDT 100 HDMI® Time-Shift Function PVR Ready 20:00 USBUser's Manual (ENG)
| Safety Information | 4 |
| Recycling Informationen | 7 |
| Accessories & Standard Settings | 8 |
| C | o | n | t | r | o | l | E | l | e | m | e |
| Remote Control | 1 | 0 |
Connections
| TV | and | Antenna | 12 | |||||||
| H | I | - | F | I | s | y | s | t | e | m |
| USB | storage | 14 | ||||||||
| Initial | Installation | 15 |
Daily Operation
| Important buttons and their function | 16 |
Recorder
| Program | Timer | 19 | ||||
| R | e | c | o | r | d | |
| Time-Shift & List of recordings | 21 | |||||
USB Media Player
| Start | Media | Player | 22 | ||
| Image | 23 | ||||
| M | u | s | i | c | |
| Video | 25 | ||||
| Supported | Formats | 26 | |||
Settings
| Edit | Channel | List | 27 | |
| Installation | 30 | |||
| TV | System | 32 | ||
| Tools | und | Games | 35 | |
| USB | und | PVR | 36 |
| Trouble Shooting | 3 | 8 | |
| Specifications | 3 | 9 | |
| Limited Warranty |
Safty Information

text_image
DAUL I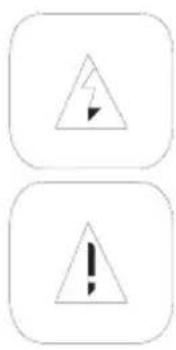
text_image
Two warning symbols: a triangle with a lightning bolt and an exclamation mark inside, both enclosed in rounded squares.The lightning flash with an arrowhead symbol within an equilateral triangle is intended to alert the user of the presence of un-insulated "dangerous voltage" within the product's enclosure that may be of sufficient magnitude to constitute a risk of electric shock to persons.
The exclamation point within an equilateral triangle is intended to alert the user of the presence of important operating and maintenance (servicing) instructions in the literature accompanying the appliance. This device complies with Part 15 of the FCC Rules. The FCC Rules are developed to avoid or reduce the interference of electrical devices at home. This device may cause radio wave. If it is not installed as instructed, it may cause. interference to radio or TV, especially at the moment of switching on and off.
User's Manual
- All the safety precautions and the operating instructions should be followed
- The safety and operating instructions should be retained for future reference.
Power supply
- Never touch the device with wet hands.
- This device works only with the storm voltage marked on the rear panel.
- Keep the appliance away from rain and moisture.
- If you want to pull the plug out of the plug socket, always pull directly on the plug. Never pull on the cable as it could tear.
- Make sure that the power cable is not bent, caught or run over and that it does not come into contact with heat sources.
- Make sure that the power cable is not wound around the device while in operation.
- Never place the machine on the power cable while it is being operated.
- Only use extension cables that are designed for the power consumption level of the machine.
- Only operate the machine if the electrical voltage stated on the type plate beneath the machine agrees with the voltage on your plug socket. The wrong voltage can destroy the machine.
- Do not open the appliance.
- Pull out the mains plug if the appliance is not to be used over a longer period of time.
- Take care that nobody can trip over the power supply cable.
Operation
- Reception of digital broadcast in SD through antenna (DVBT).
- Recording of DVB-T on USB storage.
- Playback of recorded files from USB storage.
- Playback of supported video, audio and photo files from USB storage.
Position
- Do not connect accessories on the box which are not defined by the manufacturer.
- Do not place this product on an unstable cart, stand, tripod, bracket, or table. The product may fall, causing serious injury to a child or adult, and serious damage to the product. Use only with a cart, stand, tripod, bracket, or table recommended by the manufacturer, or sold with the product. Any mounting of the product should follow the manufacturer's instructions, and should use a mounting accessory recommended by the manufacturer.
- A product and cart combination should be moved with care. Quick stops, excessive force, and uneven surfaces may cause the product and cart combination to overturn.
- The device is able to show a still image on the TV screen or monitor over an unlimited period of time. This can cause damage to the screen. It is therefore advisable to activate the screen saver. Or switch the player off, if the device is not in use.
- Do not use the device permanent in the 4:3 mode. This can cause damage to the TV screen.
- Do not increase the volume when the box is just playing very quiet sections. This cold damage the speaker if very loud passages starts all of a sudden after the quiet section.
- Switch the box off by the Off/On switch if it is not going to used for a longer period of time. Please unplug the power cable from the wall outlet.
- Disconnect the main plug during thunderstorms.
- Slots and openings in the cabinet are provided for ventilation and to ensure reliable operation of the product and to protect it from overheating, and these openings must not be blocked or covered.
- The openings should never be blocked by placing the product on a bed, sofa, rug, or other similar surface.
- This product should not be placed in a built-in installation such as a bookcase or rack unless proper ventilation is provided or the manufacturer's instructions have been adhered to.
- Protect the device against weather influences, moistures and high temperature.
- Never spill liquid of any kind on the product.
Do not expose the device and the remote control to direct sunlight
USB
Due to legal requirements of CE-conformity, the customer is asked to only connect USB-Sticks to the USB port.
Antenna
The receiver will be connected to an antenna
- Please shut down and unplug the receiver before you connect or disconnect the antenna. Otherwise there might be damage on the connected device.
- If you use the receiver with an outdoor antenna, please make sure that the antenna is grounded.
Defect
- Do not attempt to service this product yourself as opening or removing covers may expose you to dangerous voltage or other hazards. Refer to qualified service personnel.
- Refer to qualified service personnel under the following conditions:
a. When the power-supply cord or plug is damaged.
b. If liquid has been spilled, or objects have fallen into the product.
c. If the product has been exposed to rain or water.
d. If the product does not operate normally by following the operating instructions. Adjust only those controls that are covered by the operating instructions as an improper

natural_image
Illustration of a person sitting at a desk with a computer monitor, holding a pointer (no text or symbols present)adjustment of other controls may result in damage and will often require extensive work by a qualified technician to restore the product to its normal operation.
e. If the product has been dropped or damaged in any way.
- When the product exhibits a distinct change in performance this indicates a need for service.
- When replacement parts are required, be sure the service technician has used replacement parts specified by the manufacturer or have the same characteristics as the original part. Unauthorized substitutions may result in fire, electric shock, or other hazards.
- Nicotine can damage the electronic components. In case of service regarding too much nicotine, than the warranty/guarantee expired.
- Please read in the section Troubleshooting our service address and phone number.
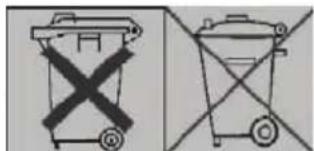
Recycling of electronic devices
This product is designed and manufactured with high quality materials and components which can be recycled and reused.
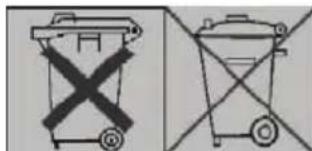
This symbol means that electrical and electronic equipment, at their end-of-life, should be disposed of separately from your household waste.
Please, dispose of this equipment at your local community waste collection/recycling centre. In the European Union there are separate collection systems for used electrical and electronic product. Please, help us to conserve the environment we live in!

natural_image
Symbol of a trash bin with crossed x and y axes, no text or labels presentRecycling of paper and carton
The material recycling symbol on the carton and user manual denotes that they are recyclable. Dispose them not with the normal household waste.

natural_image
Green recycling symbol with four chasing arrows forming a triangle (no text or labels)Recycling of plastic parts
The material recycling symbol on the plastic parts denotes that they are recyclable. Dispose them not with the normal household waste.

Green Dot
The “Grüne Punkt” denotes that the MAS Elektronik AG pays a duty to the "Society for Waste Prevention and Secondary Resource Generation".

natural_image
Circular icon with a green and yellow spiral design, resembling a refresh or recycling symbol (no text or symbols)Batteries
-
The batteries can be returned free of charge after use in the shop or in their immediate vicinity.
-
The consumer is legally obliged to return used batteries.
-
The icons on batteries are with one of the two following characters, consisting of a strikethrough trashcan and the chemical symbol of heavy metals decisive for classification as contaminant-laden.
-
Both symbols have the same meaning.
-
Batteries that contain pollutants are characterised by chemical symbols: Pb = battery contains lead, Cd = battery containing cadmium, Hg = battery contains mercury.
Every consumer is legally obliged to dispose these batteries at the collection point of his community or dealer for a environmental friendly disposal. We dispose used batteries for you free of charge and environmental friendly.
text_image
Diagram showing two types of waste sorting bins with crossed X marks, indicating no disposal or recycling.Accessories
• HRT 8300
- Remote control
- User's manual
Hinweise:
- Please use the receiver only with original accessories.
- Please contact your dealer without delay in case of missing accessories.
Standard Settings
OSD Language: German
Aspect Ratio: 16:9
Video output: HDMI (720p/50Hz), SCART (RGB, PAL)
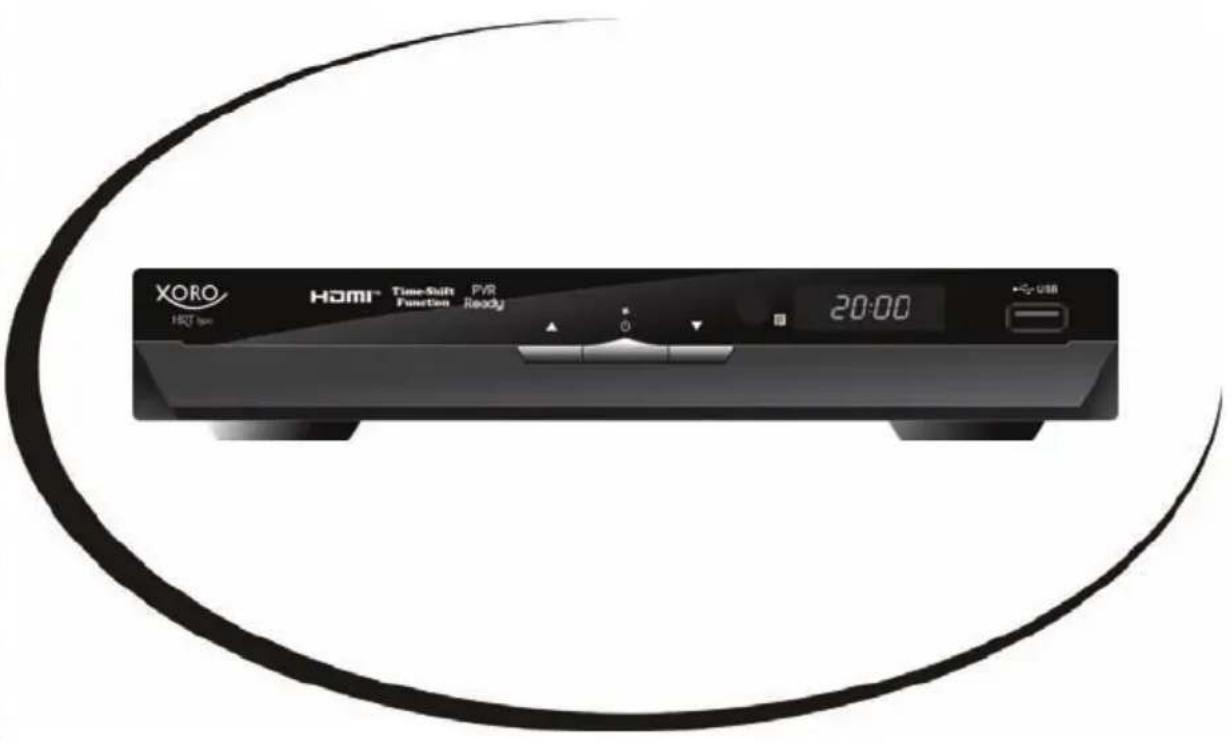
Front side

text_image
XORO HST bus HDMI® Time-Shift Function PVR Ready 20:00 USB 1 2 3 5 4 61) Go to next channel (CH+)
2) On/off (Standby, equivalent to the POWER-button on the remote control)
3) Go to previous channel (CH-)
4) Receiver of the remote control signal (IR)
5) LED-display (yellow): displays the program number if the receiver is on.
6) USB 2.0 port
Rear side
text_image
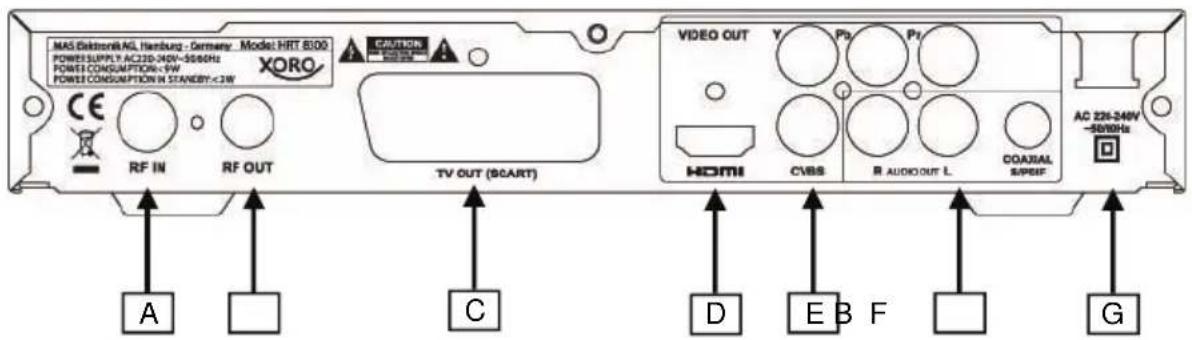
MAS Elektron® AG, Heisburg - Germany - Model HRT 6000 POWER SUPPLY AC230-34W-50/60Hz POWER CONSUMPTION: <5W POWER CONSUMPTION IN STANDRY: <2W CAUTIONS XORO RF IN RF OUT TV OUT (SCART) VIDEO OUT Y P1 P2 HDMI CVBS R AUDIOOUT L COAUSAL SPEER AC 228-24W -50/60Hz A C D E B F GA) Antenna input
B) Antenna output
C) SCART (output)
D) HDMI (output)
E) Analoge Video output (CVBS / YPbPr)
F) Audio output (analog R/L, digital S/PDIF, coaxial)
G) Power cord
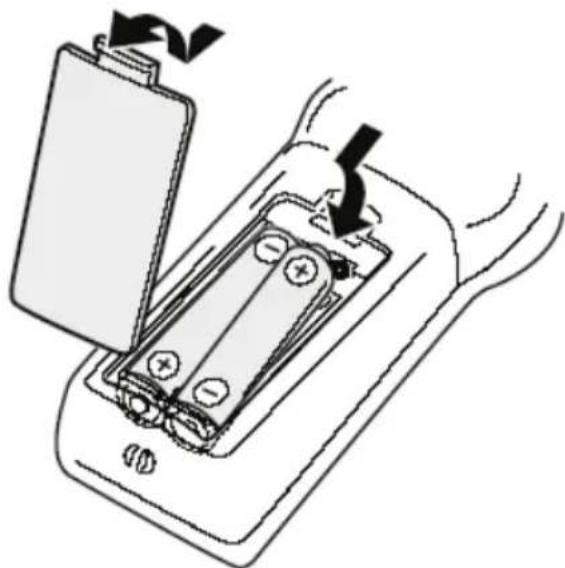
Insert Batteries and the functioning radius
- Insert the batteries by matching the (+) and (-) markings on the batteries to the markings inside the battery compartment.
- Close the compartment cover.
- Point the remote control directly at the IR window while pressing keys. Stay within 5 meter and angles of 60 degrees or less.
- Remove the batteries during storage or when you are not using the Setup Box for a long time.
natural_image
Diagram of a battery pack with arrows indicating charging direction (no text or symbols)Notes:
1 Remove old batteries to avoid possible leakage and damage on the remote control.
2 If battery leakage occurs, wipe out the liquid. Avoid skin contact with the leakage.
3 Seek medical advice if battery liquid has been swallowed.
4 In case the battery liquid comes to accidental contact with your eyes or skin, wash it out and seek medical advice.
text_image
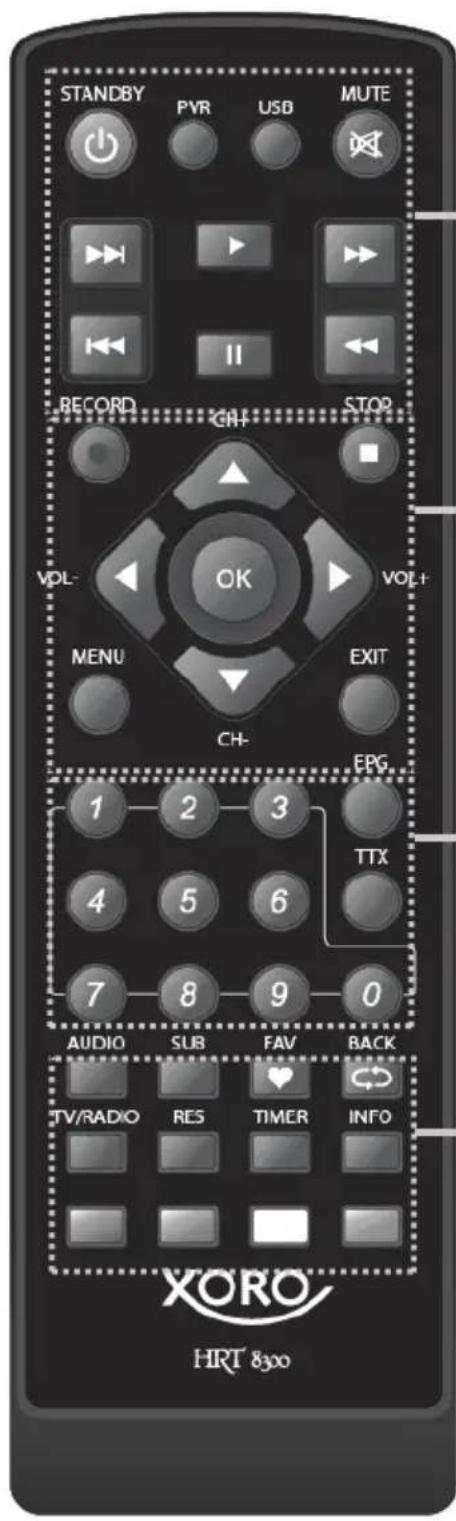
STANDBY PYR USB MUTE RECORD GH- STOP VOL- OK VOL+ MENU EXIT CH- EPG 1 2 3 TTX 4 5 6 7 8 9 0 AUDIO SUB FAV BACK TV/RADIO RES TIMER INFO XORO HRT 83001
Part 1
STAND BY (power on/off)
PVR (display recorded file)
USB (start media player, switch among music, videos, pictire etc.)
MUTE (sound on/off)
I◀◀ ▶▶▶ I (previous/next file)
▶ (start playback)
|| (pause)
◀◀ ▶▶ (fast forward /fast rewind)
Part 2
- RECORD (record)
CH+/CH- (channel switch, up/down on menu)
VOL+/VOL- (change volume, right/left on menu)
OK (confirm selection, display program list)
■ (Stopp playback)
MENU (open the main menu)
EXIT (quit menu, go to higher menu)
2
3
Part 3
Numerical buttons (0-9, number input)
EPG (display the Elektronic Programm Guide)
TTX (display Video text)
Part4
AUDIO (change sound track)
SUB (display subtitle)
FAV (display favourite list)
BACK (go to previous program)
TV/RADIO (switch between TV and Radio)
RES (change resolution by HDMI/YPbPr)
TIMER (open Timer-menu)
INFO (display Informationen)
ROT, GRÜN, GELB, BLAU (colour buttons)
Connection
To a TV and an antenna
General Information:
• Assure that the device is switched off and unplugged.
- Read the manual of your TV and note the safety instructions.
- Please establish an accurate connection.
Connection to a TV and an antenna
The connection of the HRT8300 to an antenna and a TV is illustrated below. There are many alternative ways of connecting a TV. Please read the manual of your TV to find the available jacks. If there are multiple jacks available, please choose the one with best quality according to the table below.
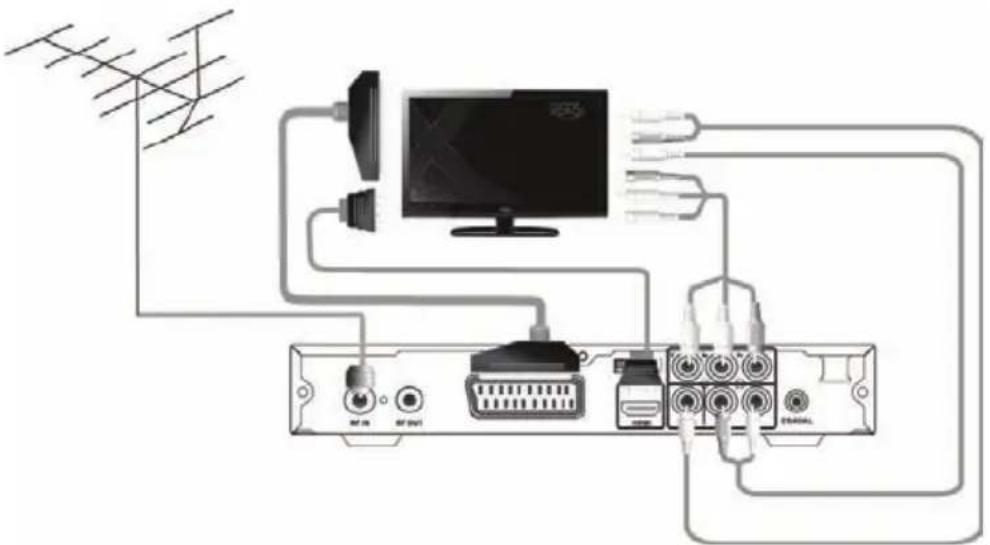
text_image
Diagram of a TV network connection showing antenna, monitor, and cable connections with labeled ports and connectorsNotes:
| Jack | Signal | Notes Quality | |
| HDMI | Picture and sound | Resolution setup: see page 32, HD resolution is not available, if „SCART RGB“ is selected at the setting of Video output | ★★★★ |
| YPbPr Only picture Resolution | tion setup: see page 32, requires separate cable for sound (Audio out), not available, if „SCART RGB“ is selected at the setting of Video output | ★★★ | |
| SCART | Picture and sound | In the factory default, RGB signal output is not active. See page 32. | ★★ |
| CVBS Only picture requires | separate cable for sound (Audio out) | ★ | |
The receiver can power an active antenna with 5V. It is described on page 31 how to activate this voltage.
The receiver has both analogue and digital audio output. An audio cinch cable is necessary for the analogue connection to a Hi-Fi system. This cable is not included in the accessories. Connect the AURIO R L out put with a free audio input of your Hi-Fi system. Please note, this receiver should not be connected with a PHONO Input. Please read the manual of your Hi-Fi system to activate the audio input.
If you connect the receiver with your TV via YPbPr or CVBS, please connect the AUDIO R L of the receiver with separate cables to the audio input of your TV. Otherwise there will be no sound.
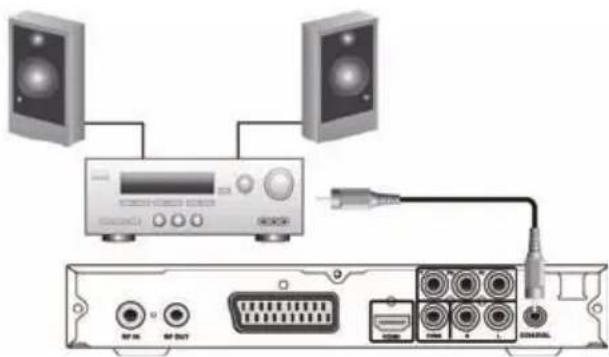
text_image
Diagram showing audio equipment connections with two speakers, a CD-ROM, and an RJ4208 port labeled with ports like NF-16, NF-DNT, and USB.A coaxial cable is necessary for the S/PDIF signals of the digital connection to a Hi-Fi system. This cable is not included in the accessories. Connect the S/PDIF out put of the receiver with the S/PDIF input of your Hi–Fi system. Please refer to the manual of the Hi-Fi system to select the audio input.
Notes:
The receiver could out put digital signals in PCM-(stereo) or RAW-/Bitstream (Dolby Digital). If your Hi-Fi system provides no sound for programs with Dolby Digital sound track, please refer to page 33 to change the format of the S/P DIF out put.
It is not possible for the receiver to output the format "dts".
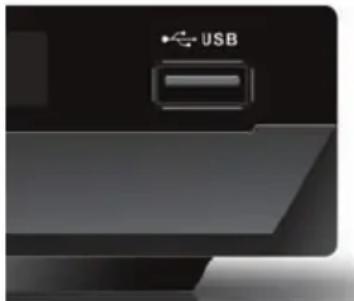
Connecting USB storage
The USB port is on the front side of the receiver. It takes the receiver under circumstances some time to recognize the USB showing the message "USB disk A is connected".
Following USB devices will be supported:
• USB storage (USB sticks etc.)
• Max. capacity 320 GB
- File system: FAT 16, FAT32, NTFS
Notes:
- USB Storage up to 320GB will be supported. USB storage of larger capacity could also be used. However the compatibility of these USB storages with the receiver could not be guaranteed.
natural_image
Close-up of a black electronic device with a USB button and a rectangular slot, no visible text or symbols.- There are a variety of USB storages on the market. Not all of them conform the specification of USB storage. If your USB storage could not be read by the receiver, please try another USB storage.
- If a USB device could not be read any more, please carry out a data storage medium analysis with your computer or format the storage again.
- USB storages requiring higher electric current than 500mA (0,5A) do not conform the specification of USB storage. These USB storages could possibly not work smoothly together with the receiver.
- Please always save all data on the USB before connection to the receiver.
- A sufficient writing and reading speed of the USB storage is necessary for recording HD programs or use the Time-Shift function. In case of problems in recording or Time-Shift, please try a USB storage with higher writing—and reading speed.
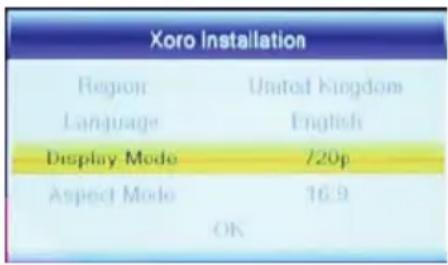
The XORO installation menu will be displayed by initial operation of the receiver. This menu contains five options:
- Region
- Language
- Display Mode
- Aspect Mode
- OK
Navigate with the arrow keys CH+ and CH− to high light the option and make the selection with the VOL− and VOL+ buttons.
text_image
Xoro Installation Region United Kingdom Language English Display Mode 720p Aspect Mode 16.9 OKRegion
Select the location where you use the receiver.
Language
Select the menu language.
In the english version of this user's manual, menu in English language is illustrated.
Dispay Mode
Press the OK button to display the list of available resolutions. Please select the resolution supported by your TV. If there is no live picture anymore after choosing a new resolution, please wait at least 30 seconds without pressing any button. The receiver switches back to the previous resolution.
After selecting successfully a new resolution, there appears a message „save video resolution?“ Choose „Yes“ with the ◀/▶ buttons and confirm with OK.
Áspect Ratio
Select an aspect ratio according to the screen format of your TV. Alternatives are 16:9, Auto, 4:3 LB & PS aus. Please refer to the details on page 32.
The settings of Display Mode and Aspect Ratio could be changed at any time after completion of the installation.
OK
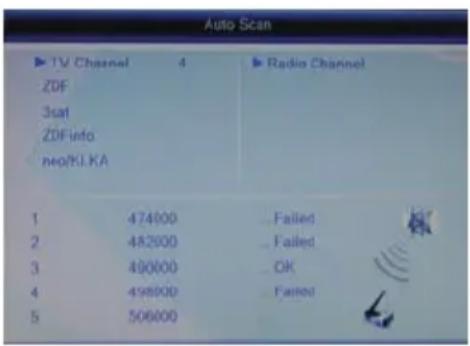
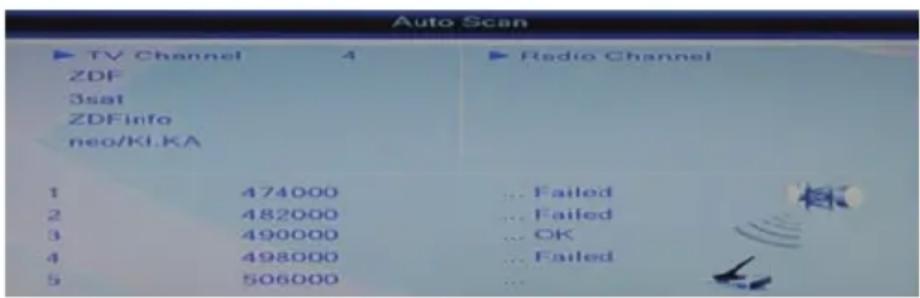
Start the channel scan with OK. The receiver shows progress of the channel scan. TV and Radio programs found will be saved.
Attention: In most of the regions in Germany, there is no DVBT Radio broadcast.
text_image
Auto Scan ▶ TV Channel 4 ZDF 3sat ZDFinfo neo/KI.KA ▶ Radio Channel 1 474000 Failed 2 482000 Failed 3 490000 OK 4 498000 Failed 5 506000Important Buttons and their Functions
Channel Switch
You can change channel with the CH+/CH- buttons. You can also input the channel number directly with the numerical buttons.
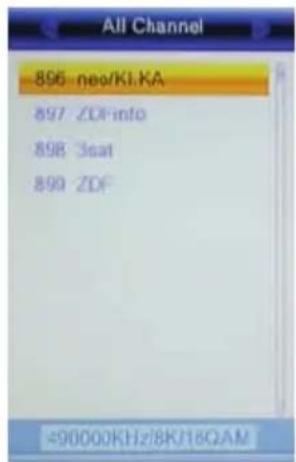
Channel List
Press the OK button to display the program list. Operation on the program list:
▲/▼ select channel OK access the chosen channel EXIT quit the list
text_image
All Channel 896 neo/KI.KA 897 ZDFinfo 898 Seat 899 ZDF =90000KHz/8K/16QAMTV/Radio
Press the TV/RADIO button to switch between TV and Radio programs.
Favorite
If you have defined favourite groups, press the FAV button on the remote control to access the list of favourite groups. Operation on this list:
FAV display the favorite list
▲/▼ select a favorite group, select a channel in a certain favorite group
◀/▶ switch among favorite groups
OK access the chosen channel
EXIT quit favorite list
Switch with the ◀/▶ buttons to „All Channel“ to return to the channel list.
Subtitle
Press SUB to enable subtitles, if the information is broadcasted. Select a language for the subtitle with ▲/▼ and confirm it with OK. To deactivate the "Subtitle language", choose OFF.
text_image
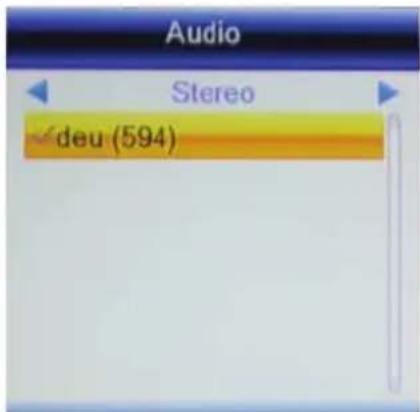
Audio Stereo deu (594)Important Buttons and their Function
Select Sound track/Language
If your TV has multiple sound tracks, you can make the selection with the Audio button.
Press the AUDIO button and select with the ▲/▼ buttons.
Teletext
You may use the number buttons 0-9 on the remote control for a direct entry of the wished page.
To quit the teletext page press EXIT.
Videotext
You can display the video text with the TTX button.
0 - 9 entry of the page number
◀/▶ switch among sub-pages
OK set the back ground transparent
EXIT quit video text
Mute
Press the MUTE button to switch off the tone. Press the MUTE button once more, the tone will be turned on again.
Change Volume
To increase or decrease the volume press the ◀/▶(VOL+/VOL-button.
If you output Dolby Digital as Bitstream (RAW) through HDMI or S/PDIF, the volume is not regulated by the receiver.
bar
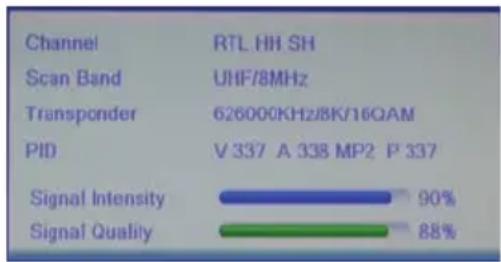
| Channel | Value | |---|---| | Scan Band | UHF/8MHz | | Transponder | 626000KHz/8K/16QAM | | PID | V 337 A 338 MP2 P 337 | | Signal Intensity | 90% | | Signal Quality | 88% |Information
You will have the access to various of information by pressing the INFO button once or a multiple of times.
Resolution
You can change resolution of the output through HDMI or YPbPr with the RES button.. Press the RES button repeatedly. The receiver needs possibly some time to recognize a new resolution. The button interaction should have an interval of a couple of seconds.
Notes:
If the video output SCART RGB is activated, there is only one resolution (576i) possible. See page 32
Important buttons and their Functions
Elektronic Program Guide (EPG)
Press the EPG button to display the program guide.
Layout of the EPG window
Titel Date and time

text_image
Upper left current program left channel list right program overviewOperation on the EPG
◀/▶ switch program
OK display detailed information on the chosen program
GRÜN open record timer for the chosen program (see also page 19)
▲/▼ previous/next program
I◀◀ ▶▶▶ I scrolls by the day
EXIT quit the EPG window

text_image
0883 RTL HH SH Verdachtfälle 14:00~15:00 03/11 14:30 15:00 15:30 16:00 0881 SRTL Zig A Kind of Fünf Freu Angelo! Sall 0882 RTL2 Hintorm S King Of King Of Q King Of Q 0883 RTL HH SH Verdacht. Familien im Brennpa Die Schul 0884 Channel 21/ 0885 DAS VIERT Dauerwer Dauerwer -1 Day -1 Day TimerTimer Recording
There are two ways of programming a recording with Timer.
- Choose the program to be recorded in EPG and press the GREEN button (see page 18). Program, date, and time will be taken over from the EPG.
- Press the button TIMER. Select an empty Timer ("Out") and press the OK button.
After all parameters on the Timer have been set, move the cursor with ▲/▼ to the field „save“ and confirm with OK.
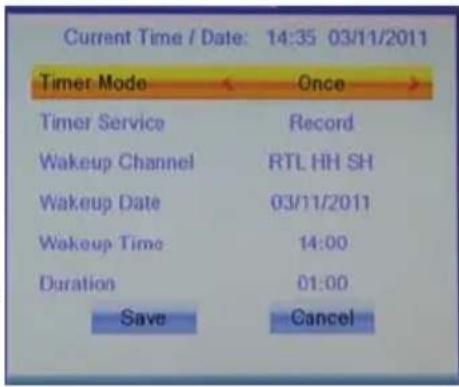
Example:
Once, Record, RTL HH SH, 03.11.2011, 14:00 to 15:00
Timer Mode: Once
Timer Service: Record
Wakeup Channel: RTL HH SH
Wakeup Date: 03/11/2011
Wakeup Tim: 14:00
Duration: 01:00
Notes:
To delete a Timer, set the Timer Mode to be „Out“ and move the cursor to the field „Save“ and confirm with OK. The timer is deleted.
text_image
Current Time / Date: 14:35 03/11/2011 Timer Mode Once Timer Service Record Wakeup Channel RTL HH SH Wakeup Date 03/11/2011 Wakeup Time 14:00 Duration 01:00 Save Cancel| Settings | Explanation |
| Timer Mode Once: | implement the timer onceDaily: implement the timer everydayMo-Fr: implement the timer on week days (Mo.-Fr.)Weekly: implement the timer every week |
| Timer Service Record | recording program on USB storageChannel: switch on the receiver at the given time |
| Wakeup Channel | Select the program to be recorded. You can display the channel list with the OK button. |
| Wakeup Date Choose | the date of Timer Implementation (TT/MM/JJJJ) |
| Wakeup Time Set the time of start | |
| Duration Set the duration of recording | |
Record
Press the RECORD button to record the current program. The receiver Stops the recording automatically after 2 hours. If you want to record a longer program, press RECORD once more to defin the duration of the recording. Confirm with RECORD. There will be a REC icon on the screen during the recording.
You can stop the recording by pressing the ■ button. The recording will be ended after the security query being confirmed.(◀/▶, OK).
The receiver is equipped with 2 receiving parts. You can switch program during the recording. You can also record the second program with RECORD. The receiver can record at most 2 programs at the same time.
If you press the STOP button during the recording, you will be asked which of the both recordings should be ended. Select the recording to be stopped with ◀/▶ and confirm with OK.
You can play back the recorded files during the recording. Press the INFO Taste twice to display the list of recorded files. Select the file to be played back with ▲/▼ and start the playback with OK.
Notes:
- You will have to connect a USB storage to the receiver for Recording, Timer Recording, and Time Shift. See page 14.
- You need to have a speedy USB storage for recording two programs simultaneously or playback one program during the recording of another. If the storage is too slow, it might cause picture disturbance or break-off.
- The receiver records program in the broadcasting format. The size of recorded files depends on the program quality.
- The receiver is equipped with two receiving parts and can record two programs separately. You have the possibility of switching to a third program during the recording of two live programs. For the two live recordings might have occupied both receiving parts of the receiver, not all channels might be available in this case. Press OK to display the list of available channels.
- If the function „Time-Shift“ and „Time-Shift-Record“ is activated (see page 37), the receiver records after pressing the RECORD button the whole program including the Time-Shift part. The record does not start from the part when the RECORD button is pressed.
Time-Shift
The Time-Shift function is not active in the factory default Mode. It is described on page 37 how to activate the Time-Shift function.
If the Time-Shift function is activated, the receiver saves temporarily the live program on USB storage.
Function of the buttons with activated Time Shift:
• II Stop the live program
- PLAY resume playback
• << / >> (fast rewind / forward)
- ■ Stop the playback
If you switch to another channel, the temporarily saved files will be discarded. You can press REC before the switch to start a normal recording, having the Time Shift files saved as recordings. (See page 37, Setting „Time-Shift Record“)
Notes:
• A sufficiently speedy USB storage is necessary for the Time-Shift.
- Program switch might take a little bit more time with activated Time-Shift. Employ in this case a more speedy storage. Disconnect the USB not in use or deactivate the Time-Shift function.
List of Recordings - Playback Recordings
Press the PVR button to show all recorded broadcasts. The PVR button has no function during recording. A simplified list of recorded files could be accessed during recording by pressing the INFO button twice.
▲/▼ Next/previous recording
ROT Rename the recording
GELB Delete a recorded file, confirm with OK
GRÜN Lock a recorded file, playback of this file requires a password (see page 33)
OK Playback of the chosen recording
During the playback
▶ Playback
|| Pause
■ Stop the playback and return to the list of recordings
<</> Fast rewind/forward
INFO Display information
Media Player
The USB media player plays back movie, photos, and music files. To access the media player, press the USB button. This button has no function during PVR recording.
text_image
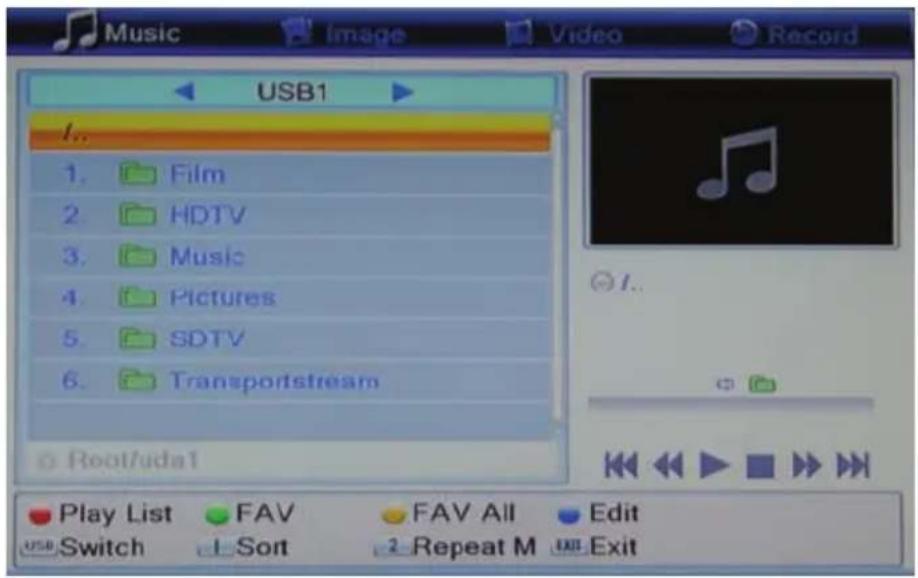
Music USB1 I.. 1. Film 2. HDTV 3. Music 4. Pictures 5. SDTV 6. Transportstream Root/uda1 Play List FAV FAV All Edit USB Switch Sort Repeat M ExitFunctions of the buttons in media player:
USB Switch among music, photo, video and recordings
▲/▼ Select file or folder
OK Playback a file/open a folder
BLAU Switch to the „edit“ mode. You can then delect, rename and copy files and folders and create new folders. Not all the functions are available for all files. Functions of the color buttons are shown on the screen. Press USB to quit this mode.
EXIT Quit the media player
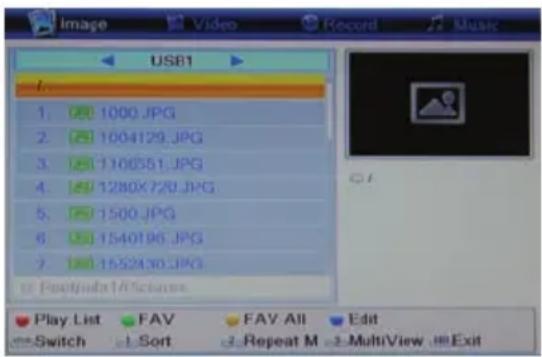
Image
Switch to view photos with the USB button: Availabe buttons:
▲/▼ Next/Previous folder or file
1 Sort the files according to Name/Time/Size/Fav
2 Set the display duration and repeat mode
3 Multi View: display the pictures in current folders in preview window
OK Display the chosen photo file
▲/▼
OK Display a photo or open a folder
Play (▶) Start slide show (all pictures in the directory)
RECALL Go to higher directory
GOTO Show pictures in preview window
EXIT Back to multimedia menu
text_image
USB1 1. 1000.JPG 2. 1004129.JPG 3. 1106551.JPG 4. 1280X720.JPG 5. 1500.JPG 6. 1540196.JPG 7. 1552430.JPG Play List FAV FAV All Edit Switch Sort Repeat M MultiView ExitStart the display with OK. Following functions are availbe:
▲ Display the next picture
▼ Display the previous picture
◀ Counter clockwise rotation 90°
▶ Clockwise rotation 90°
PAUSE Pause the playback
EXIT Stop the playback and return to the directory
Playback lilst
If you want to display a serial of pictures, you can compose a play list.
GREEN Add the chosen picture to the play list
YELLOW Add all pictures in the folder to the play list
RED Start displaying pictures on the play list
Supported Formats
It takes the media player much time to display pictures with maximal resolution. We recommend down scalling such pictures to resolutions suitable to TV (such as 1920x1080 pixel).
Music
Play Back
Switch to play music with the USB button.
Availabe buttons:
▲/▼ Next/Previous folder or file
1 Sort the files according to Name/Time/Size/Favorite
2 Set the display duration and repeat mode
OK Display the chosen music file
Start the display with OK. Following functions are availalbe:
| play the next music file
|<< play the previous music file
|| Pause
<< Fast rewind
Fast forward
■ Stop the play back
Playback lilst
If you want to display a serial of pictures, you can compose a play list.
GREEN Add the chosen picture to the play list
YELLOW Add all pictures in the folder to the play list
RED Start displaying pictures on the play list
Supported Formats
MP3, OGG
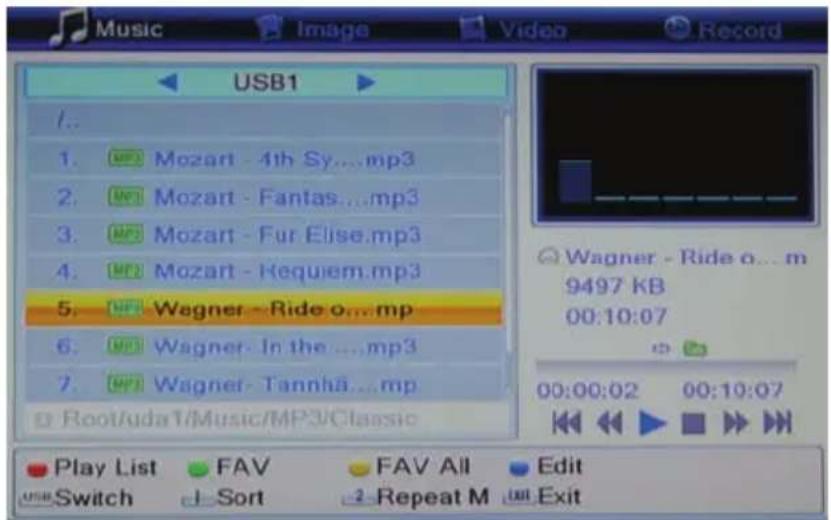
text_image
Music USB1 1.. 1. MP3 Mozart - 4th Sy...mp3 2. MP3 Mozart - Fantas...mp3 3. MP3 Mozart - Fur Elise.mp3 4. MP3 Mozart - Requiem.mp3 5. MP3 Wagner - Ride o...mp 6. MP3 Wagner - In the ...,mp3 7. MP3 Wagner - Tannhã...mp Play List FAV FAV All Edit USB Switch Sort Repeat M ExitVideo - Supported Formats
Wiedergabe
Switch to play back video with the USB button.
Availabe buttons:
▲/▼ Next/Previous folder or file
1 Sort the files according to Name/Time/Size.
OK Display the chosen video file
Start the play back with OK. Following functions are availalbe:
|| Pause
■ Stop the play back and return to the directory
<< Fast rewind
Fast forward
▲ Play the previous file
▼ Play the next file
AUDIO Change sound track
SUB Display/blank subtitle
INFO Display Information as play back progress/total file length/file name
Yellow Display chapter list (only for MKV files with chapters)
Supported Formats
There exit a variety of video-, audio formats, video containers and PC programs generating these files. It is possible that some video files are not supported. Though each part of the file is supported, a combination might not be played back.
- The table on the following page provides an overview on the supported container, formats, maximal resolution and the profiles.
- A variety of codics are supported. They will have to be generated according to the acknowledged standards. ISO/IEC 13818 applies for MPEG-2,ISO/IEC-14496 for MPEG-4
• Multiple sound tracks are supported in some certain video-containers.
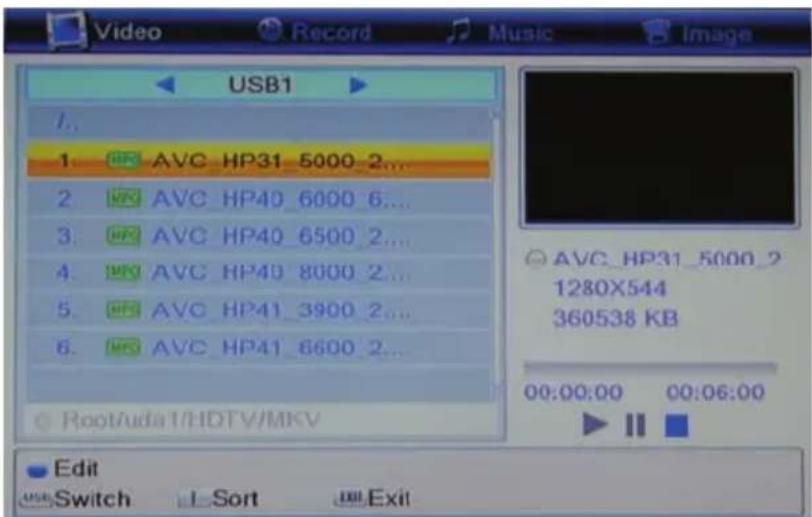
text_image
USB1 1. AVC HP31_5000_2... AVC HP40_6000_6... AVC HP40_6500_2... AVC HP40_8000_2... AVC HP41_3900_2... AVC HP41_6600_2... AVC HP31_5000_2 1280X544 360538 KB 00:00:00 00:06:00 Edit Switch Sort ExitSupported Formats
| TS | *.ts /*.tp/*.trp/*.m2t | |
| Video codec supported: MPEG1/ MPEG2 MP@HL/ H.264 HP@L4.1 | ||
| Maximal video resolution: 1920x1080x30 | ||
| Audio codec supported: MPEG layer 1/2, AC3, AAC | ||
| MPG | .mpg | |
| Video codec supported: MPEG1/ MPEG2 MP@HL | ||
| Maximal video resolution: 1920x1080x30 | ||
| Audio codec supported: MPEG layer 1/2, AC3 | ||
| MP4 | .mp4 | |
| Video codec supported: MPEG1/ MPEG2 MP@HL/MPEG4 SP@L3 to ASP@L5/H.264 HP@L4.1 | ||
| Maximal video resolution: 1920x1080x30 | ||
| Audio codec supported: MPEG layer 1/2, AC3, AAC | ||
| AVI | .avi | |
| Video codec supported: MPEG1/ MPEG2 MP@HL/MPEG4 SP@L3 to ASP@L5/ H.264 HP@L4.1 | ||
| Maximal video resolution: 1920x1080x30 | ||
| Audio codec supported: MPEG layer 1/2, AC3, AAC | ||
| MKV | .mkv | |
| Video codec supported: MPEG1/MPEG2 MP@HL/MPEG4 SP@L3 to ASP@L5/ H.264 HP@L4.1 | ||
| Maximal video resolution: 1920x1080x30 | ||
| Audio codec supported: MPEG layer 1/2, AC3, AAC | ||
Notes: GMC is not supported.
It subjects to mistakes and changes.
Main Menu
Press the MENU button to access the main menu. Sub-menu are:
- Edit Channel Lists
- Installation
- System Setup
- Tools
- Games
- USB und PVR
Press EXIT to quit a sub-menu and press EXIT once more to quit the main menu.
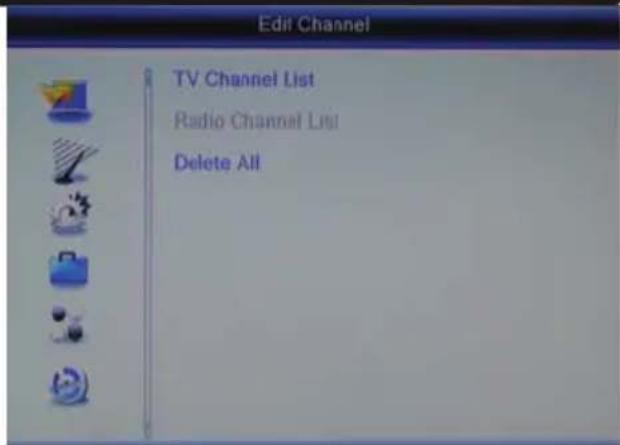
Edit Channel
The menu "Edit Channel" contains followig sub-menu: "TV Channel List", "Radio Channel List" and "Delete All".
TV Channel List
You can sort and edit the channels with this menu.
Following tools are available:
- Favorite
- Lock
- Skip
- Move
- Edit
Unter „Edit“ you have following possibilities:
- Sort
- Rename
- Delete
text_image
Edit Channel TV Channel List Radio Channel List Delete All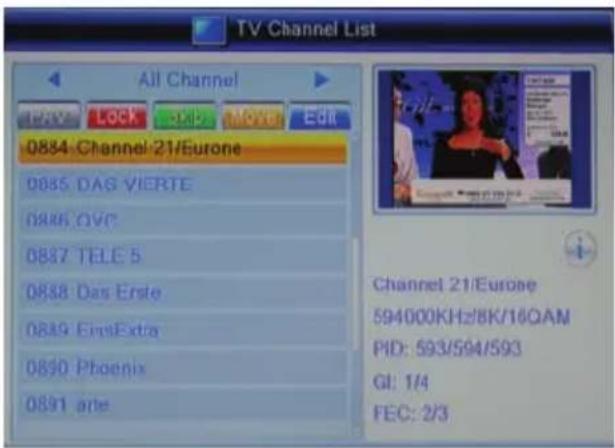
text_image
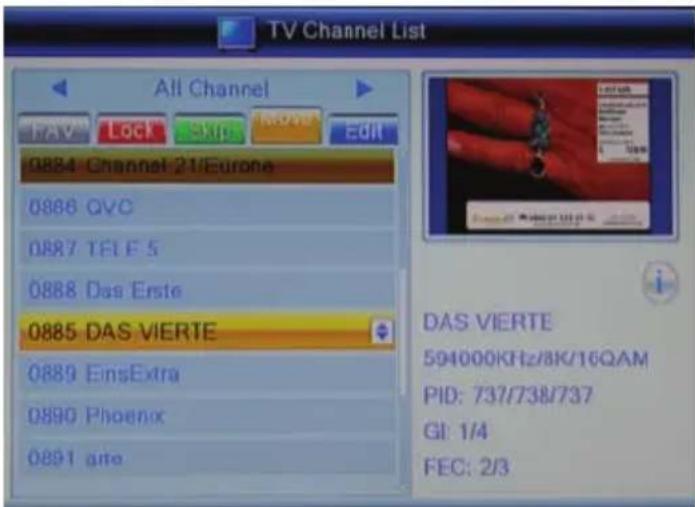
TV Channel List All Channel 0884 Channel 21/Eurone 0885 DAG VIERTE 0886 OVC 0887 TELE 5 0888 Das Erste 0889 EinaExtra 0890 Phoenix 0891 arte Channel 21/Eurone 594000KHz/8K/16QAM PID: 593/594/593 GI: 1/4 FEC: 2/3You can select the list to be edited (all Channel, Favorite, etc) with the ◀/▶ buttons. Changes will be saved at quitting the menu of channel editing.
Edit Channel
Favorite
You can define 8 favorite groups with the receiver. A channel can be categorized under one or multiple groups.
-Press the button FAV
-Select a program to be categorized and confirm with OK.
Select a corresponding favorite group with ▲/▼ and confirm with OK. Press the EXIT button.
-You can select further channels and compose favorite groups this way. After all channels to be defined are categorized, press the EXIT button.

text_image
TV Channel List All Channel Favorite Group 1 Favorite Group 2 Favorite Group 3 Favorite Group 4 Favorite Group 5 Favorite Group 6 Favorite Group 7 Favorite Group 8 DAS VIERTE 594000KHz/8K/16QAM PID: 737/738/737 GI: 1/4 FEC: 2/3Lock
-Press the RED button.
-Select a program to be locked and confirm with OK. You are asked to input Password. The standard password is 0000. Please refer to page 33 for changing the password.
After the entry of a correct password, the program is marked with a lock symbol.
-Press EXIT after all programs to be locked are marked with the lock symbol.
-You need to input the password for the access to the locked channels.
Skip
-Press the GREEN button. Select a program to be skipped with ▲/▼ and confirm with OK. The chosen channel is marked now with an arrow symbol. After all channels to be skipped are processed, press EXIT.
Notes:
- Channels marked with the arrow symbol will be skipped by channel switch with PR+/PR-/▲/▼
- You will have to input the channel number with the numerical buttons (0-9) to access these channels.
Edit Channel
Move
-Press the YELLOW button.
-Select a program to be moved and confirm with OK.
-The program is marked with a symbol with two arrows.
-You can bring the channel to a new place with the ▲/▼ button. Find a new place on the channel list and press OK.
-The channel takes the new position.
-After all programs to be moved have taken their new positions, press EXIT.
text_image
TV Channel List All Channel FAV Lock Skip MOVE EDIT 0884 Channel 21/Europe 0886 QVC 0887 TELE 5 0888 Das Erste 0885 DAS VIERTE 0889 EinsExtra 0890 Phoenix 0891 gate DAS VIERTE 594000KHz/8K/16QAM PID: 737/738/737 GI: 1/4 FEC: 2/3Edit
Press the BLUE button to sort, delete or rename channels.
Sort
This option sorts the channels according to Name(A-Z), NAME (Z-A), Free/Scramble/Lock.
Press the RED button and select a criterion with ▲/▼. Press OK and the channels will be sorted accordingly.
Rename
Press the GREEN button to rename a channel. Select the channel to be renamed with ▲/▼ and press OK. Input letters for the new name on the key board which now appears.
Function of the buttons on this key board:
YELLOW Capital letter/small type
RED Delete letter
BLUE Confirm and save the new name
EXIT Quit without saving the changes
You can quit the Rename mode with EXIT.
Edit Channel
Delete
Press the BLUE button.
Select a channel to be deleted and confirm with OK. The chosen channel is now marked with a cross. After all channels to be deleted are marked, press EXIT.
Confirm the security query with OK. The marked channels are deleted.
Radio Channel List
Operations on the Radio Channel List are the same as those on the TV Channel List.
Delete All
You can delete all TV and Radio channels here.
Choose this option and confirm with OK. After the security query has been confirmed, all TV and Radio channels will be deleted.
Press EXIT repeatedly to quit the set up menu.
Installation
Auto Scan
The Auto Scan searches TV and Radio programs on all availalbe frequencies.
The option „FTA only“ (Free to Air only) decides whether only free to air programs or also encrypted programs will be scanned. The receiver could not receive Pay-TV programs. We recommend search FTA only. You get in this way a shorter program list.
Move the cursor with ▲/▼ to „Search“ and press OK to start the scan. If you have already loaded a channel list, you are now asked if you really want to delet these channels.
Notes:
- If the receiver could not receive all programs available, adjust your antenna. The most receiving problems could be solved by a powerful antenna. Please get yourself informed on a suitable antenna.
- If the antenna relies on power supply of the receiver, please set it up on the menu Aerial Adjustment. (See Page 31)
text_image
Auto Scan ▶ TV Channel 4 ZDF 3sat ZDFinfo neo/KI.KA ▶ Radio Channel 1 474000 ... Failed 2 482000 ... Failed 3 490000 ... OK 4 498000 ... Failed 5 506000 ...Installation
Channel Scan
If you want to search programs on a certain channel or frequency, please choose Channel Scan.
| Seach By Channel By Frequency | ||
| Scan Band | Choose the band (UHF/VHF) in which the programs are broadcasted. | - |
| Ch No. Choose the channel to be searched. | - | |
| Frequency - | Input the frequency to be searched. | |
| Bandwidth - | Choose the bandwidth of the | broadcaster. |
You can judge from the bars on bottom of the page showing signal intensity and quality whether there is broadcast on the chosen channel and frequency.
Move the cursor with ▲/▼ to „Search“ and press OK to start the scan.
Aerial Adjustment
Ch. No.
Select a channel number. The signal intensity and quality will be displayed. This helps to orientate the antenna.
DVB-T Ant. +5V
If the antenna relies on the power supply of the receiver, selet „On“. Otherwise this option will have to remain „Off“.
LCN (Logical Channel Numbering)
If the LCN is activated, the programs will be sorted according to criteria of the broadcasters during the scan.
LCN is not available in Germany. Please keep this option „Off“.
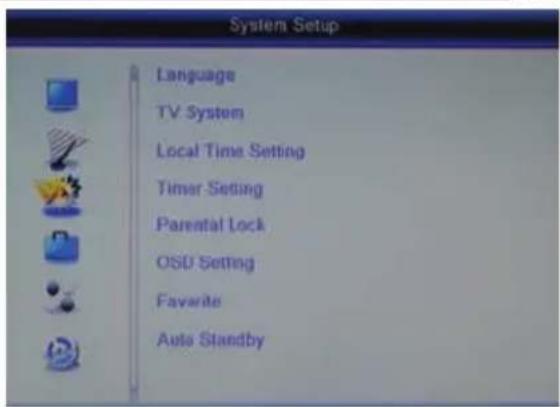
System Setup
Language
You can set up with this menu language of the receiver.
Language
Here you can define the OSD language.
First/second Audio
Languages to be spoken are set at these options.
Subtitle language
You can set here in which language should the subtitle be displayed.
text_image
System Setup Language TV System Local Time Setting Timer Setting Parental Lock OSU Setting Favorite Auto StandbySubtitle Display
Select „On“ here to have DVB-T subtitle automatically displayed if available.
Teletext
Teletext language is defined here.
TV System
This menu contains the settings for Video Resolution, Aspect Mode, Video Output, Digital Audio Output.
Video Resolution
You can set here the resolution for output via HDMI and YPbpr.
Notes: Select "HDMI/YPbPr" at the option Video Output to be able to choose HD resolution. You can also change the resolution during live programs with the RES button.
Aspect Mode
Please note the Aspect Ratio of your TV and make the selection here accordingly. The options are AUTO, 16:9, 4:3 PS und 4:3 LB.
Video Output
Select the option "SCART RGB" to output RGB-Signals via SCART. YPbPr and HD Resolution via HDMI will not be available.
If you would like to use the HDMI and YPbPr output, please select "HDMI/YPbPr" here.
TV System
Digital Audio Output
You can define here the format of audio signals at SPDIF (COAX) and /or HDMI output.
• LPCM Out: Digital audio output
- BS Out: Bitstream- or RAW-output. Please take this option if you connect a device with a decoder for surround sound to HDMI or digital Audio Output. If there is no sound via
HDMI, please choose here LPCM Out.
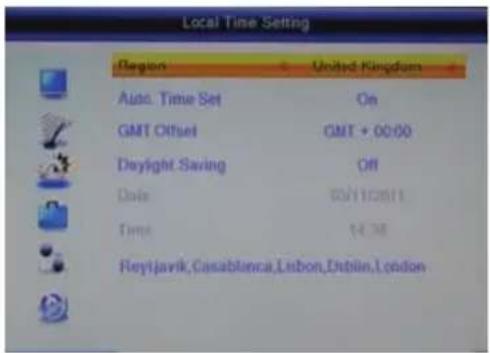
Date and Time
You can set the time with this menu.
Region
Select the region where you use this receiver.
Auto. Time set
We recommend „on“ to have time and date set automati-
cally. The receiver takes over the time transmitted by the broadcaster.
text_image
Local Time Setting Region United Kingdom Auto. Time Set On GMT Offset GMT + 00:00 Daylight Saving Off Date 00/11/2011 Time 14:38 Reyjavik, Casablanca, Lisbon, Dublin, LondonGMT Offset
The Time Zone will have to be set correctly so that the receiver could calculate the local time properly.
Select GMT +1 for Germany.
Daylight Saving
The receiver could not automatically switch from Winter time to Summer time. At the beginn of the Summer Time, please set the it „on“.
Date und Time
If the Auto. Time Set is given as „off“, you can set the date and time here manually.
Timer Setting
See page 19.
Parental Lock
To access this menu you need a password. The original password is 0 0 0 0.
Menu Lock
You can lock the settings with „on“here. No changes could then be made on the menu without a correct entry of the password.
Channel Lock
You can define here which program will only be displayed after a correct entry of the password.
Note: Information on the age limit of a DVB program is not broadcasted in some regions.
Parental Lock
New Password
You can change the password here. Type in your new password and repeat it at "Confirm Password". The new password is then active.
OSD Setting
OSD Transparency
You can define here how transparent the OSD menu should be.
Favorite
You can rename the pre-defined 8 favorite groups here.
Select the favorite group to be renamed and press OK. A screen key board will be displayed. Input the new name and confirm with the BLUE button.
To switch between capital letters and small type press the YELLOW button. You can delete letters with the RED button.
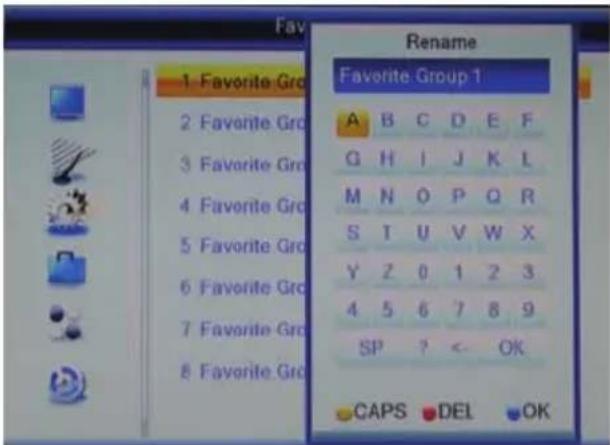
text_image
Fav Rename 1 Favorite Group 2 Favorite Group 3 Favorite Group 4 Favorite Group 5 Favorite Group 6 Favorite Group 7 Favorite Group 8 Favorite Group Favorite Group 1 A B C D E F G H I J K L M N O P Q R S T U V W X Y Z 0 1 2 3 4 5 6 7 8 9 SP ? < OK CAPS DEL OKAuto Standby
To save energy according the the EU Regulation (EuP), the receiver switches off after 3 hours without user interaction (such as pressing the buttons etc.) There will be a message on the screen informing you about the switch off shortly before it happens.
Tools
The menu „Tools“ contains following options:
- Information
- Load Factory Setting
- Upgrade by USB
- Remove USB device sately
Information
Here you have the access to information on the software and the hardware.
Load Factory Setting
You can cancel all settings and changes by restoring the factory default. Choose this option, input the password and confirm the security query.
Upgrade by USB
If an update is necessary, the update software and the update instruction are to be found on www.xoro.de.
Remove USB device safely
Please log off a connected USB storage here before you remove it from the receiver.
Games
- Othelle
- Sudoku
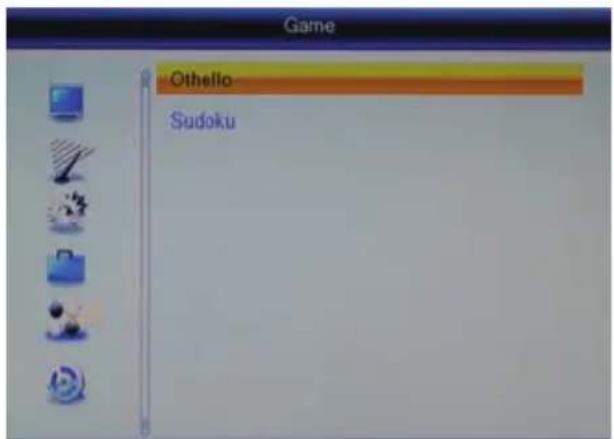
text_image
Game Othello SudokuUSB and PVR
This menu contains following options:
• Media Player
- HDD Information
- PVR Setting
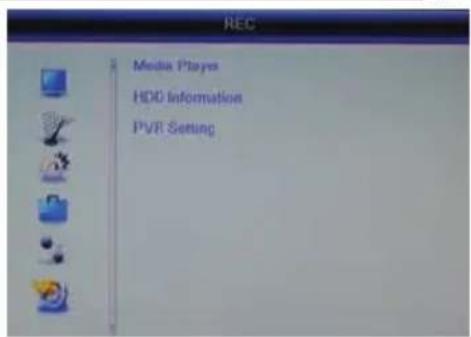
text_image
REC Media Players HDD Information PVR SettingMedia Player
See page 22
HDD Information
If the USB storage has multiple partitions, you can define here which partition should be employed for the recording. You can also format the USB storage and the partitions with this menu.
Set Recording Partition
- If the USB storage has multiple partitions, select with ◀/▶ which partition should be employed for the recording.
- Press the BLUE button.
- The DVR Set window appears. Select with the ◀/▶ buttons whether the chosen partition should be employed for both recording and Time Shift (REC & TMS; recommended) or only for Recording (Record) or Time Shift (Timeshift).
• After the DVR set is defined, move the cursor to OK and confirm the setting.

text_image
HDD Information USB Disk A: 74.53G bytes Format Disk Mode: FAT OK Cancel Rec Size: 25,000 bytes TMS Size: 0 bytes File System: FAT32USB and PVR
Format
- If the USB storage has multiple partitions, select with ◀/▶ which partition should be formatted.
- Press the YELLOW button.
- The window „Format „ appears.
- Select with ◀/▶ the file system.
- Move the cursor with ▼ to „OK“
• Confirm the setting with the OK button
Attention
All files and directories will be lost during the formatting process. Please do not format a storage with important information.
Notes: The file system FAT 32 is fast compatible with all computer and home entertainment products. However the maximal file size is limited to be 4GB. Data storage medium larger than 32 GB is used inefficiently by FAT 32.
NTFS might not be recognized by some operating systems and home entertainment products. There is no limit of 4GB on file size.
PVR Setting
Time-Shift
You can activate/deactivate the Time Shift function with this menu.
Time-Shift to Record
You can define here when to start the recording by pressing the RECORD button with activated Time Shift function.
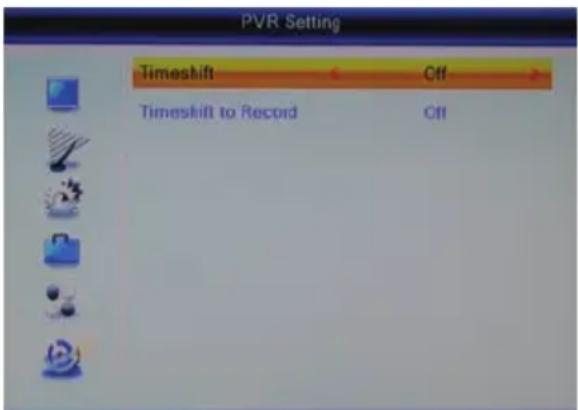
text_image
PVR Setting Timeshift Off Timeshift to Record OffOn The whole content recorded under Time Shift will
be taken over as recordings and the recording goes on after the RECORD button is pressed.
Off The recording starts upon pressing RECORD with activated Time Shift function. The context recorded under Time Shift will not be saved.
See also page 21.
Please check the following guide on solving possible problems before contacting service. Technical Support of Xoro/MAS:
| Symptom | Correction |
| No DVB-T reception /serious distortion bymosaics or artefacts/freeze pictures | No DVB-T reception in your region.Adjust the antenna.Turn on the power supply for the antenna. (page 31)Retry the Auto Scan.Buy a more powerful antenna |
| No picture / no colourfulpictures | Control the connection to the TV set.Control the setting in video output (page 32, RESbutton Page 11, 17)TV channel or program is scrambled |
| Remote control does notwork | Change the batteries.Operate within normal range (max. 5 meters, 30°)The sensor is pointed to by bright light. |
| No sound | Cancel Mute. PressMUTEbuttonIncrease volume. PressVOL+buttonPay attention to connection to TV set or amplifier.Note page 33 for the setting of digital audio output |
| No Recording | No USB memory are connected.No free space on the storage.The USB storage is too slow. |
| Recording starts timelybefote pressing theRecordbutton | Set the function “Timeshift Record” “off”. See page 21,37. |
| USB storage is notaccepted | See page 14, USB connection |
| The receiver showswrong time | Note page 14, Time Zone Setting |
| The receiver switches offafter 3 hours | See page 34, Auto Standby |
| Picture is too small ordistorted | See page 32, Aspect Mode |
General data
Power supply AC 100-240 V with 50/60Hz
Power Consumption < 9 Watts / < 2 Watt in Stand-By
Dimensions 235 x 127 x 36 mm
Weight 0,65kg (with Remote control)
Chipset Ali M3606A, 128MByte DDR II RAM
TWIN TV-Tuner
Input Frequency 174-230 MHz, 470-862MHz
Band width 7 or 8 MHz
Impedance 75 W
Waveform QPSK, 16QAM, 64 QAM
OFDM Spectrum 2K and 8K
Video
Standard MPEG-2 MP@HL, AVC/H.264 HP@L4.1, MPEG4 ASP
Aspect Ratio 4:3 / 16:9
Audio
Standard SO/IEC 11172 Layer I & II,
Sampling Frequency 32, 44.1 & 48 kHz
Connections
Video HDMI, SCART(RGB), Video (FBAS), YPbPr
Audio Digital (S/PDIF coaxial), Stereo (analogue/Cinch)
USB 2x USB 2.0 High Speed
Others Antenna input/output (IEC)
Operating conditions
Temperature 0 - 40°C
Humidity 5 - 90% (non condensing)
Note:
Specifications are subject to changes.
In case the products delivered are not free from defects in material or workmanship, MAS Elektronik AG has the right to either repair or replace the defective product at its choice. MAS Elektronik AG manufactures and repairs goods using components which are new or equivalent to new in accordance with industry standards and practice. The warranty for wearing parts (e.g. rechargeable batteries) is limited to 6 months.

text_image
Technically unlimited MAS Elektronik AGIn case the device is equipped with internal data storage (e.g. hard disc drive, Flash drive), the customer is responsible to backup his data before sending the device. MAS Elektronik AG is not liable for any data loss on returned devices. MAS Elektronik AG reserves the right to reset returned devices to factory defaults. Please note your personal settings for this reason.
MAS Elektronik AG is not liable for any accessories not belonging to original package content such as DVDs, hard disc drives, Flash storage devices, batteries, etc.
This limited warranty covers the warranty requirements set by authorities in your country.
This limited warranty only is valid in the coThis limited warranty does not cover finishes, accessories or batteries, nor does it cover damage resulting from accident, misuse, abuse, dirt, water, battery leakage, tampering, servicing performed or attempted by unauthorized service agencies. This limited warranty does not cover damages resulting from firmware upgrades. Only in case of firmware upgrades needed to add functions promised at time of purchase, such damages are covered by this limited warranty. For a correct and frictionless completion of warranty or repairs you need a RMA No. You may obtain a RMA on the internet at www.mas.de/FAQ or by telephone.
Please send the device in its original packing material, all standard accessories and a copy of the invoice, a description of defect and the RMA No. to following address. Please note the RMA number clear and in large numbers on the outer package.
MAS Elektronik AG
Pollhornbogen 19
21107 Hamburg
Germany
Support
e-mail: support@ersservice.de
Hotline: +49 (0) 40 - 77 11 09 - 17
Fax: +49 (0) 40 - 76 73 35 - 15
untry the product was purchased.
FREE TO CHOOSE INNOVATIONS
XORO®
HRT 8300

text_image
XORO HDT 100 HDMI® Time-Shift Function PVR Ready 20:00 USBMode d'emploi (FR)
text_image
Two warning symbols: a triangle with a lightning bolt and an exclamation mark inside, both enclosed in rounded squares.natural_image
Cartoon illustration of a man sitting at a desk with a TV, holding a pointer (no text or symbols present)natural_image
Symbol of a trash bin with crossed lines indicating no waste or discharge, and a solid black rectangle below (no text or labels)natural_image
Green recycling symbol with four chasing arrows forming a triangle (no text or labels)natural_image
Circular green and yellow circular icon with a curved arrow, resembling a refresh or recycling symbol (no text or symbols)Batteries
text_image
Diagram showing two types of waste sorting symbols: one with a cross symbol and the other without, both crossed out by a shared weight.natural_image
Diagram of a battery charging mechanism showing battery discharge and circuit break (no text or symbols)Notes:
text_image
Diagram of a TV network connection showing antenna, monitor, and cable connections with labeled portsNotes:
text_image
Diagram showing audio equipment connections with speakers, a CD-ROM, and an RJ4208 devicenatural_image
Close-up of a black electronic device with a USB button and a rectangular slot, no visible text or symbols.Notes:
text_image
Xoro Installation Region United Kingdom Language English Display Mode 720p Aspect Mode 16:0 OKRégion
text_image
Auto Scan ▶ TV Channel 4 ZDF 3sat ZDFinfo neo@KI.KA ▶ Radio Channel 1 474000 Failed 2 482000 Failed 3 490000 Ok 4 498000 Failed 5 506000bar
| Channel | Value | |---|---| | Scan Band | UHF/8MHz | | Transponder | 626000KHz/8K/16QAM | | PID | V 337 A 338 MP2 P 337 | | Signal Intensity | 90% | | Signal Quality | 88% |Résolution
text_image
Current Time / Date: 14:35 03/11/2011 Timer Mode Once Timer Service Record Wakeup Channel RTL HH SH Wakeup Date 03/11/2011 Wakeup Time 14:00 Duration 01:00 Save Canceltext_image
Edit Channel TV Channel List Radio Channel List Delete All
text_image
TV Channel List All Channel 0884 Channel 21/Eurone 0885 DAG VIERTE 0886 OVC 0887 TELE 5 0888 Das Erste 0889 EinaExtra 0890 Phoenix 0891 arte Channel 21/Eurone 594000KHz/8K/16QAM PID: 593/594/593 GI: 1/4 FEC: 2/3text_image
TV Channel List All Channel Favorite Group 1 Favorite Group 2 Favorite Group 3 Favorite Group 4 Favorite Group 5 Favorite Group 6 Favorite Group 7 Favorite Group 8 DAS VIERTE 594000KHz/8K/16QAM PID: 737/738/737 GI: 1/4 FEC: 2/3Verrouiller
text_image
System Setup Language TV System Local Time Setting Timer Setting Parental Lock OSD Setting Favorite Auto StandbyLangue sous-titres
text_image
REC Media Players HDD Information PVR SettingLecteur multimédia
Voir page 22.
Information disque
text_image
HDD Information USB Disk A: 74.53G bytes Format Disk Mode: FAT OK Cancel Rec Size: 25.03G bytes TMS Size: 0 bytes File System: FAT32text_image
PVR Setting Timeshift Off Timeshift to Record OffStandard SO/IEC 11172 Layer I & II,
FREE TO CHOOSE INNOVATIONS
XORO®
HRT 8300
text_image
XORO H2O 1098 HDMI® Time-Shift Function PVR Ready 20:00 USBtext_image
Two warning symbols: a triangle with a downward arrow and an exclamation mark inside, both enclosed in rounded squares.natural_image
Cartoon illustration of a man sitting at a desk with a TV, holding a pointer (no text or symbols present)natural_image
Simple line drawing of a trash bin with crossed x- and y-axes, no text or symbols present.natural_image
Green recycling symbol with three chasing arrows forming a triangle (no text or labels)Green Dot ( Punto Verde)
natural_image
Circular icon with a green and yellow curved arrow design, no text or symbols present.text_image
Diagram showing two types of waste sorting icons: one with a 'X' symbol and the other without, both crossed out by diagonal lines.Accesorios
natural_image
Diagram of a battery charging mechanism showing battery discharge and circuit break (no text or symbols)notas:
text_image
Diagram showing connections between a TV cable, audio equipment, and antenna cables with labeled components.text_image
Diagram showing audio equipment connections with speakers, a CD-ROM, and an audio jack labeled 'CD-ROM'natural_image
Close-up of a black electronic device with a USB button and a rectangular slot, no visible text or symbols.notas:
text_image
Xoro Installation Region United Kingdom Language English Display Mode 720p Aspect Mode 16.9 OKbar
| Channel | Value (%) | |---|---| | Scan Band | UHF/8MHz | | Transponder | 626000KHz/8K/16QAM | | PID | V 337 A 338 MP2 P 337 | | Signal Intensity | 90 | | Signal Quality | 88 |notas:
text_image
Current Time / Date: 14:35 03/11/2011 Timer Mode Once Timer Service Record Wakeup Channel RTL HH SH Wakeup Date 03/11/2011 Wakeup Time 14:00 Duration 01:00 Save Canceltext_image
Edit Channel TV Channel List Radio Channel List Delete All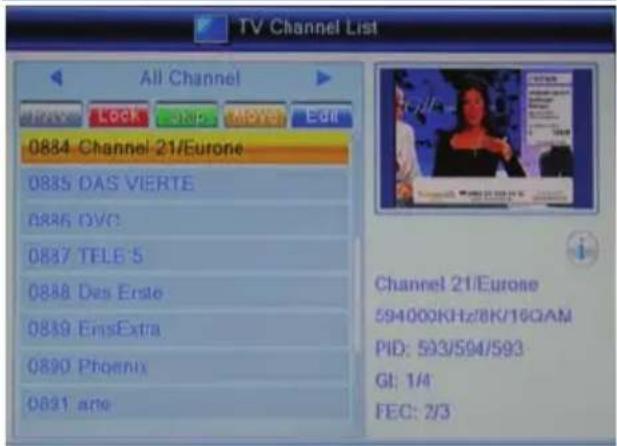
text_image
TV Channel List All Channel 0884 Channel 21/Eurone 0885 DAS VIERTE 0886 OVC 0887 TELE 5 0888 Des Erste 0889 EinsExtra 0890 Phoenix 0891 arte Channel 21/Eurone 594000KHz/8K/16GAM PID: 593/594/593 GI: 1/4 FEC: 2/3text_image
TV Channel List All Channel Favorite Group 1 Favorite Group 2 Favorite Group 3 Favorite Group 4 Favorite Group 5 Favorite Group 6 Favorite Group 7 Favorite Group 8 DAS VIERTE 594000KHz/8K/16QAM PID: 737/738/737 GI: 1/4 FEC: 2/3cerradura
text_image
System Setup Language TV System Local Time Setting Timer Setting Parental Lock OSU Setting Favorite Auto Standbytext_image
REC Media Players HDD Information PVR Settingtext_image
HDD Information USB Disk A: 74.53G bytes Format Disk Mode: FAT OK Cancel Rec Size: 25.03G bytes TMS Size: 0 bytes File System: FAT32text_image
PVR Setting Timeshift Off Timeshift to Record OffMPEG-2 MP @ HL, HP@L4.1 AVC/H.264, MPEG-4 ASP
FREE TO CHOOSE INNOVATIONS

text_image
XORO®XORO by MAS Elektronik AG
Pollhornbogen 19
21107 Hamburg
Deutschland
Tel: +49(040) 77 11 09 17
Fax: + 49(040) 76 73 35 15
xoro@mas.de
www.xoro.de

natural_image
Green recycling symbol with three chasing arrows forming a triangle (no text or labels)DE V2
ENG V1
FR V1
ESP V1
FS: 12345