
HRK 8740 CI+ - Receiver XORO - Free user manual and instructions
Find the device manual for free HRK 8740 CI+ XORO in PDF.


| Product Type | Digital Satellite Receiver |
| Brand | Xoro |
| Model | HRK 8740 CI+ |
| Tuner Type | DVB-S2 |
| Number of Tuners | 1 |
| CI+ Slot | Yes (1x) |
| HDMI Output | Yes (1x) |
| USB Ports | Yes (1x USB 2.0) |
| Video Resolution | Up to 1080p |
| Audio Decoding | MPEG-1/2/4, Dolby Digital |
| Power Supply | 12V DC, 1A |
| Power Consumption | <15W (typical) |
| Dimensions (W x D x H) | 180 x 120 x 40 mm |
| Net Weight | 0.5 kg |
| Remote Control | Included |
| Supported Satellites | Astra, Hotbird, etc. |
| Channel Storage | Up to 4000 channels |
| EPG | Yes (7-day) |
| Timeshift | Yes (via USB) |
| Recording | Yes (to USB) |
| Parental Lock | Yes |
| OSD Language | Multilingual |
| Automatic Channel Search | Yes |
| DiSEqC | 1.0/1.1/1.2 |
| LNB Power | 13/18V, 500mA max |
| Standby Power | <1W |
| Maintenance | Clean with dry cloth; keep ventilated. |
| Safety | Protect from moisture; use specified power adapter. |
| Spare Parts | Remote control, power adapter available. |
Frequently Asked Questions - HRK 8740 CI+ XORO
User questions about HRK 8740 CI+ XORO
0 question about this device. Answer the ones you know or ask your own.
Ask a new question about this device
Download the instructions for your Receiver in PDF format for free! Find your manual HRK 8740 CI+ - XORO and take your electronic device back in hand. On this page are published all the documents necessary for the use of your device. HRK 8740 CI+ by XORO.
USER MANUAL HRK 8740 CI+ XORO
FREE TO CHOOSE INNOVATIONS
XORO®
HRK 8740 Cl+ HRK 8750 Cl+ v2

natural_image
Black digital signal device with '6000' display and ports, shown against a white background (no text or symbols on the device itself)Bedienungsanleitung
User's Manual
natural_image
Cartoon illustration of a distressed scene with a large character on a computer monitor and a small figure running away, no text or symbols present.
natural_image
Cartoon illustration of a person using a device to interact with a device, no text or symbols present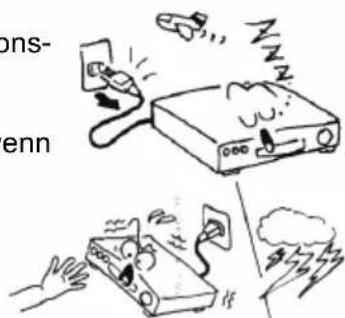

natural_image
Illustration of a cable being compressed to a monitor, with lightning bolts indicating electrical hazard (no text or symbols present)USB Anschluss
natural_image
Illustration showing a person holding a monitor, a prohibition symbol, and a chair with a TV on a table (no text or symbols present)
natural_image
Cartoon illustration of a steaming device with a distressed face (no text or symbols)
Servicefall
natural_image
Cartoon illustration of a man sitting at a desk watching a television (no text or symbols present)Energie sparen
natural_image
Three technical diagrams showing mechanical or electrical components with directional arrows, no text or symbols present.natural_image
Digital printer with digital clock showing 8:00, no visible text or symbols on the device itselfHinweise:

USB Anschlüsse
Standard ISO/IEC 11172 Layer I & II, AC3, AAC
Abtastfrequenz 32, 44.1 & 48 kHz
Anschlüsse
Video HDMI, SCART (FBAS), Video (FBAS)
Audio Stereo (analog L/R), S/PDIF (Koaxial)
USB 2x USB 2.0 High Speed
Antenne CABLE IN/OUT (IEC61069-2)
Andere CI/CI+ Schacht
Betriebsbedingungen
Temperatur 0 - 40°C
Luftfeuchtigkeit 5 - 90% (non condensing)
Hinweis:
FREE TO CHOOSE INNOVATIONS
XORO®
HRK 8740 Cl+
HRK 8750 Cl+ v2

natural_image
Black and white electronic device with digital display showing '6000' and 'SIGNAL' branding (no readable text beyond labels)User's Manual
Safety information
5
Recycling Information
9
Accessories / Features
10
| C | o | n | t | r | o | l | E | l | e | m | e |
| R | e | m | o | t | e | C | o | n | t | r | o |
Connection
TV / Cable TV Network 14
Digital output by Coaxial 15
| Stereo | Output | 15 |
| Common | Interface | 16 |
| USB | Port | 17 |
First Steps
First time installation 18
Important Keys & Functions
| Channel | List | 19 | ||||||||||
| F | a | v | o | r | i | t | e | |||||
| Change | Channel | 20 | ||||||||||
| Subtitles | 20 | |||||||||||
| Audio | 21 | |||||||||||
| T | e | l | e | t | e | x | t | |||||
| V | o | l | u | m | e | 2 | ||||||
| M | u | t | e | 2 | 1 | |||||||
| Resolution | 21 | |||||||||||
| Sleep | 21 | |||||||||||
| Zoom | 21 | |||||||||||
| Information | 22 | |||||||||||
| TV | Radio | 22 | ||||||||||
| E | P | G | 2 | 3 | ||||||||
CAM module
24
Recorder (HRK 8750 CI+ only)
| Preparation | 25 | |
| Instant recording | 25 | |
| Time Shift | 25 | |
| General Timer Programming | 26 | |
| Recorded List | 28 | |
| Playback of recorded file | 28 |
USB Port
| Connecting | USB | storage | 29 |
| Images | 30 | ||
| M u s i | c | ||
| Video 33 | |||
| Specification of video files | 33 | ||
| Record 35 |
Setup Settings
| Edit | Channel | 34 | |
| Installation | 40 | ||
| System | Setup | 41 | |
| Tools | 45 | ||
| REC Setting (HRK 8750 CI+ only) | 47 |
Troubleshooting
| Specification | 5 | 0 |
| Limited Warranty | 5 | 1 |


The lightning flash with an arrowhead symbol within an equilateral triangle is intended to alert the user of the presence of un-insulated "dangerous voltage" within the product's enclosure that may be of sufficient magnitude to constitute a risk of electric shock to persons.
The exclamation point within an equilateral triangle is intended to alert the user of the presence of important operating and maintenance (servicing) instructions in the literature accompanying the appliance.
THIS DEVICE COMPLIES WITH PART 15 OF THE FCC RULES. OPERATION IS SUBJECT TO THE FOLLOWING TWO CONDITIONS: (1) THIS DEVICE MAY NOT CAUSE HARMFUL INTERFERENCE, AND (2) THIS DEVICE MUST ACCEPT ANY INTERFERENCE RECEIVED. INCLUDING INTERFERENCE THAT MAY CAUSE UNDESIRED OPERATION.
User Manual
- All the safety and operating instructions should be read before the product is operated.
- Retain Instructions - The safety and operating instructions should be retained for future reference.
- All warnings on the product and in the operating instructions should be adhered to.
- All operating and use instructions should be followed.
Power Supply
- Never touch the plug with wet hands.
- Do not stand vases etc. on the appliance. Water could seep into the appliance.
- Keep the appliance away from rain and any moisture.
- If you want to pull the plug out of the plug socket, always pull directly on the plug. Never pull on the cable as it could tear.
- Make sure that the power cable is not bent, caught or run over and that it does not come into contact with heat sources.
- Make sure that the power cable is not wound around the device while in operation.
- Never place the machine on the power cable while it is being operated.
- Only use extension cables that are designed for the power consumption level of the machine.
- Only operate the machine if the electrical voltage stated on the type plate beneath the machine agrees with the voltage on your plug socket. The wrong voltage can destroy the machine.
- Do not open the appliance.
- Pull out the main plug if the appliance is not to be used over a longer period of time.
- Take care that nobody can trip over the power supply cable.

USB port
- Due to legal requirements of CE-conformity, the customer is asked to only connect USB-Sticks to the USB port.
- Due to the many different USB-Sticks and the built-in electronic components a support of all USB-Sticks can not be guaranteed.
- Please format the USB-Sticks only with FAT, FAT 32 or NTFS file system. Other file systems are not supported and can not be recognized by the USB port.
- Save all data from the USB memory before you connect to the device.
- The device can format the storage and all data will be missing. Please backup all data from the USB storage before you want to format them (HRK 8750 CI+ only).
- We recommend, if you want to use the recording or time shift function to employ a separate USB storage and copy never important data on it (HRK 8750 CI+ only).
Position
-
Do not connect accessories on the player which are not defined by the manufacture.
-
Do not place this product on an unstable cart, stand, tripod, bracket, or table. The product may fall, causing serious injury to a child or adult, and serious damage to the product. Use only with a cart, stand, tripod, bracket, or table recommended by the

natural_image
Illustration showing a person holding a monitor, a prohibition symbol, and a chair with a TV on a table (no text or symbols present)manufacturer, or sold with the product. Any mounting of the product should follow the manufacturer's instructions, and should use a mounting accessory recommended by the manufacturer.
-
A product and cart combination should be moved with care. Quick stops, excessive force, and uneven surfaces may cause the product and cart combination to overturn.
-
The device is able to show a still image on the TV screen or monitor over an unlimited period of time. This can cause damage to the screen. It is therefore advisable to activate the screen saver. Or switch the player off, if the device is not in use.
-
Do not use the device permanent in the 4:3 mode. This can cause damage to the TV screen.
-
Do not increase the volume when the player is just playing very quiet sections. This cold damage the speaker if very loud passages starts all of a sudden after the quiet section.
-
Switch the player off by the Off/On switch if it is not going to used for a longer period of time.
-
Disconnect the main plug during thunderstorms.
-
Slots and openings in the cabinet are provided for ventilation and to ensure reliable operation of the product and to protect it from overheating, and these openings must not be blocked or covered.
-
The openings should never be blocked by placing the product on a bed, sofa, rug, or other similar surface.
-
This product should not be placed in a built-in installation such as a bookcase or rack unless proper ventilation is provided or the manufacturer's instructions have been adhered to.
-
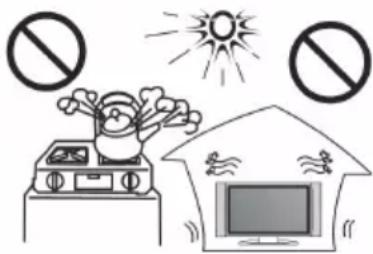
Protect the device against weather influences, moistures and high temperature.
-
Never spill liquid of any kind on the product.
-
Do not expose the device and the remote control to direct sunlight.
Defect
-
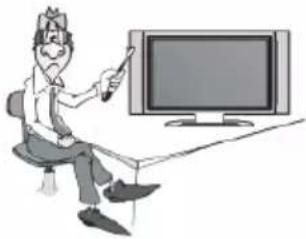
Servicing - Do not attempt to service this product yourself as opening or removing covers may expose you to dangerous voltage or other hazards. Refer all servicing to qualified service personnel.
-
Damage Requiring Service - Unplug this product from the wall outlet and refer servicing to qualified service personnel under the following conditions:
natural_image
Cartoon illustration of a man sitting at a desk watching TV (no text or symbols visible)a. When the power-supply cord or plug is damaged.
b. If liquid has been spilled, or objects have fallen into the product.
c. If the product has been exposed to rain or water.
d. If the product does not operate normally by following the operating instructions.
Adjust only those controls that are covered by the operating instructions as an improper adjustment of other controls may result in damage and will often require extensive work by a qualified technician to restore the product to its normal operation.
e. If the product has been dropped or damaged in any way, and
- When the product exhibits a distinct change in performance this indicates a need for service.
- When replacement parts are required, be sure the service technician has used replacement parts specified by the manufacturer or have the same characteristics as the original part. Unauthorized substitutions may result in fire, electric shock, or other hazards.
- Nicotine can damage the electronic components. In case of service regarding too much nicotine, than the warranty/guarantee expires.
- Please read in the section Troubleshooting our service address and phone number.
However, this is no guarantee that these problems can never occur. If these problems occur to you, please try the following:
- Position or align the dish differently.
- Increase the separation between the equipment and faulty equipment.
- Insert the plug of the receiver into another outlet as the disturbed device.
- Please try again to re-scan.
- Please control the USB storage
- Please control the multimedia files, if they are supported
- Please contact the dealer or a radio / TV technician.
Recycling Information
Recycling of electronic devices
This product is designed and manufactured with high quality materials and components which can be recycled and reused.
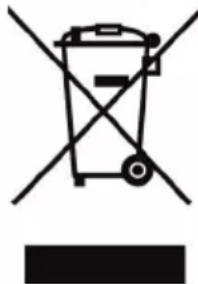
This symbol means that electrical and electronic equipment, at their end-of-life, should be disposed of separately from your household waste.
Please, dispose of this equipment at your local community waste collection/recycling centre. In the European Union there are separate collection systems for used electrical and electronic product. Please, help us to conserve the environment we live in!
natural_image
Symbol of a trash bin crossed with no text or numbers, representing waste sorting or disposal (no text present)Recycling of paper and carton
The material recycling symbol on the carton and user manual denotes that they are recyclable. Dispose them not with the normal household waste.

natural_image
Recycling symbol with three chasing arrows forming a triangle (no text or labels)Recycling of plastic parts
The material recycling symbol on the plastic parts denotes that they are recyclable. Dispose them not with the normal household waste.

Green Dot
natural_image
Circular icon with two opposing curved arrows, no text or symbols present.Batteries
- The batteries can be returned free of charge after use in the shop or in their immediate vicinity.
- The consumer is legally obliged to return of used batteries.
- The icons on batteries are with one of the two following characters, consisting of a strikethrough trashcan and the chemical symbol of heavy metals decisive for classification as contaminant-laden.
- Both symbols have the same meaning.
- Batteries that contain pollutants are characterised by chemical symbols: Pb = battery contains lead, Cd = battery containing cadmium, Hg = battery contains mercury.

Every consumer is legally obliged to make these batteries with a collection of his church or in the trade so that they can be conveyed to an environmentally sound disposal. We discard used batteries for you free of charge and environmentally. Simply return them to us.
Accessoires
When opening the package of this set top box please make sure that the following accessories are included:
• HRK 8750 CI+ or HRK 8740 CI+
- Remote Control
- User Manual
Notes:
• If any item should be damaged or missing, please contact your dealer without delay.
- Keep the packaging materials, you may need them to transport your player in the future.
• Always transport or send the player in its original packing.
- Do not change or modify any components of the device or accessories.
Features
• High Definition DVB-C Receiver
• Common Interface for CAM module and Pay-TV card
- HDMI port
• Electronic program guide (EPG) and videotext
• USB 2.0 High Speed port
- Playback of video-, music- and Picture-Files
- SCART Output
• Digital audio out by Coaxial
Default settings
OSD language
Aspect ratio
Video out
HDMI/Digital Audio PCM (Stereo)
German
16:9 PB
HDMI 720p
Front Panel
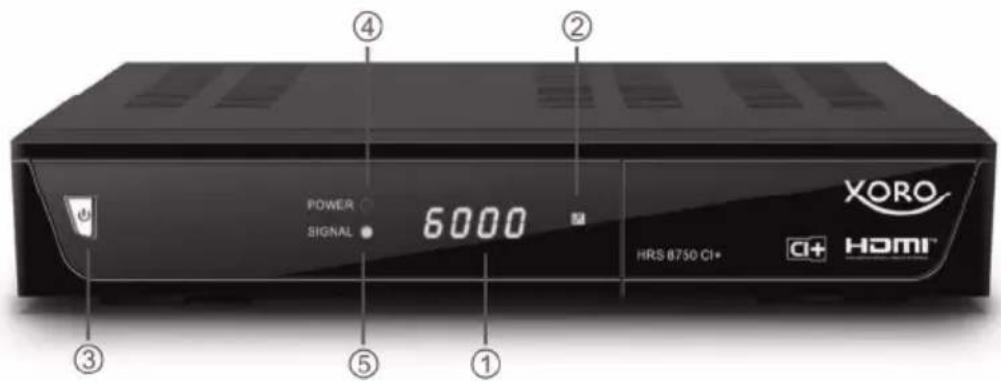
- LED Display
- IR Receiver for the Remote Control
- Power button with Power LED
- Power LED (HRK 8750 CI+ only)
- Signal LED
- USB Port A (behind the flap)
- CI / CI+ Slot (behind the flap)
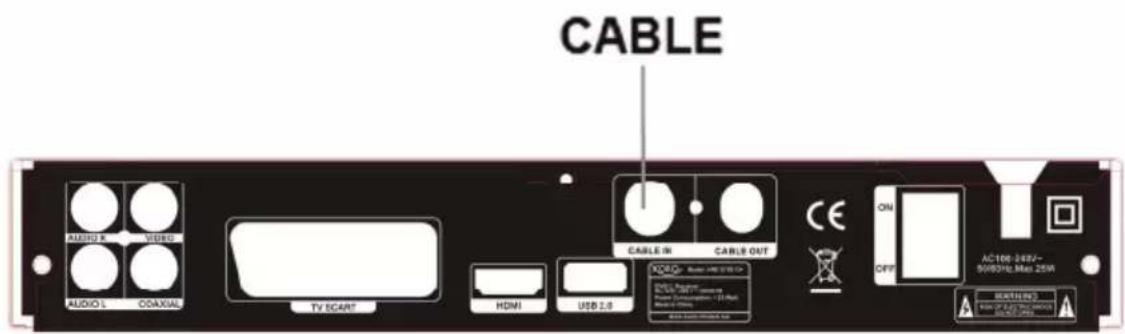
Rear Panel
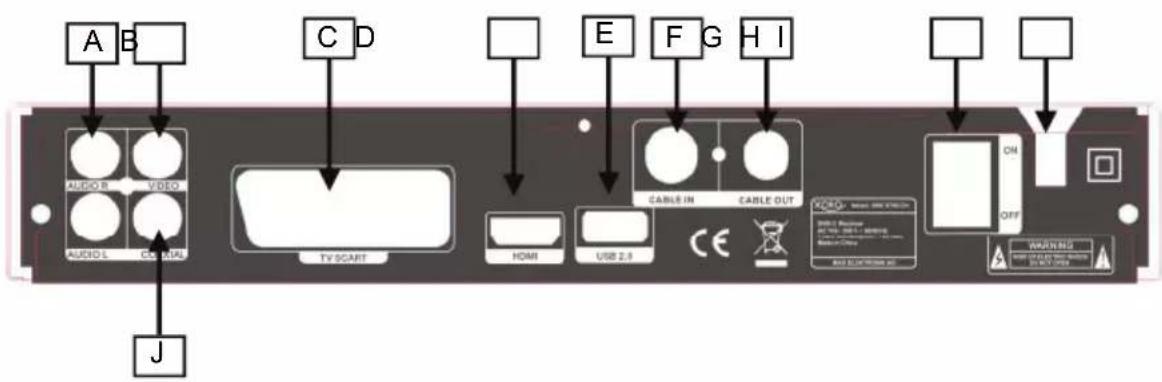
A. AUDIO R/L (analogue Audio Output)
B. VIDEO (analogue Video-Output CVBS)
C. SCART (Audio-/Video Output, analogue)
D. HDMI
E. USB (USB Port B)
F. CABLE IN
G. CABLE OUT
H. ON OFF (Power Switch)
I. Power Cord
J. COAXIAL (S/PDIF digital Audio Output)
Note:
Make sure when installing the antenna cable that the device is disconnected from the power.
Insert batteries and operation radius

natural_image
Three technical diagrams showing mechanical or structural changes with arrows indicating motion (no text or symbols)- Insert the battery (type AAA) into the receptacle of the remote.
- Close the battery cover
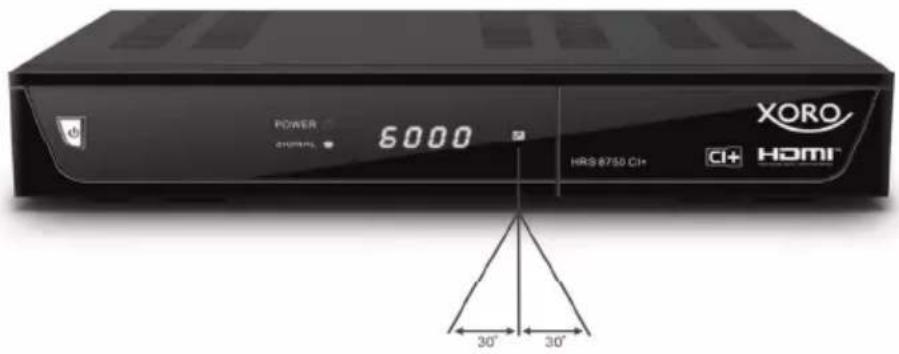
- For the best results, aim the remote towards at the player. Stay within 5 meters and angles of 60 degrees or less.
- Remove battery during storage or when you are not using the device for a long time.
Notes:
- Remove and exchange old batteries. Leaking out battery acid can damage your health and the remote control.
- Clean leaking out battery acid with a cloth
- In case of skin contact immediately wash the affected area.
- Please contact a medic after swallowing the battery or battery acid immediately
- Seek medical advice if battery acid has been swallowed. In case of contact with your eyes wash out the eyes and seek medical advice.
Buttons
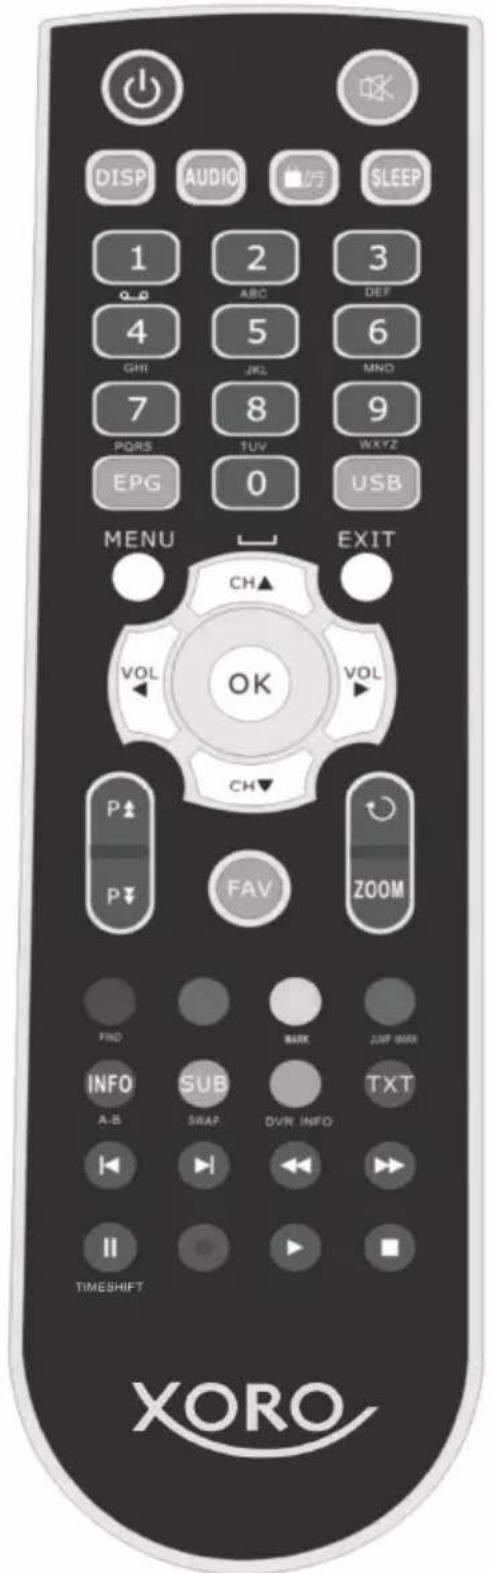
Buttons of the remote control

- Power button

2.Mute button
- DISP: Set the HDMI mode
- AUDIO: Display the audio list
- Switch between TV and RADIO
6.SLEEP: Set the sleep time - NUMERIC KEY (0\~9): Enter a TV/radio channel number or menu option number
8.EPG (Electronic Program Guide): Display the program guide
9.USB: Enter USB menu - MENU: Activate main menu
- EXIT: Exit current menu step by step
- VOL◀ /VOL▶: Change volume in viewing mode.
- CH▲ /CH▼: Change program
- OK: Confirm
- P▲/▼ : Page up/down
16.FAV: Display favorite channel list

-
:Switch to the previous viewed channel
-
ZOOM: Picture Zooming function
19.FIND: Quickly find channels which you want
20.MARK: Mark a position when play the video
21.JUMP MARK: Jump to the marked position
-
INFO: Display the program information
-
A-B: Switch the repeat mode in USB
24: SUB: Display the subtitle language list
25.SWAP: Switch to the other USB device in USB
-
DVR INFO*: Display the information of the video and the recording
-
TXT: Display the teletext.
-
I◀: Previous
-
▶I : Next
-
◀◀: Fast Rewind
-
◀◀: Fast forward
32.11: Pause/Step
33.●*: Record
-
▶: Play
-
■: Stop
36.Color Keys: The Color Keys with different functions in different menu
* Function only available in HRK 8750 CI+
Connecting to Cable and TV
General information
• Assure that the device is switched off and unplugged.
- Read the manual of your TV and attend to the safety instructions.
- Please establish an accurate connection.
- Please check the video output settings.
The connection of the Receiver to an Cable Network and a TV is described below. There are many alternative ways of connecting a TV. Please read the manual of your TV to find the available jacks. If there are multiple jacks available, please choose the one with best quality according to the table below.
| Jack | Signal | Quality |
| HDMI | Audio and Video | ★★★★ |
| SCART | Audio and Video | ★ |
| CVBS | Video only | ★ |
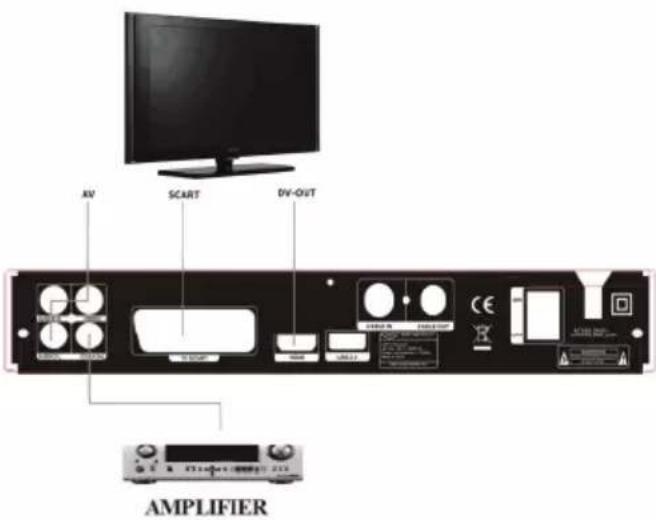
Connecting to Cable TV Network
To external decoder or amplifier

You have the possibility of transmitting the digital audio signal to a decoder or amplifier, using the coaxial output.
- Switch off and unplug all devices
- Connect the receiver and the TV with a SCART or HDMI cable
- Connect the Receiver to the decoder or amplifier (coaxial cable)
- Switch on all devices
- Activate the coaxial input at your decoder or amplifier
Stereo connection to a amplifier or soundsystem (Stereo)
Note:
• The Cables are not part of the accessories
- There are just a few channels which use digital audio.
• You can gain information about the audio signal by pressing the AUDIO key on your remote control
Connect the chinch cable to the red (R) and white (L) connectors of Receiver and to the connectors of the amplifier/sound system which is mostly labelled as “AUX IN” or “Stereo IN”. Switch on the amplifier / sound system and choose the appropriate input mode.
Common Interface
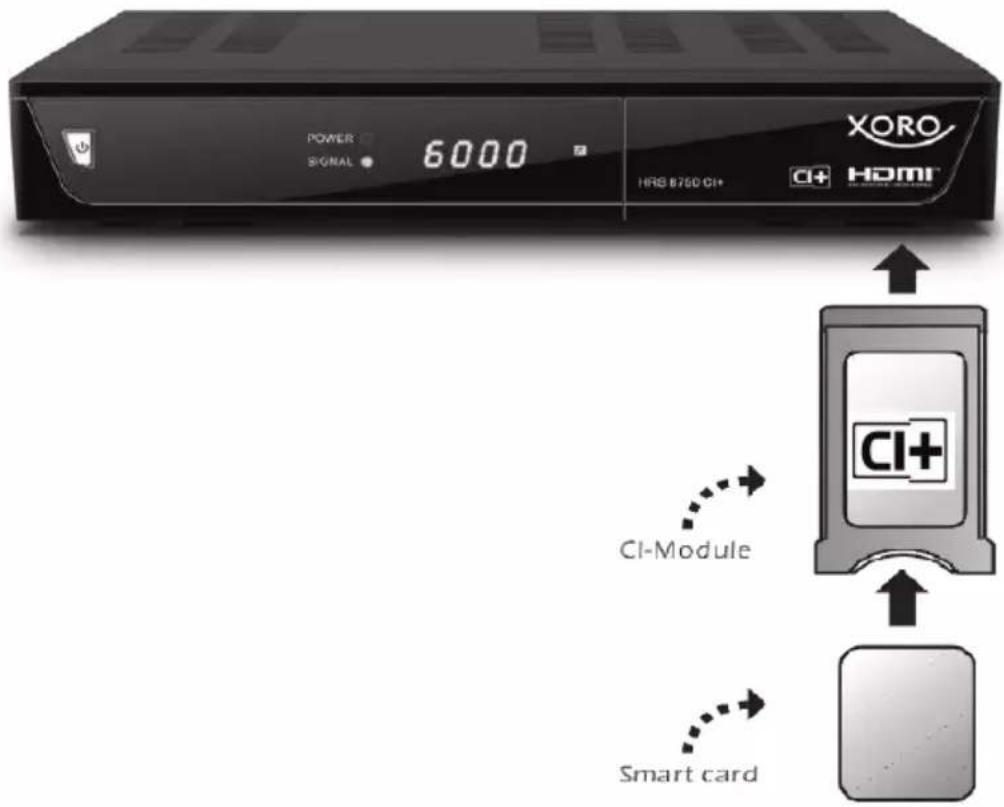
The Receiver enables you to receive both Free-to-Air TV programs and Pay-TV. There is not any additional components required for viewing Free-to-Air programs. PayTV can be received by the receiver in connection with a CAM module (CI module) and a corresponding subscription card.
Inserting the card and the CAM Module
-
Open the flap on the front right side.
of the golden Chip on the subscription card. This must be right in the CAM module. The Golden Chip must show up. -
Push the subscription card (Smartcard) in the CAM module (CI+) Module. Follow the Position
-
Subscription card and CAM Module generally end flush.
-
Gently slide now the CAM module with the subscription card in the Common Interface of the Receiver.
-
When the slide that the module not jammed.
-
This locks the CAM module correctly, you have to push a little harder at the end with two hands. You feel a slight resistance.

natural_image
Digital printer with digital clock showing 8:00, partially open into a tray (no visible text or symbols)Common Interface
- If the CAM module is seated correctly, then you can not push further.
- After properly inserting the CAM module disengage the eject button. CAM module and key are on the same level.
Notes:
- Follow the instructions of the manufacturer of CAM module (Common Interface) and subscription card.
- Carefully slide the module into the slot.
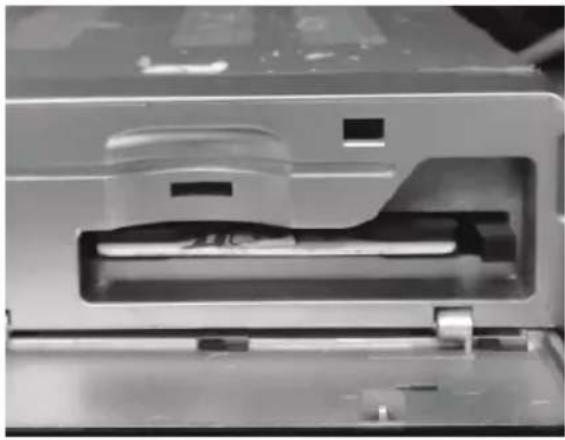
natural_image
Close-up of a mechanical component with internal cavity and mounting holes (no visible text or symbols)Ejection of the module
Press the eject button next to the CAM module up to the attack. The CAM module is pushed a little bit. Now you can pull the CAM module out of the bay.
USB port
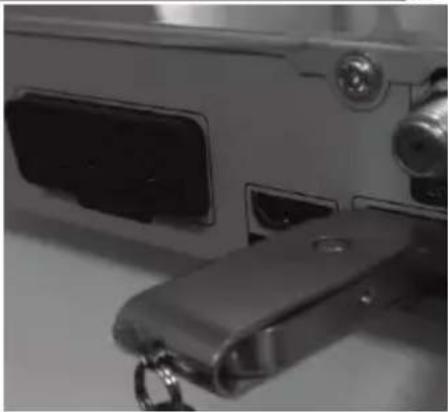
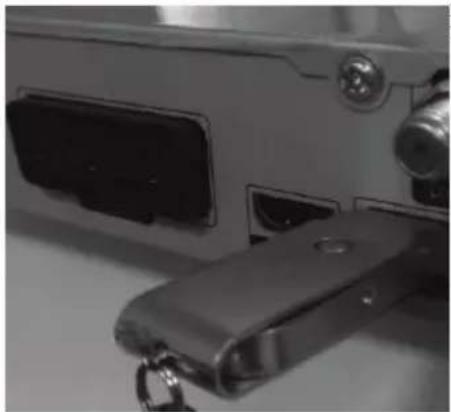
Connect the USB flash drive carefully on to the USB port. In general the label should show the USB stick to the top.
Remove the USB stick only when you are back in Live program, otherwise the drive could be damaged.
natural_image
Close-up of a white electronic device with a metallic key inserted, showing no visible text or symbols.Notes:
- Due to legal requirements of CE-conformity, the customer is asked to only connect USB-Sticks to the USB port.
- The USB port can be supported up to 16 GB flash memory size. Due to the many different USB-Sticks and the built-in electronic components a support of all USB-Sticks can not be guaranteed.
- Please format the USB-Sticks only with FAT 32 or NTFS file system. Other file systems are not supported and can not be recognized by the USB port.
- Save all data from the USB memory before you connect to the device.
- Max. supported capacity of USB Storage devices is 1024GB. Devices with higher capacity may work fine, but it can not be guaranteed under all circumstances.
First Time Installation
The XORO installation menu will be displayed by initial operation of the receiver. This menu contains following options:
Page I (Language Settings, please note Page 41)
- Language (OSD Language)
- First Audio
- Second Audio
- Subtitle Language
- Teletext
Page II (Time Setting, please note Page 42)
- GMT Offset (Select your Time Zone)
- Summer Time (Daylight Saving)
Page III (Channel Search, Please note Page 40)
- Country
- Network (Select your Cable Network Provider)
Navigate with the arrow keys CH+ and CH− to high light the option and make the selection with the VOL− and VOL+ buttons. Channel scan will start once you have set all options on page III. Channel Scan may take 40-90min.

Important keys and functions
Channel List
Retrieve the Channel List by pressing OK button.
▲/▼ Previous / Next program
P▲/P▼ Previous / Next page
◀/▶ Favourite Group
RED Search Channel
GREEN List the programs as alphabet
YELLOW Filter
FAV Favourite
OK Activating the chosen program
EXIT Exit the program list
NOTE:
TV and Radio list are very similar to handle.


Searching programs
Press the RED button on the remote and the channel list expanded with an OSD keyboard. Use the arrow keys to letters and confirm each letter with the OK button. Each input channel list is filtered.
You have the option of the switch to small-capitalization (YELLOW button), delete a character back (RED Button).
If you see the desired channel in the filtered list, press the BLUE button and return to the channel list.
Important keys and functions
Filter the Channel list
The Receiver offers you the possibility of filtering the channel list. Press the YELLOW button and the channel list will be added to the filter options. Using the buttons ▲ (CH +) / ▼ (CH) to select one of the options. Confirm your selection with the OK button and return to the channel list.
Filter options are for example All is not encrypted, encrypted, HDTV etc..
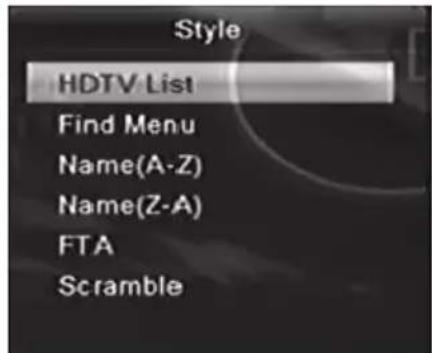
List the programs as alphabet
You can sort the list alphabetically. Press the GREEN button and the initial letter of channels to be listed could be changed with the buttons ◀ (VOL-) / ▶ (VOL+). All channels beginning with the letter appear on the list.
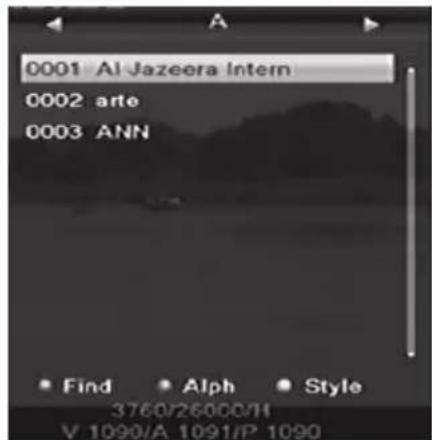
Favourites
Press the FAV button to open the favourite list. It is categorized in 8 groups. You can move among the groups with the buttons ▲ (CH +) / ▼ (CH-). Press the OK button to open the selected group.

Note:
But you should first divide the desired channels in the favourites list.
Switch Channel
To switch program please press the ▲/▼ (Up/Down) button.
Last channel
Press the BACK button on the remote and changes the device to the last channel.
Subtitles
Pressing SUB button enables subtitles. If subtitles are available for this program you can enable them with OK.
![Subtitle Language [01] fra(T) [02] deu(T) [03] nld(T) [04] swe(T) [05] rus(D)](/content/2026/05/893036/images/d6b6cd83692eff4363eedc965e2aaeefa4d4860bd9cca8c53428521e9641f652.jpg)
Important keys and functions
Audio settings of TV programs
Access the audio settings by pressing AUDIO. Change language (only certain programs), choose another audio track (if available) or choose between the audio settings (left/right channel, stereo).
![Audio Stereo ✓ deu (256) deu (257)[Dolby D]](/content/2026/05/893036/images/4f08f07943b1d8024db480c77e675f7c031a17f5a39659d416c8b7cba319c1a1.jpg)
Teletext
The teletext is activated via the TEXT button.
Navigation:
- Numeric for entering teletext pages
- ▲/▼ Next/previous page
- EXIT for closing the teletext window
Resolution
You can change the video output resolution directly in the live image without seeking the appropriate option in the setup menu. Press the D changes with each pressing.

Press the MUTE button to switch off the volume. To un-mute, press again the MUTE button.
Navigate in settings
To navigate into setup setting please press ◀/▶/▲/▼ buttons.
Sleep
Press the Sleep button to set auto standby time. There are OFF/10/30/60/90/120min options.
Zoom
Press the Zoom button to zoom in the current video picture. You can press ▲/▼/◄/► button to move the zoom icon to the position that you want to zoom in, then press zoom button again. The zooms change as follows: x1 —>x2—>x4 —>x6—>x8 —>x12—>x16 —>x1.
Important keys and functions
Information
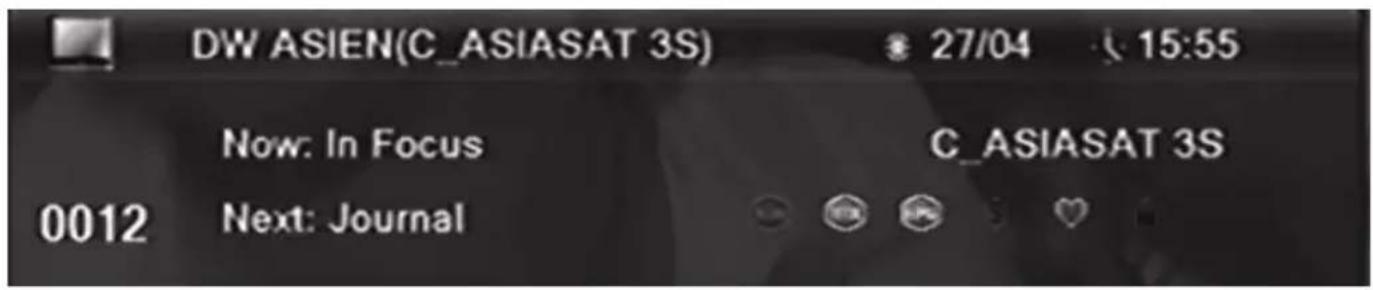
Pressing INFO shows a lot of information. By pressing the INFO button the first time the overview shows up: TV program name, active TV programs, availability of teletext, etc.
Pressing it twice shows the detail information of the current program. It shows information about Frequency, transponders, PID of the TV programs and signal quality.

bar
| Category | Value | | -------------- | --------- | | Channel | DW ASIEN | | Satellite | C_ASIASAT 3S | | Transponder | 3760/H/26000 | | PID | V 1300/A 1301/P 1300 | | Intensity | 90% | | Quality | 67% |Switch TV/Radio
During the channel searching the device can also receive Radio channels. To switch from TV to Radio Channel, press the TV/RADIO button.
EPG
EPG
The EPG is activated with the EPG button. The following picture appears on the screen.
![EPG 10:08 28/4 0012 DW ASIEN Journal 11:00~11:30 28/4 11:00 11:30 12:00 12:30 0011 $Eurosport 0012 DW ASIEN Journal European Journal euromaxx 0013 DW ASIA+ euromaxx Europa A Journal motor mo 0014 $724 STAR 0015 $750 [V] Tai Timer](/content/2026/05/893036/images/3423d4e7124e053657f6a60a3471c9464db587bfe8f1b1e6f66fd9f26d2a5195.jpg)
The EPG window is divided as following:
Top Actually date, time
Left Top Channel name, actually program and duration of program
Left Side Channel List
Right Top Preview window
Right Side Actually program and next program
Navigation in the space of the EPG window:
▲/▼ Previous / Next channel
◄/► Change TV program
OK Detailed EPG informations
GREEN Start the recording of the actually program or start the timer programming for the next program
EXIT Exit the EPG window
Programming from EPG
If you want to program the next show, then go first with the ◀ / ▶ buttons until the next show. Now press the GREEN button and the program information is copied into the timer (the reminder).
If you want to watch Pay-TV, then you need apart from the Receiver also a CAM module with a appropriate subscription card. All the CAM modules with CI and CI+ standard are supported.
CI+ module authenticate
If you insert the Cl+ module, there appears a dialogue windowe shown on the right side.
It will be followed by another dialogue window in a few minutes saying Waiting few minutes, "Your Module is operational". The window will disappear automatically. And you can watch the Pay-TV.
Note:
If you insert the module first time or switch to another module, it will take a long time for the module to be authenticated. Please wait patiently.


Preparation
Connect to a recording, time-shifting or recording programming a USB storage to the USB port of the HRK 8750 Cl+.
The HRK 8750 CI+ supports NTFS, FAT 32 and FAT file systems. Storages of other systems will not be recognized.
Recording
If you want to record the current TV program easily and quickly, first plug a USB device into the USB port and then press the RECORD ● button. Recording starts immediately. You can also record two FTA channels in the same transponder at the same time. You can stop the recording by pressing the
■ button. Confirm the prompt by pressing the OK button. And press DVR INFO button can display information of recorded files.
Changing stations
During a recording process you can press the ▲ / ▼ key switch the channels, but only within the active transponder.
Playback Mode
Press the PAUSE II or << button during recording to enter playback mode. The live image is paused. Press the PLAY button to resume the paused image.
Format of the recording
Recorded files take the form of TS. The recorded files are on the disk in the folder "ALIDVRS2" in the subdirectories. The subdirectories are named after the service, date and time.
And the images can be processed with standard PC applications (eg ProjectX for SD with MPEG-2 or HD tsMuxer for H.264).
Time shifting
- To activate the Time-Shift, you can navigate to: Menu -> REC setting -> PVR Storage Information, then press the Blue button to set DVR Type. Select the option "REC&TMS" or "Timeshift". If "Record" is selected, the timeshift function can not be activated. Then navigate to: Menu -> REC setting -> PVR Setting-> Timeshift and choose with the option "ON".
- Whether the time-shifting file is permanently stored or not when you press RECORD. This Menu -> REC setting -> PVR Setting -> Timeshift to recording with the option "ON"
Press the II button on the remote control during a live program to start the Time Shift. The live image pauses and the program is stored on the USB memory. A pause icon appears on the screen.
Playback functions
PLAY Resume the paused image
II To pause playback
| << | Fast | Rewind |
| >> | Fast | Forward |
| ■ | Stop | playback |
Record programming
To program the recording, Navigate to: Menu -> System Setup -> timer setting, and the program appears on the screen.
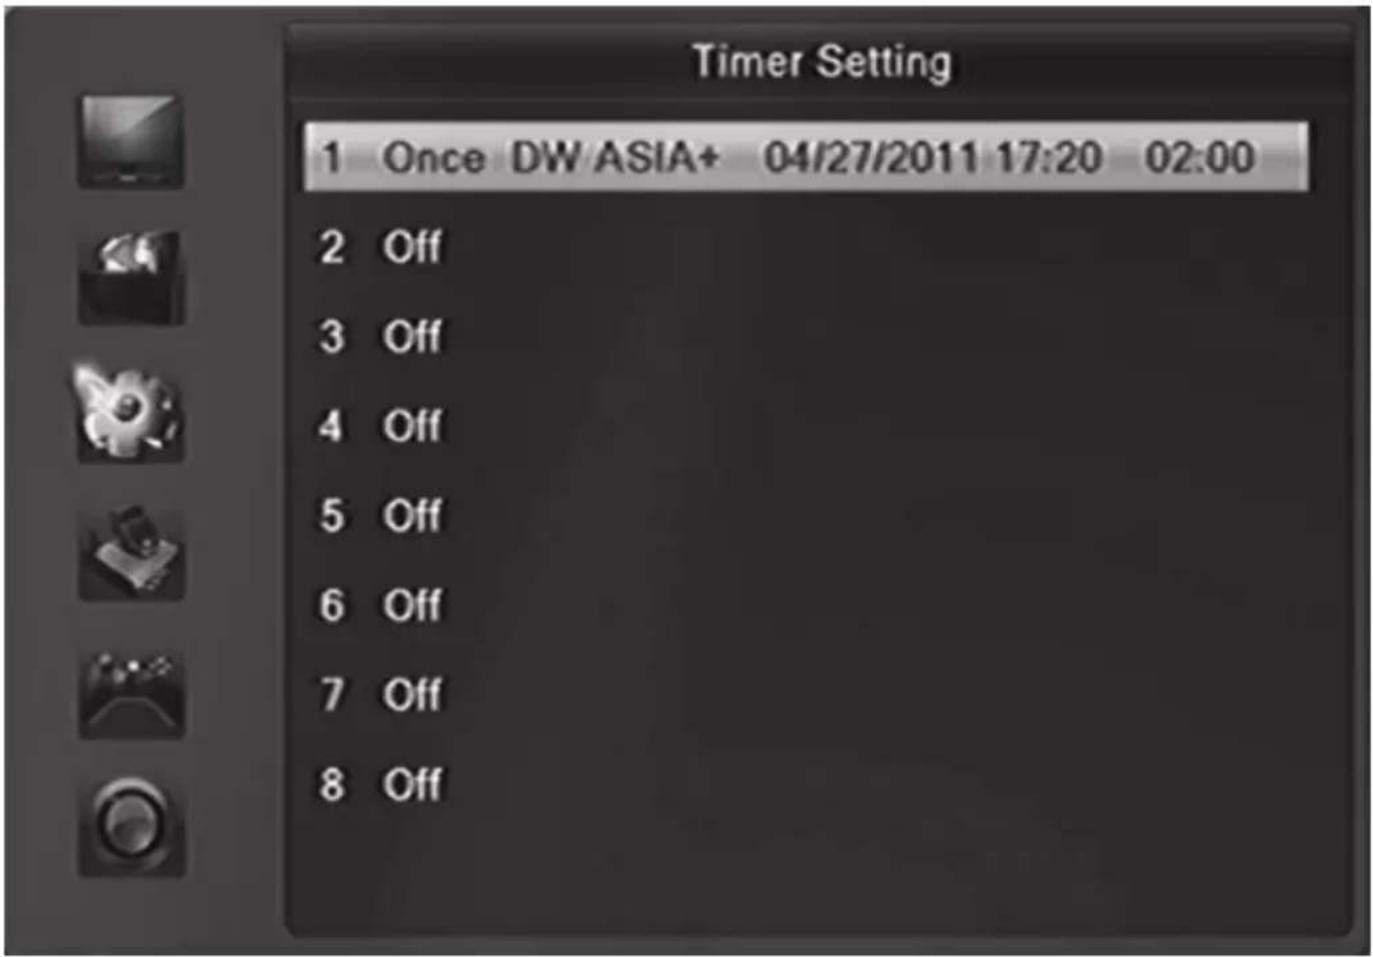
The navigation into this list occurs with the following buttons:
OK Starting option menu of the Timer programming
▲/▼ Next/previous programming
EXIT Exit timer setting menu
You could make a total of 32 entries.
Cancel programming
Select the program to be cancelled and press the OK button. Change the option Timer Mode to "Off". Then this programming will be cancelled.

Edit Timer
Select the item in the list and press the OK button. There appears a dialogue window. Following options are available:
Timer Mode
Once / Daily / Off
Timer Service
Record / Channel (HRK 8750 CI+ only)
Wakeup Channel
Selection of TV channel
Wakeup Date
Date of programming
On Time
Starting time of the programming
Duration
duration of the programming
Press the ◀ / ▶ button and the selected setting can be changed. In general, a popup window with the various options will appear. With the buttons ▲ / ▼ the different options can be selected and confirmed with the OK button. The start time and duration of the event you can change by the numeric keys to time.
If you schedule a recording, you first change the type of channel for recording. Then the other options such as duration and PS Record are active.
Recordings can also be taken over by the EPG window. Please set the starting time and duration of such a recording with a few minutes buffer to be sure of recording the whole programme.
Recorded List
The recorded program can be reached directly via pressing the DVR INFO button twice. All previous images are displayed there.
![Record 1 2011/04/22 07:38~07:42 [TS] SHANGHAI 2 2011/04/26 10:49~10:49 [TS] 745 XING KO 3 2011/04/27 17:20~17:21 [TS] Journal-DW A 4 2011/04/27 18:09~18:09 [TS] Journal-DW A 5 2011/04/27 18:24~18:24 [PS] Journal-DW DW ASIEN 04/27 18:25 3%](/content/2026/05/893036/images/ba7c02bbd2a066eabfcff8ffb42090b6664aebb074223d0706d0bcf13ef1758f.jpg)
You can navigate here with following buttons:
▲ / ▼ Move to previous or next recorded file
OK Start playback in Full Screen
EXIT Exits the Recorded list
Playback of a file
If you want to playback a file from the list, please highlight them by using the navigation button ▲/▼. To start the file press the OK button on the remote control. The video shows in Full Screen mode. And you can record and playback at the same time.
File management of the recordings
In the Recorded list, only the recent recorded files are displayed and can be played back. If you want to delete or rename the images, go to the Record of the Media Player. There you can:
- Delete recordings
- Rename recordings
- Lock recordings
![Record Music Image Video USB A No. Date Channel 0001 09/08 [PS] HUMTV US 0002 31/03 [PS] 745 XING K 0003 11/04 [PS] 745 XING K 0004 11/04 [PS] 747 Channel 0005 11/04 [PS] 743 Phoenix 0006 12/04 [TS] ---- 0007 27/04 [PS] Made in Ger HUMTV USA 15:59~16:01 37M 00:00:00 00:01:46 Rename Lock Delete Exit](/content/2026/05/893036/images/d91e68adb40f8ff0571b886be015e5b11340240ee41eda38abd3462a11395acb.jpg)
USB Port
You can connect USB Flash drives via the USB Port.
Media-Player
In the menu of Media player, you have the possibility of playing back image, music, video from a memory or managing the files. To open the menu of Media Player, connect the USB storage and then either press the USB button during the live program or navigate to Menu -> Tools -> Media Player, then press the OK button to enter.
natural_image
Close-up of a mechanical device with attached metal bracket and chain (no visible text or symbols)The media player will start with the following opening screen. The choices are: Video, Music, Image and Record
The pointer is at the top of the menu. Switch between the different options (Video, Music, Image, Record) with the ◀ / ▶ buttons. Change the ▼ button in the file browser. If connected two USB devices, you can press SWAP button to switch between the two USB devices. The SWAP button does not work in the record mode.
Press the OK button and the data from the USB memory is read and displayed,
Use the ▲ / ▼ buttons to navigate in a list. The OK button opens a directory or starts playing a file.
With the EXIT button to return the previous directory.
You are offered more operational possibilities like Edit, Sort as shown at bottom of the screen.
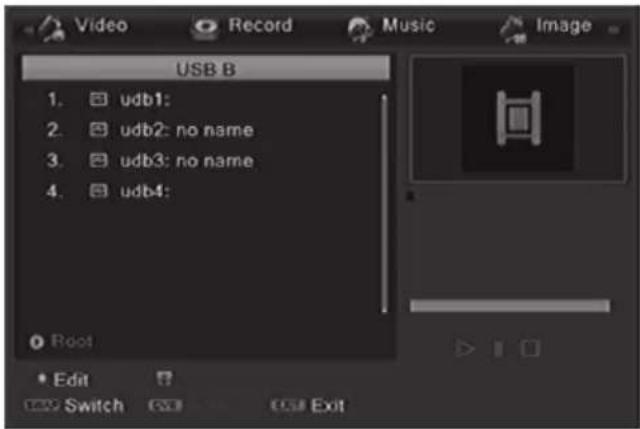
The media player menu could be closed by pressing the MENU button.

Images
If you want to display images with the Receiver, connect a USB memory and go to the menu photo. Change the ▼ button in the file browser. Press the OK button and the data from the USB memory is

read and displayed in the browser.
Aids to navigation in the file browser
OK Start the slide show of all images in this folder
▲ / ▼ Move to the previous or next image or folder
RED Display the Play List of pictures
GREEN Add the highlighted image to the Play List
YELLOW Add all the images in current directory to the Play List
BLUE Edit (Rename/Delete/Copy/Add Folder) (HRK 8750 CI+ only)
SWAP Switch to the other USB device
DVR INFO Sort the files by Name/Time/Size/Favourite
A-B Set menu with the options for the slide show time and slide show repeat
TXT Display all images as small thumbnails
EXIT Return to previous directory
Multi-View screen
In the Multi-View screen, you have a similar operation as in the file browser:
▲ / ▼ Move to upper or lower image
◀ / ▶ Move to the previous or next image
OK Start playback of the image
EXIT Ends the multi-view mode and returns to the browser
Images
Playback
Start playing the slide show by pressing the OK button. The following operations are available:
▲ Display the next picture
▼ Display the previous picture
Rotates the image 90 degrees counter clockwise
▶ Rotates the image 90 degrees clockwise
PAUSE Pause playing the slide show
ZOOM Zoom in pictures, The zooms change as follows: x1 ->x2->x4 ->x8 ->x16 ->x1.
EXIT Stop playing and return to the File Browser
Listening to music during the image display
You can listen to music while playing back pictures. You must first select the song and then go to the pictures.
Play List
You can press GREEN or YELLOW button add some favourite pictures to the play list. And then you can press RED button display the play list, And pressing OK button to view them. The play list will save to the USB memory. You can view the favourite pictures in the play list next time.
Edit
You can edit the files and add the new folders. Pressing the BLUE button to enter the edit mode. You can press RED button to rename the highlighted file, and press GREEN button to copy the file to the other directory, and press YELLOW button to delete the file. You also can press BLUE button to add a new folder.
Supported formats
JPEG, BMP
Music
If you want to play music files with the HRK 8750 CI+, connect a USB memory and go to the menu "Music". You can navigate with the ▼ button in the file browser. Press the OK button and the data from the USB memory are read and displayed in the browser.
Aids to navigation in the file browser
OK / PLAY Play the selected music piece
RED Display the Play List of the music files
GREEN Add the highlighted music to the Play List
YELLOW Add all the music files in current directory to the Play List
BLUE Edit (Rename/Delete/Copy/Add Folder) (HRK 8750 CI+ only)
SWAP Switch to the other USB device
DVR INFO Sort the files by Name/Time/Size/Favourite
A-B Sets the Repeat mode (Single, Folder, Folder Random)
▲ / ▼ Move to the next or previous file
EXIT Return to previous directory
Music
Play
Start playback by pressing the OK or the ▶ button. The following operations are available:
>>| Change to the next song
|<< Change to the previous song
|| Pauses the music play
<< Fast Rewind
>> Fast Forward
■ Stop playing
A-B Repeating modes (Single track, directory, random directory)
EXIT Return to previous directory but not stop playing
Play List
You can press GREEN or YELLOW button add some favourite music files to the play list. And then you can press RED button display the play list, And pressing OK button to play them. The play list will save to the USB memory. You can play the favourite music files in the play list next time.
Edit
You can edit the files and add the new folders. Pressing the BLUE button to enter the edit mode. You can press RED button to rename the highlighted file, and press GREEN button to copy the file to the other directory, and press YELLOW button to delete the file. You also can press BLUE button to add a new folder.
It Supported *.MP3, *.WAV, *.OGG formats.
Note:
If you want to switch to another item (Image/Video/Record) and don't stop playing, you must press SWAP button first, then press the ◀/▶ button to switch to the another item.
Video
For playing movies with the Receiver connect the USB media and enter the menu item video. Please note:
- The table shows the supported container, codec's, maximal resolution and maximal bit rate.
- If a character is not recognized correctly (for example, special characters) will appear on the site of this character a "_" symbol.
- Supported codex: Should be created with established standards. MPEG-2 with ISO/IEC13818 standard and MPEG-4 with ISO/IEC 14496 standards
- Supported transport streams: MPG, TS, TRP
- More than one audio streams are supported in some video containers.
- Supported subtitles: Subrip (SRT), Micro-DVD (SUB), Sami (SMI), SSA.
- Supported audio formats in
- MPEG-4 files: AC3, MP3, AAC
- MPEG-2: MP2/MPA, AC3
Notes:
The variety of different video codes, audio codes, video container and PC programs, it is possible that some video files are not supported. Although each part considered individually (eg, H.264, AC3, MP4) which can lead to a combination of non-playable files.
GMC is not supported.
| Suffix Container Video Codec Max. Resolution Bit rate | ||||
| DATVOB | MPG / VOB | MPEG-1/2 720x576 20 Mbps | ||
| MPG | MPG | MPEG-1 / 2MPEG-2 | 1920 x 1080 /30p | 20 Mbps |
| TS | MPEG-2H264 TS | MPBG-1 / 2 /MPH.264 (Main, High Prof.) | 1920 x 1080 /30p | 20 Mbps |
| MP4 | MP4 | MPEG-4H.264 (Main, High Prof.) | 1920 x 1080 /30p | 20 Mbps |
| MKVMOV | MKVMOV | MPEG1/ MPEG2/MPH.264 BP/MP/HPMPEG4 SP/AS, Xvid | 1920 x 1080 /30p | 20 Mbps |
| AVI | AVI | MPEG-1 / 2/MP/MPEG-4SP/ASPH.264/Xvid | 1920 x 1080 /30p | 20 Mbps |
| M2TS | BDAV2 TS | MPEQMPEG-1 / 2 /MPH.264 | 1920 x 1080 /30p | 20 Mbps |
Video
If you want to play movies with the Receiver, connect a USB memory and go to the menu "Video". Change the ▼ button in the file browser. Press the OK button and the data from the USB memory is read and displayed in the browser.
Navigating in the file browser
| ▲/▼ | Previous/Next file/folder |
| OK | Play / Open directory |
| BLUE | Edit (Rename/Delete/CopyFolder) |
| (HRK 8750 CI+ only) | |
| SWAP | Switch to the other USB device |
| DVR INFO | Sort the files by Name/Time/Size/Favourite |
| EXIT | Return to previous directory |
Navigating while playing
If you press OK the movie starts playing directly in full screen.
OK || Pause and Starts play pressing ||
again enter step mode
▶(PLAY) Cancel pause, continues playing
■ Stop and returns to the browser
GREEN Jump to a certain (self defined) time
<< / >> Fast backward/forward(x1 —> x2 —> x4 —> x8 —> x16)
| ▲ | Previous movie | |
| ▼ | Next movie | |
| ◀/▶(VOL) | Jump to backward/forward for a period of time | |
| |◀/▶| | Jump to previous/next chapter | |
AUDIO Switch audio track
SUB Switch (off) Subtitles
DVR INFO Show information like play time (current and over all) file name etc
RED Switch video program
YELLOW Switch chapter
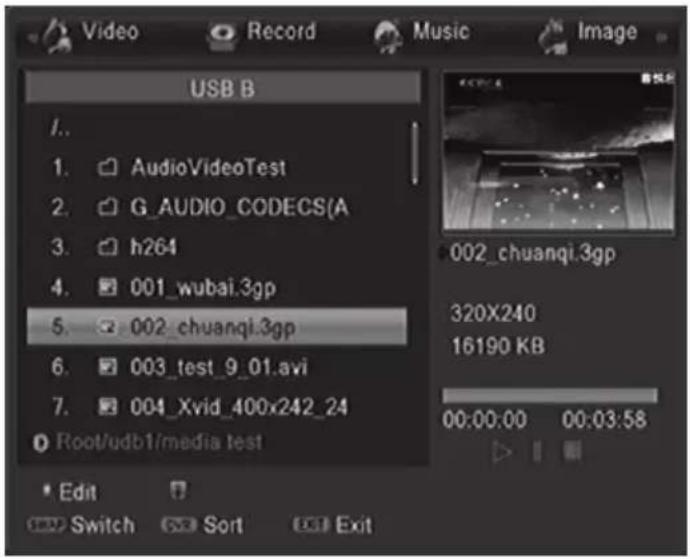
GOTO function
When you press the GREEN button during playback, you can select a time using the numeric keys to enter. After pressing the OK button on the Receiver jumps at this point in the film.
Record (HRK 8750 CI+ only)
If you want to manage the recorded files, open the menu of Media Player. First, connect the USB memory and press during the live image of the USB button. Navigate with the arrow buttons ◀ / ▶ the categories until you reach the "Record". Change the ▼ button in the file browser. Press the OK button and the images of USB memory can be displayed in the browser.
![Record Music Image Video USB A No. Date Channel 0001 09/08 [PS] HUMTV US 0002 31/03 [PS] 745 XING K 0003 11/04 [PS] 745 XING K 0004 11/04 [PS] 747 Channel 0005 11/04 [PS] 743 Phoenix 0006 12/04 [TS] ---- 0007 27/04 [PS] Made in Ger HUMTV USA 15:59~16:01 37M 00:00:00 00:01:46 Rename Lock Delete Exit Exit](/content/2026/05/893036/images/26ee3b5bbd1257a7d9925378ac5675372d24ebee2a8f724944c0c94fe1a7e472.jpg)
In addition to playing the recordings, you can Rename/Lock/Delete the recordings.
Navigating while playing back
▲ / ▼ Move to the previous or next file or folder
OK Starts playback of the file or open the folder
RED Rename the selected file
GREEN Lock the selected file
YELLOW Delete the selected file
EXIT Return to previous directory
Navigating while playing
If you press OK the movie starts playing directly in full screen.
|| Pause, pressing || again enter step mode
▶(PLAY) Cancel pause, continues playing
■ Exit playing, changing back to recording list
<< / >> Fast backward/forward (x1 —> x2 —> x4 —> x8 —> x16)
◀ / ▶(VOL) Jump to backward/forward for a period of time
|◀/▶| Jump to backward/forward as jump option in the PVR Setting menu
GREEN Jump to a certain (self defined) time
Record (HRK 8750 CI+ only)
YELLOW Mark the current time
BLUE Jump to mark
AUDIO Switch audio track
SUB Switch (off) Subtitles
INFO Display the information of current live channel
DVR INFO Show information like play time (current and over all) file name etc
TXT Show the teletext
GREEN Renaming the file
BLUE Deletes all the pictures
BACK Back to the selection menu
Rename a recording
Select the recorded file to be renamed and press the RED button on the remote control. Delete the existing name with pressing the
GREEN button repeatedly. Press RED button to switch between the caps on and caps off. You can use the numeric keys to input the character. After finishing the new name, press the YELLOW button.
You can also cancel rename by pressing the BLUE button.
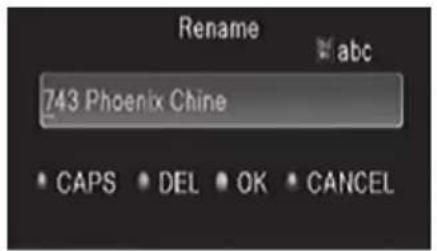
Lock a recording
If you want to lock a recorded file, you can press the GREEN button on the remote control. Then you input password, the recorded file is locked. Any future play back of the locked file requires the correct input of the password.
Delete a recording
If you want to delete a recorded file, you can press the YELLOW button on the remote control. Then you will find a delete icon on the screen. Then you exit record window, The marked recordings will be deleted.
Press MENU for the main menu. The submenu are:
- Edit Channel
- Installation
- System Setup
- Tools
- Game
• REC Setting (HRK 8750 CI+ only)
Edit Channel
The Channel menu includes the sub-menu TV Channel List, Radio Channel list and Delete All.
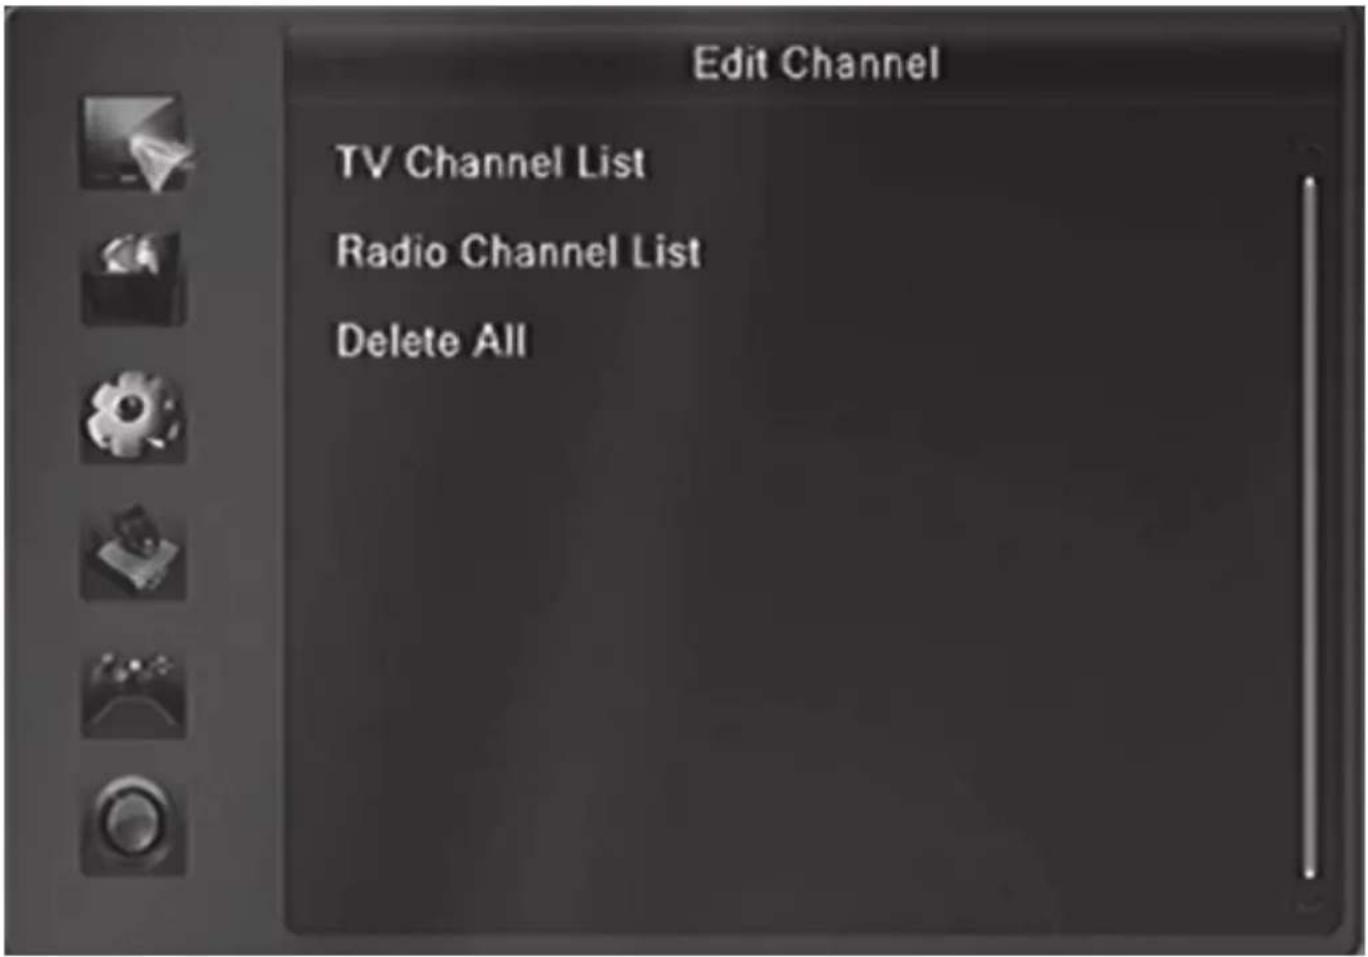
TV Channel List
With the sub-menu you have the option to sort the stations found on your request or to edit.
Edit Channel
In the channel manager you can add to FAV group, lock, skip, move and edit the channels.
![TV Channel List All Satellite FAV Lock Skip Move Edit 0009 Supreme Master TV 0010 TV5 0011 $Eurosport Asia 0012 DW ASIEN 0013 DW ASIA+ 0014 $724 STAR Chi Movi 0015 $750 [V] Taiwan 0016 $756 STAR Chinese C_ASIASAT 3S DW ASIEN 3760/H/26000 PID: 1300/1301/1300](/content/2026/05/893036/images/f42342d117657c954a125bd284d3ca211868f7c836ff0b670533085784d05d06.jpg)
Locking channels
Use the ▲ / ▼ keys to the TV stations and press the RED button. Then you must input the password. At the selected TV channel will see a lock icon. If you want to view the locked TV channels, you are asked for the change to the locked TV channels for the password. Enter the password and then you can look at the TV station.
Channel skip
Use the ▲ / ▼ keys to the TV stations and press the GREEN button. The selected TV channel is provided with a skip icon.
Note:
- When navigating this TV station is now always skipped and not with the ▲ / ▼ buttons can be selected.
• Only by the numerical input can be accessed on this channel.
Move a Channel
Use the ▲ / ▼ keys to the TV stations and press the YELLOW button. Then you can using the ▲ / ▼ keys to move the channel to the new location or using the numeric keys input the number of the position that you want to move to, and press the OK button. The channel is moved to the new position.
Edit Channel
Editing channels
Press the BLUE button and you can edit the channel list. The options are here:
- Sort
- Delete
- Rename
Sort
With this option you can (Z-A, A-Z, FTA/Scramble and lock), the transmitter according to the guidelines sort the list. Press the RED button and the menu on the screen.
Delete
Press the BLUE button if you want to delete the channel. Then you will find the delete icon on the screen. you can press BLUE button more time to mark some channels. Then you exit the edit window, you will get a security message asking whether you want to save the operation or not.
- If so, then select "Yes", then press the OK button
- If not, then select "No", then press the OK button or press the EXIT button directly.
If you have consented to the security question, the marked channels will be immediately deleted from the list.
Rename
Use the ▲ / ▼ keys to the TV stations and press the GREEN button. It appears an rename window. And delete the existing name with more time by press the GREEN button. Press RED button to switch between the caps on and off. Use the numeric keys input the letter. If the new station name completely, then press the YELLOW button. The channel gets the new label. You also can cancel rename by press BLUE button.
Favourites
With this menu, you can sort channels in the total of 8 favourite lists.
Define favourite
Use the ▲ / ▼ keys to select the TV channel from which you want to put in the Favourites list. Press the FAV button and Use the ▲ / ▼ keys to select the FAV groups, then press OK button to confirm. And the selected channel is stored in the selected favourites list.
Radio Channel List
The operation of Radio Channel List is similar to the TV Channel List.
Delete All
If you select this option, all the channels will be deleted.

Installation
Auto Search
The Auto Scan searches TV and Radio programs on all availalbe frequencies.
Goto to "Network" and select your Cable Network Provider.
Move the cursor with ▲/▼ to „Search“ and press OK to start the scan.
Notes:
- Channel Scan may take 40min to 90min.

Quick Search
If you want to search programs on a certain channel or frequency, please choose Quick Scan.

| Seach By Channel By Frequency | ||
| Ch No.Choose the channel to be searched. | - | |
| Frequency - | Input the frequency to be searched. | |
| Symbol Rate / QAM | You need to specify Symbol Rate and Modulation (QAM) | You need to specify Symbol Rate and Modulation (QAM) |
You can judge from the bars on bottom of the page showing signal intensity and quality whether there is broadcast on the chosen channel and frequency.
Move the cursor with ▲/▼ to „Search“ and press OK to start the scan
System Setup
The System Setup menu contains options for Language, TV System, Display Setting, Local Time Setting, Parental Lock, OSD Setting, Favourite, Audio Description Setting, Other.
Language
Enter Language menu, you can set the OSD Language, First Audio Language, Second Audio Language and Teletext Language. Currently available are the following languages:

German, English, French, Spanish, Italian, Portuguese, Russian, Turkish, Polish and Arabic.
TV System
Enter Language menu, you can set the Video Resolution, Aspect Mode and Digital Audio Out.
Video Resolution
Here you define the resolution, which is output via the HDMI. The options are:
- 480i / 480p
- 576i / 576p
- 720p_50 / 720p_60
• 1080i 25 / 1080i 30 - 1080p_50 / 1080p_60 / 1080p_25 / 1080p_30 / 1080p_24
Note:
Please use the native resolution of your TV. To do this, follow the specifications of your TV equipment. E.g. 720p for HD-Ready TV sets or 1080i/1080p for FULL-HD TV sets.
System Setup
Aspect Mode
With this menu you can change the aspect ratio to your TV television.
- AUTO
- 4:3 PS
• 4:3 LB
• 16:9
Note:
In general, allows to 16:9 optimal output. This shows in the correct 4:3 aspect ratio display.
Digital Audio Out
With this option you can define the nature of the digital audio output via coaxial audio output.
BS Out Sound is in RAW mode to the coaxial audio output unchanged issued LPCM Out Output is in PCM format
Recommendation: If you have not connected AV amplifier, please use the LPCM setting. Otherwise bit stream (BS out).
Display Setting
The display settings can set Brightness, Contrast, Saturation, Hue, Sharpness, Led brightness. You can press the ◀ / ▶ button to adjust the value.
Local Time Setting
The Local Time Setting contains option for GMT Offset, Summer Time, Date, Time.
GMT Offset
Change the GMT Offset by press the ◀ / ▶ button.
And the value range is "-12:00\~+12:00", increase each half hour progressively. Here you define the time zone. For Germany for example +1:00 (GMT +1).
Summer Time
Here you can switch the Summer Time On or Off.
Date/Time
These two options are inactive, only display the current date and time.

System Setup
Timer Setting
The Timer Setting menu is described between pages 26 detail.
Parental Lock
In "Parental Lock" line, press OK button, there will pop an dialogue for you to input the password.
Default password is "0000". When you input the correct password, there are four items in the Parental Lock menu.
Menu Lock
Menu Lock determining that when users wish to enter “Edit Channel/Installation/Tools” menu, whether have to input Password or not. If the setting of “menu Lock” is “Yes” which means user have to key in password, set “No” means unlock.
Channel Lock
Channel Lock determining that when users wish to play the lock channels, whether have to input the password or not. If the setting is "Yes", play the locked channels must input the password. If set "No", the lock function will invalid.
New Password
New Password is used for change the password. You can input the new password in this item by using numeric keys directly.
Confirm Password
After you finished the New Password, the highlight will auto skip to Confirm Password and ask you to input the new password again. If the password is correct, the screen will show up a message of "Saving Data, Please wait...". After finish saving and back to "system Setup" menu, the password is changed
OSD Setting
The OSD Setting contains option for OSD Timeout, OSD Transparency, OSD Aniamation.
OSD Timeout
OSD Timeout can set the duration time of the information bar show up on the screen. The range of the duration is "1 second\~10 seconds".
OSD Transparency
Press the ◀ / ▶ button to change the OSD Transparency. There are 5 levels of transparency, 10%, 20%, 30%, 40% and "Off".
OSD Aniamation
Press the ◀ / ▶ button to switch the OSD Animations status.
On Enable the OSD Animation
Off Disable the OSD Animation
System Setup
Favourite
You can rename the favourite group's name in this menu. Press the ▲ / ▼ keys to highlight a favourite group that you want to rename, then press OK button, the OSD keyboard appears on the screen. Delete the existing name with more time pressing the RED button. Press GREEN button to switch between the caps on and caps off. Search using the arrow keys (▲ / ▼ / ◀ / ▶) the letters and press for each letter of the OK button. If you are finished with the new name, then press the BLUE button. The new file name is taken.
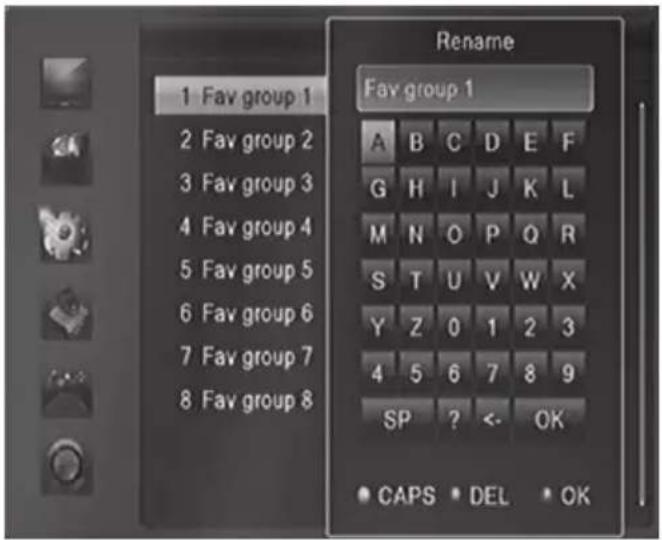
Other
Auto Standby
The Auto Standby with the default of 3 hours is part of the implementation of EuP. The Eco Design Directive 2009/125/EC, and Energy-using Products (EuP) called, aims to establish a framework for the setting of Eco Design requirements for energy-using products.
That is, after 3 hours running time in DVB-S mode without pressing a button on the Receiver automatically in the standby mode.
You also can disable Auto Standby if you select "Off".
Cable Out
If set to "On", "Cable Out" Connector is active in Standby-Mode also.
Tools
The Tools menu contains options for Information, Factory Setting, Common Interface, USB Upgrade & Save, Media Player, Remove USB device safely.

Information
Display version information such as software or hardware.
Factory Setting
You have the opportunity to make undo all the settings and changes by load the default settings.
Note:
All settings are reset. Then that they should also perform the search again.
USB Upgrade & Save
Lets you install a new software version on the device. This of course must be connected to a USB memory with only the update file in the root directory.
Upgrade & Save
You can select "Upgrade" or "Save".
Upgrade
Save
Upgrading a new software version
Saving the data of current software version
Tools
Mode
Select the different upgrade or save mode. If Upgrade & Save is "Upgrade", there are four modes, AllCode, Bootlogo, Defaultdb and Userdb. If Upgrade & Save is "Save", there are three modes, AllCode, Defaultdb and Userdb.
| AllCode | Whole the flash |
| Bootlogo | Only the logo |
| Defaultdb | Only the default data |
| Userdb | Only the User data |
File
Select the correct file for upgrade. If Upgrade & Save is "Save", this item is inactive.
Start
Pressing the OK button to start upgrading software or saving data.
Note:
When upgrading the software, please don't power off
Media Play
The Media Play menu is described from page 29 to 36 in detail.
Remove USB device safely
Before remove the USB device you can enter the Remove USB device safely menu first, like this, it will be safely when you removing the USB device.
Common Interface
This option allows you to view, change the settings and information of a Common Access Module.

REC Setting (HRK 8750 CI+ only)
The REC Setting contain relevant options for PVR Storage Setting and PVR Setting.

PVR Storage Setting
In this menu, you can format the USB device and set the DVR type.
DVR Set
You can press the ◀ / ▶ button to select the partition. If you connect two USB devices, press the ▲ / ▼ button to select the USB device. Then press BLUE button to set the DVR type. There are three options of DVR Type, REC & TMS, REC and TMS.
| REC & TMS | Both for recording and Timeshift in current partition |
| REC | Only for recording in current partition |
| TMS | Only for timeshift in current partition |

Note:
There are two icons display under the partition. The red icon means recording, the green icon means timeshift.
REC Setting (HRK 8750 CI+ only)
Format
You can press the YELLOW button to format the current partition .You have a choice between FAT32 and NTFS file formats.
Warning:
All data will be lost after formatting. The disk is completely erased.
PVR Setting
The PVR settings contain relevant options for the inclusion or time-shift function. These are Timeshift, Jump, Timeshift to Record and display REC icon.
Timeshift
With this function you can turn off Time shifting or activate. The options are "Off" and "On"
Off
No
Time-Shift
On
The Time-Shift function is always
on
Note:
If you select "On", it will remain size of 3G for timeshift.
Recommendation: Use the On option.
Jump
You can set the jump time. It is available for pressing the |◀/▶| button when you are playing
the recordings. There are 30Sec, 1Min, 5Min, 10Min and 30Min. The default setting is 30sec.
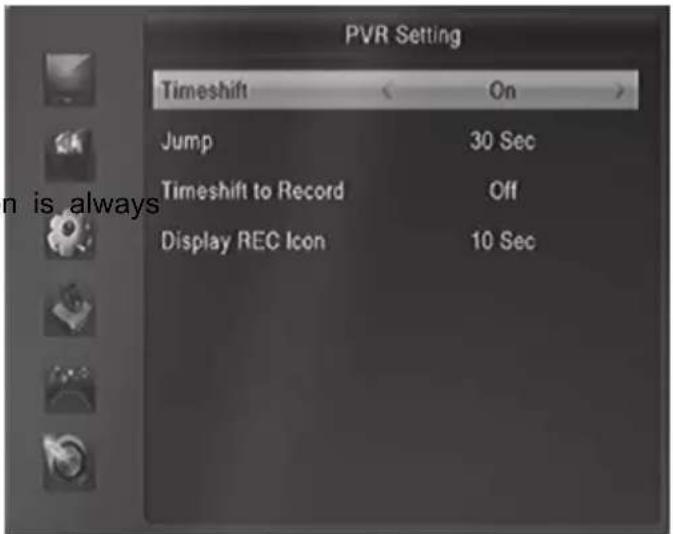
Time-shift to Record
This allows you to define whether the Timeshift recording is to be stored permanently or not.
On Will always be stored in
Off After exit from Time-Shift, the file is deleted
Recommendation: Use the option off. Otherwise, the USB memory are quickly filled.
Display REC Icon
You can set the display time of REC icon when recording. There are four options, Infinite, 5sec, 10sec and Never.
| Infinite | Display the REC icon all the time |
| 5sec | Display the REC icon hold on 5sec |
| 10sec | Display the REC icon hold on 10sec |
| Never | Don't display the REC icon |
Check the following guide for the possible cause of a problem before contacting service. Technical Support of XORO:
| Symptom | Correction |
| No DVB-C reception /serious distortion bymosaics or artefacts/freeze pictures | No DVB-C reception in your region.Retry the Auto Scan.Contact your Cable Network Provider |
| No power | Plug the power cord into the outlet tightly and turn on the power. |
| Can not scan programs | Adjust the dishRefer settings for searching |
| No picture / no colouredpictures | Control the connection to the TV set.Control the video output mode in the setup.TV channel or program is scrambledPay attention to the AV settings |
| Remote control does notwork | Change the batteries.Operate within normal range (max. 5 meters, 30°)The sensor is pointed to by bright light. |
| No sound | Cancel Mute. PressMUTEbuttonIncrease volume. PressVOL+buttonPay attention to connection to TV set or amplifier. |
| Audio / Subtitle withoutfunction or can no choose | Change audio track (pressAUDIObutton)Change subtitle track (pressSUBbutton)Other audio track is not supportedSubtitles are not supported by broadcaster |
| No RecordingNo Playback | Recording/Timeshift is supported by HRK 8750 CI+ only. It is not supported by HRK 8740 CI+!No USB memory are connected.No free space on the storage.Do not playback any files which are not specifiedsee page 47 (DVR Set!) |
| Recording has jerkings orother mal functions | The connected storage is too slow. Please use only USB-Sticks with 16 GB or higher.Please control the reception quality of the dish and align them for getting better quality. |
General data
Power supply AC 100-240 V with 50/60Hz
Power Consumption < 25 Watts / < 1 Watt in Stand-By
Dimensions 260 x 190 x 40 mm
TV-Tuner
Input Frequency 50,5-858 MHz
Impedance 75Ohm
Video Decoder
Standard MPEG 2 up to level (MP@ML) and (MP@HL)
MPEG 4 (H.264) up to High Profile Level 4
Aspect Ratio 4:3 / 16:9
Audio Decoder
Standard ISO/IEC 11172 Layer I & II, AAC, AC3
Sampling Frequency 32, 44.1 & 48 kHz
Connections
Video HDMI, SCART, Composite
Audio Digital Audio output by coaxial, Stereo RCA
USB 2x USB 2.0 High Speed
Others Cl+ Interface
Operating conditions
Temperature 0 - 40°C
Humidity 5 - 90% (non condensing)
Note:
Weight and dimensions are not absolutely exact values. Specifications are subject to change
In case the products delivered are not free from defects in material or workmanship, MAS Elektronik AG has the right to either repair or replace the defective product at its choice. MAS Elektronik AG manufactures and repairs goods using components which are new or equivalent to new in accordance with industry standards and practice.

Technically unlimited
M A S
Elektronik AG
The warranty for wearing parts (e.g. rechargeable batteries) is limited to 6 months.
In case the device is equipped with internal data storage (e.g. hard disc drive, Flash drive), the customer is responsible to backup his data before sending the device. MAS Elektronik AG is not liable for any data loss on returned devices. MAS Elektronik AG reserves the right to reset returned devices to factory defaults. Please note your personal settings for this reason.
MAS Elektronik AG is not liable for any accessories not belonging to original package content such as DVDs, hard disc drives, Flash storage devices, batteries, etc.
This limited warranty covers the warranty requirements set by authorities in your country.
This limited warranty does not cover finishes, accessories or batteries, nor does it cover damage resulting from accident, misuse, abuse, dirt, water, battery leakage, tampering, servicing performed or attempted by unauthorized service agencies. This limited warranty does not cover damages resulting from firmware upgrades. Only in case of firmware upgrades needed to add functions promised at time of purchase, such damages are covered by this limited warranty. For a correct and frictionless completion of warranty or repairs you need a RMA No. You may obtain a RMA on the internet at rma.xoro.com or by telephone.
Please send the device in its original packing material, all standard accessories and a copy of the invoice, a description of defect and the RMA No. to following address. Please note the RMA number clear and in large numbers on the outer package.
MAS Elektronik AG
Weidegrund 3
21614 Buxtehude
Germany
Support
e-mail: support@erssservice.de
Hotline: +49 (0) 4161 800 24 24
Fax: +49 (0) 4161 800 24 61
FREE TO CHOOSE INNOVATIONS

XORO by MAS Elektronik AG
natural_image
Green recycling symbol with four chasing arrows forming a triangle (no text or labels)HRK 8750 CI+ v2/HRK 8740 CI+
DE: V1
ENG: V1
FS: 12589



- XORO®
- USB Anschluss
- Servicefall
- Energie sparen
- Hinweise:
- USB Anschlüsse
- Anschlüsse
- Betriebsbedingungen
- Safety information
- Recycling Information
- Accessories / Features
- Connection
- First Steps
- CAM module
- User Manual
- Power Supply
- USB port
- Position
- Defect
- Recycling of electronic devices
- Recycling of paper and carton
- Recycling of plastic parts
- Green Dot
- Batteries
- Accessoires
- Notes:
- Features
- Default settings
- Front Panel
- Rear Panel
- Note:
- Insert batteries and operation radius
- Buttons
- Buttons of the remote control
- Connecting to Cable and TV
- General information
- To external decoder or amplifier
- Stereo connection to a amplifier or soundsystem (Stereo)
- Common Interface
- Inserting the card and the CAM Module
- Ejection of the module
- First Time Installation
- Important keys and functions
- Channel List
- Searching programs
- Filter the Channel list
- List the programs as alphabet
- Favourites
- Switch Channel
- Last channel
- Subtitles
- Audio settings of TV programs
- Teletext
- Resolution
- Navigate in settings
- Sleep
- Zoom
- Switch TV/Radio
- EPG
- Programming from EPG
- CI+ module authenticate
- Preparation
- Recording
- Changing stations
- Playback Mode
- Format of the recording
- Time shifting
- Playback functions
- Record programming
- Cancel programming
- Edit Timer
- Recorded List
- Playback of a file
- File management of the recordings
- Media-Player
- Images
- Aids to navigation in the file browser
- Multi-View screen
- Playback
- Listening to music during the image display
- Play List
- Edit
- Supported formats
- Music
- Play
- Video
- Navigating in the file browser
- Navigating while playing
- GOTO function
- Record (HRK 8750 CI+ only)
- Navigating while playing back
- Rename a recording
- Lock a recording
- Delete a recording
- Edit Channel
- TV Channel List
- Locking channels
- Channel skip
- Move a Channel
- Editing channels
- Sort
- Delete
- Rename
- Define favourite
- Radio Channel List
- Delete All
- Installation
- Auto Search
- Quick Search
- System Setup
- Language
- TV System
- Video Resolution
- Aspect Mode
- Digital Audio Out
- Display Setting
- Local Time Setting
- GMT Offset
- Summer Time
- Date/Time
- Timer Setting
- Parental Lock
- Menu Lock
- Channel Lock
- New Password
- Confirm Password
- OSD Setting
- OSD Timeout
- OSD Transparency
- OSD Aniamation
- Favourite
- Other
- Auto Standby
- Cable Out
- Tools
- Information
- Factory Setting
- USB Upgrade & Save
- Mode
- File
- Start
- Media Play
- Remove USB device safely
- REC Setting (HRK 8750 CI+ only)
- PVR Storage Setting
- DVR Set
- Format
- Warning:
- PVR Setting
- Timeshift
- Recommendation: Use the On option.
- Jump
- Time-shift to Record
- Recommendation: Use the option off. Otherwise, the USB memory are quickly filled.
- Display REC Icon
- General data
- TV-Tuner
- Video Decoder
- Audio Decoder
- Connections
- Operating conditions
- XORO by MAS Elektronik AG
Brand : XORO
Model : HRK 8740 CI+
Category : Receiver