
T-S1000 - Home cinema amp YAMAHA - Free user manual and instructions
Find the device manual for free T-S1000 YAMAHA in PDF.
User questions about T-S1000 YAMAHA
0 question about this device. Answer the ones you know or ask your own.
Ask a new question about this device
Download the instructions for your Home cinema amp in PDF format for free! Find your manual T-S1000 - YAMAHA and take your electronic device back in hand. On this page are published all the documents necessary for the use of your device. T-S1000 by YAMAHA.
USER MANUAL T-S1000 YAMAHA
1 To assure the finest performance, please read this manual carefully. Keep it in a safe place for future reference.
2 Install this unit in a well ventilated, cool, dry, clean place - away from direct sunlight, heat sources, vibration, dust, moisture, and/or cold. For proper ventilation, allow the following minimum clearances.
Top: 10cm (4 in)
Rear: 10cm (4 in)
3 Locate this unit away from other electrical appliances, motors, or transformers to avoid humming sounds.
4 Do not expose this unit to sudden temperature changes from cold to hot, and do not locate this unit in an environment with high humidity (i.e. a room with a humidifier) to prevent condensation inside this unit, which may cause an electrical shock, fire, damage to this unit, and/or personal injury.
5 Avoid installing this unit where foreign objects may fall onto this unit and/or this unit may be exposed to liquid dripping or splashing. On the top of this unit, do not place:
- Other components, as they may cause damage and/or discoloration on the surface of this unit.
- Burning objects (i.e. candles), as they may cause fire, damage to this unit, and/or personal injury.
- Containers with liquid in them, as they may fall and liquid may cause electrical shock to the user and/or damage to this unit.
6 Do not cover this unit with a newspaper, tablecloth, curtain, etc. in order not to obstruct heat radiation. If the temperature inside this unit rises, it may cause fire, damage to this unit, and/or personal injury.
7 Do not plug in this unit to a wall outlet until all connections are complete.
8 Do not operate this unit upside-down. It may overheat, possibly causing damage.
9 Do not use force on switches, knobs and/or cords.
10 When disconnecting the power cable from the wall outlet, grasp the plug; do not pull the cable.
11 Do not clean this unit with chemical solvents; this might damage the finish.
12 Only voltage specified on this unit must be used. Using this unit with a higher voltage than specified is dangerous and may cause fire, damage to this unit, and/or personal injury. Yamaha will not be held responsible for any damage resulting from use of this unit with a voltage other than specified.
13 To prevent damage by lightning, keep the power cable and outdoor antennas disconnected from a wall outlet or the unit during a lightning storm.
14 Do not attempt to modify or fix this unit. Contact qualified Yamaha service personnel when any service is needed. The cabinet should never be opened for any reasons.
15 When not planning to use this unit for long periods of time (i.e. vacation), disconnect the AC power plug from the wall outlet.
16 Install this unit near the AC outlet and where the AC power plug can be reached easily.
17 Be sure to read the "TROUBLESHOOTING" section on common operating errors before concluding that this unit is faulty.
18 Before moving this unit, press POWER downward to turn off this unit and then disconnect the AC power plug from the wall outlet.
WARNING
TO REDUCE THE RISK OF FIRE OR ELECTRIC SHOCK, DO NOT EXPOSE THIS UNIT TO RAIN OR MOISTURE.
As long as this unit is connected to the AC wall outlet, it is not disconnected from the AC power source even if you turn off this unit by POWER.
CONTENTS
PREPARATION
CONTROLS AND FUNCTIONS 2
Front panel 2
Controlling this unit with a remote control. 2
CONNECTIONS 3
OPERATIONS
TUNING 4
Automatic tuning 4
Manual tuning 4
Selecting preset stations. 4
PRESETTING STATIONS 5
Automatic station preset (FM stations only) 5
Manual station preset. 5
Clearing the preset station 5
Receiving Radio Data System information (FM stations only) 6
TP Search function (FM stations only). 7
ADDITIONAL INFORMATION
TROUBLESHOOTING. 8
SPECIFICATIONS 9
Features
40-station FM/AM preset tuning
Automatic station preset (FM stations only)
- Radio Data System text information display capability
2-line information message display
Supplied accessories
Please check that you have received all of the following parts.
- Indoor FM antenna
AM loop antenna
RCA stereo cable
Power cable
About this manual
- indicates a tip for your operation.
- This manual is printed prior to production. Design and specifications are subject to change in part as a result of improvements, etc. In case of differences between the manual and the product, the product has priority.
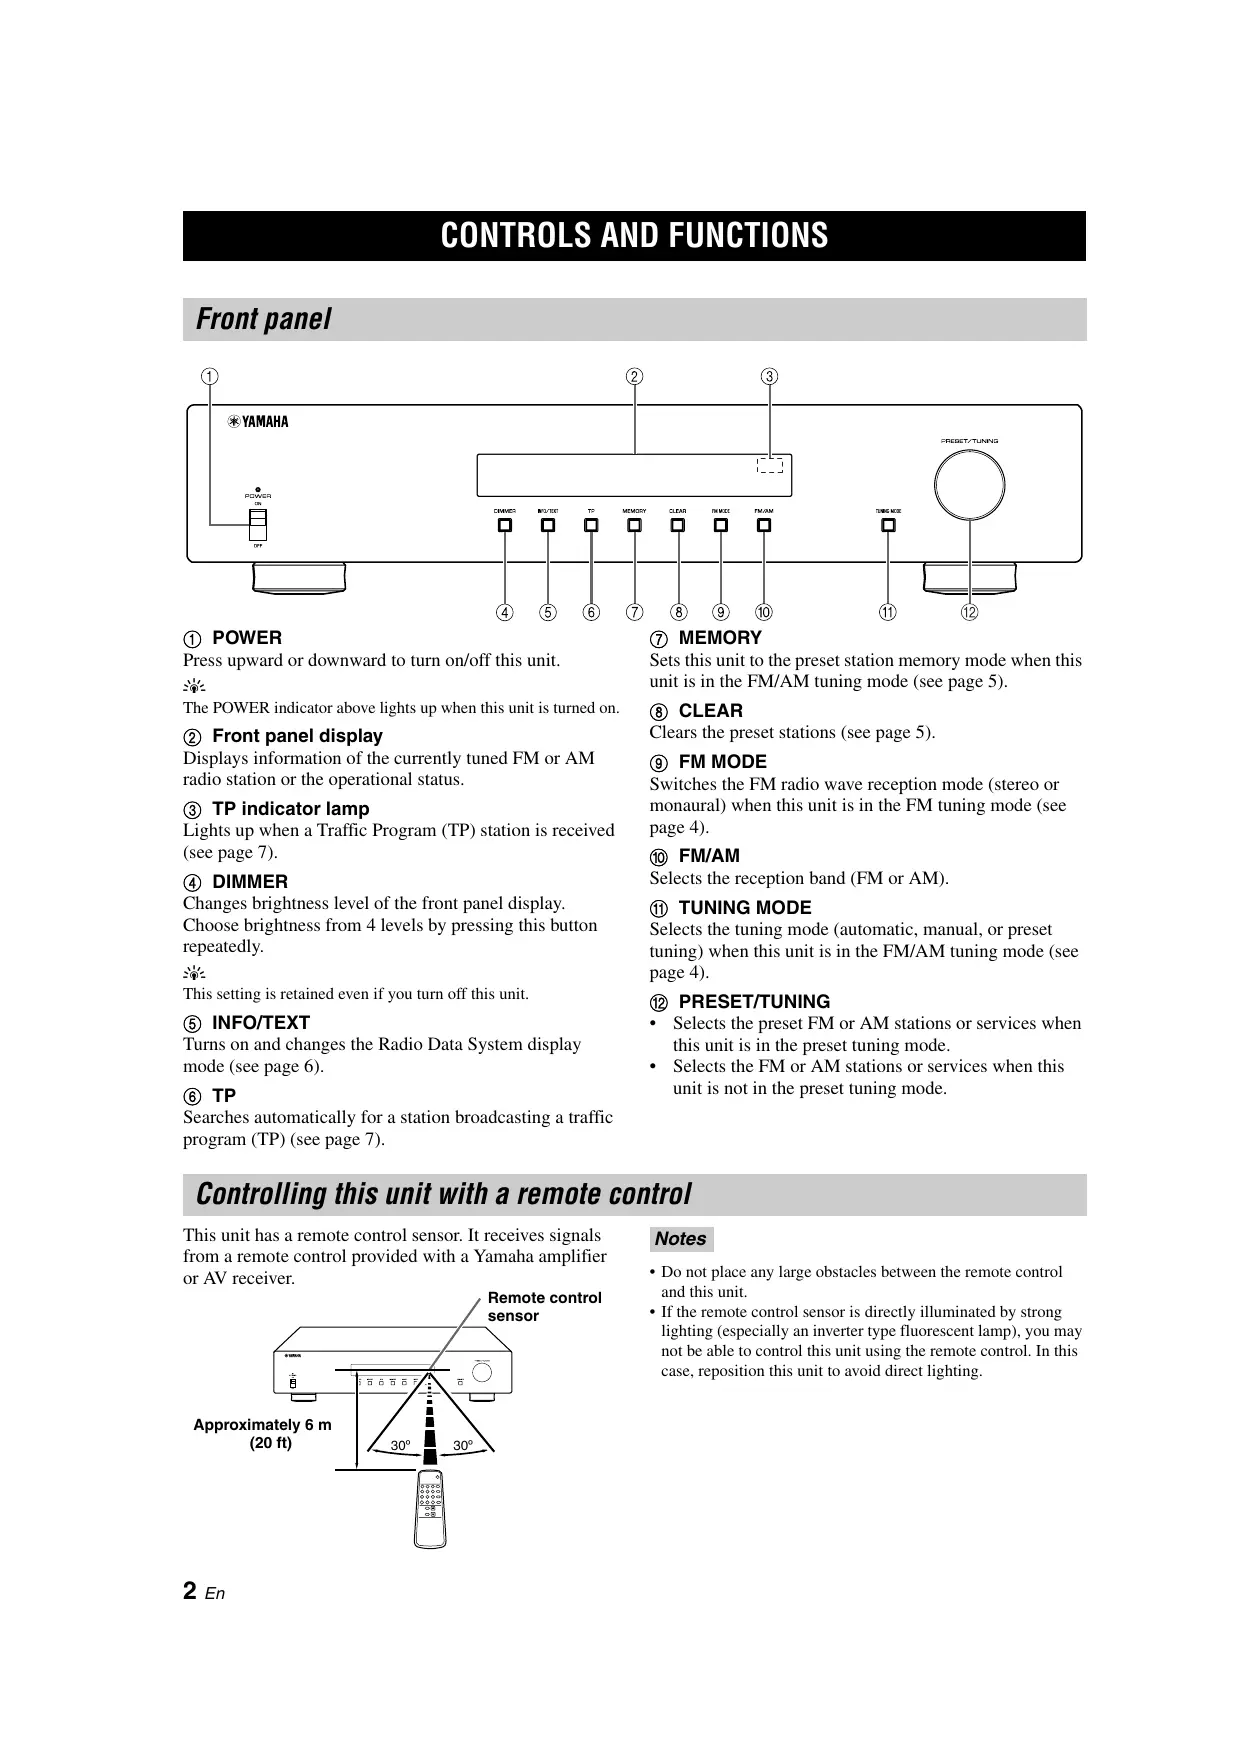
CONTROLS AND FUNCTIONS
Front panel
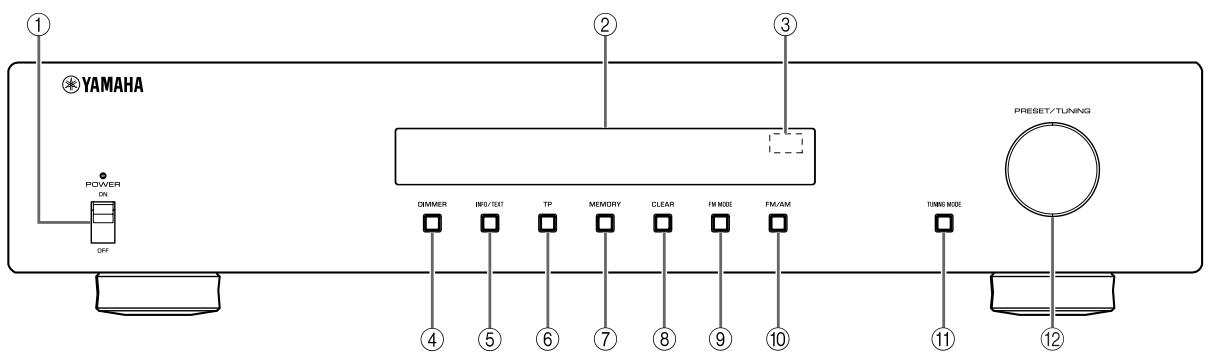
① POWER
Press upward or downward to turn on/off this unit.
中
The POWER indicator above lights up when this unit is turned on.
② Front panel display
Displays information of the currently tuned FM or AM radio station or the operational status.
③ TP indicator lamp
Lights up when a Traffic Program (TP) station is received (see page 7).
④ DIMMER
Changes brightness level of the front panel display.
Choose brightness from 4 levels by pressing this button repeatedly.
This setting is retained even if you turn off this unit.
⑤ INFO/TEXT
Turns on and changes the Radio Data System display mode (see page 6).
⑥ TP
Searches automatically for a station broadcasting a traffic program (TP) (see page 7).
⑦ MEMORY
Sets this unit to the preset station memory mode when this unit is in the FM/AM tuning mode (see page 5).
(8) CLEAR
Clearsthe presetstations (seepage5).
⑨ FM MODE
Switches the FM radio wave reception mode (stereo or monaural) when this unit is in the FM tuning mode (see page 4).
FM/AM
Selects the reception band (FM or AM).
1) TUNING MODE
Selects the tuning mode (automatic, manual, or preset tuning) when this unit is in the FM/AM tuning mode (see page 4).
12 PRESET/TUNING
- Selects the preset FM or AM stations or services when this unit is in the preset tuning mode.
- Selects the FM or AM stations or services when this unit is not in the preset tuning mode.
Controlling this unit with a remote control
This unit has a remote control sensor. It receives signals from a remote control provided with a Yamaha amplifier or AV receiver.
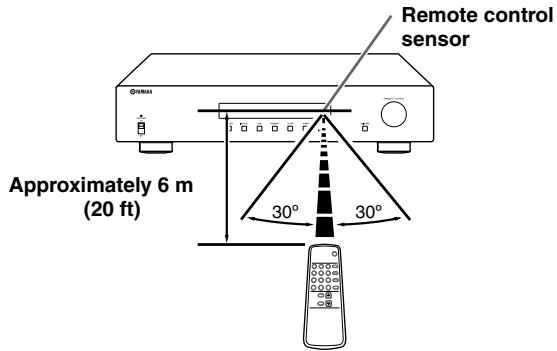
Notes
- Do not place any large obstacles between the remote control and this unit.
- If the remote control sensor is directly illuminated by strong lighting (especially an inverter type fluorescent lamp), you may not be able to control this unit using the remote control. In this case, reposition this unit to avoid direct lighting.
CONNECTIONS
Note
If you experience poor reception quality, install an outdoor antenna. Consult the nearest authorized Yamaha dealer or service center about outdoor antennas.
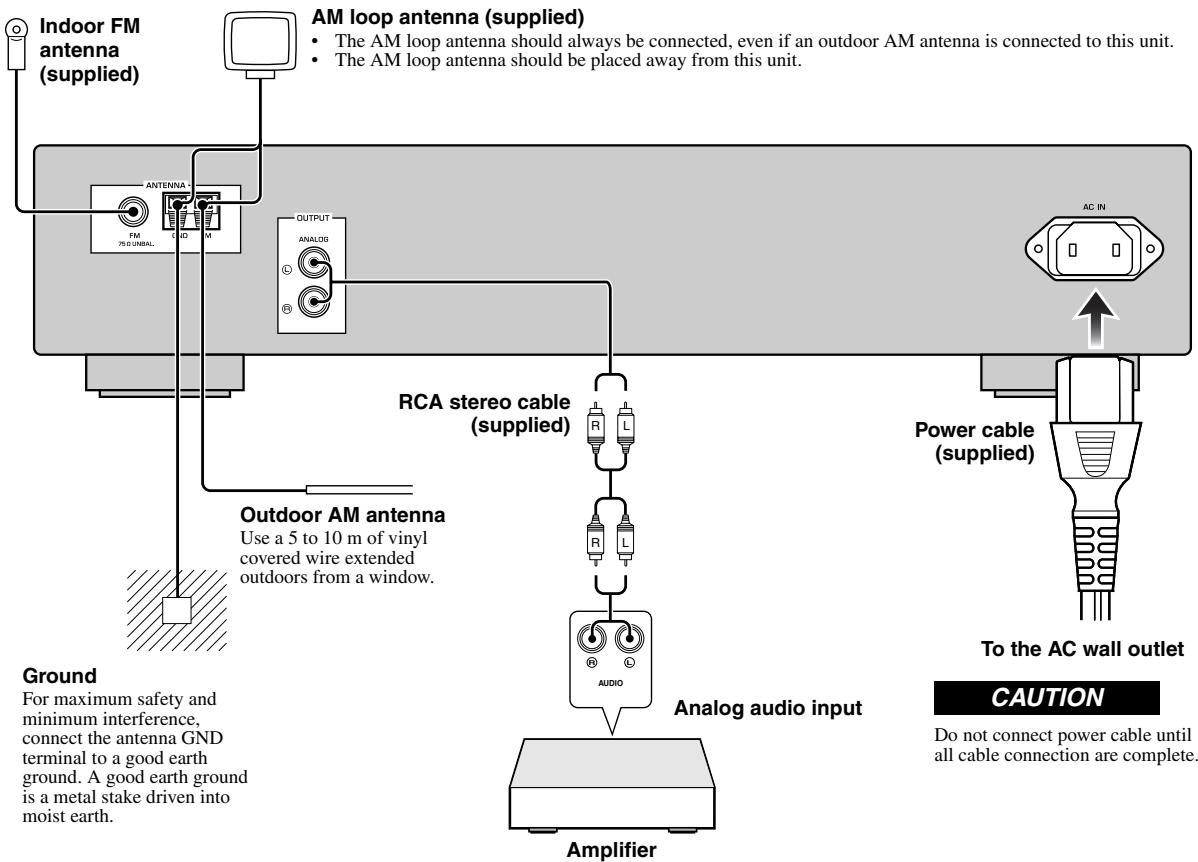
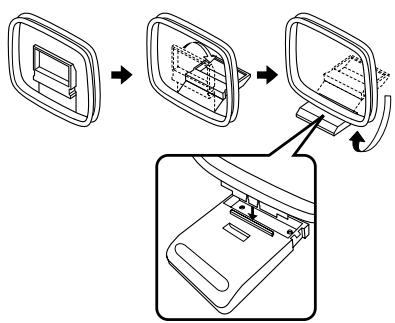
Assembling the supplied AM loop antenna
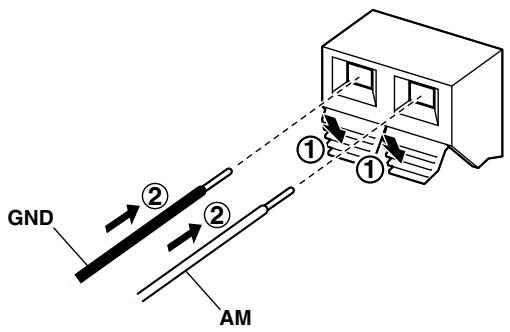
Connecting the wire of the AM loop antenna
TUNING
Automatic tuning
Automatic tuning is effective when station signals are strong and there is no interference.
1 Press FM/AM repeatedly to select the reception band (FM/AM).
2 Press TUNING MODE to select "Auto tune".
Auto tune FM 87.50MHz
3 Turn PRESET/TUNING to begin automatic tuning.
When this unit is tuned into a station, the TUNED indicator lights up and the frequency of the station is shown on the front panel display.

FM 94.98MHz
#
If the station provides Radio Data System information, the program service information will be shown on the front panel display.
Manual tuning
If the signal from the station you want to select is weak, tune into it manually.
1 Press FM/AM repeatedly to select the reception band (FM/AM).
2 Press TUNING MODE repeatedly to select "Manual tune".
Manual tune FM 37.50MHz
3 Turn PRESET/TUNING to select the desired frequency.
When this unit is tuned into a station, the TUNED indicator lights up.
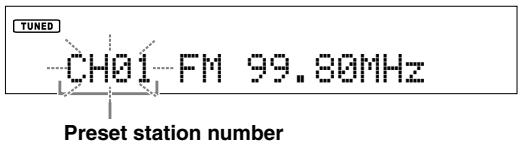
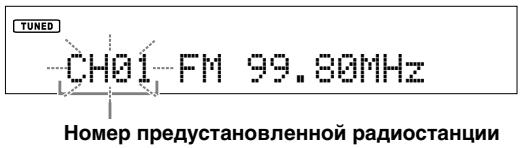
Selecting preset stations
You can tune into any desired station simply by selecting the preset station number.
Note
See the next page to preset stations.
1 Press TUNING MODE repeatedly to select "Preset tune".
2 Turn PRESET/TUNING to select the desired preset station number.
Improving FM reception
If the signal from the station is weak and the sound quality is not good, set the FM radio wave reception mode to the monaural tuning mode to improve reception.
Press FM MODE repeatedly to select "AUTO STEREO" (stereo mode) or "MONO" (monaural mode) when this unit is tuned into an FM radio station.
- When this unit is in the stereo tuning mode, the STEREO indicator lights up on the front panel display.
- When this unit is in the monaural tuning mode, the STEREO indicator goes off.
Note
Even if this unit is in the stereo tuning mode, the STEREO indicator does not light up when the current program is monaural.
PRESETTING STATIONS
You can tune into stations easily by storing (presetting) and recalling them. This function enables this unit to preset up to 40 FM and AM stations.
Automatic station preset (FM stations only)
Note
To preset AM stations, see "Manual station preset" below.
1 Press FM/AM repeatedly to select the reception band (FM).
2 Press and hold MEMORY for more than 3 seconds.
"Auto Preset" flashes on the front panel display. This unit starts searching the stations with strong signals and stores them automatically.

When automatic station preset is completed, this unit tunes into the station preset to "01".
Notes
- Only FM stations with sufficient signal strength are stored automatically. To store a station with weak signal strength, store it manually. See "Manual station preset" below.
- When you rerun "Automatic station preset", all of the preset data will be deleted and new preset data will be set to each preset number.
- If no station is found, the search ends and this unit returns to the previous station tuned in before the search.
Manual station preset
1 Tune into the desired FM/AM station.
See page 4 for tuning instructions.
2 Press MEMORY.
The preset station number flashes on the front panel display for 5 seconds.
Note
Perform the next operation within 5 seconds after pressing MEMORY.
3 Turn PRESET/TUNING to select the desired preset station number while the preset station number flashes.
Note
Perform the next operation within 5 seconds after selecting the preset station number.
4 Press MEMORY again to confirm the preset.
Notes
- When you preset a new station to an existing preset number, new preset data will overwrite the existing preset data.
- The reception mode (stereo or monaural) is stored along with the station frequency.
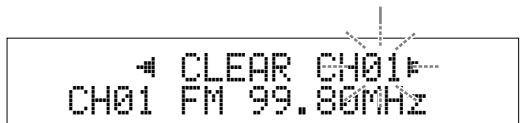
Clearing the preset station
Follow the steps below to clear a preset station one at a time.
1 Select the desired preset station number.
See "Selecting preset stations" on page 4.
2 Press CLEAR.
The selected preset station number flashes on the front panel display.
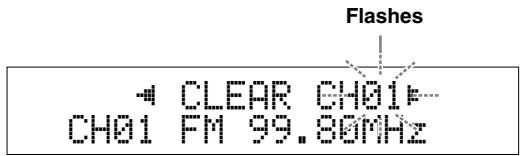
If you do not perform the next operation within 5 seconds, the clearing is canceled.
3 Press CLEAR to confirm.
"PresetXX Cleared" (XX indicates the preset number) appears on the front panel display.
中
To clear all preset stations, press and hold CLEAR for 3 seconds.
"ALL CLEAR" appears on the front panel display.
Receiving Radio Data System information (FM stations only)
Radio Data System is a data transmission system used by FM stations in many countries. This unit can receive four types of Radio Data System data information: Program Service, Program Type, Radio Text, and Clock Time.
1 Tune into the desired Radio Data System broadcasting station.
2 Press INFO/TEXT repeatedly to select the desired Radio Data System display mode.
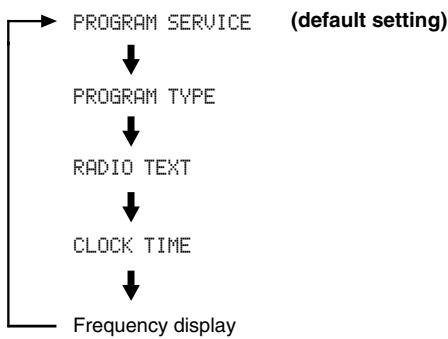
- Select "PROGRAM SERVICE" to display the name of the Radio Data System program currently being received.
- Select "PROGRAM TYPE" to display the type of the Radio Data System program currently being received.
- Select "RADIO TEXT" to display the information on the Radio Data System program currently being received.
- Select "CLOCK TIME" to display the current time.
When you select "PROGRAM TYPE," the following program type names are displayed.
| Program type | Description |
| News | News |
| Current Affairs | Current affairs |
| Information | General information |
| Sport | Sports |
| Education | Education |
| Drama | Drama |
| Cultures | Cultures |
| Science | Science |
| Varied Speech | Varied Speech |
| Pop Music | Pop Music |
| Rock Music | Rock Music |
| Easy Listening | Easy Listening |
| Light Classics M | Light Classical Music |
| Serious Classics | Serious Classical Music |
| Other Music | Other Music |
| Weather & Metr | Weather & Meteorology |
| Finance | Finance |
| Children's Progs | Children's Program |
| Social Affairs | Social Affairs |
| Religion | Religion |
| Phone In | Phone In |
| Travel & Touring | Travel & Touring |
| Leisure & Hobby | Leisure & Hobby |
| Jazz Music | Jazz Music |
| Country Music | Country Music |
| National Music | National Music |
| Oldies Music | Oldies Music |
| Folk Music | Folk Music |
| Documentary | Documentary |
| Alarm Test | Alarm Test |
| Alarm-Alarm! | Alarm-Alarm! |
Notes
- It may take a while for this unit to receive all of the Radio Data System data from the station.
- If the signals being received are not strong enough, this unit may not be able to utilize the Radio Data System data. In particular, the "RADIO TEXT" mode requires a large amount of data and may not be available even when the other Radio Data System display modes are available.
- In case of poor reception condition, press FM MODE to select the monaural reception mode (see page 4).
- If the signal strength is weakened by external interference while this unit is receiving the Radio Data System data, the reception may be cut off unexpectedly.
- When the "RADIO TEXT" mode is selected, this unit can display the program information by a maximum of 128 alphanumeric characters, including the umlaut symbol. Unavailable characters are displayed with the "_” (underscore). The displayed information scrolls continuously.
TP Search function (FM stations only)
This unit can automatically search Radio Data System stations that are broadcasting a traffic program(TP).
Press TP.
"TP SEARCH " flashes on the front panel display for 3 seconds and search starts automatically.
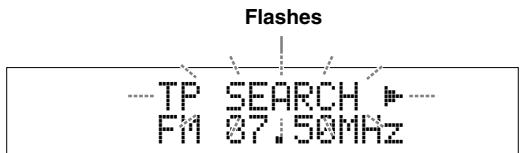
When a TP station is received, TP indicator lamp lights up and TP search finishes.


If the station provides Radio Data System information, the program service information will be shown on the front panel display.
To search the next TP station, press TP.
Notes
- Press TP during TP search to cancel.
- If no TP Stations are found, "NO TP STATION" appears on the front panel display and this unit returns to the state before searching.
TROUBLESHOOTING
Refer to the table below when this unit does not function properly. If the problem you are experiencing is not listed below or if the instruction below does not help, turn off this unit, disconnect the power cable, and contact the nearest authorized Yamaha dealer or service center.
Tuner
| Problem | Cause | Remedy | See page | |
| FM | FM stereo reception is noisy. | The characteristics of FM stereo broadcasts may cause this problem when the transmitter is too far away or the antenna input is poor. | Check the antenna connections. | 3 |
| Try using a high-quality directional FM antenna. | — | |||
| There is distortion, and clear reception cannot be obtained even with a good FM antenna. | There is multi-path interference. | Adjust the antenna position to eliminate multi-path interference. | — | |
| The desired station cannot be tuned into with the automatic tuning method. | The signal is too weak. | Use a high-quality directional FM antenna. | — | |
| Use the manual tuning method. | 4 | |||
| The Radio Data System information does not appear. | The Radio Data System information is not provided by the radio station. | |||
| The signal is too weak. | Use a high-quality directional FM antenna. | — | ||
| AM | The desired station cannot be tuned into with the automatic tuning method. | The signal is weak or the antenna connections are loose. | Tighten the AM loop antenna connections and orient it for the best reception. | — |
| Use the manual tuning method. | 4 | |||
| There are continuous crackling and hissing noises. | Noise can result from lightning, fluorescent lamps, motors, thermostats and other electrical equipment. | Use an outdoor antenna and a ground wire. This will help somewhat, but it is difficult to eliminate all noise. | — | |
| There are buzzing and whining noises. | A TV set is being used nearby. | Move this unit away from the TV set. | — | |
General
| Problem | Cause | Remedy | See page |
| This unit fails to turn on when POWER is pressed downward. | The power cord is not connected or the plug is not completely inserted. | Connect the power cord firmly. | 3 |
| This unit has been exposed to a strong external electric shock (such as lightning or strong static electricity). | Disconnect the power cord, plug it back in after 30 seconds, then use it normally. | — | |
| A “humming” sound can be heard. | Incorrect cable connections. | Firmly connect the audio connection cord plugs. If the problem persists, the cables may be defective. | — |
| This unit does not operate properly. | The internal microcomputer has been frozen by an external electric shock (such as lightning or excessive static electricity) or by a power supply with low voltage. | Disconnect the AC power plug from the outlet and then plug it in again after about 30 seconds. | 3 |
SPECIFICATIONS
AUDIO SECTION
Output Level/Impedance (fixed) FM (40kHz Dev., 1kHz) 1.0 V/1.2 kΩ AM (30% mod,1kHz) 0.36 V/1.2 kΩ
FM SECTION
Tuning Range 87.50 to 108.00MHz
- 50 dB Quieting Sensitivity (IHF, 100% mod.)
Mono 3 V (20.2 dBf)
- Usable Sensitivity (Signal to Noise 30 dB)
Mono . . . . . . . . . . . . . . . . . . . . . . . . . . . . . . . . . . . . . . . . . . . . . . . . . . . . . . . . . . . . . . . . . . . . . . . . . . . . . . . . . . . . . .
Image Rejection Ratio .. 80 dB
IF Rejection Ratio .. 70 dB
Selectivity (400 kHz) .. 70 dB
- Signal to Noise Ratio (IHF)
Mono/Stereo 80 dB/75 dB
Harmonic Distortion (1 kHz)
Mono/Stereo 0.3%/0.5%
- Stereo Separation (40 kHz Dev.)
1 kHz 43 dB
Frequency response (20Hz to 15kHz) -3dB
- Antenna Input (unbalanced) 75Ω
AM SECTION
- Tuning Range 531 to 1611kHz
- Usable Sensitivity 300 μV/m
- Selectivity 30 dB
- Signal to Noise Ratio 50 dB
- Image Rejection Ratio 35 dB
Harmonic Distortion 1.0%
GENERAL
- Power Supply AC 230 V, 50 Hz
Power Consumption 9 W - Dimensions (W x H x D) 435 x 94 x 450 mm (17 1/8 x 3 3/4 x 17 3/4 in)
Weight 5.8 kg (12.8 lbs)
Taking care of this unit
When you wipe this unit, do not use chemical solvents (ex. alcohol or thinner, etc.); this might damage the finish. Use a clean, dry cloth. For heavy dirt, dampen a soft cloth in detergent diluted with the water, wring it out, and then clean this unit up with the cloth.
The screws on the side panels may loosen as wood expands and contracts. In this case, tighten the screws.
Limited Guarantee for European Economic Area (EEA) and Switzerland
Thank you for having chosen a Yamaha product. In the unlikely event that your Yamaha product needs guarantee service, please contact the dealer from whom it was purchased. If you experience any difficulty, please contact Yamaha representative office in your country. You can find full details on our website (http://www.yamaha-hifi.com/ or http://www.yamaha-uk.com/ for U.K. resident).
The product is guaranteed to be free from defects in workmanship or materials for a period of two years from the date of the original purchase. Yamaha undertakes, subject to the conditions listed below, to have the faulty product or any part(s) repaired, or replaced at Yamaha's discretion, without any charge for parts or labour. Yamaha reserves the right to replace a product with that of a similar kind and/or value and condition, where a model has been discontinued or is considered uneconomic to repair.
Conditions
- The original invoice or sales receipt (showing date of purchase, product code and dealer's name) MUST accompany the defective product, along with a statement detailing the fault. In the absence of this clear proof of purchase, Yamaha reserves the right to refuse to provide free of charge service and the product may be returned at the customer's expense.
- The product MUST have been purchased from an AUTHORISED Yamaha dealer within the European Economic Area (EEA) or Switzerland.
- The product must not have been the subject of any modifications or alterations, unless authorised in writing by Yamaha.
- The following are excluded from this guarantee:
a. Periodic maintenance and repair or replacement of parts due to normal wear and tear.
b. Damage resulting from:
(1) Repairs performed by the customer himself or by an unauthorised third party.
(2) Inadequate packaging or mishandling, when the product is in transit from the customer. Please note that it is the customer's responsibility to ensure the product is adequately packaged when returning the product for repair.
(3) Misuse, including but not limited to (a) failure to use the product for its normal purpose or in accordance with Yamaha's instructions on the proper use, maintenance and storage, and (b) installation or use of the product in a manner inconsistent with the technical or safety standards in force in the country where it is used.
(4) Accidents, lightning, water, fire, improper ventilation, battery leakage or any cause beyond Yamaha's control.
(5) Defects of the system into which this product is incorporated and/or incompatibility with third party products.
(6) Use of a product imported into the EEA and/or Switzerland, not by Yamaha, where that product does not conform to the technical or safety standards of the country of use and/or to the standard specification of a product sold by Yamaha in the EEA and/or Switzerland.
- Where the guarantee differs between the country of purchase and the country of use of the product, the guarantee of the country of use shall apply.
- Yamaha may not be held responsible for any losses or damages, whether direct, consequential or otherwise, save for the repair or replacement of the product.
- Please backup any custom settings or data, as Yamaha may not be held responsible for any alteration or loss to such settings or data.
- This guarantee does not affect the consumer's statutory rights under applicable national laws in force or the consumer's rights against the dealer arising from their sales/purchase contract.
Information for Users on Collection and Disposal of Old Equipment and Used Batteries

These symbols on the products, packaging, and/or accompanying documents mean that used electrical and electronic products and batteries should not be mixed with general household waste.
For proper treatment, recovery and recycling of old products and used batteries, please take them to applicable collection points, in accordance with your national legislation and the Directives 2002/96/EC and 2006/66/EC.

By disposing of these products and batteries correctly, you will help to save valuable resources and prevent any potential negative effects on human health and the environment which could otherwise arise from inappropriate waste handling.

For more information about collection and recycling of old products and batteries, please contact your local municipality, your waste disposal service or the point of sale where you purchased the items.
Pb
[Information on Disposal in other Countries outside the European Union]
These symbols are only valid in the European Union. If you wish to discard these items, please contact your local authorities or dealer and ask for the correct method of disposal.
Note for the battery symbol (bottom two symbol examples):
This symbol might be used in combination with a chemical symbol. In this case it complies with the requirement set by the Directive for the chemical involved.
ATTENTION : VEUILLEZ LIRE CE QUI SUIT AVANT D’UTILISER L’APPAREIL.
(stations FM uniqueness)
Auto tune FM 87.50MHz
Auto tune FM 37.50MHz
Manuell stationsinstalling. 4
Auto tune FM 87.50MHz
3 Vrid PRESET/TUNING for att starta automatisk stationsinstalling.
Manuell stationsinstalling
Auto tune FM 37.50MHz
Auto tune FM 87.50MHz
Paraoculars:
Paraoculars are used to measure the amount of light that passes through the eye. The amount of light that passes through the eye is determined by the amount of light that passes through the lens.
Nota
Auto tune FM 87.50MHz
BbI6op IpeUcTaHOBJIeHHbIX paIHocTaHIIIN.....4
IPEJBAPHTEJIbHAA YCTAHOBKA CTAHIIH 5
ABTOMaTHuecka IIpeUcTaHOBKa cTaHiiN (TOJIbKO IJIa CTAHII B DHaIa3OHe FM) ....5
PyuHaI IpeDyctaHOBKa cTaHn.. 5
YJaJIeHHe IpeJyCtAHOBJIeHHoIpaIIIOCTaHIIN. 5
TEXHINUeCKNE XAPAKTEPNCTIKN.....9
OncsaHne
- Hac tropona IIpeDyucTaHOBOK 40 ctaHnIIN dHaIIa3OHa FM/AM
- ABTomatHuecka IIpeDyucTaHOBKa cTaNIIIN (TOJIbKO IJIa cTaNIIIN B DnAIIa3OHe FM)
IocTablaembIe npHaJdJIeXHoCTn
Y6eIITecb HaJIHcHH Bcex IepeHcJIeHHbIX HNKe JeTaJIe.
KOMHaTHa FM-aHTeHHa
- Pamoyha AM-aHTehHa
Ctepeoka6eJIb c pa3beMaMn RCA
- CnIOBOI Ka6eJIb
O daHHOM pyKOBoDCTBe
CHMBOJIOTMeyaetCOBETJIAO6JIeYHeHHyIipaBJIeHHA.
-Даанhoe pykoBOIDCTBO OTIEueaTaHO IO haayajI IPOIN3BOIDCTBA.ДиЗаIH N TeXHnueckHe XapaKTePcHtKN MOrYT YacTHUHO H3MeHHbC s cJIbO yCOBepHHeHCTBOBaHN H T.I. B cJIyuae, ecJIn HmEIoTcpa3JIuHn MeJdpykoBOIDCTBOM H aIIIapaTOM, IIpHOpHTeT OTdAeTc aIIIapaTy.
ΦροHTaJIbHaЯ NaHeJIb

① POWER
HaKMHTe HJIN OTOXMHTe, YTO6bI BKJIIOHTb HJIN BbIKJIOHTb 3TO yCTPOHCTBO.
KorJa yCTpoIcTBO BKJIIOUeHo,HaJ 3ToI KHOIIKO CBETHTC8 HINIKaTOP POWER (ΠΙΝΑΗΝΕ).
②Дисплей пеедné панели
OTo6paKaetaHΦopMaIIO O TeKyuIe BbI6paHNoi paAnocTaHIIIN INaIIa3OHa FM HJI IN AM HJIN paOoee COCTOHNHe.
③ INHdNkaTop TP
CBeHTTcA, KOrIa IIpHINMaEeTcS cTaHIIHc IIpOprAMMOI DOpOxHBIX COOOJIeHHN (TP), CMOTpHTe CTrp.7.
④ DIMMER
Auto tune FM 87.50MHz
3 ПовернITE рergyларop PRESET/TUNING, YTO6bI NaHaTb aBToMaTnueckyIO hAcTpoiKy. Ipi NaCTPOnKe JaHHOrO aIIIapaTa Ha paAnocTaHnIO 3aRopaetc HnDnKaTOp TUNED n YaCTOTa paAnocTaHnIO OTO6paXaETcRa Ha IIncJIe e pOHTaJIbHOI IaHeJIN.
TUNED
FM 94.98MHz
EcJIN paAnocTaHnIa IpeJaet HnΦopMaIIIO Radio Data System, HNΦopMaIIa 6 oc yIyre 6yIe 6yIeT OTObpaKeHa Na IIHCJIeE φpoHTaJIbHOIIaHEJI.
Pуная Habстpoиka
PnCJIa6OM CnHNaJIe JeJIaEMoI paINocTaHcIIH, IIPOHN3BeINTe pyuHyIO HAcTPOIKy.
1 HeodhokpatHo haxmMaTe KhoNky FM/AM, YTO6bI Bbl6paTb dnaNa3OH pInema (FM/AM).
2 Heodokpatno haxmaite KhoNky TUNING MODE, yTo6bI yCTaHOBtB 3HaueHne "Manual tune" (PyuHaJn HacTpoKa).
Manual tune FM 87.50MHz
3 Повернite рergyларop PRESET/TUNING, YTO6bl BbIbpaTb XeJaemyu YaCTOTy.
Korla yctpoicTBo hactpoHTcna CTaHIO, 3aogpHTc HnDnKaTOp TUNED.
BbI6op npedeYcTaHOBJIeHHbIX paNocTaHcN
MoxhoJIeKHO HAcTPOHTbcHa JIO6yJO JeJiaemyo paIIOCTaHcIIIO, BbIbpaB HOpE IpeYcTaHOBJHeHHo paIIOCTaHcIIIN.
PpmeaHne
Hnctpykui nppeyuctahOBke paHIOCTAHII pINBEHeHa ha cJIeYIOIe CTpaHIIe.
1 HeodnokpaTHo haxmMaIte KhoNky TUNING MODE, yTo6bI yCTaHOBnTb 3HaueHne "Preset tune" (PpeDyuctaHOBka).
2 ПовернITEperуларTOP PRESET/TUNING, YTO6bI BbI6paTb JKeJlaemyIO npeducTaHOBLeHHyO paHocTaHcHIO.
UnyucheHne npemaB dnaana3OHe FM
IIpn cIa6om cnHraJIe paIIOCTaHcIIIN IIJIOXOM KaueCTBe 3Byka yCTaHOBHTe MOHOΦOHueCKn peKHM IIpHEMa IIpoIgpaMMbI B IHaIIa3OHe FM, YTO6bl yJIyUHNTb KaueCTBO IIpHEMa.
HeoHOKpaTHO haxmMaTe KhoNky FM MODE, yTO6bl yCTaHOBnTB 3NaYeHne "AUTO STEREO" (cTepeofoHNueckn peXm) nIi "MONO" (MOHOFOHueckn peXm), eCNI yCTpoiCTBO HAcTpoEHO Ha npHem paAnocTaHcHn B dnaIanaOHe FM.
Kornda yctpoiCTBO haoOnITcB CtepeofoHnueckom pexHMe,HaIncJIiee fpoHTaJIbHOIaHeJIIN CBeHTTCaHdNKaTOP STEREO.
KorJa yctpoIcTBO haoJntcB MOHOΦoHnueckom pexHMe, HIIHKaTOP STEREO He cBeHTc.
PpMueaHne
B cIyue IprHema MOHOΦOHHeeCKo IIpOgPAMMbI HIIHKaTOp STEREO He 6yIeT CBeHTbC,JaKe ecJIn ycTroOhCTBO HAXOINTcB CtepeoΦOHHeeCKOM pexHMe.
ПЕДВAPИТЕЛБHA YCTAHOBKA CTAHЦИ
BbIbIpaTb paINIOCTaIHIN MOxHOb, COxpaHNB (IpeIbAPHTeJIbHO yCTaHOBnB) INx, a 3aTeM BbI3bIBaR Tpe6yEmbIe cTAIHIN. 3Ta yHKIIIN IIO3BOJIAeT BbIIOJIHNtB IIpeYcTaHOBky IO 40 paINIOCTaIHIN B dHaIIa3OHAx FM n AM.
AByomatNuecka IpeDyCTaHOBKa CtaHcN (TOJIbKOДЛЯ CTAHcNВ Dnana3OHe FM)
Примеразно
HnCTpyKIIIIO IpeYcTaHOBe ctaHIINB DnHaIa3OHe AM npHBeJeHa Bpa3JIeIe "PyHna IpeYcTaHOBA ctaHIIN" HnKe.
1 HeoHOKpaTHO HaxnMaIte KhoNky FM/AM, yTO6bl BbI6paTb dHaana3OH npHema (FM).
2 HaxMMTe n ydepxNBaIte HaxaToi KNHONKy MEMORY 6oJIee 3 cekyHd.
HaJINCIJIe 中 pOHTaJIbHOI\PaHEJIH NaHHeT MnRAtB HINIKaTOP "Auto Preset" (ABTomaTHueckaI IpeYCTaHOBka). YcTPOIHCTBO NaHET IOHCK cTAHIHN CCHJIbHbIM CNTHaJIOM N ABOTMATHueCKH COxpaHHT HX.
Auto Preset CH FM100.05MHz
IocJIe 3aBepHHeHHa ABTomAtHueCKoI IpeJyCTaHOBKn 6yJeT BbIbpaHa IIpeJyCTaHOBKa cTaHInn c HomepOM "01".
PpIMeuaHnA
- ABTomaTHueckN 6dyT coXpaHeHbToIbKo paIHocTaHIINB IJnA3OHe FM cIOCTaTOUHO CbIbHM CTHHAlOM. CoXpaHEHe cTaHIINc O cIa6bIM CTHHAlOM CJIeYET BbIIIOJIHrTb BpyHyIO. CM.pa3JIeI "PyuHaIpeJyCTaHOBka CTaHIINH Heke.
B CIIyue IIOBTOPOI 3aIpyKa yHKIIIN "ABTOMATHeCKa IpeNyCTaHOBA cTAHNI" BCE coXpaHEHbIe DaHHbIe 6dyT yJaJIeHbI. KaIXOMy Homepy IpeYcTaHOBKN 6dyT Ha3HaYeHbI HOBBIE JaHHbIe.
EcJINCTAHINHe6yUTHAIJIeHBI,IOHCKIIpeKpaTHTcN,I yCtpoNTBOBV3IOBETCTAHINIO,KOTOPA6bJIaBbIbpaHa IOhaJaIIOHCKA.
PyuHa npedyctaHOBKa CTaHcN
1 HactpoIteCb Ha XeJIaEmyIO paIIOCTaHcIIO B DuaIa3OHe FM/AM.
CMOTpHt cTp.4c yKa3aHaMn IIO HaCTpOHe.
2 HaxmTe KhoNky MEMORY.
HomepIpeUcTaHOBKnCTaHnHaIncJIeee
fpoHTaJIbHOIIaHEJIN6yJeT MmraTb B TeueHne 5
cekyHd.
PpMueaHne
BbIIOJIHNTe CJIeIyUOIIee JeIcTBHe B TeYeHHe 5 cKeYHd c MOMeHTa HaxKaTHa KHOIIKN MEMORY.
3 ПовернITE perуларTOP PRESET/TUNING BO BpemMnraHn HOMepa npedyctaHOBJIeHHo CTaHcN, YTO6bI Bbl6paTb JKeJLaEmy npedyctaHOBJIeHHyU paAnocTaHcNIO.
PpMeeHne
BbIIOJIHnTe CJIeIyUOIIee JeIcTBHe B TeUeHne 5 cKeYHc MOMeHTa BbI6opa HOMepa IIpeJyCTaHOBJieHHo CTaHIHN.
4 NOBTOPHO HAXMITE KHONKY MEMORY, YTO6bl NODTBepnIb IpeDyctaHOBKy.
PpimeyaHn
Bcnyae Ha3naeHnHOBOcTaHnHc cyIecTByIOuEMy HOMepy IpeCyCTaHOBKn, HOBbIe DaHHbIe IpeCyCTaHOBKn Ipe3aHHHT cyIecTByIOUHe DaHHbIe IpeCyCTaHOBKn.
BMeTe c TactToH coXpaHaeTc H peKHM IIpHema (ctepeoOHnueckn IIN MOHOoHNueckn).
ydaJIeHneIpeDyCTaHOBJIeHHoJ paIIOCTaHcN
YTo6bI yJaJIHTb OJHy IIpeIyUcTaHOBJIeHHyO paIIOCTaHIINIO, BbIIIOJIHNTE CJIeIyIOIIne IeIcTBHJ.
1 BbI6epnte Homep XeJaemoi npedyctaHOBJIeHHo paHIOCTaHcnn.
Cm. pa3JIeJ "BbI6op IIpeIyuctaHOBJIeHHbIX paIIOCTaHIIN" Ha cTp. 4.
2 HaxmTe KhONKy CLEAR.
HomepIpeNyctaHOBJeHHoCtAHnHa HcPiJe e
fpoHTaJbHOIIaHeJIH NaHcET MmTaTb.
Muraet
EcIn B TeueHne 5 cekyHn He 6yIeT BbIIIOJIHeO CJIeIyIOIIee JeIcTBHe, ydaJIeHne 6yIeT OTMeHeHO.
3 HaxmTe KhoNky CLEAR, YTo6bl NoDTBepnTb ydaJeHne.
HaIINJIeepoHTaJIbHOIpaHeJN OTo6pa3NTc8 coO6IeHne“PresetXX Cleared”(CtAHIIy XX yJaJIeHa),rJe XX o6O3Haayet Homep IIpeDyCTaHOBKN.
YTO6bI ydaJIHb BCE IIpeJyctaHOJIeHHbIe paJIOhcTaHIHN, HaxMHTe I ydepKnbaiTe hKaTcOIK KhoNkycLEAR B TeYeHne 3 cekyHd. Ha IcnJIeepoHTaJIbHOI pHeJIi OTO6pa3ITcCo06IIeHne ALL CLEAR" (BCE CTAHIIN YDAJIEHbI).


