E&FT 301 - Thermometer TOPCOM - Free user manual and instructions
Find the device manual for free E&FT 301 TOPCOM in PDF.
User questions about E&FT 301 TOPCOM
0 question about this device. Answer the ones you know or ask your own.
Ask a new question about this device
Download the instructions for your Thermometer in PDF format for free! Find your manual E&FT 301 - TOPCOM and take your electronic device back in hand. On this page are published all the documents necessary for the use of your device. E&FT 301 by TOPCOM.
USER MANUAL E&FT 301 TOPCOM
natural_image
White handheld electronic device with a black circular display showing measurement markings (no readable text or symbols beyond branding)EAR & FOREHEAD THERMOMETER 301
USER GUIDE / HANDLEIDING / MANUEL D'UTILISATEUR BEDIENUNGSANLEITUNG / MANUAL DE USUARIO / BRUKSANVISNING BRUGERVEJLEDNING / ANVÄNDARHANDBOK / KÄYTTÖOHJE MANUALE D'USO / MANUAL DO UTILIZADOR / UŽIVATELSKÁ PŘÍRUČKA OĐHΓIEZ XPHΣΗΣ / HASZNÁLATI ÚTMUTATÓ / INSTRUKCJA OBSIUGI UŽIVATEL'SKÝ MANUÁL
V1.1 - 06/11
CE0123

text_image
Diagram of a device with numbered parts labeled for identification and assembly reference.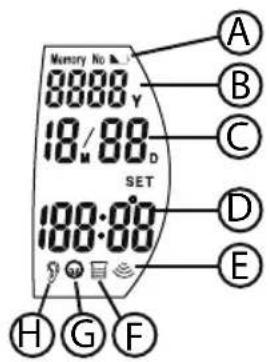
text_image
Memory No 8888 Y 18/88 D SET 100:00 A B C D E H G F1 INTRODUCTION
The Ear & Forehead thermometer uses infrared technology to measure infrared energy emitted from the forehead or eardrum and surrounding tissue, and then converts it into temperature value.
The Ear and Forehead Thermometer can also be used for measuring the room temperature and the temperture of food and fluids.
2 ABOUT BODY TEMPERATURE
Normal human body temperature fluctuates throughout the day; generally, lowest in the morning, highest in the evening.
Different parts of human body also have different temperatures. Therefore, the standards of measuring oral, axillary, rectal and ear temperatures are different. The human body temperature is controlled and adjusted by the hypothalamus in the brain. As the veins flow through the hypothalamus, they also flow through the ear-drum in the mid ear. Thus, measuring the ear temperature (the temperature of the ear drum membrane) can best reflect the body temperature.
Normal body temperature is a range, not a fixed value.
When using an IR ear thermometer to take temperature, the normal body temperature range is 35.8 ^ - 37.6 ^ . Also, people's normal temperature ranges tend to decrease with their age.

IMPORTANT NOTE
- It is important to determine your and your family members' normal temperature ranges and write them down.
- Practice to take temperatures on yourself and your healthy family members to determine their normal temperature ranges.
- It is important to clean your thermometer before the first time of use and after each application, otherwise the result may be incorrect.
• After a shower or exercise, the body temperature will rise. Take a rest before taking temperature.
3 SAFETY NOTES

WARNING
- Read carefully through the following information concerning safety and proper use. Make yourself familiar with all the functions of the equipment. Be careful to keep these advice notes and if necessary pass them on to a third party.
- This thermometer is intended for household use only. The use of this thermometer is not intended as a substitute for physician's consultation.
- The tip of the probe is the most delicate part of the thermometer, accurate readings from the thermometer can be obtained only if the tip of the probe is clean and intact.
- Don't touch or blow the infrared sensor.
- Measurement must be suspended until the ear is warmed up after outdoor activities to avoid lower results.
• After a shower or exercise, the body temperature will rise. Take a rest before taking temperature. - For proper measurement, condition the thermometer for 30 minutes in measurement site till room temperature.
- Earwax or obstructions will affect the accuracy of the thermometer.
- It is not recommended to use the product on users suffering ear disease including otitis external and lympantitis. Affected part is likely to deteriorate.
- Don't use the product in a wet ear hole after swimming or bathing. It is possible to damage the ear hole

DANGER
- The thermometer contains small parts (battery, battery cover) which can be swallowed by small children. For this reason, do not leave the thermometer unattended in hands of children.
-
When the temperature is higher than 38^ , means that the patient may have fever. Contact your doctor. Persistent fever, in particular children, has to be treated by a doctor. Get in touch with a doctor immediately.
-
Keep the unit out of children's reach. A self-measurement forced by children may cause ear damage. For accidental swallowing of a battery, please contact a doctor at once.
- Stop using the product in occurrence of any pain. It is likely to damage the ear hole.
- Don't throw batteries into fire. Batteries may explode in fire
4 BUTTONS
See folded cover page
- START - button
- LCD display
- Temperature LED indication
- Infrared thermometer sensor
- Forehead probe
- OK - button
- SET - button
- Battery compartment (1 x CR2032)
5 DISPLAY
A. Low battery icon
B. Year
C. Date
D. Temperature
E. Measuring mode icon
F. Food temperature mode icon
G. Forehead mode icon
H. Ear mode icon
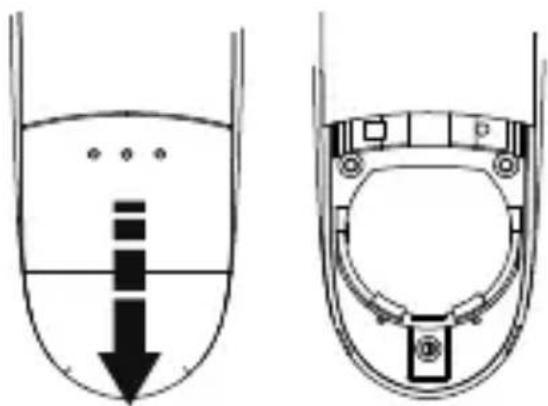
6 BATTERY INSTALLATION
- Remove the battery cover . 8
- When the batteries are pre-installed. Pull out the insulator.
- If it is not pre-installed, insert a CR2032 - 3V - Lithium battery with the positive pole (+) facing upwards.
- Reposition the battery cover.
text_image
Diagram showing fluid flow in a container with labeled components and directional arrows indicating flow direction.
IMPORTANT NOTE
- Replace the battery when ‘ ’ is disp Ayed.
• Take out the battery if you do not use it for a long time. - You have to dispose of the batteries in an environment friendly manner according to your country regulations.
7 B O D Y T E M P E R A T U

IMPORTANT NOTE
- It is recommended that you take three temperatures under the following circumstances.
- Infants in the first 3 months of life.
- Children under three years old who have a condition such as compromised immune system and for whom the presence or absence of fever is critical.
- When you are first learning to use the thermometer until you are comfortable with the technique and are gaining consistent readings
- Clean the probe cover to ensure accurate measurement.
- Wait about 30 seconds before measuring the same person to avoid excessive cooling of the skin.
- As with any type of thermometer, slight temperature variations (+/- 0.2 - 0.3°C) can happen if consecutive measurements are taken.
- If the results are different, use the highest reading.
7.1 EAR TEMPERATURE
- Pull off the Forehead probe from the unit.
- Press the START - button to turn the power on. The display will show all symbols.
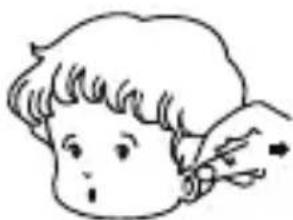
Before inserting the probe:
For children < 1 year: Pull the ear down and back.
For children > 1 year to adult: Pull the ear up and back.
natural_image
Simple line drawing of a child's face with a hand holding a pen (no text or symbols)
natural_image
Line drawing of a woman's face with wavy hair and a flower accessory (no text or symbols)- While holding the ear, insert the probe to seal the ear canal.
-
Press the START - button once. You will hear a short beep. The ear mode icon G displayed.
-
When you hear a double beep, the measurement is finished.
• Take out the thermometer from the ear canal.
• The result is displayed.
7.2 FOREHEAD TEMPERATURE
- Put on the forehead probe . 5
- Gently position the probe onto the center of the forehead.
- Press the START - button 1 once. You will hear a short beep. The forehead mode icon F displayed.
- When you hear a double beep, the measurement is finished.
- The result is displayed.
At completion of measurement, the unit automatically returns to time mode after 30 seconds.
The display will automatically turn off completely, 3 minutes after time mode is activated.
7.3 TEMPERATURE LED INDICATION
As soon as the result is displayed, the relevant LED 3 ill light.
- Green Light - 35.6 °C to 37.2 °C (96 °F to 99 °F)
- Orange Light - 37.3 °C to 37.5 °C (99.1 °F to 99.5 °F)
• Red Light - 37.6 °C to 42.9 °C (99.6 °F to 109.3 °F)
7.4 MEMORY
The result of each measurement will be stored automatically into the memory. If the memory is full (30 records), the oldest measurement result will be removed.
To recall the memory:
- Press the START - button to turn the power on
- Press the SET - button 7 successively to scroll through the memory. Each result is displayed with date and sequence number.
7.5 DISPLAY ERROR MESSAGES
| ‘HI’ | The measured temperature is >42,9 °C / 109,3 °F. |
| ‘LO’ | The measured temperature is <32,0 °C / 89,6 °F |
| ‘ErrE’ | The ambient temperature is not within the operation specifications. |
| ‘ErrU’ | |
| Does not measure after pressing ‘Measure’. Follow the steps mentioned in the user guide. | |
| ‘ErrH’ | |
| An error is detected during self-check. Remove the batteries for 10 seconds and try again. | |
| ‘ErrS’ | |
| ‘ErrR’ | Sensor error. Do not use the thermometer under extreme environment. |
| ‘ErrL’ | |
| ‘ErrP’ | Hardware problem. Return the unit to the service center. |
| Battery low. Replace the battery. | |
| Hardware problem. Return the unit to the service center. |
8 ADVANCED MODE
8.1 TIME SETTINGS
• Power on the unit by pressing the START - button ① ⑥ once. You will hear a short beep. Time mode is displayed.
- Press and hold the SET - button 7. The hour digits are blinking.
- Press the SET - button 7 repeatedly to increase the digit.
- Press the OK - button 6 to confirm. The minutes digits are blinking.
- Repeat previous steps for setting the minutes, year, month and day.
• After setting the day, the unit will enter sleep mode setting.
8.2 SLEEP MODE
When sleep mode is not activated, the display is continuously ON. The display will toggle between time and room temperature.
After setting the time and date, sleep mode setting is displayed:
- Press the SET - button 7 to switch between ON or OFF.
- Press the OK - button to confirm.
8.3 TEMPERATURE UNIT
- Power on the unit by pressing the START - button ① once. You will hear a short beep. Time mode is displayed.
- Press simultaneous the START - button ① and OK - button ⑥ for 5 seconds and release both buttons.
- A single beep confirms that you have set the temperature to ^ .
- A double beep confirms that you have set the temperature to ^ .
9 FOOD AND WATER TEMPERATURE
Next to the body temperature, the Ear and Forehead Thermometer 301 can be used to measure the temperature of nutrition.
- Put on the forehead probe . 5
- Press the OK - button 6 and simultaneously the START - button 1, 'FOOD' is displayed.
- Point the forehead probe to the nutrition and keep the probe 2 cm from the nutrition or baby milk bottle.

Do not touch food with the forehead probe 5
- Press the START - button . 1
- When you hear a double beep, the measurement is finished.
• The result is displayed.
At completion of measurement, oress the OK - button 6 and simultaneously the START - button to return to time mode.
10 FEATURES
| ModelTemperature Sensor typeMeasuring temperature rangeRoom temperatureDisplay accuracyMeasurement accuracyOperating ambient temperature rangeOperating ambient humidity rangeStorage environment temperature rangeStorage environment humidity rangeMemoryBattery TypeAutomatic switch-offWeightClassification | HV-T68Infrared32 °C ~ 42,9 °C (89,6 °F ~ 109,3 °F)5 °C ~ 59,9°C (41 °C ~ 139,8 °F)0,2°C or 0,4°F35,5°C ~ 42°C - (+/- 0.2°C)32°C to 35.4 °C - (+/- 0.3 °C)42,1C to 42.9 C° - (+/- 0.3 °C)95,9°F ~ 107,6°F -(+/- 0,4°F)89,6°F ~ 95,8°F - (+/- 0,5°F)107,7°F ~ 109,3°F - (+/- 0,5°F)Room temperature: +/- 1°CFood temperature: +/-1°C15°C ~ 35°C (59°F ~ 95°F)30 ~ 80% RH-10°C ~ 55°C (-14,0°F ~ 131,0°F)30 ~ 85% RHLast 30 measurements1 x CR2032 - DC 3V - Lithium3 minutes after the last buttonpressed in time mode65g (with battery)Type B FClass IIaInternally powered equipmentIP X 0Not suitable for use in presence of flammable anesthetic mixture with air or with oxygen or nitrous oxideContinuous operation with short-time loading |
11 CE MARK
The CE symbol on the unit, user guide and giftbox indicates that the unit complies with the essential requirements of the medical directive 93/42/EEC.
The declaration of conformity can be found on:
http://www.topcom.net/cedeclarations.asp
12 CLEANING
- To clean the tip of the probe, hold the thermometer downwards so that no liquid can enter. Use a cotton swab moistened with alcohol to wipe gently and carefully on the surface of the tip of the probe. Allow an hour drying time before operating the thermometer again.
- Clean a polluted infrared sensor with a soft wet cloth in a gentle manner. Cleaning with toilet paper of paper towel may scratch the infrared sensor, causing inaccuracy.
13 CARE AND MAINTENANCE
- Do not shock, vibrate or drop the thermometer.
- Do not allow any liquid in the thermometer.
- Do not disassemble, repair or remodel the thermometer.
- Keep out of reach of children.
- Clean the main body of the thermometer with a soft and dry cloth.
- Do not use benzene, gasoline, thinner or any other cleaner containing abrasive agents.
14 DISPOSAL OF THE DEVICE (ENVIRONMENT)
At the end of the product lifecycle, you should not throw this product into the normal household garbage but bring the product to a collection point for the recycling of electrical and electronic equipments. The symbol on the product, user guide and/or box indicate this.
Some of the product materials can be re-used if you bring them
to a recycling point. By re-using some parts or raw materials from used products you make an important contribution to the protection of the environment. Please contact your local authorities in case you need more information on the collection points in your area.
Batteries must be removed before disposing of the device.
Dispose of the batteries in an environmental manner according to your country regulations.
15 TOPCOM WARRANTY
15.1 WARRANTY PERIOD
The Topcom units have a 24-month warranty period. The warranty period starts on the day the new unit is purchased. There is no warranty on standard or rechargeable batteries (AA/AAA type).
Consumables or defects causing a negligible effect on operation or value of the equipment are not covered.
The warranty has to be proven by presentation of the original or copy of the purchase receipt, on which the date of purchase and the unit-model are indicated.
15.2 WARRANTY EXCLUSIONS
Damage or defects caused by incorrect treatment or operation and damage resulting from use of non-original parts or accessories are not covered by the warranty.
The warranty does not cover damage caused by outside factors, such as lightning, water and fire, nor any damage caused during transportation.
No warranty can be claimed if the serial number on the units has been changed, removed or rendered illegible.
Any warranty claims will be invalid if the unit has been repaired, altered or modified by the buyer.
1 INLEIDING
natural_image
Diagram showing a container with liquid and a circular structure, no text or symbols present
BELANGRIJK
natural_image
Simple line drawing of a child's face with a pointing finger (no text or symbols)natural_image
Line drawing of a woman's face with wavy hair and a flower accessory (no text or symbols)text_image
Diagram showing fluid flow in a container with internal components and directional arrows, likely illustrating fluid or material movement.
REMARQUE IMPORTANTE
7 TEMPÉRATURE DU CORPS

REMARQUE IMPORTANTE
natural_image
Simple line drawing of a person's head with a finger pointing to the ear (no text or symbols)natural_image
Line drawing of a woman's face with wavy hair and a small flower accessory (no text or symbols)text_image
Diagram showing fluid flow in a container with internal components and directional arrows indicating flow direction.
WICHTIGER HINWEIS
natural_image
Simple line drawing of a person's head with a pencil, no text or symbols present
natural_image
Line drawing of a woman's face with wavy hair and a small flower accessory (no text or symbols)7.2 STIRNTEMPERATUR
text_image
Diagram showing fluid flow in a container with an arrow indicating downward flow and labeled components inside the container.
AVISO IMPORTANTE
7 TEMPERATURA CORPORAL

AVISO IMPORTANTE
natural_image
Simple line drawing of a child's face with a hand holding an object (no text or symbols)
natural_image
Line drawing of a woman's face with wavy hair and a flower accessory (no text or symbols)text_image
Diagram showing fluid flow in a container with internal components and directional arrows, likely illustrating fluid or material movement.
VIKTIG INFORMATION
natural_image
Simple line drawing of a person's head with a finger pointing to the ear (no text or symbols)
natural_image
Line drawing of a woman's face with wavy hair and a flower accessory (no text or symbols)EAR & FOREHEAD THERMOMETER 301
text_image
Diagram showing fluid flow in a container with internal components and directional arrows indicating flow direction.
VIGTIG BEMAERKNING
natural_image
Simple line drawing of a child's face with a finger pointing to the ear (no text or symbols)
natural_image
Line drawing of a woman's face with wavy hair and a small flower accessory (no text or symbols)7.5 FEJLMEDDELELSER I DISPLAYET
text_image
Diagram showing fluid flow in a container with an arrow indicating downward flow and a circular component inside the container.
VIKTIG MERKNAD
natural_image
Simple line drawing of a child's face with a finger pointing to the ear (no text or symbols)
natural_image
Line drawing of a woman's face with wavy hair and a flower accessory (no text or symbols)7.2 PANNETEMPERATUR
13 STELL OG VEDLIKEHOLD
text_image
Diagram showing a liquid level with arrows and symbols, likely illustrating a physical or engineering concept.
TÄRKEÄ HUOMAUTUS
natural_image
Simple line drawing of a child's face with a hand holding an object (no text or symbols)
natural_image
Line drawing of a woman's face with wavy hair and a flower accessory (no text or symbols)text_image
Diagram showing a liquid level with arrows and symbols, likely illustrating a physical or engineering concept.
NOTA IMPORTANTE
natural_image
Simple line drawing of a child's face with a hand holding an object (no text or symbols)
natural_image
Line drawing of a woman's face with wavy hair and a bow accessory (no text or symbols)2 ACERCA DA TEMPERATURA CORPORAL
text_image
Diagram showing fluid flow in a container with internal components and directional arrows, likely illustrating fluid dynamics or fluid circulation.
NOTA IMPORTANTE
7 TEMPERATURA CORPORAL

NOTA IMPORTANTE
natural_image
Simple line drawing of a person's head with a finger pointing to the ear (no text or symbols)natural_image
Line drawing of a woman's face with long hair and a small flower accessory (no text or symbols)natural_image
Diagram showing two views of a ship's hull with arrows indicating direction (no text or symbols)
DŮLEŽITÁ POZNÁMKA
natural_image
Simple line drawing of a child's face with a finger pointing to the ear (no text or symbols)natural_image
Line drawing of a woman's face with wavy hair and a flower accessory (no text or symbols)7.3 INDIKACE TEPLOTY
8.3 JEDNOTKY TEPLOTY
natural_image
Diagram showing a liquid container with internal flow and a circular component inside, no text or symbols present
ΣΗΜΑΝΤΙΚΗ ΣΗΜΕΙΩΣΗ
natural_image
Simple line drawing of a child's face with a hand holding a pen, no text or symbols presentnatural_image
Line drawing of a woman's face with wavy hair and a flower accessory (no text or symbols)text_image
Diagram showing fluid flow in a container with internal components and directional arrows, likely illustrating fluid or material movement.
FONTOS MEGJEGYZÉS
natural_image
Simple line drawing of a child's face with a finger pointing to the ear (no text or symbols)
natural_image
Line drawing of a woman's face with wavy hair and a flower accessory (no text or symbols)7.2 HOMLOKHÖMÉRSÉKLET
text_image
Diagram showing fluid flow with arrows and symbols, likely illustrating a fluid or process in a container or tank.
WAŻNA UWAGA
natural_image
Simple line drawing of a child's face with a finger pointing to the ear (no text or symbols)natural_image
Line drawing of a woman's face with wavy hair and a flower accessory (no text or symbols)text_image
Diagram showing a liquid level with arrows and a circular component, likely illustrating fluid flow or pressure measurement.
DÔLEŽITÁ POZNÁMKA
natural_image
Simple line drawing of a child's face with a finger pointing to the ear (no text or symbols)natural_image
Line drawing of a woman's face with wavy hair and a small flower accessory (no text or symbols)7.2 Čelová teplota
• Vytiahnite čelovú sondu . 5
• Jemne položte sondu do stredu čela.