Baby Bath Thermometer 100 Elephant - Thermometer TOPCOM - Free user manual and instructions
Find the device manual for free Baby Bath Thermometer 100 Elephant TOPCOM in PDF.
User questions about Baby Bath Thermometer 100 Elephant TOPCOM
0 question about this device. Answer the ones you know or ask your own.
Ask a new question about this device
Download the instructions for your Thermometer in PDF format for free! Find your manual Baby Bath Thermometer 100 Elephant - TOPCOM and take your electronic device back in hand. On this page are published all the documents necessary for the use of your device. Baby Bath Thermometer 100 Elephant by TOPCOM.
USER MANUAL Baby Bath Thermometer 100 Elephant TOPCOM
natural_image
Two rubber duck toy figures, one white and one gray, lying side by side (no text or symbols visible)User Guide / Handleiding / Manuel d’utilisateur / Bedienungsanleitung / Manual de usuario / Bruksanvisning / Brugervejledning / Användarhandbok / Käyttöohje / Manuale d’uso / Manual do usuário / Ръководство на потребителя / Uživatelská příručka / Ođnyíç хрýσης / Használati útmutató / Instrukcja obsługi / Manual de instalare si utilizare / Руководство пользователя / Užívatel’ský manuál / Kullanici kilavuzu
V. 1.2
CE0123
UK The features described in this manual are published with reservation to modifications.
Congratulations on the purchase of the Baby Bath Thermomoter 100. We hope you will enjoy using the thermometer and the benefits it offers.
1 SAFETY NOTES
- Please read carefully through the following information concerning safety and proper use. Make yourself familiar with all the functions of the equipment. Be careful to keep these advice notes and if necessary pass them on to a third party.
- Do not allow children to take the bath temperature unattended.
- Never leave children alone and unsupervised in the bath.
- The bath thermometer is only a simple water temperature indicator. Always check the temperature of the bath water with the back of your hand before putting a child into a bath.
- Do not use the thermometer if it is broken or damaged.
- Do not place it into water when the temperature is higher than 70^ C .
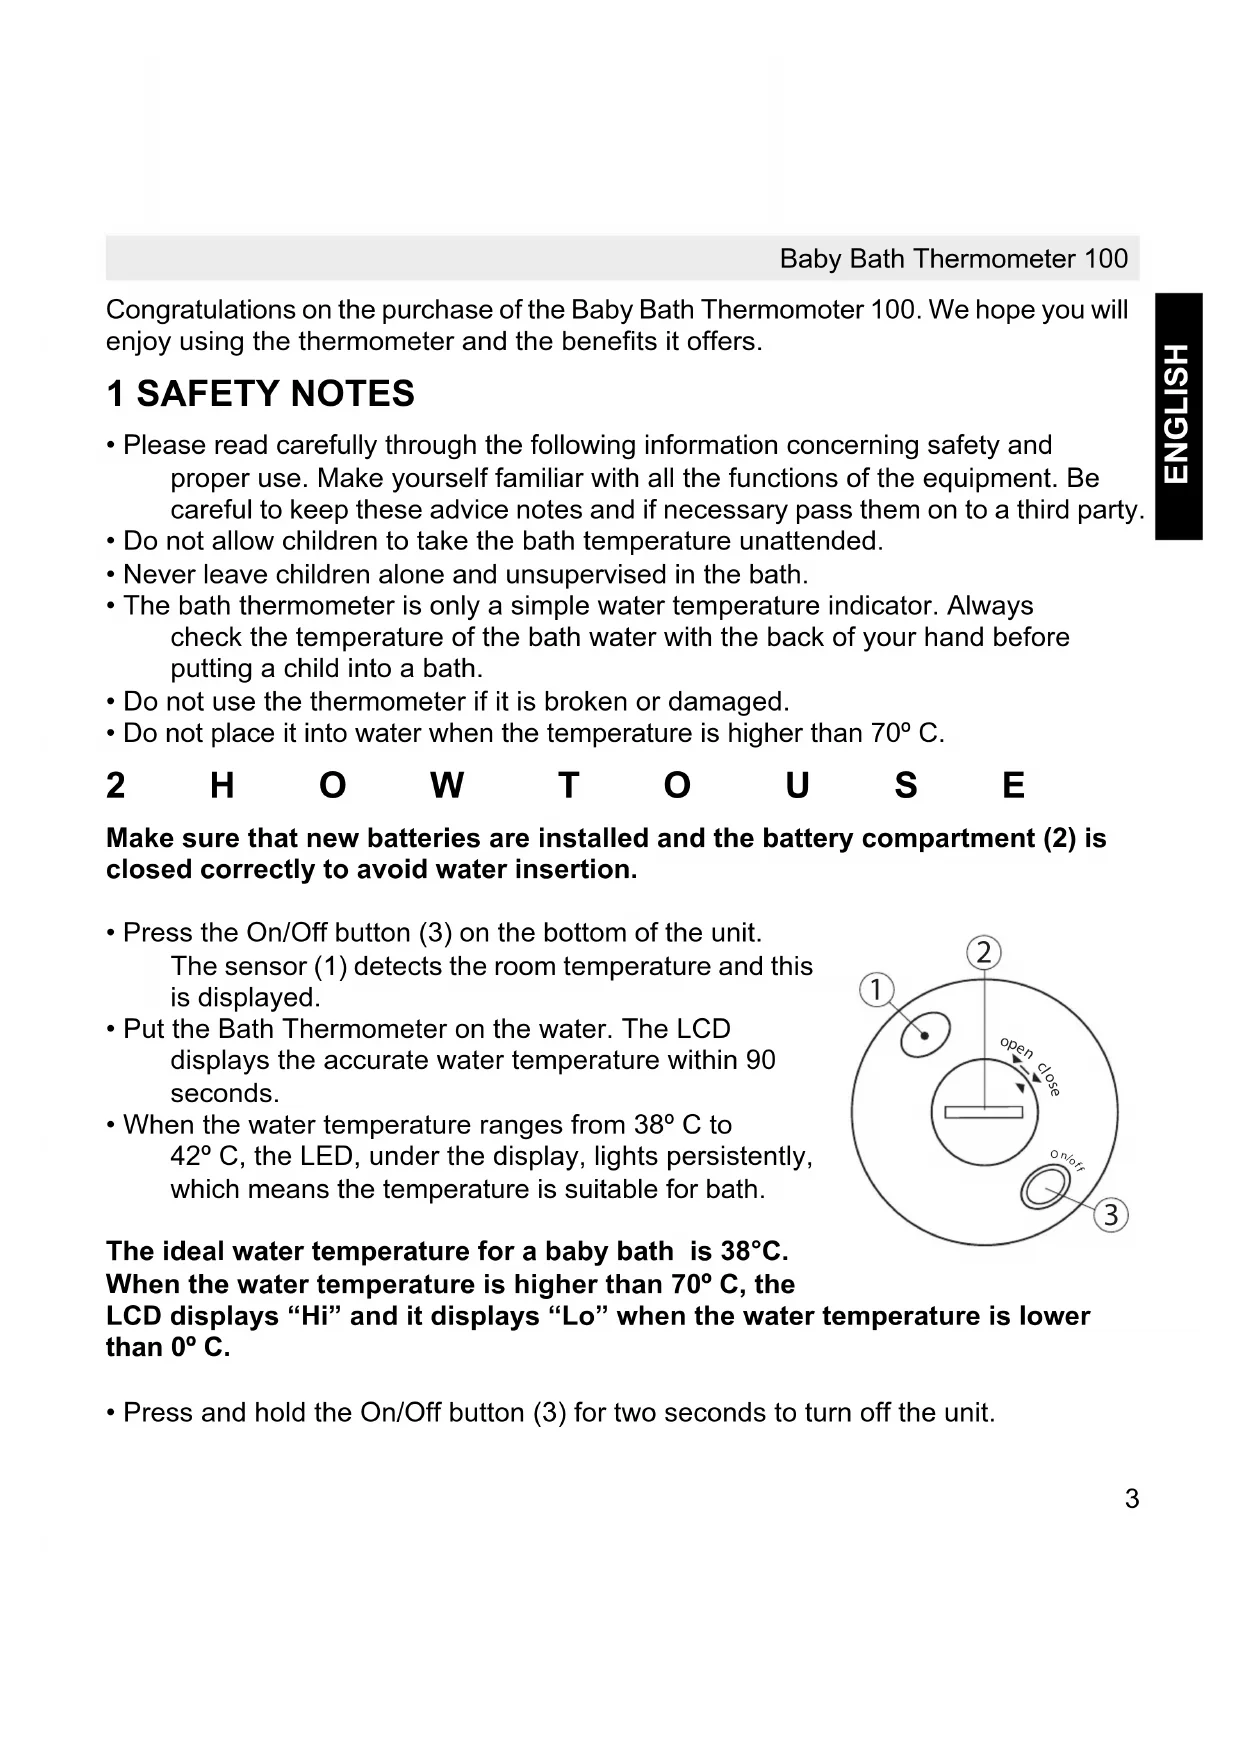
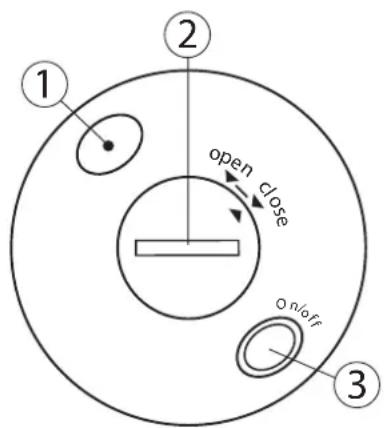
2 H O W T O U S E
Make sure that new batteries are installed and the battery compartment (2) is closed correctly to avoid water insertion.
- Press the On/Off button (3) on the bottom of the unit. The sensor (1) detects the room temperature and this is displayed.
- Put the Bath Thermometer on the water. The LCD displays the accurate water temperature within 90 seconds.
- When the water temperature ranges from 38^ to 42^ , the LED, under the display, lights persistently, which means the temperature is suitable for bath.
text_image
1 2 open close On/off 3The ideal water temperature for a baby bath is 38^ C.
When the water temperature is higher than 70^ C, the
LCD displays “Hi” and it displays “Lo” when the water temperature is lower than 0^ C.
- Press and hold the On/Off button (3) for two seconds to turn off the unit.
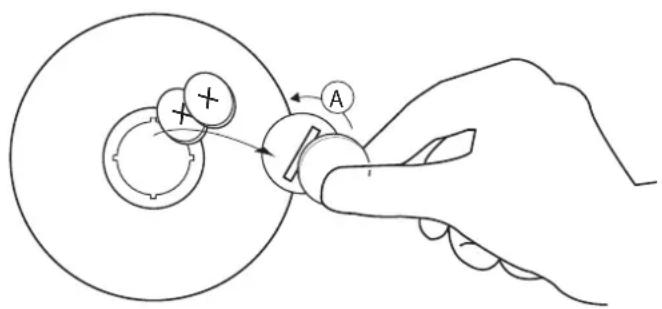
3 BATTERY REPLACEMENT
- Remove the battery compartment cover carefully with a small coin (A).
- Install 2 x L1142 batteries (3V DC) following the polarity as shown.
- Reposition the battery cover.
When LCD indication flashes, the batteries must be replaced.
text_image
Diagram illustrating a hand operating a rotating mechanical component with labeled parts A and B, showing motion direction.Batteries must be removed before disposing of the device.
Dispose of the batteries in an environmental manner according to your country regulations.
4 CARE AND MAINTENANCE
- Clean the thermometer by using isopropyl alcohol or soap and water before and after use.
- Store Bath Thermometer in a cool, dry place and away from direct sunlight while not in use.
- Do not open the bath thermometer except to replace the battery.
- Do not drop the thermometer, as this may ruin the unit.
- Turn off the bath thermometer soon after use to save battery and prolong the battery life.
5 DISPOSAL OF THE DEVICE
At the end of the product lifecycle, you should not throw this product into the normal household garbage but bring the product to a collection point for the recycling of electrical and electronic equipments. The symbol on the product, user guide and/or box indicate this.
Some of the product materials can be re-used if you bring them to a recycling
point. By re-using some parts or raw materials from used products you make an important contribution to the protection of the environment.
Please contact your local authorities in case you need more information on the collection points in your area.
6 TOPCOM WARRANTY
6.1 Warranty period
The Topcom units have a 24-month warranty period. The warranty period starts on the day the new unit is purchased. Consumables or defects causing a negligible effect on operation or value of the equipment are not covered.
The warranty has to be proven by presentation of the original purchase receipt, on which the date of purchase and the unit-model are indicated.
6.2 Warranty handling
A faulty unit needs to be returned to a Topcom service centre including a valid purchase note.
If the unit develops a fault during the warranty period, Topcom or its officially appointed service centre will repair any defects caused by material or manufacturing faults free of charge.
Topcom will at its discretion fulfill its warranty obligations by either repairing or exchanging the faulty units or parts of the faulty units. In case of replacement, colour and model can be different from the original purchased unit.
The initial purchase date shall determine the start of the warranty period. The warranty period is not extended if the unit is exchanged or repaired by Topcom or its appointed service centres.
6.3 Warranty exclusions
Damage or defects caused by incorrect treatment or operation and damage resulting from use of non-original parts or accessories not recommended by Topcom are not covered by the warranty.
The warranty does not cover damage caused by outside factors, such as lightning, water and fire, nor any damage caused during transportation.
No warranty can be claimed if the serial number on the units has been changed, removed or rendered illegible.
This product is in compliance with the essential requirements and other relevant provisions of the directive 89/336/EEC. This is confirmed by the CE-mark.
The Declaration of conformity can be found on: http://www.topcom.net/cedeclarations.php
text_image
1 2 open close On/off 3text_image
Diagram illustrating a mechanical or electrical process with labeled components and directional arrows, including a plus symbol and 'A' label.text_image
1 2 open close one off 3text_image
Diagram illustrating a hand operating a rotating mechanical component with labeled parts and directional arrowstext_image
1 2 open close on/off 3text_image
Diagram illustrating a mechanical or electrical process with labeled components and directional arrows, including a plus symbol and 'A' label.text_image
1 2 open close On/off 3text_image
Diagram illustrating a hand operating a rotating mechanical component with labeled parts A and a plus symbol indicating direction.text_image
1 2 open close one off 3text_image
Diagram illustrating a mechanical or electrical process with labeled components and directional arrows, including a plus symbol and point A.text_image
1 2 open close On/off 3- Tryk på og hold On/Off-knappen nede (3) i to sekunder for at slukke for enheden.
3 BATTERIUDSKIFTNING
text_image
Diagram illustrating a hand operating a rotating mechanical component with labeled parts A and B, showing motion direction.text_image
1 2 open close On/off 3Den ideelle temperaturen på badevannet for spebarn er 38 °C.
text_image
Diagram illustrating a mechanical or electrical process with labeled components and directional arrows, including a plus symbol and point A.4 STELL OG VEDLIKEHOLD
text_image
1 2 open close On/off 3text_image
Diagram illustrating a hand operating a rotating mechanical component with labeled parts A and B, showing motion direction.text_image
1 2 open close On/off 3text_image
Diagram illustrating a hand operating a rotating mechanical component with labeled parts and directional arrowstext_image
① ② open dose on/off ③text_image
Diagram illustrating a hand operating a rotating mechanical component with labeled parts A and B, showing motion direction.text_image
Diagram illustrating a mechanical or electrical process with labeled components and directional arrows, including a plus symbol and 'A' label.text_image
1 2 open close On/off 3text_image
Diagram illustrating a mechanical or electrical process with labeled components and directional arrows, including a plus symbol and section marker 'A'.text_image
① ② 38 open close ③text_image
Diagram illustrating a mechanical or electrical process with labeled components and directional arrows, including a plus symbol and letter A.text_image
① ② open close On/off ③text_image
Diagram illustrating a mechanical or electrical process with labeled components and directional arrows, including a plus symbol and 'A' label.text_image
1 2 open close one off 3text_image
Diagram illustrating a mechanical or electrical process with labeled components and directional arrows, including a plus symbol and 'A' label.text_image
1 2 open close On off 3text_image
1 2 open close OT On/off 3text_image
Diagram illustrating a mechanical or electrical component with labeled parts and directional arrows, including a plus symbol and point A.text_image
1 2 open close On/off 3text_image
Diagram illustrating a hand operating a rotating mechanical component with labeled parts and rotation directionKed' začne blikat' indikátor, je treba vymenit' batérie.