5329 - Epilator BRAUN - Free user manual and instructions
Find the device manual for free 5329 BRAUN in PDF.
User questions about 5329 BRAUN
0 question about this device. Answer the ones you know or ask your own.
Ask a new question about this device
Download the instructions for your Epilator in PDF format for free! Find your manual 5329 - BRAUN and take your electronic device back in hand. On this page are published all the documents necessary for the use of your device. 5329 by BRAUN.
USER MANUAL 5329 BRAUN
(Sharecall charged at local rates)
www.service.braun.com
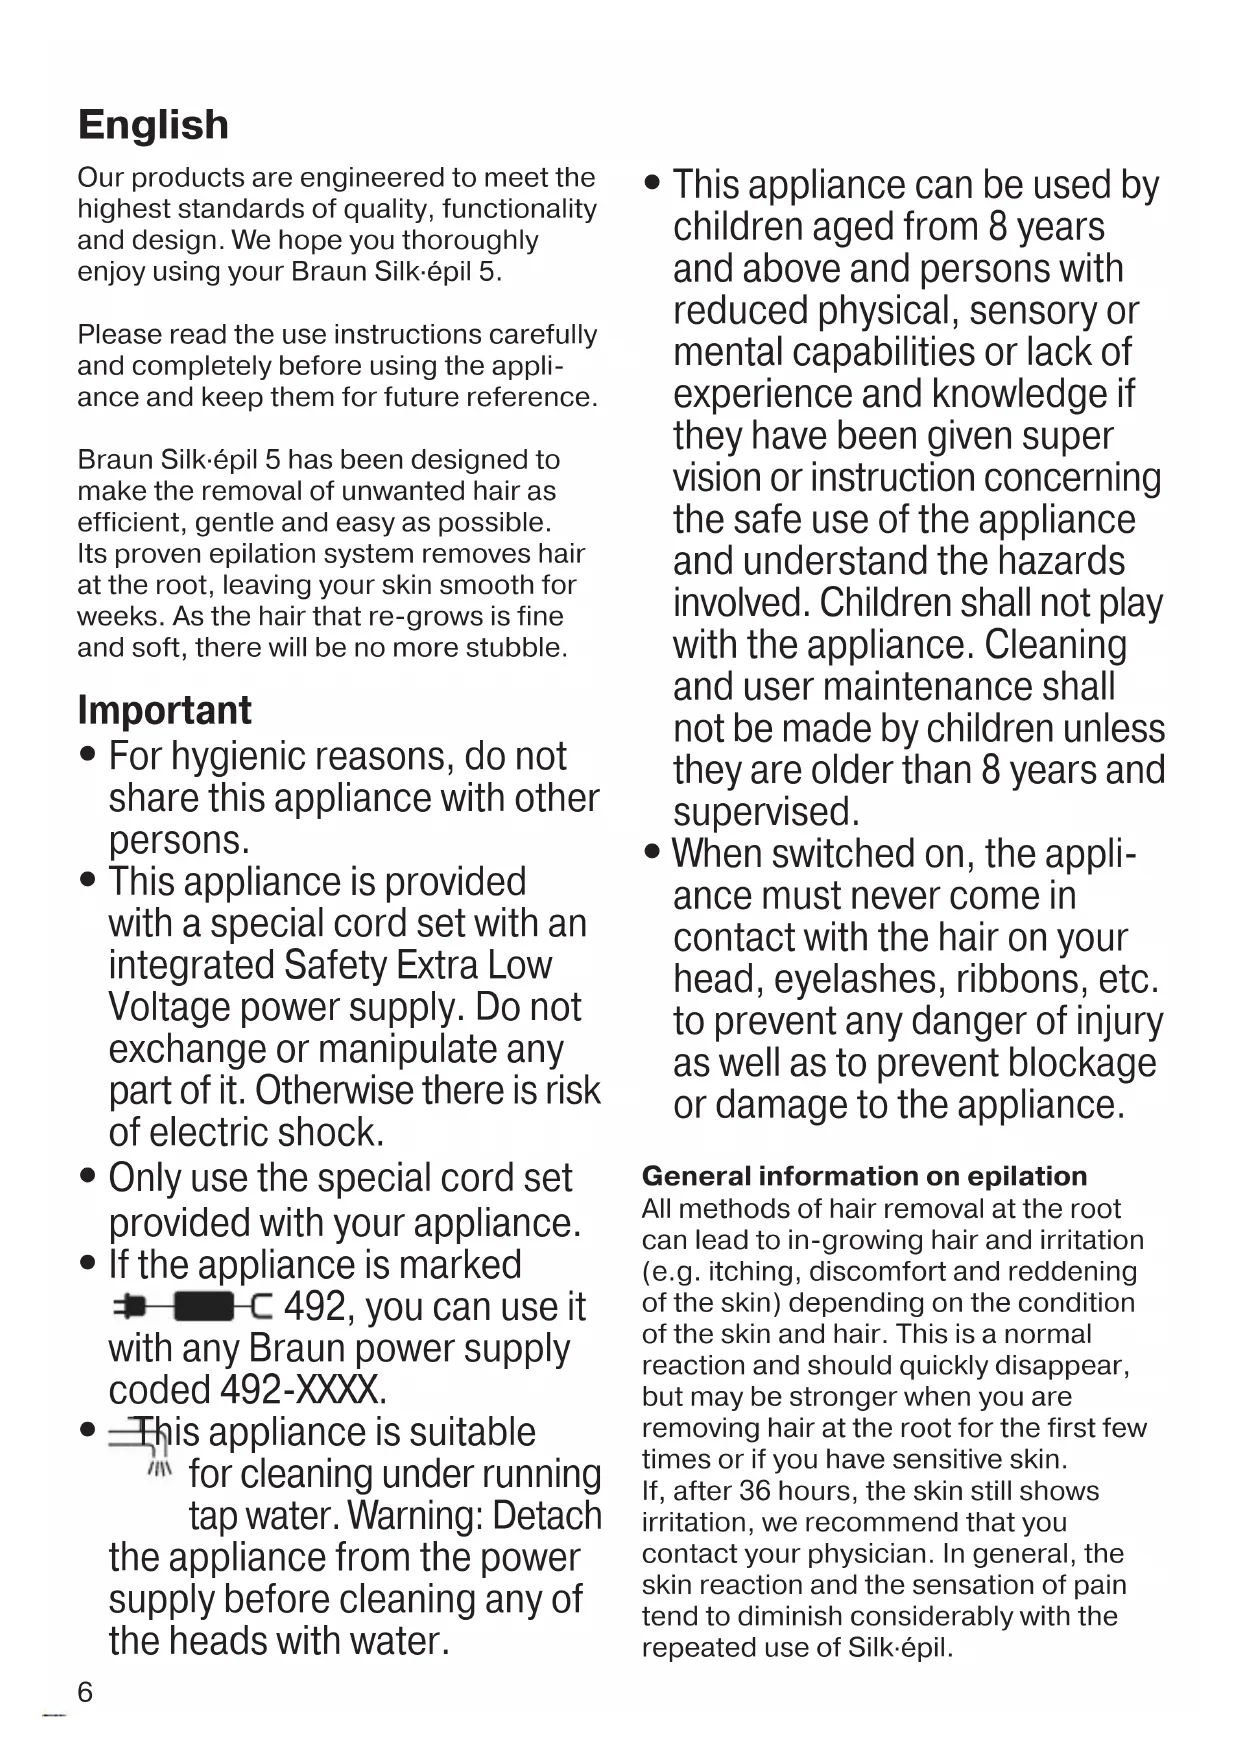
English
Our products are engineered to meet the highest standards of quality, functionality and design. We hope you thoroughly enjoy using your Braun Silk-épil 5.
Please read the use instructions carefully and completely before using the appliance and keep them for future reference.
Braun Silk-épil 5 has been designed to make the removal of unwanted hair as efficient, gentle and easy as possible. Its proven epilation system removes hair at the root, leaving your skin smooth for weeks. As the hair that re-grows is fine and soft, there will be no more stubble.
Important
- For hygienic reasons, do not share this appliance with other persons.
- This appliance is provided with a special cord set with an integrated Safety Extra Low Voltage power supply. Do not exchange or manipulate any part of it. Otherwise there is risk of electric shock.
- Only use the special cord set provided with your appliance.
-
If the appliance is marked C 492, you can use it with any Braun power supply coded 492-XXXX.
This appliance is suitable for cleaning under running tap water. Warning: Detach the appliance from the power supply before cleaning any of the heads with water. -
This appliance can be used by children aged from 8 years and above and persons with reduced physical, sensory or mental capabilities or lack of experience and knowledge if they have been given supervision or instruction concerning the safe use of the appliance and understand the hazards involved. Children shall not play with the appliance. Cleaning and user maintenance shall not be made by children unless they are older than 8 years and supervised.
- When switched on, the appliance must never come in contact with the hair on your head, eyelashes, ribbons, etc. to prevent any danger of injury as well as to prevent blockage or damage to the appliance.
General information on epilation
All methods of hair removal at the root can lead to in-growing hair and irritation (e.g. itching, discomfort and reddening of the skin) depending on the condition of the skin and hair. This is a normal reaction and should quickly disappear, but may be stronger when you are removing hair at the root for the first few times or if you have sensitive skin. If, after 36 hours, the skin still shows irritation, we recommend that you contact your physician. In general, the skin reaction and the sensation of pain tend to diminish considerably with the repeated use of Silk-épil.
In some cases inflammation of the skin could occur when bacteria penetrate the skin (e.g. when sliding the appliance over the skin).
Thorough cleaning of the epilation head before each use will minimise the risk of infection. If you have any doubts about using this appliance, please consult your physician. In the following cases, this appliance should only be used after prior consultation with a physician:
- eczema, wounds, inflamed skin reactions such as folliculitis (purulent hair follicles) and varicose veins,
around moles, - reduced immunity of the skin, e.g. diabetes mellitus, during pregnancy, Raynaud's disease, haemophilia, candida or immune deficiency.
Some useful tips
If you have not used an epilator before, or if you have not epilated for a longer period of time, it may take a short time for your skin to adapt to epilation. The discomfort experienced in the beginning will decrease considerably with repeated use as the skin adapts to the process. Epilation is easier and more comfortable when the hair is at the optimum length of 2-5 mm. If hairs are longer, we recommend that you first shave and epilate the shorter, re-growing hairs a week later. When epilating for the first time, it is advisable to epilate in the evening, so that any possible reddening can disappear overnight. To relax the skin we recommend applying a moisture cream after epilation.
Fine hair which re-grows might not grow up to the skin surface. The regular use of massage sponges (e.g. after showering) or exfoliation peelings helps to prevent in-growing hair as the gentle scrubbing action removes the upper skin layer and fine hair can get through to the skin surface.
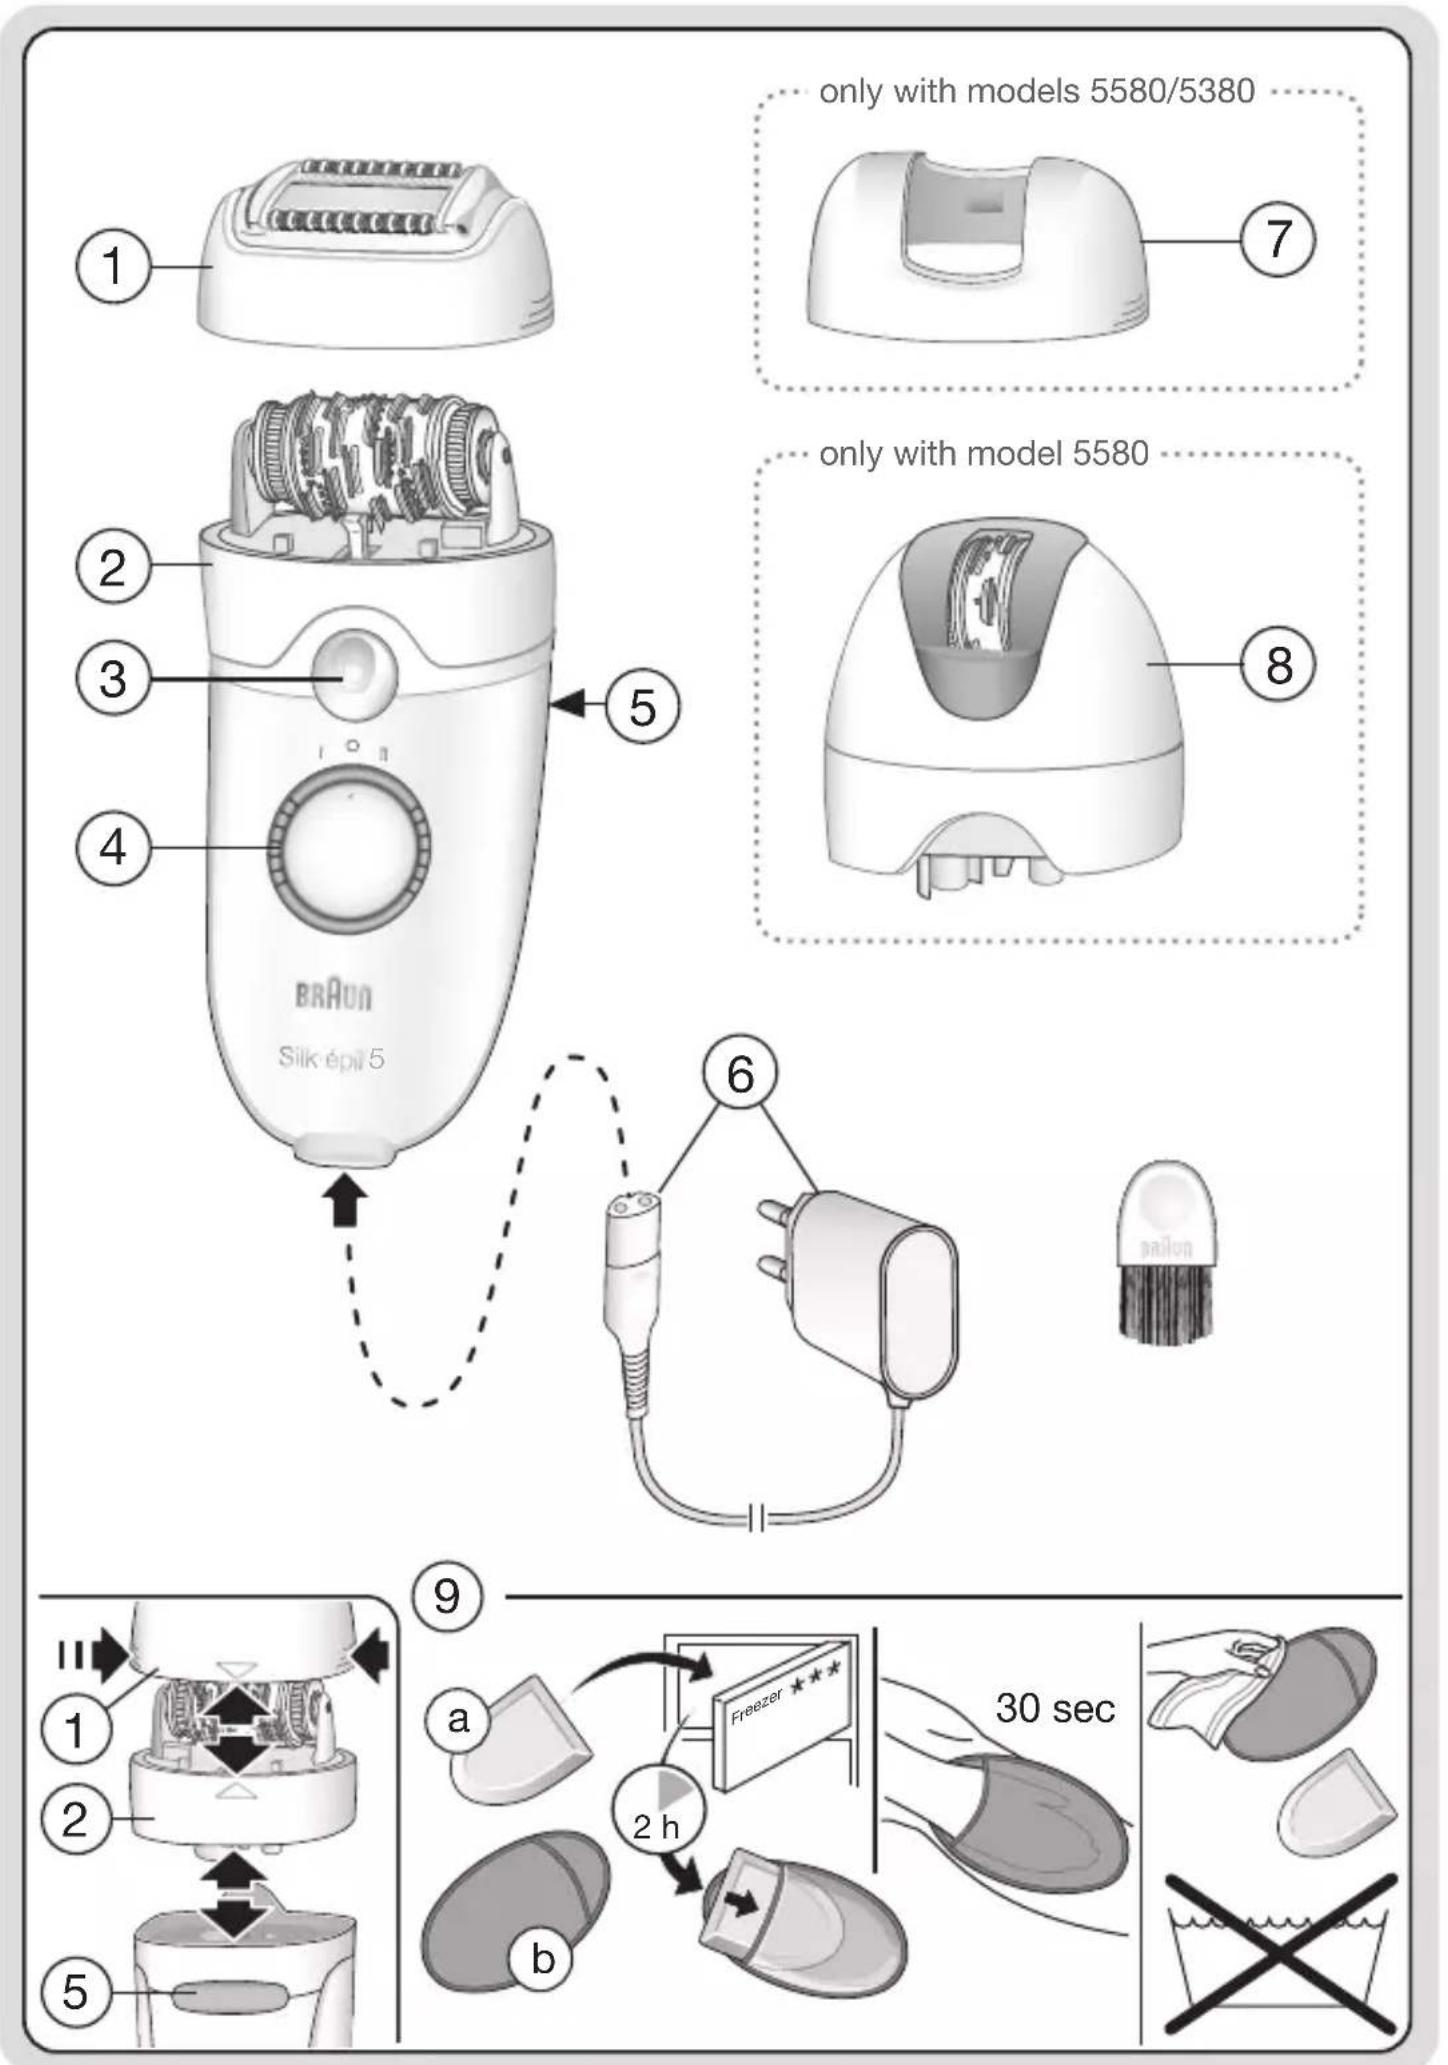
Description
1 High-frequency massaging rollers
2 Epilation head with tweezer element
3 Light
4 On/off switch
5 Release button
6 Special cord set
7 Sensitive area cap (only with model 5580/5380)
8 Facial head (only with model 5580)
9 Cooling glove/Gel pack
Preparing for use
- Your skin must be dry and free from grease or cream.
- Before use, always make sure that the epilation head (2) is clean and provided with a cap (1).
- To change caps, press their lateral ribs and pull off.
- To change heads, press the release button (5).
Cooling glove for optional skin cooling
For the first few epilations or if you have sensitive skin, you can use the cooling glove (9), recommended by dermatologists to help reduce possible skin irritation.
- Ensure that the gel pack has been in the deep freezer (^***) for at least 2 hours (for convenience you can store the gel packs in the freezer).
- Insert the gel pack underneath the cooling glove's transparent foil. Use only with glove.
- Put transparent (cool) side of the glove on your leg.
- Start cooling for approximately 30 seconds, longer if needed.
- Epilate the cooled skin area immediately as described below.
- Repeat cooling and epilating until completion.
- While epilating, please ensure your skin is dry.
Important: Apply cooling glove to the same area for no longer than 2 minutes. Keep away from sunlight. Do not use gel pack when damaged. Dispose of in household waste. Do not use if you are hypersensitive, allergic to the cold, or if your skin suffers from sensory disturbances, when suffering from cardiac diseases or arterial circulatory disorders.
How to epilate
The epilation head (2) features Close-Grip Technology to ensure extra efficiency especially with short hairs: The 40 tweezers always keep close contact to the skin to remove hairs as short as grain of sand (0.5mm) . The pivoting head perfectly adapts to the body contours for maximum thoroughness. The high-frequency massaging rollers (1) stimulate your skin effectively for an extra gentle epilation.
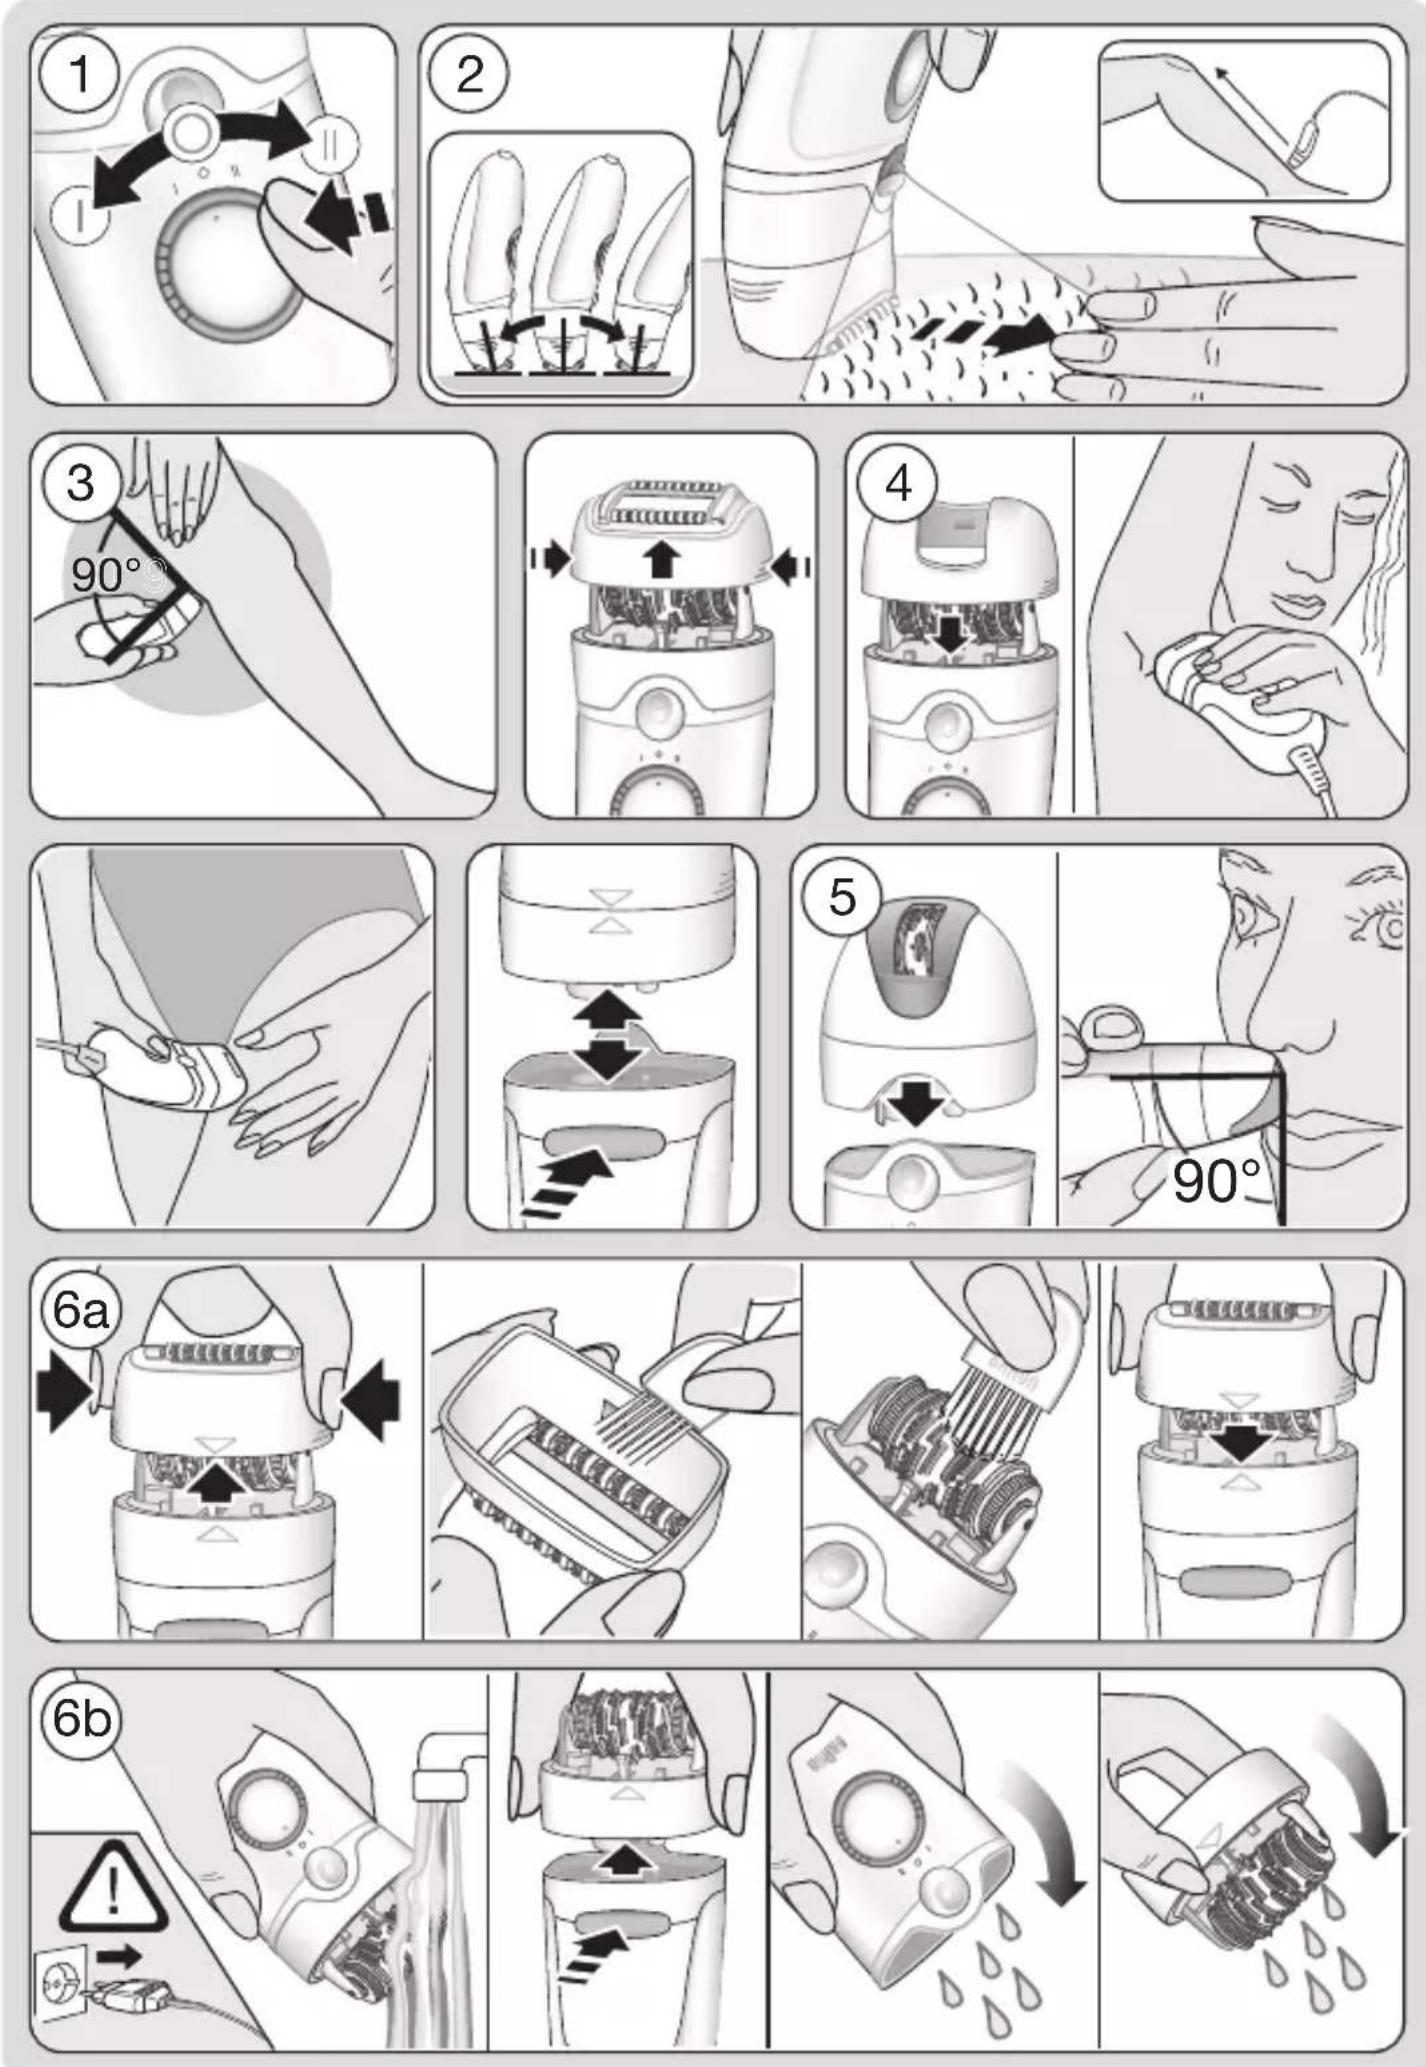
1 How to operate the appliance
Turn the on/off switch (4) to operate the appliance:
Turn to position «I» = extra gentle
Turn to position «II» = extra efficient
As long as the appliance is switched on, the light (3) illuminates the area to be epilated. This gives you a better control for improved epilation efficiency.
2 How to guide the appliance
Always stretch your skin when epilating.
Always make sure that the epilation area is in close contact with your skin.
- Guide the appliance in a slow, continuous movement without pressure against the hair growth, in the direction of the switch. As hair can grow in different directions, it may also be helpful to guide the appliance in different directions to achieve optimal results. The pulsating movements of the massaging
rollers stimulate and relax the skin for a gentler epilation.
3 Leg epilation
Epilate your legs from the lower leg in an upward direction. When epilating behind the knee, keep the leg stretched out straight.
4 Underarm and bikini line epilation
For this specific application, the sensitive area cap (7) has been developed as an optional attachment to be placed on the epilation head (2).
Please be aware that especially at the beginning, these areas are particularly sensitive to pain. Therefore, we recommend you start with switch setting «I».
With repeated usage the pain sensation will diminish. Before epilating, thoroughly clean the respective area to remove residues (like deodorant). Then carefully dab dry with a towel. When epilating the underarm, keep your arm raised up so that the skin is stretched and guide the appliance in different directions. As skin may be more sensitive directly after epilation, avoid using irritating substances such as deodorants with alcohol.
5 Facial epilation
With the facial head (8) attached, your Silk-épil is perfectly suited for conveniently removing any unwanted hair from the face or other sensitive areas.
Prior to epilation, we recommend cleaning the skin with alcohol to promote good hygiene. When epilating the face, stretch the skin with one hand and slowly guide the epilator with your other hand in the direction of the switch.
6 Cleaning the epilation head
Before cleaning, unplug the appliance. Regular cleaning ensures better performance.
a Brush cleaning:
Remove the cap (1) and brush it out. Thoroughly clean the tweezers from the rear side of the epilator head with the brush dipped into alcohol. While doing so, turn the tweezer element manually. This cleaning method ensures best hygienic conditions for the epilation head.
b Cleaning under running water:
Remove the cap. Hold the appliance with the epilation head under running water.
Then press the release button (5) to remove the epilation head (2).
Thoroughly shake both, the epilation head and the appliance to make sure that remaining water can drip out.
Leave both parts to dry. Before reattaching, make sure that they are completely dry.
Please do not dispose of the product in the household waste at the end of its useful life.
Disposal can take place at a Braun Service Centre or at appropriate collection points provided in your country.
Subject to change without notice

Guarantee
We grant a 2 year guarantee on the product commencing on the date of purchase. Within the guarantee period we will eliminate any defects in the appliance resulting from faults in materials or workmanship, free of charge either by repairing or replacing the complete appliance at our discretion. This guarantee extends to every country where this appliance is supplied by Braun or its appointed distributor.
This guarantee does not cover: damage due to improper use, normal wear or use as well as defects that have a negligible effect on the value or operation of the appliance.
The guarantee becomes void if repairs are undertaken by unauthorised persons and if original Braun parts are not used.
To obtain service within the guarantee period, hand in or send the complete appliance with your sales receipt to an authorised Braun Customer Service Centre (address information available online at www.service.braun.com).
For UK only:
This guarantee in no way affects your rights under statutory law.
Français
| MALIN Cinsi: Markasi: | Modeli: Bandrol ve Seri Numarası: |
| SATICI FÜRMA Unvan: Adres: Tel, Faks: e-posta: Kası ve İmza: | |
| Fatura Tarihi ve Saymiş: Teslim Yeri ve Tarihi: | |
| Procter & Gamble Sat®, ve Da®, Ü®, Ü®, Ü®, Ü®, Ü®, Ü®, Ü®, Ü®, Ü®, Ü®, Ü®, Ü®, Ü®, Ü®, Ü®, Ü®, Ü®, Ü®, Ü®, Ü®, Ü®, Ü®, Ü®, Ü®, Ü®, Ü®, Ü®, Ü®, Ü®, Ü®, Ü®, Ü®, Ü®, Ü®, Ü®, Ü®, Ü®, Ü®, Ü®, Ü®, Ü®, Ü®, Ü®, Ü®, Ü®, Ü®, Ü®, Ü®, Ü®, Ü®, ñ®, Ü®, Ü®, Ü®, Ü®, Ü®, Ü®, Ü®, Ü®, Ü®, Ü®, Ü®, Ü®, Ü®, Ü®, Ü®, Ü®, Ü®, Ü®, Ü®, Ü®, Ü®, Ü®, Ü®, Ü®, Ü®, Ü®, Ü®, Ü®, Ü®, Ü®, Ü®, Ü®, Ü®, Ü®, Ü®, Ü®, Ü®, Ü®, Ü®, Ü®, Ü®, Ü®, Ü®, Ü®, Ü®, Ü®, Ü®, Ü®, Ü®, Ulaşabilirsiniz. www.png.com.tr | |
| Braun Servis Istasyonlan listenize internet sitemizden veya Tüketici Hizmetleri merkezimizi arayarak ulaşabilirsiniz. www.braun.com/tr | |
Româna (RO/MD)
IodrotOBKa K NcNoJIb3ObaHHIO
Koixa neped 3nnlauee JdoJxHa 6bIb cyXo, OunuHOn OT Xnpa nIkpema.
- Перацлбзоваимьплгетаубдntecь,чToэплруюшаг罗LOВka(2)чистая И на Hei псутCTByeТнасадka (1).
- YTO6bI CMeHnTb Hacay, HaxMnte Ha eE nonepueHbIe p6pa n NOTAHnte.
- YTO6bI CMeHnTb rOJOBky, HaxMnte Ha KHONKY BbICBO6OxKeHnE 3nnIpyIO- IeNrOJOBKn (5).
OxlaJdaIOUa pyKaBnca JIg IOnHHTeIbHOrO OxJaXdEHNKoXN
Дляпервын HeCKOЛьКИX эПИЯи, Или ecn y BacЧУВСТВИТЕЛьная кОжа, Вbl MOжete ИСПОЛьЗОВaТь OXЛАЖДАЮSUуpyкавицу (9), peKOMeHДОВaHNYIO DeрмATOLOrAmN, YTOБbl UMeHbSHTb BO3MOxHOb pa3ДрраЖЕне KOKN.
- Y6eIntecb, yTO nakET C reIem HaxoIINcB MOpO3nIbHnke (^**) no KpaIHeMpe B TeueHne 2 YacOB (JyIO6CTBa IcNoJIb3OBAHnB Bi MoXeTe
XpaHntb NaKeTbIC TReJEM B MOpO3nIbHnke).
- Положи-te napetс relem по прозрачHyю часты рукавицbl.ИсплььзутetoJIbKO BmecTe C rykaBUneJ.
- Пиюкпe позрачHyIO (прoxладHyIO) CTOPOHy pyKaBnUcbl K Hore.
OxlaaKaIte Koxy B TeueHne npImepHo 30 ckyH, npn Heo6XoIMOCtN doJIbWe.
Cpa3y xe npo3nnnpuIte oxlaJdHbIyUaCTOK KOxN, KaK OINcAHO HIXe. - Повторгий Te oxлajждени и заимяюdo 3aBepшеня прочурbl.
- Y6eIntecb, yTo Ba7a Koxa octaetcayxO B npouece 3nlaun.
Baxho: npnklaDbBaIte oxJaXaIOUyO pykabu cy K OndHomy n TOMy xe yuaCTky KOxH He dolbwe 2 mHyT. XpaHnTe BdaiN OT cOnHeHOro CBeta. He nCnoJIb3yIte, ecn NaKeT C rIeM NOBpeJdEh. YTuIn3npyIte KaK bItOBbIe OTXoDbl. He nCnoJIb3yIte, ecn Bbl CTpaJaTe OT rInepCyBCTBHTeNbHOCTN, aIIeprHn Ha XOLOd nINOT pacCTpOietB KOxHoN CyBCTBHTeNbHOCTN, KOTOpBie HabIO-dAOTc prn 3a6OleBaHNx cepDa nIN hapUWeHnX apTepeNaIbHOro KPOBOCha6KeHn.
Kak npoBODntb 3nnlaucnIO
3nnpuyoaa rOIOBka (2) cna6xeha texHOrnei Close-Grip, yTo6bI oBece-HTb MaKcMaJIbHyIO 3ΦΦeKTINBHOCTb npN nCnOJb3OBaHN Ha KOpOTKnx BOLOCKax: 40 nHHcTeOB Bcerda nIOTHO npJIeRAOT K KOKe, ydaJIaY daXe cambie KOpOTKne BOLOCKn pa3MepOM C neCUnHKy (0,5 MM). PnabaIOUaIra rOIOBka nDeaJIbHO aDaNTnpyETcK KOHTypaM TeJa dIra Camoro TtataTeJIbHOrO ydaJIeHNr BOLOC. MaccxHa nCTema BbICOKOH qACTOTbl (1) 3ΦΦeKTINBHO paccIa6JIaIOT KOKy dJIa BoJebepeXHo 3nnlau.
1 KaK pa6oTaTb c np6Opom
YTo6bHaayatb pa6Otu C npu6Opom, NOBepHnTe KHOJky BKJIIOueHnry/BbIKJIIO-yeHnry (4).
Ckopocb «I»: yIbTpap-MrKaJ
Ckopocb «II»: yIbTpap-ΦΦeKTHBHa
Pp np pa6ote 3nIaTopa nOcCBetka (3) OCBeUaET 3nIpyEmbYuAcTOK. 3TO nO3BOJareT Bam lyUwe KOHTPOINpOBaTb 3nIyauNIO u CdeLaTb eE MaKcMajbHO 3ΦΦeKTHBHOJ.
2 KaK npaBnIbHo depXaTb 3nnIaTop
- Bcerda clerka haTaynBaIte Koxy Ha 3nnnpyemom yactke.
- Y6eIntecb, yTO 3nIpyoua na IOBepxHOCTb PLOTHO cOpnKacaeTcra C KoxeJ.
- MeДлЕнно И HeпрерьIBHO, 6e3
- НадаВиВаня ВеДITE ΑПИЯТОР В
- НаразВлЕни ПOTИВ рОCTА BОЛOC.
- РOCKOLБКУ BОLOСы мOrут pactИВ
- рaЗлчнын НаразВлЕнЯx, NOLE3HО
- РовECTИ АПИЯТОРМ И В ДPyRVX
- НаразВлЕнЯx, YTOБbl ДОCTИь
- ONТIMальНОг pe3yЛьТаТа.
IyIbCnpyUoJne DvNxKeHnMaCCaK-HbIX POJIKOB paccla6JrOT n CMr-uaOT Koxy, DeJa 3nnJauNIO BoJeE 6epeXHoI.
3 ΘПЯЦИнHor
Ipn3BOJNTe 3nJIaUIO HOr CHN3y BBepx NO rOJIeHN. Depxnte HORY BbITaHyTOB BO BpeMg 3nJIaUuN B NOkOJIeHHOJ oBlaCTN.
4 3ПИЯЦЯ NOДМышЕК И 3ОНБI 6ИКИН
HacaKa IyBCTBHTeIbHbIX yAcTKOB Tea (7) 6bla pa3pa6oTaHa CneuiaIbHO Ira 3Tnx ceJe, B KaueCTBe DOnolHNTeJbHO HAcAKn Ira YCTaHOBKn Ha3nnnpuyouei roIOBKe (2).
IoxaIyIcTa,IMeITe B BVNy,TO 0bIactn IODMbIWeK N 3OHbI 6NKINH OcOBeHHO yBCTBNTeJIbHbIK 6OJN, IO3TOMy Mbl peKOMeHdyem HaunHaTb INx 3nnlauco CO CKOpocTn «I».PnIOBTOPHOM IcNoJIb3OBAHNN yBCTBO 6OJN yMeHbWNTcR.
Ipeed 3nnlauee TuaTeIbHo OuHCTNTe daHHie oBlaCTn, YTObI ydaJIITbOCTaTKn KaKx-JIn6o BeIecTB (Ha npIMep, De3oOpaHTa). 3aTe m aKKypaTHOBbICyUInTE KOKY NOJOTeHcEM.
Pn3nnJrNn NOMbIWeHNO BnAdnHbI
DepXHTe pyky BbITaHyTOB BBepx IN
npoBOJTe np6OpOM B pa3JIuHbIX
HaNPaBLeHnx. NocJe 3nnJrCnKoxa
OCO6eHNo YyBCTBNTeJIbHa, PO3TOMy
n36eAte NCNoJIb3OBaHNJaIO6bIX
pa3dpaXaIOUxN BSeEcTB, TaKnx KaK
De30OpaHTbl, CoDEpXaUne aIKKOrOJIb.
5 Θиляця pa3ичьIx yuaCTKOB nica
EcnBbncnoJb3yeTe hacaKy dny ToueHoro ydaJIeHnBaIoc (8), BaW 3nnIaTOp Silk-epil ndealbHO noDxOHT dnyydoBHOro ydaJIeHnJIIO6bIX HexeIaTeJIbHbIX BOLOCKOB Ha JInCe ININ dpyrNX YvBCTBNTeJIbHbIX yactKax TeJa.
Ipepe3nnaeMbI peKomeHdyem npotepeTb Koxy CnpTOM (B rHneHuecknx ceJx).Bo Bpem3nlaun Ha IuIe CJIeKa HATaRnBaIte Koxy OdHOpyKoN MeJeHNO BeDITe 3nnlAToP dpyro pyKoB HAnpaBLeHN BBIKIOUaTeJI.
6 Ovnctka 3nnnnpyiose roJOBKn
Ipeed ouncTKoJ OTKJIouHTe np6Op ot cetn. PerylpaHaj uNcTka oBecepeuBaET lyuWn pe3yNbTaT.
a OuNTka TeTockoJ:
CHNMMTE NcNoJIb3YeMyIO HacaIky, a 3aTEM OuNCTnte ee C NOMOUsIO UTeOyKn.ДЯ OUHCTKN INHcTeOB NcNoJIb3YJTE UTeOyKy,CMOueHHyIO B CnInpTe. OuNCTnte PINHCteBIC NOMOUsIO UTeOyKn C TbIbHOJ CTOpOHbI 3nIIpyUoSeI rOLOBKn, NOBOPaUNBaJ 6apabAH BpyHyIO. 3TOT MeTOd OUHCTKn ObecneuBaET HanLyUWe rIgHeHNe YeCKne yCLOBnI dJa 3nnIpyUoSeI rOLOBKn.
b OuNTka pOJ npOTouHoi BOIOI:
СнIMNTe ИСПОЛьЗУЕМУю HaCaДКу.
ДерхNTe эплЯТOP ТАК, уTOбbl
эплИрУЮшая ГOLВКа HaxODиLacb
пOD CTpyEi BODbl. 3aTeM HaxMNTe
KHONKy BbICBO6OxJdeHnA эплИрYIO-
ШeI ГOLOBKN (5), UTOБbl CHЯТь eE (2).
ВСТРЯХNITe эплЯТOP I эплИрYIO-
ШYIO ГOLOBKY, UTOБbl y6eДNTbCRA, UTO
ИЗНХ BbITEKJa BCЯ OCTaBшЯСЯ BODa.
ПОLOЖNTe OBe YacTи CsuINTBcR.
Пе徳 сборкоу y6eДNTeCb, UTO OHI
ПОЛHOCTbIb BbICOXJI.
Bo3MoXHa MoiΦnKaun6e3 npEaBapntbHOrO yBeOMJeHnA.
EAC
3JIeKtpnueckn 3nnIaTOp BRAUN TnI 5340 c ceTeBbIM 6JIOKOM NITaHnA TnI 492-XXX
Ecnnn3delle (Ha Kopnyce)
npomapknpoBaHO uHpamn 492,TO Bbl MOXeTe nCNOJb3OBaTb eRO TOnbKO C
NCTOCHNKOM NITAHNA MapKnPOBAHHbIM KOIOm 492-XXXX. NCTOCHNK NITAHNA
Tnna 492-XXXX O3Naayet YTO,Bbl
MOxTe NOJIb3OBaTbcra TOnbKO
NCTOCHNKOM NITAHNA Braun c
MapKnPOBko 492-XXXX. NCTOCHNK
NITAHNA Tnna 492-XXXX YBIAETcra
PpeDCTaBNTeJeM CeMeIcTBa
NCTOCHNKOB NITAHNA C ODiHaKOBblIM
TEXHnueCKIMn XapaKTepNCtIKaMI.
CmBoJ "X" B Kode 3aMeHareT uNphipy OT
0do 9 n O3Naayet pa3InuHbIe
MOINΦHKaU INCTOCHNKOB NITAHNA He
CBRAaHHbIE C TEXHnueCKIMn
XapakTepNCtIKaMI. IoxaIyIcTa,
PnoBepRte MapKnPOBky NCTOCHNa
NITAHNA DJIa eRO nIeHTNoKauu.
Pa3InuHbIe MoINΦHKaUu INCTOCHNKOB
NITAHNA 492-XXXX,OTnuaOTcra dpyr OT
Dpyra ToJIbKO UBeTOM nIIu fOpMOi.
7 BaTT, 100-240 BoJIbT, 50-60 Tepu.
Klaacc 3aunbl OT npaKeHn
3JIeKTPueckm TOKOM: II
Ipon3BeJeHO B HegMaHn dJa Braun
GmbH, Frankfurter Strasse 145,
61476 Kronberg, Germany/Bpayn M6X ΦpaHKΦypTeP uTpacce 145,
61476 KpoH6epr, HegMaHn.
RU:ИМнорТер/Службаnotpe6nteJIeN: OOO «ПрokТерэнД ГмБЛ ДистрибьЮТOPСКая Komпаня》, PocSЯ,125171,MockBa, Лениградскийwoosce,16A,ctp.2. TeI.8-800-200-20-20.
Oxolodkyuoya pykabnca dlya OdaTkoBOrO OxolodxeHnA wkipn
Дяпершхkiькox ceaHcib eniiaui a6o kso y BacЧуТиBaшkipa,ВIMOжete BnKOpNCTOByBaTи OXOLOJxUoy pykabuio (10),zo peKOMeHIOBaHa DepeMaTOIOrAm, a6n 3MeHUnTI MoKJIbVe NOdpa3HeHHa ShkpN.
- IpekeohaTeC8, 10 naket 3 reJem 3haxoDnBc8 y MOpO3nIbHiK kamepi 10HaHMeHwe npotraGM 2 roDNH (dJIy 3pyuHocTi BnKOpNCtAHN Bn MoXeTe 36epiratn naket 3 reJem y MOpO3nIbHiK kamepi).
- Покладить пaket 3 relem пid npo3opy часину рykabиц. Викорисовит лше 3 рykabицю.
- Пркладыnpo3opy (npoxolodHy) CTOPOHy pyKABNci DO HOrn.
- Oxolodkyte wKipy npotyrom 6n3bko 30 cekyH, 3a Heo6xIDHOCTI - DOBwe.
Opa3yX npoepiIIOte oxolokheHy dIJIHKy Wkipn, kONscaHO HxKye. - IOBtopoIte OxolodxKeHHra ta eniJa zuIO do 3aBepweHHra npoueDypn.
-ipekeonaiTeec,ioBawa shkipa 3aIIuAeTbcSyXIOB npoceci eniIauii.
Baxnbo: npiklaaTe 0xolodkyu cykaBnIO do Ondie i tiej k dIyHKn shkpn He doBwe 2 xBnInn. 36epiraTe noaJI bID coHryHOr npomHHn. He BnKOpNCTOByte, kUO nakET 3 reIem nowkoJKeHn. YtNiI3yIte k NObyTobi biXoDi. He BnKOpNCTOByte, kUO Bn CtpaxdaTe Ha rinepuyTlNBicTB, aIepriHO h XoIoAbo MaTe po3naN cyTlNbocTi shkpn, 1o cnoCTepiraOTbC npn 3axBoPioBaHNx cepra abo npuyseHnx apTepiAlbHOro KpoBOnocTaayHn.
K npoBODn eniJaio
Eπιλίουγα rolινκα (2) ośhaunce ha texho-lorio Close-Grip, οιοδ 3a6e3neuHTn MaKcImaJIbHy eΦeKTINBHICTb πρι BnKOp-nCTaHHi ha KOPOTKOMy BOLOCCI: 40 nIH-uetIB 3aBXdI ΣilbHO npIJraIOTb Do υkIpN, BnДaJIaIouH NaBITb HnKOpOTwi BOLOCSHNK pO3MIPOM 3 nIuNHky (0.5 MM). ΠλaBaIOUa rolɪVBka iDeaJIbHo aIaNTyETbcS rdo KOHTypiB TiIa dIЯ NaHpeTeJIbHIωO BnДaJIeHHRA BOLOCCs. MacaxHa cnsTeMa BnCOKoi qactOTn (1) eΦeKTINBHO pO3cIa6JIIOe υkIpY dIЯ 6IbIb δepeJInBOI eIINA.
IaTa BnroTOBHeHbKa3aHa y BnrgIi 3-x 3NaUHO KoMy Ha Bnpo6i y Micci po3'Emy: nep7a cHpa = ocTaHHa cHpa pOKy, HacTyuHi 2 cHpy = nopAdkOBn Homep TIXKHa POKy Bnpo6HnTBA.
HapnKlaI, KOI «345» o3NaUaE, IIO npOyKT BnpO6JIeHb 45-н TnxKdEhb 2013 poKy.
TapaHTiHn TepMIn/TepmiN cIyX6n - 2 pOKn.
IodatkoBy iHopmaciio npo cepbici
ceHTpn Braun B YkpaHIMOxHa OTPMaTu
3a Teleponom rapyoi liHii, a TaKox
Ha cepbichomy nopTaJI Bnpo6nka B
iHTepHeTI - www.service.braun.com.
OblaHaHHa BiIIOBiae BImoram TexHnOro perIaMeHTy o6MeXeHHa BnKOpNCTaHHa DeAKNx He6e3neuHX peOvHN B eJIeKTPnHOMy Ta eJIeKTPoHHO My OblaHaHHi.

001
TapaHTiHi 306OB'3aHHBnpo6Hnka
Для BCix Bnpo6iB Mn DaeMo rapaHTiIO HaДBa pOKN, NOUHaIOUCh 3 MOMeHTy npIb6aHnR Bnpo6y a6o 3 DaTu NOrO Bnpo6HnTBA, y pa3i BiDCyTHocTi a6o HeHaJIexxHoro OΦOpMJIeHnR rapaHTiINHOrTo TaJOnHy Ha Bnpi6.
IpoTgrom rapaHTiHoro nepioy Mn 6e3KOuTOBHO yCyBaEMO uJnxOM peMOHTy, 3aMInn DeTaJe a6o 3aMiHN BCbOro Bnpo6y 6yNb-RAkI 3aBOUcbKi deΦeKTH, BnKJIHKaHI HeIOCTaTHbOIO YKicTIO MaTePiAJIIB a6o cKJaDaHHa. Y BnPaIKy HEmoXJIbBOcTI peMOHTy B rapaHTiHn nepioD Bnpi6 MoKe 6yTu 3aMHeHn Ha HOBn a6o aHaJIoRiHn BiINOBiIDHO do 3aKOHy npo 3axNCT npab CNOxNBauiB.
TapaHTiHa6yBaCnIINJNHe,AKUO data KyniBni niTBePdxKyeTbcr neaTkoIO
Ta niiHncom dnilepa (MaRa3nHy) Ha opurihalbHomy rapaHTiHOMy TaIohi Braun a6o Ha ocTahHi cToPiu opurihalbHOi iNctpyKci 3 ekCnnyatauBraun, kKa TakoK MoKe 6yTu rapaHTiHm TaIohom.
Lra rapaHTia Diincha y 6ydb-akii KpaH, B kcy cei Bnpi6 nocTaBnEeTbcr npedCTaBnKOM KOMpaniBnpo6nka a6o npn3HaueHm DnCTpN6'OTOpom, Ta de XoDi o6MeXeHHa 3 imnopTy a6o iHwi npabOBI noloxeHHa He nepeWkoJxAOTb HaadAHnIO rapaHTiINHO 06cnyroByBaHHa. IpaHTia Ha 3amInHei YactHHI 3aKinHyETbcR B MOMENT 3aKinHeHHra paHTII Ha daHn Bnpi6.
TapaHTiHe NOKPnBaE NOsKOJxHNe, BnKlnKaHi HeBipHm BNkopNCaHHaM (INB. TaKoX IpeJIk HxKyue) HopMaJIbHe 3HOuYBaHHcIToK Ta HOxIB dJa rOJIHHa, DepeKTn, 00 He3NaUHM uHOM BnInBaIOb Ha JAcTb PO6OTn pnilaNy. Lra rapaHTi BTPauae cNly, JaKIo peMOHT 3dIChIOCTbcR He BNOBHOaKeHOIO dJa CboRo OC6OIO Ta, RaKIo BNKOpNCTOByOTbcr He OpnHaJIbHi 3aNaChi YactHn BnPo6Hnka.
CTpOK cnyk6n npodykuii Braun
dopIBHoe rapaHTiINHomy nepiody y Dba
pOKN 3 MOMeHTy npnd6aHHa 60 3
MOMeHTy BnroTOBJIeHHa, kUO DaTy
npoJaxy HEMOxKJIuBO BCTaHOBHTN.
Y BnpaIky nped'YBHeHHa peKJaMaucii 3a
ymOBamn daHOI rapaHTII, nepeDaIte
Bnpi6 y NOBHomy KOMPJIeKTI 3rIInHO ONcCy
B opnIHalbHi nHCTpyKci II 3 ekCnIyataci
pa3OM 3 rapaHTiINHM TaIOHOM y
6yDb-IAKn cepBicHni CEHTp, kKn
OphiIiHo BNOBHOJaeHNI
npedCTaBHKnOM KOMHaHI Bnpo6HnKa.
Bci iHsi BmOrn, pa3OM 3 BmOrAmn
BiDshKOdyBaHHra 3bNTkIB, He diiChi, kKIo
HaSha BIDNoBIaJIbHiCTb He BCTaHOBJIeHa
3aKOHHM YINOM.
BnnaKn,Ha kI He po3noBcIOJxUyE7bcra rapaHTi:
- DeΦeKTH, BnKJIHKaHI φopc-MaxkopHmN O6CTaBnHaMn;
- BnKOpncTaHn3 npocciHNO MeTOO a6o 3 MeTOO OTpImaHHn np6yTKy;
- nopuyuHnBnMOr iHCTpyKu3 eknnyataui;
- HeBipHe BCTaHOBJIeHHHaHpyrMepexi XNBJIeHHra (JKAUO ueBIMaraTbcra);
- 3diincheHHaTexhiuHx 3MiH;
- MexaHiyi NOsKOJKeHHra;
-ДлгпрILAдВ,иОпрацютьHa 6baTapeKax -po6Ota 3 HeBIDNOBIdHMn a6O cnpaцьOBaHmN 6baTapeKamn,6yIbIki NOsKOJxEHnY, BnKlnKaHi cnpaцьOBaHmN a60 NiDTiKaIOUcHmN 6baTapeKamn; - NOшкоджени 3 Вин Тварин, Гизунов та комax (В ТОМУ чиси в Випадкамх 3нхODжени Гизунов та комax усередни пилади)
- ДябптВ - 3im'ЯТа a60 пова сiTka.
Ybara! rapaHTiHn TaIoh nIdIrae BnIyueHHIO B pa3i 3BepHeHHa Do cepBichoro ueHTpy 3 npoxaHHaM npo BnKoHaHHra rapaHTiHoro peMOHTy.
Iicra npoBeHnpeMOHTy rapaHTiHm TaIOHOM 6yde BBaxatncs 3anOBHeHn opriHaJ IInCTa BIKOHaHOpeMOHTy 3i StAMNOM cepBICHOrO ceHTpy TaPiINCaHn CNOXNBaYeMpO OTPMaHHBnpo6y 3 peMOHTy.
TapaHTiHn TepMin NODBKyETbCra Ha nepioD, kN dHn Bpi6 3hAxOINBCR B cepBicHomy ceHTpi B peMOHTi.
B pa3i BHHKHeHn TpydHouzIB 3
BHKoHaHHr rapaHTiHoro Ta
nicraRapaHTiHoro O6cIyROByBaHH,
IpoxaHH 3BepTaTncr Do IHopMaciHoiCnyk6n cepbicy npedCTaBHnKa KOMnHiBnPo6HnKa B YKpaHl.
Tepepon rapaoyi lihii 0 800 505 000.
ДзВинки no Ykpa'Hi 3i ctaioHapnIX TeNeФОHHnx HOMepiB e6e3KoTObHmN.
Country of origin: Germany Year of manufacture
To determine the year of manufacture, refer to the 3-digit production code located near the type plate. The first digit of the production code refers to the last digit of the year of manufacture. The next two digits refer to the calendar week in the year of manufacture. Example: "101" - The product was manufactured in week 01 of 2011.
山
e
e 1
nB
1
p 1
Jnllnnnllllo.
"101":Jio.
01 00
.2011
11 11111111111111
a=1gagaiug.1rj
i 1
gI pI I gI gI gI I bI Jc
Juiu 1yLpaiae aiea
.1yio 1jU LgLj
2
4g0g jj 1
.
y
()
yLxLy.(y)
j4.11 10g jLc 1e 8
j4a1g 101j
Jn no nnnnne nee
j 1
在 Rt ABD 中:
p,1aall jyj y
JlJU 10
.
JgW 1111111111111111
aJlaljIbI b
yI yI yI IyI yI yI yI yI yI yI yI yI yI yI yI yI yI yI yI yI yI yI yI yI yI yI yI yI yI yI yI yI yI yI yI yI yI yI yI yI yI yI yI yI yI yI yI yI yI yI yI yI yI yI. (2) 11!
yIyIyIyIyIyIyIyIyIyIyIyIyIyIyIyIyIyIyIyIyIyIyIyIyIyIyIyIyIyIyIy
:aaagla 1111111111111111111111111111111
1
J 1 J 1 J 1 J 1 J 1 J 1 J 1 J 1 J 1 J 1 J 1 J 1 J 1 J 1 J 1 J 1 J 1 J 1 J 1 J 1 J 1 J 1 J 1 J 1 J 1 J 1 J 1 J 1 J 1 J 1 J 1 J 1 J 1 J 1 J
5
(8) 111111111111111111111111111111111111111111
6
Jg y 11 Jy 11 11 11 11 11 11 11
a
JL 11111111111111111111111111111111111111
J 1 1 1 1 1 1 1 1 1 1 1 1 1 1 1 1 1 1 1 1 1 1 1 1 1 1 1 1 1 1 1 1
J 3
J 1 J 1 J 1 J 1 J 1 J 1 J 1 J 1 J 1
y 4
aL
JSLU JIJI 1bE Pn D 7 (7)uall
Jy, yJLgLo
(2) 11! j! s! j k j k j k j k j k j k j k j k j k j k j k j k j k j k j k j k j k j k j k j k j k j k j k j k j k j k j k j k j k j k j k j
1J. Js J 5u L u j
Jc (1) C lai y g y b c ii
y I a I I I I I I I
J=1. 1000000000000000
a bll a bili yabbi, 111 J
a l jy0) 111 1
sic. liyaiill Lggeo (gell
1 1
Lgj (2) j 1
Cle (Close-Grip)
(11)
(11)
(11)
(11)
(11)
1
(4)1/1j 10
$$ \dot {a} b l l \ddot {a} \ddot {a} l = (\langle | \rangle) \ddot {a} _ {2} \dot {a} _ {3} \dot {a} _ {4} $$
$$ \left. \right.\left. \right.\left. \right.\left. \right.\left. \right.\left. \right.\left. \right.\left.\left.\left.\left.\left.\left.\left.\left.\left.\left.\left.\left.\left.\left.\left.\left.\left.\left.\left.\left.\left.\left.\left.\left.\left.\left.\left.\right.\right.\right.\right.\right.\right.\right.\right.\right.\right.\right.\right.\right.\right.\right.\right.\right.\right.\right.\right.\right.\right.\right.\right.\right.\right.\right\rangle_ {0} ^ {1} = (\lll) = (\lll) = (\lll) = (\lll) = (\lll) = (\lll) = (\lll) = (\lll) = (\lll) = (\lll) = (\lll) = (\lll) = (\lll) = (\lll) = (\lll) = (\lll) = (\lll) = (\lll) = (\lll) = (\lll) = (\lll $$
JyI JzJie (3) yll
Loo, gio j! gbll abill
sllj j 1000
2
1j! 1i1 1s1 s1
yJ 1JgJgJgJgJgJgJg
yaa a bbsb 181 ygog gao jai ssc g, bgs g jg. Cai IaI aI g
15 1
1
.
y
()
()
j( a + 1) = j( a + 2) + j( a + 3) + ( a + 4) .
j()
.
2/1
i
joo 15081 jg r
.
Joo
A
L
.
1e 1
- 4.5.6.7.8.9
Jg 8.
Lgio g,
buiLguluaa 2. jil1
i 1j g j.
y
.
pIJI JJI JJI Loo yolal lJlA
.
14
1
bayu1 a|gbw| greaiy 2
3
lab/1Jie 2 liao 4
J 5
6
aL 7
(5580/5380j
8
(5580j)
9
JaaWy1
.
JaiSui Jusw 1
(2)
(1) k : k
cuii jbiui i jiu
1
jzjzj
(5)
J 1
山
iiJ (9) jj Joo
Llglll 20000000000000000000000000000000000000000000000000000000000
L 5-2 no Jg U g u 1
Lla, dI I aJg U g U g U
Ug U g U g U g U
Ug U g U g U g U
Ug U g U g U g U
Ug U g U g U g U
Ug U g U g U g U
Ug U g U g U g U
Ug U g U g U g U
Ug U g U g U g U
Ug U g U g U g U
Ug U g U g U g U
Ug U u u u u u u u u u u u u u u u u u u u u u u u u u u u u u u u u u u u u u u u u u uu
8 8 8 8 8 8 8 8 8 8 8 8 8 8 8 8 8 8 8 8 8 8 8 8 8 8 8 8 8 8 8 8 8 8 8 8 8 8 8 8 8 8 8 8 8 8 8 8 8 8 8
J 1 J 1 J 1 J 1 J 1 J 1 J 1 J 1 J 1 J 1 J 1 J 1 J 1 J 1 J 1 J 1 J 1 J 1 J 1 J 1 J 1 J 1 J 1 J 1 J 1 J 1 J 1 J 1 J 1 J 1 J 1 J 1 J 1 J 1 J
XXXX-492 jJ J
.
1 1
J 1
1 11
.
JbI Jn nn IJnnn
8n
gI gI gI gI gI gI gI
aalg 1
1
S 1
081p|LwL 1uLglaIbc!
jS
1
1i 1
8JU 8.
.
p 8 no Jab
yglgss
-
-
-
-
-
-
-
-
-
-
-
-
-
-
-
-
-
-
-
-
-
-
-
-
-
-
-
-
-
-
-
-
-
- 2
-
-
-
-
-
-
-
-
-
-
-
-
-
-
-
-
-
-
-
-
-
-
-
-
-
-
-
-
-
-
-
-
.
p 1
g
g j g j
gio 1
LgjglJyI J
o gaii liiaaig aas
a 1
gaii jolil .
5J 1
.(Braun Silk-epil 5)
J 1
1
1
5J1
Braun Silk-epil 5
aJgUgA UgE gJr
gill pll lgs
Loo,0n no
slll jg.
Stamp and signature of dealer