
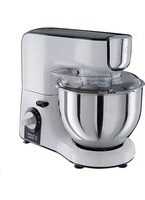
2024056 - Food Processor RUSSELL HOBBS - Free user manual and instructions
Find the device manual for free 2024056 RUSSELL HOBBS in PDF.
| Product type | Food processor |
| Brand | Russell Hobbs |
| Model | 2024056 |
| Speeds | 3 (1, 2, 3) + pulse (©) |
| Max liquid capacity | 1500 ml (MAX mark) |
| Max solid capacity | MAX level (mark on bowl) |
| Functions | Chopping, blending, beating, slicing, grating (fine and coarse) |
| Included accessories | Chopper, blender, beater, slicing/grating disc, pusher, lid, stem, support |
| Safety | Safety switch on lid; motor stops if misaligned |
| Cleaning | Removable parts dishwasher safe or hand wash; motor unit wiped with a damp cloth |
| Bowl material | Plastic |
| Max continuous use | 1 minute, then rest for 2 minutes |
| Power supply | Mains (power cord) |
| Light indicator | Light changes color according to speed (blue, purple, green, red) |
| Weight | Not specified |
Frequently Asked Questions - 2024056 RUSSELL HOBBS
User questions about 2024056 RUSSELL HOBBS
0 question about this device. Answer the ones you know or ask your own.
Ask a new question about this device
Download the instructions for your Food Processor in PDF format for free! Find your manual 2024056 - RUSSELL HOBBS and take your electronic device back in hand. On this page are published all the documents necessary for the use of your device. 2024056 by RUSSELL HOBBS.
USER MANUAL 2024056 RUSSELL HOBBS
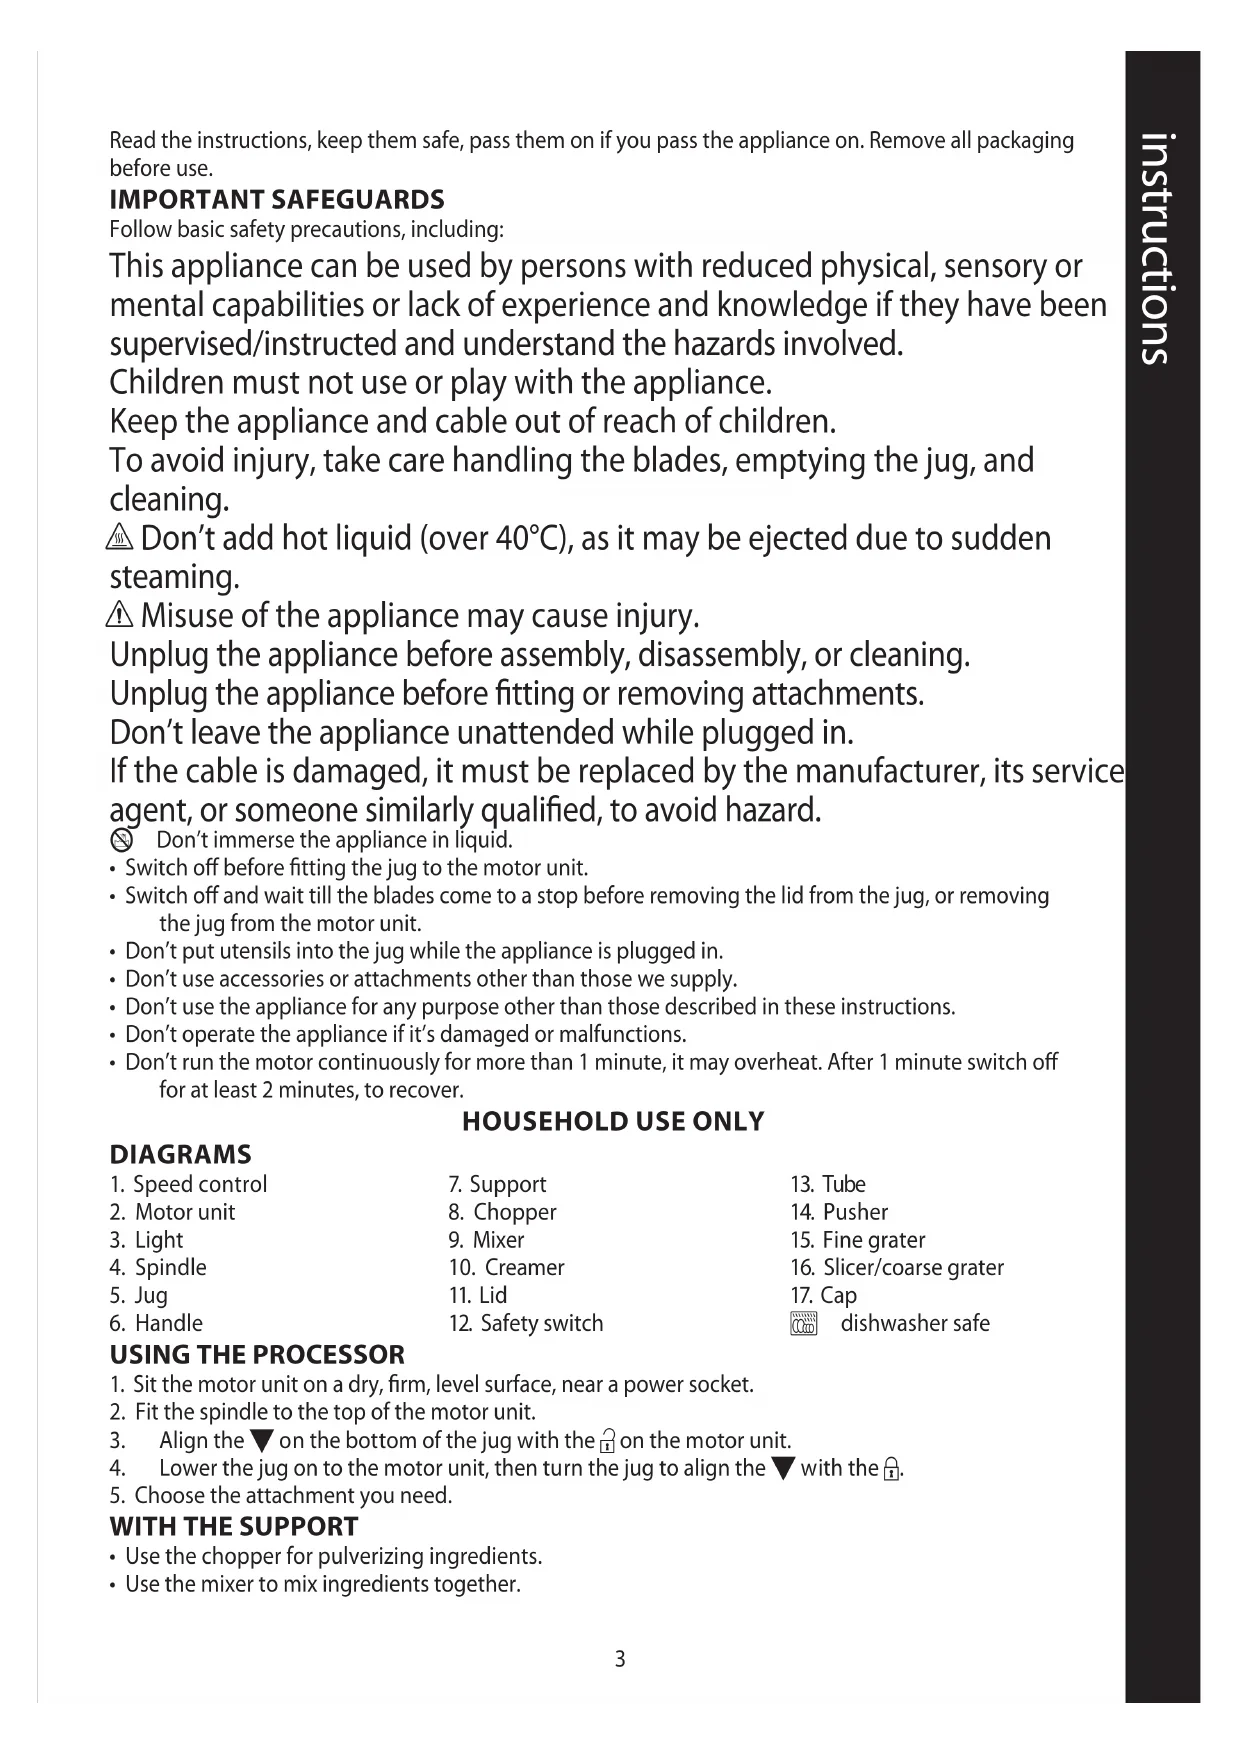
Read the instructions, keep them safe, pass them on if you pass the appliance on. Remove all packaging before use.
IMPORTANT SAFEGUARDS
Follow basic safety precautions, including:
This appliance can be used by persons with reduced physical, sensory or mental capabilities or lack of experience and knowledge if they have been supervised/instructed and understand the hazards involved.
Children must not use or play with the appliance.
Keep the appliance and cable out of reach of children.
To avoid injury, take care handling the blades, emptying the jug, and cleaning.
Don't add hot liquid (over 40^ ), as it may be ejected due to sudden steaming.
Misuse of the appliance may cause injury.
Unplug the appliance before assembly, disassembly, or cleaning.
Unplug the appliance before fitting or removing attachments.
Don't leave the appliance unattended while plugged in.
If the cable is damaged, it must be replaced by the manufacturer, its service agent, or someone similarly qualified, to avoid hazard.
Don't immerse the appliance in liquid.
- Switch off before fitting the jug to the motor unit.
- Switch off and wait till the blades come to a stop before removing the lid from the jug, or removing the jug from the motor unit.
- Don't put utensils into the jug while the appliance is plugged in.
- Don't use accessories or attachments other than those we supply.
- Don't use the appliance for any purpose other than those described in these instructions.
- Don't operate the appliance if it's damaged or malfunctions.
- Don't run the motor continuously for more than 1 minute, it may overheat. After 1 minute switch off for at least 2 minutes, to recover.
HOUSEHOLD USE ONLY
DIAGRAMS
-
Speed control
-
Support
-
Tube
-
Motor unit
-
Chopper
-
Pusher
-
Light
-
Mixer
-
Fine grater
-
Spindle
-
Creamer
-
Slicer/coarse grater
-
Jug
-
Lid
-
Cap
-
Handle
-
Safety switch
dishwasher safe
USING THE PROCESSOR
- Sit the motor unit on a dry, firm, level surface, near a power socket.
- Fit the spindle to the top of the motor unit.
- Align the on the bottom of the jug with the on the motor unit.
- Lower the jug on to the motor unit, then turn the jug to align the with the
- Choose the attachment you need.
WITH THE SUPPORT
- Use the chopper for pulverizing ingredients.
-
Use the mixer to mix ingredients together.
-
Use the creamer to thicken cream, to beat eggs, and to cream eggs and sugar together.
- Fit the attachment over the support, and slide it to the bottom.
- Lower the support into the centre of the jug, over the spindle.
- Put the ingredients into the jug.
If you're using just liquids, don't fill the jug past the max mark.
- If you're using solids, or a mixture of liquids and solids, don't fill the jug past the MAX mark.
FIT THE LID
- Hold the lid over the jug, with the safety switch to the right of the handle.
- Lower the lid on to the jug.
- Turn the lid clockwise to bring the safety switch into the gap at the top of the handle.
- The controls will only operate with the lid and jug in this position.
- The jug will not move while the safety switch is engaged.
To release the jug, you must first turn the lid to bring the safety switch to the right of the handle. - Don't try to move the lid or the jug while the motor is running.
SWITCH ON
- Check that the speed control is set to 圆
- Put the plug into the power socket.
- Turn the speed control to the speed you want (1 = low, 3 = high).
- Turn the speed control back to to turn the motor off.
- Turning the speed control anti-clockwise to will give you a short burst at high speed. In this direction, the knob is spring-loaded. When you let go, it'll return to .
- The light will change colour as the speed changes.
| 1 Blue Slicing/ shredding/ grating | |
| 2 Purple Dough/ cakes/ cream | |
| 3 Green Blending/ other | |
| © | Red Chopping/ smaller batches |
- To add ingredients while the motor is running, lift the pusher out of the tube, add the ingredients via the tube, replace the pusher.
WITH THE DISCS
- Remove the lid.
- Remove the support, and fit the disc to the top of the spindle.
- For fine grating, fit the fine grater with the rough side on the top of the disc. For slicing, the slicing blade must be on top of the disc. For coarse grating, the slicing blade must be on the bottom of the disc.
- Replace the lid.
- Remove the pusher, and drop the ingredients down the tube.
- Replace the pusher, and use it to push the ingredients gently down the tube.
- Don't use fingers or cutlery to push food down the tube - only the pusher.
- The blade(s) on top of the disc will slice or grate the food into the jug.
- Don't let the jug get more than about half full - stop and empty it.
USING THE BLENDER
- Align the on the bottom of the jug with the on the motor unit.
- Lower the jug on to the motor unit, then turn the jug to align the with the 1
- Remove the lid.
- Put the ingredients into the jug. Don't fill past the1500ml mark. If you do, the contents may force the lid off when you start the motor.
- Replace the lid.
- Align the pips on the cap with the slots in the hole, fit the cap, and turn it clockwise to lock it.
- Turn the speed control to the speed you want (1 = low, 3 = high).
-
Turn the speed control back to to turn the motor off.
-
Turning the speed control anti-clockwise to will give you a short burst at high speed. In this direction, the knob is spring-loaded. When you let go, it'll return to .
-
The light will change colour as the speed changes.
| 1 Blue Purées | |
| 2 Purple Smoothies | |
| 3 Green Soups/ other | |
| ◎ Red Ice crushing/ smaller batches |
CRUSHED ICE
Before using the appliance to crush ice, make sure it's clean, and rinse it out thoroughly.
The slightest trace of detergent may affect the taste of the crushed ice, and will flatten any drink to which it is added.
For best results, full the jug with between 150ml and 500ml of ice cubes.
Put the lid on the blender, then:
- Turn the speed control to for a second or two, then release it.
- Check the results, and adjust.
CARE AND MAINTENANCE
- Switch the appliance off (and unplug it.
- Wipe the outside of the motor unit with a clean damp cloth.
- Hand wash the removable parts.
You may wash these parts in a dishwasher.
If you use a dishwasher, the harsh environment inside the dishwasher will affect the surface finishes.
The damage should be cosmetic only, and should not affect the operation of the appliance.

ENVIRONMENTAL PROTECTION
To avoid environmental and health problems due to hazardous substances in electrical and electronic goods, appliances marked with this symbol mustn't be disposed of with unsorted municipal waste, but recovered, reused, or recycled.
CORIANDER PESTO
- 2 handful coriander leaves
2 cloves garlic - 60 g pine nuts
125 ml olive oil - 60 g Parmesan, grated
Process the coriander, garlic, pine nuts and half the oil till smooth. Transfer to a large bowl.
Stir in the Parmesan. Add oil to adjust the consistency: For a dip: thick. For a topping: medium. For pasta sauce: thin.
APENAS PARA USO DOMÉSTICO
ESQUEMAS
| 1 Blå Kutting/strimling/riving | |
| 2 Lilla Deig/kaker/krem | |
| 3 Grønn Blanding/annet | |
| © | Rød Hakking / minded deler |
| 1 Blå Pureer | |
| 2 Lilla Smoothes | |
| 3 Grønn Supper/annet | |
| © | Rød Knuse is / minre deler |
BEHANDLING OG VEDLIKEHOLD
BAKHbIE MEPbl IPREDOCTOPOXHOCTN
CneyuTe OCHOBbIM HNCTpyKcIyM NO 6e3ONaChOcTn, BkJIouyAe CNe dyUoJne:
IcnoIb3OBAHne daHHoro yCTpoiCTBa IucaMn C OrpaHnueHHbIMN
fN3UeCKIMN, ceHCOPHBIMN IIN YMCTBeHHbIMN cNoC06HOCTaMn,
HeIOCTaTKOM ONbITa IIN 3HaHn DOyckaETc npYUCOBn KOHTPOJn IINI
IHCTpyKTaJa N OCO3HaHnraCHhbIX pNCKOB. DeTAM 3aPpeJeHO
ICNOlb3OBAtB yCTpoiCTBO IIN INrpaTb C Hm. DepxKeTe yCTpoiCTBO n shHyp
BHe DoCraEMOCTn DeTei.
UTo6bI n36eXaTb TpaBM, 6yDbTe oCtOpOxHbI npn O6paUeHN C HoxaMn, ONyCToUeHN KpyKkN OuNCtKe.
He do6aBnIe ropeu yIO xNdkocTb (BbIwe 40^ ), TaK KaK OHa MoKet BHe3aPiHO BbIPBaTbCra 6paTHO C napOM.
HepaBnIbHoe nCNoJIb3OBAHne np60pa MoKeT npVBecTn K TpaBMe. OTKIOUHTe np6Op OT po3eTKn nepei c6opKo, pa360pKo IIn oUcSTKOJ. PpeJde yem yCTaHaBnIBaTb IIn CHImaTb HacaIKN, OTKIOUHTe np6Op OT CETn.
He octablaIe BKIOueHbI np6Op 6e3 npncMOtpa.
Ecn Ka6eIb NOBpeKJeH, OH DoJKeH 6bITb 3aMeHeH npOn3BOuNTeJIeM, cepBnCHbIM aReHTOM IIN dpyrIM KBaJIuΦNcIPoBAHHbIM IIncOm dIy npedOTBpaUeHn ONaCHOCTn.
He norpykaiTe npu6op B kNkoCTb.
- BbiklouaTe npi6op nepeTem kaK npicoeHHntb Kpykky 6IOKy DbrarTeJI.
- PpexKde yem cHrTb KpbIshKy C KpyxKn IIN OTcoeHNHTb KpyxKy OT 6noka DBNrataTe, BblKnIOuHTe np60p NdoXdntecb, Korda Hoxn NepeCTaHyT BpaaTaBcra.
He nomeaTe npHaJeXHoCTN B KyBUnn npn BKIOueHHom npn6ope.
IcnoJb3yTe TOnbKO npHaNAdnEKnH NaCaKn O nPON3BOaNTeJI. - Pnp60p He MoKet pa6oTaB OT BHeUHero TaMepa IIN DuctaHcNHOHcNCTeMbI ynpabNeHn.
- He nCnoB3yIe np6Op, ecn OH nobpeJdeH nn pa6oTaTc nepe6oAmN.
Bo n36exaHne nepepebaHn np6opa 3anpeaaetc HnpepbIBHO nCNoIb30BaTb dBIraTeIb 6oJIe 1 MInyTa. IIO nCTeueHN yKa3aHHoro BpemeHn OTKIouHTe np6Op MNHMym Ha 2 MInHytbl dJa BOCCTAHOBLeHn erO pa6OTocnoc6Hoctn.
TOJIbKOДЯБblTOBOrOИСПОЛьЗOBAHNIA
NJIIOCTPAUNI
- PerylaTOp ckopocTN
2.БнokДВигателЯ
3.ПоДСВЕТКА - Ocb
5.Kpyxka - Puyka
7.Дерхателb
8.ИЗмельчITeIb
9. Minkcep
10. KpemOB36nBaNka
11.Kpbioka
12. 3aunTHbIy BvIKIOuOaTeIb
13. Tpy6kn
14. Ipo6ka-TonkataeIb
- Mełkār Čepka
- Hacadka Дяшнковая/ Круна Терka
- Kolnaok

MOXHO Mblb B
NOCyDOMOeHNO MaSHHe
NcNoJIb3OBAHNE KOMBAHHA
- YctaHOBNTe 6IOK DnBraTeJIHa cyXoJ, yCTOuYBOI n POBHOI NOBepxHOCTn prdOM c po3eTKoJ 3JIeKTPoPHTaHJIa.
2.YctaHOBnTe Ocb Ha 6NOK DnurTaTeJ. - NObepHnTe KpyKky, CoBmecTnB 3HaOK B HnXHeY aactn KpyKKn CO 3HaKoM Ha 6Ioke nBnRaTeJIa.
- YctaHOBnTe KpyKky Ha 6Iok Dnuratela, nocne yero NOBepHnTe ee, coBMeua 3HaOK CO 3HaKoM
- Bb6epnte Heo6xOuMyu Hacaiky.
C DEPKATEJIEM
- IcnoIb3yIte n3MeIbIuTeJIb dJIa n3MeIbUeHnI INHpeIeHTOB.
- IcnoIb3yIte MInKcep dIJI cMeUWBaHnI INHpeJeNToB.
- IcnoIb3yIte KpeMOB36uBaIKN dIy 3aMeUHBAHn TecTa, B36uBaHn RnC n B36uBaHn RnUHOcaxapHoN cmecn.
1.YctaHOBnte HacaKny Ha nepKxAteIb 3aDbuHbTe ee Do camoro dHa. - Onyctnte depkaTeB UeHTp KyBUnHa, Ha Ocb.
- NomeCTnTe INHpeDneHTbI B KyBUnH.
- Ecni nICNoJb3yIOTc TOnJIbKO JnIKOCTN, He 3aJIbBaIte INX B KpyKky BblIe OTMeTKn max (MAKCIMAJbHbI YPOBEHb JnIKOCTN).
- Ecni nCnOJIb3yIOTcT BHepeTBA nNn Cmecb TBepeBbIX nXnDkNx, He 3aNoJIHnTe KpyKky Bblwe OTMeTKn MAX (MAKCNMAJIbHbI YPOBEHb IPOJYKTOB).
YCTAHOBKA KpbliuKIN
- YdeprKnBaIte KpbIshky Hnd KpyKoN, 3aunTHbI BblKnIOaTeIb DOJKeH pRn 3TOM 6bITb Cnpaba OT pyuKN.
- Onyctnte Kpbilkny Ha Kpykky.
- ПовернITE Крьшку по уасови стpeлke, УTOбI 3aцHTьи ВыКЛIOчATEнь OKa3aJIСЯВ 3a3Ope CBepxypuKN.
4.OpraHbI ynpabHeHH 6ydyT pa6oTaT bToJbKO TOrJa, KOrJa KpbIshKa n KpyKka 6ydyT B 3Tom NpOJOKeHH. - KpykKa He 6ydt nepemeeaTbcra, noka 3aunThbI BblKnloaTeIb 6ydtB noloxeHn 3aenneHna.
- YTO6bI BbICBO6OuNTb KpyKky, Heo6xOJIMo BHaayane NOBepHyTb KpbIaKy, YTO6bI 3aunTHbIy BbIKIOUaTeNb OKa3aNCs CnpaBA OT KpbIaKN.
- He nbitaeb nepemeaTb KpbIky nI IN Kpykky npn pa6oTaioeM dBirateJe.
BKNIOUOYEHNE
- y6eDntecb, yTO peryIaTOp cKopoCTe yCTaHOBneH Ha
- BCTaBbTe BnJky Bpo3eTky.
- YctaHOBtPe peryIaTOp ckopocTu B Tpe6yeMoE noLoXeHne (1 = Hn3Ka, 3 = BbICOKa).
- TTo6bI BvIKIIOUHTb DBruratEnb, yCTaHOBNTe pepyrJTop ckopoTei o6paTHo Ha
-
Пи поьоре Perултopa ckopocTei npOTnB YacOBoi CTpeKN K OTMeTke BO3HnKaet KpaTKOBpeMeHHoe BpaueHne C BbICOKO CKOpocTbIO. Пи DBNXeHN N 3Tu CTOpOHy pOnCXoIHT HarpyxHeHne npJxHbI KONKn. KaK TOnbKO Bbl OTnyCTnTe ee, OHa BEpHeTcra Ha @
-
LBeT INHdNkaTopa N3MeHnTcBmEcTe C N3MeHeHnEm CKOpOCTn.
UMAK OD RAJCICE S KOMADICIMA
1/2luk
1/2 crvenapaprika
1/2 zelene paprike
1 rezanj cesnjaka
1/4 crvenog feferona (bez sjemenki)
1 pregrst persina
400 g rajcice (iz limenke)
8 ml maslinovog ulja
60 ml pirea od rajice
2,5g soli
Postavite sječivo. Odaberite nisku brzinu. Nasjeckajte na komadice luk, crvenu papriku, zelenu papriku, Češanj, feferon i persin. Dodajte rajćicu, maslinovo ulje, pire od rajćice i sol. Miješajte 5 sekundi. Za 8 porcije.
Preberite navodila, jih shranite na varnem in jih predajte skupaj z napravo, ce jo posredujete naprej. Pred uporabo odstranite vso embalazo.
POMEMBNA VAROVALA
Sledite osnovnim varnostnim ukrepom, vkliquno z:
a a a a a a a a a a a a a a a a a a a a a
1 2
.3
4
5
山
.1
ai = 12( ai - 1)
()=3.1
.4
124 125
AS JU LIOE
aRall aaii 6


- IMPORTANT SAFEGUARDS
- HOUSEHOLD USE ONLY
- DIAGRAMS
- USING THE PROCESSOR
- WITH THE SUPPORT
- FIT THE LID
- SWITCH ON
- WITH THE DISCS
- USING THE BLENDER
- CRUSHED ICE
- CARE AND MAINTENANCE
- ENVIRONMENTAL PROTECTION
- CORIANDER PESTO
- APENAS PARA USO DOMÉSTICO
- ESQUEMAS
- BEHANDLING OG VEDLIKEHOLD
- BAKHbIE MEPbl IPREDOCTOPOXHOCTN
- TOJIbKOДЯБblTOBOrOИСПОЛьЗOBAHNIA
- NJIIOCTPAUNI
- NcNoJIb3OBAHNE KOMBAHHA
- C DEPKATEJIEM
- YCTAHOBKA KpbliuKIN
- BKNIOUOYEHNE
- UMAK OD RAJCICE S KOMADICIMA
- POMEMBNA VAROVALA
Brand : RUSSELL HOBBS
Model : 2024056
Category : Food Processor