HRA500IP - Docking station ROADSTAR - Free user manual and instructions
Find the device manual for free HRA500IP ROADSTAR in PDF.

| Product Type | Clock radio with docking station for iPod/iPhone/iPad, FM radio and remote control |
| Brand | ROADSTAR |
| Model | HRA500IP |
| Power Supply | AC 230 V ~ 50 Hz |
| Remote Control Battery | 1 x CR2032 |
| Radio Memory Battery | 1 x CR2032 (in the designated compartment) |
| Output Power | 2 x 2 Watt |
| FM Band | 87.5 – 108 MHz |
| Headphone Impedance | 8 – 32 ohms, 3.5 mm stereo plug |
| Connectivity | Docking station for iPod/iPhone/iPad, AUX IN input (3.5 mm), headphone jack (3.5 mm) |
| Display | LCD with indicators for mode, frequency, time, alarm, etc. |
| Main Functions | Clock, alarm (iPod/radio/buzzer), snooze, sleep, FM radio (manual/auto, 20 presets), iPod dock, AUX IN, equalizer (EQ), X-Bass, brightness adjustment (4 levels) |
| Remote Control | Infrared, range approx. 5 m, CR2032 batteries |
| Antenna | Wired FM antenna at the back |
| Safety | Double insulation, do not open the casing, do not expose to moisture or rain |
| Maintenance and Cleaning | Wipe the device with a soft, dry cloth |
| Compatibility | Certified "Made for iPod, iPhone, iPad" |
Frequently Asked Questions - HRA500IP ROADSTAR
User questions about HRA500IP ROADSTAR
0 question about this device. Answer the ones you know or ask your own.
Ask a new question about this device
Download the instructions for your Docking station in PDF format for free! Find your manual HRA500IP - ROADSTAR and take your electronic device back in hand. On this page are published all the documents necessary for the use of your device. HRA500IP by ROADSTAR.
USER MANUAL HRA500IP ROADSTAR
iPod / iPad / iPhone DOCKING STATION WITH FM-BAND TUNER, ALARM CLOCK AND FULL FUNCTION REMOTE CONTROL.
HRA-500IP
Instruction manual
Bedienungsanleitung
The exclamation point within the triangle is a warning sign alerting the user of important instructions accompanying the product.

The lightening flash with arrowhead symbol within the triangle is a warning sign alerting the user of "dangerous voltage" inside the unit.

To reduce the risk of electric shock, do not remove the cover. No user serviceable parts inside the unit. Refer all servicing to qualified personnel.
230v\~
This unit operates on 230V \~ 50Hz. If the unit is not used for a long period of time, remove the plug from the AC mains.

This unit must not be exposed to moisture or rain.

The power switch in this unit is mounted on the secondary circuit and does not disconnect the whole unit from the mains in OFF position.

Ensure all connections are properly made before operating the unit.

This unit should be positioned so that it is properly ventilated. Avoid placing it, for example, close to curtains, on the carpet or in a built-in installation such as a bookcase.

Do not expose this unit to direct sunlight or heat radiating sources.

Make sure all batteries are inserted according to the proper polarity.

If the unit is not used for a long period of time (more than 1 month), remove all batteries from their compartment to avoid possible leaking.
Made for

iPod 📁 iPhone 📄 iPad
1
2
EnglishEng
HRA-500IP
iPod iPad iPhone DOCKING STATION WITH FM-BAND TUNER AND FULL FUNCTION REMOTE CONTROL.
INSTRUCTION MANUAL
Please read this instruction manual carefully and familiarize yourself with your new HiFi System before using it for the first time. Please retain this manual for future reference.
LOCATION OF CONTROLS
-
SPEAKER
-
SNOOZE BUTTON
-
iPod iPad iPhone CONNECTOR
-
FUNCTION BUTTON ( iPod, AUX or TUNER)
-
EADPHONE JACK
-
BATTERY BACK-UP MEMORY COMPARTMENT
-
LCD DISPLAY
-
STANDBY INDICATOR
-
PLAY/PAUSE BUTTON (iPod only)
-
STANDBY/ON BUTTON
-
AC CORD
-
AUX LINE-IN JACK
-
iPod/MEMORY/CLOCK-ADJ. BUTTON
-
SKIP/SEARCH/TUNING DOWN BUTTON
-
VOLUME KNOB
-
SKIP/SEARCH/TUNING UP BUTTON
-
FM ANTENNA
-
IR SENSOR
-
JOG CONTROL KNOB
-
ALARM BUTTON
CONNECTING TO POWER
Before switching on make sure that the voltage of your electricity supply is the same as that indicated on the rating plate.
For your own safety read the following instructions carefully before attempting to connect this unit to the mains.
This unit is designed to operate on AC 230V 50Hz current only. Connecting it to other power sources may damage the unit.

3
Caution
To prevent electric shock disconnect from the mains before removing cover. No user serviceable parts inside. Refer servicing to qualified service personnel.
Safety Precaution
Do not allow this unit to be exposed to rain or moisture.
Mains Supply: AC230Volts / 50Hz - AC only
This symbol means that this unit is double insulated. An earth connection is not required.
POWERSUPPLY
Remove the stereo carefully from the box, retaining the packaging for future use.
Read these instructions carefully before use.
Connections
Connect the Mains Lead to an AC outlet. Check that your mains supply is 230V, 50Hz.
Extend the FM antenna on the rear of the unit (11).
Disconnect the power cord from the mains if the unit is not going to be used for some time.
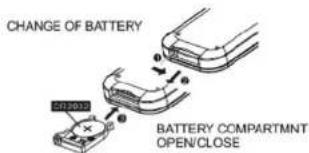
BATTERYINSTALLATION
Insert one CR-2032 battery into the battery compartment of the remote controller and replace the cover.
BATTERYREPLACEMENT
When the batteries become too weak, the operating distance of the remote controller is greatly reduced and you will need to replace the batteries.
Notes: To maintain the accuracy and long life of the transmitter, do not press two or more Buttons simultaneously.
If the remote control is not to be used for a long time, remove the batteries to prevent possible damage through leaking batteries.
text_image
CHANGE OF BATTERY BATTERY COMPARTMENT OPEN/CLOSEUSING THEREMOTECONTROLLER CORRECTLY
Point the remote controller at the Remote Sensor (10).
The functions of the buttons on the remote control are the same as the corresponding controls
4
EnglishEng
on the main unit.
When there is a strong ambient light source, the performance of the infrared Remote Sensor may be degraded, causing unreliable operation.
The maximum effective distance for remote control operation is about 5 metres (16.5 feet).
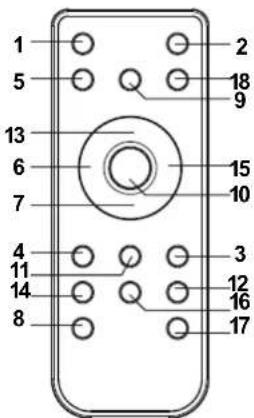
REMOTECONTROL
- STANDBY BUTTON
- MUTE BUTTON
- PRESET Radio UP BUTTON
- PRESET Radio DOWN BUTTON
- BACKLIGHT BUTTON
- SKIP/TUNING/SEARCH DOWN BUTTON
- DISPLAY BUTTON
- VOLUME DOWN BUTTON
- FUNCTION BUTTON
- SNOOZE / iPOD ENTER BUTTON
- PRESET / MENU BUTTON
- ALARM BUTTON
- PLAY/PAUSE (only iPod) BUTTON
- EQ BUTTON
- SKIP/TUNING/SEARCH UP BUTTON
- BASS BOOST BUTTON
- VOLUME UP BUTTON (21)
- SLEEP BUTTON
text_image
1 2 5 18 9 13 6 15 10 7 4 3 11 2 12 14 16 8 17CLOCK SETTING
In the STANDBY mode:
- Press and hold the CLOCK/DISPLAY button (13) until the time display changes to 12-hour digit and will flash.
- Press the TUNE/CLK+ or TUNE/CLK- button (16,14) to adjust 12-hour or 24-hour digit.
- Press the PLAY/PAUSE/FM button (9), the HOUR digit will flash on the display,
press the TUNE/CLK+ or TUNE/CLK- button (16,14) button to adjust HOUR digit. - Press the PLAY/PAUSE/FM button once more, the MINUTE digit will flash on the display, press the TUNE/CLK+ or TUNE/CLK- button (16,14) button to adjust MINUTE digit.

5
- Press the PLAY/PAUSE/FM button again to confirm the time.
- Each state as shown above will be cleared if the key is not pushed in 10 seconds.
ALARM SETTING
During in the STANDBY OFF/ON mode.
- After adjusting clock, press the ALARM button on the unit (20) for a few seconds," and "07:00" appears on the display and the HOUR digit flashes.
- Press the TUNE/CLK+ or TUNE/CLK- button (16,14) to adjust it.
- Press the PLAY/PAUSE/FM button again, the MINUTE digit will start flashing, adjust it by pressing the TUNE/CLK+ or TUNE/CLK- button.
- Press the PLAY/PAUSE/FM button once more to confirm and order ALARM time.
- After adjusting "TIMER -ON", the ALARM VOLUME LEVEL appears on the displayAdjust it by pressing the TUNE/CLK+ or TUNE/CLK- button.
- Now the "FM Memory Station" appears on the display with flashing, adjust by pressing the TUNE/CLK+ or TUNE/CLK- button.

6
EnglishEng
- Press the PLAY/PAUSE/FM button again, the timer "Buzzer Level" indicator appears on the display and flashes, adjust the timer volume high or low by pressing the TUNE/CLK+ or TUNE/CLK- button.
- Each enable state as shown above will be cleared if the button is not pushed in 7 seconds.
- The unit will be switched on automatically at "ALARM ON" order and start playing, the unit will be switched off automatically at "ALARM OFF" order.
ACTIVATING THE ALARM WAKE UP MODE
- Press repeatedly the ALARM button to activate the alarm function and select the wake-up mode.
- The alarm mode and corresponding icon TUNER / iPod / BUZZER / ALARM OFF appear in sequence to the display.

NOTE: If Alarm wake-up to iPod mode is selected and no iPod /iPhone/iPad is fitten in the docking or recognized, when the alarm arrive the buzzer was activated automatically.
To switch OFF the Alarm, press repeatedly the ALARM button until the Alarm icon disappear from the display.
SNOOZE FUNCTION
During the alarm, press the SNOOZE button will temporary switch OFF the alarm for 5 minutes and the snooze icon will be displayed. This is repeatable in the hour alarm duration.
EQ CONTROL (FROM REMOTE CONTROL)
EQ shows the BASS and TREBLE sound tone.
When you press the EQ button, the sound tone BASS or TREBLE can be changed by pressing the TUNE/CLK+ or TUNE/CLK- bottoms.
SLEEP FUNCTION (by remote control)
- If you want to fall asleep to music, press the SLEEP button.
- You may select the TUNER, iPod or AUX mode in sleep function to play from 90, 80, 70 up to 10 minutes of music before shutting itself off automatically.

FUNCTION SELECT
- Press repeatedly the FUNCTION button (12) on the unit or on the remote control (9) to select the desired. Display changes as: iPod - TUNER - AUX-IN.
FM RADIO OPERATION
Operation
- Press the STANDBY Button on the unit (23) or the remote control (1) to turn the unit on.
- Select the TUNER function with the Function Button on the unit (4) or on the remote control (9).
- There are a number of ways that you can tune to radio stations. Follow the instructions in the sections below.
- Adjust the VOLUME to the desired level using the VOLUME -/+ Knob (15) or the VOLUME -/+ Buttons (8,21) on the remote control.
• To turn off the radio, press the STANDBY Button again.
Manual Tuning
Manual tuning is useful when you already know the frequency of the desired transmitter.
- To change the frequency, repeatedly press the TUNE/CLK+ or TUNE/CLK- from Remote Control until the precise frequency is reached.
- From the main unit press the Jog Mode button (19) and rotate the Volume/Tune knob until the precise frequency is reached.
Automatic Tuning
- Press and hold the TUNE/CLK+ or TUNE/CLK- Buttons for about a second. The radio will start automatically scanning for strong radio signals. The TUNER Display shows the frequency in MHz for Fm.
8 EnglishEng
• The tuner will stop scanning when it finds a strong signal.
- Repeat this process until the desired station is found.
Notes: As automatic tuning depends on the signal strength of the transmitters, weak transmitters are sometimes skipped. In such a case, tune manually to find the weaker transmitters. On the other hand, with a very strong signal, the tuner may stop before it reaches the optimum setting. Tune manually for the best reception.
Storing Stations (from Remote Control only)
This unit allows you to store the frequencies of up to 20 radio stations in the memory;
- First tune into the station you want to store using one of the methods above.
- Then press the Preset Menu button (11) on the remote control (17).
- Press PRESET-UP or PRESET-DN Buttons the remote control (3,4) to select the desired channel memory and press the Preset Menu button (11) within 5 seconds to store it.
To reprogram a preset station repeat the procedure above.
Selecting a preset station
To select a preset station, press the Jog/Mode button and turn the Volume/Tune knob on main unit or press the PRESET-UP or PRESET-DN Buttons on the remote control (3,4) until the desired preset program is displayed.
FM Stereo Reception
When an FM signal is tuned in, the (((ST.))) indicator will appear in the display. In case of noisy reception, if you push the PLAY/PAUSE MONO-STEREO button (9) to FM MONO position, the FM STEREO indicator will turn off & switch to MONO FM status.
Antenna
For FM reception there is a wire antenna (17) at the rear of the unit. Extend it for best reception.

9
With unit in STANDBY mode:
-
Insert the iPod player in the iPod deck bracket on the top of the main unit fixedly.
-
Power on the main unit, and then press the FUNCTION button to the iPod mode, the iPod indicator will appear on the display of the main unit.
With unit in iPod mode:
-
Press the PLAY/PAUSE -button once to start the iPod playing. Adjust the volume control by turning the VOLUME knob. To stop the current playing, press the PLAY/PAUSE button once.
-
Press the PLAY/PAUSE button once to pause the current track. To resume the playback, press the PLAY/PAUSE button once again.
-
To skip forwards or backwards, press the TUNE/CLK+ or TUNE/CLK- button to select the desired track.
With unit in iPod MENU mode (from Remote Control only)
- When the unit is in iPod mode, press the PRESET/MENU button once, the unit will enter to the iPod MENU mode.
- Press the PRESET/MENU UP or PRESET/MENU DOWN button (3,4) to enter to the desired menu folder.
- To resume playback, press the Play/Pause button once again, the unit will return to iPod mode.
Charging the iPod Player battery through the main unit:
- The iPod Player has a internal non removable battery, the battery may need to be charged when it is not used for a while.
- You can charge the iPod Player through the main unit automatically under the STANDBY or POWER ON mode.
Note
- The iPod Player's battery is 80% charged in about an hour, and fully charged in about a few hours. If you charge it while playing music, it may take longer.
- It is not better to charge under the TUNER mode. It may interfere the reception.
Note:
- In any time, you can control the iPod player on the main unit, remote control or iPod player itself while the unit in the "iPod" or "iPod MENU" mode.
- In any time, the iPod player must be fixed well under in the STANDBY mode to avoid the unit and iPod player were damaged.
10
EnglishEng
AUX IN PLAY
The AUX input is located at the rear of the unit (12). Use a 3.5mm stereo jack cable to connect audio equipment through the LINE IN jack.
- To select the AUX input function, repeatedly press the FUNCTION button on the unit (or remote control) until AUX is indicated on the display.
- Press the VOLUME (UP or DOWN) button to adjust the sound output level.
Note: LINE in cable not included.
MUTE SETTING (ON THE REMOTE CONTROL)
- When you press the MUTE button (2) once on the remote control, the volume level will flash and the audio output will be temporarily terminated.
- Press the MUTE button again, the volume level and the audio output will return to normal.
HEADPHONES JACK
Headphones should have a 3.5mm diameter stereo plug and an impedance of 8-32 ohms. When headphones are connected (18), the speakers are automatically disconnected.
DISPLAY BACKLIGHT
This unit has 4 different levels of Display illumination. Press in sequence the button BACKLIGHT from Remote Control to select the desired intensity.
X-BASS FUNCTION
Press the button X-BASS on Remote Control to obtain a bass effect and better Audio response.
LCD DISPLAY WINDOW
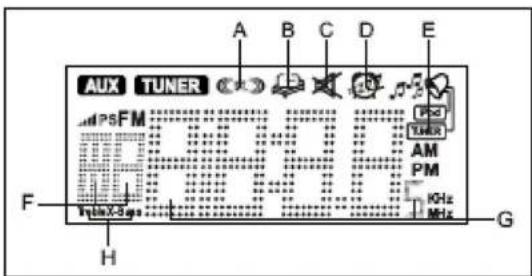
text_image
AUX TUNER PSFM 10Hz AM PM KHz MHz F Tmax-Sags H GA. STEREO INDICATOR E. ALARM INDICATOR
B. SLEEPINDICATOR F. VOLUME LEVEL INDICATOR
C. MUTE INDICATOR G. TIME / FREQUENCY INDICATOR
D. SNOOZE INDICATOR H. EQUALIZER INDICATOR

EnglishEng
TECHNICAL SPECIFICATIONS
Power Supply
AC: 230V-50Hz
DC: 1 x CR-2032 battery for Remote Control
Frequency Reception
FM: 87.5 - 108 MHZ
General
Eadphones: 3.5 mm plug 8-32 Ohm
Output Power: 2 x 2 Watt
Specifications subject to change without prior notice.

Correct Disposal of This Product
(Waste Electrical & Electronic Equipment)
This marking shown on the product or its literature, indicates that it should not be disposed with other household wastes at the end of its working life. To prevent possible harm to the environment or human health from uncontrolled waste disposal, please separate this from other types of wastes and recycle it responsibly to promote the sustainable reuse of material resources. Household users should contact either the retailer where they purchased this product, or their local government office, for details of where and how they can take this item for environmentally safe recycling.
Business users should contact their supplier and check the terms and conditions of the purchase contract. This product should not be mixed with other commercial wastes for disposal.
SICHERHEITSHINWEISE

text_image
CHANGE OF BATTERY BATTERY COMPARTMENT OPEN/CLOSEERSETZENDER BATTERIEN
text_image
Scanned text of a document with repeated Chinese characters and symbols, possibly a form or table header.text_image
Scanned image of a pixelated or corrupted document with fragmented text and symbols, possibly from a low-resolution OCR output.
text_image
Binary to hexadecimal conversion example showing bit positions and their corresponding valuestext_image
Scanned text image showing fragmented Chinese characters and symbols, possibly from a document or form.text_image
Scanned image of a barcode with placeholder symbols and a small icon on the righttext_image
Scanned text of a document with fragmented characters and symbols, possibly from a form or table.text_image
Scanned image of a barcode with placeholder symbols and decorative elementstext_image
Scanned text of a document with fragmented Chinese characters and symbols, possibly a form or table header.REPLACEMENT DESPILES
text_image
Scanned text of a document with fragmented Chinese characters and symbols, possibly a form or table header.text_image
GE OF BATTERY DR2032 BATTERY COMPARTMENT OPEN/CLOSEtext_image
Scanned image of a pixelated or corrupted digital display with fragmented text and symbols, possibly from a low-resolution document or interface.
text_image
Scanned image of a barcode or pattern recognition document with rows and columns of standard text.AJUSTE DEL ALARME (TIMER)
En modo STANDBY OFF/ON:
text_image
Scanned text image showing fragmented, pixelated symbols and a small icon with a triangle symbol in the corner.text_image
Scanned image of a pixelated or corrupted document with fragmented text and symbols, possibly from a low-resolution OCR output.text_image
Scanned image of a document with fragmented Chinese text and a small logo or watermark at the bottom right.text_image
Scanned document with handwritten-style text and a small logo, likely a form or report with placeholder characters and symbols.text_image
Scanned document with repeated Chinese text and a small logo on the righttext_image
Three pixelated digital display panels showing 'TWO' and 'TWO' icons with Chinese characters, likely representing a music or audio interface.iPod iPad iPhone DOCKING STATION, RÁDIO DIGITAL FM E CONTROLO REMOTO.
INTRODUCÃO AO MANUAL
text_image
Scanned text of a document with multiple rows of Chinese characters, likely a form or table header.text_image
Scanned image of a pixelated or corrupted graphic with fragmented symbols and text, possibly from a digital display or interface.
text_image
Scanned image of a binary code with ASCII-like structure and repeated 'X' characterstext_image
Image containing fragmented text and symbols, possibly from a document or form with pixelated patterns and a small icon.- Carregue na lecla TUNE/CLK+ o TUNE/CLK- (para cima / para trás) (16,14) para ajustar.
- Carregue na tecla PLAY/PAUSE/FM (9) novamente, o digito de Minutos piscará.
PortuguêsP
text_image
Image showing a grid of symbols and a small icon with a triangle, possibly representing a pattern or data visualization.text_image
Scanned document with handwritten-style text and a grid of asterisks, likely a form or table section- Caregue na tecla PLAY/PAUSE/FM (9) novamente, o dígito de Memoria Radio piscará. prima TUNE/CLK+ o TUNE/CLK- (para cima / para trás) (16,14) para ajustar.