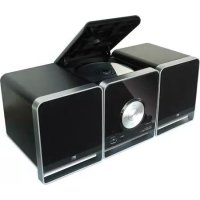
Easy Sound Micro HiFi BT - Hi-fi system Best Buy - Free user manual and instructions
Find the device manual for free Easy Sound Micro HiFi BT Best Buy in PDF.



| Product type | Micro hi-fi system |
| Brand | Best Buy |
| Model | Easy Sound Micro HiFi BT |
| Power supply | AC 100-240 V, 50/60 Hz |
| Power consumption | 20 W |
| Standby power consumption | < 0.5 W |
| Output power (max.) | 5 W x 2 |
| Operating temperature | -10 to +35 °C |
| Relative humidity | 5% to 90% |
| Frequency response (CD) | 20 Hz - 20 kHz |
| Signal-to-noise ratio | ≥ 70 dB (1 kHz) |
| FM range | 87.5 - 108 MHz |
| Wireless connectivity | Bluetooth 2.1 + EDR (range 8 m) |
| Audio inputs | Line-in (RCA), USB, CD player |
| Playable formats | CD, CD-R/RW, MP3 (via CD/USB) |
| Playback functions | Play, pause, next, previous, stop, programming, repeat, random, intro |
| Equalizer | Presets (EQ) |
| Sleep timer | Sleep (15, 30, 45, 60 min, off) |
| Remote control | Yes (range 8 m, angle 30°) |
| Display | LED |
| Maintenance | Soft dry cloth, do not use chemicals |
| Safety | Do not open the casing, avoid moisture and heat sources |
| Warranty | 2 years (parts and labor) |
Frequently Asked Questions - Easy Sound Micro HiFi BT Best Buy
User questions about Easy Sound Micro HiFi BT Best Buy
0 question about this device. Answer the ones you know or ask your own.
Ask a new question about this device
Download the instructions for your Hi-fi system in PDF format for free! Find your manual Easy Sound Micro HiFi BT - Best Buy and take your electronic device back in hand. On this page are published all the documents necessary for the use of your device. Easy Sound Micro HiFi BT by Best Buy.
USER MANUAL Easy Sound Micro HiFi BT Best Buy
natural_image
Exterior view of a modern black and silver audio workstation with 'HELLO' branding (no additional text or symbols visible)
USER MANUAL
www.bestbuy-int.com
ESPAÑOL3
| ENGLISH | 9 |
| FRANÇAIS | 15 |
| ITALIANO | 21 |
| PORTUGUÊS | 27 |
| POLSKI | 33 |
Manual de Usuario
Notas importantes
natural_image
Technical line drawing of a rectangular appliance with a circular vent and control knob (no text or symbols)Conexiones
Please read through this manual before making connections and operating this product. Retain this manual for future reference.
Don't open the cabinet of this unit. No user-serviceable parts inside. Refer servicing to qualified personnel only.
Switch off the unit when you don't use it. Switch off the unit and disconnect it from the AC power supply when it is not being used for a long time.
Don't install the unit in a place exposed to heating sources or direct sunshine.
Don't install the unit in a place exposed to moisture or rain.
The apparatus shall not be exposed to dripping or splashing and any object filled with liquids, such as vases shall not be placed on it.
Install the unit on a horizontal, flat and firm surface with good ventilation. Never block the vents which will cause malfunction resulted from overheating.
Use a soft and clean rag to clean the outside of the unit. Never clean it with chemicals or detergent.
This book is only a guide for user's operation, not a criterion for configuration.
Only use attachments/accessories specified by the manufacturer.
Where the Mains plug is used as the disconnect device, the disconnect device shall remain readily operable.
WARNING: The batteries shall not be exposed to excessive heat such as sunshine, fire or the like.
CAUTION: Danger of explosion if battery is incorrectly replaced. Replace only with the same or equivalent type.


The lightning flash is intended to alert the user to the presence of dangerous voltage within the product's enclosure, and touching the internal components may result in a risk of electric shock to persons.
The exclamatory mark is intended to alert the user to the presence of important operating instructions.
To reduce the risk of electric shock or fire, do not open the cover. Refer servicing to qualified service personnel.
This mark indicates this unit belongs to class 1 laser product. The laser beam may produce radiation harm to the directly touching human body.
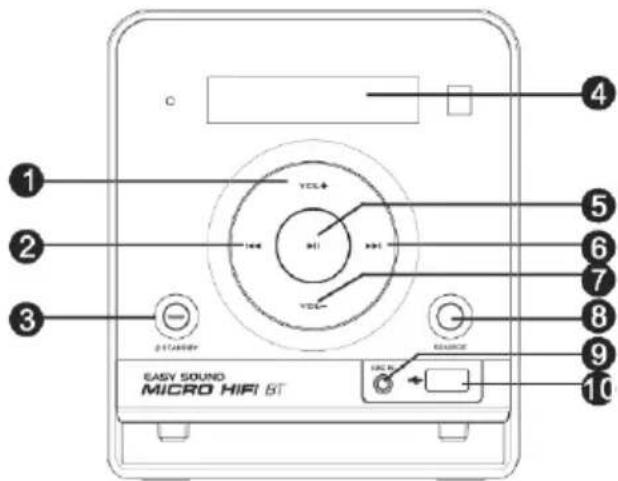
Panel
Front panel
- VOLUME+
- PREVIOUS
- STANDBY
- DISPLAY SCREEN
- PLAY/PAUSE
- NEXT
- VOLUME-
- SOURCE
- LINE IN INPUT
- USB SLOT
text_image
1 2 3 4 5 6 7 8 9 10 EASY SOUND MICRO HIFI BT VOL4 H1 H2 VOL STANDARD REFERENCERear panel
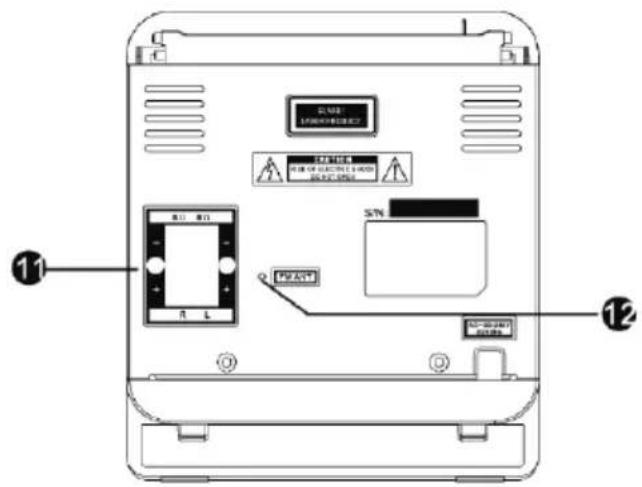
- SPEAKER OUTPUT
- FM ANTENNA JACK
Top panel
- PUSH (press to open the cover)
text_image
11 2 3 4 5 6 7 8 9 10 11 12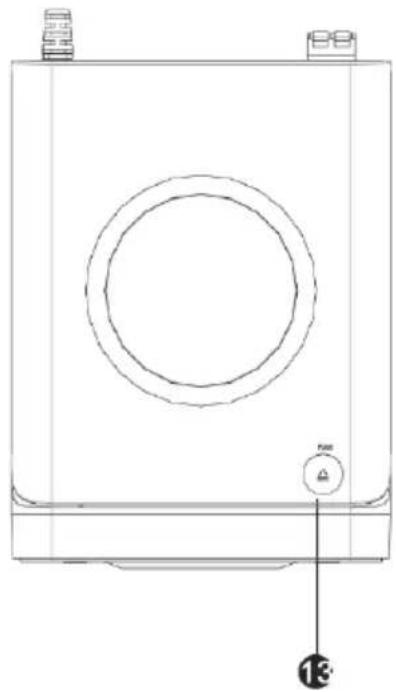
natural_image
Technical line drawing of a washing machine casing with circular vent and control buttons (no text or symbols)Connections
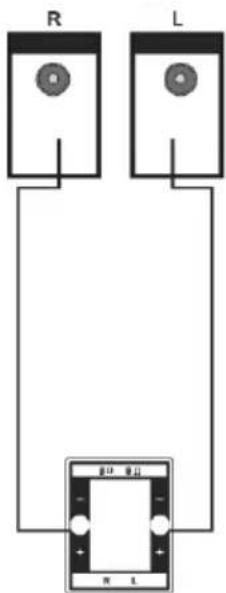
Speaker output
Connect the speakers to speaker output terminals with their attached speaker cables (white for +, black for -)
Line in
This unit has an extra group of audio input terminals. You can input the analogue stereo audio signals from extra devices such as VCD, CD, VCR, MP3 player, etc.
Use the audio cable (red for right, white for left) to connect the stereo audio output terminals of a VCD, CD, VCR player to the stereo input terminals (LINE IN) of this unit. Its corresponding signal source is LINE IN which can be available by pressing [SOURCE] on the remote control.
Bluetooth connection
Press [SOURCE] button to switch to the corresponding signal source, use your mobile phone to search the bluetooth signal of the unit, then input the password 0000, at this time, "CONNECTED" will displays on the LED display screen and the unit will synchronize to play songs on your mobile phone while they connected successfully.
Disconnect the bluetooth on the mobile phone to switch off the bluetooth connect.
NOTE: In bluetooth mode, [PLAY/PAUSE], [MUTE], [NEXT] and [PREVIOUS] buttons are also active.
Amplifier audio input
Speakers
text_image
R L + - + - + - + - + - + - + - + - + - + - + - + - + - + - + - + - + - + - + - + - + - + - + - + - + - + -Speaker output
CD audio output
Remote control
Remote Control Operation
Insert the batteries into the remote control. Point the remote control at the remote sensor on the front panel. The remote control works within a distance of about 8 metres from the sensor and within an angle of about 30 degrees from the left and right side.
Battery installation
1-Remove the battery compartment cover on the back of the remote control.
2-Load two AAA/1.5V batteries into the battery compartment making sure that the batteries have been inserted with the correct polarities matching the symbols +, - as indicated inside the battery compartment.
3-Replace the cover.
Note:
- Remove the batteries when you do not intend to use the remote control for a long time.
- Do not mix new and used batteries, or different types of batteries.
- Weak batteries can leak and severely damage the remote control.
- The batteries must not be exposed to excessive heat source, such as sunshine, fire or any other things like that.
- Be environmentally friendly and dispose of batteries according to your government regulations.
text_image
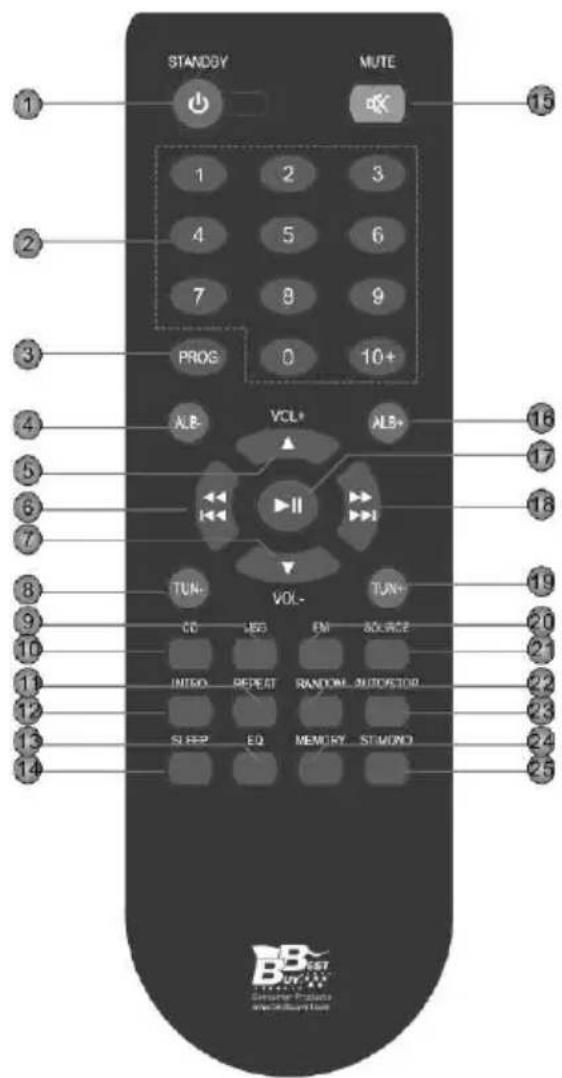
STANDOY MUTE 1 2 3 4 5 6 7 8 9 PROG 0 10+ ALB- VOL+ ALB+ I II TUN- VOL- TUN+ CD JBS EN SOURCE INTRO REPEAT RANDOM AUTOCATOR SLEEP EQ MEMORY STUDIO BB-SET Server Response Alpha Callaway Phone1- STANDBY
2- DIGIT KEYS
3-PROGRAM
4- ALB-
5- VOLUME+
6- FAST REWIND/PREVIOUS
7- VOLUME-
8- TUNER-
9-USB
10- CD
11- REPEAT
12- INTRO
13- EQ
14- SLEEP
15- MUTE
16- ALB+
17- PLAY/PAUSE
18- FAST FORWARD/NEXT
19- TUNER+
20-FM
21- SOURCE
22- RANDOM
23- AUTO/STOP
24- MEMORY
25-ST/MONO
Basic playback
Operation
Standby: Press to switch on the unit. Press it again to put the unit in standby mode.
USB: Press to enter to USB mode.
CD: Press to enter to CD mode.
FM: Press to enter to FM tuner mode.
SOURCE: Press repeatedly to select a signal source among CD, USB, LINE IN, BLUETOOTH and FM mode.
Number Keys: The digit keys can be used to input numbers or make selection of a track, etc.
Auto/ Stop: Press to stop a playback
Play/ Pause: Press to temporarily pause a playback. Press it again to resume the playback.

Next: Press to skip to the next track.
Fast Forward: Hold down for fast forward playback.

Previous: Press to return to the previous track.
Rewind: Hold down for fast rewind playback.
Vol+: Press [VOLUME+] to turn up the volume.
Vol-: Press [VOLUME-] to turn down the volume
Program: In stop mode, place a CD and press [PROGRAM] to access to the program mode. Press the Direct numeric keys to select the desired track or the arrows [Previous]/ [Next] and press once again [PROGRAM] to confirm your selection. Press [Play/Pause] to start program playback.
Mute: Press to temporarily switch off the sound. Press it again to switch it on.
Random: Press to switch the random play mode.
Repeat: Press repeatedly to switch the repeat modes.
Sleep: Press repeatedly to select a sleep time and choose option SLEEP OFF to disable the sleep function, after which the unit will go into standby mode automatically. Then press [STANDBY] to wake it up.
Intro: Press to introduce the track of the disc in order, it takes approximate ten seconds for each track.
EQ: Press to switch the equalizer modes.
Alb +/-: Press to skip the catalogue, it only available for MP3 disc.
Tuner Operation
The following buttons are used in tuner mode. Press [SOURCE] to select tuner mode.
ST/ Mono: Press to switch between Mono and Stereo reception of the broadcast signal in FM mode.
Tun +/-: Tun+: press to fine tune (increase) the frequency. Tun-: press to fine tune (decrease) the frequency. Hold down [TUN+/-] to increase/decrease the frequency continuously.
Auto/ Stop: Press to do auto scanning for the broadcasting radio channels, press it again to stop auto scanning.
Memory: After tuning in a new frequency, press [MEMORY], then select a preferred station by inputting the corresponding numbers to save it as a preset station.
Number Keys: The digit keys can be used to select a preset station.
For example, press [2] to select channel 2; press [10 + ] first, then press[1] and [5] to select channel 15.
Next: Press to skip to the next preset station.
Previous: Press to skip to the previous preset station.
NOTE: In Tuner mode, [VOLUME+/-], [MUTE] buttons are also active. For details, please refer to the introduction of the CD operation in this chapter.
Troubleshooting
Symptom Cause(s) Remedy
| No Power | The AC power cord is not connected to the power supply or is not connected to a power supply securely. | Please check that the AC power cord is connected securely. |
| There is no sound or the sound is distorted. | The audio cables aren't connected securely.The volume is set to the minimum level.The sound is switched off. | Connect the audio cables securely.Turn up the volume.Press [MUTE] on the remote control to switch on the sound.Press [PLAY/PAUSE]. |
| Unable to play a disc | This disc is placed in the disc tray in a wrong way.The unit isn't compatible with the disc.The disc is dirty. | Check that the disc is placed in the disc tray with its label side upwards.Clean the disc. |
| The player breaks down when a USB drive is inserted into the player. | The connected USB drive is probably not a certified one. | The player cannot play any uncertified USB drive. |
| The buttons on the unit doesn't work. | The unit is being interfered with static electricity, etc. | In case the player breaks down, turn it off, disconnect the power cord from the AC outlet and unplug the USB drive from the player. Then, power on the player again.The player will resume the normal status. |
| The remote control does not function. | There is no battery in the remote control.The batteries are out of charge.The remote control isn't pointed to the remote sensor.The remote control is out of its operating area.The unit is shut down. | Install two AAA/1.5V batteries in it.Replace the batteries with new ones.Make sure that the remote control is pointed to the remote control sensor.Make sure the remote control is within the operating area.Switch off the unit and disconnect it from the AC outlet. Then power on the unit again. |
Specifications
Power supply
Power consumption
Power consumption in standby mode
Power output (Max)
Working Temperature
Environment Relative Humidity
AC \~100-240V,50/60Hz
20W
<0.5W
5W × 2
-10\~+35 °C
5%\~90%
Disc Output
Frequency Response
Signal/ Noise
Frequency Range
THD+NOISE
WOW FLUTTER
20Hz\~20kHz
80dB(1kHz)
≥70dB(1kHz)
≤-60dB(1kHz)
Below the limit of apparatus measure
Tuner
FM band range
Frequency respond
87.5MHz\~108MHz
±3dB(20Hz\~20kHz)
Warranty
BEST BUY PRODUCT GUARANTEE CONDITIONS
- HARDWARE UNITS: Best Buy offers a 2 year guarantee (24 months) in materials and workmanship from the date of purchase. It is therefore necessary to present a document proving the date of delivery or purchase, whether the invoice, receipt or delivery note. Documents that have been manipulated will not be accepted.
- SOFTWARE ACCESSORIES: (only if included in the product) Product software accessories will be sent via a download link or email within 30 days of the date of purchase.
- REQUEST FOR TECHNICAL ASSISTANCE: Connect online to the Best Buy website (www :// bestbuy-int.com) and see if you can find the solution to the problem. If not, contact the Best Buy technical service (specified below) to request repair of the product.
- REPLACEMENT: Within the first 15 days from the date of purchase, if it cannot be easily repaired, the product will be replaced by another (only the defective item will be replaced and not the other elements that go with it).
- REPAIR: Repair of a product is free (both labour and materials) within the two years of the guarantee provided that there is no reason for the cancellation of the guarantee. For repair of the product you must previously contact the technical service and obtain a repair number (RMA); otherwise the product will be returned to sender and shipping costs will be charged.
- CANCELLATION OF GUARANTEE: The guarantee will be automatically cancelled in the following cases:
- Deficiencies of product use in countries other than the country of sale.
- Handling of the product or its identification elements (serial numbers) by anyone other than the official technical service staff.
- Deficiencies caused by improper installation of the product.
- Problems arising from use of unofficial product accessories.
- Breakage caused by manipulation of the components of the unit.
- Damage caused fortuitously by accidents, falls or natural disasters.
- The guarantee does not include consumables and parts used and worn by normal use (remote control keys, batteries, bulbs, connectors scratched by multiple connections and disconnections, etc.).y desconexiones, etc.).
• ADDITIONAL NOTES: Batteries that have reached the end of their useful life will not be covered by the guarantee. Replacement of damaged equipment or any part thereof shall not involve extension of the guarantee. - USER COMPENSATION: The liability and SOLE compensation will be to change or repair the defective product (or defective part thereof), provided they fall within the aforementioned cases.
- GENERAL: Best Buy International or its representatives shall in no case be liable for any damages, including those resulting from lost profits or any other pecuniary loss, arising as a result of the use or inability to use the product in question, even assuming that Best Buy International has reported that they may arise.
How to benefit from being a registered user.
Register on our website http://www.bestbuy-int.com
How to request technical assistance.
Once registered, you can request technical assistance at any time as follows:
BEST BUY INTERNATIONAL

sat@bestbuy-int.com

24 MONTH WARRANTY!
Just easy
natural_image
Line drawing of a washing machine front panel with circular vent and control knob (no text or symbols)Connexions
CONDITIONS DE GARANTIE DES PRODUITS BEST BUY
natural_image
Technical line drawing of a washing machine casing with circular vent and control buttons (no text or symbols)Connessioni
Uscita altoparlanti
natural_image
Technical line drawing of a washing machine casing with circular vent and control knob (no text or symbols)Conexões
text_image
R L R1 R2 R Lnatural_image
Technical line drawing of a washing machine casing with circular vent and control knob (no text or symbols)Łączność
Wyjście głośnikowe
text_image
R L R1 R2 R LWARUNKI GWARANCJI PRODUKTÓW BEST BUY
Environment protection first!
Your appliance contains valuable materials which can be recovered or recycled. Leave it at a local civic waste collection point.