
EasyPhone 3.5 - Smartphone Best Buy - Free user manual and instructions
Find the device manual for free EasyPhone 3.5 Best Buy in PDF.


| Product Type | Smartphone |
| Brand | Best Buy |
| Model | EasyPhone 3.5 |
| Dimensions | 114.8 x 60.5 x 12.2 mm |
| Weight | Approx. 110 g (estimated) |
| Processor | MTK6572 Dual Core 1.0 GHz Cortex A7 |
| Operating System | Android 4.2 |
| Display | 3.5 inch HVGA IPS (320x480) |
| Camera | Front 0.3 MP + Rear VGA (2 MP interpolated) |
| Internal Memory | 512 MB RAM + 4 GB ROM |
| Expandable Storage | MicroSD card (not included) |
| Battery | 1300 mAh, rechargeable Li-ion |
| Network | GSM/WCDMA (3G HSPA+) |
| Connectivity | Wi-Fi 802.11 b/g/n, Bluetooth, GPS/AGPS |
| Multimedia | MP3/MP4 player |
| Sensors | G-sensor (accelerometer) |
| SIM Card | Dual SIM (standard size) |
| Maintenance | Do not use alcohol, thinner, or benzene for cleaning; avoid high temperature, humidity, and dust |
| Safety | Do not throw or crash; avoid using in aircraft or restricted areas; follow volume guidelines |
| Warranty | 2 years (hardware), 15-day replacement, free repair within warranty period (conditions apply) |
| Compliance | CE, RoHS, Low Voltage Directive, EMC, R&TTE |
Frequently Asked Questions - EasyPhone 3.5 Best Buy
User questions about EasyPhone 3.5 Best Buy
0 question about this device. Answer the ones you know or ask your own.
Ask a new question about this device
Download the instructions for your Smartphone in PDF format for free! Find your manual EasyPhone 3.5 - Best Buy and take your electronic device back in hand. On this page are published all the documents necessary for the use of your device. EasyPhone 3.5 by Best Buy.
USER MANUAL EasyPhone 3.5 Best Buy

Pantalla Principal (Home)

Contactos
Almacenamiento
Accesibilidad
Low Voltage Directive 2006/95/EC
EMC Directive 2004/108/EC
CE Marking Directive 95/68/EEC
R&TTE Directive 1999/5/EC
ETSI EN 300 440-1 V1.6.1 (2010-08), ETSI EN 300 440-2 V1.4.1 (2010-08)
ETSI EN 301 489-01 V1.9.2 (2011-09), ETSI EN 301 489-07 V1.3.1 (2005-11)
ETSI EN 301 489-17 V2.2.1 (2012-09), ETSI EN 301 489-24 V1.5.1 (2010-10)
ETSI EN 300 328 V1.7.1 (2006-10), ETSI EN 301 908-1 V5.2.1 (2011-05)
ETSI EN 301 908-2 V5.4.1 (2012-12), ETSI EN 301 511 V9.0.2 (2003-03)
EN 62479:2010, EN 62209-1:2006, EN 62209-2:2010,
EN 50360:2001, EN 50554:2011

Firmado: Patty Zheng, Lab Inspector
Fecha y lugar
22/01/2014
Best Buy Asia Limited
906, 9/F, Two Grand Tower, 625 Nathan Rd.,
Mongkok, Kowloon, Hong Kong
User Manual
ENGLISH


SECURITY
This manual includes some important safety method and some information about how to use the product correctly to avoid the unnecessary troubles. Before you use the product, please refer to the manual carefully.
- Don't put the product in high temperature, humid and dusty environment
- Don't put the product in the vehicles, whose windows are closed.
- Don't throw and crash the product strongly. Don't vibrate the TFT screen, or it will be broken down or displays abnormally.
- Choose the suitable volume, turn down the volume or power off if you feel syrigmus arised from the high volume.
- Charge in the following case: a) The icon shows no charge. / b) The operation system self-closing, shutdown after restarting-up. / c) No response of the operation icon. / d) Show red in the top right corner.
error of software.
responsibility this company will bear, so please use according to the manual.
- Don't remove the package without permission. Don't clean the products by alcohol, thinning agent and Benzene scrubbing stuff.
- Don't use the products in the non-electronics areas (like the aeroplane)
· The USB only can be used to transfer data.
- This company retains the right to improve products, no notice will be re leased when specification or design is changed.
- No waterproof
Thanks
Thanks for buying EasyPhone 3.5 from Best Buy. We would recommend you to read this guide carefully in order to take the first steps with your new phone.
NOTE: All the pictures in this manual is for your reference! no notice will be released when specification or appearance is changed!
Phone description
- Volume Button: Adjusts the volume. Keep it pressed in to rapidly adjust the volume level to the maximum or minimum.
- Speaker
- Front Camera
- Power Button: Press this button to turn the screen on/off. Keep it pressed for a while to open a menu with options for the Plane Mode (Plane), the Silent mode (Silent), the Vibration (Vibration) and to disable and turn the phone back on.
- Menu Button: Press this button to open a menu with elements concerning the screen or the current application.
- Home Button: Press the button to open the home screen. If you are viewing the home screen extended from the left or right, press this key to open the central home screen.
- Back Button: Press this button to go to the previous screen where you were working. If the keyboard on the screen is open, press it to close the keyboard.
- Earphones
- Camera Flash
- Micro USB Connection
- Rear Camera
- Multimedia speaker
Screen control
You can control your phone through a series of operations on the screen.
Touch: You can touch the items on the screen to select, to open the applications or to use the keyboard to input characters.
Swipe or slide: Quickly move your finger across the surface of the screen, without pausing when you first touch (so you don't drag something instead).
Touch & hold: You can touch & hold some items to get the item's available menu.
Drag: You can drag some items on the screen to realize some operations.
Switch between landscape mode and portrait mode: You can switch to the landscape mode by rotating your phone. The landscape mode is only valid under some interfaces, such as the text input interface, the message viewing interface, etc.
Pinch: In some apps (such as Maps and Gallery), you can zoom in and out by placing two fingers on the screen at once and pinching them together (to zoom out) or spreading them apart (to zoom in).
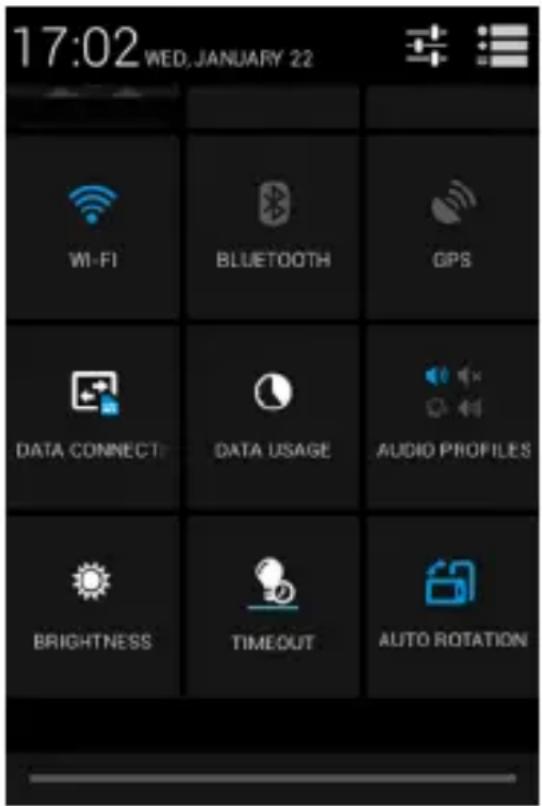
QUICK MENU
If you scroll down the upper notification bar and touch the upper right icon you can have quick access to basic set up.
Installation of Micro SD and SIM Cards
1- Open the rear housing of the unit.
2- Once the battery has been taken out, install the optional card Micro SD (sliding it to the right) and lifting up the metal seal) and the SIM cards (sli-ding them to the left). Make sure that the card and phone connections coin-cide. Make sure you lower the metal seal of the Micro SD card and slide it to the left.
3- Install the battery, making its connectors coincide with those of the phone.
4- Close the rear housing of the unit.
Note: You can configure your cards by accessing the application Adjustments > SIM Card administration. This phone may take up to two cards/phone numbers simultaneously.
Charging the battery and first use of the phone
Before using the phone for the first time, we would recommend you to totally recharge the battery. With this in mind, connect the transformer of the unit to the electrical mains and then the Micro USB connection to the phone. The battery charging level will be displayed on the screen. Once the battery has been charged, keep the Power button pressed in to turn the unit on.
Sleep mode
After the phone has changed to sleep mode, the screen will go off and lock. To use it again follow these steps:
- Press the power button to turn on the screen.
- Drag the lock icon to the right to unlock the screen. If you have configured an unlock pattern or key, you must draw the unlock pattern or enter the password to access the main interface.
Status bar
The upper bar which remains fixed on the device screen displays the time, notifications, network status, Wi-Fi and data connection amongst other things.
Wi-Fi. This appears when your device is connected to a Wi-Fi network. It also indicates the signal intensity.
Battery. This displays the battery charging level.
Bluetooth®. This appears of your smartphone has its Bluetooth® connected.
Coverage. Displays the signal intensity of each SIM. If the data connection is enabled, it will appear alongside this icon:
G: GPRS data traffic
3G: 3G connection
H: HSDPA connection


Open and switch applications
Open and close the All Apps screen
On the home screen, touch theicon to open the All Apps scree

You can slide the All Apps screen left or right to view more applications.
After opening the All Apps screen, touch an icon to enter the corresponding application. Touch the Back key to return to the previous screen. Touch the Home key to return to the home screen.
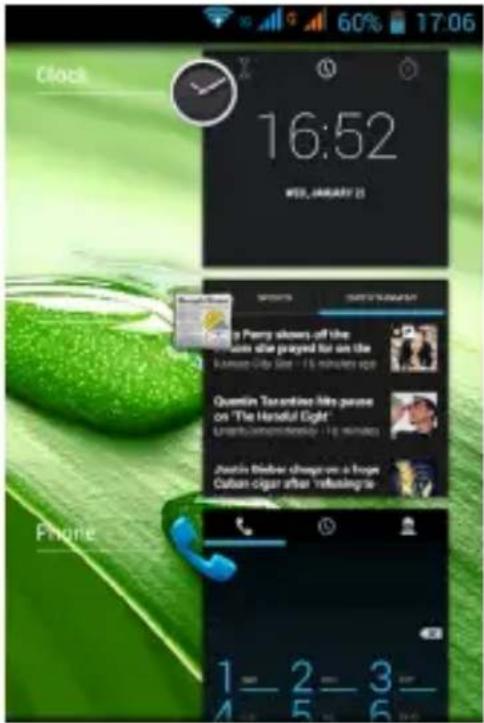
Switch to a recently used application
On the home screen, touch & hold the Home key, opens a list of thumbnail images of apps you've worked with recently. To open an app, touch it. To remove a thumbnail from the list, swipe it left or right.
Arrange & work with apps
From All Apps, you can:
- Explore your widgets: Touch the widgets tab at the top of any All Apps screen.
- Get more apps: Touch the Play Store icon at the top of any All Apps screen.
Manage notifications
- Open notifications panel: When a new notification appears on the notification bar, you can drag the notification bar down from the top of the screen to open notifications panel when your phone has been in idle mode or lock the screen.
- Respond to a notification: Touch it.
- Dismiss a notification: Swipe it sideways.
- Close notifications panel: Drag the tab at the bottom of the notification panel to the top of the screen.
Display area
The home screen can be extended to exceed the screen's width in order to provide more space for newly added shortcuts, widgets, etc.
On the home screen, slide your finger on the screen to extend to the left or right.
Place an app icon on a Home screen
Touch & hold the app icon, slide your finger, and lift your finger to drop the icon in place.
Delete items on the homepage
Touch & hold the app icon, slide your finger toward the top of the screen, and drop the app over the Remove icon.
Use folders
You can combine several app icons in a folder. Drop one app icon over another on a Home screen, and the two icons will be combined.
From any Home screen, you can
- Open a folder: Touch it. The folder opens:
- Rename a folder: Touch its name.
- Move icons around your Home screens: Touch, hold and slide.
Favorites tray
The app icons you keep in the favorites tray remain visible on every Home screen.
- Place an app icon in the Favorites tray: Touch, hold, & slide to move one of the Favorites icons out of the tray. Then use the same technique to move another one into the same position.
The All Apps icon in the center is permanent, you can't move it.

Change wallpaper
- Touch & hold anywhere that's not occupied on the home screen. A list of options appears.
- Select wallpaper from Gallery/ LiveWallpapers/ Wallpapers.
Switch to sleep mode
Sleep mode is a kind of power saving mode, which also helps to prevent inadvertent operations. If your phone has been in idle mode for a while, it will automatically switch to sleep mode.
You can also press the Power key to turn off the screen and enable sleep mode.
Wake up your phone
After the phone switches to the sleep mode, the screen will be turned off and locked. In this case, please awake your phone and unlock the screen if you want to use your phone.
- Press the Power key to turn on the screen.
- Drag the icon to the right tounlock the screen.
If you've set an unlock pattern or password, you need to draw the unlock pattern or input the password to enter the main interface. (For details, please see Systemsettings> Security> Screenlock).
Make and answer calls
Note: When a call is answered the unit automatically turns off the screen by default. If you want to wake up the screen just press the Power button for a second. You also can change this setting going to Menu > Settings > Other Settings and changing the 'auto turn off the screen' option.


Directly make a call
On the home screen or in the All Apps screen, touch the button to display the dialing keypad. Touch the numeric buttons to input the telephone number and touch the button to make the call.
Make the call from Contacts
On the home screen or in the All Apps screen, touch the icon, touch the desired contact and touch the phone number to dial it.
Make the call from Call log
On the home screen or in the All Apps screen, touch the button, notice the three tabs at the top of the phone, the call log tab shows recent calls. Touch the phone icon in a call log to return it.
Make an international call
On the home screen or in the All Apps screen, touch the button, to display the dialing keypad. Touch & hold the "0" key until "+" appears on the screen, then dial the country code or region code, city code and phone number.
Dial from Messaging
- On the home screen or in the All Apps screen, touch the Messaging icon
- Select and open one message or conversation.
- Touch the 📞 icon at the top of the phone to dial.
Answer a call
Your phone will ring or vibrate (depends on the current mode and settings) upon an incoming call.
- Slide the 📊 icon from middle to right to answer the call.
- If the earphone is inserted, press the key on the earphone to answer the call.
Reject a call
- Slide the 📊 icon from middle to left to reject the call.
End a call
- Touch the 📞 button to hang up the call.
Adjust the volume
In a call, you can raise or lower the volume by using the volume keys.
Turn the speaker on or off
In a call, touch the 📋 button to turn on the speaker, and touch it again to turn off speaker.
Add one call
In a call, touch the 📄 then dial a number and touch the phone icon to add one call and put the current caller on hold. This function requires the support of the network operator.
Open the dialing keypad
In a call, you can touch the button to open the dialing keypad to input additional numbers.
Contacts
You can place calls from the Phone app, the People app, or other apps
or widgets that display contact information. Wherever you see a phone number, you can usually touch it to dial.
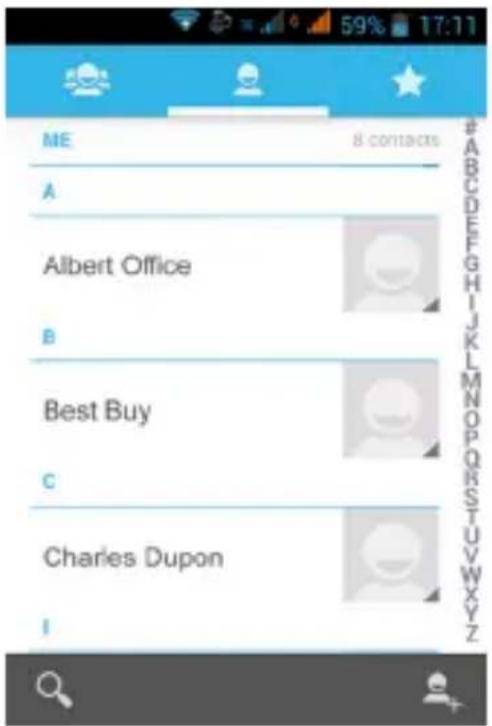
The contacts interface can be divided into the following tab pages:
- Caller groups: Groups of callers you have created.
- Contacts: View the list of contacts.
- Favorites: Display the numbers you usually call.
All of your contacts are displayed alphabetically in a scrollable list. You can slide your finger up or down to scroll quickly.
Add new contact
- In People, touch the add contacts icon 📄 at the bottom right hand corner of the screen.
- Select a memory location.
- Input all contact information. Slide up to move to the next field or touch
Next.
- Touch the √ DONE icon to save your contact.
Delete contacts
- In People, touch the Menu key and then select Delete contact.
- Touch the contacts you want to delete, then select OK.
Edit contact details
- In People, touch the contact whose details you want to edit.
- Touch the Menu key and then select Edit.
- Edit the contact information.
Search contacts
- In People, touch the icon.
- Type a key word of a contact name. The phone will automatically list all matched contacts.
Add a contact to Favorites
You can tap the contact you want to add to favorites in the contact interface, and then touch ★ in the upper right corner to add it to Favorites directly. You can only add the contacts stored on the phone to the Favorites.
Create a group of contacts
By creating groups of contacts, you can manage multiple contacts and send a message to an entire group.
- In People, touch the tab.
- Touch the icon at the bottom of the screen.
- Select a memory location.
- Enter the group's name and type the person's name or touch icon to select the contacts you want to add to the group, then touch
- Press the Menu key then touch Edit to add members to the group.
- Touch √ DONE

Accounts
You can synchronize contacts information to your phone from multiple GoogleTM Accounts, Microsoft Exchange ActiveSync accounts or other kinds of accounts, depending on the applications installed on your phone.
In People, touch the Menu key and then select Accounts.
Import/Export contacts
- In People, touch the Menukey to select Import/export.
- You can select your Google account, your SIM Card, Phone contact, Phone storage and SD Card.
Share a contact
You can share a contact with someone.
- In People, tap the contact you want to share.

- Touch the Menukey and then touch Share.
- Select application with which to share (Bluetooth®, Email, Gmail, MMS, SMS and SD Card).
Messaging
In Messaging, you can send or receive text messages and multimedia messages. On the home screen or in the All Apps screen, touch the Messaging icon to open.
Send messages
- In Messaging, touch the icon.
- Input your desired telephone number in Type name or number.
You can also touch the 📁 button to select contacts you want to send message from the People and then touch OK.
- You can touch the + icon attach pictures, videos or audio file and the phone will convert the message to a multimedia message.
-
Input some text in Typetext message. You can touch the Menu key to select:
-
Addsubject: Add a message subject.
- Insert quick text: Insert a quick text.
- Insert contact: Insert contact information.
- After that, touch the icon to send the message.
Receive messages
- In idle mode, you will be reminded about the new messages in the notification area. Slide down to open the notification panel to view.
- Touch the message.
- Directly input text to reply to the message.
- Touch the 📞 icon at the top of the phone to directly call back.
Touch & hold the text to pop up the Message options menu, you can Copy, Forward, Lock/Unlock or Delete the message, etc.
Message thread
The messages from one contact or number will be aligned in one message thread in chronological order. You can manage these threads in the messaging interface.
On the Messaging screen, touch the Menu key and then touchDelete all threads to delete all threads.

Settings
Network connection
Your phone can connect to the Internet, so you may need to pay for some data service. For details, please consult your network service provider.
Ways of Connecting to the Internet
Your phone's networking capabilities allow you to access the Internet via the mobile network's GSM/WCDMA connection and Wi-Fi.
SIM Management
With this option you can set up which SIM card the phone should use for voice calls, video calls, messagin or data connection. Also here you can bind a user to a specific SIM card anda set up the Roaming mode.
Wi-Fi
Turning Wi-Fi On/Off
- On the main screen (Home), press the Menu button and then select the system settings option.
- Turn on the Wi-Fi function by touching the on icon and sliding it to the right. To turn it off, slide it to the left.
Wi-Fi Connection
- On the main screen (Home), press the Menu button and select the system settings option.

- Turn the Wi-Fi option on.
- Touch the Wi-Fi option. Your phone will automatically look for the Wi-Fi wireless networks nearby.
- Select a network from the list you wish to connect to.
- If you select an open network, your phone will be automatically connected to it.
- If you select a secure network you will have to know and enter the corresponding password.
Bluetooth®
Using the Bluetooth function you can exchange data with other devices nearby which have this wireless connection. In some cases interference may occur if there are physical obstacles or other electronic devices in the surrounding vicinity.
Turning the Bluetooth function On/Off
- On the Home screen, press the Menu button and touch the system settings option.
- Slide the on/off button near the Bluetooth option to turn the function on or off.
Link
- Touch the Bluetooth option when the latter is active to automatically look for devices. Your phone will display all the devices it finds nearby.
- Press the identification of the desired device. You may require a password for this device to pair it (consult the instructions of the device to be paired).


Data usage
Usage situations of mobile network data traffic.
More
Usage situations of mobile network data traffic.
Airplane mode
In areas where the use of mobile devices is restricted, you can activate the Airplane mode to disable phone function but still use other functions of your phone such as
calendar, music and games. You will not be able to make/answer calls, send/receive messages in Airplane mode.
- On the home screen, touch the Menukey and then touch System settings>More....
- Check the box for Airplane mode. The phone will turn off all wireless connections when Airplane mode is enabled.
Tip: On the home screen, you can press and hold the Powerkey, then select Airplane mode.
VPN
You can build private network on the public network by this technology. It is so called virtual net.
Tethering & Portable hotspot
You can connect a device to the phone's 3G connection in order to share Internet access. You can make the connection through Wi-Fi or Bluetooth.
Mobile Networks (GSM/WCDMA data connection)
Different locations may have different mobile networks available. Initially, your phone is configured to use the fastest mobile network available for
data.
You can also configure your phone to access a different set of networks entirely, or to behave in special ways when roaming.
The icons on the Status bar indicate which kind of data network you're connected to.
On the home screen, touch the Menu key and then touch System settings> More...> Mobilenetworks to perform relevant settings.
Device
Audio profiles
Touch the Menu key and then touch System settings > Audio profiles, you can set the predefined profiles.
General: Touch ☐, you can set volume for ringtones, alarms and notifications, set the ringtone for voice calls & video calls and set the default notification ringtone, etc. Silent: Silence all sounds (including call and notification ringtones) except the audio from music, videos, and other media or any alarms you have set.

Meeting: Make your phone vibrate only upon incoming calls.
Outdoor: Make your phone vibrate and ring upon incoming calls.
Display
Touch System settings > Display.
Lock screen notifications: Select to show notifications on lock screen.
Wallpaper: Choose a wallpaper.
Auto-rotate screen: Set the interface to rotate automatically when you rotate the device.
Brightness: Adjust the brightness of the screen.
Font size: Set the font size.
Sleep: Choose the delay before the screen automatically turns off.

Storage
To copy files between a PC and your phone's SD card, you should set the SD card as USB mass storage.
- Connect your phone to your PC with the USB cable.
- Touch Turn on USB storage.
During this time, you can't access the SD card from your phone, so you can't use applications that rely on the SD card, such as Camera, Gallery and Music.
Safely remove the SD card
Just flick down the notification panel and touch Turn off USB storage.
Check space on the SD card
- On the home screen, touch the Menukey and then touch System settings.
- Touch Storage.
Erase the SD card
- On the home screen touch the Menukey and then touch System settings.
- Touch Storage > Erase SD card.
Battery
Display the usage conditions of battery; after tapping the chart, you can view more details about the usage conditions.
Apps
Display the usage conditions of Apps.
DOWNLOADED: List the apps installed by customer.
RUNNING: Display the running apps.
ON SD CARD: Displays the applications installed on the memory card.
Personal
Location service
Set My location as interactive with GPS (you can turn on or turn off GPS here) or Wi-Fi & mobile network location..
Security
Set the security options.
Screen Lock: Set the mode of screen un- locking.
Owner info: You may input some text information here.
Set Up Sim Card Lock: You can set up the security pin number for each SIM card.
Make Password visible: Check Make passwords visible to show the password when typing in, for instance in conditions of accessing WIFI or logging in the Google Market, etc.


Device administration: Manage tools.
Unknown sources: The current application is not obtained from E-market. Credential Storage: Identify the legitimacy and reliability of the programs through certain credentials.
Trusted credentials: Stored credentials which the system or user has used or set as trusted.
Install from SD card: Import reliable credentials from SD card.
Clear credentials: Clear all the credentials of system record; this option is normally unavailable by default.

Language & input
You may select system display language and input method.
Language: Select system display language from the over 60 options.
Spelling correction: Based on the selected language, the system will coordinate and make correction when input errors appear.
Personal dictionary: By default the dictionary is empty of any content for users to self-define words and expression.
Keyboard and input methods: Select and set the system input method.
Mouse/touch pad: Pointer speed: The responding speed of the pointer.
Backup & reset
Backup my data: Backup application data, WIFI password and other data to Google server.
Backup account: For the purpose of troubleshooting and this option is not available by default.
Automatic restore: After applications reinstalled, the system will reset according to the backup data on Google server.
Factory data reset: Select this option to erase all data on the PC; it is often used to restore the system when errors occur.
Accounts
Google accounts are required when logging in Google Market or Calendar and in this interface you may manage the accounts.
Accounts & sync: Tap to activate/deactivate the synchronization function in the upper right corner.
Add account: Tap this option when adding a new email account of the available services.
System
Date & time
Set date, time, time zone and format.
Automatic date & time: To use time on internet, you need to connect to internet and select Use network-provided time and then restart to finish.
Set date: Enter the date setting interface to set date.
Select time zone: Enter time zone setting interface to select and set.
Set Time: Enter the time setting interface to set time.

Use 24h format: Set the format of displaying time.
Select date format: Select from different date displaying formats to display date.
Scheduled power on & off: Here you can set up the week day & time were you want that the phone will turn off and turn on automatically.

Accessibility
Magnification gestures: You can activate this function to move images or change the zoom level with touch controls.
Auto-rotate screen: Adjust the screen display direction according to gravity detection.
Touch & hold delay: Set the responding speed of the touch screen.
Enhance web accessibility: Allow installation of scripts from Google to facilitate web page browsing.
Developer options
About phone
System updates: Detect the system version and update.
Status: Status of the tablet, including information on battery power status, network Bluetooth, boot time, etc.
Legal information: Code development permit and Google legal information.
Model number: Equipment model.
Android version: Version number of android system.
Kernel version: Version number of Linux kernel.
Build number: User-defined build number for the purpose of distinguishing system software.
Specifications
Processor: MTK6572 Dual Core 1.0Ghz Cortex A7
Operating System: Android 4.2
Screen: 3.5 HVGA IPS (320x480)
Camera: Front 0.3Mp + Rear VGA (2Mp interpolated)
3G Connection: HSPA+
Internal memory: 512Mb + 4Gb
Multimedia: MP3 / MP4
Battery: 1300mAh
G-sensor: Supported
Bluetooth: Supported
WiFi: Supported
GPS/AGPS: Supported
Size: 114.8 x 60.5 x 12.2 mm
WARNING: The battery has a specific number of charging and discharging cycles. When these cycles have been exceeded, the battery may need to be changed. A battery that has completed its life cycle is not covered by the guarantee.
Warranty
BEST BUY PRODUCT GUARANTEE CONDITIONS
- HARDWARE UNITS: Best Buy offers a 2 year guarantee (24 months) in materials and workmanship from the date of purchase. It is therefore necessary to present a document proving the date of delivery or purchase, whether the invoice, receipt or delivery note. Documents that have been manipulated will not be accepted.
- SOFTWARE ACCESSORIES: (only if included in the product) Product software accessories will be sent via a download link or email within 30 days of the date of purchase.
- REQUEST FOR TECHNICAL ASSISTANCE: Connect online to the Best Buy website (www :// bestbuy-int.com) and see if you can find the solution to the problem. If not, contact the Best Buy technical service (specified below) to request repair of the product.
- REPLACEMENT: Within the first 15 days from the date of purchase, if it cannot be easily repaired, the product will be replaced by another (only the defective item will be replaced and not the other elements that go with it).
- REPAIR: Repair of a product is free (both labour and materials) within the two years of the guarantee provided that there is no reason for the cancellation of the guarantee. For repair of the product you must previously contact the technical service and obtain a repair number (RMA); otherwise the product will be returned to sender and shipping costs will be charged.
- CANCELLATION OF GUARANTEE: The guarantee will be automatically cancelled in the following cases:
- Deficiencies of product use in countries other than the country of sale.
- Handling of the product or its identification elements (serial numbers) by anyone other than the official technical service staff.
- Deficiencies caused by improper installation of the product.
- Problems arising from use of unofficial product accessories.
- Breakage caused by manipulation of the components of the unit.
- Damage caused fortuitously by accidents, falls or natural disasters.
- The guarantee does not include consumables and parts used and worn by normal use (remote control keys, batteries, bulbs, connectors scratched by multiple connections and disconnections, etc.).y desconexiones, etc.).
- ADDITIONAL NOTES: Batteries that have reached the end of their useful life will not be covered by the guarantee. Replacement of damaged equipment or any part thereof shall not involve extension of the guarantee.
- USER COMPENSATION: The liability and SOLE compensation will be to change or repair the defective product (or defective part thereof), provided they fall within the aforementioned cases.
- GENERAL: Best Buy International or its representatives shall in no case be liable for any damages, including those resulting from lost profits or any other pecuniary loss, arising as a result of the use or inability to use the product in question, even assuming that Best Buy International has reported that they may arise.
How to benefit from being a registered user.
Register on our website http://www.bestbuy-int.com
How to request technical assistance.
Once registered, you can request technical assistance at any time as follows:
BEST BUY INTERNATIONAL

sat@bestbuy-int.com

www.bestbuyasia.com.hk
DECLARATION OF CONFORMITY
CE PTS1401031001R
Best Buy Asia Limited declares that the product EasyPhone 3.5 from Best Buy
Consumer Products brand with CE from year 2014 is a smartphone unit that complies with:
ERP Directive 2009/125/EC
Low Voltage Directive 2006/95/EC
EMC Directive 2004/108/EC
CE Marking Directive 95/68/EEC
R&TTE Directive 1999/5/EC
ETSI EN 300 440-1 V1.6.1 (2010-08), ETSI EN 300 440-2 V1.4.1 (2010-08)
ETSI EN 301 489-01 V1.9.2 (2011-09), ETSI EN 301 489-07 V1.3.1 (2005-11)
ETSI EN 301 489-17 V2.2.1 (2012-09), ETSI EN 301 489-24 V1.5.1 (2010-10)
ETSI EN 300 328 V1.7.1 (2006-10), ETSI EN 301 908-1 V5.2.1 (2011-05)
ETSI EN 301 908-2 V5.4.1 (2012-12), ETSI EN 301 511 V9.0.2 (2003-03)
EN 62479:2010, EN 62209-1:2006, EN 62209-2:2010
EN 50360:2001, EN 50554:2011

Signed: Patty Zheng, Lab Inspector
Date and place
22/01/2014
Best Buy Asia Limited
906, 9/F, Two Grand Tower, 625 Nathan Rd.,
Mongkok, Kowloon, Hong Kong
- Pantalla Principal (Home)
- Contactos
- Almacenamiento
- Accesibilidad
- User Manual
- ENGLISH
- SECURITY
- Thanks
- Phone description
- Screen control
- QUICK MENU
- Installation of Micro SD and SIM Cards
- Charging the battery and first use of the phone
- Sleep mode
- Status bar
- Open and switch applications
- Open and close the All Apps screen
- Switch to a recently used application
- Arrange & work with apps
- Manage notifications
- Display area
- Place an app icon on a Home screen
- Delete items on the homepage
- Use folders
- Favorites tray
- Change wallpaper
- Switch to sleep mode
- Wake up your phone
- Make and answer calls
- Directly make a call
- Make the call from Contacts
- Make the call from Call log
- Make an international call
- Dial from Messaging
- Answer a call
- Reject a call
- End a call
- Adjust the volume
- Turn the speaker on or off
- Add one call
- Open the dialing keypad
- Contacts
- Add new contact
- Next.
- Delete contacts
- Edit contact details
- Search contacts
- Add a contact to Favorites
- Create a group of contacts
- Accounts
- Import/Export contacts
- Share a contact
- Messaging
- Send messages
- Receive messages
- Message thread
- Settings
- Network connection
- Ways of Connecting to the Internet
- SIM Management
- Wi-Fi
- Turning Wi-Fi On/Off
- Wi-Fi Connection
- Bluetooth®
- Turning the Bluetooth function On/Off
- Link
- Data usage
- More
- Airplane mode
- VPN
- Tethering & Portable hotspot
- Mobile Networks (GSM/WCDMA data connection)
- Device
- Audio profiles
- Display
- Storage
- Battery
- Apps
- Personal
- Location service
- Language & input
- Backup & reset
- System
- Date & time
- Accessibility
- Developer options
- Specifications
- Warranty
- BEST BUY PRODUCT GUARANTEE CONDITIONS
- BEST BUY INTERNATIONAL
- DECLARATION OF CONFORMITY
Brand : Best Buy
Model : EasyPhone 3.5
Category : Smartphone