
PV2005 - Iron SOLAC - Free user manual and instructions
Find the device manual for free PV2005 SOLAC in PDF.

| Brand | Solac |
| Model | PV2005 |
| Product type | Steam iron |
| Power supply voltage | 220-240 V |
| Soleplate | Metal soleplate |
| Water tank capacity | Approximately 200 ml |
| Steam functions | Continuous steam, Super steam, Vertical steam |
| Spray | Yes, spray button |
| Anti-scale system | Yes, resin filter |
| Anti-drip system | Yes |
| Self-cleaning function | Yes, recommended once a month |
| Safety | Do not leave unattended, unplug before filling |
| Soleplate maintenance | Eco-friendly clay-based products |
| External parts maintenance | Damp cloth and soap |
| Reparability | Replaceable cord by an authorized Solac service |
| Storage | Upright position, cord wrapped around the base |
Frequently Asked Questions - PV2005 SOLAC
User questions about PV2005 SOLAC
0 question about this device. Answer the ones you know or ask your own.
Ask a new question about this device
Download the instructions for your Iron in PDF format for free! Find your manual PV2005 - SOLAC and take your electronic device back in hand. On this page are published all the documents necessary for the use of your device. PV2005 by SOLAC.
USER MANUAL PV2005 SOLAC
HnCTpyKunL 3a yNtpe6a
UPUTE ZA UPOTREBU
INSTRUCTIUNI DE UTILIZARE
Solac is a registered Trade Mark
07/13


5-10· ESPANOL
11-15· ENGLISH
16-21 • FRANÇAIS
22-27 DEUTSCH
28-33· PORTUGUES
34-39·ITALIANO
40-45· NEDERLANDS
46-50 CESKY
51-56· POLSKI
57-62·SLOVENCINA
63-68
69-746 6bIrpckC
75-80·ROMÁNA


ESPAÑOL
- Read these instructions before first using your appliance.
This manual is an integral part of the product. Please safeguard it for future reference.
ATTENTION
- This appliance can be used by children aged from 8 years and above and persons with reduced physical, sensory or mental capabilities or lack of experience and knowledge if they have been given supervision or instruction concerning use of the appliance in a safe way and understand the hazards involved. Children shall not play with the appliance. Cleaning and user maintenance shall not be made by children without supervision.
This appliance must not be left unattended whilst connected to the mains. - The mains plug on the power cord must be removed from the socket before filling the water tank.
- The filling opening must not be left open during operation. If you are steam ironing, please see the "STEAM IRONING".
The iron must be used and left on a stable surface. - When you place it on its base, make sure that the surface underneath the base is stable.
The iron is not designed to be used if it has been dropped, if there are visible signs of damage or if it is leaking. - Keep the iron and its power cord out of the reach of children under 8 years of age when it is connected or is cooling down.
- If the supply cord is damaged, it must be replaced by the manufacturer, one service agent authorized by SOLAC or a similarly qualified person in order to avoid a hazard.
Before using your iron, remove all the paper or plastic bags, plastic sheets, cards and possible stickers that may be on the outside or inside of the appliance that acted as handling protection or sales promotion material. Remove the soleplate protector before using your iron. - Do not plug it in without checking that the voltage of the appliance is the same as your home mains voltage.
- Take care that the cord does not touch the hot parts of the appliance.
- Check that the socket outlet has a suitable ground connection.
- To fill your iron or fill it while ironing, follow the instructions in the "FILLING WITH WATER" (fig. 1), unplugging it and using the beaker provided.
- Do not plug your iron in without water in the tank as this may cause irreparable damage to the system.
- The appliance may emit a little smoke and a plastic smell during the first few minutes of use. This is normal and will disappear quickly.
ATTENTION 11


- The first few times you use it, some small white particles may be released; these are totally harmless and do not stain. This is a relatively normal result of the manufacturing processes.
- Do not spray "vertical" steam on a garment hanging in the wardrobe or on a person. Vertical ironing must be done with the garment on a hanger and away from other garments, elements or persons.
- When you finish ironing, always empty the water from the tank. If you want to drain it while ironing, always unplug the appliance from the mains first.
To disconnect the iron, never pull on the power cord, take out the plug.
IMPORTANT: When you want to dispose of the appliance, NEVER throw it in the rubbish. Instead, go to your closest CLEAN POINT or waste collection centre for subsequent treatment. In this way, you will be contributing to looking after the environment.
Before disposing of your used appliance, you should make it visibly unserviceable and have it disposed of according to current national legislation. Ask your Distributor, Town Council or Local Authority for detailed information.
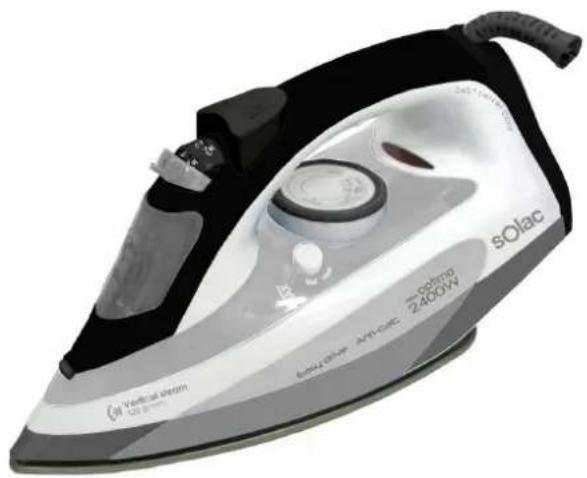
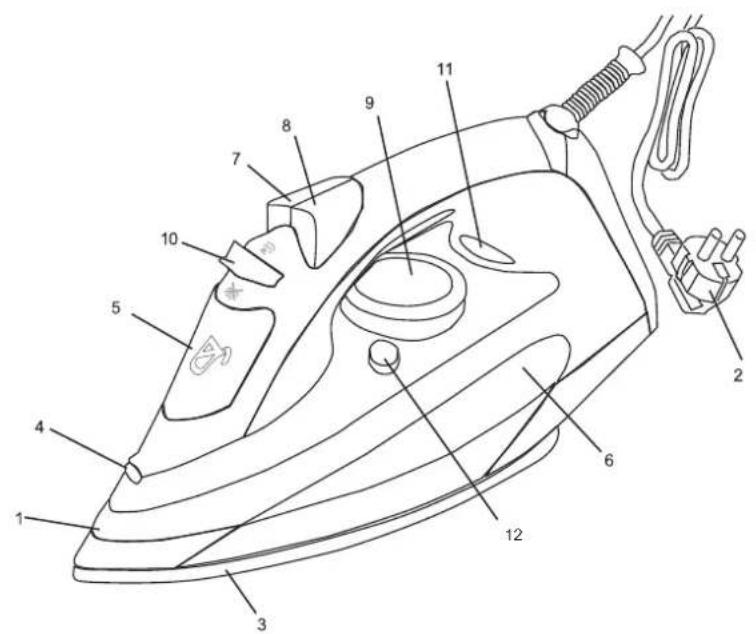
MAIN COMPONENTS
1 Main body
2 Power cord
3 Metal soleplate
4 Spray outlet
5 Water filler opening
6 Water tank
7 Spray button
8 Supersteam button
9 Temperature selector
10 Steam/Self-clean selector
11 Temperature pilot light
12 Self clean
BEFORE STARTING TO IRON

Always make sure the soleplate protector has been removed before starting to iron.
Due to the high levels of mains water hardness in most areas, Solac recommends that you always use demineralised water for ironing. In this way, you will guarantee that your iron remains in optimal condition for a longer period of time.
If, for any reason, you cannot find demineralised water, please ensure you use water with a low mineral content (soft water), or filter tap water using a water filter.
Do not use decalcifying agents or descaling products in the water tank. Do not use scented water or ironing water either. These products damage the interior of the steam generation system.
1 With the iron unplugged from the mains, rotate the steam selector (10) to the closed position (Fig. 2).
2 Open the water filler opening (5). Fill the water tank without exceeding the maximum level, using the water beaker provided (12) and keeping the iron in the vertical position (Fig. 1). When the tank is full, close the cap.
When filling the tank, make sure that the water does not overflow from the water filler opening.
3 Check whether the garment to be ironed has a label indicating the ironing temperature.
We recommend you classify the garments according to their required ironing temperature and begin with the garments ironed on the lowest temperature () .
SYNTHETIC FIBRES, minimum temperature ()
SILK, WOOL, medium temperature ( )
COTTON, high temperature (…)
LINEN, MAX temperature
NOTE: Ironing delicate garments at a temperature higher than necessary spoils the fabric and causes burnt residue to stick to the soleplate.
12
MAINCOMPONENTS


If you have any doubts about the temperature to use for a given garment, perform a test on a part, which will not be visible, beginning with the lowest temperature settings.

USE
This appliance has been designed exclusively for ironing clothes. Do not use it for any other purpose.
Completely remove all the elements use for transportation and packaging.
If the appliance is hot, handle it with care and do not touch the metal soleplate.
Never leave the iron in a horizontal position when the soleplate is hot. Rest it on its rear end.
Take care with the steam; do not aim it at people, animals or delicate objects.
Always iron on stable, solid and smooth surfaces.
For very delicate garments, place a cloth between the iron and the delicate garment to avoid potential markings from the soleplate.
1 Extend the cord completely and plug it into the mains. The temperature pilot light will turn on (11). Place the iron in the vertical position.
2 Select the desired operating temperature according to the garment you wish to iron (see "TEMPERATURE SELECTION (fig. 4)").
3 Select steam ironing (medium or maximum) or dry ironing, as appropriate (see "STEAM SELECTION").
4 Hold the iron by the handle, and slide the soleplate over the garment to be ironed.
5 After using the iron, set the steam selector (10) to the closed position and the temperature selector (9) to position 0.
6 Unplug the power cord from the mains.
7 Empty the water tank (see "EMPTYING THE WATER TANK"). Wait until the iron is completely cold and store it in the vertical position in a safe place.
BEFORE FIRST USE
Before using it for the first time, use the appliance to iron an old cloth or clothing, to clean the system.
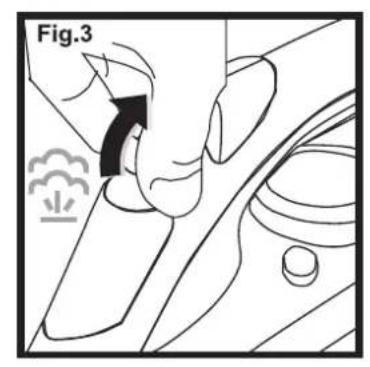
1 Set the temperature selector (9) to the Max position and wait a few minutes for the iron to reach the appropriate temperature (the temperature pilot light will go out).
2 Rotate the steam selector (10) until it is in the completely open position (fig. 3): steam will start to come out of the orifices in the soleplate.
3 Hold the iron by the handle and slide the soleplate over the old towel.
4 When the water tank is empty, no more steam will be produced. The iron is ready for use.
Do not worry if the iron gives off a little smoke when used for the first time. This will go away quickly.
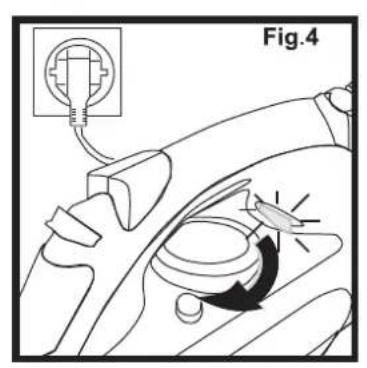
TEMPERATURE SELECTION (fig. 4)
1 Turn the temperature selector (9) until it is in the desired position.
When changing the position of the temperature selector (9), to either increase or reduce the temperature, several minutes must pass before the iron reaches the selected temperature.
When the selected temperature is reached, the pilot light will go out (11).
STEAM SELECTION
To obtain steam, set the temperature selector (9) between the levels and Max, depending on the garment to be ironed.
The iron has 3 steam positions (dry ironing medium steam flow or maximum steam flow

USE 13

en


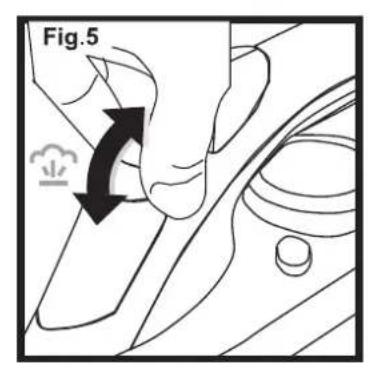
1 When the pilot light (11) goes out, indicating that the desired temperature has been reached, rotate the steam selector (10) until the desired steam flow is obtained (fig. 5).
EMPTYING THE WATER TANK
When you finish ironing, always empty the water from the tank.
1 Set the steam selector (10) to the closed position and the temperature selector (9) to the 0 position.
2 Unplug the plug from the mains
3 Open the water filler opening (5) and place the iron face down over the sink, gently shaking it to completely empty the tank.
4 Wait until the iron is completely cold and store it in the vertical position in a safe place.
IRONING RECOMMENDATIONS
STEAM IRONING
If professional ironing results, we recommend you steam iron garments first and then dry iron them.
SUPERSTEAM
If you want more steam while ironing, press the button (8) two or three times, aim the supersteam at the desired area of the garment and pass the iron soleplate over it to dry it. Thus is useful for eliminating wrinkles.
The supersteam may not be released on the first occasions. This is normal. Press the push-button a couple of times. Once the supersteam circuit has been primed, the jet of steam will be released.
We recommend pressing the control at 5-second intervals.
VERTICAL STEAM
This allows you to remove creases from delicate garments without having to put them on the ironing board: jackets, overcoats, curtains, etc.
1 Fill the water tank as explained in the "BEFORE STARTING TO IRON" section.
2 Place the garment on a hanger, well away from other garments, people, animals, etc.
A Do not discharge steam onto a garment hanging in the wardrobe or on a person.
3 Set the steam control (10) to the closed position and the temperature selector (9) to the Max position.
4 Bring the iron close to the garment, in the vertical position, (between 15 and 30~cm ) and press the supersteam button (8) once only. Do not position the iron too close to the garment, because you could damage it.
5 Wait a few seconds before pressing the button (8) again, so as not to damage the garment. Most wrinkles can be eliminated with three sprays of steam.
DRY IRONING
1 If there is water in the tank, turn the steam selector (10) to the closed position (fig. 2).
2 Plug in the iron and set the temperature selector (9) to the desired position.
The pilot light (11) will go off when the temperature is reached.
IRONING WITH SPRAY
Spray can be obtained by pressing the corresponding button (7) when dry ironing or ironing with steam. The iron is at any temperature level.
- Press the spray button (7) as many times as you want to use this function.
14
IRONING RECOMMENDATIONS


OTHER FUNCTIONS
ANTI-LIMESCALE SYSTEM
This iron has an innovative built-in anti-limescale system, consisting of a resin filter that retains the limescale substances from the water, so these cannot reach the steam chamber of the soleplate, thus extending the life of the iron.
The existence of this anti-limescale system does not mean that the recommendations about water hardness mentioned in the "BEFORE STARTING TO IRON" section can be ignored.
STORAGE AND CLEANING
Clean the appliance after using it for the first time, immediately after each use and after a long time without use.
en
SOLEPLATE
1 Disconnect the iron and allow the soleplate to cool down.
Use clay-based, environmentally friendly products to clean the soleplate.
EXTERNAL PART
1 To clean the external part of your iron, use a cloth dampened with soapy water.
1 Do not use solvents or abrasive products to clean your iron, as these could damage some of the plastic parts and/or remove some of the marks
2 Store your iron in a vertical position, coiling the cord around the base and pressing the cable into the fixing clip.
Although the power cord is fitted with a 360^ swivel piece, NEVER FORCE this cord when coiling it around the appliance on the first turn.
SELF-CLEANING
It is advisable to carry out the self-cleaning operation about once a month, depending on the frequency of use and the hardness of the water used.
1 Ensure that the tank is half filled with water.
2 Place the iron in the vertical position.
3 Plug in the iron and turn the temperature selector (9) to the Max position.
4 Wait for the pilot light to go off (11) indicating that the desired temperature has been reached.
5 Turn the temperature selector (9) to the 0 position and unplug the iron from the mains.
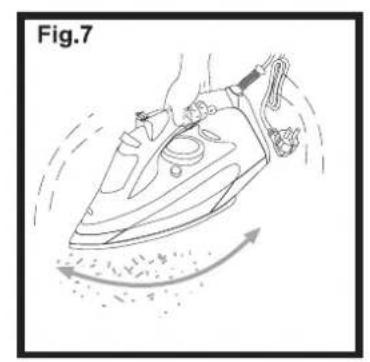
6 Place the iron in the horizontal position over a sink or an appropriate container and press the self-clean button (12), keeping the iron in this position and swinging it gently from side to side. Steam and water will come out from the holes in the iron, flushing out dirt and impurities. Swing the iron gently from side to side. Steam and water will come out of the holes in the iron, flushing out dirt and impurities (fig. 6-7).
A Be careful when performing this operation, as the water and steam are very hot and can cause burns.
7 Place the iron in the vertical position and wait for it to cool completely.
8 Wipe the soleplate with a damp cloth.
Remember that damage caused by the effects of limescale is not covered in the warranty.
OTHER FUNCTIONS 15


RANCAIS
VOLBA TEPLOTY (Obr. 4)
EMISJA PARY W PIONIE
VOLBA TEPLOTY (obr.4)
1 Regulator teploty (9) otocte do pozadovanej polohy.
1 Prizmene polohy regulatora teploty (9) musite pri znižovani alebo zvyšovani teploty pekolkko minuti pockat, aby zhelicka dosiahla spravnu teploty.
Po dosiahnuli pozadovanej teploty indikator zhasne (11).
VYBER PARY
Aaalaaal yjy jaiy jay jS
i 1
aannn aannnnn nnnnnn nnne annnnnnnnnnnnnnnnnnnnnnnnnnnnnnnnnnnnnnnnnnnnnnnnnnnnnnnnnnnnnnnnnnnnnnnnnnnnnnnnnnnnnnnnnnnnnn
e 1
1
1
"4 2
j 3
()
4
0 9 10 5
6
("olaljia jia jia" s jai)olaljia jia jia 7
a
ar


65


5
y
"5y 11
2
y
Max (9) 3
30.15 30.15
5
中
(2)(10)
sall sall lall yll lal lal lal lal lal lal
1
s
Max (9) jj j j j j j j j j 3
4
5
(12) 6
a 1
(7,6)
y 1
a 1
a
y


.6bIrapck
- Ppedu yonme6a eumamennno npoememe meu uncmpykuu.
Teu uncmpykuu 3a ynpmpe6a ca hepazdenha yacm om npodykma. Cbxpahrae me zu Ha 6e0anacno mrcmo 3a 6bdeea cnpaKa.
BHIMAHNE
To3u ypeo moke da 6bde u3non3aoh om deua ha 8 u nooeue zoDuH u luca c HamaeneHu fu3uuecku, cemuhu unu ymcmehu 8b3moxhocmu UU HeonumHu u HepaomHomu luua, ako ca h6nnoabaH uU ca um dadehu uncmpkyuu omnocho ynomebaHa ypeDa no 6e0anacen Haun u me pa3bupam 6b3moxhume onachocmu. Deuma he mpr6ba da cu uepam c ypeDa. Pouucmbahemo u nodopbkkama He mpr6ba da ce npaeu om deua 6e3 had3op.
To3u ypeD He mpa6ea da ce ocma8a 6e3 HabnOdeHue,doKamo e Eknouen B enekmpuueckama Mpeka.
UeencbHmHa3axpaHeauKabepmpra6a da ce 6adu om konhmacna npedu nIHHene Ha pe3epoapa 3a 8oda.
Omeopb3a nblhe He mpr6ea da ocmaea omboepen no epeMe Ha pa6oma.Ako enadume c npapa,euXme pa3dena ,Ipaede h c npap
Tp6ea da u3non3ame u da ocmae PV ebpxy cma6unha noebpxHocm.
Koama nocmae me cumemama bpxy ochoba u, npoeepaune da nu no6bpxhocmna nod ochoba e cmaabunha.
- PV He e npedHa3hauhe Ha 3a u3non3BaHe cne d u3nyckaHe, npu eudmu cnedu om noepeda unu ako meue.
a3eme PV u 3axpaheauqra kaben daney om deua nod 8 ooduH, KOzamo e 6knouheHa unu u3cmuea.
Ako 3a6eKume, ye 3axpaHeauunm KaBEn e nopeDen, 3a da u3bezHeme pUCOBe, ce ObPHeMe KbM omOpu3upAn om npou3bOumEn mExnuecku cepu3, mbu kAmo 3a NODMaHa My ca Heo6xOduMu cneuaHnU UChmpyEmu.
- Ipedu da u3non3eame Bawaama iomura, omcmpaHeme 6cuKu xapmuHu unu nlaactMMacobu onakOBku, kapmoHu u neHku, nocnykunu 3a ona3eae npu mpaHcnpumapHaemu unu peKnamHu cenu. OmcmpaHeme 3auumHomo fonuo om anaedwaema nema.
He bknouaume PV npedu da cme npoeepunu danu en. Hanpexehue eB Bauua dOom om2oapra Ha nocoohomo Ha anapama.
Bhumabaune kabena da he ce donupa do aopeumte yacmu ha en. ypeda.
Yeepeme ce, ye KOhmakmbm e do6pe 3a3emeh.
3a da HanbHnme c 6oDa omura, cneobame uncmpykuuume, yka3aHu e pa3e nn.3AINBBAHE C BODA (pue.1)cned u3knoubahe ha ypea om 3axpaehemo u c nomouma Ha ocuayepama yauka.
BknoubaHemno ha kumura 6e3 boda e peepoapa ue doeede do Hennopabumuyepexdaunha cucmemama.
O m ypeə ma moke da u3nua lek dum unu mupu3ma Ha nnaemaca npe3 nppeumuhymu Ha fykuohupaHemo.Toea e Hopmanho u 3a kpmko epeme.
BHIMAHHEB69


bg


- Ppu pBpueHnKo u3no38aHua e 8b3moXHO omdeHemo Ha 6enu cmu; me ca HanbJHo 6e06oBu H u He oCmaem nemHa. Toea ca ocmmu on npou3oOcmeHua npoec.
He Hacoeaeune eepmukanma npapa KbM okaeha e zapedeopba dpexa unu obeneha ebyooe. Bepmukanmo zanaede mpeba da ca uebpuea bpxy dpexa, okaeha h naakaayanka u omdananeha om dpyuoyeuxpneMemu unu nuia.
Cnep kamo npknnohme c anaedeHemo, buhau u3npa3aune pe3epoapa om obadama. Ako xenaema de 20 u3npa3Hne no epe me Ha anaede, npedeapumenHO u3knoyeme oumma om en. 3xpaheae.
3a da u3knouhme PV om kohma, he dbpnaume 3axpaheauu kaben, a uencena. BAAKHO! Ppu 6paKyahe ha ypeda, HIKORA HE zo 1x6bPnue 8 KOPama 3a 60kny. Omhe-ceme 2o hai-bnuku IYHKT 3A Cb5PAHE ha emopuHu cypoBuHu. No moo hu, ue ne cnoHORte 3a onbaahe Ha OKonHATA cpeda.
Ppe du ce ooeobdume om cmpa cu en.ype,mpraea da 2o haneume eudmo Heunnon3baemu da 2o u3xbpnme Ha mecmama, npdeduehu 3a eumma on deucmbauomo emcpna Bua kaohodamencme. Pockaedne no pboha unfoopmau no moe bnpoc om Bauna ducmpubymop, oouina unu meema admuhcpaua.
meme am a
OCHOBHN KOMNHOHTN
1 Kopnyc
2 3axpaheau kaben
3 Memanna nnoya
4 Om8op 3a npbckaHe
5 Omeop 3a nBnHe He Ha Boda
6 Pe3epeoap 3a 80da
7 Myoh 3a npbckaHe
8 Bymoh 3a cunna npa
9 Pezynamop Ha memnepamypama
10 Pezynamop ha napa
11 CemnueH uDukamop 3a
memnepamypama
12 amonoyucmea.
PPEINDA3ANOCHETDAIADNTE
Bunau npoeepraume dau npomekmopb m ha nnoyama e ceanen npedu da 3anoyneme da anadume.
I Nopadu bucokama mebpocm ha bodaema e kahanuaaohama mpekae nooeemyemecma, Solac npenopbweea euhaau da ce uonnonea demnepanupana 60da 3a anaede. No mozu hauin ce aapaumupa, ye omura ma ocmane 6 onmumnohcmonnae 3a no-bnbnpneoop on speme.
Ako no HyaKaea npuHa He MoKeme da Hamepume demuHepaun3upana 6oDa, moJa, yepeMe ce ueonon3ame boda c Hukco cbbpxHae Ha MuHepanu (MeKa oDa) unu fnumnpupaue yeumnHaama oOda, uonon3auku fumnpb 3a oOda.
He u3non3eaumdeekanunupauu a2emmu un npodykmu 3a omcmpnhae Ha komnehura kambke pe3epoapa 3a oda. He u3non3eaume u apomamupa h oeda unu oeda 3a anaede. Te3 npodykmu yepexdAm ebmpuehocmna h cuscmemama 3a oppayeane ha npaa.
1 Pn n3KIOUeHa OT eNEKTPueckata MPexa IOTna, 3aBbptete peryntopa Ha napata (10)do 3aTbopeho nonoxehne (Fur.2).
2 OTbOpTe OTbopa 3a nbHHeHe c B0da (5). HanbHHeTe pe3epBoapa c B0da 6e3 da npeBnIaBaTe MAXcHMaHTo HnBO, Kato n3non3BaTe npDoCTabeHata MeH3pya (12) N dPbKHeT OTHrA TBA BepTKaHNo NOxKeHne (ΦnR. 1). Korato pe3epBoapbT ce HanbJHn, 3aTbOpTe Kanahkata.
Ppu HnBnaeHa Hepeepoapa, Eummaaune boda ha e 3muva om omeopa 3a IIbHHe.
3 IpoBepete daNN o6NeKnTo, KOTo 1e rnaTe, mHa eTNKeT C mHnKaua 3a TEmpeATyPaTa HraNaHe.
70 OCHOBH KOMNHOHTN


Pnpopbweame eu da npdepedame obneknama cnoped heobxdumama 3a max memepamyp3a anaedehe u da 3anaoyame c obneknama, koumo ce anadm npu hau-Huckama memepampa (*)


- ESPAÑOL
- ATTENTION
- ATTENTION 11
- MAIN COMPONENTS
- BEFORE STARTING TO IRON
- USE
- BEFORE FIRST USE
- TEMPERATURE SELECTION (fig. 4)
- STEAM SELECTION
- en
- EMPTYING THE WATER TANK
- IRONING RECOMMENDATIONS
- STEAM IRONING
- SUPERSTEAM
- VERTICAL STEAM
- DRY IRONING
- IRONING WITH SPRAY
- OTHER FUNCTIONS
- ANTI-LIMESCALE SYSTEM
- STORAGE AND CLEANING
- SOLEPLATE
- EXTERNAL PART
- SELF-CLEANING
- RANCAIS
- VOLBA TEPLOTY (Obr. 4)
- EMISJA PARY W PIONIE
- VOLBA TEPLOTY (obr.4)
- VYBER PARY
- .6bIrapck
- BHIMAHNE
- BHIMAHHEB69
- bg
- OCHOBHN KOMNHOHTN
- PPEINDA3ANOCHETDAIADNTE
- OCHOBH KOMNHOHTN
Brand : SOLAC
Model : PV2005
Category : Iron