
IPS 37 - Cooker NODOR - Free user manual and instructions
Find the device manual for free IPS 37 NODOR in PDF.
| Brand | Nodor |
| Model | IPS 37 |
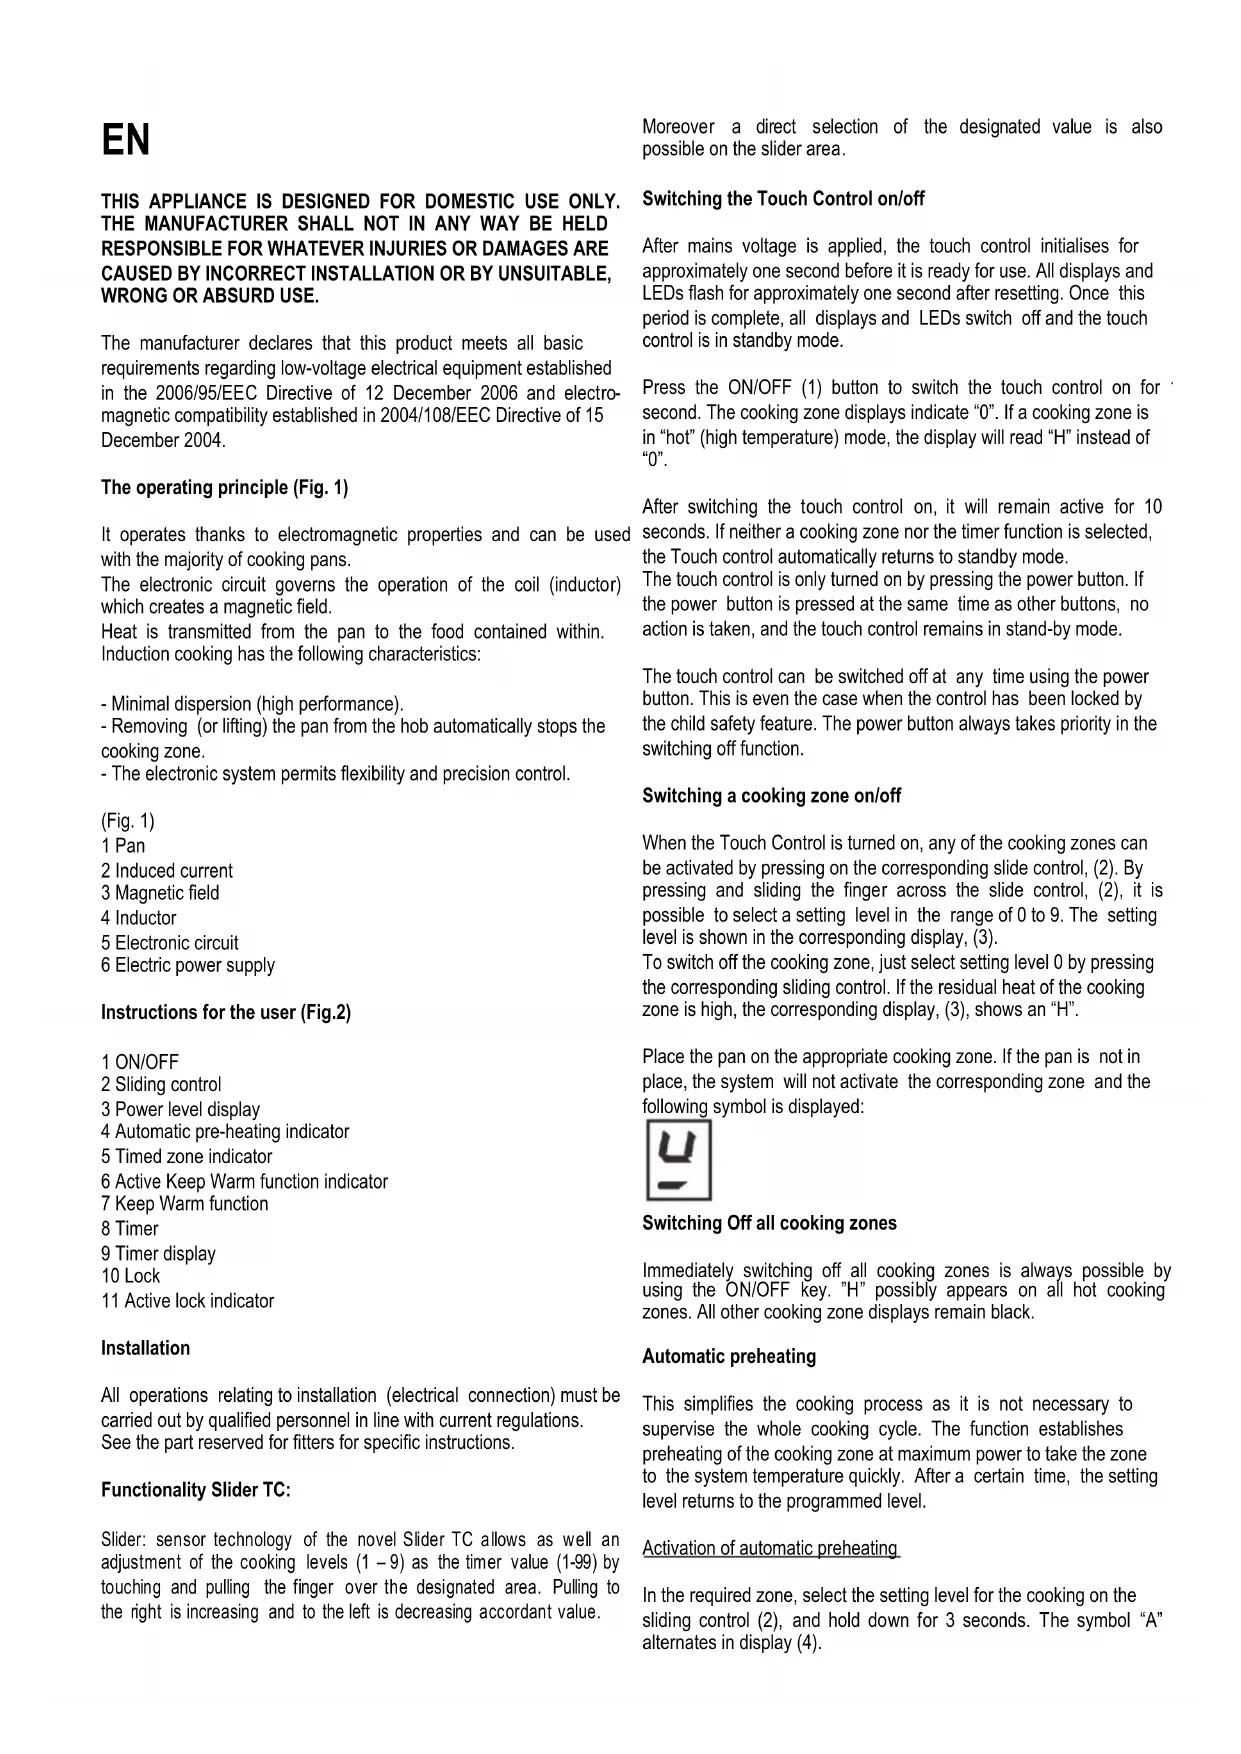
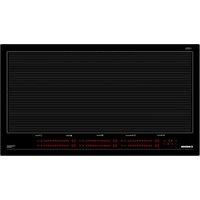
| Product type | Induction hob |
| Number of cooking zones | 4 |
| Electrical supply | 230 V ~ 50/60 Hz |
| Maximum total power | 7400 W |
| Control | Touch control with slider bar |
| Functions | Automatic preheating, Booster, Keep warm, Independent timer |
| Child lock | Yes |
| Residual heat indicator | Yes ("H" display) |
| Automatic shutdown | Yes (operating time limit) |
| Compatible cookware types | Magnetic bases (steel, cast iron, ferritic stainless steel) |
| Maintenance | Clean with scraper and non-abrasive cleaner |
| Installation | Built-in, do not place above an oven without ventilation |
| Overcurrent protection | Omnipolar disconnection device required |
Frequently Asked Questions - IPS 37 NODOR
User questions about IPS 37 NODOR
0 question about this device. Answer the ones you know or ask your own.
Ask a new question about this device
Download the instructions for your Cooker in PDF format for free! Find your manual IPS 37 - NODOR and take your electronic device back in hand. On this page are published all the documents necessary for the use of your device. IPS 37 by NODOR.
USER MANUAL IPS 37 NODOR
Operating and maintenance instructions for hobs

THIS APPLIANCE IS DESIGNED FOR DOMESTIC USE ONLY. THE MANUFACTURER SHALL NOT IN ANY WAY BE HELD RESPONSIBLE FOR WHATEVER INJURIES OR DAMAGES ARE CAUSED BY INCORRECT INSTALLATION OR BY UNSUITABLE, WRONG OR ABSURD USE.
The manufacturer declares that this product meets all basic requirements regarding low-voltage electrical equipment established in the 2006/95/EEC Directive of 12 December 2006 and electromagnetic compatibility established in 2004/108/EEC Directive of 15 December 2004.
The operating principle (Fig. 1)
It operates thanks to electromagnetic properties and can be used with the majority of cooking pans.
The electronic circuit governs the operation of the coil (inductor) which creates a magnetic field.
Heat is transmitted from the pan to the food contained within. Induction cooking has the following characteristics:
- Minimal dispersion (high performance).
- Removing (or lifting) the pan from the hob automatically stops the cooking zone.
- The electronic system permits flexibility and precision control.
(Fig. 1)
1 Pan
2 Induced current
3 Magnetic field
4 Inductor
5 Electronic circuit
6 Electric power supply
Instructions for the user (Fig.2)
1 ON/OFF
2 Sliding control
3 Power level display
4 Automatic pre-heating indicator
5 Timed zone indicator
6 Active Keep Warm function indicator
7 Keep Warm function
8 Timer
9 Timer display
10 Lock
11 Active lock indicator
Installation
All operations relating to installation (electrical connection) must be carried out by qualified personnel in line with current regulations.
See the part reserved for fitters for specific instructions.
Functionality Slider TC:
Slider: sensor technology of the novel Slider TC allows as well an adjustment of the cooking levels (1 - 9) as the timer value (1-99) by touching and pulling the finger over the designated area. Pulling to the right is increasing and to the left is decreasing accordant value.
Moreover a direct selection of the designated value is also possible on the slider area.
Switching the Touch Control on/off
After mains voltage is applied, the touch control initialises for approximately one second before it is ready for use. All displays and LEDs flash for approximately one second after resetting. Once this period is complete, all displays and LEDs switch off and the touch control is in standby mode.
Press the ON/OFF (1) button to switch the touch control on for second. The cooking zone displays indicate "0". If a cooking zone is in "hot" (high temperature) mode, the display will read "H" instead of "0".
After switching the touch control on, it will remain active for 10 seconds. If neither a cooking zone nor the timer function is selected, the Touch control automatically returns to standby mode.
The touch control is only turned on by pressing the power button. If the power button is pressed at the same time as other buttons, no action is taken, and the touch control remains in stand-by mode.
The touch control can be switched off at any time using the power button. This is even the case when the control has been locked by the child safety feature. The power button always takes priority in the switching off function.
Switching a cooking zone on/off
When the Touch Control is turned on, any of the cooking zones can be activated by pressing on the corresponding slide control, (2). By pressing and sliding the finger across the slide control, (2), it is possible to select a setting level in the range of 0 to 9. The setting level is shown in the corresponding display, (3).
To switch off the cooking zone, just select setting level 0 by pressing the corresponding sliding control. If the residual heat of the cooking zone is high, the corresponding display, (3), shows an "H".
Place the pan on the appropriate cooking zone. If the pan is not in place, the system will not activate the corresponding zone and the following symbol is displayed:

Switching Off all cooking zones
Immediately switching off all cooking zones is always possible by using the ON/OFF key. "H" possibly appears on all hot cooking zones. All other cooking zone displays remain black.
Automatic preheating
This simplifies the cooking process as it is not necessary to supervise the whole cooking cycle. The function establishes preheating of the cooking zone at maximum power to take the zone to the system temperature quickly. After a certain time, the setting level returns to the programmed level.
Activation of automatic preheating
In the required zone, select the setting level for the cooking on the sliding control (2), and hold down for 3 seconds. The symbol "A" alternates in display (4).
If a higher setting level is then selected, the preheating function is maintained, and the preheating time is adapted to the new selected setting.
If, on the other hand, a lower setting level is selected, the automatic preheating function is cancelled.
Booster Function
The Booster function can be selected by pressing the "P" at the far right of the sliding control, (2), for the required cooking zone.
With this function, all the cooking zones are able to receive a power supply above the nominal power (the number of zones with booster at the same time will depend on the power provided to the different zones, which must always be less than the maximum power of the hob).
The booster activation time is limited to 10 minutes to protect cooking utensils. After the booster has automatically switched off, the cooking zone continues to operate at setting level "9". The booster can be reactivated after a few minutes.
If the pan is removed from the cooking zone during boosting, the booster function remains active and the disabling time continues its countdown.
Power management is based on the principle that the last modification to the setting level in the different zones has top priority. This means that the setting levels previously configured in the other zones may be automatically decreased
- If the induction detects that any of the cooking zones requires reduction, the display for this zone flashes for 3 seconds to time for correction prior to modification.
- If the selected zone is re-adjusted within the correction period, power management analyses the power distribution again. If a reduction in power is not required the flashing stops and the original setting level remains on the corresponding display.
- Should power distribution be changed again by the user, the setting level will under no circumstances automatically increase in the zones where it has been automatically reduced.
Keep Warm Function
This function is available for all the cooking zones and is used to keep cooked food warm. After pressing the (7) button, the (6) display flashes for 5 seconds, indicating that the function is ready to be selected. During this time you must press the sliding control (2) that corresponds to the cooking area on which you want to activate this function. After selecting the zone, the corresponding display shows the symbol:

If no cooking zone has been selected within 5 seconds, the Keep Warm function is automatically deactivated and the (6) display is turned off.
Residual heat indicator
This informs the user that the glass is at a dangerous temperature should the area around the cooking zone be touched. The temperature is determined by a mathematical model and any residual heat is indicated by an "H" on the corresponding 7-segment display. Heating and cooling are calculated based on:
· The selected setting level (between "0" and "9")
· The ON/OFF time.
After switching off the cooking zone, the corresponding display will indicate "H" until the temperature in the zone has dropped below the critical level ( ≤ 60^ ) according to the mathematical model.
Automatic disconnection (operating time limit)
A maximum operating time is defined for each activated cooking zone. The maximum operating time depends on the selected cooking power. When the maximum operating time has passed, the cooking zone automatically switches off.
Each time that the cooking zone mode is activated (change in cooking power, etc.) the timer returns to the initial setting.
The timer settings take priority over the operating time limits when adjusting the cooking power.
Protection against unintended switching-ON
If the Touch Control detects continued pressure on a button for more than 10 seconds:
-If it is the ON/OFF button, (1), all the displays flash with the symbol shown below until the pressure is removed and any one of the buttons is pressed again.
-If it is one of the locking buttons, (10), Touch Control will switch off.
-If it is the sliding control (2), of the timer button (8) or of the Keep Warm function (7), the control produces a continuous acoustic signal and the symbol shown below flashes on the corresponding display. If the pressure is maintained, Touch Control switches off after a further 10 seconds.
Water or food spilt on the glass in the control zone may be detected as a continuous pressure on one or more buttons.

If no cooking zone is activated within 10 seconds after switching on the touch control, it will return to standby mode.
- When the control is switched on, the ON/OFF button takes priority over the other buttons, to allow the control to be switched off at any time, in the event of multiple or continuous pressure on the buttons.
- In standby mode, no effect will be caused by buttons being kept held down. In any case, to switch the electronic control back on, the control must have detected that no buttons are pressed down.
Button lock (child safety feature)
Activating locking button (10) in stand-by or active mode will lock the buttons and the allocated lock LED, (11), will remain lit. The activation times for the lock button should be observed in this case. The hotplate continues operating in the adjusted mode, but it is no longer possible to use any of the buttons, except the lock button or the On/Off button (1). When the buttons are locked, the On/Off button, (1) can be switched off. The allocated button lock LED, (11), goes out when the control is disabled. The button lock function LED is reactivated when it is switched on (in stand-by mode 10 s) until it is switched off by repeatedly pressing the lock button. The activation / deactivation of the button lock function is not possible when the unit is switched off. When the programmed timers end, the corresponding timer alarms may be confirmed by activating any button without unlocking the control. Repeatedly activating the locking button in stand-by or active mode will unlock the buttons and the allocated lock LED, goes out. All the sensor buttons can be used again in their normal way.
Sound signal (buzzer)
During use, the following activities are signaled by a buzzer:
- Normal button pressing by a short sound.
- Buttons kept pressed down for more than 10 s by a continuous sound.
Timer Function
The timer function permits up to a maximum of 4 independent timers. That is, one timer for each individual cooking zone and one standalone timer (independent to the cooking zones).
Stand-alone timer
-If the touch control is on and none of the cooking zones are on (all the displays show a "0"), the stand-alone timer can be activated by pressing button (8). If, on the other hand, the setting level is other than "0" in any of the cooking zones, the stand-alone timer may be activated by pressing button (8) twice. The timer display (9) shows "00" and the decimal point on the display is lit. Now it is possible to select the required time between 0 and 99 minutes. If no value selected, the timer is deactivated after 10 seconds.
-To select the required time, use any of the 3 sliding controls (2). During this operation, all the sliding controls are off for the selection of the cooking zone setting level. 10 seconds after the time has been selected, the timer automatically deselects.
-After the programmed time, an intermittent sound signal is activated and the display (9) shows an flashing "00". Both the "00" and the sound signal stop when any of the buttons is pressed or after 2 minutes.
-If it is active, when the Touch Control is switched off using the ON/OFF button (1), the stand-alone timer continues the countdown.
Timer for the cooking zones
-If at least one cooking zone is on, the timer can be activated by pressing button (8).
- "00" flashes on the timer display (9) and the timer symbol (5) for each zone that is in use lights up. You now have 10 seconds to select the time for the required cooking zone using the corresponding sliding control (2). During this operation, the other sliding controls remain activated for the selection of the cooking zone setting level.
-To change the timer allocated to a cooking zone for a timer allocated to another zone, just press button (8).
-At the end of the programmed time, an intermittent sound signal is activated and "00" flashes on the display (9), the corresponding cooking zone switches off and its display shows "0" (alternating with "H" if there is any residual heat). Both the "00" and the sound signal stop when any of the buttons is pressed or after 2 minutes.
Using the timer
-The required time setting can be selected using the sliding control (2). If you hold your finger above any part of the sliding control for at least 0.5 seconds, a default time of 10 minutes is established. By sliding your finger to the left or right, the time can be reduced or increased respectively.
-The total timer limits are 00 minutes to the left and 99 minutes to the right.
-The time setting can be modified up to a maximum of 10 minutes, just by sliding your finger across the control. For higher settings, lift up your finger and then slide it along the control again (2).
-The timer setting can also be selected by holding your finger above the sliding control (2). To reduce the time, press on any part of the left side of the sliding area; to increase the setting, press on the right half.
-To deactivate the timer, select the setting, "00". To do so, just press the far left of the sliding area for 0.5 seconds.
Precautions
- Keep all magnetisable objects out of reach (credit cards, floppy disks and calculators, etc.) when the hob is in use.
- Never use any aluminium foil or place any foodstuffs wrapped in aluminium foil directly on the hob.
- Do not place any metal objects such as knives, forks, spoons or lids on the hob surface as they will heat up.
- When using non-stick pans, before adding seasoning, limit the preheating time to one or two minutes.
- When cooking food that may easily stick, start at a low setting and then slowly increase while stirring regularly.
- After use, switch off using the corresponding function (turn down to "0") and do not rely on the pan sensor.
- If the hob surface breaks, switch off the appliance at the mains immediately to prevent the risk of an electric shock.
- Do not use steam cleaners to clean the hob.
- This appliance is not designed for use by individuals (including children) with reduced physical, sensorial or mental capacities, or who do not have adequate experience or knowledge, unless under supervision or after instruction on the use of the appliance from a person responsible for their safety.
- Children should be supervised so that they do not play with the appliance.
Pans (Fig. 3)
- A magnet-attracting pan may be suitable for induction cooking.
- Preferably use pans indicated as being suitable for induction cooking.
- Flat and thick-bottomed pans.
- A pan with the same diameter as the cooking zone ensures the maximum power is used.
- A smaller pan reduces the power but will not lead to energy loss. In any case, we do not recommend the use of pans with a diameter of less than 10 cm.
- Stainless steel pans with multi-layer or ferritic stainless-steel bases if the base indicates: for induction cooking.
- If cast iron pans are used, these should preferably have an enamel bottom to avoid scratching the ceramic hob surface.
- The following types of pans are not suitable: glass, ceramic, earthenware, aluminium, copper or non-magnetic (austenitic) stainless steel.
Maintenance (Fig. 4)
Pieces of aluminium foil or food, fat splashes, spilt sugar or highly sugared foodstuffs should be removed immediately from the cooking surface using a spatula to avoid scratching the hob surface.
Subsequently clean the surface with a suitable product and kitchen roll, rinse with water and dry with a clean cloth. Never use abrasive sponges or scourers and avoid the use of aggressive chemical detergents or stain removers.
Instructions for the fitter
Installation
These instructions are to be used by the fitter as a guide to installation, setting and maintenance in line with current regulations and standards. The appliance must be disconnected from the mains before any work is carried out.
Installation (Fig. 5)
The appliance is designed for fitting into a worktop, as shown in the figure.
Place the supplied sealant around the perimeter of the hob.
The hob should not be installed over an oven, although if this is the case, check that:
- the oven is equipped with an appropriate cooling system
- there is no warm-air leakage from the oven towards the hob.
- suitable air inlets are provided as shown in the figure.
(Fig. 5)
1 Front view
2 Front side
3 Oven or cupboard zone
4 Air input
Electrical connection (Fig. 6)
Check the following before the electrical connection is made:
- the installation characteristics are in line with that indicated on the specifications plate on the base of the hob surface
- the installation is fitted with an efficient earthing connection in line with current regulations and law. The earth connection is a legal requirement.
Where the appliance is not supplied with a cable or plug, use suitable material for the current indicated on the specifications plate and for the operating temperature. The cable must never reach a temperature of more than 50^ C above the ambient temperature.
Fit a device for disconnecting from the mains power supply on the fixed cable, with a contact separation at all the poles to permit total disconnection in the event of category III over-voltage, in accordance with wiring regulations.
The plug or omnipolar switch must be easily accessible when the appliance is installed.
This appliance is not designed to be used with an external timer or separate remote control system.
The manufacturers shall not in any way be held responsible in the event of non-compliance with that indicated above and where accident prevention regulations are not respected.
To avoid all risk, if the power cable is damaged it must only be replaced by the manufacturer, by an authorised service centre or by a qualified electrician.
FR
CE PRODUIT EST CONÇU EXCLUSIVEMENT POUR USAGE DOMESTIQUE. LE CONSTRUCTEUR DÉCLINE TOUTE RESPONSABILITÉ POUR DOMMAGES ET BLESSURES CAUSÉES PAR UNE INSTALLATION INCORRECTE OU PAR UN USAGE IMPROPRE, ERRONÉ OU ABSURDE.
- Activation normale des touches (son bref).
Fig.3 - Abb.3 - Afb. 3 - Puc. 3 - Rys. 3 - Kuva 3. - 图3-3. ábra - Euk. 3.

natural_image
Illustration of a hand using a paintbrush to brush residue from a surface (no text or symbols)Fig.4 - Abb.4 - Afb. 4 - Puc. 4 - Rys. 4 - Kuva 4. - 图4 - 4. ábra - Euk. 4.

Fig.5 - Abb.5 - Afb. 5 - Puc. 5 - Rys. 5 - Kuva 5. - 图5-5. ábra - Euk. 5.

*Teniendo en cuenta el factor de simultaneidad
*Bei Gleichzeitigkeitsfaktor
*En tenant compte du coefficient de simultanéité.
*Considering complementary factor
*Tenendo conto del fattore di contemporaneità
*In aanmerking de Geleijktijdigheidsfactor
*Tomando en consiferação o factor de dimultaneidade
*Idet der tages højde for samtidighedsfaktoren
*yhtäaikaisuuden huomioonottaen
* Samtidighetsfaktorn bör tas med i beräkningen
*Λαμβάνοντας υπόψη τα προεξέχοντα πλήκτρα χειρισμού
*Учитывая фактор совместимости
*Biorąc pod uwagę ich komplementarność
*Figyelembe véve az egyidejüségi tényezőt
*素,控制盘四周要用随产品赠送的防渗水的胶条粘牢。
*Ta i betraktning samtidighetsfaktoren
Fig.6 - Abb.6 - Afb. 6 - Puc. 6 - Rys. 6 - Kuva 6. - 图6 - 6. ábra - Euk. 6.

NODOR

CATA ELECTRODOMÉSTICOS, S.L.
c/ Ter, 2 - 08570 TORELLÓ (Barcelona) SPAIN
Tel. +34 938 594 100 - Fax +34 938 594 101
www.cnagroup.es - e-mail: cna@cnagroup.es


- The operating principle (Fig. 1)
- (Fig. 1)
- Instructions for the user (Fig.2)
- Installation
- Functionality Slider TC:
- Switching the Touch Control on/off
- Switching a cooking zone on/off
- Switching Off all cooking zones
- Automatic preheating
- Activation of automatic preheating
- Booster Function
- Keep Warm Function
- Residual heat indicator
- Automatic disconnection (operating time limit)
- Protection against unintended switching-ON
- Button lock (child safety feature)
- Sound signal (buzzer)
- Timer Function
- Stand-alone timer
- Timer for the cooking zones
- Using the timer
- Precautions
- Pans (Fig. 3)
- Maintenance (Fig. 4)
- Instructions for the fitter
- Installation (Fig. 5)
- (Fig. 5)
- Electrical connection (Fig. 6)
- FR
- CE PRODUIT EST CONÇU EXCLUSIVEMENT POUR USAGE DOMESTIQUE. LE CONSTRUCTEUR DÉCLINE TOUTE RESPONSABILITÉ POUR DOMMAGES ET BLESSURES CAUSÉES PAR UNE INSTALLATION INCORRECTE OU PAR UN USAGE IMPROPRE, ERRONÉ OU ABSURDE.
- NODOR
Brand : NODOR
Model : IPS 37
Category : Cooker