
RT 36 - Cooker NODOR - Free user manual and instructions
Find the device manual for free RT 36 NODOR in PDF.
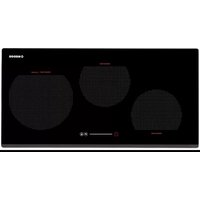
| Product Type | Ceramic glass hob with touch control |
| Brand | NODOR |
| Model | RT 36 |
| Number of cooking zones | 4 |
| Control type | Touch Control keys |
| Power levels | 9 (1 to 9) |
| Keep warm function | Yes (symbol « u ») |
| Automatic simmer function | Yes |
| Residual heat indicator | Yes (display « H ») |
| Child safety lock | Yes (key lock) |
| Automatic shutdown | Yes (after 20 seconds of inactivity, per zone) |
| Timer / Minute minder | Yes (independent timer and per zone timer, from 1 to 99 minutes) |
| Multiple circuits | Yes (double/triple zone) |
| Power supply | 220-240 V ~ 50/60 Hz |
| Estimated dimensions (W × D × H) | 590 × 520 × 50 mm |
| Estimated weight | 8 kg |
| Surface material | Ceramic glass |
| Electrical connection | Fixed with power cable (replacement by a professional) |
| Usage | Household use only |
| Maintenance | Clean with a scraper and mild detergent; avoid abrasive sponges |
Frequently Asked Questions - RT 36 NODOR
User questions about RT 36 NODOR
0 question about this device. Answer the ones you know or ask your own.
Ask a new question about this device
Download the instructions for your Cooker in PDF format for free! Find your manual RT 36 - NODOR and take your electronic device back in hand. On this page are published all the documents necessary for the use of your device. RT 36 by NODOR.
USER MANUAL RT 36 NODOR
Operating and maintenance instructions for hobs
FR
THIS APPLIANCE IS DESIGNED FOR DOMESTIC USE ONLY. THE MANUFACTURER SHALL NOT IN ANY WAY BE HELD RESPONSIBLE FOR WHATEVER INJURIES OR DAMAGES ARE CAUSED BY INCORRECT INSTALLATION OR BY UNSUITABLE, WRONG OR ABSURD USE.
The manufacturer declares that this product meets all basic requirements regarding low-voltage electrical equipment established in the 2006/95/EEC Directive of 12 December 2006 and electro-magnetic compatibility established in 2004/108/EEC Directive of 15 December 2004.
User's Instructions
Installation
All operations relative to installation (electric connection) should be carried out by skilled personnel in conformity with the rules in force.
As for the specific instructions see part pertaining to installer.
Use
Touch sensitive keys
All operations can be performed using touch sensitive keys (capacitive sensors) located on the front of the control board; each key has a corresponding display. All actions are confirmed by an audible signal.
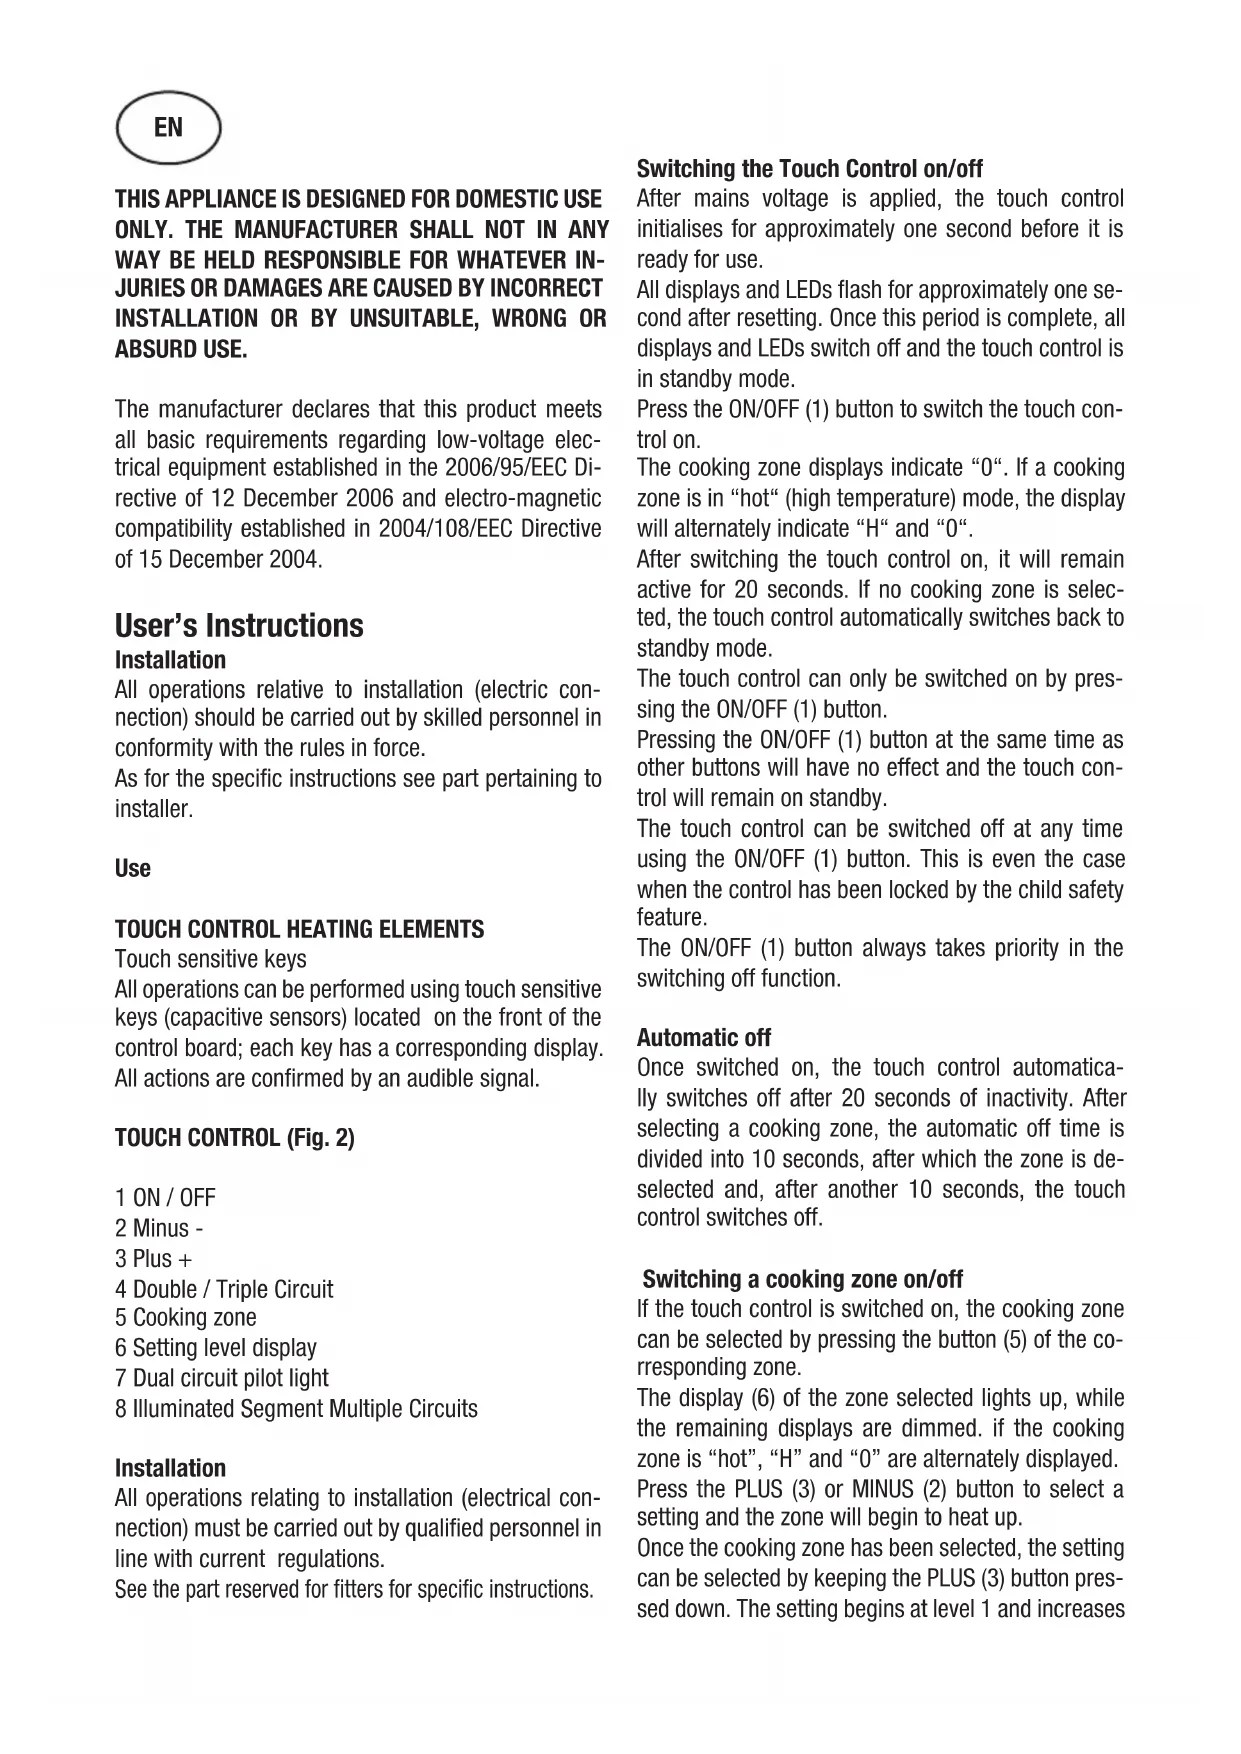
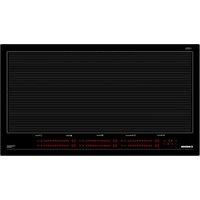
TOUCH CONTROL (Fig. 2)
1 ON/OFF
2 Minus -
3 Plus +
4 Double / Triple Circuit
5 Cooking zone
6 Setting level display
7 Dual circuit pilot light
8 Illuminated Segment Multiple Circuits
Installation
All operations relating to installation (electrical connection) must be carried out by qualified personnel in line with current regulations.
See the part reserved for fitters for specific instructions.
Switching the Touch Control on/off
After mains voltage is applied, the touch control initialises for approximately one second before it is ready for use.
All displays and LEDs flash for approximately one second after resetting. Once this period is complete, all displays and LEDs switch off and the touch control is in standby mode.
Press the ON/OFF (1) button to switch the touch control on.
The cooking zone displays indicate "0". If a cooking zone is in "hot" (high temperature) mode, the display will alternately indicate "H" and "0".
After switching the touch control on, it will remain active for 20 seconds. If no cooking zone is selected, the touch control automatically switches back to standby mode.
The touch control can only be switched on by pressing the ON/OFF (1) button.
Pressing the ON/OFF (1) button at the same time as other buttons will have no effect and the touch control will remain on standby.
The touch control can be switched off at any time using the ON/OFF (1) button. This is even the case when the control has been locked by the child safety feature.
The ON/OFF (1) button always takes priority in the switching off function.
Automatic off
Once switched on, the touch control automatically switches off after 20 seconds of inactivity. After selecting a cooking zone, the automatic off time is divided into 10 seconds, after which the zone is deselected and, after another 10 seconds, the touch control switches off.
Switching a cooking zone on/off
If the touch control is switched on, the cooking zone can be selected by pressing the button (5) of the corresponding zone.
The display (6) of the zone selected lights up, while the remaining displays are dimmed. If the cooking zone is "hot", "H" and "0" are alternately displayed.
Press the PLUS (3) or MINUS (2) button to select a setting and the zone will begin to heat up.
Once the cooking zone has been selected, the setting can be selected by keeping the PLUS (3) button pressed down. The setting begins at level 1 and increases
by 1 level every 0.4 seconds. When setting "9" is reached, the setting will not be changed further.
If the setting level has been selected using the MINUS (2) button, the start level is "9" (maximum level). Keep the button pressed down to lower the active level by 1 every 0.4 seconds. When setting "0" is reached, there will be no further setting changed. The setting can only be changed by pressing the MINUS (2) or PLUS (3) button again.
Switching a cooking zone off
Select the zone to be switched off using the corresponding button (5). The display (6) of the zone selected lights up, while the remaining displays are dimmed. Press both the selection button for the corresponding area and the MINUS key (2) at the same time to set the power level of the area to 0. Alternatively, the MINUS button (2) can be used to reduce the setting level to 0.
If a cooking zone is "hot", "H" and "0" will be alternately displayed.
Switching all cooking zones off
Press the ON/OFF (1) button to immediately switch off all zones at any time. In standby mode, an "H" is displayed in all cooking zones that are "hot". The remaining displays will be switched off.
Setting level
The cooking zone can be set to 9 levels that are indicated by the numbers "1" to "9" on the seven-segment LED displays (6).
Automatic Parboiling

When Automatic parboiling is activated, the power of the cooking zone is switched to 100% for a period of time depending on the selected onboiling stage. As soon as the parboiling time is over, the preselected onboiling stage is valid again.
Procedure to start Automatic parboiling:
The control unit is switched on and a cooking zone is selected.
After setting cooking stage to level "9", press again the PLUS (3) button.
As a next step, there is a 10 seconds period time to select the desired cooking stage, by using MINUS (2) and PLUS (3) buttons.
If a different setting level is then selected, the parboi
ling function is maintained, and the parboiling time is adapted to the new selected setting.
Keep Warm Function
This function is available for all cooking areas and is used to keep food that has already been cooked warm. It is a power level between level 0 and level 1. To activate this function, follow these steps:
- Select the desired cooking area.
- Select power level 1 using the PLUS button (3)
- Press the MINUS button (2). The symbol "u" will be displayed, indicating that the "Keep Warm" function has been activated.
Residual heat indicator
This informs the user that the glass is at a dangerous temperature in the event of touching the area located around the cooking zone. The temperature is determined by a mathematical model and any residual heat is indicated by a "H" on the corresponding 7-segment display.
Heating and cooling are calculated based on:
The selected setting level (between "0" and "9")
The ON/OFF time.
After switching off the cooking zone, the corresponding display will indicate "H" until the temperature in the zone has dropped below the critical level (≤ 60^)
Automatic off function (operating time limitation)
In terms of the setting level, if no operation occurs each cooking zone switches off after an established maximum time.
Each operation in the cooking zone condition (using the PLUS (3) and MINUS (2) or dual zone) restarts the maximum operating time of the zone by resetting it to its initial value.
Protection against unintended switching on
- If the electronic control detects a button being held down for approx. 10 sec. it will switch off automatically. The control sends out an audible error signal to warn the user that the sensors have detected the presence of an object. The displays indicate error code "ER03". If the cooking zone is in "hot" mode, "H" will be indicated alternately on the display with the error signal.
- If no cooking zone is activated within 20 seconds after switching on the touch control, it will return to
standby mode.
- When the control is switched on, the ON/OFF button has priority over all other button and, therefore, the control can be switched off at any time, even when several buttons are pressed at the same time or a button is kept held down.
- In standby mode, no effect will be caused by buttons being kept held down. However, before the electronic control can be switched back on, it has to detect that no button is pressed down.
Button lock (child safety feature)
- Child safety feature:
Button lock:
To activate the child safety device after turning on the Touch Control, press and hold the MINUS (2) button. Then press the button to select the cooking area: upper left if the hob has 3 cooking areas lower left if the hob has 4 cooking areas
An "L" standing for LOCKED (child safety feature preventing unintended switch on) will be indicated on all displays. If a cooking zone is in "hot" mode, "L" and "H" will be alternately displayed.
This operation must take place within a 10 successive seconds and no button other than those described must be pressed. Otherwise, the sequence will be interrupted and the hob will not be locked.
The electronic control remains locked until it unlocked by the user, even if it has been switched off and back on meanwhile. Not even touch control resetting (after a voltage drop) will interrupt the button lock.
Cancelling the button lock:
After switching the touch control on, the child safety feature can be disabled. Follow the same procedure as for locking: press and hold the MINUS (2) button, then press the button to select the cooking area:
- upper left if the hob has 3 cooking areas
- lower left if the hob has 4 cooking areas If all operations are completed in the correct order, the button lock will be cancelled and the touch control will return to Stand-by mode if no other operation is carried out within 10 seconds. Otherwise, the sequence will be considered incomplete and the touch control will remain locked and will switch off after 60 seconds.
Switch the touch control back on using the ON/OFF button and all displays will be indicate "0", the de
cimal points will flash and the touch control will be ready for cooking. If a cooking zone is in "hot" mode, "0" and "H" will be alternately displayed.
Control of multiple circuits
Hobs without double or triple circuit, see Fig. 2A Hob with triple zone. (Fig. 2B)
When a dual / triple cooking zone is activated, the 3 circuits are switched on at the same time. The activation / deactivation of each circuit is done with button 4 and it is indicated with an illuminated segment (8).
Sound signal (buzzer)
The following activities are indicated by a buzzer during use:
- Normal button pressing by a short sound.
- Buttons kept pressed down for more than 10 sec. by a long, intermittent sound.
Timer function (optional)
The timer function is realized in two versions:
- Stand-alone timer 1..99 min: sound signal when the time is over (= minute minder). This function is only available when the cooktop is not in operation, i.e. when there is no cooking.
- Cooking zone timer 1..99 min: sound signal when the time is over, four cooking zones can be programmed independently.
Timer as minute minder (stand-alone):
- If the control is ON and no cooking zone selected, the standalone-timer can be used by simultaneously operating MINUS (2) and PLUS (3) keys.
- Adjustment range (0-99min), it can be set in 1-minute steps with any key, starting at 1 up to 99 (end stop) with the minus-key starting at 99 down to 0 (end stop)
- Continuous activation of the plusor minus-key results in a dynamic increase of the adjustment speed up to maximum value without sound signal.
- when the plus- or minus key is released in the meantime, the adjustment speed starts again from a (low) initial value.
- adjustment can be made with a continuously activated plusor minus-key or by tip-operation (with sound signal). After the timer is set the time runs down according to the adjustment. When the time is over there is a sound signal and the timer display blinks.
The sound signal will be stopped
- automatically after 2 minutes and/or by operating any key. Then the blinking of the timer display stops and the display extinguishes.
Switching-OFF/changing the timer - The timer can be changed or switched-off anytime by simultaneously operating MINUS (2) and PLUS (3) keys. (with sound signal). The timer will be switched off by counting down to "0" with the minus-key. For 10 seconds the timer display remains at "0" before it will be switched-off.
Timer programming on cooking zones
When the control is switched-ON an independent timer can be programmed for every cooking zone.
- By selecting a cooking zone with the cooking-zone-selectkey (4), then selecting the setting and, finally, operating MINUS (2) and PLUS (3) keys simultaneously, the timer can be programmed as a switch-off function for a cooking zone.
- During timer programming, the pilot light (6) of the selected cooking zone blinks.
- When the timer has run down, there is a sound signal and the timer display shows "00" statically, the assigned cooking zone timer LED blinks. The programmed cooking zone will be cut off and ^ H^n will be displayed if the coking zone is hot.
The sound signal and the blinking of the timer LED will be stopped
automatically after 2 minutes
by operating any key.
The timer display extinguishes.
- The basic behaviour follows the description of the "minute minder" (stand-alone-timer).
Precautions (Fig. 3)
- When one makes use of heating elements, we advise receptacles with flat bottom having same diameter or lightly higher than that of the hot area.
- Avoid overflows of liquid, therefore when boiling has happened, or in any case when liquid is heated, reduce the heat supply.
- Don't leave the heating elements on without receptacles on the top or with void pots and pans.
- If the surface of the hob is damaged, immediately disconnect the appliance from the mains to prevent the possibility of electric shock.
- Never use a steam cleaner to clean the hob.
- This appliance hood is not designed to be used by people (including children) with reduced physical,
sensorial or mental capacity, or who lack experience or knowledge about it, unless they have had supervision or instructions on how to use the appliance by someone who is responsible for their safety.
- Children must be supervised to ensure that they do not play with the appliance.
Maintenance (Fig. 4)
By means of a scraper immediately remove any aluminium foil bits, food spills, grease splashes, sugar marks and other high sugarcontent food from the surface in order to avoid damaging the hob.
Subsequently clean the surface with some towel and appropriate product, rinse with water and dry by means of a clean cloth. Under no circumstance should sponges or abrasive cloths be used; also avoid using aggressive chemical detergents such as oven sprays and spot removers.
Installer's Instructions
Installation
These Instructions are for the qualified technician, as a guide to installation, adjustment and maintenance, according to the laws and standards in force. These operations must always be carried out when the appliance has been disconnected from the electric system.
Positioning (Fig. 5)
1 Front view
2 Front side
The appliance can be fitted into a working area as illustrated on the figure. Apply the seal supplied over the whole perimeter of the working area.
I once the appliance is installed there is access to the lower part, a protection panel (wooden or something similar) ought to be placed at the distance indicated in the figure.
Electrical connection
Prior to carrying out the electrical connection, please ensure that:
the plant characteristics are such as to follow what is indicated on the matrix plate placed at the bottom of the working area;
- that the plant is fitted with an efficient earth connection, following the standards and law provisions in force.
- The earth connection is compulsory in terms of the law.
Should there be no cable and/or plug on the equipment, use suitable absorption material for the working temperature as well, as indicated on the matrix plate. Under no circumstance must the cable reach a temperature above 50^ of the ambient temperature.
Insert in the fixed wiring a mean for disconnection from the supply mains having a contact separation in all poles that provide full disconnection under over-voltage category III conditions, in accordance with the wiring rules. The plug or omnipolar switch must be easily reached on the installed equipment.
This appliance is not intended to be used via an external timer or a remote control system.
The manufacturers decline any responsibility in the event of non-compliance with what is described above and the accident prevention norms not being respected and followed.
To avoid all risk, if the power cable becomes damaged, it must only be replaced by the manufacturer by an authorised service centre, or by a qualified electrician.
CE PRODUIT EST CONC U EXCLUSIVEMENT POUR UN USAGE DOMESTIQUE. LE CONSTRUCTEUR DÉCLINE TOUTE RESPONSABILITÉ DANS LE CAS DE DOMMAGES ET BLESSURES CAUSES PAR UNE INSTALLATION INCORRECTE OU PAR UN USAGE INAPPROPRIÉ, ERRONÉ OU ABSURDE.
Hnctpykunn noJb30BaTeJia
MoHTaK
Bce onepaunn no MOHTaKy (JIeKtpnueckne IIOJKIHOyeHna) JOJKHbI IPOHN3BOIDTBcR TOJBKO KBAJINΦHUNPObAHHBIM NEPCOHAIOM H B COOTBeTCTBHH C CYIecTBYIOHMH HOPMaTHBaMn.
B Pa3JeIe "JIMaMOHTaXHnKa" npHBedeHb BCE IOpO6HOCTM OHTaKa.
IIpImeHeHne
3JIEMEHTbI HATPEBAHnRA TOUCH CONTROL (yipabJIeHHe IIpHKoCHOBehnem) KJIaBnHa JERKOr HaKaTHA
KJIaBNHINJeTKOHOHaKaTHN(HINceHCopbTIIa EMKOCTHBIX DaTCHKOB)IpeJHa3HaueHbI IJI BbIOJIHeHHaJIbOHoIePAuHNpacIOJOKeHbI HaΦPOHTaJIbHOu qAcTHn KApTOUKN,IprHcEM IJI KaJIOH KApTOUKN IIpeJyCMOTpeH COOTBeTCTBYIOHIN JInCIIJe. BbIOJIHeHne JHOBOrJeHCTBnIIOITBepKJaetc 3ByKOBBIM CNHGJOM.
CEHCOPHOE YIIPABJIECHNE (Pnc. 2)
1 BkJIIOUeHHe/BBKJIIOUeHHe— «BKJI/BbIKJb
2 KhoNka «MHHYC» -
3 KhoIIKa «IJIIOC» +
4ДВОИН/ТрОИн KOHTyp
5Bb6OpBaOpHOn30HBi
6ДисплійурOBн MOИHOCTH
7 INHnKaTOp BKJIIOueHENy IBOHHO3OHbI HArpeBa
8 _DCBE HeHHbI cerMeHT HeckoJbKO KOHTypOB
MoHTaK
Bce pa60tbI IO MOHTaKy (IOJIKIOueHne K 9JI. cETn) IOJXHBI IPOBOINTbcKBAJIHΦHIIHPoBAHHbIM IepcoHaJOM B COOTBeTCTBnC DeIeCTBYIOHMN HOPMaMn.
HCTpyKuH NIO MOHTaKy IINHBeIeHbIB COOTBeTCTBYIOIeM pa3JeJ.
BkJIOueHne H BbIKJIIOueHne ceHCOPHO ynpabJeHHa
IocJIe IIOJIKJIOUeHnK 3JIeKTPocetN ceHCOPHoeyIpaBJIeHne HHHuaJIN3HpyeTcI IIpHMepHO B TeueHne 1 c.
Pn BkJIOueHNN BCE HcJIeH N HHINKaTOpbIMnAOT B TeueHne Pnp6JIN3HTeJIbHO OJHOcKyHdbI. IocJIe TORO KAK BCE HcJIeH NHHaTOpbI NORacHyT, dyHKuHN ceHCOPHorOynpabJeHNACTaHyT IOCTUINbIMN DJIHcNOJB3OBAHN.
Дя BKJOUeHnCceHCOPHOrO ynpaBJeHnHaKMITE KHOIIKY BKJOUeHn(1).
HaIINCIIIEAx BapOuHbIX 3OH IIOBHTc8 3HaueHHe 0 .EcJIN KAKaJ-JIb6o H3 BapOuHbIX 3OH TOpraJa, HaIINCIIIEe 6ydyT IOnepMeHHO OTo6paKaTbc8 H 0
CeHCOPHoe ynpaBJIeHHe ocTaeTcA kTHBbIM B TeueHne 20 cekyHn IocJIe BKJIOUeHn. Ecln B TeueHne 3TOrO BpeMeHH He IpONCXoHT BbIbOpa 3OHbI HArpeBaHH, CeHCOPHoe ynpaBJIeHne aBTOMaTHueCKn IepexoINT B peKHM OxNJaHH.
CecncoHoe ynpabJIeHne BKIOUaETc npn HaKaTHN TOJIbKO Ha OdHy KHOIIKY BKJIOUeHHN (1).
EcJH OIOHOpeMeHHO c KHOIIKOI BKJIHOeHHa (1) IPOHN3BOINTcHaKaTHe Ha KaKyIO-JINbO IpYrHyO KHOIIky, ceHCOPHoe yIpaBJeHHe OCTaeTcB peKHMoXKnJaHHa.
BbIKIOueHne ceHCOPHO yIpaBJIeHHn IPOIN3BOJNTcA c HOMOIIbTO TOn KHOIIKN. 2TO MOKHO cJeIaTb TaKe B Tex CJIyuaX, KOrJa yIpaBJIeHne 3a6JIOKInpOBAHO OT JeTeN.
KHOIIKa BKNIOHeHHa (1) HMeET IINpHOpHTeT IIpN BBIKJIIOHeHH.
ABTOMaTHueCKoe BBIKJIOueHHe
IocJe BKJIOueHn ycTpoNCTBa ceHCOPHoeyipabJIeHne aBTOMaTHueCKN BbIKJIOHaeTcyepe3 20 ckyH B cIyuae OTcyTcTBn KaKoJIb6o AKTHBHOCTn IIOJB3OBateJ. Ype3 10cekyHIOcJIe TORO KAK BbIbpaHa BapouHna 3OHa, BblOp 30HbI OTMeHReTcA, a eIe Ype3 10 ckyHd BbIKJIOuHaTeC CeHCOPHo yipabJIeHne.
BkJIIOUeHHe/BbIKJIIOUeHHe BapOuHOI 30HbI
Ipn BkJIOueHHOM ceHCOPHOM ynpaJIeHHMOxHO BbOpaTb JIO6yIO BapOHyIO 3OHyHaXaTHEm KHOKN BbOopa COOTBeCTBYIOseN
3OHb1 (5).
HnHJEn Bb6paHHo30Hb (6) 3aropaetc HJIbHee, a OCTaJIbHbIe HnCIIJeH rachyT.
EcHn 30Ha HarpBaetc,To IooOpeIHO OTo6paKaIOTcHmBOJIbI n 0
HaKHMa KHOIIKN «JIIOC» (3) H «MHHYC» (2), MoKHO BbIbpaTb Heo6xOIMbI ypOBeHb MOIHCTH, H 30Ha HaHT HaIpeBaTbc.
Bb6paB BapOHyIO 30Hy, MoKHO HaCTpOHTb yPOBeHb MOIHOCTn, HaKHMaj KHOIIky
Ipn HacrpoKe yPOBnMoHOCTH IIpn IOMOII KHOIIKN MHHYC> (2) IepBOHaJIbHbIyPOBeHb 6yJeT paBeH 9 (MaKcHMAJIbHbIyPOBeHb). Ecln yIepKNaBaT bTy KHOIIKy HaKaToN, yPOBeHb MOIHOCTH 6yJeT cHJKAtbcra Ha OINKakDbie 0,4 cekyHdbI. YPOBeHb 0 AIBJareTcMHHMaJIbHbIM yPOBHeM MOIHOCTH. DpeRyInpOBaHn yPOBn MoIHOCTH Heo6xOJIMO cHOBA HaKaTaB KHOIIKy IJIIOC> (2) HIN MHHYC> (3).
BbIKJIIOUcHHe BApOuHOI 30HbI
Bb6epHTe 30Hy, KOtopyo Heo6xOHNMO OTKJIOHTb, pH NOMOIN COOTBeTCTBYOIIeN KHOKN (5). DcPiIe Bb6paHHoN 3OHbI (6) 3aROpHTcra CHJIbHee, a OCTaJIbHbIe HcPiJeN IORachyT. Pn OHOBpeMeHHOM HaKaTHN KJIaBNiIN Bb6opa COOTBeTCTBYOIIeN 3OHbI N KJIaBNiIN MInHC(2), yPOBeHb MoIHocTH 3OHbI ycTaHOBHTcra Ha 0. B KaueCTBe aJIbTePHaTHBbI MOKHO HcNOJIb3OBaTB KHOKNY «MInHC» (2), YTObI CHN3HTb yPOBeHb MoIHocTH Do «0».
EcJn KaKaJ-JH60 H3 BapOuHbIX 3OH TOpJyA, Ha IINJIeE 6yIyT IIOIIepMeHHO OTO6paKaTbcJ H n 0
BbIKJIIOueHHe BcEx BaOpHHbIX 30H
HaKaB KHOIIky BKJIIOueHn (1) MoKHo cpa3y BbIKJIOuHTb BCE BapOuHbIe 3oHbI. B peKHe Me OxHJaHHa IINcIIJee BceX rOpYHX BapOuHbIX 3OH oTO6paKaTcR cHMBoJ «H». BCE ocTaJIbHbIe IINcIIJeN 6yIyT OTKJIIOueHbI.
YpOBeHb MoIuHocTH
JIa HAcTpoKn MOIHOCTH BApOuHBIX 3OH IIpeIycMOrpeHbI 9 ypOBHei, KOtOpBie 06o3HaHaOTcra IINΦpaMn O1 1o 9 Ha 7-cerMeHTHBIX CBeToIOHOHBIX INCIIJExx (6).
ABTomaTHueckoe nponapHBaHHe

EcJIN aKTHBnPoBaHO aBTOMaTHueCKoe InpapHBaHHe,MOHOCb 30HbI pHrTOBJIeHHBkIOUeHa Ha 100% B TeueHne nepnoJa,
KOTOPbI 3aBnCT OT CtaHn KNIIeHHA.
IocJe OKOHuaHHBpeMeHH IIpoIIapHbHH BHOBBKJIIOHaETcCTaIHKNIIeHHN.
IpoueJypa HauJa aBTOMaTHueCKOTo IpuapHBaHHa:
BLOK yIpaBJIeHHN BKJIIOHaETcH, H BbIbHpaeTc3OHa IIpHrTOBJIeHH.
YCTAHOBHB yPOBEHb MOIHCHT Ha 9, HAXMNTe KJIABHIy IJIIOC (3).
IocJIe 3TOB TeueHHe 10ceKyHn Heo6xOIMMO BbOpaTb HJXHyIO MOHOCtB HaRpeBaHHc IOMOUIIO KJIaBnM MHVC (2) n IIIOC (3).
EcJH BIOOJIeIcTBHH BBI BBI6epTe IpyroI yPOBeHb MOIHOCTH, fYHKIIINIpeIBaPHTJBHOB BAPKN IIPOJOJkaeT IeNCTBOBaT H IIpHBODNT BpEMIpeIBaPHTJEHOB BAPKN B COOTBeTCTBHe C BBIOpaHHbIM yPOBHem.
30Ha He peryJnpoBaJIocb.
KaKIOe H3MeHHeHc COCTOHH 30HbI IIpH IOMOuHKHOIOK «JIIOC» (3), «MHHYC» (2) IN KHOIKN BKIOUeHHa BOHOB 30HbI HaPBeBa IIpHBODHT K TOMy, YTO IIpeJeJbHoe BpeMa pa6OTbHaUNHaet OTCHTbIBaTbc 3aHOBO.
3aunta or cJyauHoro BKJIOueHn
IIINTEbHOM HaKaTHN HA KHOIky (IOJIbIe 10c) HArpeB 6yIeT aBTOMaTHYeCKN OTKJIIOueH. EcIn Ha ceHCOPHO KNIOKe HaxOITcRA KaKoJnHO IIpeIMet, yCTPOIcTBO N3JaCT 3ByKOBO CHrHaONH6Kn. Ipn 3tOM Ha INCIIee OTO6pa3HTcR KOI OINH6KN «E R 0 3». EcIn 3OHa rOpYAA, Ha INCIIeE 6yDyT IOIIepMeHHO OTO6paKaTbCRA KOI OINH6KN H cHMBOJI «H».
B cIyuae ecIN B TeueHne 20 cekynIIOcJIe BKJIOUeHnCeHCOPHOYnpaBJeHHHe6yJeT aKTHBnPOBaHa HN OHa H3 BapOuHbIX 3OH, IINTa aBTOMaTHueCKN NepeKJIOHTcB peKHM OKNJaHH.
-Прн BKJOUeHHOM ceHCOPHOM ynpaBJeHHN KHOIIKa BKJIOUeHnI HMeET npHOpHTeT HaB CECMH OCTaJIbHBIMN KHOIIKAMN. 3TO IO3BOJIaER TBIKIOUHTb IIINTy B JIO60I MOMENT,ДаЖe BCJIYae OJHOBpeMeHHOTo IJIN DJIHTeJIbHOrO HAkaTHI HeCKOJIbKHX KHOIIOK.
BpeKHMe OxHdAHn npn DInTeJbHOM HaKaTHN KHOIOK He IpoHCXoINT HnKaKHX H3MeHeHn. B JIObOM CJIyuae DIA TOrO YTO6bI CHOBa BKJIOHTb 3JIeKTPOHHoe ynpabJIeHne, y6eINTEcB, YTO6bI HN OJHa KHOIIKA He 6blJa HaKaTa.
Блорвка Конок (Зшта о Лети)
-ФункиязаиntыOTдeTeH:
Блорвka Khoик
IJIa aKTHBaUHH yHKnH 3aIHNTbI OT JeTei IocJIe BKJIIOueHnCeHCOPHO YIIpaBJIeHn Heo6XoJHMo HaKaTb KHOIIKy «MnHyc》 (2) H, yIepKHBaJe ee, HaKaTb KHOIIKy BblOpa BapOuHOr 3OHbI:
JIeByIO BepXHIOIO ->ecJn y IINITbI 3 BapOuHbIE 3OHbI
JIeByIO HnKHHIO ->ecJyIINHTbI 4 BapOuHbIE 3OHbI
Ha Bcex IINCIIIEax OTO6pa3HTcra CHMBOJ L 06O3HaayaoHn 6IOKnpOBky (6IOKnpOBka ot cIyauHoro BKIOueHna).EcJN KaKaJ-1HO 3OHa rOpua, 6yUyt IIOIepMeHHo OTO6paKaTbcra CHMBOJIbI L H H
BpeMa OJHObpeMeHHoro HaKaTHa He IOJIgHo IpeBbIiAtb 10 cekyHd. Ppr 3tOM HeJIb3r HaxHMaTb HnKaKHX KHOIOK, KpOME ONHcAHbIX BbIe. B IpOTHBOM cIJyae NocJIeIOBaTeJIbHOCTb DeIcTBH 6yJeT IpePbaHa H IIHTa He 3a6JIOkNpyETc.
3JIeKtpoHHe yIpaBJIeHne 6yTeT 3a6IOKpOBAHO DaKe Iprn BbIKJIIOUeHHN IIOcJIeDyIOIeM
BKJIOUOeHHN IO MOMeHTa CHIHTH 6JIOKHPOBKN IIIOJIb3OBaTeJIeM. IOBTOpHOe BKJIOUeHHe IINTbI (IOcJIe OTKJIOUeHHN IHTaHH) He CHHMaet 6JIOKHPOBKN yIIpaBJIeHHN.
ChTHe 6JIOKINPOBKN KHOIIOK yIipabJIeHHa
IocJIe BKIOueHnCeHCOPHO yipabJIeHHyHKUNa 3aHTbO TTeN MoKeT 6bITbdeAKTHBPOBaHa. JIg 3TOrO Heo6XoJHMO IIpoJeJaTB Te Je IaH, YTO H JIg 6IoKHpOBKn: HaKaTaB KHOIIKy MmHyc> (2) n,
UyIepKHBaey,HaKaTb KHOIIky BblOpa BapOuHoi 3OHbI:
JIeByIO BepXHIOIO ecJIN y IJNTbI 3 BapOuHbIE 3OHbI
JIeByIO HnKHIIO ->ecJy IIJNTbI 4 BapOuHbIE3OHbI
EcJIN BbIIOJIHrTB BCE OIIepaIINB HUKHOmpaIKe, 6JIOKnpOBKa KJIaBNH 6yJeTcHra, H Touch Control BepHeTcB peKHM OxHdAnH, ecJIN B TeueHne 10 cekyHn He 6yJeT npOH3BeJeHO HNKaKHX OIIepaIIN. B IpOTNBOM cIyae IpoIeCC ChTnE 6JIOKnpOBKn 6yJeT npepBaN KaK He3aBepWeHHbI, 6JIOKnpOBKa OCTaHETcA kTHBHO, n CeHCOPHoe yIpabJIeHne OTKJIOuHTcYpe3 60 cekyHn.
Ipn NocJJeIyOuIeM BKJIIOUeHNN ceHCOPHOYnpaJIeHHN Iprn NOMOUIK HOIIKN BKJIIOUeHHNA Bcex IncJIeEx OTO6pa3HTc8 3HaueHHe 0 , DecrTHuHbIE TOUKN HaHyT MHRaTb, a IIHTa 6yDet rOToBA JIA HcNOJIb3OBaHHN. EclKaKaJa-JIb6o 3OHa rOpqAra, Ha IncJIeE 6yDyT InonepMeHHO OTO6paKaTbc8 3HaueHnn 0 n H
YIIpaBJIeHHe HeCKOJIbKHMN KOHTypamn
KoHΦopKn 6e3 IBOHOrO HJN TpoHOrO KOHTypa. cm.pnc.2A
KoHΦopKa c TpoHoi 3oHoi. (Pnc. 2B)
Ipn aKTHBaIIHH IBOHHO/tpOHIO 3OHbI IIpHrTOBJIeHn 3 KOHTypa BKJIOHuaOTcO,IOHOpeMeHHo. BkJIOueHHe/OTKJIOUeHne KaJIOrO KOHTypa ocYIeCTBJIeTcKHOIIKO4N IIOTBepKJaetcIIOJCBeYeHHBM ceRMHTOM (8).
3BykoBoH cHrHaJI (3yMMep)
Pn HcIOJIb3OBAHHI IINTbI 3BYKOBbIe CHTHaJIbI pa3JaOTcB CJIeIyIOIIHX CJIyuaX:
KpaTKOBpeMeHHoe HaKaTHe KHOIOK - KOPOTKN CHHaJI;
JIHTeJIbHoe HaKaTHe KHOIIKN (6oJee 10 cekyH) — JINHHBn IpepbIBNCTbI CNrHaJI.
Функия таймера
MepbI npceIOctOpOxHocTH (Pnc.3)
-
Mbl coBetyem Bam hCnoJb3ObaTb nocuyc c IIIOCKHM dHOM dIa IprnroTOBJIeHNr IINu C IIMOUIbIO 9JIeMeHTOB HaIpeBaHHr, IprHcEM dHaMeTp Hx DHa DOJIkeH 6bITb paBHbIM IIN HeCKoJIbKO IpEByIIaTb dHaMeTp, yKa3aHHbIH Ha cepnIpaΦHH.
-
CJIeIHTb 3a TeM, YTO6bI KHNIOKCTb He IPOJINBaJIacb Ha IIINTy.
IIO3TOMy yMeHbWHTe MOUHOCTb HaRpeBaHHn IIpH KIIIEHHN HJN IOCJIe TOrO, KaK XIKKOCTb IOCTHIGa HjxHyIO Bam TeMIIepaTypy.
-He octabJrIe BKJIOueHHbIMN 3JIeMeHTbI HaIpeBaHn6e3 HX NCIOJB3OBaHHN IIO Ha3HaueHHIO, H He cTabBTe Ha HNX IIyCTbIE KaCTpOJIN JIO6yIO IOcyDJ.
-
Pn pa3Jome IOBepXHocTH IIHTbI, cJeIyET HeMeJIeHHO OTKJIHOHTb aIIIapaT OT cETN IITaHH BO H36eKaHHe 3JIeKtpNuYeCKOTo IIoka.
-
3aIIpeIIaETcHcIOJIb3OBaTb IIapOBbIe aIIIapATbI JJIy OUHCTKN IOBepXHOCTN IJIHTbI.
-Дань anapat He npeHa3HaeH JIЯ eRO HcIOJB3OBaHHJ JHObMH (BKJIIOyA JeTeH) C OrpaHneHHBMn 6H3NueCKHM, ceHCOPHBIM HJIN YMCTBeHHBMn CIOOCO6HOCTaHm, HJIN TeMH JIiAmH, y KOTO Het IOCTaTOHOrO OIIbTa HJIN 3HaHH, 3a HCKJIIOUeHHem Tex CJlyuAeB, KOTda OTBeTCTBeHHbJ 3a 6e3OJaacHOCTb IPOBepNJ HX DeHCTBnH N BbIaJI HM BCE COOTBeTCTBYIOUHe HHCTpyKUnn PO HcIOJB3OBaHHIO aIipapaTa.
-Heo6xOJHMO CJIeIHTb 3a TEM, YTO6bI JeTn He HrpaJIn C daHHbIM aIIIapaTOM.
Yxoi(Pnc.4)
IIpnIOnaJaHHHa KOHΦOpKn OCTaTKa
aJIOMHHHeBOJ FOJIbTH, OCTaTKOB IIHIIH,
KHPbIX IITeH HIN 6pI3r Jnpa, caxapa HIn OHcAcapCTbIX IPOyKTOB, CJIeIyETHX
HEMeJIeHNO yJaJIHTb C BapOuHOH IOBepxHOCTH
IOCpeIcTBOM CIEUHaJIbHOrO CKpe6Ka BO
H36eKaHHe IAPAaHNNB BApOuHOH IOBepxHOCTH.
IOcJIe 3TOrO IIpOMbITb IOBepxHOCTb
CIIeIIHaJIbHbIM IPOyKTOM C HCIOJIb3OBaHHem
6yMaJHO rIOJOTeHua, 3aTeM CIOJOChyTB
BOIOH N BbICYHNTb YNCTOH TprIOUKOi.
KaterOpHueckn 3aIIpeIaetcra HCIOJIb3OBaTb
abpa3HBHbIe rY6KN HIN IIeTKN, a TaKKe
3aIIpeIaetcra IIOJIb3OBaTbcra arpeccNBbIMN
XHMnueckHMn YNCTRIHMN CpeIcTBaAMN HJIN
IIATHOBBIOJNTeJIAMN.
HnctpykuHH JJIa MoHTaKHNka
MOnTaK
HactoIune HnCTpyKuHN PpeHa3HaueHbI IJIa
HCIOJIb3OBAHHA
B IepHOJ MOHTaKa H IJIa MOHTaXKNKa, 3TO
pYKOBOcTBO IJIa
MOHTaKa, peryJINPOBKn H yXoJa 3a IIINTOn B
COOTBeTcTBHe C
cyIeCTByIOUHMn HopMaTHBaAMn. He 3a6bIBaIte
O TOM, YTO
HEo6xOJIMO OTKJIIOUHTb IJIHTy IJIa BBIOJIHeHHA
KaKHX-JIHO
OIIepaHn.
YctaHOBka (Phc. 5)
1BnCpeEn
2IpeeHnaCTb
JaHbI aIInapaT npedHa3HaueH JIA yCTaHOBKn B COOTBeTcTByUOSei 30He TaK, KaK 3TO yKa3aHo Ha PncyHKe.
OueHbBaJHO IIOIROBHTb JIyYCTaHOBKN BeCb IIepnMetp IOBepxHOCTN C HCIOJIb3OBaHHem BOIOHEIIPOHIIaEMOINJIeHKN, BXOJIeB KOMIIJEKT IOCTABKN.
IocJe yctaHOBKn ycTpoiCTBa HMeetcJIOCTYIK eTo HnKHe NactH, 3aIIHTHyIO IIaHeJIb (IepeBHHyIO HJIN H3 IIOIO6HOrO MaTePnaJa) cJeIyET pacIOJOKHTb Ha paCCTOAHNN, yKa3aHHOM Ha pNCyHKe.
3JIeKtpueeckne noaKJIOueHn
IpeIIOIKJIOUeHHeM K cETH IHTAHN, y6eITecb B TOM, YTO:
-XapaKTePnCTHKn yCTaHOBKn COBIIaIaOT c XapaKTePnCTHkAmN, IIpNBeJIeHHbIMN Ha ycTaHOBOUHOI IJIacTHHe, HAXOJaIeIcRHa IHe INaHEJIN DJIa BapKn;
-Дя yctaHOBKN IpeIyCMOTpeH NOCTaTOHOMOIIHOE 3a3eMJIeHNe, B COOTBeTCTBnC HOpMaTHBaMH N Tpe6oBAHHm DeIcTBYIOIero 3aKOHODaTeJIbCTBa. 3a3eMJIeHne IpeIyCMOTpeHO B yCTaHOBJIeHHbIX HOpMaTHBaX.
B Tom CJiyue, ecJIN JIA annapaTa He
IpeDyCMOTpeH IHHp-HJIN PO3eTKA BKIOUeHn, Heo6XoIMHO HCIOJIb3OBaTb MaTePnaJI, IIpiROJHBiI JJIa 3HaueHN 3JIeKTPnueCKOTo TOKa, IIpiBHeEHbIX Ha yCTaHOBOuHOH IIJaCTHne C xapaKTepnCTHKaMn, H JIAaHHo paOoye TeMIIEpaTypbI. 3aIIpeIIaetcH NcIOJB3OBaTb IIHyp B cJyuae erO IIpeIpeBaHnH IIpy IIpeBbIeHN 50°C TeMIIEpaTybI OKpykaIOUeI cpebl. IIOIKIIOHTe K cTAIHNOHApHOH 3JIeKTPoIIPOBOJKe 3aIHTHoe ycTPOIcTB OTKJIIOUeHNr OT IIHTaIOUeI ceTN C IOJIHBIM pa3pbIBOM IeHN, YTO6bI ObecIIeHTb IOJIHOE OTKJIIOUeHNr OT 3JIeKTPoCHA6KeHNr IIpy IIpeBbIeHNr HOMHHaJaHaIIpyKeHNr CeTN COJIacHO Tpe6OBaHHM KJIACCA III N B COOTBeTCTBHN C Tpe6OBaHHM IIpaBnI yCTPOIcTB aJIeKTPoYcTaHOBOk. Po3ETKa HJIN MHOroIOJIIOCHbI INePEKJIIOUaTeJIb DOJIXHbI 6bITb IIpoCTbI N DOCTYINbI IJIra IOIKJIIOUeHNr YCTAHOBJIeHHORO aIInapaTa. DaHHOE ycTPOIcTB O He IIpeJHa3HaueHo DJIa HcIOJOIB3OBaHHN C BHEIHHM TaIMepOM HJIN C IIyJBtOM dNCTAHUHOHHORO yIPpaBJieHNr. KOHCtpyKTop cHImaeT c ce6r BCIO OTBEcTBeHHOCb TB TOM cIJyae, ecJIN BCE BBIIweyKa3aAHhIE Tpe6OBaHHN r O6bIyHbIe HopMbI IIpeIOCTOpOJXHOCTH He 6ydyT CO6JIIODeHbI.
B cIyue noBpeKJHeHHn Hhpya nHTaHn, o6paHTecb K fapnKaHTy IJI eTO 3ameHbI, HJN o6paHTecb B yIOJHOMOeHHbI IeHTp TexHHuecko IIOMOuH, HJN JKe o6paHTecb K TexHHueckomy CNEIHnAJIHCTy JIO60rO IeHTpa C IOIOOBHbIMN IOJHOMOHNM, IJIa IIpeIoTbPaIeHHN BO3HHKHOBeHHN JIO60rO BnDa pncOB.

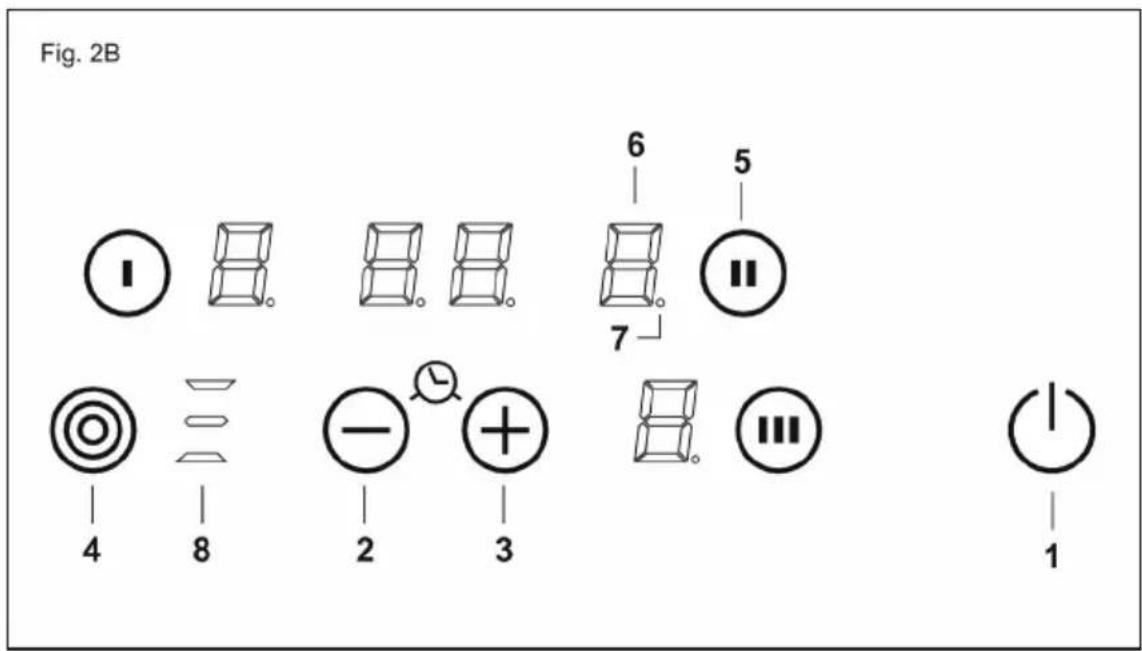
Fig.2 - Abb.2 - Afb. 2 - Pinc. 2 - Rys. 2 - Kuva 2. - 图2-2. abra - Euk. 2.
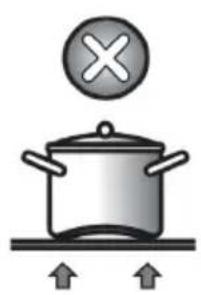

Fig.3 - Abb.3 - Afb.3 - Pnc.3 Rys.3-Kuva 3.-图3-3.abra-Euk.3.

Fig.4 - Abb.4 - Afb.4 - Pinc.4 - Rys.4 - Kuva 4. - 图4-4.ábra-E1K.4.
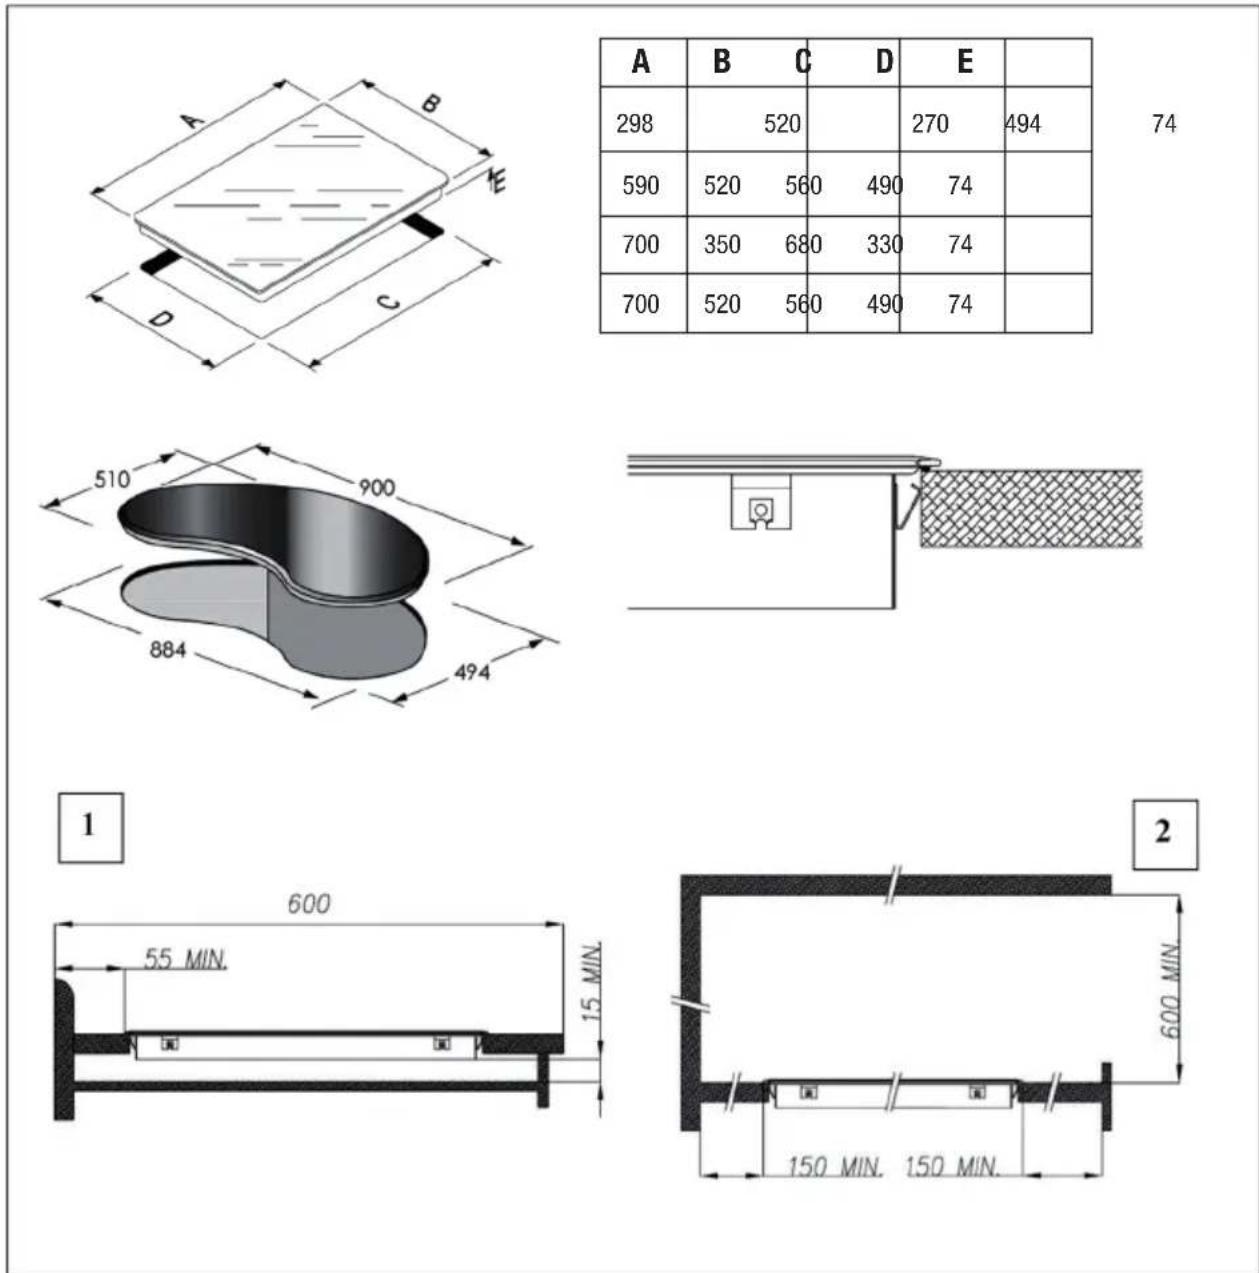
Fig.5 - Abb.5 - Afb. 5 - Pinc. 5 - Rys. 5 - Kuva 5. - 图5-5. abra - Euk. 5.
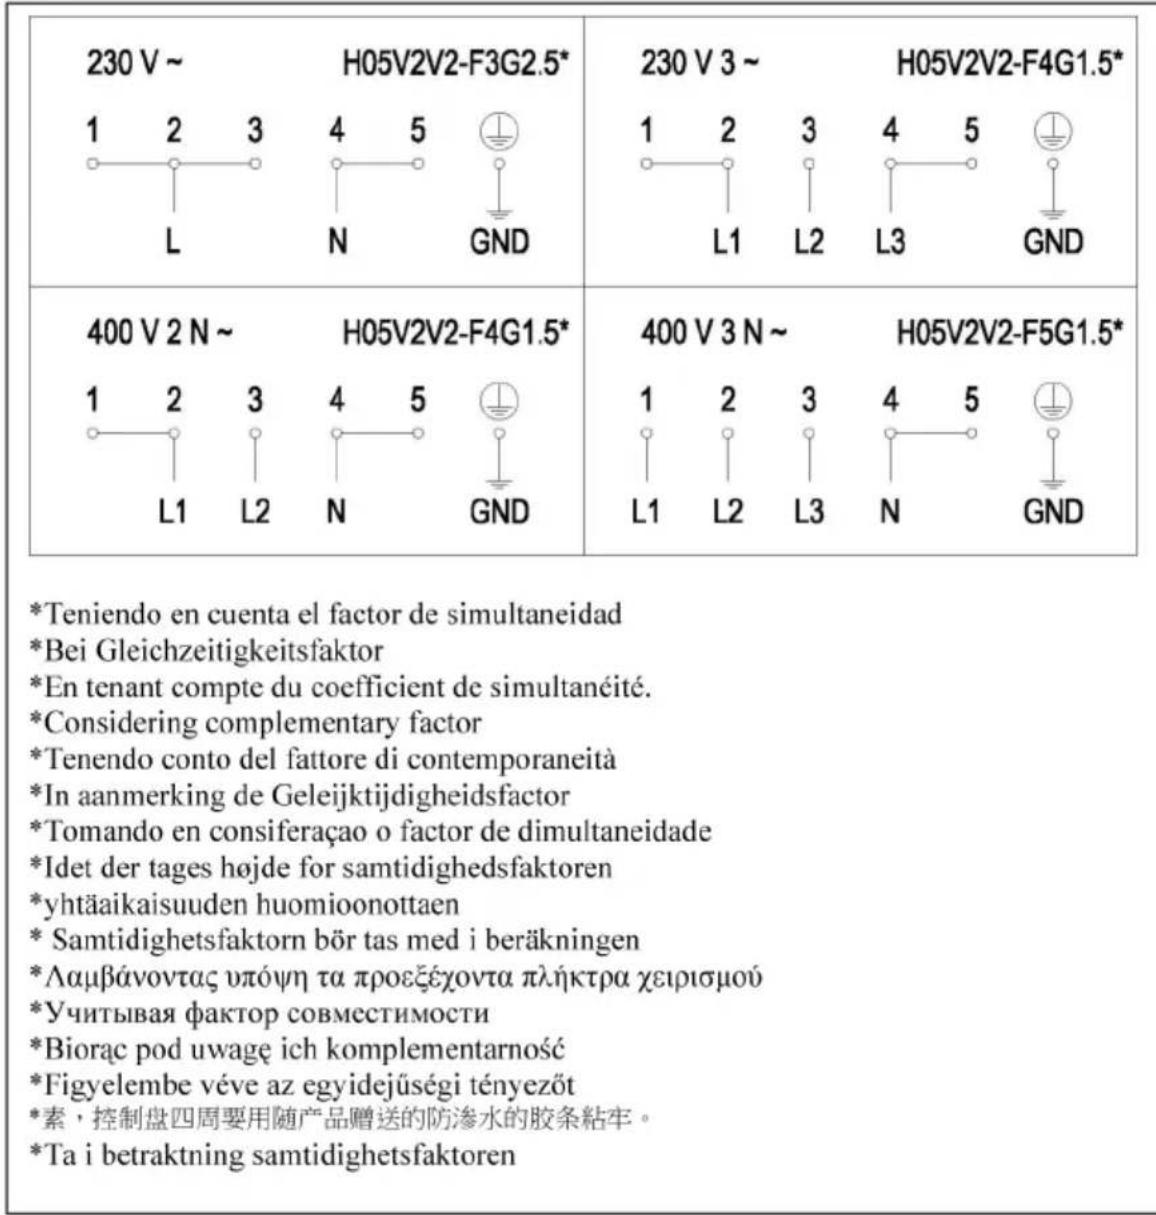
Fig.6 - Abb.6 - Afb.6 - Pinc.6 - Rys.6 - Kuva 6. - 图6-6. abra - Eik. 6.

CNA
CATA ELECTRODOMÉSTICOS, S.L.
C.Ter, 2 - 08570 TORELLO (Barcelona) SPAIN
Tel. +34 938 594 100 - Fax +34 938 594 101
www.cnagroup.es - e-mail: cna@cnagroup.es


- User's Instructions
- Installation
- Use
- TOUCH CONTROL (Fig. 2)
- Switching the Touch Control on/off
- Automatic off
- Switching a cooking zone on/off
- Switching a cooking zone off
- Switching all cooking zones off
- Setting level
- Automatic Parboiling
- Keep Warm Function
- Residual heat indicator
- Automatic off function (operating time limitation)
- Protection against unintended switching on
- Button lock (child safety feature)
- - Child safety feature:
- Button lock:
- Cancelling the button lock:
- Control of multiple circuits
- Sound signal (buzzer)
- Timer function (optional)
- Timer as minute minder (stand-alone):
- Timer programming on cooking zones
- Precautions (Fig. 3)
- Maintenance (Fig. 4)
- Installer's Instructions
- Positioning (Fig. 5)
- Electrical connection
- Hnctpykunn noJb30BaTeJia
- MoHTaK
- IIpImeHeHne
- 3JIEMEHTbI HATPEBAHnRA TOUCH CONTROL (yipabJIeHHe IIpHKoCHOBehnem) KJIaBnHa JERKOr HaKaTHA
- CEHCOPHOE YIIPABJIECHNE (Pnc. 2)
- BkJIOueHne H BbIKJIIOueHne ceHCOPHO ynpabJeHHa
- ABTOMaTHueCKoe BBIKJIOueHHe
- BkJIIOUeHHe/BbIKJIIOUeHHe BapOuHOI 30HbI
- BbIKJIIOUcHHe BApOuHOI 30HbI
- BbIKJIIOueHHe BcEx BaOpHHbIX 30H
- YpOBeHb MoIuHocTH
- ABTomaTHueckoe nponapHBaHHe
- IpoueJypa HauJa aBTOMaTHueCKOTo IpuapHBaHHa:
- 3aunta or cJyauHoro BKJIOueHn
- Блорвка Конок (Зшта о Лети)
- -ФункиязаиntыOTдeTeH:
- Блорвka Khoик
- ChTHe 6JIOKINPOBKN KHOIIOK yIipabJIeHHa
- YIIpaBJIeHHe HeCKOJIbKHMN KOHTypamn
- 3BykoBoH cHrHaJI (3yMMep)
- Функия таймера
- MepbI npceIOctOpOxHocTH (Pnc.3)
- Yxoi(Pnc.4)
- HnctpykuHH JJIa MoHTaKHNka
- MOnTaK
- YctaHOBka (Phc. 5)
- 3JIeKtpueeckne noaKJIOueHn
Brand : NODOR
Model : RT 36
Category : Cooker