NorCook IH N9205 BK - Cooker NODOR - Free user manual and instructions
Find the device manual for free NorCook IH N9205 BK NODOR in PDF.

User questions about NorCook IH N9205 BK NODOR
0 question about this device. Answer the ones you know or ask your own.
Ask a new question about this device
Download the instructions for your Cooker in PDF format for free! Find your manual NorCook IH N9205 BK - NODOR and take your electronic device back in hand. On this page are published all the documents necessary for the use of your device. NorCook IH N9205 BK by NODOR.
USER MANUAL NorCook IH N9205 BK NODOR
text_image
NODOR always innovating ES MANUAL DE INSTRUCCIONES EN INSTRUCTIONS FOR USE FR MANUEL D'UTILISATION PT MANUAL DE INSTRUÇÕES DE GEBRAUCHSANWEISUNGNorCook IH N8205 BK
NorCook IH N9205 BK
natural_image
Illustration of a hand using a paintbrush to brush residue in liquid (no text or symbols)(F4)

text_image
min.15 mm min.2 mm min.2 mm min.5mm Cajón Drawer Armario Cabinet min.20mm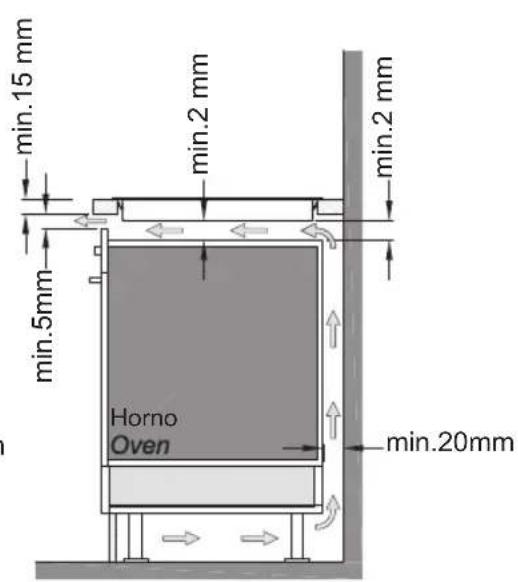
text_image
min.15 mm min.2 mm min.2 mm min.5mm Horno Oven min.20mm(F5)
text_image
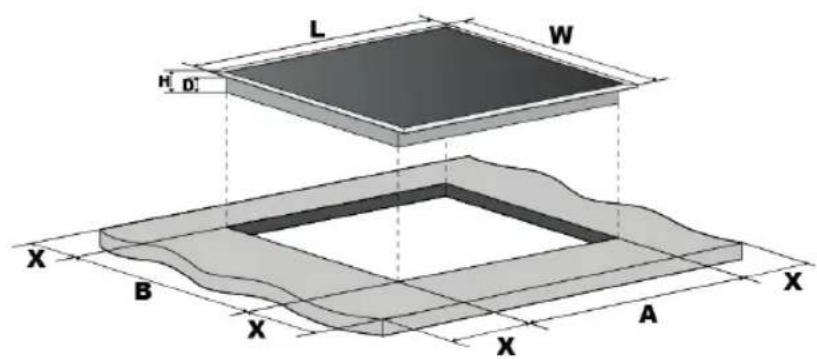
L W H D' X B X A X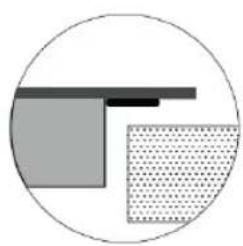
natural_image
Abstract geometric diagram with two shaded regions inside a circle (no text or symbols)| Model | L (mm) | W (mm) | H (mm) | D (mm) | A (mm) | B (mm) | X (mm) |
| NorCook IH N8205 BK | 810 | 520 | 55 | 50 | 795 | 503 | 50 min |
| NorCook IH N9205 SW | 930 | 908 |
(F6)
natural_image
Pure technical diagram showing two connected components with a wavy line indicating a detail (no text or symbols)(F7)
| PLT | ||
| 1/1,5 10 | 0,8 | |
| 2/2,5 5 | 2,4 | |
| 3/3,5 5 | 3,8 | |
| 4/4,5 4 | 5,2 | |
| 5/5,5 3 | 6,8 | |
| 6/6,5 2 | 2 | |
| 7/7,5 2 | 2,8 | |
| 8/8,5 2 | 3,6 | |
| 9 1 - | ||
| P1 16min - | ||
| P2 16min - | ||
 | 2 | - |
 | 2 | - |
 | 2 | - |
(F8)

text_image
R S - + U4 00000 00000 01 00000 00000 - + T U(F9)

text_image
230 V ~ H05V2V2-F3G4* 1 2 3 L 4 5 N GND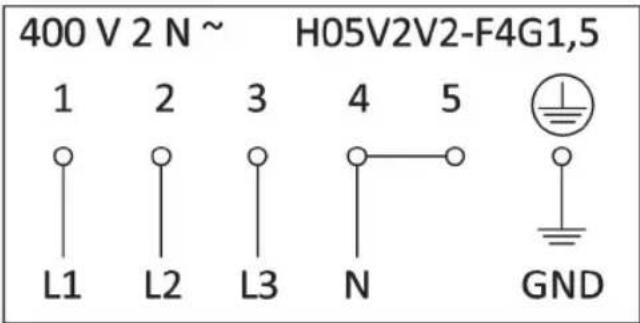
text_image
400 V 2 N ~ H05V2V2-F4G1,5 1 2 3 4 5 L1 L2 L3 N GND(F10)
*Considering complementary factor.
THIS APPLIANCE IS CON- CEIVED FOR DOMESTIC USE ONLY. THE MANUFACTURER SHALL NOT IN ANY WAY BE HELD RESPONSIBLE FOR WHATEVER INJURIES OR DAMAGES ARE CAUSED BY INCORRECT INSTALLATION OR BY UNSUITABLE, WRONG OR ABSURD USE.
The manufacturer declares that this product meets all the essential requirements for low voltage electrical material set out in European directive 2014/35/EU and for electromagnetic compatibility as required by European directive 2014/30/EU.
PRECAUTIONS
- When the hob is in use keep all magnetizable objects away (credit cards, floppy disks, calculators and so on).
- Do not use any aluminium foil or place any foodstuffs wrapped in aluminium foil directly on the hob.
- Do not place any metal objects such as knives, forks, spoons and lids on the hob surface as they will heat up.
- When cooking in a non-stick pan without seasoning, do
not exceed 1-2 minutes' pre-heating time.
- When cooking food that may easily stick, start at a low power output level and then slowly increase while regularly stirring.
- After cooking is finished, switch off using the key provided (turn down to "0"), and do not rely on the pan sensor.
- If the surface of the hob is cracked, immediately disconnect the appliance from the mains to prevent the possibility of electric shock.
- Never use a steam cleaner to clean the hob.
- The appliance and accessible parts may be hot during operation.
- Take care to avoid touching the heating elements.
- Children less than 8 years of age should be kept at a safe distance unless continuously supervised.
- This appliance may be used by children aged 8 or over and by persons with reduced physical, sensory or mental capabi-
lities or lack of experience and knowledge, if they are supervised and have received suitable instructions on safe use of the appliance and understand the dangers involved. Children must not play with the appliance. User maintenance and cleaning should not be carried out by children except under constant supervision.
- Cooking with grease or oil may be dangerous and cause a fire if left unattended. NEVER try to extinguish a fire with water. Rather, disconnect the appliance and then cover the flames with a cover or fire blanket, for example.
- The cooking process has to be supervised. A short term cooking process has to be supervised continuously.
- Unattended cooking on a hob with fat or oil can be dangerous and may result in a fire.
- Fire hazard: do not store elements on cooking surfaces.
- Only countertop protectors designed for use with the co-oking appliance and listed in the manufacturer's instructions should be used as suitable protection for the countertop
incorporated in the appliance. Use of unsuitable protectors may cause accidents.
- Do not place or drop heavy objects on your hob.
- Do not use cookware with jagged edges. Do not drag cookware across the induction glass surface as this can scratch the glass.
- Do not heat up tins made of ferromagnetic material. Closed tins can explode when they are heated up. Open tins can overheat because the hob temperature control is not adapted to this kind of co-okware.
- Place the cookware directly on the glass surface. Do not put anything in the middle (paper, cloth, place mats, etc.) as they could get burnt.
- Persons with cardiac pacemakers or other electrical implants (such insulin pumps) must consult with their doctor or implant manufacturer before using this appliance to make sure that their implants will not be affected by the electromagnetic field.
- WARNING: Accessible parts will become hot when in use.
To avoid burns and scalds children should be kept away.
- Insert in the fixed wiring a mean for disconnection from the supply mains having a contact separation in all poles that provide full disconnection under overvoltage category III conditions, in accordance with the wiring rules. The plug or omnipolar switch must be easily reached on the installed equipment.
- This appliance is not intended to be used via an external timer or a remote control system.
- The manufacturers decline any responsibility in the event of non-compliance with what is described above and the accident prevention norms not being respected and followed.
- To avoid all risk, if the power cable becomes damaged, it must only be replaced by the manufacturer, by an authorised service centre, or by a qualified electrician.
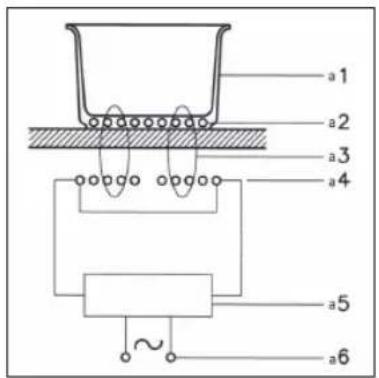
A Word on Induction Cooking (F1)
- a1 Cookware
- a2 Induced current
- a3 Magnetic field
- a4 Inductor
- a5 Electronic circuit
- a6 Electric power supply
Induction cooking is a safe, advanced, efficient, and economical cooking technology. It works by electromagnetic vibrations generating heat directly in the cookware, rather than indirectly through heating the glass surface. The glass becomes hot only because the cookware eventually warms it up.
Induction cooking has the following characteristics.
- Minimal dispersion (high performance)
- Removing (or lifting) the cookware from the hob automatically stops the cooking zone.
- The electronic system permits flexibility and precision control.
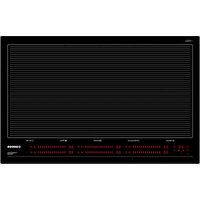
Product Overview
This full induction hob does not have any fixed cooking areas. You may place the cookware anywhere within the marked area, while taking into account the following:
- You can use up to 6 pieces of cookware at once, no matter what shape they are.
- The recommended distance between the bases of the cookware is of at least 5cm so that the system is able to differentiate them clearly.
User's Instructions (Fig.2)
1 ON/OFF
2 Slider
3 Pause
4 Keylock
5 Setting level and timer display
6 Stand-alone Timer
7 Booster
8 Cooking functions
9 Conflict display
10 Stand-alone Timer display
11 BBQ function / Grill function
12 Settings
13 Chef function
Installation
All operations relative to installation (electric connection) should be carried out by skilled personnel in conformity with the rules in force. As for the specific instructions see part pertaining to installer.
Switching the Touch Control ON/OFF
After mains voltage is applied the control initializes for approx. 5 seconds before it is ready for operation. After a reset all displays and LEDs glow for approx. 2 seconds. When this time is over all displays and LEDs extinguish and the control is in the stand-by mode.
Press the ON/OFF (1) button to switch the touch control on. An acoustic signal will be emitted, and a light sequence will turn on. Then, the hob is ready to be used.
If a cooking zone is in the "hot" status, the display (5) shows a static "H". After switching-ON the electronic control remains activated for 30 seconds. If no cooking zone or timer selection follows within this period of time, the electronic control automatically switches back into the stand-by-mode. The control can only be switched-ON if it identifies the ON/OFF key (1) alone being operated. Should it recognize key activation other than that, the control remains in the standby-mode.
If the child safety feature is active when switching on, all cooking zones (5) show "L", (LOCKED). If the cooking zones are in a "hot" status, the display (5) shows "L" and "H" in alternation. When the Touch Control is ON it can be switched-OFF at any time by operating the ON/OFF key (1). An acoustic signal will be emitted, and the hob will go in to standby mode. This is also valid if the control has been locked (activated child safety feature). The ON/OFF key has always priority in the switch-OFF function (1).
Functionality Slider TC
The touch control comprises touch displays that light up according to the following criteria:
· The keys of the functions available light up with low intensity.
· The key selected lights up with a higher intensity.
- The keys for functions that are not available remain unlit.
Slider (2): sensor technology of Slider TC allows an adjustment of the cooking levels (1 - 9) as the timer value (1-99) by touching and pulling the finger over the designated area. Pulling to the right is increasing and to the left is decreasing accordant value. Moreover, a direct selection of the designated value is also possible on the slider area.
Nsense: Automatic cookware detection
Place a suitable piece of cookware on the hob. Depending on its position, the designated slider (2) will automatically be activated. Select the power level by sliding your finger over the control (2).
If you lift the cookware, the display (5) will show the symbol for 10 seconds. If you do not put the cookware back after this time, the slider will switch off.
If you place a piece of cookware that is too small or made of unsuitable material, the slider (2) and the display (5) will not be activated.
If an error occurs when detecting the cookware (e.g. a large pan is detected as two pots during the hob ignition), lift the cookware for more than 2 seconds and place it back on the hob.
Nprecise: Power levels
Up to 17 different power levels can be selected for each piece of cookware (from 1 to 9, with increments of 0.5). The selected value will be shown on the display (5) to the left of the designated slider. To stop cooking, select power level 0 on the slider (2) designated to the cookware.
Power management
This function is designed to avoid overloading the system with excessive power demand. If high outputs have been selected for two pieces of cookware placed close to one another, the output of the piece of cookware that was placed first will automatically be reduced if necessary. The designated
display (5) will flash for 3 seconds before switching to a lower power. During these 3 seconds you can select a lower power for the other piece of cookware if you wish. Otherwise, the power supply for the first piece of cookware will automatically be reduced.
Nheat: Residual heat indicator
This safety function serves to identify areas of the glass that have a temperature above 65^ , which could cause burns if touched.
The display (5) designated to the hot area displays the letter "H" whether the hob is switched on or off. If cooking is in progress, then the display (5) designated to the cookware will only show the selected power level.
Nfollowme: Power transfer
This function allows you to change move cookware without having to select its power level again. When you move a piece of cookware, the system will recognise the movement, cancel the slider (2) of the previous position and activate the control (2) designated to the new position, preserving the parameters it had in the previous position (power, timer).
The position must be changed in less than 10 seconds. If more than 10 seconds pass between you lifting the cookware and putting it back, the parameters will be eliminated from the memory and the cookware's control (2) will be switched off.
Only one action can be performed on one piece of cookware at once. Performing simultaneous actions on more than one piece of cookware (add, move) can make it difficult for the control to identify them correctly. Simultaneous actions are those carried out with a time difference of less than 2 seconds. However, removing more than one piece of cookware from the hob at once is not a problem.
In the settings menu (code U6) you can customise the confirmation of the parameters in the new position. If confirmation is required, the cookware will not receive any power until you press the (flashing) slider (2) to confirm. If after 15 seconds it has not been pressed, then the power will automatically drop to 0.
Nboost+: Booster function
The Booster function allows the power supplied to the cookware to be increased above its nominal value for 10 minutes. Once this time has passed, the power will automatically decrease to level 9. This function is designed to heat or boil large amounts of water in a short time.
Due to its high power, the Booster function should only be used when cooking with water. Oil or fat could cause burns.
To activate this function, press the key (7) designated to the desired cookware. Pressing once will activate the first Booster level and P1 will appear on the display (5). Pressing twice will activate the second Booster level (which is more powerful) and P2 will appear on the display (5).
To cancel this function, select any other power level on the slider (2).
Ncook: Cooking Functions
This hob has 3 predefined cooking modes that keep the cookware temperature constant:
| Mode Temperature (°C) Taps Symbol | |||
| Melt/Defrost 44 1 |  | ||
| Keep hot 70 2 |  | ||
| Slow cook 94 3 |  |
To activate them, press the key (8) designated to the desired cookware. Press it once, twice or three times depending which function you wish to activate. The display (5) will light up with the symbol designated to the selected function.
To cancel this function, press key (8) several times until the power level display (5) designated to the hob shows 0. Or, select a new power level on the slider (2).
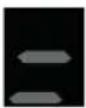
Nbbq: Grilling
To activate this function, first press key (11). Then select the cookware you want to use this function with by pressing the designated slider (2). Two horizontal bars will light up on the left side of the display (5) to indicate that this function is active. Finally, use the slider (2) to select the desired power level for the grill function. The remaining cooking functions designated to the hob cannot be selected, but it is possible to program a timer.
To cancel this function, press key (11) and then select the corresponding slider (2). If level 0 is selected on the slider (2), it will also be cancelled.
Nfastup: Automatic heating (F8)
This function heats the cookware using its full power (intensive cooking) for a preset period of time (T) and then automatically reduces the power to the level (P) initially selected (continuous cooking).
See the values of the F8 chart, where:
P is the selected power level for continuous cooking.
T is the duration of intense cooking, in minutes.
To activate this function, select the power level for continuous cooking on the slider (2) and hold it down for 3 seconds.
-During the warm up period, the corresponding display (5) will show an "A" alternately with the selected power level.
-While this function is active, you can select a higher power level without the function being cancelled.
-Once the warm up period is finished, an acoustic signal will be emitted, and the power will be reduced to the level initially selected.
-With this function activated, if the cookware is placed in another position, the function must be validated for the new position within 15 seconds by pressing anywhere on the slider (2).
To cancel this function, select a lower power level.
Nchef: Three power zones
This function divides the entire hob surface into 3 rectangular areas, each with a different power level:
Left zone: level 3 (keep hot, poach vegetables)
Centre: level 6 (cook at medium heat)
Right zone: level 9 (boil, seal meat)
This allows you to change the heating level of each piece of cookware by moving it from one zone to another, without having to change the power level in the control area.
The sliders (2) and timers (5) are then disabled.
To activate this function, press key (13). The displays (5) will show the power level allocated to each zone (3-6-9). You can program the maximum duration of this function with key (6). Once the timer has ended, the Nchef function is cancelled.
To cancel this function, press key (13). All power levels will return to 0.
Nlock: Control block
This function allows the control keys to be blocked when the hob is in use. It is particularly useful for cleaning the hob, as it prevents any keys being pressed accidentally.
To activate this function, press the lock key (4) with the hob turned on. All of the keys will remain disabled except the lock key (4) and the on/off key (1).
The block will remain operational even if the hob is turned off and on again. None of the tasks in progress when the block is activated will be modified or cancelled. A power disruption of more than 10 seconds would terminate this function, as it would no longer be active when the hob is switched on again.
To cancel this function, press and hold the lock key (4) for 3 seconds.
Nchild: Child lock
This function protects the hob from unintended use (by children, for example).
When activated, the control keys remain hidden even when the hob is switched on.
The lock will remain operational even if you switch the hob off and on again. A power disruption will not cancel this function either. It can only be deactivated manually.
With this function enabled, when you switch the hob on, the displays (5) show an "L" and you cannot do anything. Only the On/Off key (1) remains active.
This function cannot be activated or cancelled if the Nlock function (4) is active.
To activate this function, press the lock key (5) for 3 seconds, with the hob switched on. Then slide your finger on the slider (2) in the direction shown by the light sequence (from left to right) and at the same speed.
This must be done within 10 seconds, otherwise the hob will switch off.
If this process is not carried out correctly, you must switch the hob off and on again to repeat the activation process
To cancel this function, press any of the displays (5) for 3 seconds with the hob switched on. Then slide your finger on the slider (2) in the direction shown by the light sequence (from right to left) and at the same speed. You can now use the hob as usual.
Npause: Cooking pause
This function "freezes" the hob for up to 10 minutes. It is particularly useful if you cannot tend to your
cooking for a short period of time. All cookware will stop receiving power and all timers and alarms are stopped, just for the duration of the pause.
To activate this function, press key (3) for at least 1 second. All of the keys will remain disabled except the lock key (4) and the On/Off key (1).
To cancel this function, press key (3) for at least 1 second. The pause icon will flash. Then, press any other key within 10 seconds, otherwise the hob will switch off. All cooking processes will be resumed at the same point they were when the pause function was activated. The cookware will be reheated to the same power level and the timers will be reactivated. Only the Nboost+ and Nfastup functions are cancelled after the pause.
Nlimit: Operating time limitation (F8)
This safety function turns the heat off if an unusually long period of time has passed since the control was last used. This time (L) depends on the selected power level (P).
See values in the F8 chart, where:
P is the selected power level.
L is the maximum operating time, in hours.
Each new action on the control of the cookware restarts the countdown to this time limit.
Nkey: Protects from continuous key pressing
This safety function is intended to protect the hob from prolonged and unintentional key pressing. Pressing any key for more than 10 seconds will activate the error message "Er03" on the display (10) and turn off the control.
When the key is no longer being pressed, this error message will disappear, and the control can be turned on again.
Note: Liquid spilled on the control area will not always activate this function.
Ntime: Timer for cookware
This function allows you to automatically programme the end of the cooking time for a piece of cookware. Each piece of cookware has its own stand-alone timer. Several timers for several pieces of cookware can be running at once. You can select the time you require within a range of 1 to 99 minutes. The remaining time is shown on the display (5) alternately with the power level.
To activate this function, the cookware must be in use (power > 0). Press the display (5) designated to the piece of cookware and select the time using the slider (2). First you must select the units and then the tens. In each case, the value will automatically be set 2 seconds after the last time it was touched. The countdown begins and the selected time value is shown on the display (5) for 5 seconds and then the power value is shown again. The remaining time will be shown on the display (5) every 25 seconds for 5 seconds. For each piece of cookware with an active timer, an LED lights up next to the display (5). To change an active timer, press key (5).
When the timer reaches its last minute, the remaining seconds are shown on the display (5).
If the timer is set to 0, then it will be cancelled without interrupting the cooking process.
When the timer ends, the display (5) flashes 00 and an acoustic signal is emitted. The end of the timer will be confirmed, and the acoustic signal can be stopped by pressing any key, or after 2 minutes.
To cancel this function, press and hold key (5) for 2 seconds.
Stopping a piece of cookware's cooking process will also cancel the designated timer.
Nwarn: Reminder
This function allows you to set a reminder that will sound at the end of the time set. This does not impact any cooking processes that are underway, it is only an acoustic signal. You can select the time you require within a range of 1 to 99 minutes.
To activate this function, press key (6) and select the time using the slider (2) on the front left side. First you must select the units and then the tens. In each case, the value will automatically be set 2 seconds after the last time it was touched. The time selected is shown on the display (10) and the countdown begins. When it reaches its last minute, the remaining seconds are shown on the display (10). To change the reminder time press key (6).
When the timer for the reminder ends, the display (10) flashes 00 and an acoustic signal is emitted. The end of the timer will be confirmed, and the acoustic signal can be stopped by pressing any key, or after 2 minutes.
To cancel this function, press and hold key (6) for 2 seconds.
Conflicting positioning of cookware
There are 3 types of conflicts:
1. Power conflict
This induction hob comprises 12 inductors. A conflict arises when several pieces of cookware with different power requirements are placed on the same inductor.
Symbol (9) and the display (5) are allocated to the piece of cookware with the highest power level flash for 8 seconds.
To resolve the conflict, perform one of the following actions within 8 seconds:
- Move one of the pieces of cookware.
- Reduce the power level of the piece of cookware with the highest power level.
- Remove or turn off one of pieces of cookware.
If no action is taken, after 8 seconds the highest power level will automatically decrease.
Once solved, symbol (9) turns off and the display (5) remains in place.
2. Positioning conflict
This occurs when the system is not able to determine the exact position of a piece of cookware.
An acoustic signal is emitted. Symbol (9) flashes. A light sequence begins (from the centre to the ends) on the slider (2) of the piece of cookware that has caused the conflict.
To resolve the conflict, perform one of the following actions:
-If the piece of cookware was already on the hob before pressing the ON/OFF key (1), then lift it for 2 seconds and put it back.
-Move the cookware.
-Remove the cookware.
Once solved, symbol (9) turns off and the display (5) and slider (2) remain in place. All the initial parameters (power level, timer) are restored.
3. Allocation conflict
Each piece of cookware can only have one unique control element. Likewise, each control element can only be assigned to one piece of cookware.
This conflict occurs when you add a new piece of cookware and the system cannot assign a control element to it, as there are none available for this new position.
An acoustic signal is emitted. Symbol (9) flashes. A light sequence begins (from the centre to the ends) on the slider (2) of the piece of cookware that has caused the conflict.
To resolve the conflict, perform one of the following actions:
-If the piece of cookware was already on the hob before pressing the ON/OFF key (1), then lift it for 2 seconds and put it back.
-Move the cookware to another position that has a free control element.
-Remove the cookware.
Nmemory: Recovery of settings
This function allows you to recover the power levels and timer settings if the hob is accidentally switched off. Within 6 seconds of switching the hob off, all the previous settings (power levels, timers, etc.) can be automatically restored.
To activate this function, press the on/off key (1) within 6 seconds of turning the hob off. The pause key (3) will start flashing. Press it and all settings prior to shut down will be restored.
Npower: Full power limitation
The appliance features a function that allows the maximum power level to be limited internally.
The power limit can be chosen from 41 values starting at 2kW. To activate this function, read code U8 on the "Settings Menu". By default the hob comes factory configured with no power limit.
When the required power is higher than this limit, the display (5) will flash for one of the pieces of cookware and its power level will automatically be reduced. The system maintains the power of the last piece of cookware selected.
Nprotect: Empty Cookware Protection
This function restricts the maximum temperature the cookware can reach to prevent it from being damaged, especially if it is are empty. It works well with most cookware, although the reliability of this protection decreases with cookware that has concavities in its base.
Cookware
Size of the cookware
Round cookware: Preferably, the diameter of the base should be between 145mm and 350mm. If the diameter is between 100mm and 145mm, the cookware will not be detected in all positions. If this occurs, move the cookware approximately 10cm to a new position.
- Oval/rectangular cookware: The base must be smaller than 380x320mm
Choosing the right cookware (F3)
- Preferably use cookware indicated as being suitable for induction cooking.
- A magnet-attracting cookware may be suitable for induction cooking.
- Stainless steel cookware with multi-layer or ferritic stainless-steel bases if the base indicates: for induction cooking.
- If cast iron cookware is used, it should preferably have an enamel bottom to avoid scratching the ceramic hob surface.
- The following types of cookware are not suitable: glass, ceramic, earthenware, aluminium, copper or non-magnetic (austenitic) stainless steel.
- Flat and thick-bottomed cookware.
- A cookware with the same diameter as the cooking zone ensures the maximum power is used.
- A smaller cookware reduces the power but will not lead to energy loss.
- The quality of the cookware plays a major role in the cooking efficiency.
- Induction cooking can cause some noises, for example, screeching, whistling and buzzing. The
cookware can also have a significant impact on the noise level. Should any disturbing noises occur, please consider these suggestions:
- Change the position of the cookware slightly.
- Make sure that there are no foreign bodies between the ceramic hob and the bottom of the cookware (grains of salt, for example).
- Make sure that the lids of the cookware cannot vibrate.
- Try using other cookware. Cookware with a composite base is more likely to cause noise.
Settings menu (F9)
This menu allows you to customise certain functions.
To access the settings menu, press the on/off key (1) to switch the hob on. Then press and hold the settings key (12) for at least 1 second. The control on the right-hand side will light up the settings menu.
The setting parameter code is shown in the display (R) on the top row. Select the desired parameter using the upper slider (S).
The parameter value is shown in the display (T) on the bottom row. To modify it, you must use the lower slider (U).
To discard the changes and leave the settings menu, press the settings key (12).
To save the changes and leave the settings menu, press the on/off button (1) for 2 seconds.
If no key is pressed for 1 minute, the system automatically leaves the settings menu without saving the changes.
| Code Parameter Possible values Comments | |||
| U2 Key sound volume | 0-1-2-3 0: minimum | um3: maximum | |
| U3 Warning sound volume | 0-1-2-3 0: minimum | um3: maximum | |
| U4 Contrast between dim and bright light | 0-1-2-3 0: minimum | um3: maximum | |
| U5 Power display 0-1 0: 1 digit | 1: 2 digits | ||
| U6 Confirmation of the parameters after moving the cookware | 0-1-2 0: It does not require confirmation1: Confirmation is required from power level 7 (included)2: It always requires confirmation | ||
| U7 Timer completion notice | 0-1-2 0: beeping for 120 seconds2: beeping for 120 seconds2: one short beep | ||
| U8 Full power limitation | --2-.0-5.0 with increments of 0.1kW5.0-10.0 with increments of 0.5kW | --: UnlimitedExamples:2.1: Power limited to 2.1kW5.5: Power limited to 5.5kW |
Maintenance (F4)
Pieces of aluminium foil or food, fat splashes, spilt sugar or highly sugared foodstuffs should be removed immediately from the cooking surface using a spatula to avoid scratching the hob surface. Subsequently clean the surface with a suitable product and kitchen roll, rinse with water and dry with a clean cloth. Never use abrasive sponges or scourers and avoid the use of aggressive chemical detergents or stain removers.
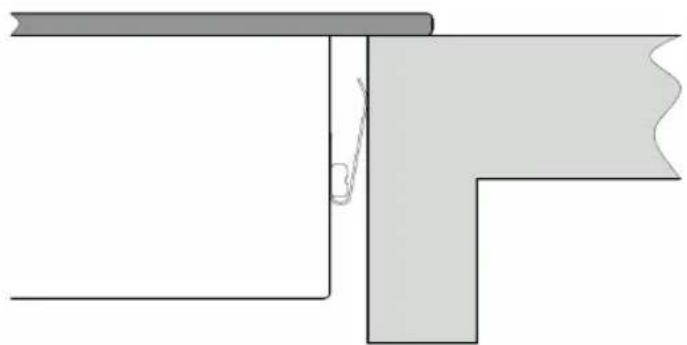
Installation (F5) (F6) (F7)
Instructions for the fitter
All operations relating to installation must be carried out by qualified personnel in line with current regulations.
The appliance is designed for fitting into a worktop, as shown in the figure. Place the supplied sealant around the perimeter of the hob. The hob should not be installed over an oven, although if this is the case, check that:
- The oven is equipped with an appropriate cooling system
- There is no warm-air leakage from the oven towards the hob.
- Suitable air inlets are provided as shown in the figure.
Selection of installation equipment
- Cut out the work surface according to the sizes shown in the drawing. (F6)
- For the purpose of installation and use, a minimum of 5 cm space shall be preserved around the hole.
- Be sure the thickness of the work surface is at least 15mm.
- Under any circumstances, make sure the induction hob is well ventilated and the air inlet and outlet are not blocked. (F5)
- Stretch out the supplied installation joint along the underside edge of the hob, ensuring the ends overlap.
- Do not use adhesive to fix the hob into the worktop.
- Place the hob into the cutout in the worktop (F7). Apply gentle pressure downwards onto the hob until it is fitted, ensuring a good seal around the outer edge.
Before you install the hob, make sure that
- The work surface is level and made of a heat-resistant material. Also, the walls near the hob must be heat-resistant.
- The hob will not be installed directly above a dishwasher, fridge, freezer, washing machine or clothes dryer, as the humidity may damage the hob electronics.
- The installation will comply with all clearance requirements and applicable standards and regulations.
When you have installed the hob, make sure that
- The power supply cable is not accessible through cupboard doors or drawers.
- If the hob is installed above a drawer or cupboard space, a thermal protection barrier is installed below the base of the hob.
- Disconnect the appliance from the mains electricity supply before carrying out any work or maintenance on it.
Connecting the hob to the mains power supply (F10)
Before connecting the hob to the mains power supply, check that:

- The domestic wiring system is suitable for the power drawn by the hob.
- The voltage corresponds to the value given in the rating plate.
- The power supply cable sections can withstand the load specified on the rating plate.
-
The installation is fitted with an efficient earthing connection in line with current regulations and law. The earth connection is a legal requirement.
-
To connect the hob to the mains power supply, do not use adapters, reducers, or branching devices, as they can cause overheating and fire.
- Where the appliance is not supplied with a cable or plug, use suitable material for the current indicated on the rating plate and for the operating temperature. The cable must never reach a temperature of more than 50 °C above the ambient temperature.
- The power supply should be connected in compliance with the relevant standard, or a single-pole circuit breaker.
- The installer must ensure that the correct electrical connection has been made and that it is compliant with safety regulations.
- The cable must not be bent or compressed.
FR
CET APPAREIL EST CONÇU POUR UN USAGEDOMESTIQUE UNIQUEMENT. LE FABRICANT NE PEUT EN AUCUN CAS ÊTRE TENU RESPONSABLE POUR TOUTE BLESSURE OU TOUT DOMMAGE CAUSÉ PAR UNE MAUVAISE INSTALLA- TION, OU UNE UTILISATION INCORRECTE, FAUSSE OU DÉRAISONNABLE.
NODOR always innovating

CATA ELECTRODOMÉSTICOS, S.L.