
RDOS 46 - Cooker NODOR - Free user manual and instructions
Find the device manual for free RDOS 46 NODOR in PDF.
| Brand | Nodor |
| Model | RDOS 46 |
| Product type | Built-in hob |
| Number of burners | 4 |
| Control type | Touch control with slider bar |
| Power supply | 230 V ~ 50/60 Hz |
| Main functions | Touch on/off, power setting (1-9), double/triple circuit, pause, independent and per-zone timer, automatic simmer, child lock, automatic shut-off, residual heat |
| Indicators | Digital displays for power and timer, indicators for standby, pause, lock |
| Surface material | Ceramic glass |
| Cut-out dimensions | Not specified |
| Weight | Not specified |
| Cleaning and maintenance | Use a scraper for residues, suitable cleaner and absorbent paper, rinse with water, dry with a clean cloth. Do not use metallic or abrasive sponges, nor harsh chemical detergents. |
| Safety devices | Automatic shut-off after 20 s without action, protection against accidental activation (ER 03), child lock, emergency shut-off via ON/OFF key, automatic zone shut-off, audible error signal |
| Memory function | Recovery of settings after unintentional shut-off (6 s to restart, then press pause) |
| Installation | Built into a worktop, electrical connection by a professional, mandatory grounding |
| Standards | Low Voltage Directive 2006/95/EEC, EMC Directive 2004/108/EEC |
Frequently Asked Questions - RDOS 46 NODOR
User questions about RDOS 46 NODOR
0 question about this device. Answer the ones you know or ask your own.
Ask a new question about this device
Download the instructions for your Cooker in PDF format for free! Find your manual RDOS 46 - NODOR and take your electronic device back in hand. On this page are published all the documents necessary for the use of your device. RDOS 46 by NODOR.
USER MANUAL RDOS 46 NODOR
Operating and maintenance instructions for hobs

THIS APP LIA NCE IS CONCEIVED FOR DOM ESTIC USE ONLY. THE MANUFACTURER SHALL NOT IN ANY WAY BE HELD RESPONSIBLE FOR WHATEVER INJURIES OR DAMAGES ARE CAUSED BY INCO RRE CT INSTALLATION OR BY UNSUITABLE, WRONG OR ABSurd USE.
The manufacturer declares that this product meets all the essential requirements for low voltage electrical material set out in European directive 2006/95/EEC of 12 Decem ber 2006 and for electromagnetic compatibility as required by European directive 2004/108/EEC of 15 December 2004.
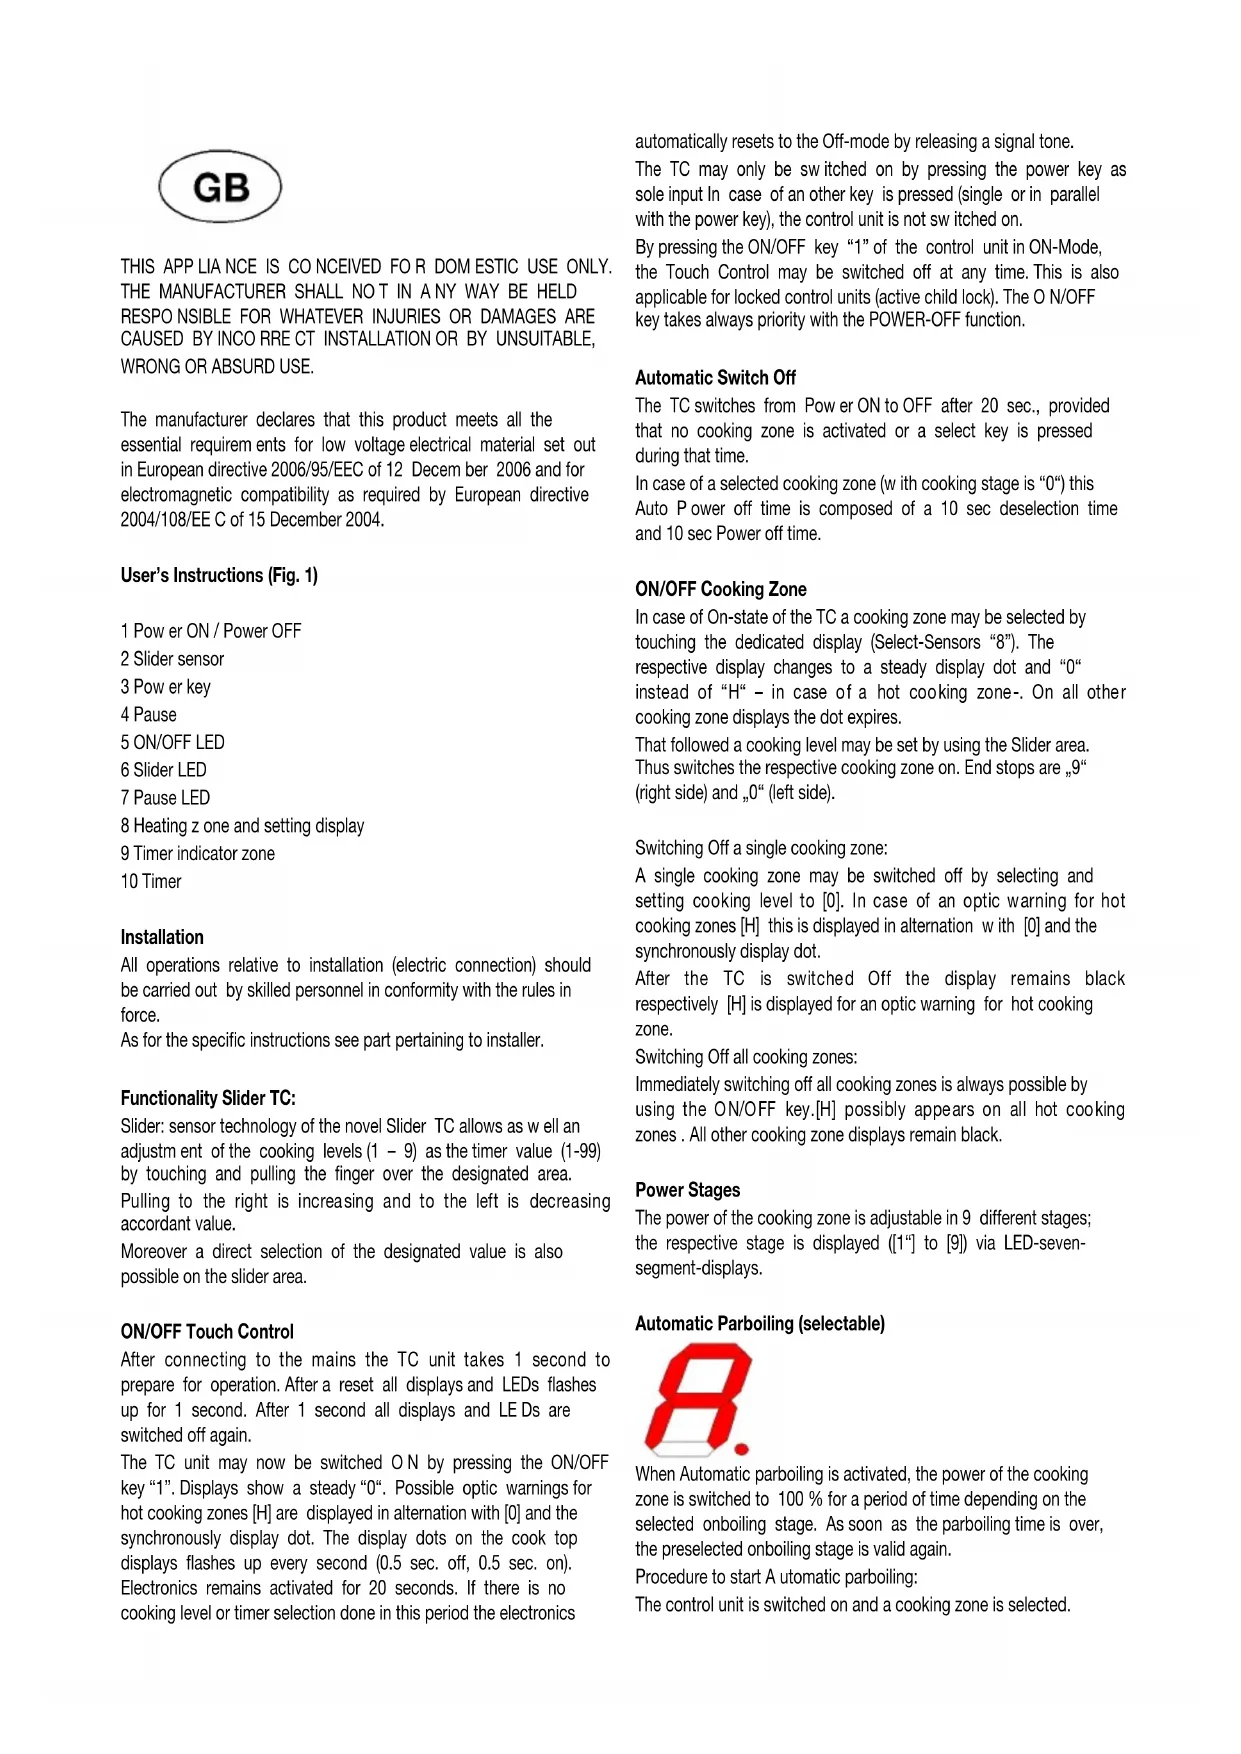
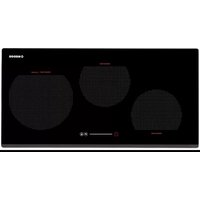
User's Instructions (Fig. 1)
1 Power ON / Power OFF
2 Slider sensor
3 Power key
4 Pause
5 ON/OFF LED
6 Slider LED
7 Pause LED
8 Heating z one and setting display
9 Timer indicator zone
10 Timer
Installation
All operations relative to installation (electric connection) should be carried out by skilled personnel in conformity with the rules in force.
As for the specific instructions see part pertaining to installer.
Functionality Slider TC:
Slider: sensor technology of the novel Slider TC allows as well an adjustm ent of the cooking levels (1 - 9) as the timer value (1-99) by touching and pulling the finger over the designated area.
Pulling to the right is increasing and to the left is decreasing accordant value.
Moreover a direct selection of the designated value is also possible on the slider area.
ON/OFF Touch Control
After connecting to the mains the TC unit takes 1 second to prepare for operation. After a reset all displays and LEDs flashes up for 1 second. After 1 second all displays and LEDs are switched off again.
The TC unit may now be switched ON by pressing the ON/OFF key "1". Displays show a steady "0". Possible optic warnings for hot cooking zones [H] are displayed in alternation with [O] and the synchronously display dot. The display dots on the cook top displays flashes up every second (0.5 sec. off, 0.5 sec. on). Electronics remains activated for 20 seconds. If there is no cooking level or timer selection done in this period the electronics
automatically resets to the Off-mode by releasing a signal tone.
The TC may only be sw itched on by pressing the power key as sole input In case of an other key is pressed (single or in parallel with the power key), the control unit is not sw itched on.
By pressing the ON/OFF key "1" of the control unit in ON-Mode, the Touch Control may be switched off at any time. This is also applicable for locked control units (active child lock). The ON/OFF key takes always priority with the POWER-OFF function.
Automatic Switch Off
The TC switches from Power ON to OFF after 20 sec., provided that no cooking zone is activated or a select key is pressed during that time.
In case of a selected cooking zone (with cooking stage is "0") this Auto Power off time is composed of a 10 sec deselection time and 10 sec Power off time.
ON/OFF Cooking Zone
In case of On-state of the TC a cooking zone may be selected by touching the dedicated display (Select-Sensors "8"). The respective display changes to a steady display dot and "0" instead of "H" - in case of a hot cooking zone-. On all other cooking zone displays the dot expires.
That followed a cooking level may be set by using the Slider area. Thus switches the respective cooking zone on. End stops are 9^ (right side) and 0^ (left side).
Switching Off a single cooking zone:
A single cooking zone may be switched off by selecting and setting cooking level to [0]. In case of an optic warning for hot cooking zones [H] this is displayed in alternation with [0] and the synchronously display dot.
After the TC is switched Off the display remains black respectively [H] is displayed for an optic warning for hot cooking zone.
Switching Off all cooking zones:
Immediately switching off all cooking zones is always possible by using the ON/OFF key.[H] possibly appears on all hot cooking zones. All other cooking zone displays remain black.
Power Stages
The power of the cooking zone is adjustable in 9 different stages; the respective stage is displayed ([1] to [9]) via LED-seven-segment-displays.
Automatic Parboiling (selectable)

When Automatic parboiling is activated, the power of the cooking zone is switched to 100% for a period of time depending on the selected onboiling stage. As soon as the parboiling time is over, the preselected onboiling stage is valid again.
Procedure to start A utomatic parboiling:
The control unit is switched on and a cooking zone is selected.
After setting cooking stage "9" Automatic parboiling is activated by pressing at the right slider sensor. "A" appears on the display immediately.
Now the required onboiling stage is selected via Slider area. The "A" symbol appears after 3 sec. upon releasing the key - alternating with the onboiling stage (500 msec. "A" and 1.5 sec. onboiling stage).
The onboiling stage may be changed within 15 sec after activation without switching off the parboiling boost. Therefore, the cooking zone is to be selected and the relevant cooking zone is to be set afterwards.
In case of a selection after 15 sec a lower cooking stage may be set; automatic onboiling is switched off.
a higher onboiling stage may be selected; this leads to the parboiling time being automatically brought in line with the currently selected onboiling stage
Multi Circuit Activation (Optional)
The control unit may trigger - depending on the type - dual circuit or triple circuit. Multi Circuits are switched automatically on after activating a cooking zone.
Activation/Deactivation of dual circuit HL
By actuating the dual-circuit key "3" the respective double or outer circuit is deactivated. Re-actuating the dual-circuit key "3" activates the outer circuit again,
An active double or outer circuit is also shown by the assigned LED "11" is statically illuminated.
Activation/Deactivation of triple circuit HL
For triple-circuit the following operation procedure is provided:
-By actuating the multi-circuit key "3" the respective double and triple circuits of an active cooking z one are deactivated.
-Re-actuating the multi circuit key "3" activates the first outer circuit and the assigned LED "11" illuminates again.
-A second actuation of the multi circuit key "3" activates the second outer circuit and the assigned LED "11" illuminates again.
Residual Heat
The determination of how long a cooking zone has residual heat after operation and switch off - which may lead to burnings when contacting - is calculated.
Status is calculated depending on:
Selected power stage (from "0" to "9")
On/Off Time of the Relays
The residual heat indication of each cooking zone remains activated until the calculated tem perature is smaller than +60^ .
Automatic Switch-off (Operating Time Limitation)
For each activated cooking zone a max. operating time is defined. The max. operating time is depending on the selected cooking stage. After the expiration of the max. operating time the cooking zone is automatically switched off.
Each actuation of the cooking zone status (changing the cooking level etc.) resets the count-down timer to the initial starting value.
Timer settings take priority vs. operating time limitations for high cooking stage setting.
Protection against unintentional activation
The electronic system cuts off automatically in case of an identified permanent use of keys for about 10 seconds. The control unit releases an audible signal for 10 sec of the malfunction (period: 1000 msec., 500 msec. ON) and the error code "ER 03" flashes on the display (0.5 s ON 0.5s OFF). If the permanent actuation exceeds 10 sec., only the error code "ER 03" keeps flashing as long as the malfunction occurs and is identified as such. In case the cooking zone is at stage "hot" the [H] symbol alternates with the error code (0.5 sec Symbol 0.5 sec "H").
Water sprinkled on the glass surface does not always lead to a key actuation and cannot be surely detected. ( After wiping the glass covering the keys, all keys are ready for operation in no time).
If no cooking zone is activated within 20 sec after pressing POWER ON, the control unit is reset to Off-mode (black displays).
Key Lock (Optional)
The actuation of the key lock key "4" in the wait or active mode locks the keyboard and the assigned key-lock LED "7" is statically illuminated. Here, the actuation times of the key-lock key have to be taken into account. The control continues to work in the set mode, but may no longer be operated with any key, except the key-lock key itself or the on/off key "1".
The switching OFF with the on/off key "1" is also possible in the locked condition. The assigned key-lock LED "7" fades when switching off the control The key-lock function included LED is active again when switching on (in wait mode 10 s) until this is deactivated by a repeated actuation of the key-lock key. The activation/deactivation of the key-lock function in the off mode is not possible.
When programmed timers expire, the respective timer alarms may be confirmed by actuating any key without needing to unlock the control.
The repeated actuation of the key-lock key in the wait or active mode unlocks the keyboard and the assigned key-lock LED fades. All sensor keys may be operated as usual again.
Acoustic Feedback (Buzzer)
The following activities occurring during operation of the TC unit are fed back audibly via a buzzer:
Short single tone for regular actuation of a key
Longer, intermittent tone for permanent use of keys over a longer period of time (≥ 10 sec)
Expiry of the timer
Timer-function (optional)
The timer function is available in two types:
- Stand-alone-timer 1..99 min: Audible signal with timing. This function can only be activated as long as no cooking zone is in operation (all stages = 0). Is any cooking zone started with operation (level > 0) than the stand alone timer keeps in operation. If the timer shall be used to cut off a cooking zone (see cooking zone timer) then the control must first be switched off (power sensor) and switched on again.
-Cooking zone timer 1..99 min: This function can only be activated as long as a cooking is active (stage < 0 ; display dot). Audible signal with timing, four cooking zones to be cut off are freely program mable.
Setting a timer value:
By adjustment with the slider area.
Primarily the adjustment of the first digit takes place and thereafter the adjustment of the second digit.
Within 10sec after the adjustment of the second digit the value might be reset. (Illuminated display dot in the timer display and in case of a cooking z one specific timer a blinking assigned LED).
In case of an active timer display the timer value may be set to [0] directly by pressing [0] on the slider area (left side)
Switching off an active timer:
A timer can be switched of by setting its value to 0.
A stand alone timer can be switched of by a double actuation of the power key "1".
Timer Stand-Alone:
If the control unit is switched on (all cooking zone displays show [0]), the stand-alone timer may be activated by pressing the timer select key. The timer display shows "00". The decimal dot on the timer display flashes. The timer is cut off after 10 sec (black display) if no further settings are made. In case of a timer value is set with no activation of a cooking zone within 10sec, the cooking zone displays are cut off (interposing relays are also cut off). Possible optic warnings for hot cooking zones [H] are displayed permanently
As long as the timer is selected (display dot flashes for 10 sec) it can be set. The setting range is 0 -99 minutes in single steps; by Slider area.
Directly after the timer value is set, count down starts with the last set value. The timer is deselected automatically after 10 sec and the timer display indicates the timer value. After expiring of the set time an acoustic signal is given and the timer display flashes "00".
The acoustic signal is terminated
-after 2 min and/or
-by actuating any key.
Thereafter timer display stops blinking and extinguishes. Possible optic warnings for hot cooking zones [H] are displayed permanently.
By pressing the ON/OFF key "1", the control unit may be switched from „purely timer operation" to cooking zone at any time -with or without an activated Stand-Alone timer -. Sw itching back to TC active mode with an active Stand-Alone timer the timer is selected first (decimal dot on timer display flashes). After a cooking zone is selected, the decimal dot disappears from the timer display and a steady decimal dot on the cooking zone display flashes on. When sw itching off the control unit by ON/OFF key "1", the Stand-Alone timer - if still in operation -is also sw itched off.
Cooking zone specific timer programming
Switching on the TC enables timer setting for dedicated cooking zones.
By actuating a cooking zone (cooking zone stage >0 ) followed by selecting the timer display (within 10 sec) a timer value may be assigned to the cooking zone as a cut-off function. The LED around the timer "9" indicates which cooking zone the timer had been activated for.
As soon as the timer is selected the according LED is blinking and the dot in the timer display is flashing permanently. In case of a cooking zone is selected thereafter, the dot extinguishes and the LED stops blinking.
When switching from one cooking zone to another, the timer display indicates the current timer value of the respective cooking zone. Timer settings of other cooking zones stay active.
Further setting is like with the stand-alone timer
In case of more than one active timer the display indicates the lowest timer value (after 10s deselection time).
After expiring of the set time an acoustic signal is given and the timer display flashes 00^ . The related timer LED is blinking synchronously. The programmed cooking zone is cut-off, a permanent "0" is displayed and the cooking zone is selected automatically. After 10 sec. (deselection time) a permanent "H" is displayed on a "hot"cooking zone. Otherwise, the symbol "0" is indicated.
The acoustic signal and the blinking of the cooking zone timer Led is terminated
- after 2 min and/or
by actuating any key.
Thereafter timer display stops extinguishes and the cooking zone stays unselected.
Behaviour of the cooking zone specific timer is similar to the stand alone timer.
In case of a timer is programmed for a cooking zone the operating time limitation is dependent of the timer value and not of the standard table value.
Pause mode
Activating the Pause function:
While at least one cooking zone is working, the cooking zones can be switched off by touching the "Pause" key for more than 1 sec.
During the pause:
Timers already programmed are discontinued and remain in this condition during the pause.
The pause mode can last for max. 10 min. If the status is not cancelled within this period, the control unit switches off. The TC unit can be switched off via the ON/OFF key at any time, a possible pause mode is, thus, aborted.
Terminating the Pause mode:
Touching Pause key together with any other one key within 10 sec causes a re-establishment of the state prevailing prior to the pause mode. If no further key is touched within 10 sec, the TC unit switches off.
Settings recovery
If the touch control is turned off by mistake with the ON/OFF button "1", it is possible to recover the previous settings with the recovery function. Once it is turned off, the user has 6 seconds to turn it on again, and then another 6 seconds to press the pause button "4". This function allows you to recover the previous cooking power and timer values for each cooking zone.
Precautions (Fig. 2)
- When one makes use of heating elements, we advise receptacles with flat bottom having same diameter or lightly higher than that of the hot area.
- Avoid overflows of liquid, therefore w hen boiling has happened, or in any case w hen liquid is heated, reduce the heat supply.
- Don't leave the heating elements on without receptacles on the top or with void pots and pans.
- If the surface of the hob is damaged, immediately disconnect the appliance from the mains to prevent the possibility of electric shock.
-
Never use a steam cleaner to clean the hob.
-
This appliance hood is not designed to be used by people (including children) with reduced physical, sensorial or mental capacity, or who lack experience or knowledge about it, unless they have had supervision or instructions on how to use the appliance by someone who is responsible for their safety.
-
Children must be supervised to ensure that they do not play with the appliance.
Maintenance (Fig. 3)
By means of a scraper immediately remove any aluminium foil bits, food spills, grease splashes, sugar marks and other high sugar content food from the surface in order to avoid damaging the hob.
Subsequently clean the surface with some towel and appropriate product, rinse with water and dry by means of a clean cloth. Under no circumstance should sponges or abrasive cloths be used; also avoid using aggressive chemical detergents such as oven sprays and spot removers.
Installer's Instructions
Installation
These Instructions are for the qualified technician, as a guide to installation, adjustment and maintenance, according to the laws and standards in force. These operations must always be carried out when the appliance has been disconnected from the electric system.
Positioning (Fig. 4)
The fixture is especially designed for fitting into a work-top as shown in the corresponding figure. Place the supplied sealing agent along the hob perimeter. Do not install the hob over an oven; in case you do, make sure of the following:
- the oven is equipped with an appropriate cooling system
- there is no warm-air leakage from the oven tow ards the hob
- suitable air-inlets are provided as shown in the figure.
1 Front view
2 Front side
Electrical connection (Fig. 5)
Prior to carrying out the electrical connection, please ensure that:
- the plant characteristics are such as to follow what is indicated on the matrix plate placed at the bottom of the working area;
- that the plant is fitted with an efficient earth connection, following the standards and law provisions in force. The earth connection is compulsory in terms of the law.
Should there be no cable and/or plug on the equipment, use suitable absorption material for the working temperature as well, as indicated on the matrix plate. Under no circumstance must the cable reach a temperature above 50^ of the room temperature. Should a direct connection to the network be required, it will be necessary to interpose an omnipolar switch with min. aperture between the 3 mm. contacts, dimensioned to bear the plate load and it must follow the standards in force (the yellow/green earth cable must not be interrupted by the switch). The plug or om nipolar switch must be easily reached on the installed equipment.
The manufacturers decline any responsibility in the event of noncompliance with what is described above and the accident prevention norms not being respected and followed.
To avoid all risk, if the power cable becomes damaged, it must only be replaced by the manufacturer, by an authorized service centre, or by a qualified electrician.

CE PRODUIT EST CONÇU EXCLUSIVÉMENT POUR USAGE DOMESTIQUE. LE CONSTRUCTEUR DÉCLINE TOUTE RESPONSASIBILÉ POUR DOMMAGES ET BLESSURES CAUSES PAR UNE INSTALLATION INCORRECTE OU PAR UN USAGE IMPROPRE, ERRONÉ OU ABSURDE.
Controllo tattle ON/OFF
AAN/UIT touch-control
PnHHunnbI pa60bI (Pnc.1)
1 BkIIOueHne/BbIKIOueHne ON/OFF
2 Slider
3BKnIOueHHe NcKoJIbKINX KOHTypOB
4Iay3a
5JaAMIOUKN BkJIIOUeHHe/BbIKJIIOUeHHe ON/OFF
6 Jammouky Slider
7IooBcTKaHHJHKaTopaIIay3a
83oHaBapkn
9ПодсВettingаИнДИКАТОРаТаймера
10 Taumep
MOHTAX
Bce onepaunno montaxy (3Jektpnueeckne noKIOUeHna)doJXhbl npOn3BOOnTbcra TOLbko KBaIINpObaHHbIM nepcoHaON M B COOTBETCBN C CyueCTByIOUM HOpMaTNBAMN.
B Pa3dene "Дя мотатхнka" npuBeDeHbI BCE noDpo6HocTm MOHTaKa.
Функим сададар TC:
CnaIep:ceHCOPHaeTexHOJIOHn HNHOBaUOHHORcnaIepa TC n03BOJIeT TaKHe peryIINPOBaTb yOBHN npriTOBJIeHn (1-9) B BVne 3Haehn TaMepa (1-99) 3a cHT npIKoCHOBHn u ydepKnBaHn Heo6XoDMoN oBlaCTn. CmeJeHne Bnpabo yBeInuBaet Heo6XoDMoE 3HaueHne, a BLeBO - noHxJaT.
Ha cnaidepe cyueCTByet BO3MOXHOCTb HENOCpeDCTBeHHOro BbyOpa TOTO WIN INHO 3NaueHn.
Cencophoe ynpablenHe BKJI/BblKI
Pocne BkIIOHEnB Cetb 6IOK TC B TeeHnE 1 cek. roTOBntc K paOte.Pocne 3TOro B TeeHnE 1 cek..obHOBnIOCTc BCE DcNpEn u 3aRopaETc CBTeODnO.D.CNYCTA 1 cek.BCE DcNpEn n CBToDnOdb BHOBb OTKIOUOHTcra.
BLOK TC MOXHO BKJIOHTb, HAKaBa HA KONky BKL/BblIKL. Ha DCNnee NOBNTc3HaHeHne "0". NonepeMeHHo C [0] MoryT NOBJIbC8 ONTNueCKNe npdynpexKeHnra TropHx 3OH npiroTOBHeHn [H], a TaKKe CNHXPOHbIe TOckn DcNlEe. 3Tu Tockn DcNlEe Ha BepxHx DNCLPEe X piroTOBHeHn 3aropAOTc KaKdyO cek.yHdy (0.5 cek. BblKn, 0.5 cek. BK). 3JeKtpOnHka OCTaETcA kTINBHO B TeueHne 20 cek. Ecn ypOBeH npiroTOBHeHn mII TaMmep He bbl Bb6paH B 3OT nepNO, 3JeKtpOnHka ABtOMATUeCKn nepexoDHT B pexHM BblK, n3dabAR 3ByKOBo CnHaI.
TCMOKET6bITB BKJIOUeH NIMb HaxaTneM KHOKNI NITAHNA.B CJIyuae HAXATNIAIOBOIpyROKHOKNI (NOOTDeJIbHOCTNIINBMecTe C KHONKOIINTAHNA),6nOKynpabHeHNE BKJIOHaetc.
Ecn npn BkIIOueHn 6bIa aKTHBnPOBaHa 一 Y h K 山 6IOKnPOBKn OT DeTe》, Ha BCeI 3OHe npiROTOBJIeHn IONBUTcR L" B NOITBePckDeHne 6IokpOBKn. NonepeMeHHo C [L] MOryT noBtbcn npdeynpeXedHn ropAUX 3OH nprirotOBJIeHn [H] (H-ON=0.5 cek.; L-ON=1.5 cek.).
CecHcOpHoe ynpaBHeHne MOxHO B JIO6oB MOMEHT OTKJIOUHTb, HAXaB KONky BKJI/BblKl 6Ioka ynpaBHeHnB pexmme BKJI. 3To TaKKe OTHCOTcK 3a6JIOKpOBaHbIM 6Iokam ynpaBHeHnA (c aKTUBHO 6IokpOBkOJ OT dTeE). KONka BKJI/BblKl IMeT npOpntET C cyHKUeNtOKJIIOUeHnIITAHn.
ABTOMATNueeCKoe OTKIOHoueHne
TC nepexoNTnCocToHnNnIITaHne BKL B BblKl cncty 20 cek., npu ycnoBn OTCyTCTNBn AKTNBHO 3Ohbl npiroTOBHeHn Nnna HaxaToN KhoNn Bb6opa B TeeHne 3TOro BpeMeHN.
Ecni 30Ha npiroToBneHn6blna BbIbpaHa (ypobeh npiroToBHeHn 己 _ 日 ^ 日 ),BpemrABTOMaTnueCKoroOTKIOUeHncoCToNT n3 10 cek.OTMeHbBlbopa n10 cek.OTKIOUeHnPiTaHn.
BKJI/ BbIKI 30Hb npnroTOBHeHn
EcHnTC HaxoDntcB COCTOHN BKJI,30Hy npiroTOBHeHMOxHO Bb6paTb,KochyBwncB COOTBeTCTByUeero DnCnpea (uippoBbIe ceHCOpby Bb6opa).COOTBeTCTByUoUm DnCnpeu N3MeHReT COCTOHN Ha NOCTOHHbIe TOckN, n "0"BMecTo "H"-dny ropayen nobepxHocTN npiroTOBHeHnHa BceX OCTaJIbHbIX 3OHAX npiroTOBHeHn TockN NCye3aIOT.
YpOeHb npiroTOBHeHn moKHO yCTaHOBnTb C nOMoUbIO cIaIepa.
PpN 3ToM BkIOuHaTeCn COOTBeTCTByIOua 30Ha npiroTOBHeHn.
PpeJeNbHe 3NaueHn "9" (CnpBa) n,0" (CneBa).
OTKJIIOHHeOHOIHOI30HbI pNIGROBJIeHnI:
Ody 30Hy npiroTOBHeHMOxHO OTKIOuHTb, Bb6paB u yctaHOBNypoBeH npiroTOBHeHnHa [0].EcIn No8BnEeTc ONtueckoe npedynpexJeHne ropaeH 30hbl npiroTOBHeHn [H] nonepeMeHo C[0] nCINxPOHHbIMn TOkAMn DnCJIpe.
Iocne BbIKIOueHn T, DmCIIeN ocAETcY cepHbIM. [H] OTo6paJaeTcK kAn ppeDynpExdHne ropJe3 30hbl npriTOBJIeHn.
OTKIOHcHHe BCEx 3OH pIINTOBJeHnA:
OTKJIIOHTb BCE 30HbI pnpiroTOBHeHn MRHOBeHHo MOXHO C NMOUBo KhoNKn BKN/BblIKn.[H] MoKeT NOBtbcn DnB Ceex TOpAUX oBlaCTe npiroTOBHeHn. Iocne 3TOrO dncnEe Bcex 3OH npiroTOBHeHn OCTaETcYepHbIM.
YpOBHMOUHOCTN
MoHocTb 30hbl npiroTOBHeHH perynmpyETc Ha 9 ypoBHx; COOTBeTCTByUOuM npoBeHb OTo6paKaetc (OT [1] do [9]) uepe3 DnCnIe nCBTeODIOIOB u3 CeMn CeMeHTOB.
AbTomatueckoe nponapnBaHne (Bb6paemoe)

Ecn
aKTNBnPoBaHo
ABTOMATNUHECKOE
npnapBaHne,MoHOCtB 30Hb npiroTOBHeHn BKnIOeHa Ha 100% B TeHeHne nepoJa, KOToPbI 3aBNCIT OT CtaNn KIneHn. Pocne OKOHuaHn BpeMeHn npnapBaHn BHOBb BKIOHaETc CTaNn KIneHn.
IpoeDypa HauJaIa ABToMaTnueckOro npOnapuBaHnIa:
BbIbpaHoro ypoBHa MOUHocTn (OT ,0" Do ,9")
BpeHn BkJI/BlKJI peIe
HnDkaun octatoohoro Tenna 30hbl npirotoBHe HnOCTaetc aKTHBOH, noka paChETHa TEmpeatypa He noHN3NTc HnKe +60 ^ C
ABTomatueckoe BbIKHoueHne (OrpaHnueHne BpeMeHa pa6oTb)
JaKaKJIo aKTbUInPoBaHHo 30HbI onpeJeTcra MAcCMaJIbHOe Bpempa6ToI. MaKcMaJIbHOeBpempa6ToI 3abNCtOT bIb6paHHoro ypoBn npiroTOBHeHn.CnyCTra MAcCMaJIbHOe Bpempa6ToI 30Ha npiroTOBHeHn ABTomAtueckn OTKIOuAeTcR.
Kaxd aKTINBaUNc cTAtyca 30HbI pNiroTOBJeHn (N3MeHeHne yPOBn npiroTOBJeHn n T.D.) C6pacbIBaETc TaMep Ha NcXoJHOe 3HaueHne.
HactpoKn TaMepa MeHOT npOpntET nIgOrpaHHeHn BpeMeHn pa60bC HactpoKaMn BlicOKOTO ypOBH npiroTOBHeHn.
3auntataotCnyauHOrO BKIOUeHHN
3JIeKTOHnA CNTema ABToMaTuYeCeKn OTKJIOuHaTeC B Cnyae 6OBapXeHHN NcNOJB3OBAHH KHOHK THeHne 10 cek. BLOK ynpaBHeHH N3daet 3BykoBcunHan NoCle 10 cek. HeNCpabHOCTN (peNoD: 1000 MceK., 500 MceK. BKJI) n KoD oWbKn "ER O 3" 3aropaTcna Ha Dncnnee (0.5 cek. BKJI n 0.5 cek. BblKJI). Ecnn NOctoHHoe BKNUeHHe NpeBbIaet 10 cek., KOD oWbKn "ER 03"
npoDnJxAeT ropeb, noka npucytCTByeH enCnpaBHOCTb, n oka OHa He 6ydt NHTNCHINPOBaHa. Ecn 3OHa nprirotOBHeHn HaxoNTcHa ypOBHe "TopraO", CmB0n [H] YpeEpyETc KODom Oun6Kn (0.5 cek. CmB0n, 0.5 cek. "H").
Boda, KOtopa nonadaet Ha cTeKJHHyo NOBepxHOCTb, He Bcerda npBOIT K BKIOUeHHO KHONOK H E MOKeT 6bIb yCTaHOBJHe. (IOcJIe BItupAHn CTeKJIa, KOtOpoe NOKpbBaet KHONKn, BCE KHONKN MOMHTaIBHO TOTOBbl KICNOJb3OBAHHO).
EcIn Hn Onda 30Ha npiroTOBJIeHn He 6blJa aKtUBnpObaHa B TeueHne 20 cek. nocJe haxaTn BkJI nTaHne, 6Jok ynpabHeHn nepexoHT B pexuM BblKJI (hepbI duCnne).
npiroTOBHeHn, CneuHaNbHbTaimep C MrrAIOUIM CBeToDIOOM).
IaAKTNBHOro TaMepa 3HaueHHe TaMepa DOJXHO 6bITb
yCTaHOHeHO Ha [0] HeNOCpeDCTBeHHbIM HaxKaTneM [0] Ha cnaJepe (CneBa)
BbIKJIOUeHne aKTHBHOr TaIMepa:
Taimep MoKHO BbIKIOHHTb, yCTaHOBNB eO 3HaueHHe Ha O.
He3aBcunmbi TaMep MoXHO BbIKJIOUHTb, DBoHbIM HkaTneM
KHONK NITAHNA. (1 TC AKTNBHy, 2 TC N TaMep BbIKJI).
He3aBcMbI TaMep:
Ecnn 6Iok ynpaBneHn BkIOueH (Bce DnCnNe 30H npiroTOBHe HnOKa3bIbAOT [O]), He3aBNCmbl TaMep MoKet 6bTb BKIOueH HaxKaTHe M KONKn BbIbopa TaMepa DcNlne TaMepa noka3bIbAeT "00". Lndpobar Tocka Ha dncnlee TaMep 3aropaetc. TaMep OTKIOUoAeTc Cnctra 10 cek. (YeHbN DnCnne), ecnn He BbINONHIOrTa IIObE dpyrne HAcTpOKn. Ecnn B TeueHne 10 cek. 3HaueHne TaMepa 6blNo BbICTabNEHO npn BbIKIOuHNO 3OHe npiroTOBHeHn, DmcnEe 3Ohbl npiroTOBHeHn OTKIOUaOTc (IpomexyTochbe pele OTKIOUaOTc). Bo3MOxHBe oTIuneckne npedynpexdeHn ropnyix 3OH npiroTOBHeHn [H] OTo6paKaIoTc NOCTOHHO
Ecnn TaHmep 6bln BbIbpaH (Touka ducnner Mnae T TeueHne 10 cek.), ero MOxHO HacTpanBaT. Dnaa3OH HAcTpoKu 0 -99 MNHyT, OINHOHBIM DeCTBnMn; Ha CnaIpe.
HenocpeDCTBHeHNO nOcIe yCTaHOBKn 3HaueHnra TaIMepa HauHnaetcT OTCHT CHTUkA C NOCJeHrero 3aDaHrO 3HaueHnra. TaIMep aBTOMaTHHeCKN OTMeHReTcN cyTc10 cek., a DnCnJIe TaIMepa nOKa3bIbAeTcR 3HaueHne TaIMepa. PocIe NCTeHuHry TcTAHOBHeHHo BpEmHn pa3daETcR 3ByKOBo CNrHaJ, H Na DCnJIee TaIMepa 3aropaeTcR,00".
3BykoBoN CnHnI npeKpaaTcTc
-Yepe3 2 MmH nn
-Notce BKNIOHEnKHOKN.
Iocne 3toro dincnnei taMepa nepectaet MURatb n rachet. Bo3moKhbIe onTnueckne npdynpexkdenia ropyux 30H npiroTOBHeHH [H] oTo6paKaIO TcNoCTOAnHHO
Iocne Haxatn KhoNk NITaHHe 6NoK ynpabHeHn MoXHO nepeKIOHTb “ToIbKO 3a CHT paObTb TaMepa” Ha 30Hy npiroTOBHeHnB JIO6oM MOMENT-C IIN 6e3 BKNIOUeHn H3aBNCIMoro TaMepa-.
PnpeKJIIOUeHmHaakTNIBhIpeXIMTCbKJIIOUeHbIM
He3aBnCmBIM TaMepOM, Chayana BbIbpaTcra TaMep (3aRopaetc Taoka DecrTuHOn DpObn Ha DCNcPiee TaMepa). NocLe BbIbopa 3oHb npiroTOBHeHn, ToKa DecrTuHOn DpObn MChe3aET Ha DCNcPiee TaMepa, INoCToHHa TOpKa DecrTuHOn DpObn 3aRopaTec Ha DCNcPiee 3OHi piroTOBHeHn.
PnBbIKIOHcHm6Ioka ynpabHeHmC nOMOcIbK HONKn IITaHne, He3aBNCMbTaMep,ecn OH pa6oTaet,TAKKe OTKIOUaETcR.
IporpamMnipoBaHme TaMepa Dnla 30hbl npiroTOBHeHH
PnB KJIuHcHm Tc akTbUpyetc HacTpOka TaMepa dIOnpeJeHHbIX 3OH npiroToBHeHn.
PnB BKIOHEn 30Hb npiroTOBHeHn (ypoBeHb > 0) n BbI6pe DcNpner TaMepa (B TeCHHe 10 cek.) 3HaueHne TaMepa MoKet 6bItb PnCBOHO DaHHo 30He npiroTOBHeHn KAK yHKnO tKIOUeHn. CBeTOnIOBokpyr TaMepa O3Haayet, dJa KaKOJ 30Hb npiroTOBHeHn 6bl AKTBNIPOBAH TaMep.
Nocne BbIbopa TaIMepa COOTBETCTBYUOuIN CBETODIOH HauHnAeT MIRatb, a Toyka Ha dncJIee TaIMepa NoCToHNO rOpetb. EcIn 30Ha nprirotOBHeHn 6bJa BbIpaHa NocIe, Toyka raChet, a CBETODIOH npeKpaaet MIRatb.
PnnepeKIOUeHnC OJHOI 30HbI npiroTOBHeHnHa DpyrHyIOINCNIIe TaMepa NOKa3bIbAe TKeKyuee 3HaueHne TaMepa DnCOOTBeCTByIOUeI 30HbI npiroTOBHeHn. HAcTPOKn TaMepaDpyrNX 3OH npiroTOBHeHn OCTaOTcA KtNBbIMN.
JaIbHeiHne HacTpoNKn BblIOJIHJOTc, KaK I dIe He3aBnCmOrToTaMepa
EcJIN AKTNBbIM YBJIeTcH He OIN TaMep, DnCJIeN NOKa3bIbAet HAnMeHbWee 3HaueHHe TaMepa (CnCyT 10 cek.).
NOCNE NCTeEHnY yCTaHOBJIeHNOrO BpeMeHN pa3daetc 3BykoBOI CNrHaJ, H Na DmCJIeE TaMepa 3aropaETc 0^u . OndOBpeMeHIO 3aropaETc COOTBeTCTByUoIIN CBETODIO TaMepa.
3anporpammpoBaHHa 30Ha npiroTOBHeHn OTKIOHaETc, NOBIAETcnoCTOHHbI "0" ,n30Ha npiroTOBHeHn BbIbnpaETc ABTomatueckn.Cnyctra10cek.(BpemrOTMeHbI)Ha "口 州 用 用 30He npiroTOBHeHn NOBIAETcNOCTOHHbICIMBOJ "H"
B npotubHOM cIyuea noRbIeTcra CIMBOJ"0".
3BykoBoi CnHn MmraHne CBeToOnoTa TaMepa 30HbI npuroTOBLeHnnpkepaaaetcra
Yepe3 2MnHn/nn
IIOCLIE BKIOUOeHnKHOIIK.
Iocne toro, KaK dncnneOcTaHOBKn noracHET, 30Ha npuroTOBHeHHA BHOBB ocTaeTcH He BbIbpaHHoH.
Pa60Ta TaMepa DnI OnpedeJIeHNO 3OHBI npiroTOBHeNnaHAnOruHa He3aBNCIMOMy TaMepy.
EcIn TaImeP npOrpAmMpyETC Dn OnpedeHHO 30HbI npiroTOBLeHnO, OrpaHnueHne pa6oery BpeMeHN 3aBNCIT OT 3HaueHnTaIMepa,a HeOTCTaHdaptHoro Ta6nHORO 3HaueHn.
Pexim nay3bl
AkTbuaZmapeXmMa nay3bl
Ioka 30hbl Bapkn HaxoTcB pa6oyem pexkme, Bbl moxete npnoCTaHOBTb nx pa6oty haxatmKJIabuun "Pausa" (nay3a) Ha npotjKeHn 1 cekyHdb.
BoBpemnay3b:
3anporpammmpoBaHbIe TaMepbl npnoctHaabnBaHT CBOIO pa60Ty Ha BCE Bpem na3bl. B TOM cnyae,ecnAKTINBPOBAH 6ycTe,pOHaTKe pnoocTaHaBnBaET CBOIO pa60Ty Ha npotraKeHNn Na3bl.
Pekn may3b moKet dInTbcra MAKcMmaIbHO 10 MNHT. EcnB bI erO He
OTMeHnIN B 3OT NepNO BpeMeHN, TO BbIKNIOHTcR Touch Control.
MoxHo BbIKJIOHITb Touch Control B JIO60m MOMENT, HaxaB Ha KJIABnUy
ON/OFF, B 3TOM clyaepexkim nay3b6ydt OTMeHeH.
OTMeHa pexkMa nay3bI:
PnHaxKaTmKnaBnNnay3bl,CoNPoBOXJaEMbIM HaxKaTnEMHa IIO6yIpyrIyKnaBnUy,BI BepHeTeCk nppeBlyuemy
peKMy pa6oTb. EcHn Bbl He haxMeTe Hn Ha Ody n3 KnaBmB TeeyHne 10 cekyHn nocne haxatna HknaBmU np3by, To Touch Control otKnHOHTCra.
BocctahOBJIeHHe NaCTpoek
EcHcHcOpHoe ynpaBHeHne 6blNo BbIKIOueHO B pe3yIbTaTe OwHbOCHoro HaxaTn KhoNk ON/OFF (BKn./BbIK.) "1", BOCCTaHOBNTB npdebyuine HaCTPOKMOXHO C NOMOuBO fHyKuIN BOCCTaHOBNEHn. Nocne BbIKIOueHn B TeHnE 6 cekyHd NOIb3OBaTeJIb MOxET CHoBA BKIOUYt b yCTPOJCTBO, a B TeHnE n CJeDyUOxN 6 cekyHd HaxaTb KhoNk Naay3bl "4". DaHHa FyHKuIN PO3BOJAE TBCCTaHOBNTB npdebyuine NapaMeTpbl MOUHOCTN PpNiTOBOTHEHn I TaMEpaIg KaKdo 30HbI pPiROTOBHeHn.
Mepbipneoctopoxhoctn(Pnc.2)
-MbI coBeyem Bam nCnOJb3OBaTb Nocydy C nIOCKNIM dHOM dI npriroTOBHeHn PnUc n NOMOuBIO 3JeMeHToB HArpeBaHn, npuHem DnAmETp IN DHa DOJIKeH 6bITb paBHbIM ININ HeCKoJIbKO ppeBbIaTb DnAmETp, yKa3aHHbI Ha cepurpaHm.
- CnEInb 3a Tem, TTo6bI KUdkocTb He npOJIbaIacb Ha IIITy. IOnTOmy yMeHbWnte MoUHOCTb HArpeBaHH np KNHeHH ININ NOcJIe TORo, KaK XuDKocTb DoCTmJIa HyKHyIO Bam temNepaTy.
-He octabJnTe BkIIOHeHHbIMN 3JIeMeHTbH HArpeBaHn6e3nx IcNoB3OBAHnno Ha3NaueHnIO, n He CTaBBTe Ha HnX NcyTbe KactpIOnn nn JIOb6yIO nocdy.
- Ppi pa3nOme NOBepxHocTNIINtbl, CneNyET HEmeDnEHNOOTKIOHTb aannapat OT cETNIITAHNBA N36exaHHe 3JIekTpueckoro Woka.
-3anpeaetcnaonb3oBaT npOBe annapaTb nOBEpxHOCTn PNTbl.
-Данньй annapat He npedHa3haeHдя erо ИспльбзOBaHи
Люьм (ВКлоча DeTe) C OрранчeHbIMn ΦИЗчeCKMn,
CEHCOPhbIM NIN yMCTBeHHbIMN CnOCO6HocTЯMn, INI TemN JIncaMn,
Y KORO HET DoCTaTOHOrO ONbIa NIN 3HaHn, 3a IckIIOUeHem TEx
ClyuaeB, KOrda OTBeTCTBeHHbI 3a 6e3OanachOCTb nPObepu IN
ДeIcTBnI N BbIaII M BCE COOTBeTCTByIOUne IHCTpyKUn N
ИСПОЛБЗОВАHи Annapata.
- Heo6xOIMo CJIeINb 3a TEM, YTO6bl DcTN He nIgpani C daHHbIM annapatom.
YxoD(Pnc.3)
Pn noTadaHn Ha KOHΦOpKn OCTaTka aIHomHneBc FOJbRn, OCTaTKOB NIIu, XHPbIX PAnTeH NIN 6bp3r KInpa, caxapa UIN OueHb CaxapNCbIX npOyKTOB, CNeDyET INx HEmedJeHHo ydaJIITb C BapOchNo NobepXHOCTN NOpeCDTBOM CneUaJIbHorO CKpe6Ka BO N36ExAHne capanaHnBapOCHNo NobepXHOCTN. Nocne 3TOrnpomblb NOEpxHOCTb CneUaJIbHbIM pOdyKTOM C NcIOJIb3OBaHNEM BymaxHoro NOToEHca, 3aTEM CNOLOCHyTb BOOn I BbICyHTb YHCToT TpAOnKo. KaTEROpUeCKn 3aNPeUaETcN cNOJIb3OBaTb abpa3INBhle rY6kn NIN UeTKn, a TAKKe 3aNPeUaETcN NOIb3OBaTbCn arpeCCNBbIM XmMueCKMn YnCTraUIMN CpEDCTBaMn NIN PTHOBbIBODNTELMNI.
Ipeed noekJIOeHnEM K cTe NITaHn, ybeNTecb TOM, UTO:
XapakTePncTmKn yCTaHOBKn COBnJaKoT C xapaKTePncTmKnAMn, nPinBeHeHHbIMn Ha yCTaHOBOUHON PnactHHe, HaxOJaIeICsHa DHe NaHeMn DnBapKn;
- yCTaHOBKn npEDyCMOTpeHO DOCTaTOH MOUHoe 3aemJIeHne, B COOTBeTCTBn C HOpMaTbAMn I Tpe6oBaHnMn DeJCTByIOUero 3akoHOdaTeIbCTBa. 3aemJIeHne npEDyCMOTpeHO B yCTaHOBJIeHHbIX HOpMaTbBax.
B TOM clyae, ecn dna annapata He npedymoehwyp n - wln po3eTKa BKIOUeHn, Heo6xOIMMO NcnoIb30BaT MaTePnA, npiroDhni dna 3NaueHn 3neKtpuyeckoro ToKa, npBedeHHbIX Ha yctahOBouHoi pIactInHe C xapaTeepntkamn, n Dn daHHoI paOoe TempepaTybl. 3anpeaaetcNcNoIb30BaT shyB cLvyae ero neperpebaHn npn npebblueHn 50^ TEMpepatpybokpykaouse cpdebl.
EcI BAM Tpe6yeTc npraMoe NOKJIIOUeHne K CETN, CJeDyET BCTaBnTB MHorONIOIOCHbI NepeKIOUaTeJB C MNHMaJIbHbIM pacCToRHaEM MeJxdy KOtAKTaMn B 3 MM, paccHTaHHbI Ha MOUHOCTb PnITbI, NOTBeuaIOUm DeiCTByIOUIm HOpMaTINBaM (UHyp 3a3emHeH NKeTTb/3eNEbH I He DOnJKe H npepbIBaTcBcN nepeKIOUaTeMe). Po3EtKa NII MHorONIOIOCHbI NepeKIOUaTeJB DOJXHbI 6bITb IpocTb I DoCTyINbI DJI NODKIOUeHn yCTaHOBJIeHOrO aannapata.
KoHCTpykTOp CHImaet C c6eB Bc0 OTBETCTBEHHOCb B TOM Clyuae, ecJIN BCE Bblweyka3aHHbIe Tpe6oBAHn I ObIuHbI HOpMbI npedocTopopXHOCTn He 6byT co6JIouDeHbI.
B cnyuae noBpeKdHnna shHpya nHTAHnra, o6paTntecb K
fapbHKaHTy dner er0 3AmHbI, nn o6paTntecb B
ynonHomOeHHbI ueTp texHueCKoN nomOuNi, nn JKe
obpatNTecb K texHueCKOMcneunAnNcty IIO6Oro ceHTp C
noo6hBMn NOHMOChm, dner npedotBpaueHnra
BO3HNHOBeHn HIO6OrBnDa pncOB.
TOUCH CONTROL
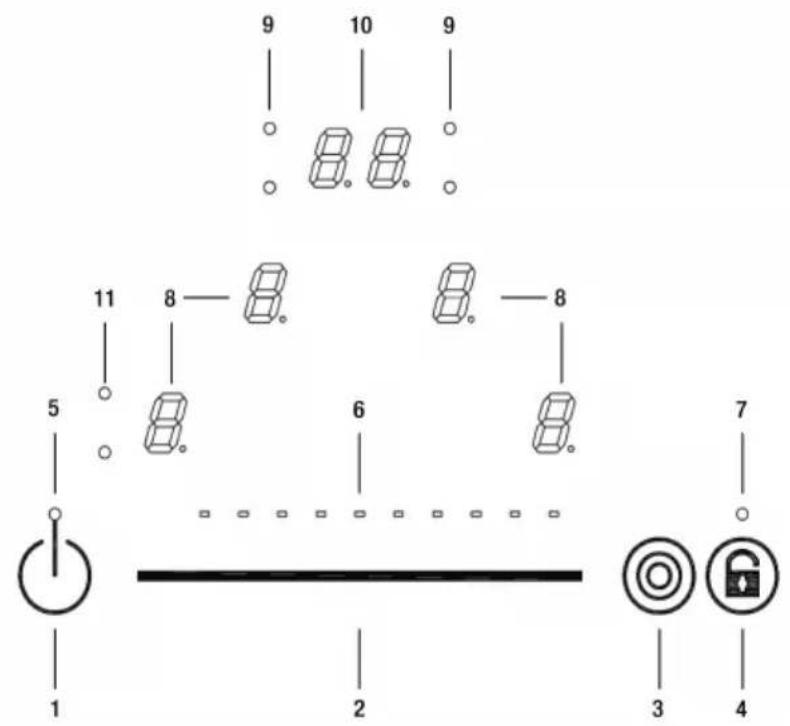
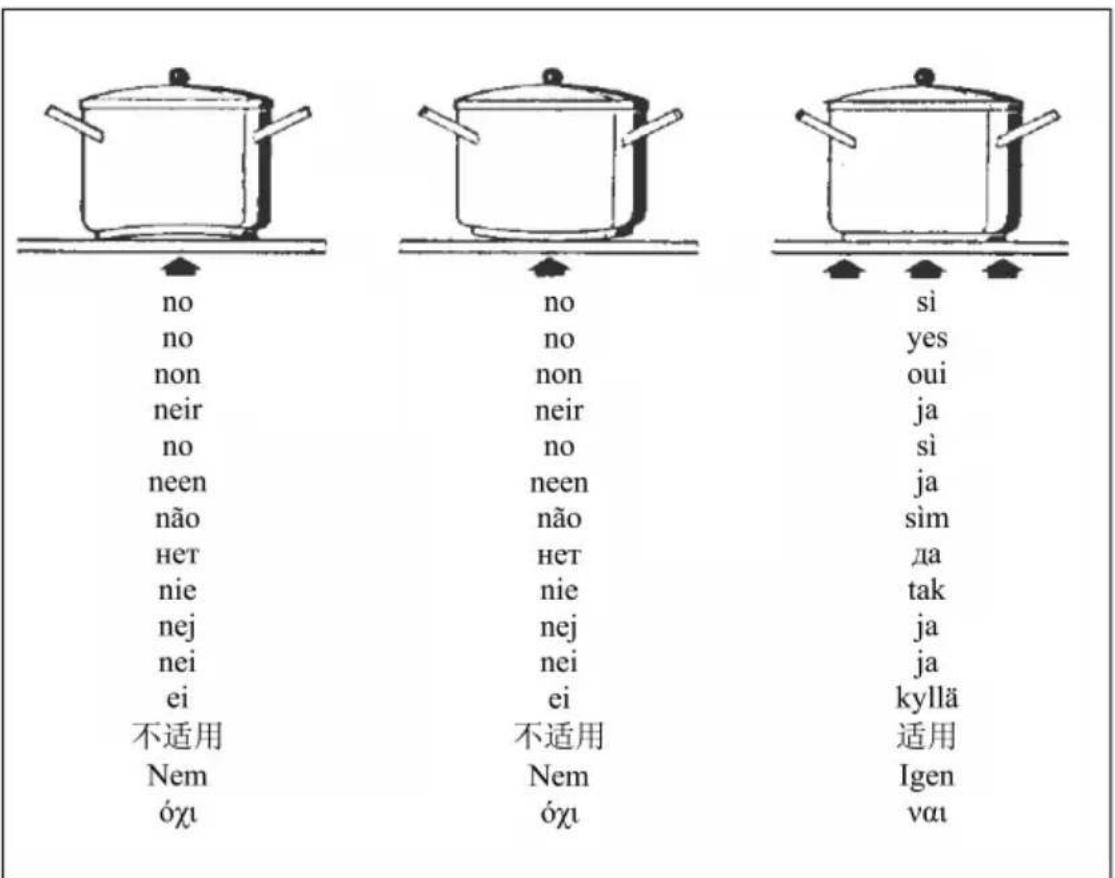
Fig.1 - Abb.1 - Afb. 1 - Pnc. 1 - Rys. 1 - Kuva 1. - 图1-1. abra - Euk. 1.
Fig.2 - Abb.2 - Afb.2 - Pnc.2 - Rys.2 - Kuva 2. - 图2-2.äbra-Euk.2.
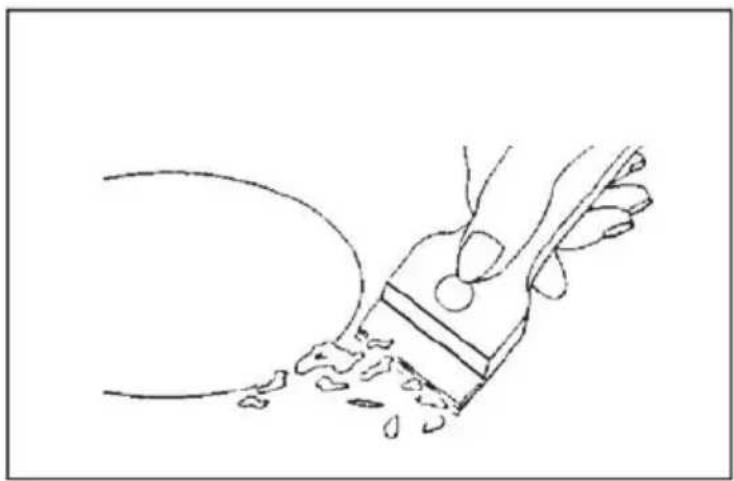
Fig.3 - Abb.3 - Afb.3 - Pnc.3 - Rys.3 - Kuva 3. - 图3-3.ábra-Euk.3.

Fig.4- Abb.4 - Afb. 4 - Phc. 4 - Rys. 4 - Kfba-4. a bra - Euk. 4.
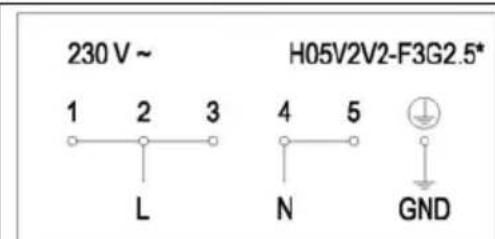
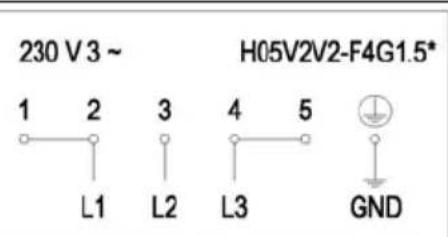
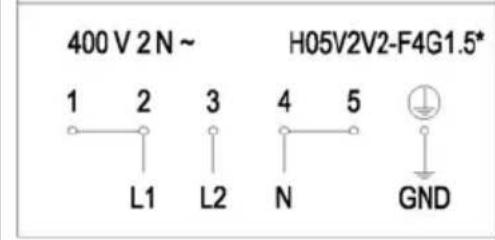
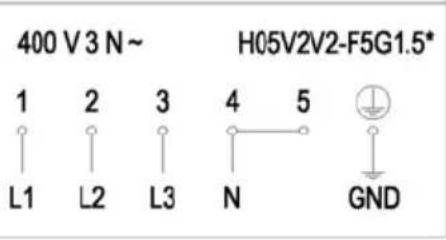
Fig.5 - Abb.5 - Afb.5 - Phc.5 - Rys. 5 - Kuva 5. - 图5-5.ábra-Eik.5.
Teniendocenocuentaoclofactoroedcsimultancidad
BeioGleichzeitigkeitsfaktor
Enotenantocompteoducoefficientodesimultanéité.
Consideringcomplementaryfactor
Tenendoσcontoδdelσfattoreδidiocontemporaneita
*Insigma kingodeGeleijktijdigheidsfactor
Tomandoenoconsiferaocosfactoroeddimultaneidade
Idetoderostagesohjdeoforosamtidighedsfaktoren
yhtäikaisuudenohuomioonottaen
*Samtidighetsfaktornoborotasamedoioberakningen
*Aaubavovtacovonoyntaoepoeexovtaanktpaoxepiuou
*YHTbIBaOgakTOpOCOBmecTHMOCTH
Bioracopodouwagocichokcomplementarnosc
Figyembeöveeəzoegyidejusegiortenyezot
素,控制盘四周要用随产品赠送的防渗水的胶条粘牢。
Taoobetraktningsamtidighetsfaktoren
NODOR
CNA
group
CATA ELECTRODOMÉSTICOS, S.L.
C. Angel Guimerà, 16-17 - 08570 TORELLO (Barcelona) SPAIN
Tel. +34 938 594 100 - Fax +34 938 594 101
www.cnagroup.es - e-mail: cna@cnagroup.es


- User's Instructions (Fig. 1)
- Installation
- Functionality Slider TC:
- ON/OFF Touch Control
- Automatic Switch Off
- ON/OFF Cooking Zone
- Power Stages
- Automatic Parboiling (selectable)
- Multi Circuit Activation (Optional)
- Residual Heat
- Automatic Switch-off (Operating Time Limitation)
- Protection against unintentional activation
- Key Lock (Optional)
- Acoustic Feedback (Buzzer)
- Timer-function (optional)
- Setting a timer value:
- Switching off an active timer:
- Timer Stand-Alone:
- Pause mode
- During the pause:
- Terminating the Pause mode:
- Settings recovery
- Precautions (Fig. 2)
- Maintenance (Fig. 3)
- Installer's Instructions
- Positioning (Fig. 4)
- Electrical connection (Fig. 5)
- Controllo tattle ON/OFF
- AAN/UIT touch-control
- PnHHunnbI pa60bI (Pnc.1)
- MOHTAX
- Функим сададар TC:
- Cencophoe ynpablenHe BKJI/BblKI
- ABTOMATNueeCKoe OTKIOHoueHne
- BKJI/ BbIKI 30Hb npnroTOBHeHn
- YpOBHMOUHOCTN
- AbTomatueckoe nponapnBaHne (Bb6paemoe)
- ABTomatueckoe BbIKHoueHne (OrpaHnueHne BpeMeHa pa6oTb)
- 3auntataotCnyauHOrO BKIOUeHHN
- Pexim nay3bl
- BocctahOBJIeHHe NaCTpoek
- Mepbipneoctopoxhoctn(Pnc.2)
- YxoD(Pnc.3)
- TOUCH CONTROL
- NODOR
Brand : NODOR
Model : RDOS 46
Category : Cooker