USER MANUAL 7FF2FPAS PHILIPS
natural_image
Digital photo frame displaying two people wearing goggles and swim gear, posing together in a tropical beach setting (no text or symbols visible)
10FF2 Series
7FF2 Series
5FF2 Series
EN User manuals 1
- Welcome to Photo Manager 2
- Photo Manager Features 2
- Getting Started 3
3.1 System Requirements 3
3.2 Installation 3
3.3 Start Philips Photo Manager 3
- Phillips Photo Manager Overview 4
- Using the Photo Manager 5
5.1 Setting up Photo Manager 5
5.2 Crop Photos 7
5.3 Cutting, Copying and Pasting Photos 8
5.4 Create New Albums 9
5.5 Renaming Albums 9
5.6 Deleting Albums and Photos 9
1. Welcome to Photo Manager
Philips Photo Manager for PhotoFrame is a Windows application for users to manage photos between the Philips PhotoFrame and a PC. It provides an easy to use user interface. It enables you to:
- Browse and preview the photos in both PC directories and PhotoFrame albums.
- Perform operations such as copying, moving and deleting photo(s).
2. Photo Manager Features
Philips Photo Manager for PhotoFrame has the following features for your convenience:
- Share photos between PC and the Philips PhotoFrame.
- Automatically resize the photos to match PhotoFrames resolution.
- Use drag and drop to copy photos between a PC and the Philips PhotoFrame.
- Retrieve removed photos from Auto Run Recycle Bin.
• Automatically detect Philips PhotoFrame.
3. Getting Started
3.1 System Requirements
- Computer Hardware Basic Requirements: Minimum: Pentium III 500MHz processor or equivalent or above, 128MB RAM, 100MB free HDD space, 16-bit High Color display adapter.
• Supported PC Operating System: MS Windows XP, and MS Windows 2000.
• Supported Languages: Chinese Simplified, Chinese Traditional, English, French, German, Italian, Japanese, and Spanish.
3.2 Installation
Follow the instructions below to install the Photo Manager Software on your computer:
1 Insert the CD into the CD-ROM of your computer and the CD will Auto play.
2 Follow the on screen instructions.
3 Click Finish to complete installation and launch Photo Manager.
3.3 Start Philips Photo Manager
Photo Manager automatically starts when you connect your PhotoFrame to your PC with the USB-cable.
To start Philips Auto Run manually:
1 Right-click the Auto Run icon in the Windows taskbar.

2 Select Show Photo Manager.
The main window appears.
To start using Photo Manager, refer to Section 5 Using Philips Photo Manager.
To terminate the program, select Terminate Photo Manager.
Photo Manager will automatically launch when the PhotoFrame is connected to your PC through a USB cable. You may also double click the desktop shortcut to bring up this application. See Section 4 for further details.
4. Phillips Photo Manager Overview
The screen below is the first one you will see when launching the Photo Manager. From here you control the functionality of the software. The screen is divided into the sections described below:
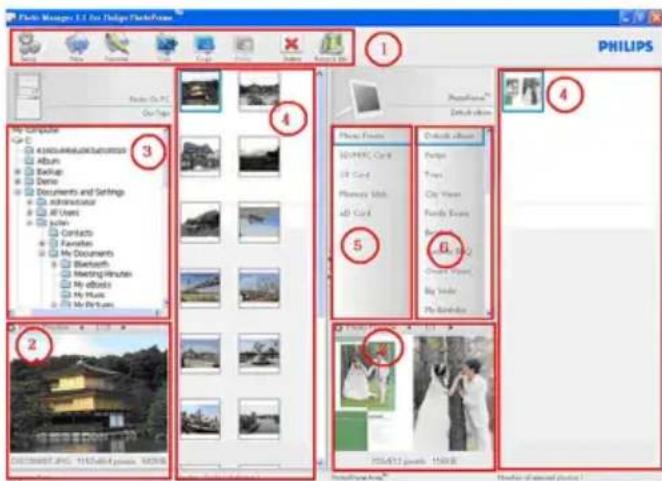
1 Photo Manager Toolbar
Command Key Pane is just beneath PC/PhotoFrame Panes and contains the functional button for Photo Copy, Cut, Past and Delete operations. Within the Command Key Pane, you may click the setup button to set the desired language, and use the recycle bin button to undelete photos.
Setup: The Setup button allows you to change such features as Photo Manager automatically running when the PC starts, and the language of the application.
New Album: The New Album button allows you to create new albums on a memory card or the PhotoFrame.
Rename Album: Click the Rename Album button to bring up a Keyboard Input Window.
Cut: You should select photos first and then click on the Cut button to cut the selected photos.
Copy: Select photos first and then click on the Copy button to copy the selected photos.
Paste: Immediately after you click on the Copy or Cut buttons, the Paste button will become available. You can select the target folder from the previous selected photos into the target folder (album).
✗ Delete: Select the photos or album that you want to remove and click on the Delete button to remove them.
Recycle Bin: Click the Recycle Bin button to switch the target folder to the recycle bin folder. You may browse those removed photos and move them back to desired folders.
Close: Clicking the Close button minimizes the application, which will be shown as a tray icon in the taskbar.
Your can always bring back this application by right-clicking on this tray icon and selecting the "Show Photo Manager" option. Alternatively, you may terminate this application by selecting "Terminate Photo Manager".

2 Photo Preview
Display the user selected picture with detail information, such as file name, file size and photo resolution.
3 The PC Frame
The PC Frame displays a folder tree structures similar to Windows Explorer, photos are shown as thumbnails. If no JPEG images are available "No Photo" will be displayed.
Warning:
Even if this view displays the "No Photo" message, this folder may contain other files and may not be empty.
Folder Tree View:
Displays all folders and the recycle bin in a tree structures similar to Windows Explorer. If the user clicks the desired folder, all photos in the folder will be shown in Photo Thumbnail View.
4 Thumbnail Previews
Display all photos in thumbnail view based on the user selected folder from folder tree view.
5 PhotoFrame Storage
Displays all of the storage devices on the PhotoFrame. The available devices are highlighted.
Note :
Philips PhotoFrame is not connected to your PC the "Disconnected" message will be shown.
Between the PhotoFrame storage (5) and the PC thumbnail Preview (4) is the Slide Bar: Click to move the Slide Bar left and increase the PhotoFrameTM Storage area and vice versa (you may click to increase the PC Thumbnail preview).
6 Album View
Displays the albums in the storage device.
5. Using the Photo Manager
5.1 Setting up Photo Manager
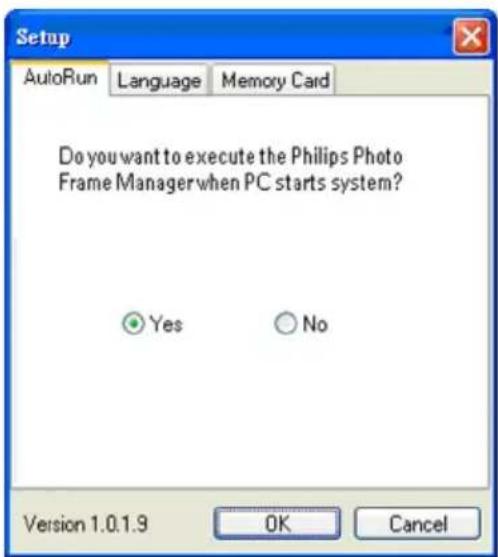
Setup Tool: You may setup application execution and language preferences from this window.
AutoRun Tab :
1 Select the "Yes" radio button to execute the Philips PhotoFrame Manager automatically, or select "No" to execute the Philips PhotoFrame Manager manually.
2 Click "OK" to confirm the change you have just made.
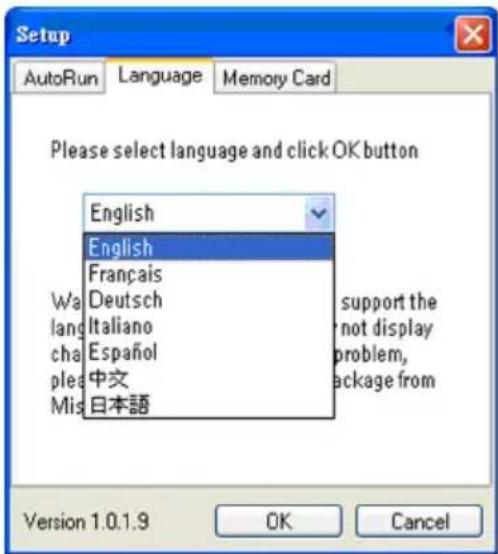
Language Tab:
1 Select the required application language from the list.
2 Click "OK" to confirm the change.
Warning:
If your computer doesn't support the selected language, the characters may not be displayed correctly. To solve this problem, update the language service packs from the Microsoft Website.
Memory Card Tab:
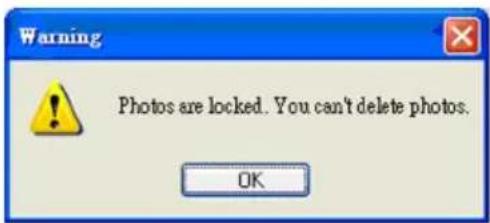
1 Select the "Yes" radio button to prevent users from deleting or making changes to photos in the PhotoFrame or select "No" to allow users to perform those operations on photos in the PhotoFrame.
2 Click "OK" to confirm the change you have just made.
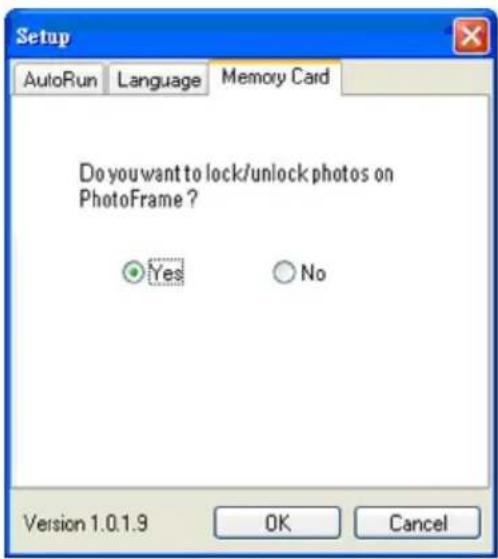
3 If users try to delete photos when the PhotoFrame has been locked, the following warning message will be displayed.
5.2 Crop Photos
- Photo Manager will automatically resize all photos copied to the PhotoFrame.
- Photos larger than 540x720 or 720x540 pixels can be manually cropped by double clicking the photos in the thumbnail view as shown below.
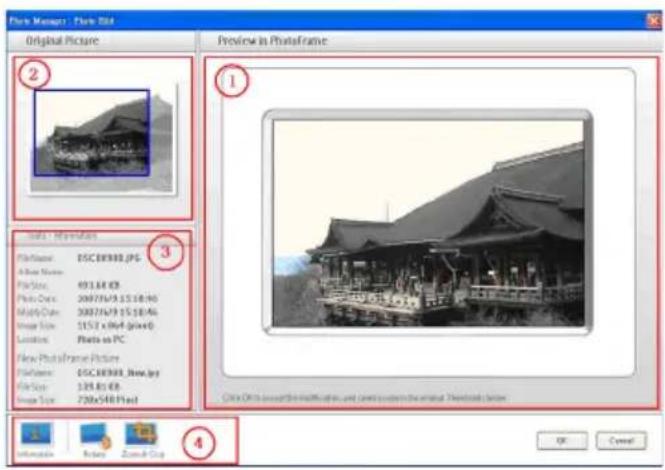
1 Preview in PhotoFrame
In this preview area, the cropped photo results are shown as it will be display in PhotoFrame.
2 Original Picture
- Displays the original photo in the thumbnail view and the area to be cropped in a blue rectangle, which presents the cropping area with 540x720 or 720x540 pixels.
- Use the mouse to drag this rectangle area to your desired area.
- Displays the Album Name, Date Time, and Photo Description information of the selected photo.
- Displays the submenu icons based on the selected command keys.
The Tools Pane is just located on the bottom of the Photo Edit Window, and contains the buttons for photo editing.
The Information button shows the Album Name, Date Time, and Photo Description information of the selected photo.
| Tools - Information |
| File Name: | Phi_0001.JPG |
| Album Name: | Trips |
| File Size: | 98.11 KB |
| Photo Date: | 2007/1/12 14:18:04 |
| Modify Date: | 2007/1/12 14:18:04 |
| Image Size: | 720 x 424 (pixel) |
| Location: | Photo on PC |
| New PhotoFrame Picture |
| File Name: | Phi_0001_New.jpg |
| File Size: | 100 KB |
| Image Size: | 720x540 Pixel |
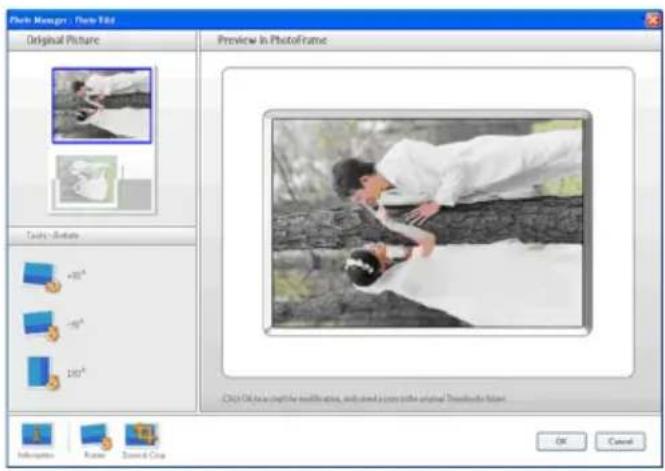
Rotate:
The Rotate button allows you to rotate the angle of the selected photo. Available angles are +90°, -90° and 180°. Once the desired angle has been selected, both images in Original Picture and Preview in PhotoFrame will be automatically adjusted to the new angle.
Zoom & Crop:
Click the Zoom & Crop button to bring up the scaling control bar into Tools information Area. Users can zoom in to the photo by dragging the control bar up, or zoom out by
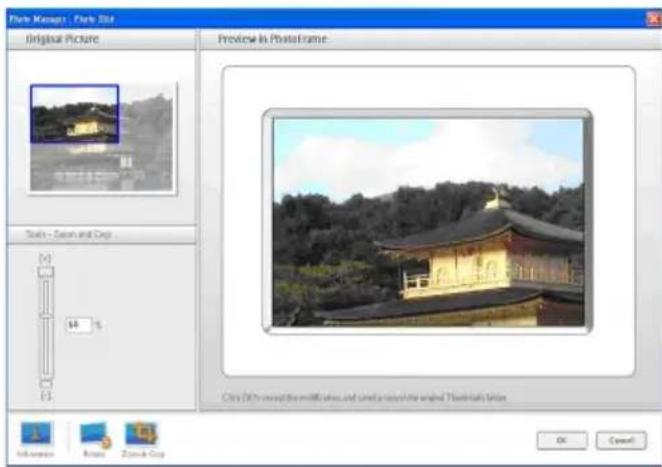
To confirm the crop operation simply click OK button. It will save the cropped file in the same folder. The saved file will carry the same filename plus an index number. For example, if the original filename is original.jpg, the saved file will be original(1).jpg

Note :
If the Photo size is less than 540x720 or 720x540 pixels, it will display the following warning message.

5.3 Cutting, Copying and Pasting Photos
Copy:
Select the photos first, and then click the Copy button to copy the selected photos. Copying leaves the selected photos in their original folder.
Cut:
Select the photos first, and then click the Cut button to cut the selected photos. Cutting removes the selected photos from their original folder.
Warning:
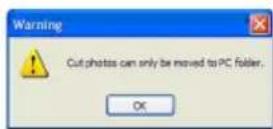
Photos can be cut from a memory card to a PC, but cannot be cut from a PC to a storage device.
Warning:
Do not disconnect USB connection between the PC and the PhotoFrame when copying, moving or deleting photos in PhotoFrame as this may cause the loss of data or the photo.
Paste:
Once the photo has been cut or copied it needs to be pasted into the chosen folder.
1 Select the folder to paste into.
2 Either click the Paste icon or right click for the secondary menu and click Paste.
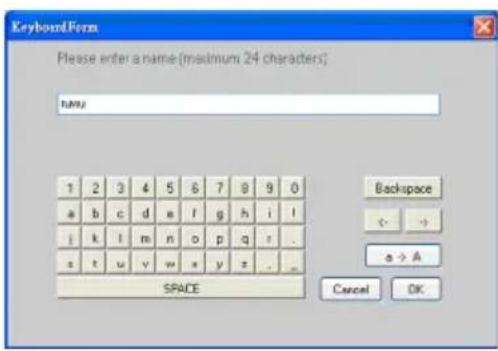
5.4 Create New Albums
To create a new album
1 Select the PhotoFrame or target memory card
2 Click on the New Album icon to bring up Keyboard Form window. the album to bring up the secondary menu and click Rename.
3 Input the name for the album using either the computer keyboard or by clicking on the keyboard buttons.
4 Click OK to add the new name.
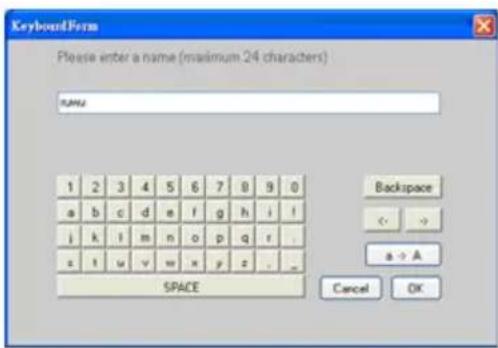
5.5 Renaming Albums
1 Select the album to rename.
2 Either click the rename icon or right click the album to bring up the secondary menu and click Rename.
3 Input the name for the album using either the computer keyboard or by clicking on the keyboard buttons.
4 Click OK to add the new name.
5.6 Deleting Albums and Photos
Albums and files are deleted in the same way:
1 Select albums / photo that you want to be removed.
2 Either click the Delete icon or right click for the secondary menu and click Delete Album/Delete.
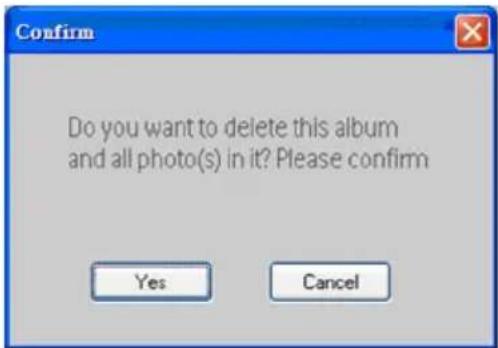
3 A confirmation window similar to the one below will pop up and ask you to double confirm. Click Yes.

Note :
All deleted files will be moved into the Recycle Bin.
Warning:
If the HDD has minumim free memory space, it does not allow to backup.

Contenu
6 Affichage de l'album
Displays the albums in the storage device.
5. Utiliser Photo Manager
5.2 Rogner des photos
Zoomer & Rogner (Zoom & Crop):
Avertissement:
Inhalt
To start Philips Auto Run manually:
2 Fotovorschau
Registerkarte Sprache (Language):
1 Vorschau in PhotoFrame (Preview in PhotoFrame)
Sommario
1. Benvenuti in Photo Manager
Scheda Lingua (Language):
1 Anteprima in PhotoFrame
Attenzione:
Содержание
Phillips Photo Manager
5.2 Обрезка фотоснимков
Масштаб и обрезка (Zoom & Crop):
Предупреждение:
Contenido
2 Seleccione Mostrar Photo Manager (Show Photo Manager).
2 Vista previa de la foto (Photo Preview)
5.2 Recortar fotos
1 Vista previa en PhotoFrame (Preview in PhotoFrame)
2 Imagen original (Original Picture)

Zoom y recortar (Zoom & Crop):
Aviso:
Inhoud
1 Photo Manager Taakbalk
2 Photo Preview
4 Thumbnail Previews
Language tab:
1 Preview in PhotoFrame
Zoom & Crop:
Waarschuwing:
Indhold
- Velkommen til Photo Manager 72
- Photo Manager Fuktioner 72
- Kom Godt Igang 73
3.1 System Krav 73
3.2 Installation 73
3.3 Start Philips Photo Manager 73
- Phillips Photo Manager Overblik 74
- Brug af Photo Manager 75
5.1 Opsætning Af Photo Manager 75
5.2 Beskær Fotos 77
5.3 Klippe, Kopiere Og Indsæt Fotos 78
5.4 Opret Nyt Album 79
5.5 Renaming Albums 79
5.6 Slette Albums og Fotos 79
1. Velkommen til Photo Manager
2 Vælg Vis Photo Manager.
Hoved vinduet vises.
For at bruge Photo Manager, henvises til kapitel 5 Brug Af Philips Photo Manager.
2 Vis Foto
Fanebladet Sprog:
5.2 Beskær Fotos
1 Vis i PhotoFrame
Zoom & Beskær:
Advarsel:
目录
3.3 启动Philips Photo Manager
(PhotoFrame Storage)
语言(Language)选项卡:
记忆卡(Memory Card)选项卡:
1 相框预览(Preview in PhotoFrame)
5.3 剪切、复制和粘贴照片
复制(Copy):
注意:
目次
2 写真のプレビュー
Using the Photo Manager
Language(言語)タブ:
5.2 写真のトリミング
1 Preview in PhotoFrame(PhotoFrame でのプレビュー)
![Park Manager - Flare Edit Original Picture Preview in PhotoFrame Tests - Zoom and Crop [1] 64 % P3 Close OK to update the profile at all, but not how to update the original 'Theatrical library' Unknown Notes Zoom & Crop OK Cancel](/content/2026/02/359656/images/b4798ebb9830bbc6a83cf0309ea32ed6c453de5e4552b6b7bf0ce56c70cd2ea5.jpg)
Cut(切り取り):
Paste(貼り付け):