
QC5053 - Beard trimmer PHILIPS - Free user manual and instructions
Find the device manual for free QC5053 PHILIPS in PDF.
| Product Type | iPod Dock Station |
| Brand | Philips |
| Model | QC5053 |
| iPod Compatibility | All iPods with dock connector (adapters included) |
| Main Functions | Charging, USB syncing, audio playback, photo/video display via S-Video |
| Power Supply | 12V DC power adapter or computer USB port |
| Audio Outputs | 3.5mm jack + RCA output (cable included) |
| Video Output | S-Video (cable included) |
| Connectivity | USB (for computer), DC 12V input |
| Remote Control | Model SJM3141 (infrared, CR2025 battery, range 5 m) |
| Indicator Light | Green (on/charging) |
| Package Contents | Dock, power adapter, USB cable, S-Video cable, stereo audio cable, remote control, manual |
| Maintenance | Clean with a dry cloth, do not expose to water |
| Safety | Do not block vents, use on a stable surface, unplug when not in use |
Frequently Asked Questions - QC5053 PHILIPS
User questions about QC5053 PHILIPS
0 question about this device. Answer the ones you know or ask your own.
Ask a new question about this device
Download the instructions for your Beard trimmer in PDF format for free! Find your manual QC5053 - PHILIPS and take your electronic device back in hand. On this page are published all the documents necessary for the use of your device. QC5053 by PHILIPS.
USER MANUAL QC5053 PHILIPS
What can you do with the SJM3140 and SJM3141 4
Setup for your Docking Station 4
Playing Music through External Speakers or a Stereo 4
Display photos or video on a TV or other video device 5
Remote Operation 5
FCC Compliance 6
Industry Canada Statement 7
Technical Support 7
Limited One Year Warranty 7
Congratulations on purchasing the Philips Docking Cradle for iPod. It serves as a convenient home base for charging,yncing and more. It works with all iPod models that have a dock connector, so if you own more than one iPod, you can keep just one Dock connected to your computer, stereo or TV.
Any model of iPod with a dock connector can fit into a single Dock through the use of interchangeable inserts called Dock Adapters*. You simply insert the Dock Adapter that fits your particular iPod model, and then plug in your iPod. When you want to connect a different-size iPod, simply pop out the Dock Adapter and insert a new one.
*Dock adapters not included.
Package Contents
- Docking Station for iPod
- Power adapter
- USB cable
- S-Video cable
- Stereo Audio Cable.
- Instruction Manual
- Remote (Model SJM3141 only)
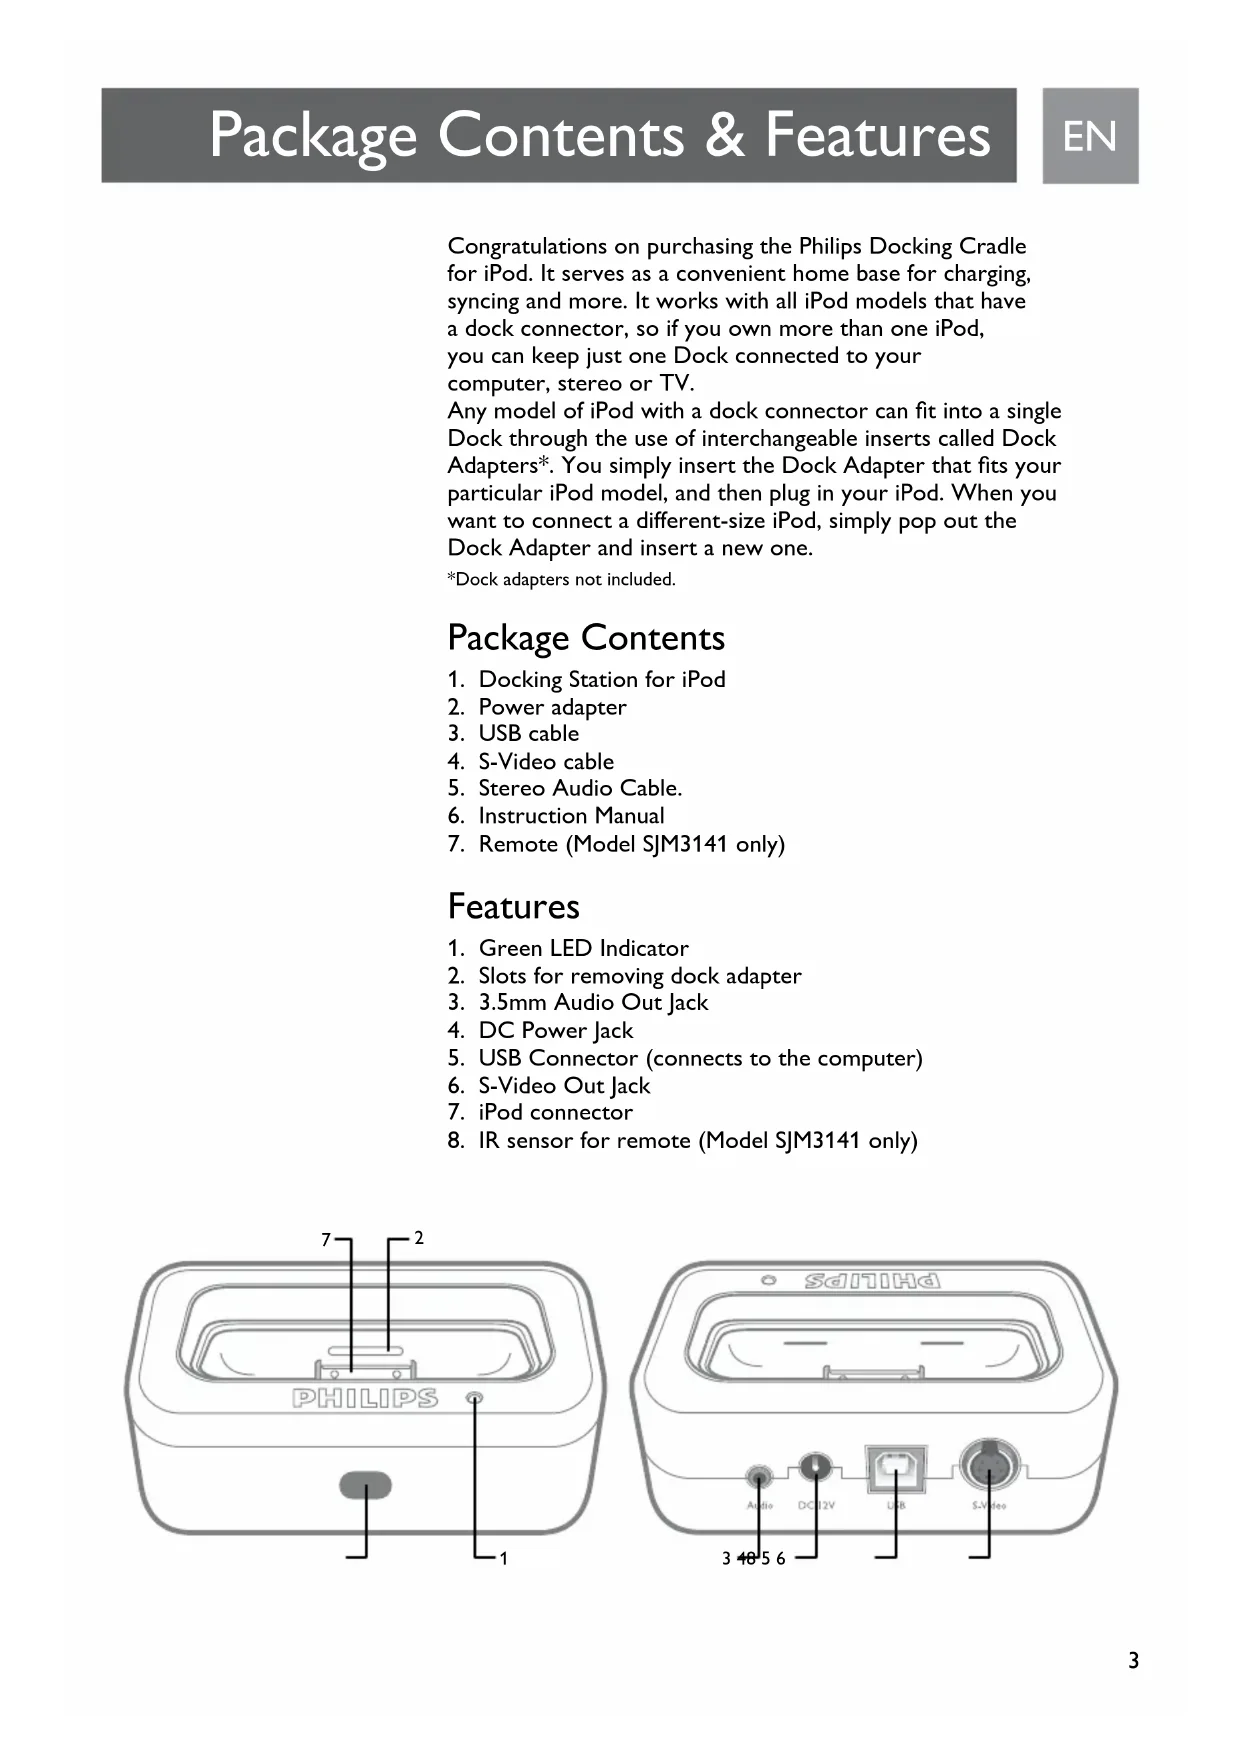
Features
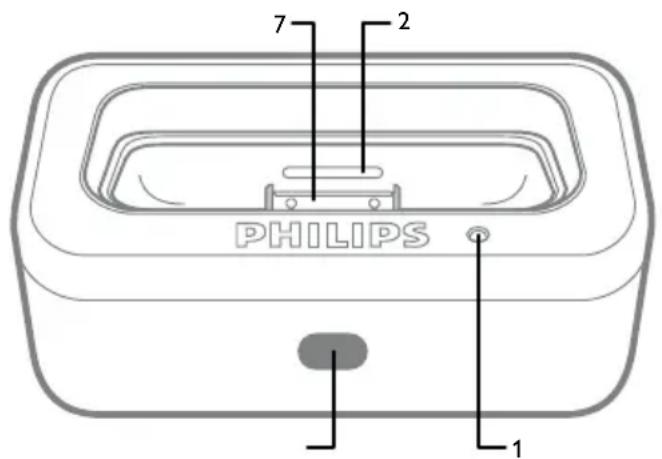
- Green LED Indicator
- Slots for removing dock adapter
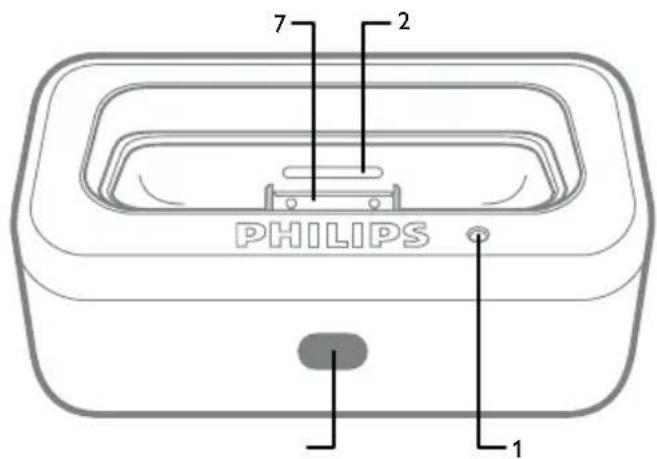
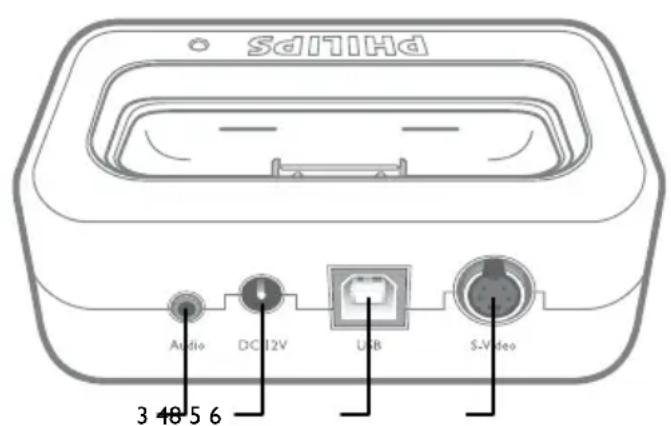
- 3.5mm Audio Out Jack
- DC Power Jack
- USB Connector (connects to the computer)
- S-Video Out Jack
- iPod connector
- IR sensor for remote (Model SJM3141 only)
What can you do with the SJM3140 and SJM3141
- Connect the Dock to your computer with the USB cable, and then place your iPod in the Dock to sync and charge the battery. No more reaching behind the computer to plug it in.
- Connect the Dock to an electrical outlet using the Power Adapter, and then place your iPod in the Dock to charge the battery.
- Connect the Dock to a stereo or speakers using the supplied stereo audio cable to play music from iPod.
- Display photos or video on a TV or other video device using the supplied S-video cable if you have an iPod with a color display.
Setup for your Docking Station
- Remove all package contents
- Locate your dock near your Computer, Stereo or TV.
- For Sync and Charging, Connect one end of the supplied USB cable to the USB port on your computer and the other end of the cable to the jack labeled USB on your docking station.
- For Stereo Playback, Connect the Red and White RCA connectors on one end of the supplied Audio cable to the Audio in RCA jacks on your stereo, connect the other end with 3.5mm plug to the jack labeled Audio on your docking station.
- For Video and Photo Playback, Connect one end of the supplied S-Video cable to the S-Video in jack on your television, connect the other end to the jack labeled S-Video on your docking station.
- Connect the Power cord to an electrical Outlet and the other end of the power cord to the DC 12V jack on the back of your docking station.
- Remove the plastic tab from the Remote (SJM3141 only)
Playing Music through External Speakers or a Stereo
Using the iPod Dock, you can play music from your iPod over externally powered speakers or a home stereo. The Dock includes a stereo audio cable with RCA plugs. This cable is used with speaker systems and home stereos with Audio in RCA Jacks. Some speaker systems will only have a 3.5mm audio in jack. With this type of speaker system you will need to use an audio cable with 3.5mm stereo plugs on both ends.
(A standard 3.5mm to 3.5mm audio cable is not included.)
To use your iPod with the Dock to play your music through speakers or a stereo:
- Insert the appropriate dock adapter for your specific iPod model.
- Place iPod in the Dock.
-
Use the supplied audio cable to connect the Dock's Audio out jack to your home stereo or speaker system's Audio in RCA jacks.
-
Use the iPod control wheel to navigate iPod menus and play songs. (Note for SJM3140: Volume can only be increased or decreased by using the volume control on your home stereo or speaker system.)
To play music when the Dock is connected to your computer, iPod must not be enabled for use as a disk (for information about using iPod as a disk, consult your iPod user manual.)
*Dock adapters not included.
Display photos or video on a TV or other video device
Using the iPod Dock, you can display photos or video if you have an iPod with a color display. You need an S-Video cable which is included in the additional accessories.
To use your iPod with the dock to display photos or video on a TV or other video device:
- Place iPod in the Dock.
- Use the S-Video cable to connect the Dock's S-Video out jack to your TV or other video device.
- Use the iPod control wheel to navigate the iPod menus and display photos or videos. (Note for SJM3140: Volume can only be increased or decreased by using the volume control on your TV or video device.)
To display photos or videos when the Dock is connected to your computer, iPod must not be enabled for use as a disk. (for information about using iPod as a disk, consult your iPod user manual.)
The iPod will charge and the charge LED will illuminate any time the iPod is docked and:
- The Power adapter is connected to a live wall power outlet.
- The dock is connected to the USB port on a computer and the Computer is "awake" and connected to a power outlet, OR is running on a charged battery pack.
Remote Operation
(For Model SJM3141 Only)
- Remove the Plastic tab from the battery before using the remote.
- Make sure the iPod is in the Dock and the Dock is connected to your stereo or TV.
- Make sure the Power adapter is connected to a power outlet.
- Point the remote control toward the sensor on the docking station.

A) Power -Turn the dock power on and off. Dock power must be on in order to use the remote control. iPod will be charged with dock power on or off.
B) Play/Pause - Play/pause a song or video.
C) Volume Up - Increase the dock audio output volume.
D) Volume Down - Decrease the dock audio output volume.
E) Next - Skip to next song or video.
F) Backward - Skip to previous song or video.
G) Up - Scroll up through menus.
H) Down - Scroll down through menus.
I) Next Playlist - Scrolls to next playlist.
J) Previous Playlist - Scrolls to previous playlist.
K) Fast Forward - Press and hold to fast-forward search.
L) Rewind - Press and hold to fast-rewind search.
M) Random - Toggles between Off, Song Shuffle, and Album shuffle.
N) Repeat - Toggles between Off, Repeat a single song, and repeat all songs.
O) OK - Select current menu, playlist, song or video.
P) Menu - Used to go back to previous menu
Notes on using the remote control:
- The remote control will only increase and decrease the dock's output volume. The remote control will not control the iPod's volume.
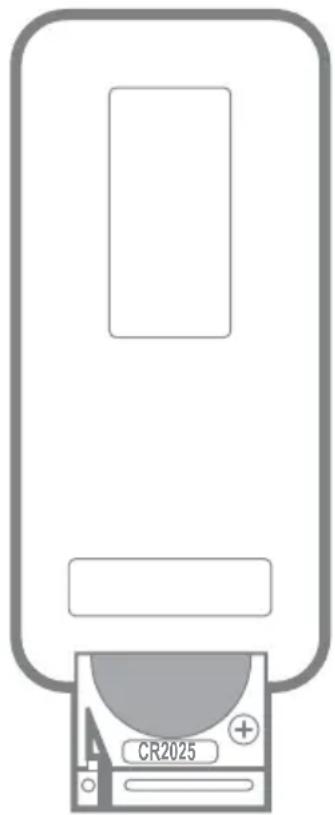
- Replace with type 3V CR2025 battery
- The battery life is approximately one year. If the remote is not functioning please replace the battery (see Replacing the battery).
- Remove the batteries when the remote is not in use for an extended period of time.
- Stay within a range of 16' (4.88 meters) and 60^ .
FCC Compliance
This device complies with Part 15 of the FCC Rules. Operation is subject to the following two conditions:
- this device may not cause harmful interference, and
- this device must accept any interference received, including interference that may cause undesired operation.
Note!
This equipment has been tested and found to comply with the limits for a Class B digital device, pursuant to Part 15 of the FCC Rules. These limits are designed to provide reasonable protection against harmful interference in a residential installation. This equipment generates, uses and can radiate radio frequency energy and, if not installed and used in accordance with the instructions, may cause harmful interference to radio communications. However, there is no guarantee that interference will not occur in a particular installation. If this equipment does cause harmful interference to radio or television reception, which can be determined by turning the
equipment off and on, the user is encouraged to try to correct the interference by one or more of the following measures:
- Reorient or relocate the receiving antenna.
- Increase the separation between the equipment and receiver.
- Connect the equipment to an outlet on a circuit different from that to which the receiver is connected.
- Consult the dealer or an experienced radio/TV technician for help. Any unauthorized modification to this equipment could result in the revocation of the authorization to operate the equipment.
Industry Canada Statement
This Class B digital apparatus complies with Canadian ICES-003.
Technical Support
Email: accessoriesupport@philips.com
Limited One Year Warranty
Philips warrants that this product shall be free from defects in material, workmanship and assembly, under normal use, in accordance with the specifications and warnings, for one year from the date of your purchase of this product. This warranty extends only to the original purchaser of the product, and is not transferable. To exercise your rights under this warranty, you must provide proof of purchase in the form of an original sales receipt that shows the product name and the date of purchase. For customer support or to obtain warranty service, please call 919-573-7863. THERE ARE NO OTHER EXPRESS OR IMPLIED WARRANTY. Philips' liability is limited to repair or, at its sole option, replacement of the product. Incidental, special and consequential damages are disclaimed where permitted by law. This warranty gives you specific legal rights. You may also have other rights that vary from state to state.
All rights reserved. iPod is a registered trademark of Apple Computer, Inc.


DFU "Information to the Consumer"
Disposal of your old product
Your product is designed and manufactured with high quality
materials and components, which can be recycled and reused.
When this crossed-out wheeled bin symbol is attached to a
product it means the product is covered by the European Directive
2001/96/EC
Please inform
for economical
yourself about the local separate collection system
and electronic products.
Please act according to your local rules and do not dispose of your old products with your normal household waste. The correct disposal of your old product will help prevent potential negative consequences for the environment and human health.
Industry Canada Statement 13
Support Technique 14
Garantie 14
Industry Canada Statement
This Class B digital apparatus complies with Canadian ICES-003.
Support technique
Courriel:accessorysupport@philips.com
Garantie
http://www.philips.com/support


Technical Support 21
Garantie 21
This Class B digital apparatus complies with Canadian ICES-003.
E-mail: accessorysupport@philips.com
Garantie
http://www.philips.com/support


E-mail: accessorysupport@philips.com
Garantie
http://www.philips.com/support


Email: accessorysupport@philips.com
Garanzia
http://www.philips.com/support


E-post: accessorysupport@philips.com
Garanti
http://www.philips.com/support


WEEE-märkning i DFU: "Information till konsumenten"
Email: accessorysupport@philips.com
Eyyunon
http://www.philips.com/support


Bocnpoun3BeAeHne My3bIKn Ha BHeuHNx rpOMKOrOBOpHTeAIX HAN cTepeoCnCTeMe. 73
OTo6paXKeHHe fOTo HAn BnAeO Ha TeAeBn3OpE HAn APyROM 3KpaHHOM yCTpOJCTBe. 74
YnpaBHeHc nOmoBIO nybTa y 75
CoOTBeTCTBHe FCC 76
OtpacaeBoe 3aBHeHne KaHa.76
TexHHuecka IOMOu7b 78
TapaHTn8 78
I03ApABAeM C NOKyIKoN AOK-CTAHuIN Philips AIA iPod AOK-CTAHUCAUYKNT B KauecTBe yAO6HOJ 6a3bl AIA 3apAKn, CnHXPOHn3aUN I T.I. AOK-CTAHURA NOAepXnBaET BCE MOeAN iPod c pa3bEMOM AIA AOK-CTAHUIN, NO3TOMY ECAN Y BAC HECKOABKO MOeAeN iPod BB MoXeTe N0A3OBaTBCr TOAbKO OAnOH AOK-CTAHUeN, POAKAUOyeHHoN K KomNbIOTepy, CtepeocnCTEm HAN TEAEBn3OpY.
AIO6a Moe b iPod c pa3beMOM AIA OOK-CTAHUN MOKeT 6bIb yCTAHOBaHa B OOK-CTAHUHO C NMOOuBIO CMEHHbIX BCaBOK, Ha3bIBaEMbIX aAnTepaMn OAK-CTAHUH. Hyxho npocTo ycTaHOBt b aAnTeP OOK-CTAHUH, IOXoAJeE ONpeAeHHO MoeA H iPod, 3aTe mnoKAIOHTb iPod. PnH No6xoAMOCtN IOKIAOHTb iPod apyroro pa3Mepa npocTo h3BAeKHTe aAnTeP OOK-CTAHUN IN BCaBBte dpYroH.
CoepxHmoe ypaKOBKn
I. AOK-CTaHcHgAIA iPod
2. Aaantep 3AeKTPoNTaHn
3. Ka6eAb USB
4. Ka6eAb S-Video
5. Ctepeo ayAnoka6eAb.
6. PykoBOACTBO NOAb3ObaTeA
7. Πγαβτ Δγ (TOλκο γ MOεAN SJM314I)
XapakTepnCTnKn
- 3eAeHbI INHAnKaTOp
- Ppoembl AAn H3BaeueHn aAanTepa DOK-CTAHn
- BbIXOaHO pa3bem ayAnocnHaHa 3,5 MM
- Pa3bem AAN NOKAOUeHIN NITaHIN NOCTOHHORTO TOKA
- Pa3bem USB (noAkanoyehne K KomnbioTepy)
- BbIXOa S-Video
- Pa3bem AA iPod
- IK-aaTnK AaIpybTa Y (ToAko y MoeAn SJM3141)
TO MOXHO AeAaTb C NOMOu yHnBepcaAbHOI
DAK-CTaHcHH
- IOnKaIOUHTe AOK-CTAHUIO K KOMNbIOTepy C NOMOuBIO Ka6eA USB, 3aTeM yCTaHOBtE iPod B AOK-CTAHUIO DAA CNHXPOH3aUNN HapAKe aKKMyAITOPa. AIA NOKAIOUChHn 6oABwe He HxKHO TAYTbCn K 3aDHe nAHeN KOMNbIOTepa.
- I OaKIOUHTe AOK-CTAHUIO K 3AekTPoNTaHNUO yepe3 aAnTep nepemehnHO ToKa, 3aTeM yCTaHOBtE iPod B AOK-CTAHUIO dAra 3aprAKn aKKyMaTopa.
- PIOKIAOHTe AOK-CTAHUIO K CTEpeOCnCTeMe HAN rPOMKOROBOPNTA M c NOMOUBIO pNAAraEMOrO CTEpeo ayAnoka6eAa BocpOn3BeDeHn My3bIKc iPod.
- PpOcMaTpHbAaTe foTOrpaΦn HAn BnAeO Ha 3KpaHe TeAeBn3Opa HAn APyIrO 3KpaHnOro yCTpoNCTBa C NOMoUbIO npHaaraEMoro Ka6eA S-video, ecAn y Bac iPod c UBeTHbIM 3KpaHOM.
HactpoIka dok-ctaHcnn
Email: accessorysupport@philips.com
Garanti
http://www.philips.com/support


Specifications are subject to change without notice
Trademarks are property of
Philips Accessories and Computer Peripherals
©2007 Philips Accessories and Computer Peripherals,
Ledgewood, NJ USA
IMPORTANT SAFETY INSTRUCTIONS
- Read these Instructions.
- Keep these Instructions.
- Heed all Warnings.
- Follow all instructions.
- Do not use this apparatus near water.
- Clean only with a dry cloth.
- Do not block any of the ventilation openings. Install in accordance with the manufacturers instructions.
- Do not install near any heat sources such as radiators, heat registers, stoves, or other apparatus (including amplifiers) that produce heat.
- Do not defeat the safety purpose of the polarized or grounding - type plug. A polarized plug has two blades with one wider than the other. A grounding type plug has two blades and a third grounding prong. The wide blade or the third prong are provided for your safety. When the provided plug does not fit into your outlet, consult an electrician for replacement of the obsolete outlet.
- Protect the power cord from being walked on or pinched particularly at plugs, convenience receptacles, and the point where they exit from the apparatus.
- Only use attachments/accessories specified by the manufacturer.
- Use only with a cart, stand, tripod, bracket, or table specified by the manufacturer, or sold with the apparatus. When a cart is used, use caution when moving the cart/apparatus combination to avoid injury from tip-over.
- Unplug this apparatus during lightning storms or when unused for long periods of time.
- Refer all servicing to qualified service personnel. Servicing is required when the apparatus has been damaged in any way, such as power-supply cord or plug is damaged, liquid has been spilled or objects have fallen into the apparatus, the apparatus has been exposed to rain or moisture, does not operate normally, or has been dropped.
WARNING: The apparatus shall not be exposed to dripping or splashing and no objects filled with liquids, such as vases, shall be placed on the apparatus.
The box of lightning is intended to alert the user to the presence of uninsulated dangerous voltage within the product's enclosure that may be of sufficient magnitude to constitute a risk of electric shock to persons
The "exclamation point" calls attention to features for which you should read the enclosed literature. It also includes operating and maintenance problems.