
Pinmaster II - Binoculars LEICA - Free user manual and instructions
Find the device manual for free Pinmaster II LEICA in PDF.
| Product type | Laser rangefinder for golf |
| Brand | Leica |
| Model | Pinmaster II |
| Category | Binoculars (rangefinder) |
| Magnification | 7x |
| Objective diameter | 24 mm |
| Measuring range | Approx. 10 to 750 m |
| Measurement accuracy | ±1 m up to 375 m, ±2 m up to 750 m |
| Power supply | 1 lithium 3V battery type CR2 |
| Battery life | Approx. 2000 measurements at 20°C |
| Dimensions (w x h x d) | 75 x 34 x 113 mm |
| Weight (with battery) | Approx. 220 g |
| Main functions | Distance measurement, scan mode, first target logic, diopter adjustment, unit selection (m/yd) |
| Laser type | Class 1, invisible, eye-safe |
| Operating temperature | -10 to 55°C |
| Water resistance | Up to 1 m depth for 30 min |
| Housing material | Carbon fiber reinforced synthetic, lacquered |
| Maintenance and cleaning | Clean lenses with a damp cloth then a special optical chamois. Avoid alcohol and chemical solutions. |
| Safety | Do not look directly at bright light sources. Do not open the device. |
| Spare parts and repairability | Spare parts available (eyecup, strap) from Leica customer service. |
| Warranty | Warranty card included |
| Package contents | Rangefinder, CR2 battery, carrying strap, Cordura case, warranty card |
Frequently Asked Questions - Pinmaster II LEICA
User questions about Pinmaster II LEICA
0 question about this device. Answer the ones you know or ask your own.
Ask a new question about this device
Download the instructions for your Binoculars in PDF format for free! Find your manual Pinmaster II - LEICA and take your electronic device back in hand. On this page are published all the documents necessary for the use of your device. Pinmaster II by LEICA.
USER MANUAL Pinmaster II LEICA
Product Support / Software Support
Am Leitz-Park 5
D-35578 Wetzlar
Telefon: +49(0)6441-2080-111/-108
Telefax: +49(0)6441-2080-490
info@leica-camera.com/
software-support@leica-camera.com
LEICA CUSTOMER CARE
- Secondary button
- Main button
- Eyecup with
a. Diopter scale
- Carrying cord eyelet
- Eyepiece
- Battery compartment cover
- Battery compartment
- Lens for viewing optics
- Laser transmitter optics
Scope of delivery
-Rangefinder
- 1 lithium cell 3V type CR2
- Carrying cord
Cordura case
Warranty Card
Leica Pinmaster
Order no.: 40533
Warning notice:
As with all binoculars, to avoid damaging your eyes, do not look directly at sources of bright light through your Leica Pinmaster.
FOREWORD
Dear Customer
Worldwide, Leica stands for superb optical quality, close-tolerance precision engineering, absolute reliability, and a long product life. We wish you every success and a great deal of pleasure in using your new Leica Pinmaster. The Leica Pinmaster sends out pulses of laser light, which are in the infrared wavelength, harmless and invisible to the naked eye. Some of these pulses are reflected back. The built-in microprocessor calculates the object distance from these reflected signals. The Leica Pinmaster is equipped with a first target logic specially developed for golf and a scanning mode. This greatly simplifies measuring the distance to the flag. The Leica Pinmaster is equipped with superb 7x-magnification optics, which enable good targeting even in difficult conditions, and its functional design makes it easy to use. Please read the following instructions to get the maximum benefit from this versatile and high quality laser rangefinder.
TABLE OF CONTENTS
Nomenclature 16
Scope of delivery 16
Foreword 17
Disposal of electric and electronic. 13
equipment 19
Fitting the carrying cord. 20
Inserting and changing the battery 20
Battery charge level 21
Use with and without glasses 22
Diopter compensation 22
Setting the unit of measure 23
Distance measurement 24
Scan mode 24
First target logic. 25
Operating range and accuracy. 26
Maintenance/cleaning. 27
Troubleshooting 28
Technical Data 29
Leica Information Service. 30
Leica Customer Care. 30
FCC note 32
DISPOSAL OF ELECTRICAL AND ELECTRONIC EQUIPMENT
(Applies within the EU, and for other European countries with segregated waste collection systems.)
This device contains electrical and/or electronic components and must therefore not be disposed of in general household waste! Instead, it should be disposed of at a recycling collection point provided by the local authority. This costs you nothing. If the device contains standard or rechargeable batteries, these must be removed first and also be disposed of in line with relevant regulations.
Further information on the subject is available from your local administration, your local waste collection company, or in the store where you purchased this device.
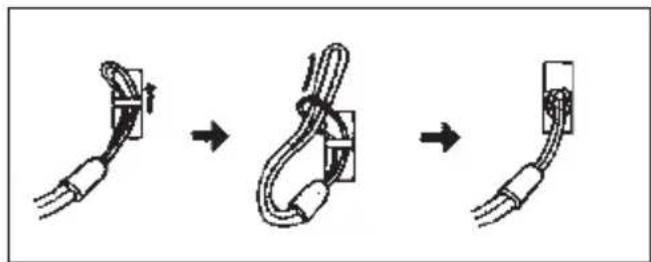
FITTING THE CARRYING CORD
Push the smaller loop through the eyelet (4) on the housing of the Leica Pinmaster. Then, thread the longer loop through the smaller loop and pull it tight so that the carrying cord is securely attached to the eyelet.
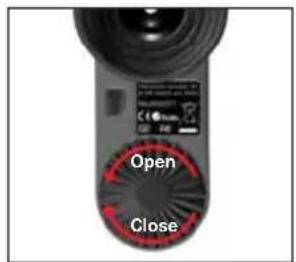
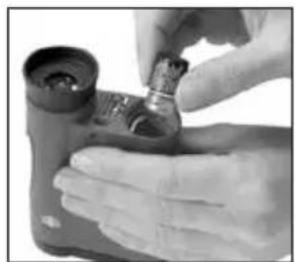
INSERTING AND CHANGING THE BATTERY
The Leica Pinmaster is supplied with power by one 3 Volt lithium cell (e.g. Duracell DL CR 2, Ucar CR 2, Varta CR 2, or other CR 2 types).
- Open the battery compartment (7) cover (6) by turning it anticlockwise.
- Insert the battery with its positive contact facing forwards (as marked in the battery compartment).
- Close the cover again by turning it clockwise.
Notes:
- Battery performance suffers in the cold
- There-fore, at low temperatures, it is a good idea to keep the Leica Pinmaster in an inside pocket (close to the body) and fitted with a fresh battery.
- If the Leica Pinmaster is not going to be used for a long time, the battery should be removed.
- Batteries should be stored in a cool dry place.
Attention:
- Batteries should never be put in a fire, heated, recharged, disassembled, or broken apart.
- Used batteries may not be disposed of as normal household waste as they contain hazardous materials that are harmful to the environment. To ensure that they are properly recycled, they should be returned to the dealer or disposed of as special waste (at a collection point).
Battery charge level
A flat battery is indicated by the flashing distance display and the target mark. Over 100 further meas urements (at a progressively diminishing range) can be taken after the display first starts to flash.
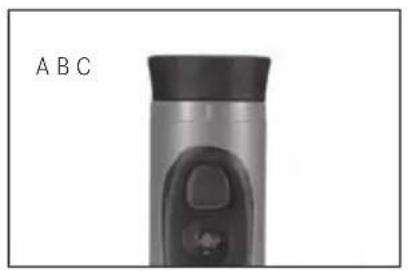
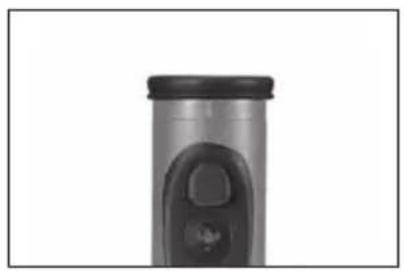
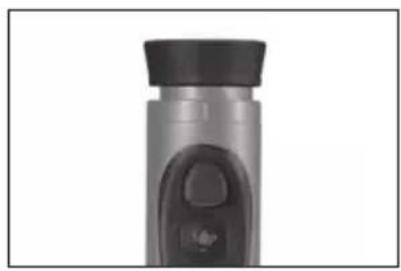
USE WITH AND WITHOUT GLASSES
If you are not wearing glasses, leave the rubber eyecup (3) folded up, as it comes (Figure A). This position gives the correct distance between the eye and the Leica Pinmaster. When viewing with glasses, fold down the eyecup (Figure B).
DIOPTER COMPENSATION
The diopter compensator allows you to adjust the sharpness of the target mark to suit you best. Simply target the Leica Pinmaster on some far away object and turn the eyecup (3) until the target mark is as sharp as possible. The target mark can be seen by pressing the main button (2). The degree of compensation can be read off the "+" or "-" scale (3a) on the eyecup. Compensation within the range of ± 3.5 diopters is possible.
SETTING THE UNIT OF MEASURE
The Leica Pinmaster can be set to meters or yards, the more commonly used unit in the USA.
Setting:
-
Briefly press (<3s) the main button (2).
-
The target mark appears.
-
Press and hold (≥ 3s) the secondary button (1).
EU.Us5 appears below the target mark.
-
Briefly press the main button.
-
EU disappears, the target mark and US continue to flash.
-
Select your preferred units of measure by (repeatedly) pressing the secondary button. US stands for the unit yards, EU for meters.
-
The respective displays continue to flash.
-
Save your setting by briefly pressing the main button.
-
The saved setting and the target mark light up continuously for 2 seconds for confirmation and then disappear.
Notes:
- The current setting can always be seen in the display-if meters are selected, a dot appears to the bottom right of the target mark.
- Concerning the setting process: The displays disappear 3 seconds after you last press one of the two buttons. The previously saved setting is retained.
DISTANCE MEASUREMENT
To measure the distance to an object, it must be perfectly targeted. To do this, activate the target mark by pressing the main button (2) once. The target mark remains lit for about 4 seconds after letting the main button go. If the button is kept pressed, the target mark remains lit.
While the target mark is lit, aim the Leica Pinmaster at the object and press the main button a sec ond time; the distance is then measured and displayed. The target mark disappears briefly during the
measurement. A new measurement can be made at any time, as long as the target mark is lit, by pressing the main button once again. If the object is less than 10m / 11 yds away, out of range, or does not provide enough reflection, then _ _ _ appears on the display.
The Leica Pinmaster switches itself off as soon as the display disappears.
SCAN MODE
With the Leica Pinmaster, continuous measurements can also be made: If the main button (2) is held down the second time it is pressed, the unit switches to scan mode after approx. 0.5 seconds and then takes continuous measurements. This is indicated by the changing display: a new measured value is produced around every 0.5 seconds. Scan mode is particularly practical when measuring to flagsticks or other smaller targets.
Note:
In scan mode, due to the constant measurements, the power consumption is greater than for single measurements.
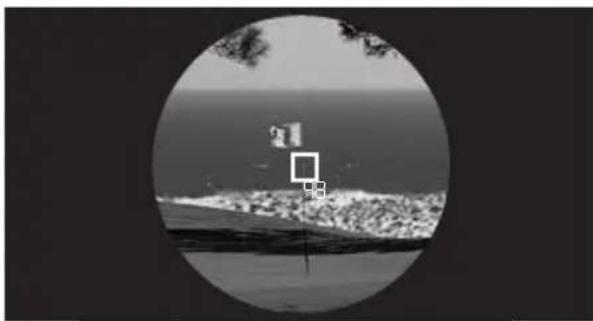
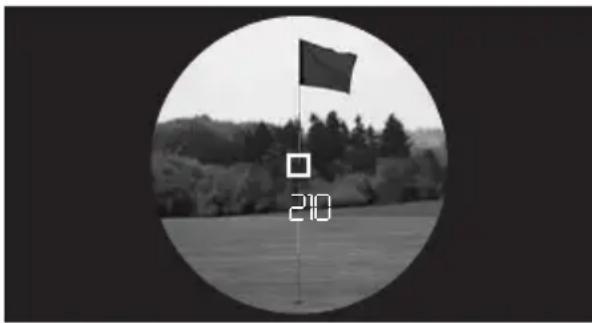
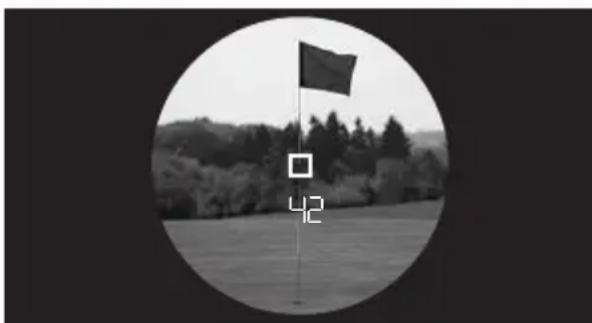
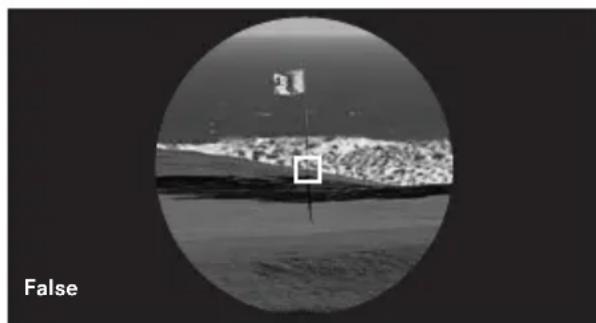
FIRST TARGET LOGIC
The Leica Pinmaster is equipped with first target logic specially developed for golf, which greatly simplifies the measurement of small targets such as golf flags. If the unit records two distances in the area of the target mark, the distance to the closer - smaller - target is displayed (A) and not that of the further, larger object (B). This first target logic also works in conjunction with scan mode.
In the example, when going past the flagstick, the measured value changes from 210 meters (bushes in the background, A/B) to 42 meters (flagsticks). If the measurement was successful, the distance measurement display flashes at high frequency. If there is no second target (flag in front of the horizon/ measurement in a bunker), the display does not flash.

Tip for use:
Despite this function, when taking measurements for golf flags or similar small objects, you should always try to line up the target mark so that no other objects are recorded or so that these objects are at least situated a good distance (minimum 15m / 50ft ) away from the first target.
OPERATING RANGE AND ACCURACY
The measuring accuracy of the Leica Pinmaster is up to ± 1 Meter/Yard. The maximum range is achieved with a well reflecting object and unaided visibility of 10km / 6.2 miles. The operating range is influenced by the following factors:
| Range | higher lower | |
| Color | white black | |
| Surface | glossy matte | |
| Angle to lens | perpendicular acute | |
| Object size | large small | |
| Sunlight | little (cloudy) | extensive (midday sun) |
| Atmospheric conditions | clear hazy | |
| Shape of object | uniform (house wall) | Irregular (bush, tree) |
In sunshine and with good visibility, the following accuracies can be achieved:
| Range | approx. 10m to 750m |
| Precision | approx. ±1m to 375m approx. ±2m to 750m |
MAINTENANCE/CLEANING
Your Leica Pinmaster does not require special care. Any large dirt particles, such as sand, should be removed with a soft brush or be blown off. Fingerprints etc. on the lens or eyepiece can be can be cleaned off the lenses by first moistening them with a damp cloth and then wiping with a soft, clean chamois leather or lint-free cloth.
Important:
Do not exert excessive pressure when wiping heavily soiled lens surfaces. Although the coating is highly resistant to abrasion, sand or salt crystals can still damage it. The housing should be cleaned only with a dampleather. Using dry cloths can lead to an electrostatic build-up. Alcohol and other chemical solvents must not be used to clean the optics or the housing. As well as its type designation, each Leica Pinmaster has its "personal" serial number. Make a note of this number in your documents for security.
Attention:
Do not open the main body under any circumstance!
Spare parts
If you should require any spare parts for your Leica Pinmaster, e.g. eyepiece cup or carrying cord, please contact our Customer Service department (address, see p. 31) or the Leica distributor in your country (see Warranty Card for addresses).
TROUBLESHOOTING
| Fault Cause Remedy | ||
| No circular image is obtained during viewing. | a) Viewer's pupil is not in ocular's exit pupil. b) Eyecup position is not correct for us with/without glasses. | a) Correct the eye position. b) Correct the adjustment: When wearing glasses, fold down the eyecup; for viewing without glasses it should remain up (see p. 6). |
| Display not focused Diopter compensation | not perfect Carry out diopter compensation | compensation again |
| displayed when measuring a) | Measuring range is too long or too short b) Insufficient reflection from target | Note information on the measuring range |
| display flashes or no measurement possible | Battery discharged Replace battery |
TECHNICAL DATA
| Magnification | 7x |
| Lens diameter | 24mm |
| Exit pupil | 3.4mm |
| Twilight factor | 13 |
| Geometric light intensity | 11.8 |
| Field of vision (at 1,000m) / objective viewing angle | 115m / 6.5° |
| Eyepoint design | 15mm |
| Prism type | roof-type |
| Coating on lens elements on prisms | High Durable Coating (HDCTM) and hydrophobic Aqua-Dura coating on outer lenses, phase correction coating P40 |
| Diopter compensation | ±3,5dpt. |
| Functioning temperature | -10 to 55°C |
| Storage temperature | -15 to 75°C |
| Water tightness | for 30min: up to 1m water depth |
| Housing/chassis material | carbon fiber reinforced plastic; soft lacquer coated//die-cast aluminum |
| Maximum range | approx. 750m |
| Minimum range | approx.10m |
| Measuring accuracy | approx. ±1m to 375m / approx. ±2m to 750m |
| Display | LED with 4 digits |
| Battery | 3V / lithium Type CR2 |
| Battery service life | approx. 2000 measurements at 20°C |
| Laser | invisible, eye-safe to EN and FDA Class 1 |
| Laser beam divergence | approx. 0,5 x 2,5mrad |
| Maximum measuring time | approx. 0.9 s |
| Dimensions (W x H x D) | approx. 75 x 34 x 113mm |
| Weight (with battery) | approx. 220g |
LEICA INFORMATION SERVICE
Should you have any technical questions regarding the use of Leica products, the Leica Information Service will be happy to answer in writing or by phone, fax, or e-mail:
Leica Camera AG
For service of your Leica equipment and in case of necessary repairs please contact the Customer Care of Leica Camera AG or of any national Leica agency (see Warranty Card for address list). Ask your authorized dealer and Leica specialist for advice.
Leica Camera AG
Customer Care
Am Leitz-Park 5
D-35578 Wetzlar
Telefon: +49(0)6441-2080-189
Telefax: +49(0)6441-2080-339
customer.care@Leica-camera.com
This is a Class B product based on the standard of the Voluntary Control Council for Interference from Information Technology Equipment (VCCI). If this is used near a radio or television receiver in a domestic environment, it may cause radio interference. Install and use the equipment according to the instruction manual.
FCC Note: (U.S. only)
This equipment has been tested and found to comply with the limits for a Class B digital device, pursuant to Part 15 of the FCC Rules. These limits are designed to provide reasonable protection against harmful interference in a residential installation. This equipment generates, uses, and can radiate radio frequency energy and, if not installed and used in accord dan ce with the instructions, may cause harmful interference to radio communications. However, there is no guarantee that interference will not occur in a parti cular installation. If this equipment does cause harmful interference to radio or television reception, which can be determined by turning the equipment off and on, the user is encouraged to try to correct the interference by one or more of the following measures:
Reorient or relocate the receiving antenna.
- Increase the separation between the equipment and receiver.
- Connect the equipment into an outlet on a circuit different from that to which the receiver is connected.
- Consult the dealer or an experienced radio/TV technician for help.
FCC Caution:
To assure continued compliance, follow the attached installation instructions and use only shielded interface cables with ferrite core when connecting to computer or peripheral devices. Any changes or modifications not expressly ap proved by the party responsible for compliance could void the user's authority to operate this equipment.
Trade Name: Leica
Model: Pinmaster CRF
Responsible party/ Leica Camera Inc.
Support contact: 1 Pearl Court, Unit A
Allendale, New Jersey 07401
Tel.: +1 201 995 0051 232
Fax:+12019951684
repair@Leicacamerausa.com
This device complies with Part 15 of the FCC Rules.
Operation is subject to the following two conditions:
(1) This device may not cause harmful inter ference, and
(2) this device must accept any interference re ceived, including interference that may cause undesired operation.
This Class B digital apparatus complies with Canadian ICES-003
Leica Pinmaster

Tested To Comply
With FCC Standards
FOR HOME OR OFFICE USE
DESCRIPTION DES ÉLÉMENTS
customer.care@Leica-camera.com
BENAMING VAN DE ONDERDELEN
Product Support / Software Support
Am Leitz-Park 5
D-35578 Wetzlar
Telefoon: +49(0)6441-2080-111/-108
Telefax: +49(0) 6441-2080-490
info@leica-camera.com/
software-support@leica-camera.com
LEICA CUSTOMER CARE
Product Support / Software Support
Am Leitz-Park 5
D-35578 Wetzlar
Telefono: +49(0)6441-2080-111 /-108
Fax: +49(0)6441-2080-490
info@leica-camera.com /
software-support@leica-camera.com
LEICA CUSTOMER CARE
Product Support / Software Support
Am Leitz-Park 5
D-35578 Wetzlar

- LEICA CUSTOMER CARE
- Scope of delivery
- Leica Pinmaster
- Warning notice:
- FOREWORD
- TABLE OF CONTENTS
- DISPOSAL OF ELECTRICAL AND ELECTRONIC EQUIPMENT
- FITTING THE CARRYING CORD
- INSERTING AND CHANGING THE BATTERY
- Notes:
- Attention:
- Battery charge level
- USE WITH AND WITHOUT GLASSES
- DIOPTER COMPENSATION
- SETTING THE UNIT OF MEASURE
- Setting:
- DISTANCE MEASUREMENT
- SCAN MODE
- Note:
- FIRST TARGET LOGIC
- Tip for use:
- OPERATING RANGE AND ACCURACY
- MAINTENANCE/CLEANING
- Important:
- Spare parts
- LEICA INFORMATION SERVICE
- FCC Note: (U.S. only)
- FCC Caution:
- This device complies with Part 15 of the FCC Rules.
- DESCRIPTION DES ÉLÉMENTS
- BENAMING VAN DE ONDERDELEN
Brand : LEICA
Model : Pinmaster II
Category : Binoculars