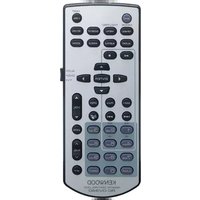
KCARC107MR - Remote control KENWOOD - Free user manual and instructions
Find the device manual for free KCARC107MR KENWOOD in PDF.
| Product Type | Wired remote control for audio receiver |
| Brand | KENWOOD |
| Model | KCA-RC107MR |
| Compatibility | KENWOOD KMR-700U receiver (and compatible models) |
| Cable length | 1 meter (approx.); extension cables available up to 15 meters |
| Power | Via the receiver (no batteries required) |
| Display | LCD screen with adjustable backlight (DIM) |
| Main functions | Volume control, source selection, track search, audio adjustment, display configuration |
| Number of connectable remote controls | Up to 3 (with extension cables) |
| Material | ABS plastic |
| Weight | 150 g (approx.) |
| Dimensions (L x W x H) | 100 x 50 x 20 mm (approx.) |
| Operating temperature | 0°C to 40°C |
| Maintenance and cleaning | Clean with a soft, dry cloth. Do not use chemical products. |
| Safety | Do not expose to moisture, direct sunlight, or excessive heat. |
| Spare parts and repairability | No detachable parts available. In case of failure, contact a professional. |
| General information | Complies with EMC directive 2004/108/EC. Manufactured by Kenwood Corporation. |
Frequently Asked Questions - KCARC107MR KENWOOD
User questions about KCARC107MR KENWOOD
0 question about this device. Answer the ones you know or ask your own.
Ask a new question about this device
Download the instructions for your Remote control in PDF format for free! Find your manual KCARC107MR - KENWOOD and take your electronic device back in hand. On this page are published all the documents necessary for the use of your device. KCARC107MR by KENWOOD.
USER MANUAL KCARC107MR KENWOOD
Register your Kenwood product at www.Kenwoodusa.com

- ID should be registered for this unit when connecting this unit to the receiver. For details on how to register ID, refer to
in the receiver instruction manual. - You can control only the front or rear side with this unit when the dual zone function of the receiver is active. By default, the front side can be controlled. To switch to the rear side, refer to
in the receiver instruction manual. - You may not be able to control the receiver from this unit just after turning the power on. Wait for 1 to 2 seconds and then operate it.
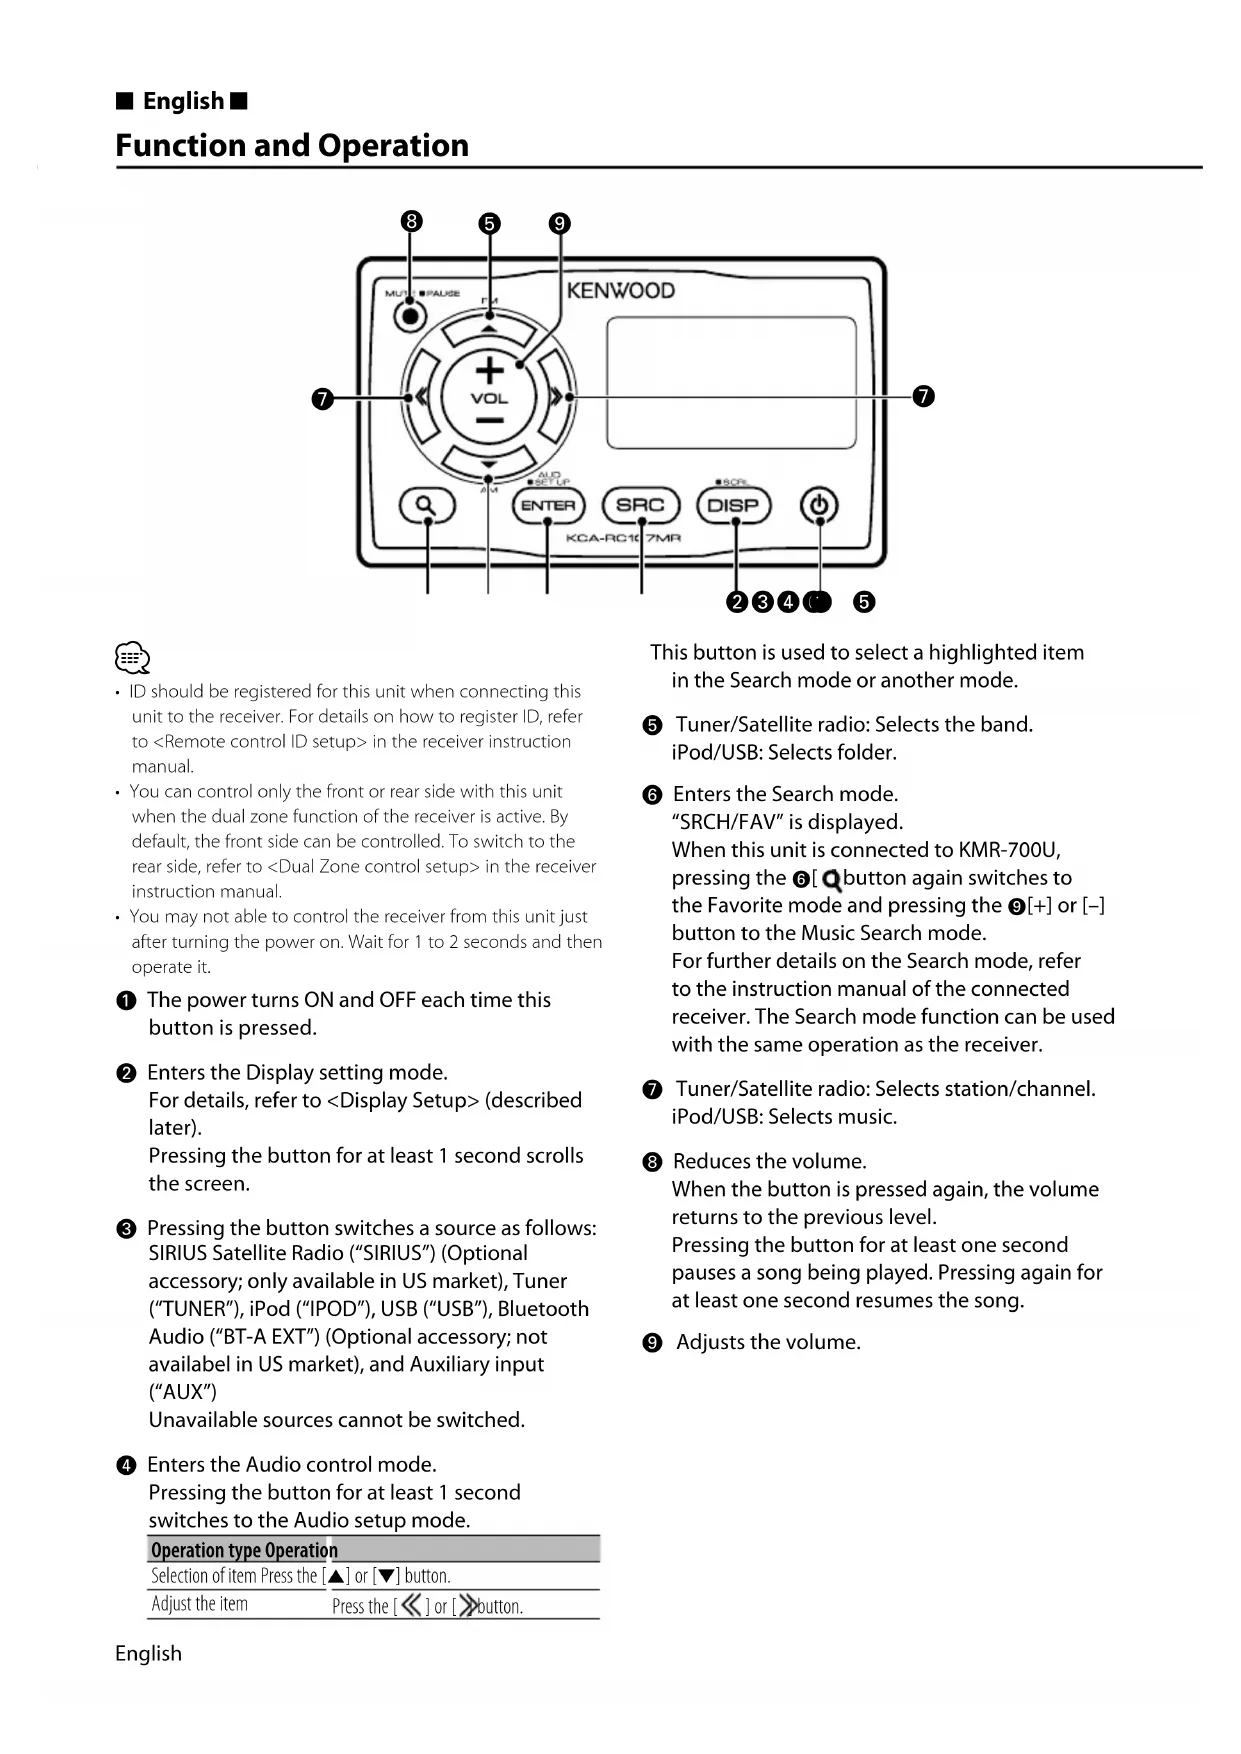
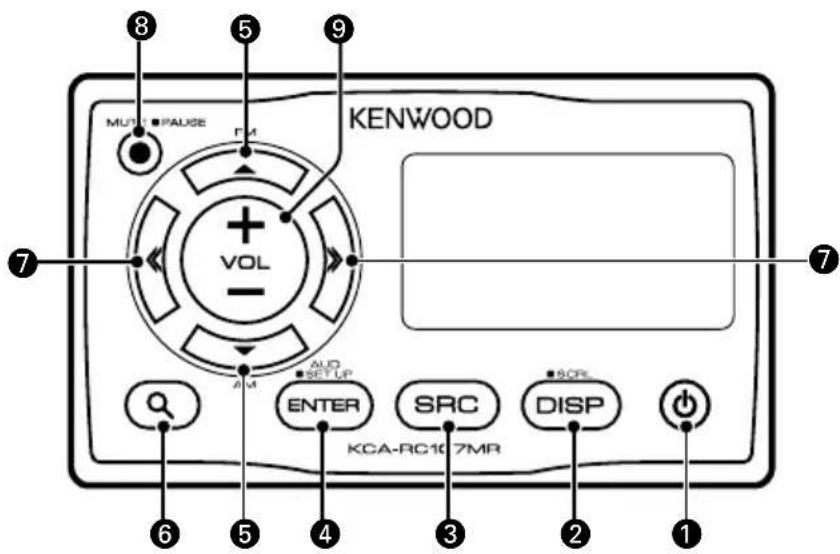
The power turns ON and OFF each time this button is pressed.
2 Enters the Display setting mode. For details, refer to
3 Pressing the button switches a source as follows: SIRIUS Satellite Radio ("SIRIUS") (Optional accessory; only available in US market), Tuner ("TUNER"), iPod ("IPOD"), USB ("USB"), Bluetooth Audio ("BT-A EXT") (Optional accessory; not availabel in US market), and Auxiliary input ("AUX") Unavailable sources cannot be switched.
4 Enters the Audio control mode. Pressing the button for at least 1 second switches to the Audio setup mode.
| Operation type Operation |
| Selection of item Press the [▲] or [▼] button. |
| Adjust the item Press the [≪] or [≫] button. |
This button is used to select a highlighted item in the Search mode or another mode.
Tuner/Satellite radio: Selects the band. iPod/USB: Selects folder.
6 Enters the Search mode. "SRCH/FAV" is displayed. When this unit is connected to KMR-700U, pressing the 6 [Q button again switches to the Favorite mode and pressing the 9[+ or [-] button to the Music Search mode. For further details on the Search mode, refer to the instruction manual of the connected receiver. The Search mode function can be used with the same operation as the receiver.
Tuner/Satellite radio: Selects station/channel. iPod/USB: Selects music.
8 Reduces the volume. When the button is pressed again, the volume returns to the previous level. Pressing the button for at least one second pauses a song being played. Pressing again for at least one second resumes the song.
Adjusts the volume.
Display Setup
You can adjust following Display items;
| Display Item Setting | |
| "DISP SEL" Refer to <Text Display Selection>. — | |
| "DIM" Sets whether the display illumination is dimmed in conjunction with the light switch of the vessel or it is dimmed constantly. | "AUTO", "MANU", "OFF" |
| "CNTRST" Adjusting the display contrast. "0" — "10" | |
| "ID:" Display the Remote control ID. — |

- For details on Remote control ID, refer to
in the receiver instruction manual.
1 Enter Display setup mode Press the [DISP] button.
2 Select the Display setup item Press the [▲] or [▼] button.
3 Adjust the Display setup item Press the [or] button.
4 Exit Display setup mode Press the [DISP] button.
Text Display Selection
Displays the following abbreviated text for settings and functions;
In Tuner source
| Information | Display |
| Frequency & Program Service name (RDS) | “FREQ/PS” |
| Music title (RDS) & Artist name (RDS) | “TITLE” |
| Station Name (RDS) | “ST NAME” |
| Radio text Plus (RDS) | “R-TEXT+” |
| Radio text (RDS) | “R-TEXT” |
| Frequency (FM/AM) | “FREQ” |
| Clock | “CLOCK” |
| Date | “DATE” |
In iPod/USB source
| Information | Display |
| Music title & Artist name | “TITLE” |
| Album name & Artist name | “ALBUM” |
| Folder name | “FOLDER” |
| File name | “FILE” |
| Play time & Music number | “P-TIME” |
| Clock | “CLOCK” |
| Date | “DATE” |
In Auxiliary input source
| Information | Display |
| AUX name | “SRC NAME” |
| Clock | “CLOCK” |
| Date | “DATE” |
In SIRIUS source (Optional)
| Information | Display |
| Channel Name | "CH-NAME" |
| Music Title | "SONG" |
| Artist Name "ARTIST" | |
| Composer Name | "COMPOSER" |
| Category Name | "C CATEGORY" |
| Label Name "LABEL" | |
| Comment | "COMMENT" |
| Channel Number | "CH NUM" |
| Clock | "CLOCK" |
| Date | "DATE" |
1 Enter Display setup mode Press the [DISP] button.
2 Select the Display text select item Press the [▲] or [▼] button. Select the "DISP SEL" display.
3 Enter Display text select mode Press the [ENTER] button.
4 Select the text display part Press the [A] or [▼] button.
5 Select the Display text Press the [or] button.
6 Exit Display text select mode Press the [ENTER] button.

If the selected display item does not have any information, alternative information is displayed.
- When selecting "FOLDER" while playing with iPod, text will be displayed depending on the currently selected browsing mode.
- If all characters cannot be displayed while playing with iPod, the file number in the list is displayed.
| Information | Display |
| Music title | "TITLE****" |
| Folder name | "FLD****" |
| File name | "FILE****" |
Connectable model (as of February 2009)
KMR-700U
A
- Mounting and wiring this product requires skills and experience. For safety's sake, leave the mounting and wiring work to professionals.
- Do not install the unit in a spot exposed to direct sunlight or excessive heat or humidity.
- Do not use your own screws. Use only the screws provided. If you use the wrong screws, you could damage the unit.
- After installing the unit, check to make sure that electrical equipment such as the signal lamps and gauges operate normally.
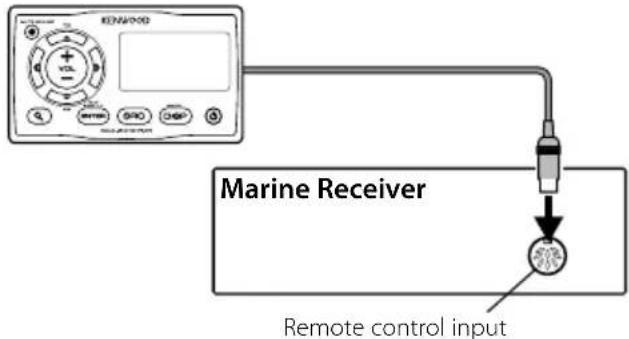
When connecting single KCA-RC107MR KCA-RC107MR
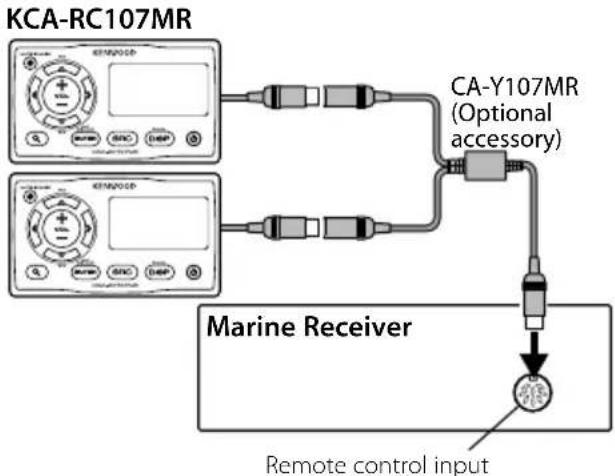
When connecting two KCA-RC107MRs

When connecting three KCA-RC107MRs

- You can use the extension cable CA-EX7MR (7m) or CA-EX3MR (3m) to extend the wiring cable up to 15 meters, if the installation positions of the receiver and KCA-RC107MR are long distance apart.
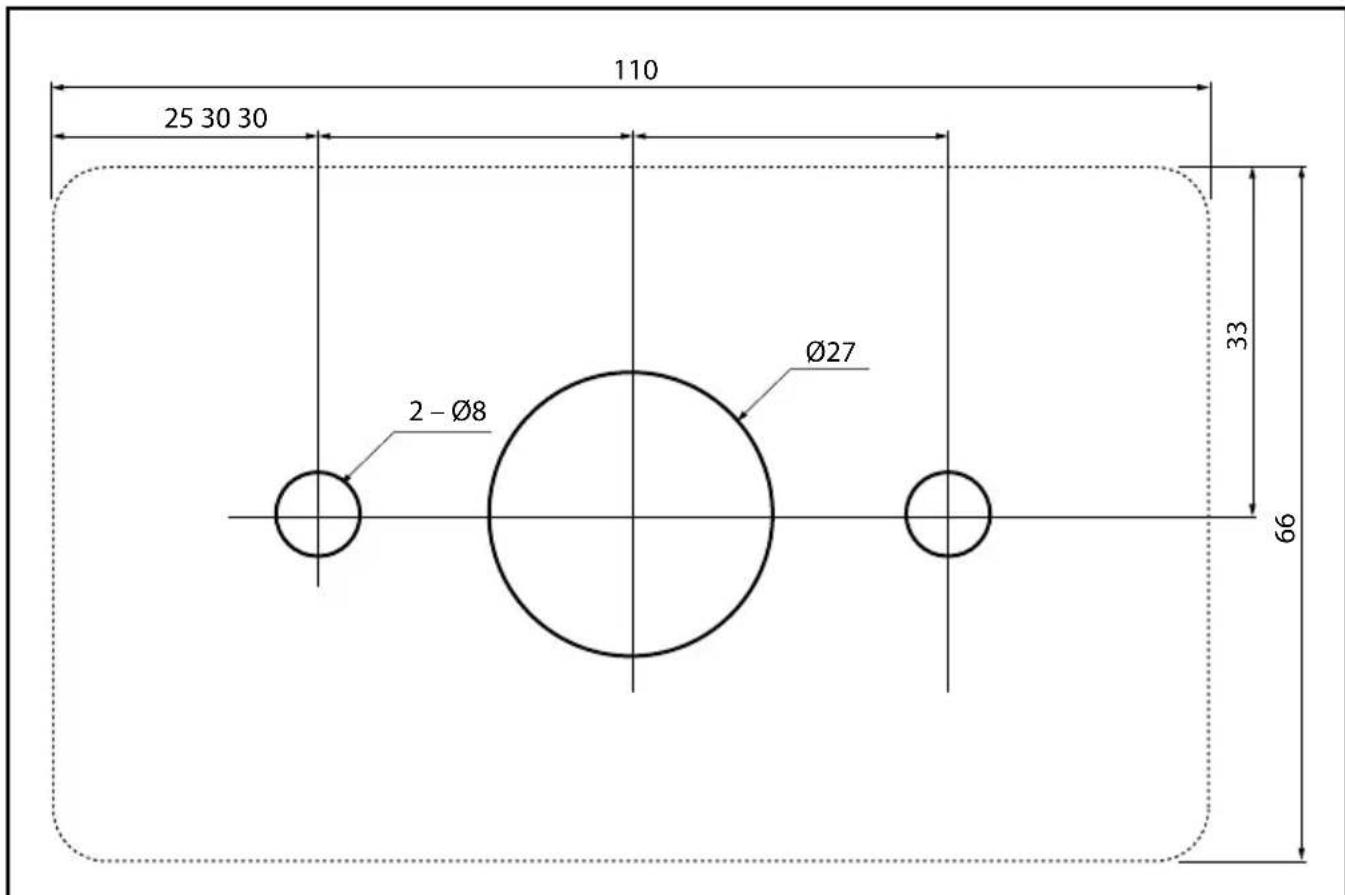
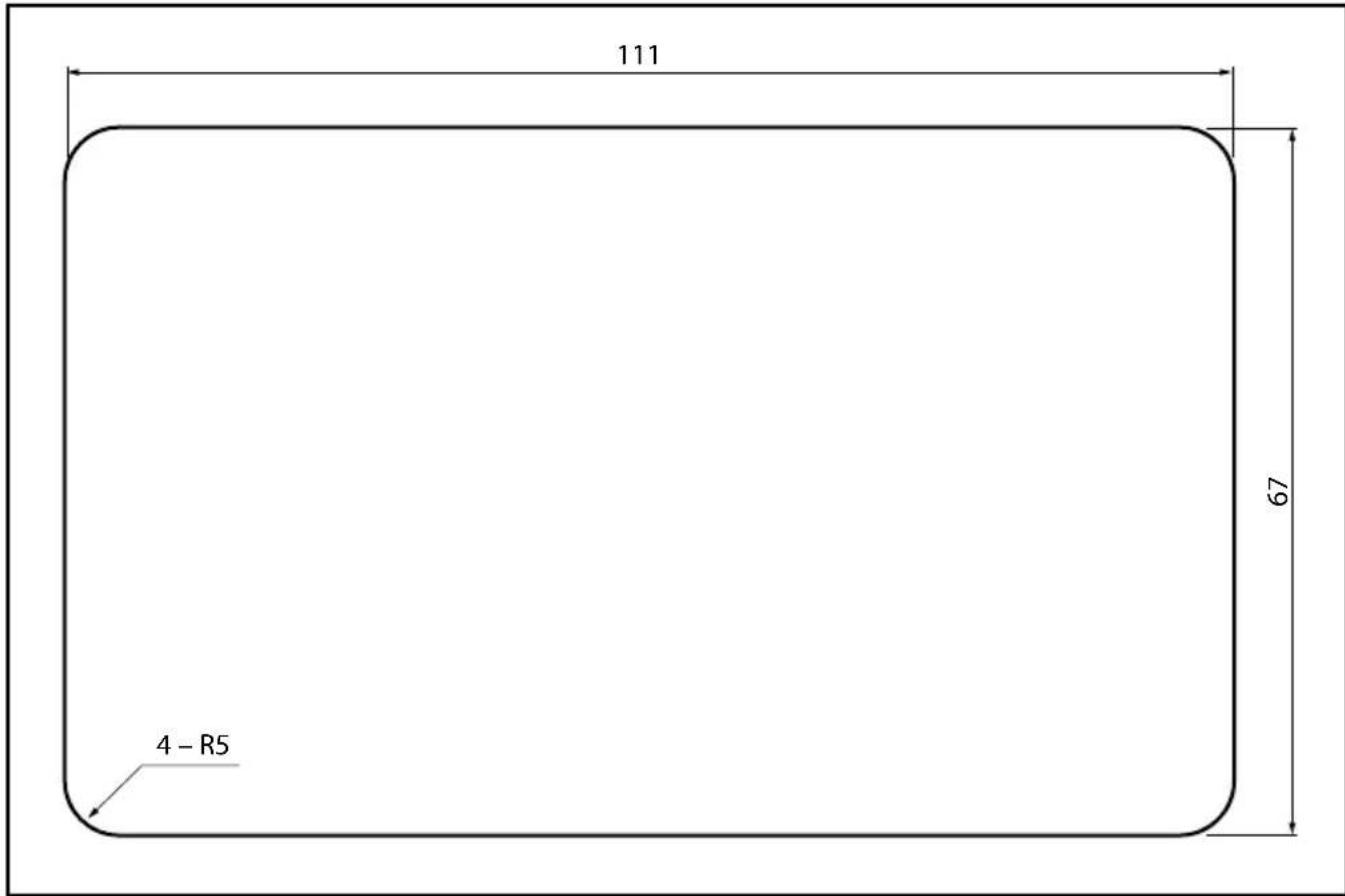
1 Drill holes on the mounting surface in accordance with Template (back cover).
2 Install the KCA-RC107MR as shown in the figure below.
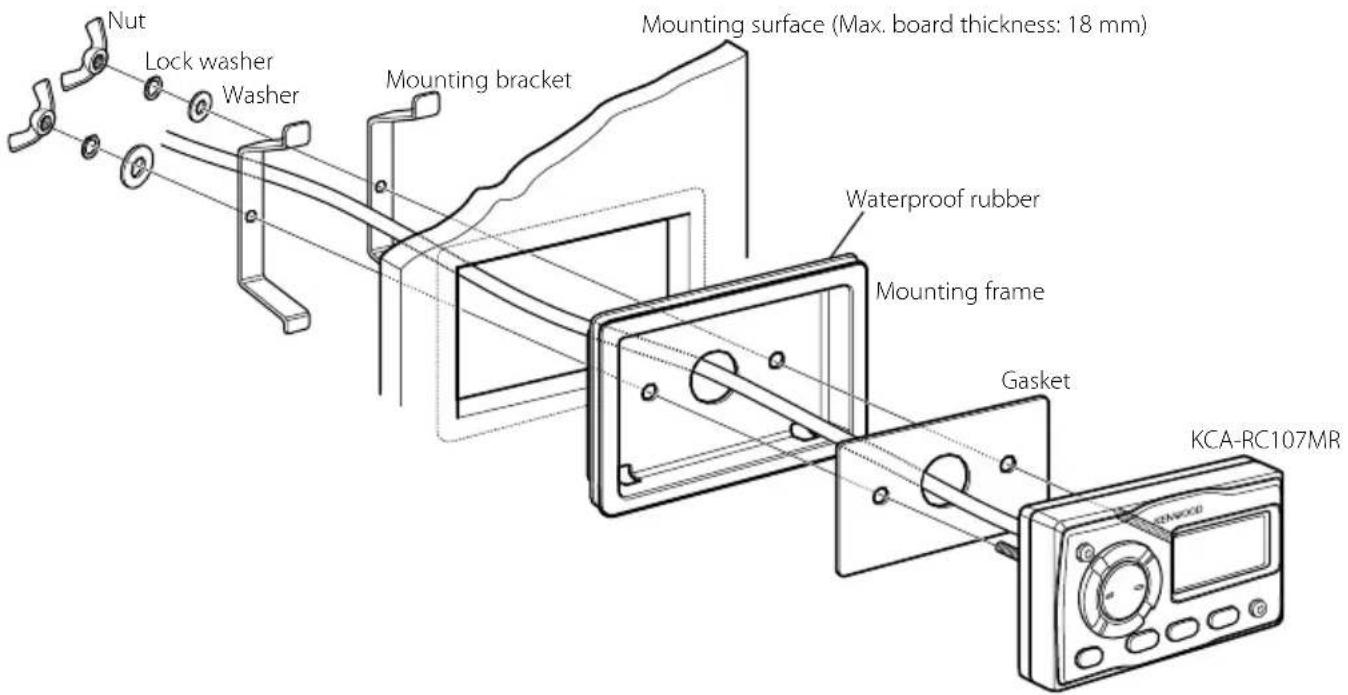
When using the Mounting frame
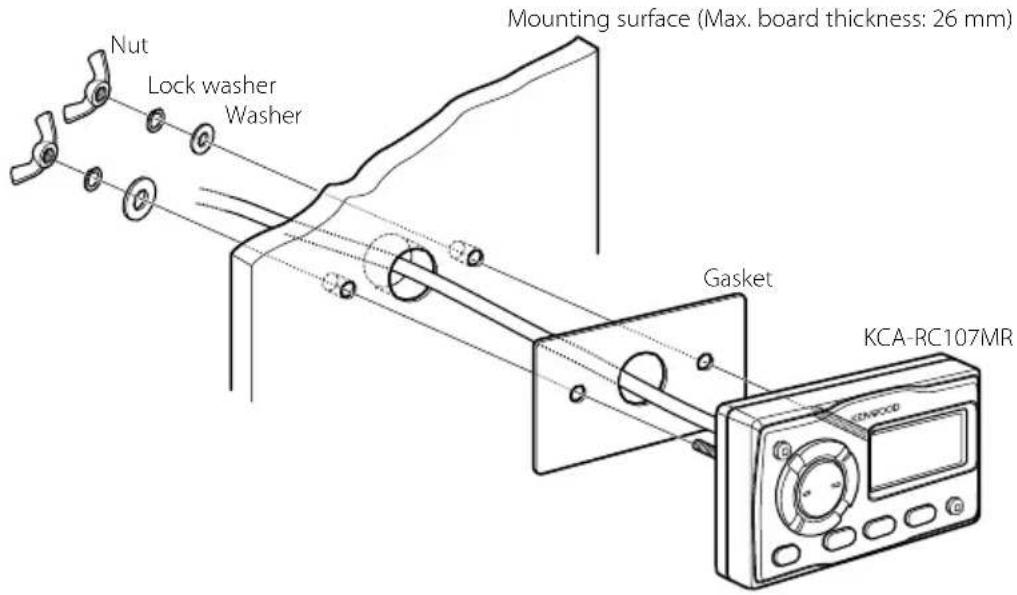
Surface Mounting (not using mounting frame)

Selection are displayed "DISP SEL".
"DISP SEL" Consulate
Declaration of Conformity with regard to the EMC Directive 2004/108/EC
Manufacturer:
Kenwood Corporation
2967-3 Ishikawa-machi, Hachioji-shi, Tokyo, 192-8525 Japan
EU Representative's:
Kenwood Electronics Europe BV
Amsterdamseweg 37, 1422 AC UITHOORN, The Netherlands
C E
Information on Disposal of Old Electrical and Electronic Equipment and Batteries (applicable for EU countries that have adopted separate waste collection systems)
Products and batteries with the symbol (crossed-out wheeled bin) cannot be disposed as household waste.
Old electrical and electronic equipment and batteries should be recycled at a facility capable of handling these items and their waste byproducts.
Contact your local authority for details in locating a recycle facility nearest to you. Proper recycling and waste disposal will help conserve resources whilst preventing detrimental effects on our health and the environment.
Notice: The sign "Pb" below the symbol for batteries indicates that this battery contains lead.
This equipment may generate or use radio frequency energy. Changes or modifications to this equipment may cause harmful interference unless the modifications are expressly approved in the instruction manual. The user could lose the authority to operate this equipment if an unauthorized change or modification is made.
NOTE:
This equipment has been tested and found to comply with the limits for a Class B digital device, pursuant to Part 15 of the FCC Rules. These limits are designed to provide reasonable protection against harmful interference in a residential installation. This equipment may cause harmful interference to radio communications, if it is not installed and used in accordance with the instructions. However, there is no guarantee that interference will not occur in a particular installation. If this equipment does cause harmful interference to radio or television reception, which can be determined by turning the equipment off and on, the user is encouraged to try to correct the interference by one or more of the following measures:
- Reorient or relocate the receiving antenna.
- Increase the separation between the equipment and receiver.
- Connect the equipment into an outlet on a circuit different from that to which the receiver is connected.
- Consult the dealer or an experienced radio/TV technician for help.
THIS DEVICE COMPLIES WITH PART 15 OF THE FCC RULES. OPERATION IS SUBJECT TO THE FOLLOWING TWO CONDITIONS:
(1) THIS DEVICE MAY NOT CAUSE HARMFUL INTERFERENCE, AND
(2) THIS DEVICE MUST ACCEPT ANY INTERFERENCE RECEIVED, INCLUDING INTERFERENCE THAT MAY CAUSE UNDESIRED OPERATION.
Template/Gabarit/Schablone/Sjabloon/Modello/Plantilla/Modelo/テnhleト
When using the Mounting frame/Avec cadre de montage/Mit Montagerahmen/Wanneer montageframe wordt gebruikt/Con inscription del telaio di fissaggio/Si se utilizes el marco de montaje/ Quando a estrutura de montagem é'utilizada/取付flreau使用る场合
Surface Mounting (not using mounting frame)/Sans cadre de montage/Ohne Montagerahmen/Wanneer montageframe Niet worden gebruikt/Senza insereire il telaio di fissaggio/Si no se utilizes el marco de montaje/ Quando a estrutura de montagem não éutilizada/取付Flre-UM使用ない场合