
MCR-140 - Audio System YAMAHA - Free user manual and instructions
Find the device manual for free MCR-140 YAMAHA in PDF.
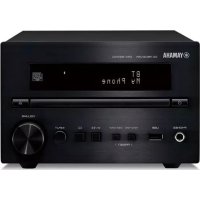
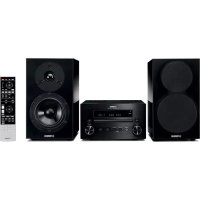
| Product type | Micro system audio with CD player, FM tuner, iPod/iPhone connectivity and USB |
| Model | YAMAHA MCR-140 |
| Dimensions (W × H × D) | 180 × 120 × 309 mm |
| Weight (main unit) | 3.6 kg |
| Speaker dimensions (NS-BP80) | 122 × 118 × 287 mm |
| Speaker weight | 1.4 kg each |
| Power supply | AC 230 V, 50 Hz (European model) |
| Power consumption | 25 W (max.), standby: < 2.0 W (normal mode), < 1.0 W (ECO mode) |
| Output power | 15 W + 15 W (6 Ω, 1 kHz, 10% THD) |
| Supported audio formats | CD, CD-R/RW, MP3, WMA; iPod (5th generation, classic, nano, touch) and USB devices (FAT16/32) |
| FM tuner | Range 87.50-108.00 MHz, 30 station presets, RDS |
| Wireless connectivity | AirWired (wireless digital audio transmission from iPod); optional subwoofer (SWK-W10) |
| Auxiliary input | 3.5 mm stereo mini jack (PORTABLE) |
| Special functions | Programmable timer, sleep timer, tone controls (treble/bass), balance, display dimmer, ECO mode |
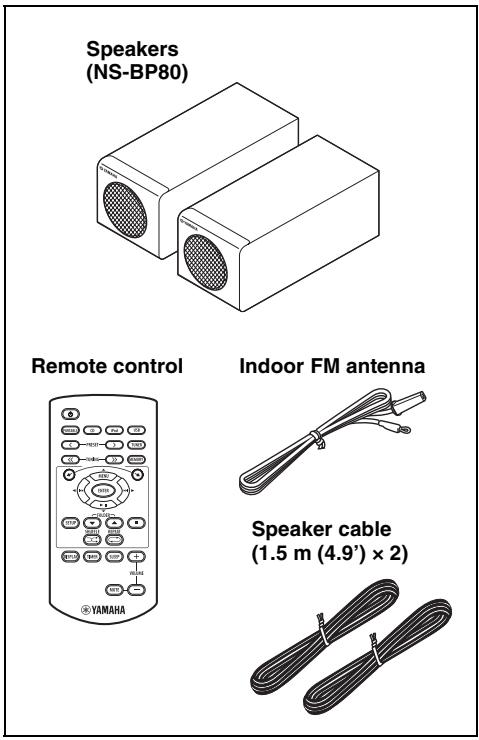
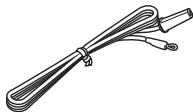
| Included accessories | Remote control, indoor FM antenna, speaker cables (1.5 m × 2), remote control battery |
| Maintenance and cleaning | Use a dry, clean cloth; do not use chemical solvents |
| Safety | Class 1 laser; do not expose to rain or moisture; maintain minimum ventilation (10 cm around) |
| Warranty | 2 years (EEA and Switzerland), parts and labor, from an authorized dealer |
Frequently Asked Questions - MCR-140 YAMAHA
User questions about MCR-140 YAMAHA
0 question about this device. Answer the ones you know or ask your own.
Ask a new question about this device
Download the instructions for your Audio System in PDF format for free! Find your manual MCR-140 - YAMAHA and take your electronic device back in hand. On this page are published all the documents necessary for the use of your device. MCR-140 by YAMAHA.
USER MANUAL MCR-140 YAMAHA
CAUTION: DO NOT STARE INTO BEAM INVISIBLE LASER RADIATION WHEN OPEN
VAROITUS
If the socket outlets in the home are not suitable for the plug supplied with this appliance, it should be cut off and an appropriate 3 pin plug fitted. For details, refer to the instructions described below.
Note
The plug severed from the mains lead must be destroyed, as a plug with bared flexible cord is hazardous if engaged in a live socket outlet.
Special Instructions for U.K. Model
IMPORTANT
THE WIRES IN MAINS LEAD ARE COLOURED IN ACCORDANCE WITH THE FOLLOWING CODE:
Blue: NEUTRAL
Brown: LIVE
As the colours of the wires in the mains lead of this apparatus may not correspond with the coloured markings identifying the terminals in your plug, proceed as follows: The wire which is coloured BLUE must be connected to the terminal which is marked with the letter N or coloured BLACK. The wire which is coloured BROWN must be connected to the terminal which is marked with the letter L or coloured RED.
Make sure that neither core is connected to the earth terminal of the three pin plug.
Caution: Read this before operating your unit.
1 To assure the finest performance, please read this manual carefully. Keep it in a safe place for future reference.
2 Install this sound system in a well ventilated, cool, dry, clean place - away from direct sunlight, heat sources, vibration, dust, moisture, and/or cold. For proper ventilation, allow the following minimum clearances around CRX-040/140.
Top: 10cm (4 in)
Rear: 10cm (4 in)
Sides: 10cm (4 in)
3 Locate this unit away from other electrical appliances, motors, or transformers to avoid humming sounds.
4 Do not expose this unit to sudden temperature changes from cold to hot, and do not locate this unit in an environment with high humidity (i.e. a room with a humidifier) to prevent condensation inside this unit, which may cause an electrical shock, fire, damage to this unit, and/or personal injury.
5 Avoid installing this unit where foreign object may fall onto this unit and/or this unit may be exposed to liquid dripping or splashing. On the top of this unit, do not place:
- Other components, as they may cause damage and/or discoloration on the surface of this unit.
- Burning objects (i.e. candles), as they may cause fire, damage to this unit, and/or personal injury.
- Containers with liquid in them, as they may fall and liquid may cause electrical shock to the user and/or damage to this unit.
6 Do not cover this unit with a newspaper, tablecloth, curtain, etc. in order not to obstruct heat radiation. If the temperature inside this unit rises, it may cause fire, damage to this unit, and/or personal injury.
7 Do not plug in this unit to a wall outlet until all connections are complete.
8 Do not operate this unit upside-down. It may overheat, possibly causing damage.
9 Do not use force on switches, knobs and/or cords.
10 When disconnecting the power cable from the wall outlet, grasp the plug; do not pull the cable.
11 Do not clean this unit with chemical solvents; this might damage the finish. Use a clean, dry cloth.
12 Only voltage specified on this unit must be used. Using this unit with a higher voltage than specified is dangerous and may cause fire, damage to this unit, and/or personal injury. Yamaha will not be held responsible for any damage resulting from use of this unit with a voltage other than specified.
13 To prevent damage by lightning, keep the power cable and outdoor antennas disconnected from a wall outlet or this unit during a lightning storm.
14 Do not attempt to modify or fix this unit. Contact qualified Yamaha service personnel when any service is needed. The cabinet should never be opened for any reasons.
15 When not planning to use this unit for long periods of time (i.e. vacation), disconnect the AC power plug from the wall outlet.
16 Be sure to read the "TROUBLESHOOTING" section on common operating errors before concluding that this unit is faulty.
17 Before moving this unit, press to set this unit to the standby mode, and disconnect the AC power plug from the wall outlet.
18 Condensation will form when the surrounding temperature changes suddenly. Disconnect the power cable from the outlet, then leave this unit alone.
19 When using this unit for a long time, this unit may become warm. Turn the power off, then leave this unit alone for cooling.
20 Install this unit near the AC outlet and where the AC power plug can be reached easily.
21 The batteries shall not be exposed to excessive heat such as sunshine, fire or the like. When you dispose of batteries, follow your regional regulations.
22 Excessive sound pressure from earphones and headphones can cause hearing loss.
This unit is not disconnected from the AC power source as long as it is connected to the wall outlet, even if this unit itself is turned off by . This state is called the standby mode. In this state, this unit is designed to consume a very small quantity of power.
WARNING
TO REDUCE THE RISK OF FIRE OR ELECTRIC SHOCK, DO NOT EXPOSE THIS UNIT TO RAIN OR MOISTURE.
LASER SAFETY
This unit employs a laser. Due to possible eye injury, only a qualified service person should remove the cover or attempt to service this device.
DANGER
This unit emits visible laser radiation when open. Avoid direct eye exposure to beam. When this unit is plugged into the wall outlet, do not place your eyes close to the opening of the disc tray and other openings to look into inside.
The laser component in this product is capable of emitting radiation exceeding the limit for Class 1.
CAUTION
Danger of explosion if battery is incorrectly replaced. Replace only with the same or equivalent type.
Do not use MCR-140 within 22cm (9 in) of persons with a heart pacemaker implant or defibrillator implant.
We, the manufacturer Yamaha hereby declare that the MCR-140 is in compliance with the essential requirements and other relevant provisions of Directive 1999/5/EC.
CONTENTS
PREPARATION
PARTS. 2
PLAYABLE DISCS AND FILE FORMAT. 3
CONNECTION 4
Basic connection 4
Wireless connection MCR-140 5
Other connection. 5
REMOTE CONTROL 6
FRONT PANEL DISPLAY 6
OPERATION
FRONT PANEL AND BASIC OPERATION ....7
LISTENING TO MUSIC. 8
Playback operation. 8
Other operation 9
LISTENING TO FM RADIO STATIONS 10
Tuning to radio stations 10
Presetting radio stations. 10
Selecting preset radio stations (Preset tuning) 10
Displaying Radio Data System information. 10
USING USEFUL FUNCTIONS 11
Using setup menu 11
Using timer and sleep timer. 13
ADDITIONAL INFORMATION
TROUBLESHOOTING 14
General. 14
Radio reception. 15
iPodTM 15
USB 18
Disc playback 19
Remote control 19
HANDLING COMPACT DISCS 20
SPECIFICATIONS. 20
About this manual
- This manual describes how to operate this unit using a remote control except when it is not available. Some of these operations are also available using the front panel buttons.
- The symbol “ t_ ” with page number(s) indicates the corresponding reference page(s).
Notes contain important information about safety and operating instructions. indicates a tip for your operation. - This manual is printed prior to production. Design and specifications are subject to change in part as a result of improvements, etc. In case of differences between the manual and the product, the product has priority.
Copyright and logo marks
Advanced YST
In 1988, Yamaha brought to the marketplace speaker systems utilizing YST (Yamaha Active Servo Technology) to give powerful, high quality bass reproduction. This technique uses a direct connection between the amplifier and speaker, allowing accurate signal transmission and precise speaker control. As this technology uses speaker units controlled by the negative impedance drive of the amplifier and resonance generated between the speaker cabinet volume and port, it creates more resonant energy (the "air woofer" concept) than the standard bass reflex method. This allows for bass reproduction from much smaller cabinets than was previously possible.
AirWired MCR-140
Real-time uncompressed music transfer without sound degradation is realized by Yamaha original digital wireless transfer technology, AirWired. You can also control turning on/ standby and volume with the iPod by AirWired.
Wired
PARTS
Make sure you have all of the following items.
+
Using the remote control
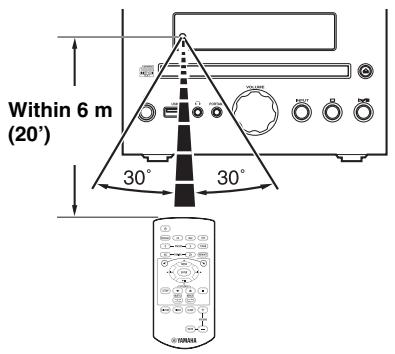
Use the remote control within 6m (20') of this unit and point it toward the remote control sensor.
Notes
- Do not spill liquid on the remote control.
- Do not drop the remote control.
- Do not leave the remote control in the following places:
hot or humid places such as a bathroom or near a heater
extremely cold places
-dustyplaces
Replacing the battery in the remote control
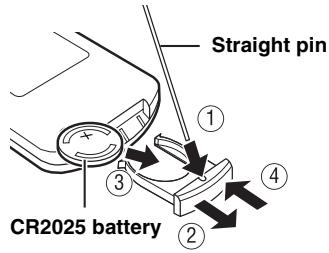
Change the battery when the operation range of the remote control decreases.
PLAYABLE DISCS AND FILE FORMAT
Playable discs
Use compact discs bearing the marks below.

... Compact discs (digital audio)

CD-R,CD-RW digital audio discs
- CD-R or CD-RW discs bearing one of the following phrases.
FOR CONSUMER
FOR CONSUMER USE FOR MUSIC USE ONL
- Finalized CD-R or CD-RW discs

Note
This compact disc player may not be able to play some CD-R/CD-RW discs or discs on which recording was not made correctly.

CD-TEXT discs

the inner recessed area of the disc tray. Do not add (12-cm) CD on top of an 8-cm (3 in) CD.
To prevent a malfunction of this unit:
- Do not use any nonstandard shaped disc (heart, etc.) available on the market because it might damage the unit.

- Do not use a disc with tape, stickers, or paste on it. If you use such a disc, the disc may get stuck in the unit, or damage to the unit may result.
Note: Do not use any lens cleaners as they may be a cause of malfunction.
Playable MP3 and WMA files
MP3
| Format | Bitrate (kbps) | Sampling frequency (kHz) |
| MPEG 1 Audio Layer-3 | 32-320*1 | 32/44.1/48 |
| MPEG 2 Audio Layer-3, 2 | 8-160*1 | 16/22.05/24 |
*1 Variable bitrate is supported.
WMA
Version 8
- Version 9 (Standard and variable bitrates are supported. Professional and Lossless are not supported.)
| Profile | Bitrate (kbps) | Sampling frequency (kHz) |
| High Profile | 32-320*2 | 32/44.1/48 |
| Mid Profile | 16-32 | 22.05 |
*2 Both constant and variable bitrates are supported.
Notes
- Playback for Data Disc starts in alphanumeric order of files.
- Playback for USB starts in order by date and time of creation.
Copyright-protected WMA (DRM) files cannot be played back by this unit. - The disc must be ISO 9660 compatible.
- The maximum file and folder numbers are as follows.
| Data Disc | USB | |
| Maximum file number | 511 | 9,999 |
| Maximum folder number*3 | 255 | 255 |
| Maximum file number per folder | 511 | 255 |
*3 The root is counted as one of the folders.
CONNECTION
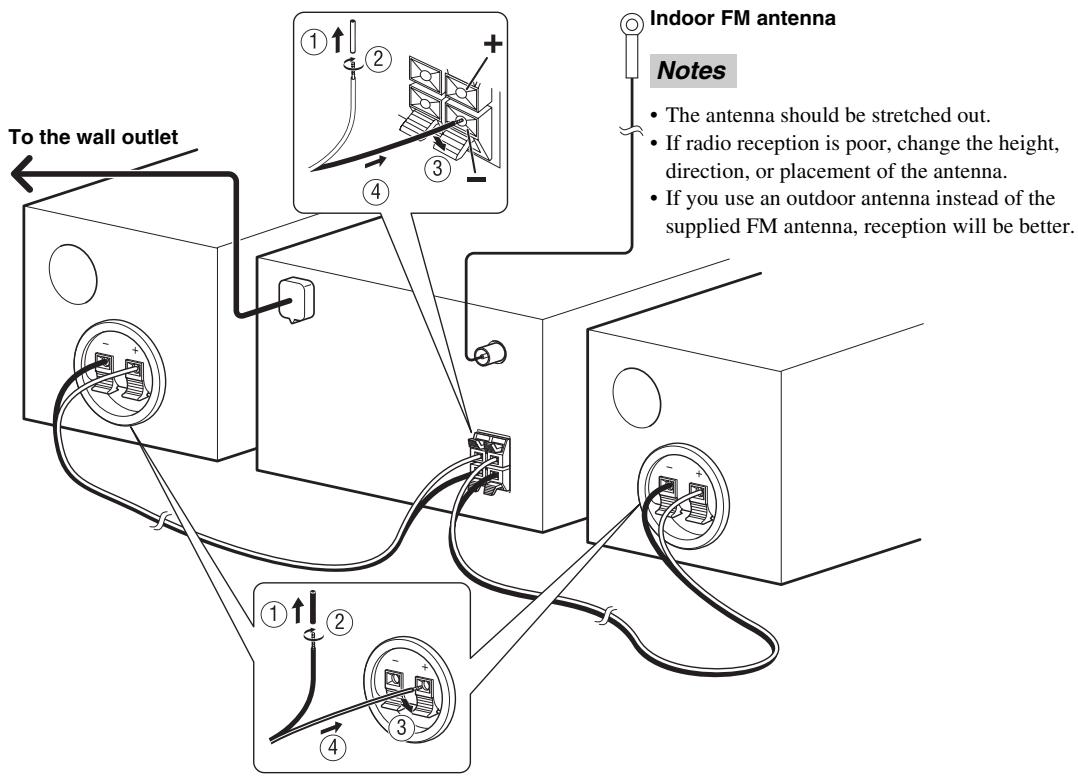
Basic connection
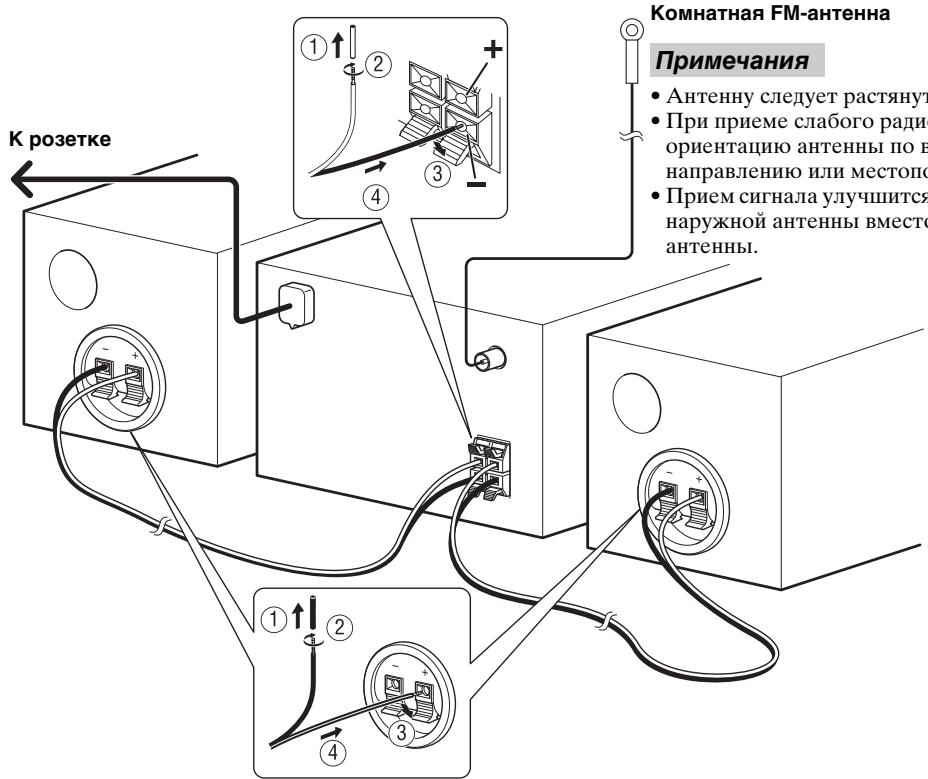
Follow the procedure below to connect the speakers and indoor FM antenna to this unit.
CAUTION
Do not connect the power cable of this unit until all cable connections are completed.
Notes
- Be sure to connect the left channel (L), right channel (R), "+"(red) "-" (black) properly. If the connections are faulty, no sound will be heard from the speakers, and if the polarity of the speaker connections is incorrect, the sound will be unnatural and lacks bass.
- Do not let the bare speaker wires touch each other or do not let them touch any metal part of this unit. This could damage this unit and/or the speakers.
- Use the supplied speakers only. Using different speakers may cause the sound to differ from the intended design.
- There is a chance that placing speakers too close to a CRT-based (Braun tube) TV set might impair picture color. Should this happen, move the speakers away from the TV set.
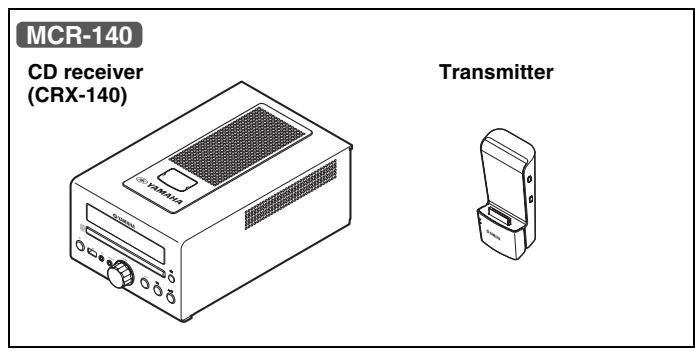
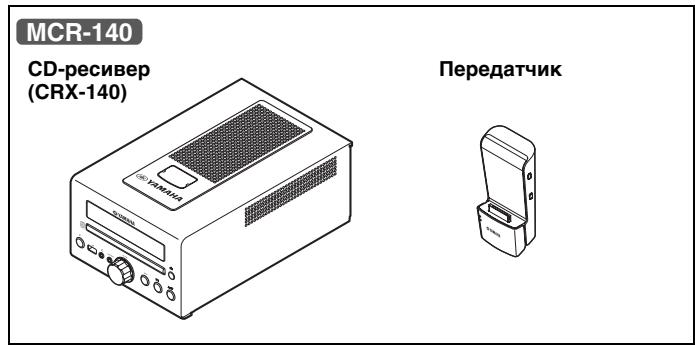
Wireless connection MCR-140
Playback operation with your iPod connected to the transmitter turns the unit on automatically, and you can enjoy the music in your iPod.

To turn on the unit by the playback operation of your iPod, set POWER SAVING to NORMAL (P. 11).
Note
The volume of the unit is adjusted simultaneously with the iPod. Be careful when controlling the volume with your iPod.
Group setting
To operate your iPod using transmitter, you need to match the wireless group between the transmitter and the CD receiver (CRX-140). The default setting for both the transmitter and the CD receiver is A2.
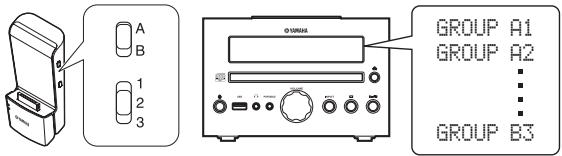
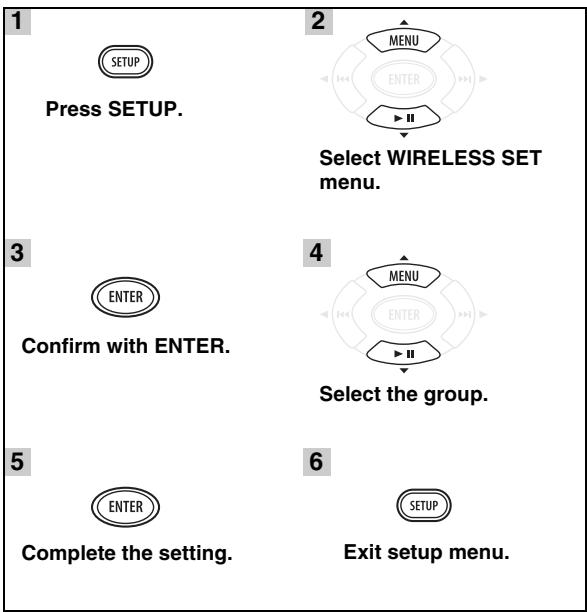
To select wireless group of the CD receiver (CRX-140)
■ Wireless connection to Subwoofer
You can use a subwoofer wirelessly with the wireless subwoofer kit (SWK-W10, etc., sold separately). To establish the wireless connection, set WIRELESS SW to YES (P. 11). For details, refer to the owner's manual of SWK-W10.
Other connection
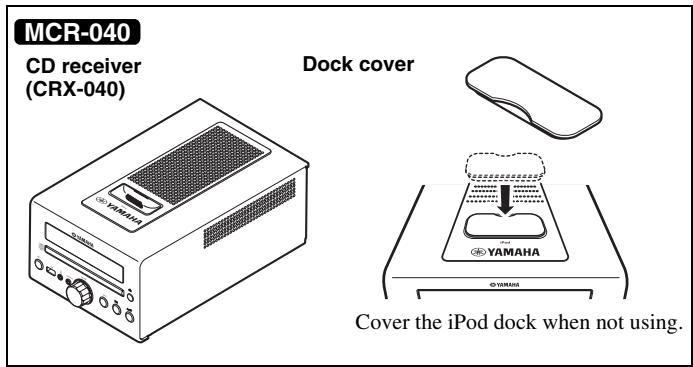
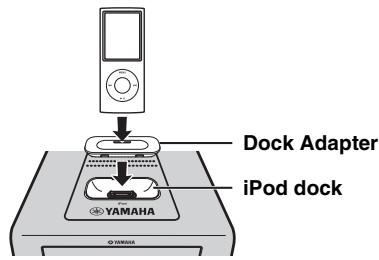
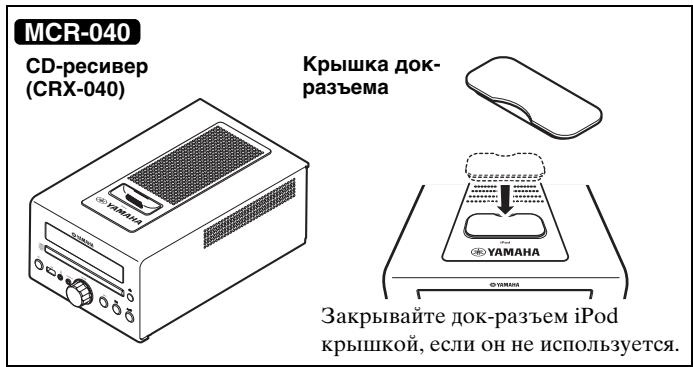
■ Stationing iPod
Station or remove your iPod whenever you want.

Your iPod is automatically charged when your iPod is set in the iPod dock/charging cradle, even if the unit is in standby mode.
Note
The unit is compatible with iPod (5th generation), iPod classic, iPod nano, and iPod touch.
MCR-040
Note
To secure the connection, attach a compatible Dock Adapter supplied with the iPod or an iPod Universal Dock Adapter (sold separately), and remove the protective case covering your iPod.
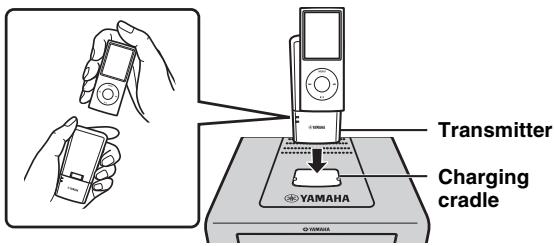
MCR-140
Station your iPod in the charging cradle when you want to charge your iPod. You can also control your iPod with the remote control when your iPod is in the charging cradle.
Connecting USB
Connect or remove your USB device whenever you want.
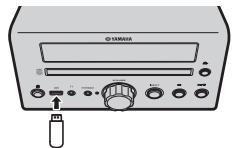

USB device is automatically charged when it is connected to the unit, even if the unit is in standby mode.
Notes
- This unit supports USB mass storage class devices (e.g., flash memories or portable audio players) using FAT16 or FAT32 format.
- Do not connect devices other than USB mass storage class devices (such as USB chargers or USB hubs), PCs, card readers, an external HDD, etc.
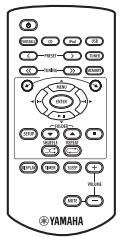
REMOTE CONTROL
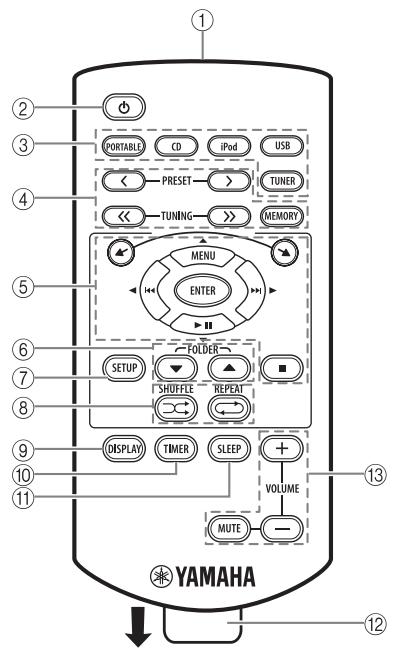
① Infrared signal transmitter (P.2)
② ):standby/on
③ Source buttons: PORTABLE, CD, iPod, USB, TUNER (P. 8, 10)
④ FM control buttons (P. 10)
⑤ / : iPod scroll buttons (P.8)
MENU/ENTER/ multi function buttons (P.8,9,10,11)
■: Stop button (P.8,9)
⑥ FOLDER▼/▲ (P.8)
⑦ SETUP (P.5, 11)
⑧ SHUFFLE/REPEAT (P.9)
⑨ DISPLAY (P.9, 12)
⑩ TIMER (P. 12, 13)
⑪ SLEEP (P.13)
⑫ Battery insulation sheet: Remove before using.
Volume control buttons: Press to control the volume. Press MUTE to turn off the sound. Press again to resume the volume.
FRONT PANEL DISPLAY

① SLEEP indicator: Lights up when the sleep timer is on (P. 13).
(2) PRESET indicator: Lights up when you preset radio stations (P. 10).
③ STEREO indicator: Lights up when this unit is receiving a strong signal from an FM stereo broadcast.
④ AUTO indicator: Lights up when this unit is in the Automatic Tuning mode (rP.10).
⑤ SHUFFLE indicator: Lights up when you set your iPod (MCR-040)/CD/USB to shuffle play (P. 9).
⑥ REPEAT indicator: Lights up when you set your iPod (MCR-040)/CD/USB to repeat play (P. 9).
⑦ Radio Data System indicators: The name of the Radio Data System data offered by the currently received Radio Data System station lights up (P. 10).
MUTE indicator: Lights up when the sound is muted.
(9) Multi information display: Shows the various information such as the tuning frequency.
⑩ TIMER indicator: Flashes during timer setting. Lights up when the timer is on (P. 13).
TUNED indicator: Lights up when this unit is tuned into a station (P. 10).
⑫ MEMORY indicator: Flashes when searching for a radio station by automatic preset tuning. Lights up when you preset radio stations automatically or manually (P. 10).
3 Multi information indicator: Indicates the music information currently displayed on Multi information display (P. 9).
^14 Operation indicators: Shows operable multi function buttons for a currently selected SETUP item.
FRONT PANEL AND BASIC OPERATION

- This unit has an automatic standby function, which will automatically switch the unit to standby mode if the unit is left turned on for 1 hour without playback or any other operation being performed. This function is not available when the source is set to PORTABLE/ FM.
- Press to set the unit to standby mode. All the information on the front panel display is not displayed in standby mode. This can reduce power consumption. To turn on the unit, press / , or start playback with your iPod connected to the transmitter (MCR-140 only).
- If the iPod selected as the input source is disconnected from the transmitter, or does not output sound for a certain period, the unit will automatically switch to standby mode (MCR-140 only).
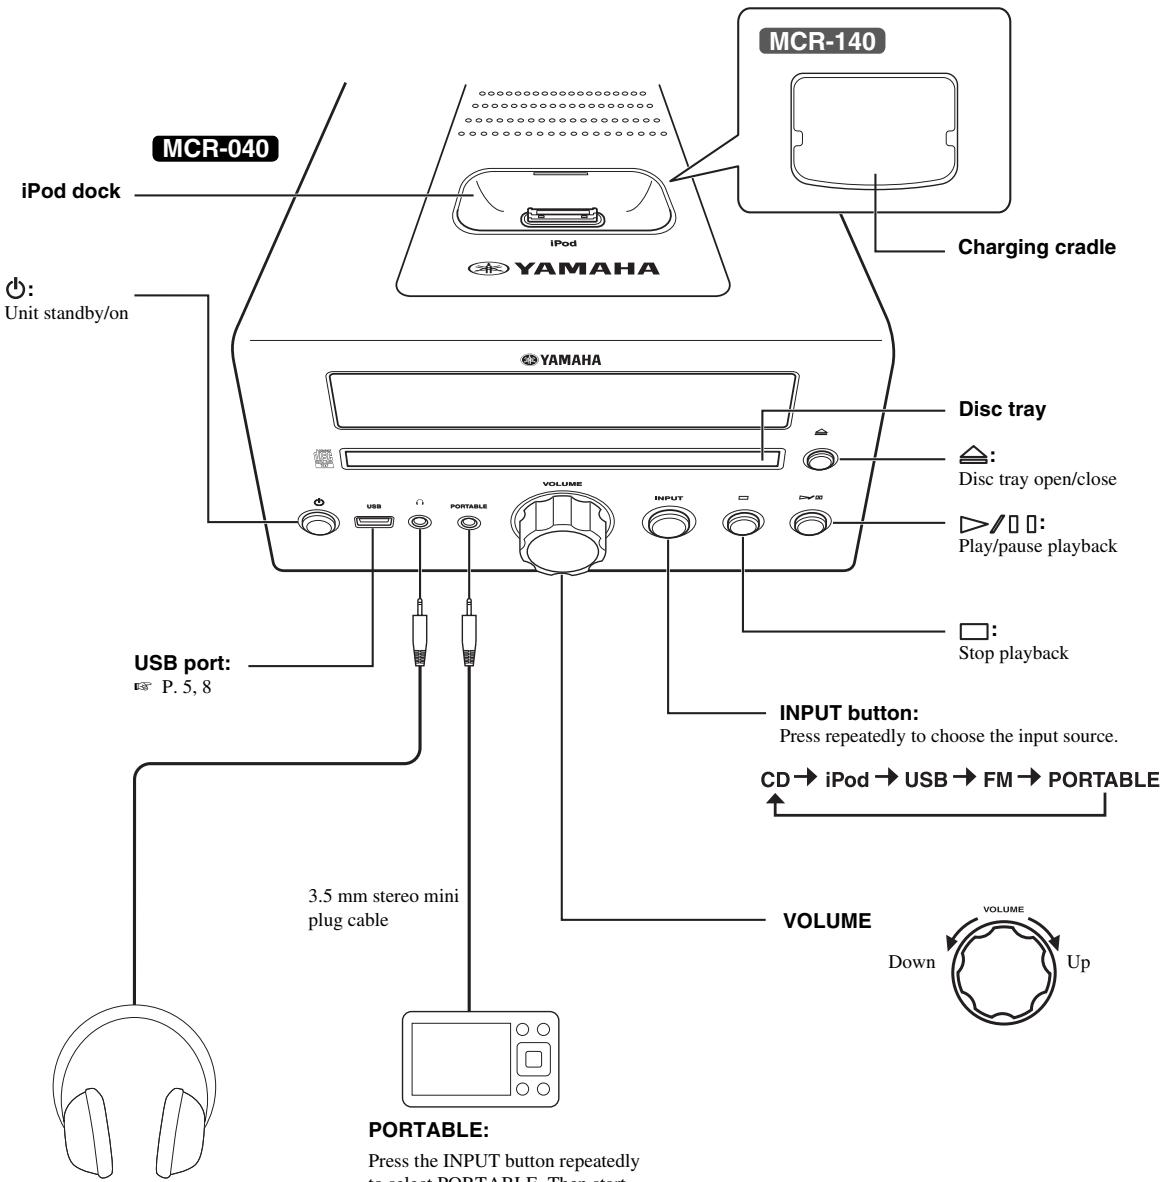

Connecting headphones
No sound is output from the speakers when headphones are connected.
PORTABLE:
Press the INPUT button repeatedly to select PORTABLE. Then start playback on the connected portable audio device.
LISTENING TO MUSIC
Playback operation
Follow the procedures below to play back music.
| 1 Set the source | 2 Switch the input | 3 Select music and start playback | |
| iPod*1 | MCR-040 Dock Adapter YAMAHA P.5 | iPod | Scroll the list Control menu For the MCR-140, the operation on the remote control or front panel is available only when your iPod is stationed in the charging cradle (P.5). |
| MCR-140 Status indicator P.5, 16 | MCR-140 Control with iPod Be careful when controlling the volume (P.5). | ||
| CD | CD | CD | FOLDER SKIP to the first file in the previous/next folder for MP3 or WMA*3 |
| USB*2 | USB P.5 |
1 Some features may not be available depending on the model or the software version of your iPod.
2 - Some devices may not work properly even if they meet the requirements.
- Playability of and power supply to all kind of USB devices are not guaranteed.
- The reading time may exceed 30 seconds depending on the number of files/folders.
- Yamaha and suppliers accept no liability for the loss of data saved on the USB devices connected to this unit.
As a precaution, it is recommended that the files are made backup copies.
*3 If you press these buttons during playback, the folder name is displayed on the front panel display for a certain period.
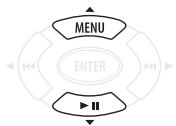
Other operation
Control playback
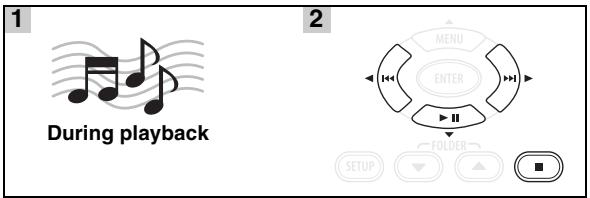
▶▶: Skip forward/Press and hold to Fast forward
: Skip backward/Press and hold to Rewind
▶ III: Play/Pause
:Stop
Notes
- Playback for Data Disc starts in alphanumeric order of files.
- Playback for USB starts in order by date and time of creation.
Shuffle play
You can play back in random sequence.

For iPod

*1 You cannot set ALBUMS when you use an iPod touch.
For CD/USB

*2 If the audio format of the selected music source is MP3/WMA, you can also select FOLDER.
Repeat play
You can play back repeatedly.


*3 If the audio format of the selected music source is MP3/WMA, you can also select FOLDER.
Switching the display
You can switch the playback information shown on the front panel display. Some special characters may not be shown properly.

For iPod MCR-040
Song number and elapsed time (default setting)

Song number and remaining time

Song name

Artist name

Album name

Back to the default setting
Note
This function is available for iPod (5th generation), iPod classic, iPod nano, and iPod touch. However, even with these models, this function may not be available depending on the software version of your iPod.
For CD/USB
Track/file number and elapsed time of the current song (default setting)

Track number and remaining time of the current song*4

Total time of the disc*4

Remaining time of the disc*4

File name*5

Track name*6

Artist name*6

Album name*6

Back to the default setting
4 Only for Audio CDs
5 Only for MP3/WMA files
*6 Only when the selected track has information
LISTENING TO FM RADIO STATIONS
Tuning to radio stations
1

Press TUNER.
2

Press and hold.
Automatic tuning starts.
#
If the signal received from the station you want to select is weak, you can also tune into radio stations manually by pressing TUNING repeatedly.
Note
If you tune to a station manually, the sound is monaural.
Presetting radio stations
You can store your favorite FM stations with the preset function.
Automatic preset tuning
1

Press and hold
MEMORY for more than
2 seconds in FM mode.
2

Start the automatic preset.
Note
When you perform the automatic preset, all stored stations are cleared and the new stations are stored.
Manual preset tuning
1


2

Tune into a favorite radio station.
Press MEMORY.
3
Select the preset number you want to store to.
4

Complete the manual preset.
#
- You can preset up to 30 FM stations.
- To cancel the manual preset while choosing a preset number, press MEMORY again.
- You can delete a preset station by pressing SETUP MENU ▲/▼ ENTER to select PRESET DELETE.
Selecting preset radio stations (Preset tuning)

—PRESET

Select the preset radio station in FM mode.
Displaying Radio Data System information
1

While listening
2

Press repeatedly.
PS (Program Service)

PTY (Program Type)

RT (Radio Text)

CT (Clock Time)

Frequency

Back to the PS
Note
If the signal transmission of the Radio Data System station is too weak, this unit may not be able to receive Radio Data System information completely. In particular, RT (Radio Text) information uses a lot of bandwidth, so it may be less available compared to other types of information.
USING USEFUL FUNCTIONS
Using setup menu
The setup menu appears on the front panel display by pressing SETUP. You can set various useful functions with setup menu.
| Setup menu | Parameter or control range | Reference page |
| PRESET DELETE | (Displays only when the input source is set to FM.) | 10 |
| DIMMER | DIMMER ON (25%)/OFF (100%) | below |
| TREBLE | -6 dB to +6 dB | below |
| BASS | -6 dB to +6 dB | below |
| BALANCE | L+5 - CENTER - R+5 | below |
| AUTO CLOCK*1 | ON/OFF | 12 |
| CLOCK SET | Hour, minute | 12 |
| TIMER SET | Time (hour, minute), running time, sound (source, track or preset number), timer on/off | 12 |
| WIRELESS SET MCR-140 | GROUP A1/A2/A3/B1/B2/B3 | 5 |
| POWER SAVING MCR-140 | NORMAL/ECO | below |
| WIRELESS SW MCR-140 | NO/YES | below |
*1 This function is available only for Europe, U.K. and Australia models.
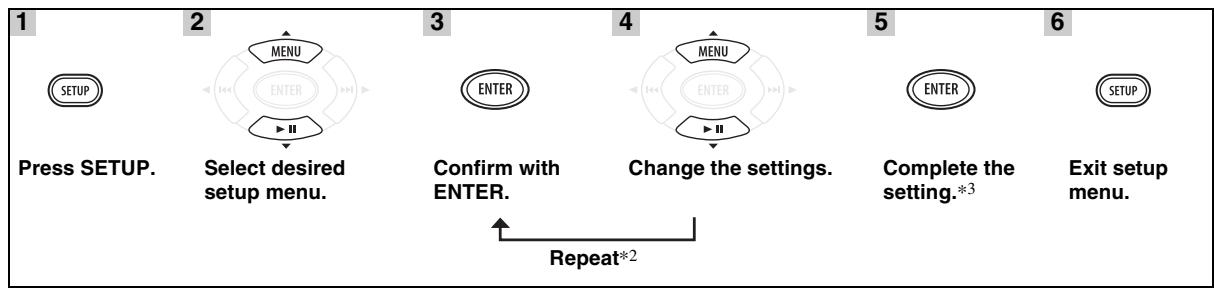
2 When there are some parameters to set, repeat steps 3 and 4. You can go back to a previous parameter by pressing .
3 To set additional items, repeat steps 2 to 5.

To cancel the setting during the operation, press SETUP.
Setting dimmer, tone/balance and power saving mode
DIMMER: Changes the brightness of the front panel display.
TREBLE*4: Adjusts the high frequency response.
BASS*4: Adjusts the low frequency response.
BALANCE: Adjusts the volume level of each left and right speaker channel.
POWER SAVING: If you set to ECO, you can reduce standby power consumption. However, you cannot turn on the unit by playback operation on your iPod during standby mode. The default setting is NORMAL. This function is available only for MCR-140.
WIRELESS SW: Set to YES when you use a subwoofer via the wireless subwoofer kit (SWK-W10, etc., sold separately). The default setting is NO. This function is available only for MCR-140.
*4 Also effective when you are using headphones.
Adjusting the clock
AUTO CLOCK: Automatic adjustment function is available for Europe, U.K. and Australia models only. To apply for this function, set AUTO CLOCK to ON.
CLOCK SET: To set hour and minute, repeat steps 3 and 4 on page 11.

The current time appears on the front panel display for a certain period by pressing and holding DISPLAY if the time setting has completed.
Note
The time setting is lost once the power cable is disconnected from the wall outlet.
Setting the timer
TIMER SET: To select the following setting items, repeat steps 3 and 4 on page 11.

You can enter TIMER SET directly by pressing and holding TIMER.
Time (hour and minute)

Running time

You can choose the running time from 10 minutes to 90 minutes in 10 minute increments. "--" means the unit will not be set to standby mode automatically.
Input source and track/file number or preset number
Notes
- If the source is not set properly, the timer sound will not be heard. Make sure that the source is set securely.
- MCR-140: When you select an iPod as the input source, you need to set the iPod in the charging cradle on the unit.
iPod:
When you select the iPod as a source, this unit resumes the music that you were listening to last time.
CD:
Set a track/file number.
If you set the track/file number which is not exist, the first track/file is played back automatically.
USB:
Set a file number.
If you set a file number that does not exist, the first file is played back automatically.
FM:
Set preset number.
By selecting - - " , the FM station you set last time is set.
Timer ON/OFF
Switch the timer on/off. When the timer is on, the TIMER indicator lights up on the front panel display (P. 6).

This setting is also available with TIMER (P.6, 13).
Using timer and sleep timer
Using the timer
The timer sets the unit to play back music at the time you set. The unit is set to standby mode after the specified running time elapses.
To use the timer, set the appropriate input source securely and set the timer in the setup menu in advance (P. 12).
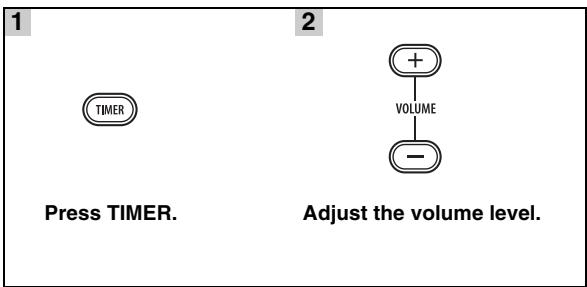
Each time you press TIMER while the power is on, it switches on/off. When you switch on the timer, the TIMER indicator lights up on the front panel display (P. 6). To turn on the unit via the timer, set this unit to standby mode when the timer is switched on.
Notes
- The clock has to be set in advance.
- When the unit is in standby mode, the TIMER indicator does not light up on the front panel display even if the timer is on.
- After the unit is operated via the timer, the timer function switches off.

- To activate the timer function again, press TIMER while the power is on.
- The timer setting is saved for convenient use next time.
Using sleep timer
The sleep timer sets the unit to the standby mode after the specified time elapses.


The SLEEP indicator lights up on the front panel display (P. 6).
TROUBLESHOOTING
Refer to the table below when this unit does not function properly. If the problem you are experiencing is not listed below or if the instruction below does not help, turn off this unit, disconnect the power cable, and contact the nearest authorized Yamaha dealer or service center.
General
| Problem | Cause | Remedy | page |
| This unit fails to turn on or enters the standby mode soon after the power is turned on. | The power cable is not connected or the plug is not completely inserted. | Connect the power cable firmly. | 4 |
| This unit has been exposed to a strong external electric shock (such as lightning or strong static electricity). | Set this unit to the standby mode, disconnect the power cable, plug it back in after 30 seconds and then use it normally. | — | |
| The unit does not operate properly. | |||
| No sound. | No appropriate input source has been selected. | Select an appropriate input source with INPUT on the front panel (or the source buttons on the remote control). | — |
| Speaker connections are not secure. | Secure the connections. | 4 | |
| The mute function may be on. | Cancel the mute function. | 6 | |
| The volume is turned down. | Turn up the volume. | — | |
| Signals this unit cannot reproduce are being input from a source component, such as a CD-ROM. | Play a source whose signals can be reproduced by this unit. | 3 | |
| The power is suddenly turned off. | The sleep timer may be set. | This is not malfunction. Turn on the unit and play the source again. | — |
| The unit is left turned on for 1 hour without playback or any other operation being performed. | |||
| The power was turned on by the timer and elapsed specified running time. | |||
| MCR-140: The iPod selected as the input source is disconnected from the transmitter, or does not output sound for a certain period. | |||
| The clock setting has been cleared. | The power cable has been disconnected. | Connect the power cable, and set the clock again. | — |
| Sound is heard from the speaker on one side only. | Incorrect cable connections. | Connect the cables properly. If the problem persists, the cables may be defective. | 4 |
| There is noise interference from digital or radio frequency equipment. | This unit is too close to the digital or high-frequency equipment. | Move this unit farther away from such equipment. | — |
The following status messages appear only if you are using MCR-140.
| Status message | Cause | Remedy | page |
| Subwoofer Link | Wireless connection between the subwoofer and the unit is established. | ||
| SubwooferUnlink | Wireless connection between the subwoofer and the unit is disconnected. | ||
| Wireless Error | There is a problem with the internal circuit of this unit. | Disconnect the power cable and contact the nearest authorized Yamaha dealer or service center. | — |
Radio reception
| Problem | Cause | Remedy | page |
| FM stereo reception is noisy. | The antenna is connected improperly. | Check the antenna connections. | 4 |
| The characteristics of FM stereo broadcasts may cause this problem when the transmitter is too far away or the antenna input is poor. | Try using a high-quality directional FM antenna. | — | |
| Use the manual tuning method. | 10 | ||
| The desired station cannot be tuned into with the automatic tuning method. | The signal is too weak. | Use a high-quality directional FM antenna. | — |
| Use the manual tuning method. | 10 | ||
| The preset selecting function does not work. | The preset (memory) may have been erased. | Preset radio stations again. | 10 |
| There is distortion, and clear reception cannot be obtained even with a good FM antenna or an outdoor antenna. | Multipath reflection or other radio interference may have occurred. | Change the height, direction, or placement of the antenna. | — |
iPodTM
Note
In case of a transmission error without a status message appearing in the front panel of this unit, check the connection to your iPod (see page 5).
The following status messages appear only if you are using MCR-040.
| Status message | Cause | Remedy | page |
| iPod Connecting | This unit is in the middle of recognizing the connection with your iPod. | If the message continues to appear in the front panel display and playback does not start, connect the iPod again. | — |
| iPod Charging | |||
| Unknown iPod | There is a problem with the signal path from your iPod to this unit. | Connect the iPod again. | 5 |
| The iPod being used is not supported by this unit. | Only iPod (5th generation), iPod classic, iPod nano, and iPod touch are supported. | — | |
| iPod | This unit has recognized your iPod; however, it cannot obtain information such as elapsed time. | ||
| iPod Unplugged | Your iPod was removed from the iPod dock. | Station your iPod back in the iPod dock. | 5 |
TROUBLESHOOTING
The following status messages appear only if you are using MCR-140.
| Status message | Cause | Remedy | page |
| iPod Linked | Wireless connection was successful. | ||
| iPod | |||
| iPod Unlinked | Wireless connection has disconnected. | Connect the iPod to the transmitter and start playback. | 5 |
| iPod Low Batt. | The battery of the iPod is getting flat. | Set it in the charging cradle. | 5 |
The following LED statuses of the status indicator refer to the transmitter.
| LED status | Transmitter status | Remedy | page |
| Off | The transmitter is in standby mode. | ||
| An iPod is not connected or wireless communication has not been established. | |||
| Flashes green | Connection in progress. | Please wait. | — |
| Flashes green once | Adjusting the volume level or operating with the remote control. | ||
| Lights up green | Wireless communication between the unit and transmitter is established. | ||
| Lights up green and flashes red for 2 seconds | An unsupported iPod is connected. | Only iPod (5th generation), iPod classic, iPod nano, and iPod touch are supported. | 5 |
| Lights up green and keeps flashing red | Connection failed. | Connect again. | 8 |
| Flashes red | Error occurs. | Remove the iPod from the transmitter, and connect again. | 8 |
| Flashes red once | The volume of the unit is set to maximum or minimum. | ||
| Flashes red 2 times continuously (regardless of green status) | The battery of the iPod is low. | Set the iPod in the charging cradle. | 5 |
| Problem | Cause | Remedy | page |
| No sound. | The power of the unit is off. | Connect the power cable correctly. | — |
| The iPod software version has not been updated. | Download the latest iTunes software to update the iPod software version to the latest. | — | |
| The iPod is in the process of connecting with the unit. | Please wait for a while. | — | |
| MCR-140: The battery of the iPod is low. | Charge the iPod. | — | |
| MCR-140: The iPod is not connected to the transmitter firmly. | Connect the iPod firmly. | — | |
| MCR-140: Earphones are connected to the iPod. | Remove the earphones. | — | |
| MCR-140: The signal from the transmitter is blocked by your body or metallic objects, etc. | Change the way of holding, the orientation, or the position of the transmitter to avoid your body or metallic objects blocking the signal. | — | |
| MCR-140: There is a device (microwave oven, wireless LAN, cordless telephone, etc.) outputting signals in the 2.4 GHz frequency band nearby. | Place the unit away from these devices, or turn them off. If the device is IEEE802.11n-compliant, change the channel setting of the device so as not to affect the unit. | — | |
| MCR-140: Distance is too far. | Move the transmitter closer to the unit. Transmission range is approximately 10 m (32.8 ft). Also, placing the unit in a lower position makes it easier to receive wireless signals. | — | |
| MCR-140: The unit and transmitter are not connected since they are set to different groups. | Set both the unit and transmitter to the same group. | 5 | |
| MCR-140: The unit is connected to another unit. | Select a different group by changing the group setting of the unit and transmitter. | 5 | |
| No sound. | MCR-040: The iPod is set in the iPod dock improperly. | Remove the iPod from the unit, then set it in the iPod dock again. | 5 |
| The iPod sounds, but you cannot operate it with the unit or the remote control. | MCR-140: The iPod is not connected to the transmitter properly. | Remove the iPod from the transmitter, then set it to the transmitter again. | 5 |
| Cannot change the volume by changing the volume of the iPod. | The iPod is not supported by this unit. | Only iPod (5th generation), iPod classic, iPod nano, and iPod touch are supported. | 5 |
| The iPod is not connected correctly. | Connect the iPod firmly. | — | |
| The iPod display does not change by pressing the remote control volume keys. | The iPod software version is out of date. | Update the iPod software version to the latest. If the problem cannot be solved, even with the latest software, reset the iPod. | — |
| The unit cannot be operated by the remote control. | |||
| You cannot operate from the iPod. | MCR-040: The iPod is set in the iPod dock improperly. | Remove the iPod from the unit, then set it in the iPod dock again. | 5 |
| MCR-140: The iPod is connected to the transmitter improperly. | Remove the iPod from the transmitter, and connect to the transmitter again, then start playback. | 8 | |
| The playback information is not displayed on the front panel display. | The iPod you set is not compatible with the playback information display. | Only iPod (5th generation), iPod classic, iPod nano, and iPod touch are supported. | 5 |
| You are using MCR-140. | Only MCR-040 is available for playback information display. | — | |
| The iPod does not charge up. | MCR-040: The iPod is set in the iPod dock improperly. | Remove the iPod from the unit, then set it in the iPod dock again. | 5 |
| MCR-140: The iPod is set in the charging cradle improperly. | Remove the iPod from the unit, then set it in the charging cradle again. | 5 |
TROUBLESHOOTING
| Problem | Cause | Remedy | page |
| Suddenly the speaker produces sound even though an iPod is not connected. | MCR-140: The unit is connected to another transmitter. | Change the group setting. | 5 |
| Transmitted sound is cut. | MCR-140: If noise occurs at the same frequency the transmitter is using, the unit will search and move to another (unused) frequency, which may cause sound to be cut. | This is not malfunction. If cut occurs frequently, relocate the unit. | — |
USB
Note
In case of a transmission error without a status message appearing in the front panel of this unit, check the connection to the USB device (see page 5).
| Status message | Cause | Remedy | page |
| USB Unplugged | The USB device is not connected firmly. | Connect the USB device again. | 5 |
| Unknown USB | The connected USB device is not playable on this unit. | Connect playable USB device. | 5 |
| USB OverCurrent | The connected USB device is not playable on this unit. | Disconnect the USB device. Change input source other than USB and select USB as input source again. Then connect playable USB device again. | 5 |
| The USB device is connected at an angle. |
| Problem | Cause | Remedy | page |
| MP3/WMA file in the USB device does not play. | The USB device is not recognized. | Connect the USB device again. | 5 |
| Connect an AC adapter if supplied with the device. | — | ||
| Improper USB device connections. | Connect the USB device again. | 5 | |
| The MP3 or WMA formats are not compatible with this unit. | Replace the file with a correctly recorded file playable with this unit. | 3 | |
| If the solutions above do not resolve the problem, the USB device is not playable on the unit. | Try another USB device. | — |
Disc playback
| Problem | Cause | Remedy | page |
| No sound or distorted sound | The sampling rate of an MP3 or WMA file may not be compatible with this unit. | Check the sampling rate and bit rate of an MP3 or WMA file are compatible with this unit. | 3 |
| Disc playback does not start. | You may be using a CD-R/RW that is not finalized. | Finalize the CD-R/RW. | — |
| The disc label may be upside down. | Check that the disc label is facing up. | — | |
| The disc may be defective. | Try playing back another disc. If this cures the problem, the disc you want to play back is defective. | — | |
| MP3/WMA disc may not contain sufficient music files to be played back. | Check that your MP3/WMA disc contains at least 5 MP3/WMA music files. If the number of files is small, the disc may not be recognized. | — | |
| The sampling rate of an MP3 or WMA file may not be compatible with this unit. | Check the sampling rate and bit rate of an MP3 or WMA file are compatible with this unit. | 3 | |
| Some button operations do not work. | The disc loaded into the unit may not be compatible. | Remove the disc and then check whether the unit supports the disc or not. | 3 |
| Playback does not start immediately after pressing >/□ on the unit or ▷ on the remote control. | The disc may be dirty. | Wipe the disc clean. | — |
| The disc loaded into the unit may not be compatible. | Use a disc supported by the unit. | 3 | |
| If the unit was moved from a cold to warm place, condensation may have formed on the disc reading lens. | Wait for an hour or two until the unit adjusts to the room temperature, and try again. | — | |
| “No Disc” appears in the display even though a disc is in the disc tray. | The disc loaded into the unit may not be compatible. | Use a disc supported by the unit. | 3 |
| The disc may be dirty. | Remove the disc and then wipe the disc clean. | — | |
| Disc is loaded upside-down. | Remove the disc and then load the disc with the labeled side facing up. | — |
Remote control
| Problem | Cause | Remedy | page |
| The remote control does not work nor function properly. | The remote control may be operated outside its operation range. | For information on the remote control operation range, refer to “Using the remote control”. | 2 |
| The remote control sensor on this unit may be exposed to direct sunlight or lighting. | Change the lighting or orientation of this unit. | — | |
| The battery may be worn out. | Replace the battery with new one. | 2 | |
| There are obstacles between the sensor of this unit and the remote control. | Remove the obstacles. | — |
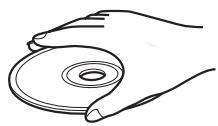
HANDLING COMPACT DISCS
- Always handle with care so that the playing surface is not scratched. Do not bend discs.
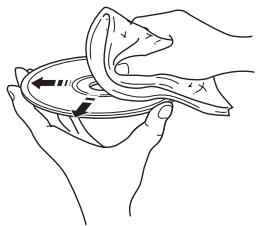
- To keep the playing surface clean, wipe with a clean, dry cloth. Do not use any type of disc cleaner, spray, or any other chemical-based liquid.
-
Do not expose discs to direct sunlight, high temperature or high humidity for a long time.
-
Do not wipe with a circular motion; wipe straight outward from the center.
- Use a soft-tipped pen when writing on the label side of a disc.
SPECIFICATIONS
CD RECEIVER (CRX-040, CRX-140)
PLAYER SECTION
iPod
- Supported iPod.....iPod (5th generation), iPod classic, iPod nano, iPod touch
CD
Media CD, CD-R/RW
Audio format Audio CD, MP3, WMA
LASER
- Type .Semiconductor laser GaAs/GaAlAs
- Wave length 780 nm
Output Power 10 mW
USB
Audio format.. MP3, WMA
PORTABLE
- Input connector.......STEREOL/R: 3.5 mm STEREO mini Jack
AMPLIFIER SECTION
Maximum output power. 15 W + 15 W (6 Ω 1 kHz, 10% THD)
Input sensitivity PORTABLE. 450 mV/22 kΩ
Total harmonic distortion CD etc. 1kHz / 1W . 0.05%
TUNER SECTION
- Tuning range [U.S.A. and Canada models] 87.5 to 107.9 MHz [Other models] 87.50 to 108.00 MHz
GENERAL
-
Power Supply [Europe model] AC 230 V, 50 Hz [U.S.A. and Canada models] AC 120 V, 60 Hz [Asia model] AC 220/230-240 V, 50/60 Hz [Taiwan model] AC 110/120 V, 60 Hz [Australia model] AC 240 V, 50 Hz [U.K. model] AC 230 V, 50 Hz [China model] AC 220 V, 50 Hz [Korea model] AC 220 V, 60 Hz
Power consumption 25 W -
Standby Power consumption MCR-040. 0.5 W or less MCR-140 POWER SAVING: ECO. 1.0 W or less POWER SAVING: NORMAL (default setting) 2.0 W or less
- Dimensions (W × H × D) 180 × 120 × 309 mm (7 1/8 × 4 3/4 × 12 1/8 in)
Weight 3.6 kg (7.9 lbs.)
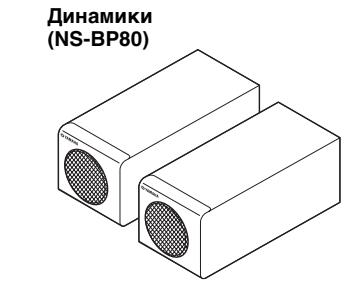
SPEAKER (NS-BP80)
- Driver unit 10 cm (4 in) full-range Cone type /Non Magnetic Shielding Type
- Dimensions (W × H × D) 122 × 118 × 287 mm (43/4 × 45/8 × 111/4 in)
Weight 1.4 kg (3.1 lbs.)
TRANSMITTER (YIT-W11TX)
Frequency 2.4 GHz
Transmission range.. Approx. 10m (32.8 ft) (without interference)
- Number of units which can be simultaneously transmitted to Up to 7 units (depending on the circumstances)
Specifications are subject to change without notice.
iPodTM
iPod is a trademark of Apple Inc., registered in the U.S. and other countries.
"Made for iPod" means that an electronic accessory has been designed to connect specifically to iPod and has been certified by the developer to meet Apple performance standards.
Apple is not responsible for the operation of this device or its compliance with safety and regulatory standards.
Limited Guarantee for European Economic Area (EEA) and Switzerland
Thank you for having chosen a Yamaha product. In the unlikely event that your Yamaha product needs guarantee service, please contact the dealer from whom it was purchased. If you experience any difficulty, please contact Yamaha representative office in your country. You can find full details on our website (http://www.yamaha-hifi.com/ or http://www.yamaha-uk.com/ for U.K. resident).
The product is guaranteed to be free from defects in workmanship or materials for a period of two years from the date of the original purchase. Yamaha undertakes, subject to the conditions listed below, to have the faulty product or any part(s) repaired, or replaced at Yamaha's discretion, without any charge for parts or labour. Yamaha reserves the right to replace a product with that of a similar kind and/or value and condition, where a model has been discontinued or is considered uneconomic to repair.
Conditions
- The original invoice or sales receipt (showing date of purchase, product code and dealer's name) MUST accompany the defective product, along with a statement detailing the fault. In the absence of this clear proof of purchase, Yamaha reserves the right to refuse to provide free of charge service and the product may be returned at the customer's expense.
- The product MUST have been purchased from an AUTHORISED Yamaha dealer within the European Economic Area (EEA) or Switzerland.
- The product must not have been the subject of any modifications or alterations, unless authorised in writing by Yamaha.
- The following are excluded from this guarantee:
a. Periodic maintenance and repair or replacement of parts due to normal wear and tear.
b. Damage resulting from:
(1) Repairs performed by the customer himself or by an unauthorised third party.
(2) Inadequate packaging or mishandling, when the product is in transit from the customer. Please note that it is the customer's responsibility to ensure the product is adequately packaged when returning the product for repair.
(3) Misuse, including but not limited to (a) failure to use the product for its normal purpose or in accordance with Yamaha's instructions on the proper use, maintenance and storage, and (b) installation or use of the product in a manner inconsistent with the technical or safety standards in force in the country where it is used.
(4) Accidents, lightning, water, fire, improper ventilation, battery leakage or any cause beyond Yamaha's control.
(5) Defects of the system into which this product is incorporated and/or incompatibility with third party products.
(6) Use of a product imported into the EEA and/or Switzerland, not by Yamaha, where that product does not conform to the technical or safety standards of the country of use and/or to the standard specification of a product sold by Yamaha in the EEA and/or Switzerland.
- Where the guarantee differs between the country of purchase and the country of use of the product, the guarantee of the country of use shall apply.
- Please backup any custom settings or data, as Yamaha may not be held responsible for any alteration or loss to such settings or data.
- This guarantee does not affect the consumer's statutory rights under applicable national laws in force or the consumer's rights against the dealer arising from their sales/purchase contract.
Information for Users on Collection and Disposal of Old Equipment and Used Batteries

These symbols on the products, packaging, and/or accompanying documents mean that used electrical and electronic products and batteries should not be mixed with general household waste.
For proper treatment, recovery and recycling of old products and used batteries, please take them to applicable collection points, in accordance with your national legislation and the Directives 2002/96/EC and 2006/66/EC.

By disposing of these products and batteries correctly, you will help to save valuable resources and prevent any potential negative effects on human health and the environment which could otherwise arise from inappropriate waste handling.

For more information about collection and recycling of old products and batteries, please contact your local municipality, your waste disposal service or the point of sale where you purchased the items.
[Information on Disposal in other Countries outside the European Union]
These symbols are only valid in the European Union. If you wish to discard these items, please contact your local authorities or dealer and ask for the correct method of disposal.
Note for the battery symbol (bottom two symbol examples):
This symbol might be used in combination with a chemical symbol. In this case it complies with the requirement set by the Directive for the chemical involved.
ATTENTION : VEUILLEZ LIRE CE QUI SUIT AVANT D’UTILISER L’APPAREIL.
■ ALTAVOCES (NS-BP80)
BOCIPPOH3BODIMbIE INCKN IΦOPMATbI ΦAIJIOB 3
IIOJKJIIOUeHHe 4
OchOBhIe IIOJKJIOUeHn. 4
BecipobOIOHoe IOIKJIOUeHHe
MCR-140 5
IpyrHe IIOKJIIOUeHnna 5
IIyIbT IY 6
JINCHJIEN IEPEDHIIAHEJIN 6
PABOTA
IIPEHJIAHEJIb N OCHOBHOE
YIIPABJIEHNE 7
IIPOCJIYIHHBAHNE MY3bIKN 8
OIIepaIIN BOCIpON3BedeHn8
Дугные операцinn. 9
IIPOCJIYIHHBAHNE
FM-PAHIOCTAHIII 10
Hacrpoika padnoctanu 10
IpeBbapHTeJIbHaHaHacrpoiKa paIIOcTaHciu. 10
BbI6op IpeIyuctaHOBJeHHbIX paIIOCTaHIIN (HaCTpoIka Ha IpeIyCTaHOBJeHHyIO paIIOCTaHIINIO) 10
OTo6paJxHHe HnΦopMaIHH cHCTeMbI paIIOJaHHbIX. 10
HcIOJIb3OBAHHe IOJE3HbIX
Функим.. 11
HcnoJIb3OBAHHe MeHIO HacTpoIKn. 11
HcnoJIb3OBaHHe TaMepa H TaMepa cHa. 13
O hactoIeM pyKOBODCTBe
B DAHHoH INHCTpyKIIHN OHnCaHbI ONepaIHIN NO ynpabJIeHHIO aIInapaTOM C IOMOIIbIO IIJbTa DY, KpOME cJIyaeB, KORJa 3TO HEBO3MOxHO. HeKOtOpBie H3 DAHHbIX ONepaIHIN TAKKe BblIOJIHrOITc C IOMOIIbIO KHOIIOK IIpeJIeHneIIHaHeJIH.
- CHMBOJI “e” pIOM c HOMepOM (HOMepAMN) CTpaHHI O6O3HaayeT COOTBeTCTBYIOIIne CTpaHHIbI JIIa CIPaBKN.
-ПиMuMeuHnIcoIepKgATBaJHyIO INHΦopMaIHI O 6e3OIIaIacHOCTN I INHcTpyKIIHN IO 3KcJIlyaTaIHN. -06o3Haayet COBET IO IIOBOy OIIePaIHN.
-Данноe pykoBOCTBO OTIeYaTahO Do IPOH3BOCTBa.ДИЗаH IN texHnueckHe xapaKTePnCTKN MOryTuacTHUHO H3MeHrTbC r cIJIbIO yIyuIeHn KaueCTBa n T.I.B CJIyuae, ecIn HmEIoTcR pa3JIuHn MeJkypykoBOCTBOM n aIIIapAToM, IIpHOpHTeT OTdAeTcR aIIIpaAty.
0603aHcHn8 6abTOpcknX npabax nIorOtInbl
Advanced YST
B 1988 rody kOMIIaHnYamaHa IpeIcTabHla Ha pbHke akyctHueckne cncTeMbI c texHOJIorHe YST (Yamaha Active Servo Technology) IIra BbICOKKaueCTBEHNORO
BOcIIPOON3BeDEHnI 3Byka C MOIIbIMN HIN3KIMN YaactOTAMn. 3Ta texHOJIorH NIOJIb3yET IpyMly CB83 MEXdY UCHJIteJEM n AkyCTHueckO cnCTeMOI JITo TOnHOI IpePeJaU CHrHAJIa I IpeIeIHNOHHoro yIpaBJIeHNn AkyCTHueckCNCTeMOI.
HcIOJIb3OBAHnE B 3TOI TexHOJIorHn AkyCTHueckNX CNCTeM C yIpaBJIeHNm OTPiAteJIbHBIM IOJIbIM COIpOTHBJIeHNm UcHJIteJIa N pe3OHaHCOM MeJy O6bEMOM KOpNyca
aKyCTHueckO cnCTeMbI h OTBepCTHE mIO3BOJIaET CO3JaBaTb
60JIbIIe pe3OHaHCHO HePrgHI (IOHHThe "BO3DIIHHO R HN3KOaCTOTHO rHAMHKa"), Yem IIpN HCIOJIb3OBaHHn CTaHApTHorO MeToJa OTPaKeJa 6acob. 2To IO3BOJIInO
BOcPON3BOJNTb HIN3KHe YaactOTb C IOMOIIbO AkyCTHueckNX CNCTeM, HMeIOIIHX HamHOrO MeHbIIHe KOpNyca.
DONOJIHNTIELbHAR NHΦOPMALIJA
YCTPAHEHNE HENCIPIPABHOCTEI.....14
OmbaJyacTb 14
PaHnoIpnem 15
iPodTM 15
USB 18
Bocippon3BeJeHne Incka. 19
IyJIbT IY 19
OBPAIIIEHNE C
KOMIIAKT-ДИСКAMN. 20
TEXHNUECKNE XAPAKTEPNCKU....20
AirWired MCR-140
Ipepa3Byka6e3cKaTHBpeaJIbHOMBpeMeHH6e3 yuxiIeHHKaueCTBaOcUIIeCTBJIaeTc8IlaOJaAp
opnHaJIbHO6ecPiPOBoHNIOHΦpBOoTexHOIoTEN
AirWiredOTKOMIIaHHYamaHa.CIIMOJIbOfHyNKIIIN
AirWired MoXHO TaKJe yIpaJIbTb BKLIOUeHNEM/peXHMOM
OxHdAHN H IprOMKocTbIO iPod.
Wired
DETAJIIN
Y6eIHTecbBTOM, YTO KaIIIAPAty IIpHJIaIaOTcBce IIpeIcTaJIeHHbIe HNKe IeTaJIH.
+
IyblT dY
KOMHaTHa FMaHTehHa
+
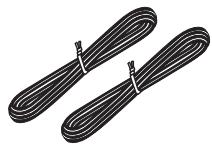
Ka6eBb DnHaMnka (1,5 M x 2)
IcnoJb3ObaHne npJbTa Dy
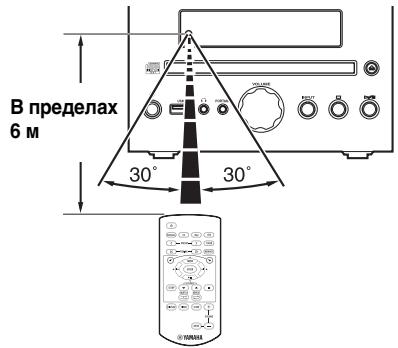
IcnoJIb3yIte IyJIbT Ha pacCToRHH 6 M oT aIIIapaTa HnHaIIpaBJIaTe erO Ha IaTUnK
Примейань
He npoJIbBaIte XnIKKocTb Ha IIyIbT IY.
- HepoHnIte npJIbT IV.
-He octabJIaIte IyJIbT JY B cJIeJyoIIHx MecTaX: -JapKHX HIN BJaXHbIX, HAIpIMeP, B BaHHoH NIN BO3JIe O6OrpeBaTeJIa;
-OUeHb XOJIOnHbIX MecTax;
- IIbIJBHbIX MECTaX.
3aMeHa 6aTapeKn B nyIbTe Dy
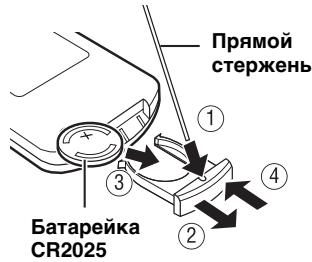
PnCnHexHnPa6oOeToIHaIIa3OHa IyJIbTa 3aMeHrTe 6aTapeKy.
BOCPON3BODIMbIE DNCKN IN ΦOPMATbI ΦAINIOB
Bocnpon3BOIDMbIe DnCKN
IcIOJIb3yIte KOMIIaKT-ⅡHCKN COTMeTKaMn, yKa3aHHbIMN JaJIee

... KomnakT-DnCKn (uΦpOBoe ayDnO)

...LcnpobbIe ayndnoNcKn CD-R, CD-RW
- IINCKN CD-R HJIN CD-RW, Ha YIIaKOBKe KOtOpbIX HJIN Ha cAMOM IINCKe HMeetcR OJHa H3 CJJeIyIOIIHX HAJIINCEH.
FOR CONSUMER FOR CONSUMER USE FOR MUSIC USE ONLY
- ΦинajaинзироваHHbIe IиСКИ CD-R HJIN CD-RW


PpMeyaHne
Ha daHHOM IpoHrpBbATEJe KOMIIaKTIINCKOB He yJaCTcB OBCIpOn3BecTHeKOTOpBie INCKN CD-R/CD-RW IIININCKN C HeIIpaBHJIbHO BbIIIOJIHeHHO3aIIINCbIO.

...Диас CD-TEXT
Bocnpon3BeJeHne 8-cm CD-dncka
ПомecтHTe ДИСК BO BHyTpEHHIOU YacTb JIoTkaДИСКOBOДa. He yCtHaHbJIbAиTe OБьИчБIe (12-cM)CD-ДИСКН ПОВЕХ 8-cM CD-DИСКOB.
ДлпрдOTВрашени Вьхова n3 CTpoJ daHHoro annapata:
He HcnoJIb3yIte IINCKH HeCTaHapTHoH φOpMbI (B BVIE cepIIa H T.II). TaK KaK 3TO MoKeT IIOBpeHITb aIIIapAT.

He nCIOJIb3yIte IINCKn,Ha IOBepxHOCTH KOtOpbIX ecTb IIeHka,HaKJIeIKN HJIN KpacKa. EcJIN BCTaBHTb TaKOJ IIcK B IINCKOBOJ, OH MOKeT IIpHJIINIIHyTB K HeMy IJIN IOBpeIITb CHTbIBaIOUe ee yCTpoIcTBO.
Примеанne: He ИспОЛьзУгТе КаКе-ЛИбО OЧИСТЕЛДЯ ЛИНЗ,ТAKΚАК ЗTO мОжЕТ ПИВЕСТК HeиспРаВ"Hо рбОte.
Bocnpon3BoDnMbIe paJIbI MP3 n WMA MP3
*3 ΠyTb cUHTaETcOJHOn H3 nAnOK.
ПОДКЛЮЧЕНЕ
OchOBhIe NODKJIIOUeHnA
При ПОДКЛЮЧЕНН ДИНAMнКOB И KOMHaTHоI FM-aHTeHHbI K ДaHHOMy aIIIapaTy сJEунTe OПИсанHоI HNXe IIpoIeIype.
ПЕДОCTЕРEXЕNHIE
He IIOIcoeINHnIte cHIOBOI Ka6JIb IIITaHII NaHHOrO aIIIapTa IIO Tex IOp, IOKa He 6yUT IIOKJIIOUeHbI Bce IIPOUHe Ka6JIH.
PpmeaHn
- Y6eHITecb B I npaBnIbHOM IOKJIIOueHHN JIEBOr KaHaJa (L), IIpaBOr KOHaJa (R), “+” (KpacHbI) n “-” (UepHbI). 3ByuAHHe OT INHAMIKOB 6yIeT OTCYCTBOBaT bIpn HeIIpaBnIbHOM BbIIIOJIHeHHN IOKJIIOueHHN, IN 3ByuAHHe 6yIeT HeEcTeCTBeHHbIM COTcYCTBHeM Hn3KOuaCTOTHO rO CHHaJa IIpn HecO6JIIOJeHHN IOJIpyPHocTH IIpn IOKJIIOueHHN KOJIOHOK.
- OTKpbIbIe IIOPOBaI DHHAMKOB He IOJIJKHbI COIIpHKacATbC Jpyr C IpyROM HJIN C JIO6oB MeTaJIINueCKO YAcTbIO aIIIapata. 3TO MOKET IPIBcETN K IOJIOMKe aIIIapata N/HJIN DHHAMKOB.
- IcIOJIb3yIte ToJIbKO IIpHJIaRaemBIE INHaMHKN. IcIOJIb3OBAHHe IpyTHX INHaMHKOB MoKeT cTaTB IIpHUNHOI TORO, YTO 3ByK 6yJeT OTJNUATbCt OITpeINIOJaAeMORO KaueCTBa 3ByuHaHH.
CJIINKOM 6JIH3Koe paCIOJIOKeHHe JaHHoro aIIIapaTa K TeJIeBn3Opy c 3JIeKTPoHNO-JUyeBOI Tpy6KO MoKeT IIpHBecTH K yxyIiueHnIO Ibeta H3O6paKeHn. B 3TOM cJIyuaI OTOdBHHbTe INHaMHKn OT TeJIeB3Opa.
EcJINIOIKNIOUOYeHb HAYIIHHNK, 3ByK He 6yJeT BbIBOaHTbCra H3 IHHAMIKOB.
PORTABLE:
BALANCE: NaCTPOnKa yPoBnI rPOMKoCTn OTJeJIbHO JIeBOr I IpaBOr KaHaJa IIHaAMHkOB.
POWERSAVING:EcJH3aJaTbECO,MOxHO yMeHbIITb 3HePrrIOITpe6JIeHne BpeKHMoeKHaHn. OHaKaO, ecJH aIIapat HaxoHTcB PexKHMoeKHaHn,eO He yJaCTcB BKJIIOHTb OpeaHne BocIpOn3BeJeHn c iPod.
HacrpoiKa IIO yMOJIuaHHIO: NORMAL.Даннай Функць IOOCryIHa TOJIbKO IJIa MCR-140.
WIRELESS SW: yctaHOBtTe 3HaueHne YES, KOrIa ca6Byfep HcIOJIb3yeTcS c IOMOIIbIO KOMIIJEKta 6ecIpOBoIHoro ca6Byfepa (SWK-W10 n T.I., IIpno6peTaetcI IOIOJIHNTeJIbHO). HaCToPka IIO yMOJIuaHHIO: NO. DaHHa fYHKIIIN IOCTUIIHa ToJIbKO IJIa MCR-140.
Mozho BBecTH TIMER SET Haipmyu, HkaB u yepkBaI hKaToI KHOIIky TIMER.
Bpem (aacbl MNHyTbI)

Bpempa60TbI

MOxHO BbI6paTbBpeMa pa6Otbl OT 10 IO 90 MNHyT c IlaROM 10 MNHyT.
“--”O3HaJaET,HTo aIIIapaT He IepeIeT BpeKHM OKnIaHnA bTOMaTHuecKn.
IcToUHnK BbOda n HOMep 3ByKOBoN DOpOxKn/foaJna IJn HOMep npeDyuctaHOBKn
PpMueaHn
- EcsIIN HCTOCHNK Bb16paH HeHaJIeKaIIHM 06pa3OM, He 6yJET CJIbIIIEH 3ByK TaIIMepa. Y6eIHTEcB, YTO HCTOCHNK Bb16paH IIpaBHJIbHO.
- MCR-140: EcJIN BbIbpaTb B KaueCTBe HcToUHnKa BBOJa iPod Heo6xOJHMo yCTaHOBHTb iPod B 3apJHbI OTeK anIInapata.
iPod:
IcnoJb3ObaHne TaMepa cHa
IIO HCTeueHn 3aHaHHoro BpeMeHn TaHMeP cHa IpeBODHT aIIIapAT BpeXHM OJHJaHn.


Ha nncnlee nepeaehne nnaheJn 3aropaeTcNnHnKaTOp SLEEP (cTp.6).
YCTPAHEHNE HENCINPABHOCTEIN
EcJH y Bac BO3HNKJIN JIO6bIe H3 cJIeIyIOUx TpyHocTeB O BpEma 3KcIIyataaHn DaHHoro aIInapaTa, BOCIOJB3yIteCt bTJIiEe HNKe IJIY yCTpaHeHnO OII6Kn. B cIJyae ecJH HeNCIPpaBHocTb He yKa3aHa B Ta6JIiue HJIH Bbl He cMOJIN HcIIpaBHTb ee, cJIeIy HNcTpyKIIIM Ta6JIiBbI, OTKJIIOHTe DaHHyo ChCTeMy, OTCoeIHINTE cHIOBOI Ka6eJIb IIITaHnI N oBaPaHTecb K 6JIIXKaIIeMy OfHIHaJIbHOMy INJIepy HJIIN B cepBnCHbI ΒeHTP YamaHa.
067a yacTb
| HeincpaBnOcTb | Причнa | Способ устранeия | стр. |
| Annapat He ВКЛЮаЕТСЯ Или nevexODIT B reхим Ождадия посle ВКЛЮЧЕНЯ питаня. | He 6blI ПОДКЛIOчЕн сИLOвОй Ka6eJIb ПИТАнь, Или ВИЛka He ПОЛHOCТБIO ВСТАБLEнaВ розетку. | ПОДКЛIOчITE сИLOвОй Ka6eJIb ПИТАнь СоOTВETCTBYUQUIM OБразм. | 4 |
| Алларat ПОДВергаля СИЗДЕСТВИО БИСOKOTOЗЕТРУECHКО НИРЯЖЕНИО BTВЕПЕГО HICTOCHNKA (HaPIMМER, MOIIHЯ Или сИЛьhoe стческoe зЛeKTPruchecТВ). | ПЕРBEДITE АПAPAT B reXIM Oждадия, OTKЛIOчITE сИLOвОй Ka6eJIb ПИТАнь, ОпДКЛIOчITE erO K розтke чered30 ceKунд, И ПОЛБЗУЛТЕСКAK OБычно. | - | |
| Annapat pa6oTaTe ненадлесашmic образом. | |||
| ОсутstbvET 3byk. | He 6blI Bbl6pan coOTBETCTBYUQUIIH нSTОчнК. | БыберITE COOTBETCTBYUQUIIH INSTOчнIK IIprHema С ПОМОШБО селЕKTOPA INPUT Na IpeperДeH ПаHEЛIN (ПИКПОК ПОПСКА на ПИЛТe ДY). | - |
| ДИнAMNKI ПОДКЛIOчЕны Инаджно. | Наджно ПОДКЛIOчITE ДИнAMNKI. | 4 | |
| ВКЛIOчЕн Функциг OTKЛIOчЕн� 3Byka. | ОТмeHNTe Функциг OTKЛIOчЕн� 3Byka. | 6 | |
| НИЗКИ урOBеь ГROMКОCTN. | УБELИЧTES UPOBEHь ГROMKOCTN. | - | |
| СИнHAЛы, И БОСПОнЗВОДIMь аППAPATOM, пIHXODIT OT KOMПОнERTA HSTOчнКa, takOTOКak ДИСК CD-ROM. | ВoscPON3BVEITE HSTOчнIK, сИнHAЛы KOTOPORO Можно ВoscPON3BVECTN Ha aППapate. | 3 | |
| ПОНЗОШLO ВHEZANHoe OTKЛIOчЕн питаня. | YSTAHOBlen TaIIМER сHa. | ЭTO He YBIAJEТСЯ ИСИСРABHOCSTbO. BKЛIOчITE aППAPAT сHObA И ВОПОн3BVEITE HSTOчнIK. | - |
| В ТЕЧЕпЕ 1 ча на aППаРte He БblIOЛHЯЛСь опepaцIN ВОСПОн3BVEDENHЯ Или ЛIOБbie Другпe ОпeрaцIN. | |||
| ППТАнIE 6blIO BKЛIOчЕн c ППOMOДьTOТМера И NTeKЛIO уКAZAHнOE ВЕм рабту. | |||
| MCR-140: iPod, bbl6pAHь B КачESТBE HSTOчнKa BBOda, OTKЛIOчAEТСЯ OT IpeperATЧИКИ Или He БblODIT 3ByK B TteчЕн ОпepeДeLEHNOgo IpeHODa ВЕмEHи. | |||
| Сбpoшени нострочи чавов. | OTKЛIOчЕн сИLOвОй Ka6eJIb ПИТАнь. | ПОДКЛIOчITE сИLOвОй Ka6eJIb ПИТАнь И сHObA устонВITE чав. | - |
| СblsHTC8ЗУанпe OT ДИнAMNKa TOlbKO на оДно CTOPОн. | Ka6eJIH ПОДКЛIOчЕны ИправHLьно. | ПОДКЛIOчITE Ka6eJIH COOTBETCTBYUQUIM obpa3OM.ЕсИн HeINCPaBNoCTB He 6blIa устранe,эTO O3Hааet,чTO ИСПОЛБ3уЕь ka6eJIH могут sbltь HeINCPaBHy. | 4 |
| СblsHTC8 Zhymobvie пomexи OT czIFpoВOrO илі padnoactOTTHORO оборUDOBANH. | ДанBsIй aiПаРAT сIлshkom 6blI3Ko pacnoJIoJeK He IciФрOBOMu Или БblICOKOuaCTOTHOMy obOpudOBANH. | ПЕPERДИНTE aiПаРAT IOДАЛБИЕ OT TAKORO оборUDOBANH. | - |
CJIeIyUoIe He coO6IeHn o cOcToHnO tO6paKaIoTcR ToJIbKo IIpn HcIIOJIb3OBAHH MCR-140.
TEXHUNCHECKNE XAPAKTEPNUCTNIK
CD-PECNBEP (CRX-040, CRX-140)
PA3DEJI IPOINPbIBATEJIa
iPod
BxOJHO pa3bem.....CTEPEO JI/II: MHHH-pa3bem CTEPEO 3.5 MM
PA3ДЕЛ YCИЛNTIEL
- MaKcHMaJIbHaЯ BbIXOДЯ MOIIHOCtB. 15BT+15BT (6Ω1kΓI,10% OHN)
- CyBCTBHTeJIbHOCTb Ha BXOJe PORTABLE 450 MB/22 KΩ
- 06iiKo3ΦfHHeHT HeJIHHeHbIX HcKaJeHH CD nT.I.1 KΓu/1 Br. .0,05 %
PA3DEJI TIOHEPA
-Дианпазонн actpoикн [moJIENIIJI CIIIAI KaHaJIbI] ...ot 87,5do107,9MgI [dpyTHe moJIeJIH] ...ot 87,50do108,00MgI
OBsI PA3dEJI
- HanpjaKeHne [MoJeJIIN DJIa EByPOnbI]..... 230 B IepemeHHoro ToKa, 50 Tc [MoJeJIIN DJIa CIIIA KaHaJIbI]
120BIIepeMeHHoroToKa,60Tc
[MoJIbIJaA3HH] 220/230-240BIIepeMeHHoroToKa,50/60Tc
[MoJIeJIbIJIaTaIbAHa] 110/120BIIpeMeHHoroToKa,60Tc
[MoJIeJIbIJIaABCTpaJIHH] 240BIIpeMeHHoroToKa,50Tc
[MoJIbIJa BeJIHKo6pHTaHH] 230B IIepemeHHoro ToKa,50Tc
[MoJIbIJIa KHTa].....220B IIepeMeHHoro ToKa,50Tc [MoJIbIJIa Kope].....220B IIepeMeHHoro ToKa,60Tc
-3heproioTpe6JIeHHe 25Bt
3HeprnoIopTe6JIeHHe BpeKHe MCR-040 0,5BTnH MeHe MCR-140
POWERSAVING:ECO. 1,0BTHJIMMehee POWERSAVING:NORMAL(hactpoikaIyoymoJIyauHHIO) 2,0BTHJIMMehee
- Pa3mepbI (III × B × Γ)……… 180 × 120 × 309 MM
Bec 3,6 Kr
■ДИНAMК(NS-BP80)
-ДИнhamнК.....10cm,IIIINPOKOIOJIOCHbI KOHNueCKOROTIIA /HemaHRHTbI TnI 3aIITbI
- Pa3mepbI (III × B × Γ)………122 × 118 × 287 MM
Bec 1,4 Kr
■ PPEДАТЧИК (YIT-W11TX)
- Yactota 2,4 Tg
-ⅡHnIa3OH Ipepa.. ..PpH6JI.10M (6e3 IIpeIIaTCTBHI)
KojInueCTBO yctpoHCTB, HA KOtOpbIE MOXHO OINHO BHe IpeEJaBaTb CnIHaJIbI .......7o 7yctpoHCTB (B3aBnCHMOCTH OT o6cToTJeTbCTB)
TexHnueckne XapaKTePncTHKn MOryT H3MeHЯTbC6e3 IIpeBapHTeJIbHoro YBeJOMJIeHHN.
iPodTM
iPod JBJIeTcTOBAPHbIM 3HaKOM KOpIIOPAuINn Apple Inc., 3apeHCTpnpOBaHHbIM B CIIIA H npyTHX CTpaHax.
3HaK "Made for iPod" yka3bIbaeT, qTo 3JIeKtpOHHbIe IIpHHaJIXeXHcOHTN, HA KOTOPbIX HMeeeTc 3OT 3HaK, IIpeJHa3NaHeBb IJIa IIOCoEINHeHn K ycTpoiCBy iPod, a TAKKe YTO OHn cepTHΦHInPObaHbI pa3pa60TuNKOM B COOTBeTCTBn C ΚKΠIyAtaIHOHHbIM cTaHApTAm Apple.
Kopnopaunr Apple He Hecet OTBeTCTBHeHOctn 3a pa60Ty daHHoro yctpoCTBa IIN eRO COOTBeTCTBHe cTaHApTaM 6e3OIIacHOCTN HpeYJIaTHBbIM HOpMaM.
HΦopMaunI IJI NOJb3OBaTeJeI NO c6OpU yTnJIu3aUnI CTapOJ annapaTypbl NcNoJIb3OBaHHbIX 6aTaapeek

3TH 3NaKHa aIIIAPAtype, yIIaKOBkax H B COIIPOBOIDTeJIbHbIX IOKyMeHTax Yka3bIBaIOT Ha TO, YTO IIePjKaHHBe 3JIeKTPnueckne H 3JIeKTPoHHBe Ipi6OpbI H 6aTapeiKN He IIOJXbI BBIbpaCBaTBcB MecTe C O6bIYhIM IOMaIIHHM Mycopom.
- VAROITUS
- Note
- Special Instructions for U.K. Model
- IMPORTANT
- Caution: Read this before operating your unit.
- WARNING
- LASER SAFETY
- DANGER
- CAUTION
- CONTENTS
- PREPARATION
- OPERATION
- ADDITIONAL INFORMATION
- About this manual
- Copyright and logo marks
- Advanced YST
- AirWired MCR-140
- PARTS
- Using the remote control
- Notes
- Replacing the battery in the remote control
- PLAYABLE DISCS AND FILE FORMAT
- Playable discs
- ... Compact discs (digital audio)
- CD-R,CD-RW digital audio discs
- CD-TEXT discs
- To prevent a malfunction of this unit:
- Playable MP3 and WMA files
- WMA
- CONNECTION
- Basic connection
- Wireless connection MCR-140
- Group setting
- ■ Wireless connection to Subwoofer
- Other connection
- ■ Stationing iPod
- MCR-140
- Connecting USB
- REMOTE CONTROL
- FRONT PANEL DISPLAY
- FRONT PANEL AND BASIC OPERATION
- PORTABLE:
- LISTENING TO MUSIC
- Playback operation
- Other operation
- Control playback
- Shuffle play
- For iPod
- For CD/USB
- Repeat play
- Switching the display
- For iPod MCR-040
- LISTENING TO FM RADIO STATIONS
- Tuning to radio stations
- #
- Presetting radio stations
- Automatic preset tuning
- Manual preset tuning
- Selecting preset radio stations (Preset tuning)
- Displaying Radio Data System information
- USING USEFUL FUNCTIONS
- Using setup menu
- Setting dimmer, tone/balance and power saving mode
- Adjusting the clock
- Setting the timer
- Time (hour and minute)
- Running time
- Input source and track/file number or preset number
- iPod:
- CD:
- USB:
- FM:
- Timer ON/OFF
- Using timer and sleep timer
- Using the timer
- Using sleep timer
- TROUBLESHOOTING
- iPodTM
- USB
- HANDLING COMPACT DISCS
- SPECIFICATIONS
- CD RECEIVER (CRX-040, CRX-140)
- PLAYER SECTION
- iPod
- CD
- LASER
- PORTABLE
- AMPLIFIER SECTION
- TUNER SECTION
- GENERAL
- SPEAKER (NS-BP80)
- TRANSMITTER (YIT-W11TX)
- Limited Guarantee for European Economic Area (EEA) and Switzerland
- Conditions
- Information for Users on Collection and Disposal of Old Equipment and Used Batteries
- [Information on Disposal in other Countries outside the European Union]
- Note for the battery symbol (bottom two symbol examples):
- ATTENTION : VEUILLEZ LIRE CE QUI SUIT AVANT D’UTILISER L’APPAREIL.
- ■ ALTAVOCES (NS-BP80)
- PABOTA
- IIPEHJIAHEJIb N OCHOBHOE
- IIPOCJIYIHHBAHNE
- HcIOJIb3OBAHHe IOJE3HbIX
- O hactoIeM pyKOBODCTBe
- 0603aHcHn8 6abTOpcknX npabax nIorOtInbl
- DONOJIHNTIELbHAR NHΦOPMALIJA
- OBPAIIIEHNE C
- DETAJIIN
- IcnoJb3ObaHne npJbTa Dy
- Примейань
- 3aMeHa 6aTapeKn B nyIbTe Dy
- BOCPON3BODIMbIE DNCKN IN ΦOPMATbI ΦAINIOB
- Bocnpon3BOIDMbIe DnCKN
- ... KomnakT-DnCKn (uΦpOBoe ayDnO)
- ...LcnpobbIe ayndnoNcKn CD-R, CD-RW
- PpMeyaHne
- ...Диас CD-TEXT
- Bocnpon3BeJeHne 8-cm CD-dncka
- ДлпрдOTВрашени Вьхова n3 CTpoJ daHHoro annapata:
- Bocnpon3BoDnMbIe paJIbI MP3 n WMA MP3
- ПОДКЛЮЧЕНЕ
- OchOBhIe NODKJIIOUeHnA
- ПЕДОCTЕРEXЕNHIE
- PpmeaHn
- Bpem (aacbl MNHyTbI)
- Bpempa60TbI
- IcToUHnK BbOda n HOMep 3ByKOBoN DOpOxKn/foaJna IJn HOMep npeDyuctaHOBKn
- PpMueaHn
- IcnoJb3ObaHne TaMepa cHa
- YCTPAHEHNE HENCINPABHOCTEIN
- TEXHUNCHECKNE XAPAKTEPNUCTNIK
- CD-PECNBEP (CRX-040, CRX-140)
- PA3DEJI IPOINPbIBATEJIa
- PA3ДЕЛ YCИЛNTIEL
- PA3DEJI TIOHEPA
- OBsI PA3dEJI
- ■ДИНAMК(NS-BP80)
- ■ PPEДАТЧИК (YIT-W11TX)
- HΦopMaunI IJI NOJb3OBaTeJeI NO c6OpU yTnJIu3aUnI CTapOJ annapaTypbl NcNoJIb3OBaHHbIX 6aTaapeek
Brand : YAMAHA
Model : MCR-140
Category : Audio System