SECSA301RF - Smoke detector HQ - Free user manual and instructions
Find the device manual for free SECSA301RF HQ in PDF.
User questions about SECSA301RF HQ
0 question about this device. Answer the ones you know or ask your own.
Ask a new question about this device
Download the instructions for your Smoke detector in PDF format for free! Find your manual SECSA301RF - HQ and take your electronic device back in hand. On this page are published all the documents necessary for the use of your device. SECSA301RF by HQ.
USER MANUAL SECSA301RF HQ
natural_image
White electrical smoke shield with ventilation slots and a handle (no text or symbols visible)MANUAL (p. 2)
Oprical Wireless Smokealarm
ANLEITUNG (s. 5)
MANUAL DE USO (p. 17)
The photoelectric wireless online smoke alarm KD-101LF can be interconnected as a system. Its communication is very easy just through a LERN-IN button. In a learnable wireless online smoke alarm system others will sound together if one smoke alarm detects the smoke and sounds. In this way the alarm is set off.
The product is used in family homes and non-smoking areas.
- TESTING
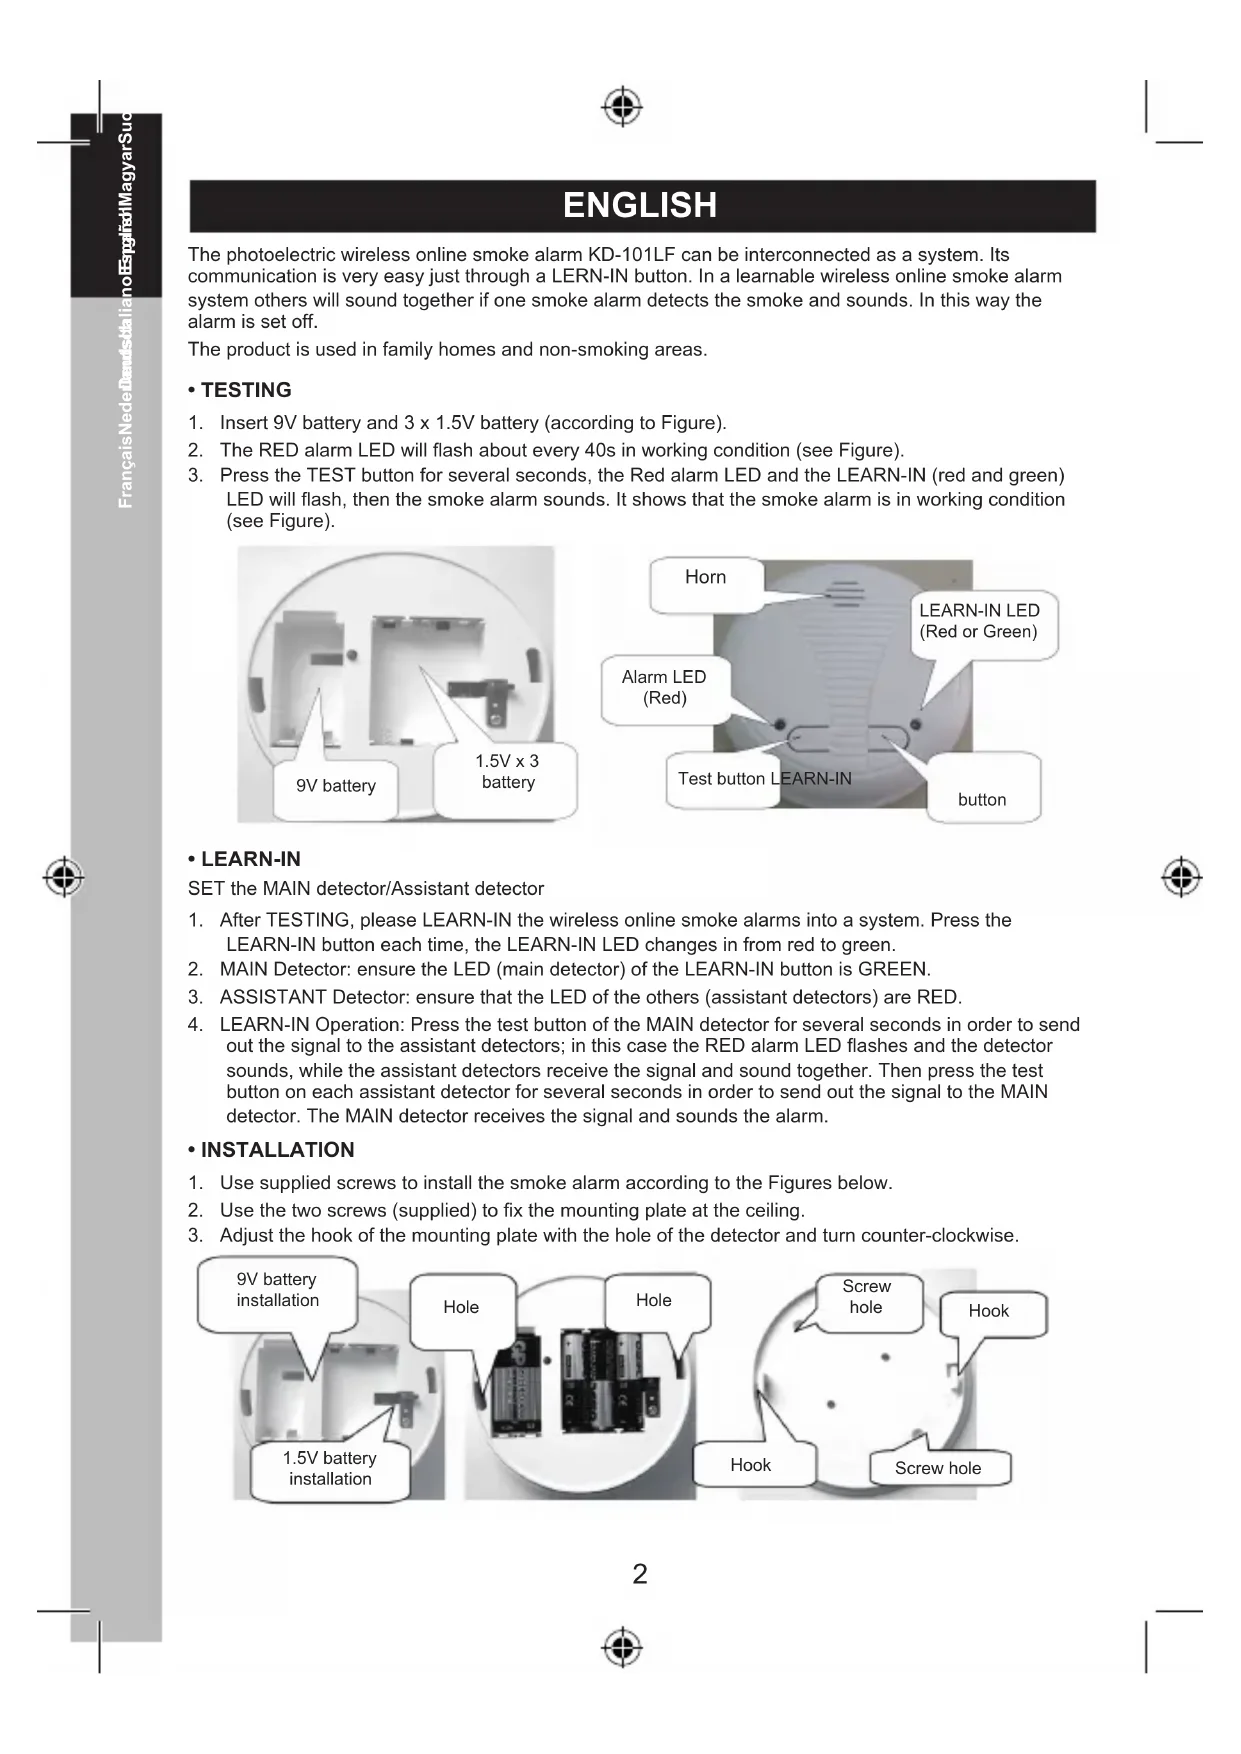
- Insert 9V battery and 3 x 1.5V battery (according to Figure).
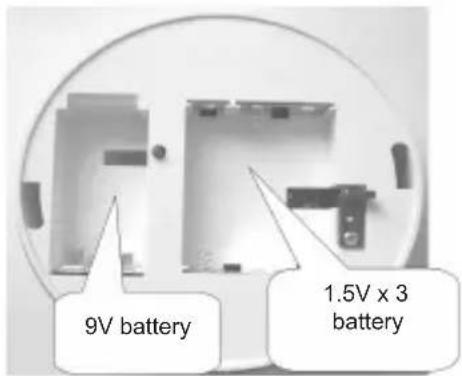
- The RED alarm LED will flash about every 40s in working condition (see Figure).
- Press the TEST button for several seconds, the Red alarm LED and the LEARN-IN (red and green) LED will flash, then the smoke alarm sounds. It shows that the smoke alarm is in working condition (see Figure).
text_image
9V battery 1.5V x 3 battery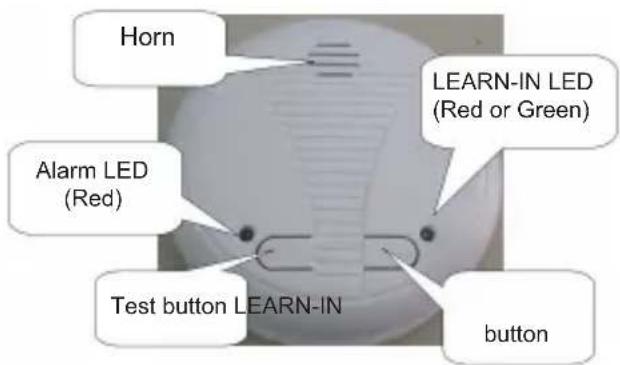
text_image
Horn LEARN-IN LED (Red or Green) Alarm LED (Red) Test button LEARN-IN button- LEARN-IN
SET the MAIN detector/Assistant detector
- After TESTING, please LEARN-IN the wireless online smoke alarms into a system. Press the LEARN-IN button each time, the LEARN-IN LED changes in from red to green.
- MAIN Detector: ensure the LED (main detector) of the LEARN-IN button is GREEN.
- ASSISTANT Detector: ensure that the LED of the others (assistant detectors) are RED.
- LEARN-IN Operation: Press the test button of the MAIN detector for several seconds in order to send out the signal to the assistant detectors; in this case the RED alarm LED flashes and the detector sounds, while the assistant detectors receive the signal and sound together. Then press the test button on each assistant detector for several seconds in order to send out the signal to the MAIN detector. The MAIN detector receives the signal and sounds the alarm.
• INSTALLATION
- Use supplied screws to install the smoke alarm according to the Figures below.
- Use the two screws (supplied) to fix the mounting plate at the ceiling.
- Adjust the hook of the mounting plate with the hole of the detector and turn counter-clockwise.
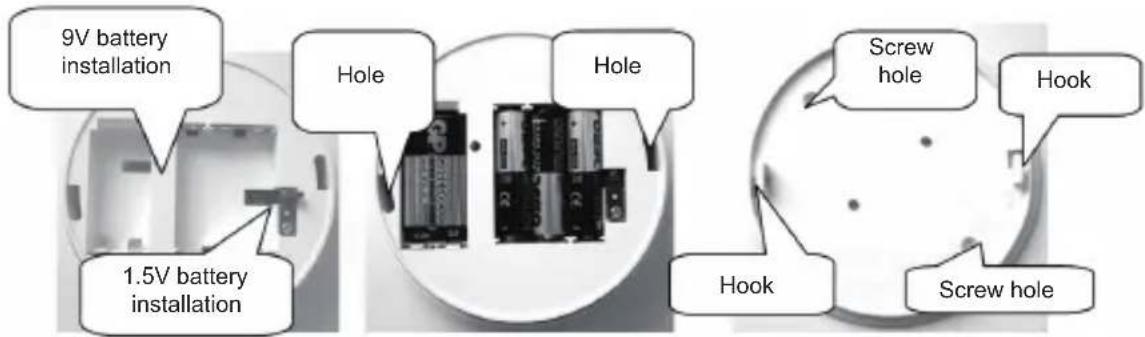
text_image
9V battery installation Hole Hole 1.5V battery installation Screw hole Hook Screw hole• Technical Parameters
Operating voltage: DC9V (smoke testing)
DC4.5V (transmission/Receiver: 3 x 1.5V battery)
Current: DC9V average stand-by current ≤10uA
DC9V average alarm current ≤ 20mA
DC4.5V average working current ≤120 uA
Alarm volume: 85dB/3m
Alarm LED: Red LED
LEARN-IN LED: Red/Green LED
Frequency: 433.92MHz
Transmission/Receiver distance: ≤60 m
Operating temperature: -10^ 40^
- Points for attention:
- No replaceable parts inside. Only battery is replaceable.
- Do not use the product in the humid, dusty and smoky environment.
- When the battery reaches a low energy level, the detector will sound about every 45 seconds to indicate that the battery must be replaced.
- Please test the smoke alarm weekly.
• Quality Guarantee:
- This product is guaranteed for two years by the manufacturer.
- Repair by third parties or improper operation of the product are excluded from the guarantee.
Declaration of conformity
We,
Nedis B.V., De Tweeling 28, 5215MC 's-Hertogenbosch, The Netherlands
Tel.: 0031 73 599 1055, Email: info@nedis.com
Declare that product:
Brand: HQ / SEC-SA301RF
Model: KD-101LD
Description: Optical Wireless Smoke alarm
Is in conformity with the following standards:
EN 14604: 2005, EN 300 220-2 V2.1.2, EN 301 489-01 V1.6.1, EN 301 489-03 V1.4.1
And complies with the requirements of the European Union Directives 89/106/EEC and 1999/5/EC.
's-Hertogenbosch, 01-09-2009
Mrs. J. Gilad
Purchase director

Safety precautions:
To reduce risk of electric shock, this product should ONLY be opened by an authorized technician when service is required. Disconnect the product from mains and other equipment if a problem should occur. Do not expose the
product to water or moisture.
Maintenance:
Clean only with a dry cloth. Do not use cleaning solvents or abrasives.
Warranty:
No guarantee or liability can be accepted for any changes and modifications of the product or damage caused due to incorrect use of this product.
General:
Designs and specifications are subject to change without notice.
All logos brands and product names are trademarks or registered trademarks of their respective holders and are hereby recognized as such.
Keep this manual for future reference.
Attention:
This product is marked with this symbol. It means that used electrical and electronic products should not be mixed with general household waste. There is a separate collections system for these products.
Copyright ©


DEUTSCH
Marque : HQ / SEC-SA301RF
Modèle : KD-101LD
LEARN-IN LED: Rode/groene LED
Frequentie: 433.92MHz
• LEARN-IN (APRENDIZAJE)
Declaration of conformity
We,
Nedis B.V., De Tweeling 28, 5215MC 's-Hertogenbosch, The Netherlands
Tel.: 0031 73 599 1055, Email: info@nedis.com
Declare that product:
Brand: HQ / SEC-SA301RF
Model: KD-101LD
Is in conformity with the following standards:
EN 14604: 2005, EN 300 220-2 V2.1.2, EN 301 489-01 V1.6.1, EN 301 489-03 V1.4.1
And complies with the requirements of the European Union Directives 89/106/EEC and RF devote to 1999/5/EC.
's-Hertogenbosch, 01-09-2009
Mrs. J. Gilad
Purchase director
Οδηγίες ασφαλείας: