TT401 - Toaster FAGOR - Free user manual and instructions
Find the device manual for free TT401 FAGOR in PDF.
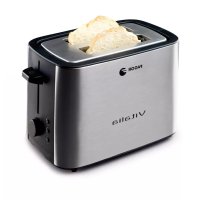
| Product type | Toaster |
| Brand | Fagor |
| Model | TT401 |
| Power supply | 220-240 V – Check voltage before use |
| Main functions | Toasting, defrosting, reheating |
| Browning levels | Adjustable by knob |
| Auto shut-off | Yes, automatic ejection at end of cycle |
| Defrost function | For frozen bread, with browning adjustment |
| Reheat function | Reheats cold toast, preset duration |
| Crumb tray | Removable for easy cleaning |
| Power cord | Standard length, do not replace yourself |
| Safety | Do not immerse, avoid metal objects, do not leave unattended, not for outdoor use |
| Maintenance | External cleaning with damp cloth, empty crumb tray regularly |
| Repairability | Only entrust to an authorized technical service |
| Environmental protection | Do not dispose with household waste – recycle at collection points |
Frequently Asked Questions - TT401 FAGOR
User questions about TT401 FAGOR
0 question about this device. Answer the ones you know or ask your own.
Ask a new question about this device
Download the instructions for your Toaster in PDF format for free! Find your manual TT401 - FAGOR and take your electronic device back in hand. On this page are published all the documents necessary for the use of your device. TT401 by FAGOR.
USER MANUAL TT401 FAGOR
Electromagnetic Compatibility: The interference of this appliance has been suppressed in accordance with Electromagnetic Compatibility Directives. This appliance complies with the EEC directives relating to food contact materials.
2. SAFETY WARNINGS
- Before using the appliance for the first time, read this instruction manual carefully and keep it for later reference.
- Before using the toaster, check the mains voltage corresponds to that indicated on the appliance.
- The electrical safety of this appliance is only guaranteed if it is connected to an efficient earth installation. In case of doubt, contact a qualified professional.
- This appliance is for domestic use only.
Do not use it outdoors. - In case of breakdown or malfunctioning, switch off the appliance. Do not try to repair it. If it needs repairing, contact a Technical Assistance Service authorised by the manufacturer.
- The cable must not be replaced by the user. If it is damaged or needs replacing, contact a Technical Assistance Service authorised by the manufacturer.
- Do not touch the appliance with wet or damp feet or hands. Do not submerge the toaster in water.
- Never pull on the cord to remove the plug.
- Do not allow children to use this appliance.
-
Prevent the cord from touching any parts of the appliance that have become hot.
-
Unplug the appliance when it is not in use and before carrying out any cleaning or maintenance.
- IMPORTANT: When the appliance is functioning, the areas near the toast slots can reach very high temperatures and there is therefore a risk of burns.
- Do not insert metal objects such as spoons or knives into the slots. Never place any objects on top of the toaster.
- Do not leave the toaster unattended when it is switched on. It could be dangerous.
- Important: Never leave this appliance unattended when functioning. The bread could catch fire inside the toaster.
- Ensure there are no flammable objects on or near the toaster, e.g. curtains.
After using the appliance, allow it to cool down before putting it away. - When the appliance is no longer useful, cut its cord after unplugging it from the mains.
- This appliance should not be used by physically, sensorially or mentally handicapped people or people without experience or knowledge of it (including children), unless they are supervised or instructed in the use of the appliance by a person responsible for their safety.
Children should be watched to ensure they do not play with the appliance. - For greater protection, we recommend installing a residual current device (RCD) with an operational residual current not exceeding 30mA . Ask your installer for advice.
3. TIPS FOR USE
Types of bread
Sliced bread is the most suitable for use in this toaster. If you wish to other types of bread, bear the following in mind:
- Cut the bread into regular-shaped slices with an even thickness of around 1 cm.
- Do not toast different types of bread at the same time, or slices of different thicknesses.
- Do not spread butter, oil or similar on the bread before toasting.
Selecting toast darkness
- The toastbrowning can be set with the browning control dial (3).The higher the number, the darker the toast will be.
- When choosing the toast darkness, remember that dry bread and thin slices toast quicker than fresh bread and thicker slices. The browning selection will therefore vary depending on the type of bread, the quality of the bread and the thickness of the slices.
- The toast darkness must be selected before switching on the toaster.
4. FUNCTIONING
- Stand the toaster on an even, heat-resistant surface.
- Before using the toaster, check there are no objects the slots.
- Switch the toaster on for the first time with no bread in the slots, as described below, turning the browning dial to its highest position, in order to eliminate any residual manufacturing oil.
- Place the slices of bread in the slots.
- Select the toast darkness on the dial.
Plug the toaster in. - Press the toast lever down until it is retained at the bottom of the toaster. The toasting cycle will then begin.
- When the toasting cycle ends, the bread will pop up automatically and the toaster will switch off. If you wish to toast more bread, wait 1 or 2 minutes before using the toaster again.
- If you wish to remove the bread before the toasting cycle finishes, press the stop button. The bread will automatically pop up and the toaster will switch off.
- When you finish using the toaster, unplug it and wait for it to cool down before putting it away.
Important: If a slice of bread becomes stuck in the toaster, proceed as follows:
- Unplug the toaster and wait for it to cool down.
- Then carefully remove the bread. Do not use metal or sharp objects.
- Do not try to remove the bread while the toaster is functioning.
Reheat function
Toast can be reheated by placing the cold slice of toast into the bread slot, lowering the lever and pushing the reheat button.
The reheat light will come on and the toast will be reheated for a short set time.
N.B.: When you are using the reheat function, watch the bread to make sure that it does not burn.
Defrost function
The defrost function is useful for defrosting or toasting frozen bread all in the same operation.
Adjust the browning control to the desired browning level. Start with a medium setting (3-4) and adjust the variable browning control to a lighter or darker setting according to your personal preference.
5. CLEANING
Before cleaning the toaster, unplug it and wait for it to cool down.
Wipe the outside of the toaster with a damp cloth. Do not submerge it in water or place it under the tap.
Do not use solvents or abrasive products to clean the toaster.
To remove crumbs, pull out the crumb tray. Avoid touching the metal edges of the crumb tray. Clean it and replace it in its slot.
6. INFORMATION FOR THE CORRECT DISPOSAL OF ELECTRICAL AND ELECTRONIC APPLIANCES
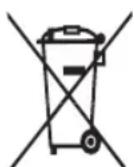

At the end of its working life, the product must not be disposed of as urban waste. It must be taken to a special local authority differentiated waste collection centre or to a dealer providing this service. Disposing of a
household appliance separately avoids possible negative consequences for the
environment and health deriving from inappropriate disposal and enables the constituent materials to be recovered to obtain significant savings in energy and resources.
To remind you that you must collaborate with a selective collection scheme, the symbol shown appears on the product warning you not to dispose of it in traditional refuse containers.
For further information, contact your local authority or the shop where you bought the product.
FR
1.DESCRIPTION (Fig. 1)
gai jia gai jia gai jia gai jia
aillil 1 aie! jj j Jai i jy jia jia jia jia jia jia jia jia jia jia jia jia jia jia jia jia jia jia jia jia jia jia jia jia jia jia jia jia jia jia jia jia jia jia jia jia jia jia jia jia
1 1
a 1
(3)
jS1 jg Sj yaaill jS1 aaii jg Sj laic
a 1
aalll 1
法一. 完全顺
.4
a aagaae eae
1
a a a b b b b b b b b b b b b b b b b b b b b b b b b b b b
J 1000
i 1
j 1
aalal 0 g jg s klaq
1
m = 311
.5
1 1 1 1 1 1 1 1 1 1 1 1 1 1 1 1 1 1 1 1 1 1 1 1 1 1 1 1 1 1 1 1 1 1 1 1 1 1