
RSX 700 - Earphones BEYERDYNAMIC - Free user manual and instructions
Find the device manual for free RSX 700 BEYERDYNAMIC in PDF.

| Product type | Wireless headphone with transmitter |
| Brand | Beyerdynamic |
| Model | RSX 700 |
| Frequency band | 2.4 GHz |
| Maximum range | Up to 20 meters (line of sight) |
| Modulation | Digital |
| Number of channels | 8 adjustable channels |
| Headphone transducer | Dynamic |
| Headphone frequency response | 20 - 20,000 Hz |
| Maximum sound pressure level | 113 dB |
| Distortion | < 0.5% (at 1 kHz) |
| Transmitter power supply | AC/DC adapter 12V / 300mA |
| Headphone power supply | 2 NiMH AAA 1.2V / 1000mAh rechargeable batteries |
| Headphone battery life | Approximately 6 hours |
| Charging time | First charge: approx. 24h; subsequent: 6 to 8h |
| Transmitter dimensions (L x W x H) | 95 x 75 x 17 mm |
| Transmitter weight | 65 g |
| Headphone weight (with batteries) | 270 g |
| Connectivity | 3.5mm audio input; RCA adapter included |
| Package contents | Transmitter, headphone, power adapter, audio and charging cables, adapters, 2 rechargeable batteries |
| Care and cleaning | Damp soft cloth; do not use solvents |
| Safety | Use only the supplied power supply; do not open; avoid moisture |
| Spare parts and repairability | Replaceable ear pads and batteries; professional repair only |
| Warranty | In accordance with applicable law |
Frequently Asked Questions - RSX 700 BEYERDYNAMIC
User questions about RSX 700 BEYERDYNAMIC
0 question about this device. Answer the ones you know or ask your own.
Ask a new question about this device
Download the instructions for your Earphones in PDF format for free! Find your manual RSX 700 - BEYERDYNAMIC and take your electronic device back in hand. On this page are published all the documents necessary for the use of your device. RSX 700 by BEYERDYNAMIC.
USER MANUAL RSX 700 BEYERDYNAMIC
Safety Information. Page 16
1. Transmitter. Page 17
1.1 How to operate the Transmitter.. 17
2. Headphone Page 19
2.1 How to operate the Headphone.. 19
3. Charging of rechargeable Batteries.. Page 20
4. Maintenance.. 21
5. Tips for a noise-free Reception . Page 21
6. Trouble Shooting.. 22
7. Technical Specifications Page 23
8. Disposal.. 23
Declaration of Conformity 72
NOTICE D'UTILISATION RSX 700
Thank you for selecting the RSX 700 wireless headphone system from beryerdynamic. Please take some time to read carefully through this manual before using the product.
The RSX 700 wireless headphone system operates in the frequency range of 2.4GHz . Reception is possible over a range of approximately 20 metres, even through walls and ceilings, making it possible to move around freely within your home or outdoors. It is possible to operate several headphones with only one transmitter.
European Regulations
This product has been designed, tested and manufactured according to the European R&TTE Directive 1999/5/EEC.
Following this Directive, this product can be used in the following countries: Austria, Belgium, Cyprus, Czech Republic, Denmark, Estonia, Finland, France, Greece, Germany, Hungary, Iceland, Ireland, Italy, Latvia, Liechtenstein, Lithuania, Luxembourg, Malta, Norway, The Netherlands, Poland, Portugal, Slovakia, Slovenia, Spain, Sweden, Switzerland and United Kingdom. Furthermore, this frequency range is approved in many other countries.
Supplied Accessories
This wireless headphone system includes:
1 Transmitter
1 Headphone
1 AC/DC adapter 12 V / 300 mA
1 Audio cable (3.5 mm stereo jack - 3.5 mm stereo jack)
1 Adapter cable with 2 RCA plugs, red (right) and white (left)
1 Adapter (3.5 mm stereo jack - 6.35 mm (1/4") stereo jack
1 Charging cable
2 NiMH rechargeable batteries AAA-size 1.2 V, 1000 mAh
Safety Information
- Only use the power adapter that was originally supplied with the transmitter. Make sure that the voltage rating of the adapter matches that of the AC mains outlet you are to use. If you connect the adapter to the wrong voltage, you may seriously damage it.
- The power adapter must be accessible to disconnect it easily from the mains if necessary.
- Always disconnect the power adapter when changing connection or moving the transmitter.
- Never open electronic components! This must only be carried out by authorised service personnel. Any such tampering by non-authorised persons can invalidate your warranty and could be dangerous.
- Use the devices in dry rooms only. You can also use the headphone outside in dry weather, but always leave the transmitter and power adapter inside the house.
- Never expose the power adapter to rain or water.
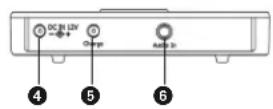
1. Transmitter
Controls and Indicators
Top view Rear view
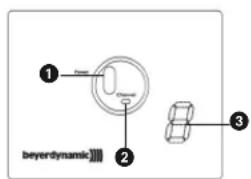
Power on LED is illuminated red when the transmitter is active
Channel selector to adjust the transmitting frequency
3 Channel display, from 0 - 7
Important: "0" also indicates a channel.
4 Socket to connect the power adapter to supply the transmitter
6 Socket to connect the charging cable
Audio input socket (mini jack 3.5 mm)
1.1 How to operate the Transmitter
Location
- Choose a suitable place near your audio source (hi-fi system, CD/DVD player, television set etc.). To ensure noise-free reception you should not operate the transmitter in the immediate vicinity of radio equipment, mobile phones, microwaves or above the picture tube of TV sets or monitors.
- Do not expose the transmitter to direct sunlight or near metallic objects and avoid placing metallic objects onto the transmitter.
Mains Connection
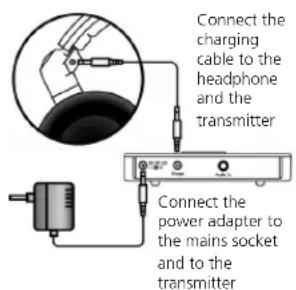
- Connect the cable to the socket on the transmitter and the power adapter to the mains socket. The power adapter of the transmitter can be connected permanently to the mains supply without harming the power adapter itself or the transmitter.
Connect the power adapter to the mains socket
Connect the power cable to the transmitter

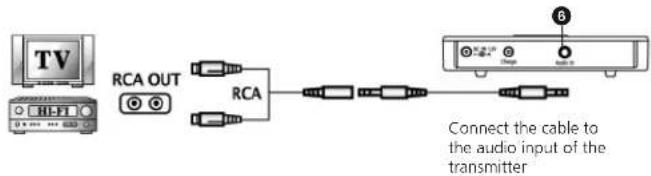
Audio Connection
- Connect the supplied audio cable and adapter cable to the audio input socket 6 of the transmitter and preferably to the phono/RCA sockets of your audio source/hi-fi system. Important: Ensure that the polarity of the phono/RCA connectors is correct, i.e. right to right (red) and left to left (white).
- As an alternative you can use the headphone output (mini jack 3.5 mm; 6.35 mm (1/4") jack by using an appropriate adapter) of your audio source/ hi-fi system. Please note that in this case the volume must be turned up sufficiently.
Connect the transmitter to a TV set or hi-fi system via RCA
Connect the transmitter to a CD or MP3 player via mini jack (3.5 mm)


Volume of the CD or MP3 player must be turned up sufficiently

Connect the cable to the audio input of the transmitter
Connect the transmitter to a hi-fi system via 1/4" jack (6.35 mm)

Volume of the hi-fi system must be turned up sufficiently
Connect the cable to the audio input of the transmitter
Switching on
- Switch on the audio source to which the transmitter is connected. When the transmitter receives a signal, the red Power On LED will illuminate. Attention:
If the transmitter does not receive any signal, it will automatically switch off after approximately 3 minutes and the Power On LED will go out.
- If the transmitter receives a signal again, it is turned on automatically. The channel display , however, always indicates "0".
2. Headphone
Controls and Indicators
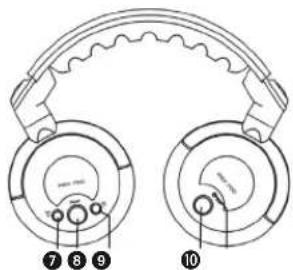

Button to increase the volume of the headphone
3 Channel button to scan and set the receiving frequency automatically to the frequency of the transmitter
Button to reduce the volume of the headphone
10 On/Off button
1 Power on LED will illuminate green when the headphone is turned on; when charging it will illuminate red
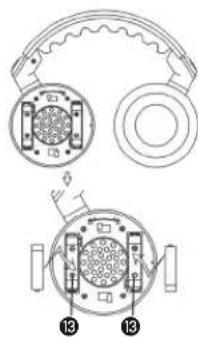
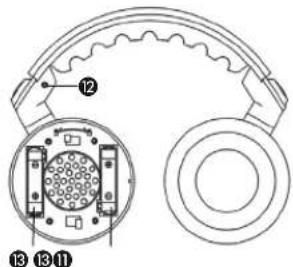
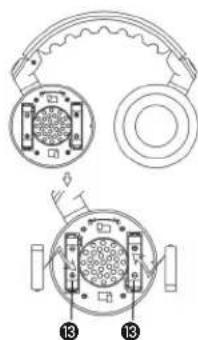
Charging socket to connect the charging cable to the left hand side
Battery compartment to insert the rechargeable batteries into the left ear cup
2.1 How to operate the Headphone
How to insert/replace the Batteries
- Turn the left ear cup clockwise and remove it by pulling slightly.
- Insert the rechargeable batteries (AAA size, 1.2 V) according to the “+/-” symbols into the appropriate compartments
Attention: The rechargeable batteries must be charged before the first use (refer to chapter 3. "Charging of rechargeable Batteries").
If you use other rechargeable batteries instead of those supplied by beyerdynamic, you must remove a bit of the plastic jacket at the negative pole by using a knife or something similar to ensure contact to the lateral charging contacts inside the battery compartment.
Instead of rechargeable batteries you use normal dry cell batteries.
Warning: Do not remove the plastic jacket of normal dry cell batteries, as there could be danger of explosion, if you try to charge by mistake!
- Replace the left ear cup and turn it anti-clockwise by pressing slightly onto the ear cup until it locks into place.
Important: Use the padlocked symbols as a location guide when the ear cup is replaced.
Switching on
- Switch the headphone on 10. The Power on LED 1 will illuminate green.
Switching off
- Switch off the headphone after use 10. The Power on LED 11 goes out.
How to adjust the Reception and Volume
- Place the headphone on your head observing the left and right indications. Use the buttons 7 and 8 to set the volume to suit your requirements. Use the button 9 to increase the volume; use the button 0 to reduce the volume.
- Use the channel button to scan and set the receiving frequency of the headphone automatically to the frequency of the transmitter.
- You should now be able to move freely from one room to another.
- Important: Do not set the volume too high, because it can damage your hearing or cause existing hearing damage to deteriorate.
How to change the Frequency
- If noise caused by other devices or interferences occur, change the frequency of the transmitter and use the channel button of the headphone to scan and set the receiving frequency automatically.
- Important: When the transmitter is turned off, the channel is saved. The channel display , however, always indicates "0".
LED Indication / Operating Time
- When the batteries are empty, the Power on LED 1 will go out. The operating time with rechargeable batteries is around 6 hours.
- Depending on the volume setting, the approximate operating time can differ from this value.
3. Charging of rechargeable Batteries
Make sure that rechargeable batteries are inserted (no normal dry cells).
- Switch the headphone off 10 and connect the charging cable to the charging socket 12 of the headphone.
- Connect the other end of the charging cable to the charging socket ⑤ of the transmitter.
- During the charging process the Power on LED 1 of the headphone will illuminate red. The Power on LED continues to illuminate red even when the rechargebale batteries are fully charged.
- When charging the batteries for the first time, they are fully charged after approximately 24 hours and you can finish the process. Thereafter, the batteries are fully charged after 6 to 8 hours.
Important:
- If you interrupt the charging process, the operating time of the battery will be greatly reduced. If the charging process is re-activated again, it takes up to 14 hours until the batteries are fully charged depending on the charging state.
- Rechargeable batteries have a life span dependent on the amount of use and will eventually need to be replaced by new ones. New battery packs can be obtained from your beyerdynamic dealer.
- You can also use an appropriate external charger for charging the batteries outside the headphone.
- If you do not intend to use the headphone for several weeks or months it is recommended that you remove the batteries as they may leak and cause damage to the components. Even "leak-proof" batteries should be removed as a precaution.
- Please do not throw used battery packs away with your household rubbish, take them to your local collection points.
4. Maintenance
- Use a damp cloth for cleaning the transmitter and headphone, taking care not to allow any water to enter the transducers. Never use solvent agents.
- With time, ear pads will need replacing. These can be obtained from your beyerdynamic dealer.
To replace them, remove the old ear pads by turning them clockwise. Place the new ear pads on the housing and turn them anti-clockwise to tighten.

5. Tips for a noise-free Reception
- If interference or problems with the transmission range occur, you should place the transmitter in another area.
- If the reception does not improve, disconnect the transmitter from the mains and check the frequency range with the headphone by pressing the channel button 8 several times. If the headphone remains silent, the conditions are clear.
- However, if you hear noise, speech or music, then there is another wireless headphone, baby phone, walkie talkie etc. in operation, which is interfering with the reception. In this case you should change the frequency for the transmitter and headphone by pressing the channel button 8.
- The headphone has an integrated squelch function. This means that, when you are outside of the reception area or when the transmitter is switched off, the squelch function is activated and the headphone is muted. As soon as you are within the reception area the transmitter signal can be heard again.
6. Trouble Shooting
If a problem occurs, please check the items below before taking the set for repair.
If you are not able to solve a problem by following these hints, please contact your beyerdynamic dealer.
Warning:
Do not try to repair the set yourself, as this would invalidate the warranty.
| Problem Possible Cause | Solution | |
| No audible signal Headphone | he is not switched on | Switch on the telephone with the On/Off button 10 |
| Batteries in the telephone are not inserted correctly | Insert the batteries according to the polarity marks | |
| Volume of the telephone is turned down | Increase the volume of the telephone | |
| Power adapter is not connected correctly | Check the power adapter connection | |
| Audio source is not turned on | Turn on the audio source | |
| Volume control of the audio source is turned down | Turn the volume control on the audio source up | |
| NiMH batteries in the telephone are not charged | Recharge the batteries | |
| Headphone channel does not correspond to the transmitter channel | Press the channel button 6 of the telephone to start the automatic channel search | |
| Signal only on one side of the microphone | Plug of the audio cable is not connected properly | Check the audio cable and connect the plug properly |
| Signal distorted Interference | caused by other units | Change the transmission frequency of the transmitter and press the channel button 6 of the telephone |
| Problem Possible Cause Solution | ||
| Signal distorted Adapter cable is not properly connected to the audio cable | Make sure that adapter and audio cable are properly connected. If necessary return the cables for repair. | |
| Distorted sound | Batteries inside the head- phone are empty | Recharge/replace the batteries |
| Volume of the audio source is too high | Reduce the volume | |
7. Technical Specifications
Transmitter
Power supply. AC/DC adapter 12 V/300 mA
Transmission frequencies. 8 channels in the 2.4 GHz range, 9 MHz channel spacing, switchable
Modulation . digital Input impedance. >10k
Operating distance up to 20 m (at clear sight) Signal-to-noise ratio >85 dB A
Switching on. automatic at input signal >10mV Switching off. automatic after approx. 2 min at input signal < 5mV
Dimensions 95 x 75 x 17 mm Weight 65 g
Headphone
Transducer type. dynamic
Operating principle closed Frequency response. 20 - 20,000Hz
Max.SPL 113 dB
T.H.D. 0.5%
Sound coupling to the ear. .circumaural
Headband pressure 2 N
Power supply. 2 x 1.2 V NiMH rechargeable battery AAA, 1000 mAh
Operating time approx. 6 hours
Weight (with batteries) 270 g
8. Disposal
This symbol on the product, in the instructions or on the packaging means that your electrical and electronic equipment should be disposed at the end of its life separately from your household waste. There are separate collection systems for recycling in the EU. For more information, please contact the local authority or your retailer where you purchased the product.
SYSTEME DE CASQUE SANS FIL RSX 700
7. Specifications techniques
Emetteur
- PnO TcYcTBm CnHana, NpePaTnK BbIKIOuHTCnpe3 3 MInHyTbI, PnP 3OM CBeToDnO D noraCHET.
B MOMENT NONYEHHI NOBTOPHORO CHHRA ABOTMnHECKK BKNHOAETCNRpepaTnK. KaHAN COOTBCTERTY TOM, KOTOPbBblBbPahpaHee, Ho HA INHnKaToPe 5 Byet OToBpKaatBa,0
2. Hayshnki

TneMeHTb ynpaBHeHH
7 Khonka ybeHHeHHr pOMKOCTn HayuHkoB
Khoika BaBbopa KaHana DnA ABTomaTueckoro nonka n HactpoKnHa YacToTy NpeDaTnuKa
9 KHONka yMeHbSeHn rPOMKoCTn HayuHnKOB
10 BbIKIOuATeNb
KoHTpObnHbI CBToIOIO 3arOpaeTc8eNEHbIM npN BkNIOueHm HayuHKnOB, KpaChbI cBET -npouceC 3aprdkn aKKyMjTTOPOB
Pa3bem dIa NOdkJIOHHeH 3apdHOrO Ka6eJIc C neBOB CTOpOHb HAYUHKO8
0TcekIyraTHOBKnAkkymyIaTOPOB I3 KOMnJIeKTA NOCTABKN C neBOI CTOpOHbI HayHmKOB
2.1 BkIIOueHHe HayuHKnOB
YcTaHOBka/3aMeHa aKKMyJrTOPOB
Ipytem nobopota no yacoboi cTpeJIke KpbIuKN NEBORO HayuHnKa CHImaem ee.
YCTaHaBnBaEmakKkMyTOpbl(TNNAAA,1,2B),co6bIouaonlnpoctb+/-,BOTceKe

BHMaHHe: AkkMyIATOpbI nepeI nepBbIM MCnOJIb3OBaHmE Tpe6yIOT 3apAKn (CM.3.3apJKa aKKMyIATOpB)
PnHCNOB3OBaHm aKkyMylrTOPOB,OTNHybIX OT NOCTabnaembIX B KOMnNEKeTcΦpMoB beyerdynamc,Heo6xoDIMO cCTOPObI OTPuataeNbHO rONIOCA CHrTBHOJNACIO,INr 3TORO MOKOHO NcNObSBOBaTHOX INN H0N OCTpbN pPeDMTe.TenePB6OKOBBe BbIOBdI Dn3apRKn 6ydyT HxOaNTbCBA KOHTAKTE C AKKyMylrTOpAMn
BMeTO AKKyMnTTOPOB MOXHO NcNOb3oBaTb 6aTape anHANOHORO pa3mepa.BHMnAne:3anpeuaeTCHINMATb INN NOpeKJaTB nactKOByIO 06oONQy 6aTeapeK, INHAe He NCKIoJeH BEOHTHOCb B3pBbA, ECNI NO OwN6Ke HAYHeTcN IX 3apDnKa.
YcTaHOBnTE KpbIuKy neBoro HayUnHkA B npexHee nOnoXeHne INOBepHnTe ee npTbN YacobO CTpeKnO Do npya.BpaaaiTe KpbIuKy C nERKIM HaxHMOM. BHmAHnE: Ppi OeBaHHy HauHnKOB CnEInTe 3a TEM, YTO6bI COBnADJIN CNMBOJI BNCyero 3AmKA Ha KOPnye.
BkIIOueHne
BkHIOHTe HauHHKn 10.3arOpTc3eneHbCBETOINHDhINHdkaTOp 11
BbIKJIOueHne
-10OKOHaHIMNICJb3OBAHINBbIKIOHTeHayWHNKn 19.CBeTOIOHOHbI INdikatop norachET.
HacpoKa dnaana3oHa npHeMa n rpmKocTn 3ByKa
BHHMaHHe:
- OdeHbTe HauuHnK, co6IIOaI npabIIa. Otperyunpyte rPOMKOCTb 3ByuHaNc nomoUbIO KHOONK 7 u9. KlaBnua 7 - yBeINueHne rpOMKoCTN; KJIaBnua 9 - yMeHbUHeHne rpOMKOCTN.
C NOMOJIH KONIKI BbI6Opa KaHana ③ BbIIOJHReTCA ABOTMaTMeCKA cnHXPOHn3aun cactoTb I pRMe HAuyHHKOB u cactoTb pa60Tb IpePaUoero yctPOnCTBa.
Tenepb MoXHO CBO6OHO nepemueaTbca N3 KOMHaTbI B KOMHATy, He CHIMAR HayuHKOB.
He peKoMeHnyETc yCTaHABJIbATb BbICOKn ypOBeH b rPOMKOCTn, nocKoJIbKy 3To BpeHNo dIra cIyxa. Bo3mOxHO o6cTpeHne ImeUeXc7 npO6bnC opraHAm cIyxa.
CMeHaYactOTbl
CBeToIOHOHbI INHdNkATOp/BpeMa pa6OThi
Pn nonHom pa3pnae akkmynTOpOB rachET cBeToNDHb HINKATOP 1 PpOdoJXntebHOCTb pa60tbi 6e3 no3apRKn OKONO 6 YacOB.
B 3aBNCIMOCTN OT yCTAHOBNEHHORO B HauyHnKax yPOBHNr pOMKoCTN pINOJXHTeJIb HOCTb paOToI b63 NoD3apRKn MOKeT OTMnAaTbCt OT YK3a3aHHORO BIIWe.
3. 3apnka aKKymyIaTOPOB
- Y6eIntecb, YTO B HAYHNIKAX yCTaHOBNEHbAkkMyNlTOpbI (He naIbHuNKOBbIe 8aTaapeiHK)
OTKIIOHHTe HauHHNKIN 10 n noCoEOHNHnTe K rHe3dY 12 pRAdHbK a6eBb.
Дуг� кони Ka6eJЯ NOdcoeMHNTe KrH3dY 5 nepeDaTtHa.
BoBpMa3aprKn3aRopaTeCkpaChbCBeTOdNDbHnHNdkaTOp HuyHnKOB.CBeToDnDbHmHNdkaTOpHeracnet np3abepeHnn 3ap - 豬甲纳3apnka npoJnaeTc He MeHee 24acob. B daJIbHeIeMmDn3apKn aKcyMyIaTOPOB Tpe6yeTc 6 - 8acob.
PoaTb NtAHnE oTpO3ek Tcpe3 6NoK NtAHmK nepeDatNkY.

BHHMaHHe:
-ПисokрашениВременЗардкakkymлгОпьзаржkaIOTc
mshчacTNUHO,aВрemрбOTыnxdoCNeDyUO脊нOD3apRkn
cokpaasTe.ПиВо306HOBJIeHIMnPpocecaЗapRknTpebyeTeCryxe
ropa3do6oJIbWeВремENdoNonHOr3apRknakkymlralTOpOB,do
14 Yacob.
B npocecce dntenbHOn 3Knnyataunn AkyMylrtoBbIpa6tibAIOpecypc, n3 zapKda ctaHOBNCT HeNoHoi. TaKeA kkyMylrtoBpO NoJnxkat 3ameHe. HObBe akyMylrtoBpMOxHO npno6peTn, HanpImep, y Iio6o rInepa beyerdynamic.
3apKaTb aKKyMnTOpbl MOxHO n NOMOuBHeHrO 3apAHorO yCTpoIcTBa.
-ПиДИТЕьБИХ NepepbIbax B 3KcNpyaTauHn Ha cpoK HeCKOBKe HEDeB NIN MecAueB peKOMEHyETcR xaPHTb AkkMyIATOpbl OTdEhHO OHT HayuHKnOB. NocKOBky AkkMnyIATOpbl/naBuHKnOBBle 6aTaPeKmMoryT bItYe, nHayuHKnN pnpDy T BeRoJHoCTb. MapKIpObKa, "Leak proof"Ha akKMyIaTopax/naBuHKnOBbix 6aTapeKkax He ABJIeTcRA gapAHTIPOBaHHO 3aUHToT O BTeKaHnA.
3aPpeaaetcYtHnI3aunrO tCnykBwix Cboi cpoK aKKyMnIATopoB/3JIeMeHTOB NITAHIN BmecTe C 6bIToBbIMN OTXoDAMN, MecTHbIe CbOpHbIe NyhKTbI OcyuCTBIAHOT IN npneMky dNRA NOCEdyoue yTtHnI3aunr.
4. yxod n o6cnyxbHae
- PerylarpHO Heo6xOIMNO npOTnpaTb HayuHnKn I nepeDaTHNK MrgkON BnaXKn TpNknO.CneDnte, YTObBi BOda He nnona B aM6yUOpby. 3anPeuaTeCnIb3oBaTcBcA pAcTBOpNTeJIIMN INI YCTAUMN cpeDCTBAMn.
- PnH3HOce NOKpbTINAM6yHOpOB OHN NOJHexKAT 3ameHe. CMeHHbIe am6yHOpbl MoXHO npNoBpctu y dInepob beyerdynamic.
- Octopoxho CHIMITE am6yHOpbl, NOBOPaHbA IN no yacBOB
CTpeJIke.YCTaHOBInTe HOBIIe am6yHOpbl,3akpenINbN INIpyTEM BpaueHHn npOTINb YacOBON CTpeKN Do cpa6aTbIBAHnB 6aHOnHeTHORO 3aTbOPa.
5.ObecneueHne yToHNBoro cHnHa
B cnuyae nomex npn npneMe cnghana nnn yxduhen npneMa b paunye deiCtBna Heo6xoDnMo CmEHntb MeTo paononoKeHnpePeDaTuHa.
Ecnn3TO He npnuBeTeK ynyuWeHIO npnHMaEMORO cnHana, OTKJIOnHTe 6NOK NITAHNA OI nepeDaTnKa N BblONJHTE peKeKNIOHENe NO BCEmy DnAna3OHy HAcTOT, MHOROkPaTHO HaxKMnHa KONky TmUHNa B HayuHKnx CBnDETeBCTByET 06 OTCYCTBn BHewHX NOMEX.
EcNJKe Bbl CbIuHTe WMyBblpey HIN My3bIKy,TO 3TO ROBOPHT O TOM, YTO B HENOCPECTBEHHOH 6bn30ctn OT Bac pabotAOt Dpyrme 6ecnpoBOHbIe HayuHKn, Detckn TenefoH, BKIOUHO HepeROBOPHOe ycTPOCTBO N.T.CMeHIne TaCToT pyoBtI nepeDaTHKa, BInOJIHNB NOMCK HaxaTHEM KONIK NBIbOpa KAHana 8.
B HayuHKax HmeeTcBCTpoeHHbI uMBoo fNtbp, T.e. npn HaxokdeHN BHe paDyCa DeiCTBnI IN pO TKNIOHennpePaTHKa fNtbp AKTINBpyETCH nOTKIOHaet HayuHKn. PpN Bo3BpAte B 3ohy DeiCTBn NEpeDATyKH, pNEM CInrHana BO306HOBnHTcN.
6. YctpaHHeH HeNCnPaBHOCTe
PnB03HKnHOBeHHN HcnpaBHOCTn Do o6paueHN B cepBnCHyIO cnyk6y BBINOHNTE CNEyIOUe NeCTBNA.
EcnBce-TaKHe ydaTcYcTpaHnTB HeNCnpaBHOCTb,ObpaauTecb K dInepy beyerdynamic.
BHHMaHHe:
He nbitaTaeCb BbINOHNHtpeMOHT CO6CTBENHBMn CINAMn, NCKONbky 3TO npBBeTeK NCKIOUeHNO rapaHTNHbIX 063ATEbCTB.
PnHnreHepnpOBaHa3Byka...DnHaMueckm
KoHCTpyKUHaayuHnKOB. 3aKpbTbIe
Pa6oyn dnaana3OH qactot 20-20.000
MaKc. ypoBHeH 3ByKOBOrO
DabBHeH. 113
Ko30pHnueHT rapMOHnuecknx
NCKAKeHn Ha 1 Kr. .≤0,5%
PacnonoxeHne. 3akpbBaet ywn
Ucnnne npnxma 2H
EC-DECLARATION OF CONFORMITY
Application of
Council Directive: 93/68/EEC Low Voltage Directive
99/5/EC R&TTE Directive
Standards to which
Conformity is declared: EN 300 440 Radio Spectrum
EN 301 489-1-3 EMC
EN 61558-2-6:1997 &
EN 61558-1/A11:2003 Safety
Manufacturer's Name: beyerdynamic GmbH & Co. KG
Manufacturer's Address: Theresienstrasse 8, 74072 Heilbronn,
Germany
Type of Equipment: Digital Wireless Stereo Headphone
Model Numbers: RSX 700
I, the undersigned, as an employee of beyerdynamic, hereby declare that the equipment specified conforms to the above Directive and Standards.
Wendel Rote
Date: 1st February 2007
Full Name: Ulrich Roth
Position: Director of R&D
RSX 700 is a class 1 device