ICXPTM2T03 - Flat screen mount Chief - Free user manual and instructions
Find the device manual for free ICXPTM2T03 Chief in PDF.

| Product Type | Wall mount for flat screen |
| Model | ICXPTM2T03 (tilting variant) |
| Maximum load capacity | 113.4 kg (250 lb) |
| Material | Steel |
| Tilt function | Yes, adjustable |
| Mounting types | Wood stud or concrete wall |
| Minimum distance between wall plates | 609.6 mm |
| Maximum drywall thickness | 16 mm |
| VESA compatibility | 200x200 to 600x400 mm |
| Included fasteners | Lag bolts, washers, concrete anchors, various screws |
| Safety | Support structure must withstand 5 times total weight |
| Maintenance | Clean with a soft dry cloth |
| Mount weight | Approximately 15 kg |
Frequently Asked Questions - ICXPTM2T03 Chief
User questions about ICXPTM2T03 Chief
0 question about this device. Answer the ones you know or ask your own.
Ask a new question about this device
Download the instructions for your Flat screen mount in PDF format for free! Find your manual ICXPTM2T03 - Chief and take your electronic device back in hand. On this page are published all the documents necessary for the use of your device. ICXPTM2T03 by Chief.
USER MANUAL ICXPTM2T03 Chief
Milestone AV Technologies, and its affiliated corporations and subsidiaries (collectively, "Milestone"), intend to make this manual accurate and complete. However, Milestone makes no claim that the information contained herein covers all details, conditions or variations, nor does it provide for every possible contingency in connection with the installation or use of this product. The information contained in this document is subject to change without notice or obligation of any kind. Milestone makes no representation of warranty, expressed or implied, regarding the information contained herein. Milestone assumes no responsibility for accuracy, completeness or sufficiency of the information contained in this document.
Chief® is a registered trademark of Milestone AV Technologies. All rights reserved.
IMPORTANT WARNINGS AND CAUTIONS!
WARNING: A WARNING alerts you to the possibility of serious injury or death if you do not follow the instructions.
CAUTION: A CAUTION alerts you to the possibility of damage or destruction of equipment if you do not follow the corresponding instructions.
WARNING: Failure to read, thoroughly understand, and follow all instructions can result in serious personal injury, damage to equipment, or voiding of factory warranty! It is the installer's responsibility to make sure all components are properly assembled and installed using the instructions provided.
WARNING: Failure to provide adequate structural strength for this component can result in serious personal injury or damage to equipment! It is the installer's responsibility to make sure the structure to which this component is attached can support five times the combined weight of all equipment. Reinforce the structure as required before installing the component. The wall to which the mount is being attached may have a maximum drywall thickness of 5/8 (1.6cm).
WARNING: Exceeding the weight capacity can result in serious personal injury or damage to equipment! It is the installer's responsibility to make sure the combined weight of all components attached to the iCXPFM2/iCXPTM2 does not exceed 250 lbs (113.4 kg).

AVISOS Y PRECAUCIONES IMPORANTES!

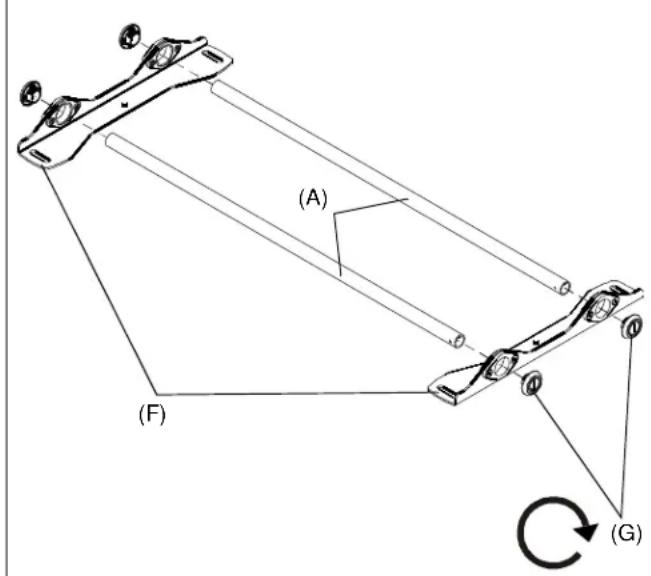
| 1 | ASSEMBLY AND INSTALLATION The iCXPFM2 and iCXPTM2 have been designed to be mounted directly onto either a wood stud or concrete wall. The iCXPFM2 has static brackets which keep the TV in an upright position. The iCXPTM2 has brackets which allow the TV to be tilted. WARNING: IMPROPER INSTALLATION CAN LEAD TO MOUNT FALLING CAUSING SEVERE PERSONAL INJURY OR DAMAGE TO EQUIPMENT! It is the installers responsibility to make certain the structure to which the mount is being attached is capable of supporting five times the weight of the iCXPFM2 or iCXPTM2 and all attached equipment not to exceed 250 lbs (113.4 kg). Assembling the Wall Mount 1. Place both wall uprights (F) on the floor. 2. Slide rails (A) into wall uprights. 3. Thread endcaps (G) into the end of each rail. NOTE: Proceed to either the Installing to a Wood Stud Wall (2a) section or the Installing to a Concrete Wall (2b) section. |
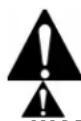
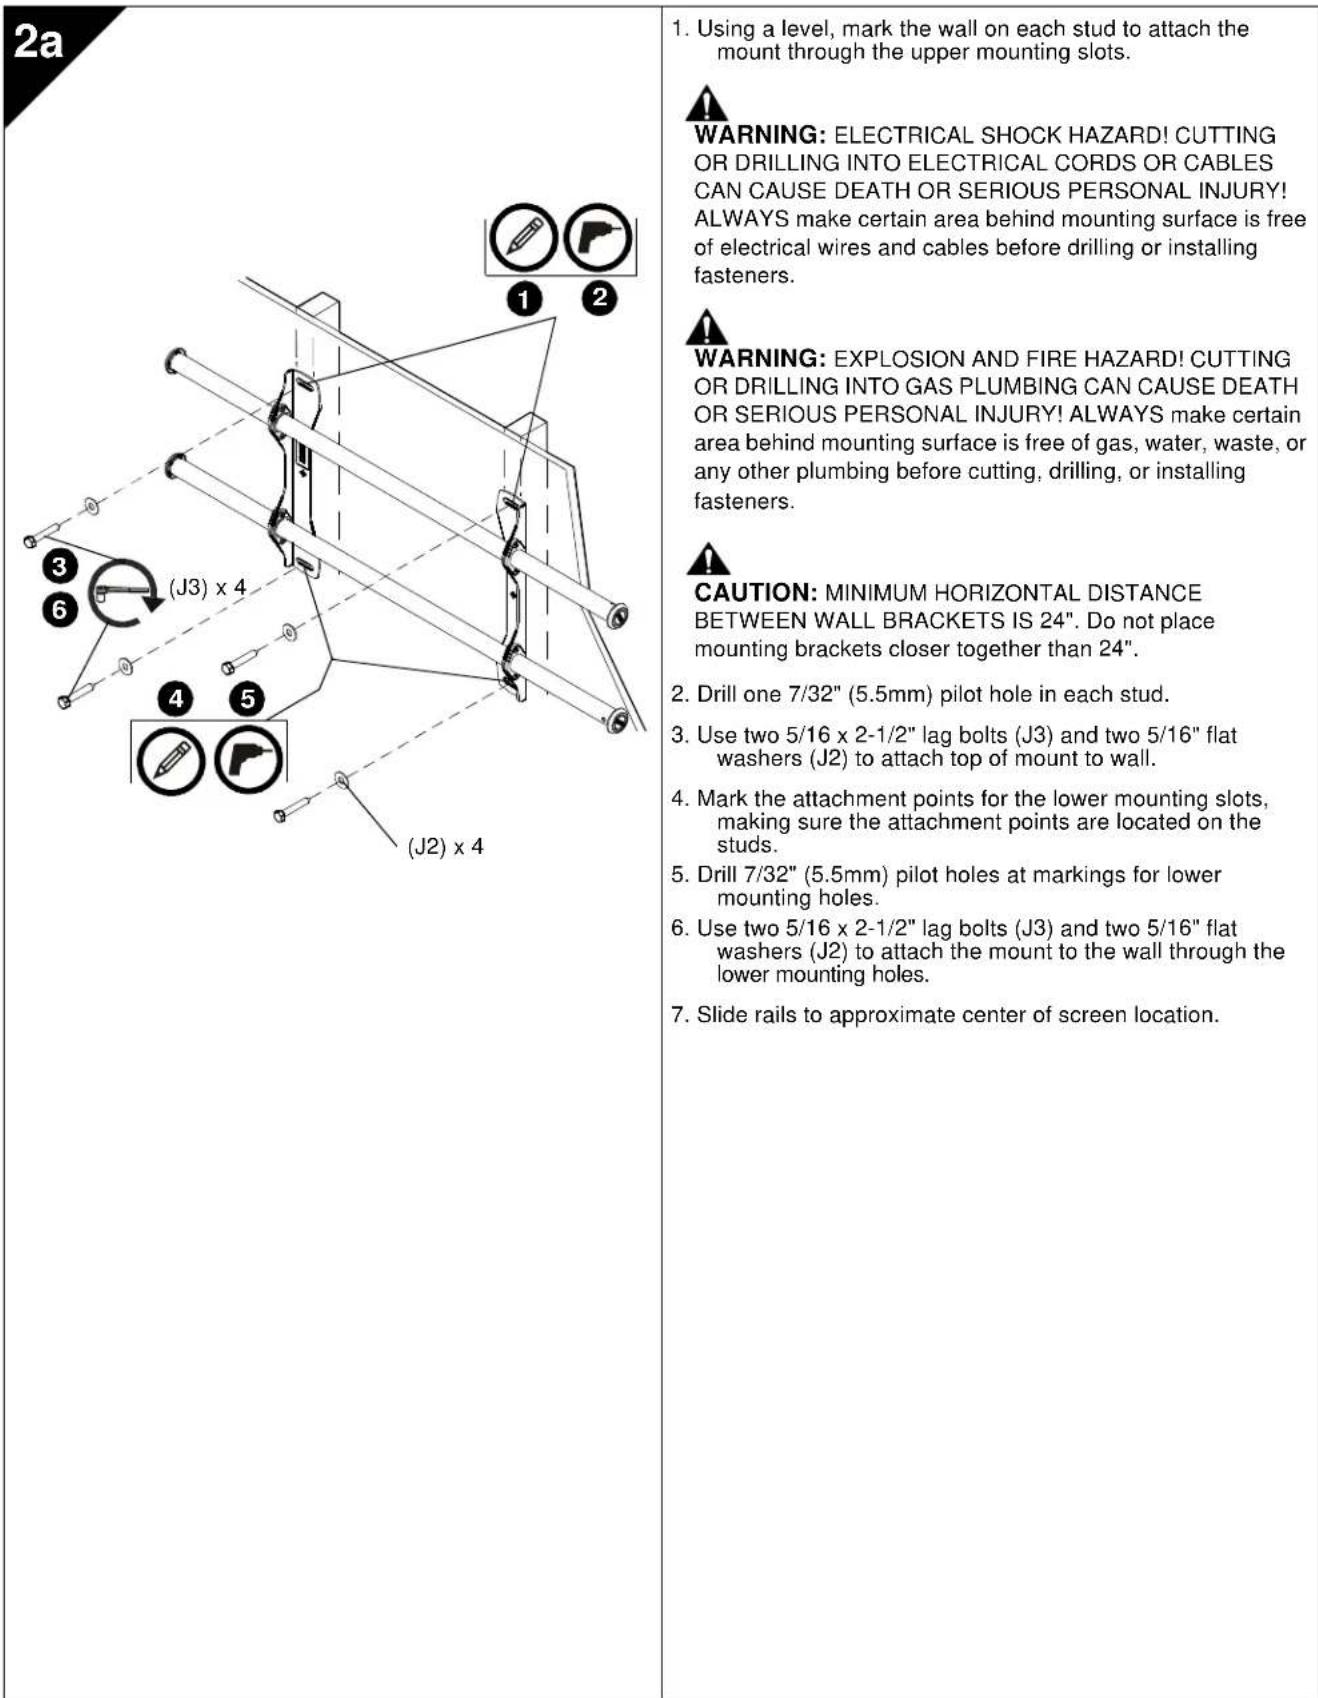
| 2a | Installing to a Wood Stud Wall 1. Determine the center of the TV screen, and where it should be located on the wall. 2. Locate the stud to the left and right of the selected location. CAUTION: MINIMUM HORIZONTAL DISTANCE BETWEEN WALL BRACKETS IS 24". Do not place mounting brackets closer together than 24". CAUTION: When attaching to a wall containing studs located 16" on center, space the uprights 32" apart. 3. Line up the diamond on mount with center of screen marking to determine vertical center. 4. Measure up 6" from the center point to mark location of the upper mounting slots. |
2b
Installing to a Concrete Wall
- Determine the center of the TV screen, and where it should be located on the wall.
- Line up the diamonds on mount with center of screen marking to determine vertical center.
- Measure up 6" from the center point to mark location of the upper mounting slots.
CAUTION: MINIMUM HORIZONTAL DISTANCE BETWEEN WALL BRACKETS IS 24". Do not place mounting brackets closer together than 24".

WARNING: ELECTRICAL SHOCK HAZARD! CUTTING OR DRILLING INTO ELECTRICAL CORDS OR CABLES CAN CAUSE DEATH OR SERIOUS PERSONAL INJURY! ALWAYS make certain area behind mounting surface is free of electrical wires and cables before drilling or installing fasteners.

WARNING: EXPLOSION AND FIRE HAZARD! CUTTING OR DRILLING INTO GAS PLUMBING CAN CAUSE DEATH OR SERIOUS PERSONAL INJURY! ALWAYS make certain area behind mounting surface is free of gas, water, waste, or any other plumbing before cutting, drilling, or installing fasteners.
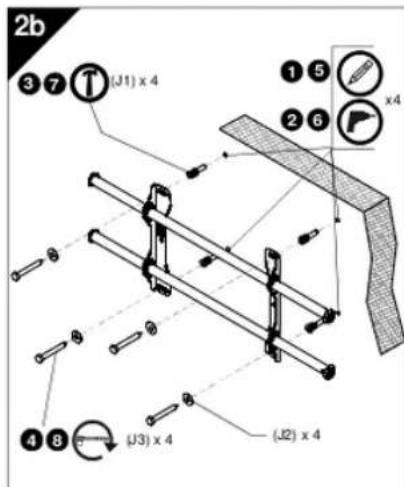
2b
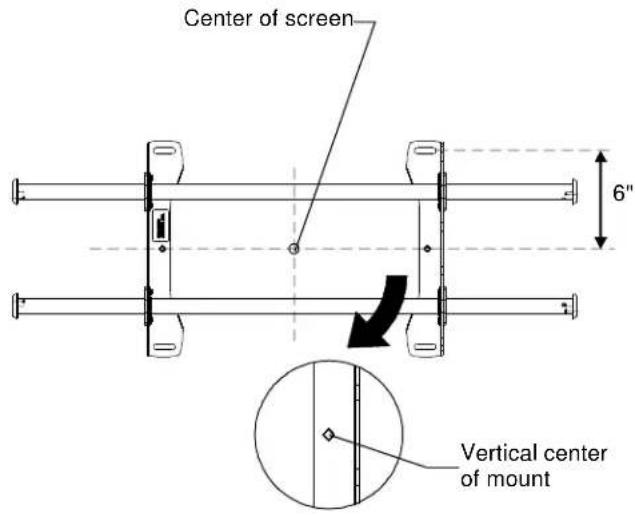
- Using a level, mark the wall through both upper mounting slots.
- Drill one 25 / 64'' (10mm) pilot hole at each marking.
- Install an anchor (J1) into each pilot hole using a hammer.
- Use two 5 / 16 × 2 - 1 / 2 lag bolts (J3) and two 5 / 16 flat washers (J2) to attach top of mount to anchors in wall.
- Mark the attachment points for the lower mounting slots.
- Drill one 25/64" (10mm) pilot hole at each marking for lower mounting holes.
- Install an anchor (J1) into each pilot hole using a hammer.
- Use two 5 / 16 × 2 - 1 / 2 lag bolts (J3) and two 5 / 16 flat washers (J2) to attach the mount to the wall through the lower mounting holes.
- Slide rails to approximate center of screen location.

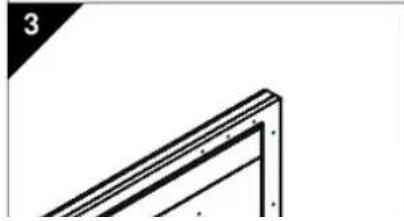
3
Attaching Interface Brackets to TV
- Align the center of the bracket with center of screen.
NOTE: The diamond-shape hole in the bracket corresponds to the center of the mount.
WARNING: IMPROPER INSTALLATION CAN LEAD TO DISPLAY FALLING CAUSING SERIOUS PERSONAL INJURY OR DAMAGE TO EQUIPMENT! Using screws of improper size may damage your display. Properly sized screws will easily and completely thread into display mounting holes. If spacers are required, be sure to use longer screws of the same diameter.
- Select correct screws, spacers (if necessary) and universal washers from the hardware bag (H) and attach brackets to back of screen.

Switching Interface Brackets (Optional)
If an installation situation makes adjusting the location of interface brackets necessary, there are several options.
- The wall brackets may be adjusted side to side at the point of attachment.
- The location of the left and right interface brackets may be switched, with the knobs on the iCLPTM2 interface brackets facing the inside of the mount.
- If necessary, the tilt interface bracket knobs may be switched to allow the interface brackets to be reversed.
a. Remove display from mount.
b. Remove interface brackets from display.
c. Hold the right interface bracket horizontally, tightly gripping it so that spacers do not move.
d. Remove the knob, washer and screw.
e. Replace the knob, washer and screw in the opposite order, with the knob on the inside of the bracket.
f. Switch the right interface bracket to the left side of the wall mount.
g. Repeat Steps 3c through 3f with the left interface bracket.
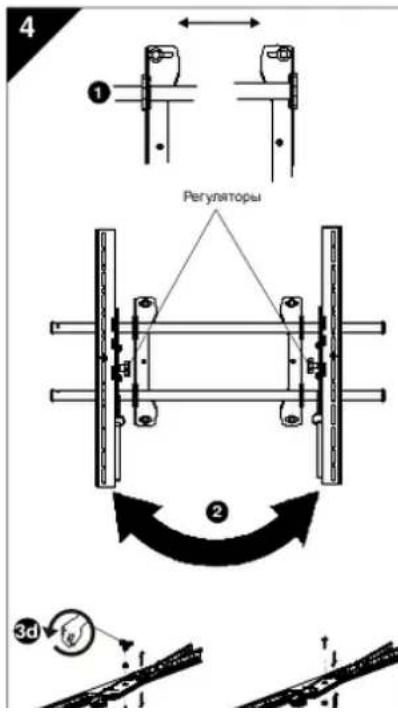
Tilting the Interface Brackets (iCXPTM2 only)
The brackets may be tilted by loosening the knob on the brackets, tilting to desired location, and tightening knob on the brackets.
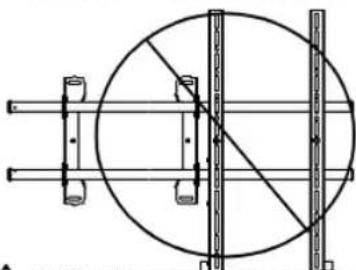
5

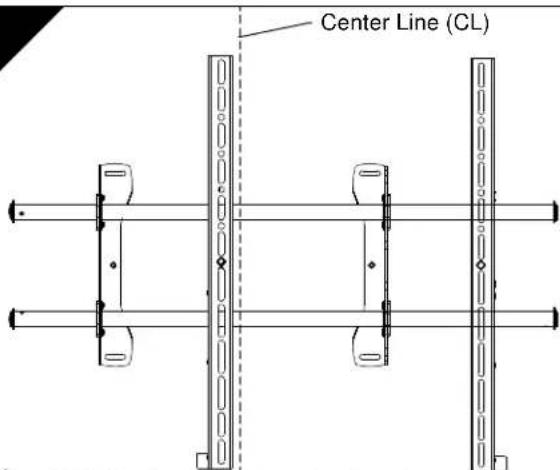
NEVER place both interface brackets to one side of the wall mount center line (CL)!
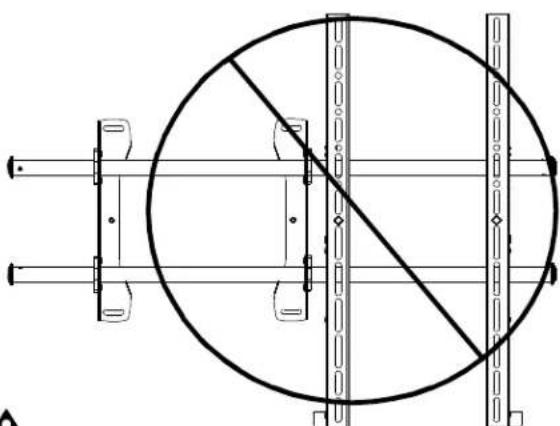

Both interface brackets must NEVER be located to one side of the wall brackets!
5a
Attaching Screen to Wall Mount
- (iCXPTM2 only) Adjust Velcro® pull strap (if necessary) so it does not extend beyond bottom of screen.
NOTE: Do NOT allow both interface brackets to be located on same side of wall bracket.
NOTE: NEVER place both interface brackets to one side of the wall mount center line!
NOTE: Proceed to either Step 5a Attaching to iCXPTM2, or Step 5b Attaching to iCXPFM2.
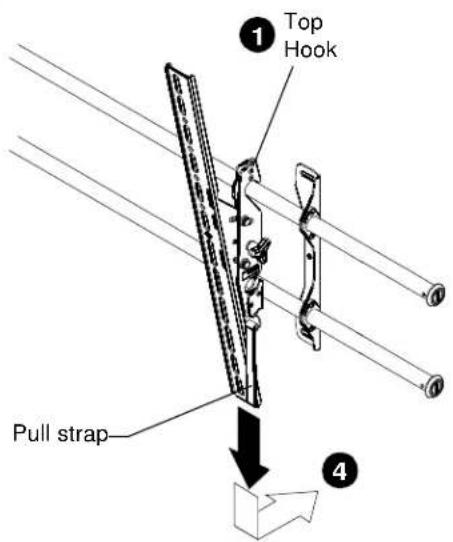
Attaching to ICXPTM2
- Hang top hook of interface brackets onto the top bar of the mount.
NOTE: The screen initially installs into the "kickstand mode" to allow easy cable access.
-
Slide screen and bars to desired viewing position.
-
Route cables between wall and bars.

CAUTION: PINCH POINTS! Keep fingers, hands and cables out of pinch point areas.
- Pull downward on the pullstraps and swing inward toward wall, latching interface brackets to lower bar and locking bottom of screen to the mount.
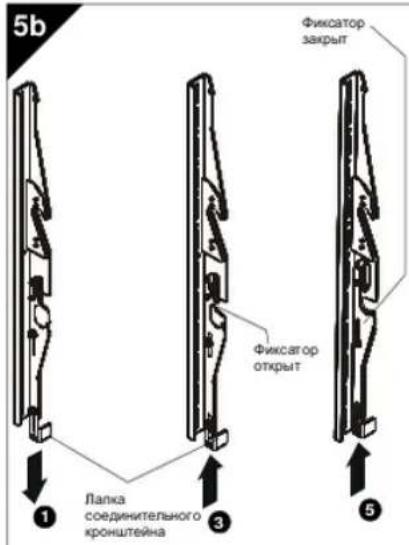
5b

Latch closed
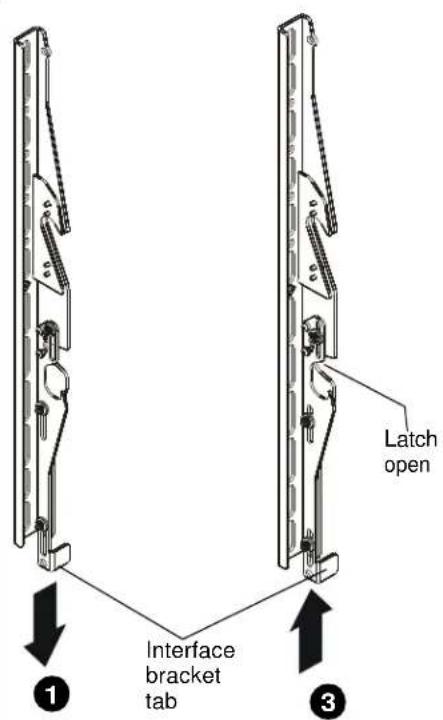
Attaching to iCXPFM2
- Push interface bracket tab all the way down so that the lower mounting slot is blocked.
- Hang the top hook of interface brackets onto the top bar of the mount. The bottom of the screen will be away from the wall.
- Move screen towards the wall by pulling display bottom away from wall and pushing the interface bracket tabs up one notch to the detent which you will be able to feel (approximately half way up).
- Push bottom of display toward the wall bracket so that lower latch on interface bracket surrounds lower bar of wall mount.
- Raise interface brackets tabs all the way to secure the brackets onto the wall mount.
1
ENSAMBLAJE INSTALACION
YcTaHOBkHa6eToHHyOCTeH
- Onopenerine opodery HefekkoHoro 3paHa MecTo eropacnonokhenra HcTepe
- COBEMCTNE pOOMBOHPOE OTEBPCTNE HA XPOHUTNE C cIeMTOX cepEDINHcPbA, YTOB6OnpEDENITc CEPEHNY NO BEPKAN.
- OMTBPELT 15,24 CM BBEXP OT CEPHEH PNHNN NOTAMTE BECTE KBEHPFO 15,24XKTOOHTOBEPCTN

OCTOPOXHO! PACCTORHHE NO FOP3OHATIN MEKUY HACTEHBMIVKOHPOTENHAMMOJXHO BblTb HE MEHIEE 60.96 CM.PaMeueaeMTOAHOe kpoHHTHe He bmeke 60.96 cm dpyr ot dpyra.

BHIMAHIEI OANACOCTb NOPAXEHAR
3NEKTPYCKHN TOKOMI PA3PE3AHHE IIN
PPOCBEPIVAHBE IPOBODA WIK KASELMOCKET
PINECYK C KEPEB3HbIM TPABMAM, B TOM HNCIE, CO CMEPTEJBbHM XCNQDMI TepecBnepHHM
OTePCTNI YcYCTAOHKO XpENEXHbX 3JEMENTOS
OB3ATEJIbHO y6eDTeBcA bTOM, cTO B MECCT eYCAHOHk
Her aenKtPrnckx npoBDaN kABeHN.

BHIMHAHE! OANACTOCTB3PbBAIINIOXKAPAA
PA3E3AHNE IINPPOCBEPMBAHIEA30BOB
TPy5blMOKETIPNBECTNI K CEP8E3HbIMTPABMM
B TOM YCNIE, CO CMEPTBbHbIMNXODOMIpep
pexoh, cabeHNPEOTbEpcNTyIeYtaoTHAO
kpenenhux anemtoTAOBRA TEbHO y6dntteb b TOM,
TO a MeTe yCTaHOHnTaeBOs, 80npno8QDaHb,
KaHAna3aepHOHnIynDpy6.
1.ПгИМОДСУР.OБТВССЕДАЛНЕТСЕТЕОМETKINьМЕСТХАБМESHUNBEXHAXMO.THTXHIXYTOBTECPN.
2. PocOBePbI8E BOTMEHNEHIXMECTA XO ODMHY HABPAHUYKOMY BTOPCTNQIADAMETPOM 10 MM
3. 3a5e9te monoton 品 ~ d ~ i ~ e ~ n ~ (J1)a kaxdoe hankpaaiaaege or8e4tce.
4. PnKpEniTe X CteHepBepHmE CTOpHbO60x KpHouTeHOB 60TAMM5/16X2-1/2"J3)CnnooxxMaWdAmx5/16"(J2), 8CTAaX X aDoeN.
5. OTMETE TOH NAPMAEENI HNOHXMOHTAKHOBIXOBTSEPCNT
6. PtoocbePHTBE e OTMeHNHbX MecCTA X ODMHY HANPAHOBQYMOY OTBePTCNOZAMDBTPOM 10 MM
7. 3a5eTe MONOTKOM dIObEM (J1) a KAKOE HAPARABIAKUeE oBcPTe.
8. TpKpENPTEK C T ENEHKKHE CT apOHsO bOxON KPOHETBHO B60TAMM 5/16 X-2-1/2"J3) cIINOOHMAAAMM6/15"J2).
9. CdaHbte peKnpeponaraemomy eHTpy kpaHa.
Kpnenee coedHnHteIbIx KPOHHTeHOB K TeneBtOpy
- COBEMTATE UeHTP cooeHnHTe Horo KPOHUs He hco cpedekn nnneKkpana.
PIMMEYAHNE.POMBOHNOOHOAeBcPTHe a COEHNHTENHOM KPOHUTHE OOOBTETBYET CEHTPYKPOHUTHEHa.
BHIMAHIE! HENPABINBHAY CTAHOBKA MOKET CTATb PNYHNOI PADEHMI MOHNTOPA INPYBECTN
TepectAHOBIA CoedHHTEnbLbX KPOHUTeHOB (DONONTEHUNB803MOXHOCT)
EcnB X KOe yCTAHOBX BO3HHAKT HcOoKQyMMoCTb N3MmHHTs NOxONXHE Co0HMeTBeMbX KPOUHeTbHO, 3TO MOxHO cDnAaHEKOoHbXMOnC6oSMk.
- KPOHUTSEHIM KOHO CHAMHYI TROPHOHTAHNHO B TY KIN DpyTFO CTOPOHY OHOTCHNTBO HOKH pBNHEHN
- 黎尼尼帕尼的成像能用他那KPOHUTHEHMOHOKO NOMEHTHEMCTAMU,VNCN03YB4PEYNATOPDU, paONIOKHeHHC H C BYTPEHN CTOPOH NO COEHTHEHAX KPOHUTHEHOB MOENICLPTM2.
- ECHHEOxMOHMeHTB MCTAMCOeDHTeHbHe KPOHHTeHa, HMeHTeNOHKeHpeYrHPTo8A HkHOHa COeDHTeHaXPOHHTeHaX
a. CHIMITE MOHTOP C GCTEMBI KPNJENHR
b. Chmmtte coednnttehnepe kpoohetepa C MOHNTOPA
C.KpEnKyopeepaBnAe npaaBcoedHnTbeBnBn KpnKTHBnBnBnBnBnBnBnBnBnBnBnBnBnBnBnBnBnBnBnBnBnBnBnBnBnBnBnBnBnBnBnBnBnBnBnBnBnBnBnBnBnBnBnBnBnBnBnBnBnBnB
d. ChmnteperynTOp u waiy in OTBHTTE BHT
e.YCTAHOBHTpepyrTOP,AMHTNuaaBbYbO6pHOM nopRaeCpeyTcTOPOHxHOHnTaK,THoBOE pepyrTOPOK3ANCBYTPENHEOTOPOH.
f.YCTAHOBITEpabasCoepHHTINbIeKPOHHTENc I CBAEO TOCOPHOH HACTHEONC CTMBTE KPEINELNA
g. TIOPOITeD ETeAaTbAeAeBHe BpyHkTx 3c-3f, DnA neGROOEOHHTENBOXPOKHTUHe.
HaNIOH CoeHNHTBbHNK KPOHNHTEHOB (TOLNOK B MOENIC IXCPMT2)
KPOHUTHEHMOXHOHAKOHHTA.13N3T0TOOCAHTEB
peyIATOPbKPOHUTHEHOBAKOHHTeKPOHUTHEHBAHYHOE
NOHXOEHN3ABAHHTHepeYIRTOHPaKPOHUTHEHDOYONPA.
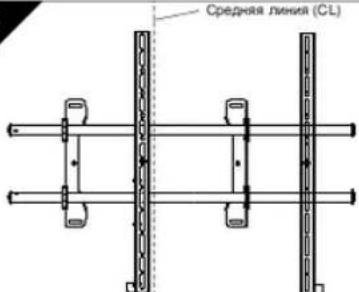
5
3JAPUEHEHO paimeHATb o6a coedHHTeBnHbIX KPOHsTeHa no Ody cToOpy ot CpeHN Hnnn (CL) HactenOH CTcHMeT kpenHn
A
3ANPEUHO pameaTb 6o coeMHHTbHux KPOHUTHE No Ody CTOPNY o HACTEHHX MOHTBHX KPOHUTHE!
YcTaHOBk3KpaHa B HacteHHyO ChCTemy KpenneHn
1.(TnkoBmDnHCXPTM2)OtpnynpyIeIHyKpnexeknoNeHTbVc08(pnHeobxOIMC0TH)TAK,TO6OBAHEbXtyna3AHHNkKpAOKPAHA
PIMMEYAHNE 3ANPEEHO paMaHbTa 06a 00eMHHTBbHX KPOHHTHaNo OyH CTOPOHOT HACTEHNO MONTAHHO KPOHHTHa.
PIMMEYAHNE.3APNEEHO paaaTb 6ba COeHNHTBbK XPOHETHa NO ONDI CTOPHYOT CpeHn Hnnn KACTENHO CTCTEMKXPENNNH!
PIMMEYAHNE. DAIJIbHeIeHue HcTpyKmCm. BpaIepJe 5a YCTAOHKB B MOdenl ICXPTM2. INI 5b YCTAOHKB B MOdenl ICXPFM2.

5a
anwdd
YcTaHOBka B Moden iCXPTM2
YcTaHOBKaB MoDennICXPFM2
1.OTTHHNTBHN3OyNnopaNAnkycoepMHHTBHOPOKCHHTA,T06bIpepepbrHmKHeeMOHTAXHOEOTABPCTME.
2. NoBceIe BexXHKeCKoBc coepEnHbTeHbXpOHTHeHb HApExpoK peXyCnCTeBxPnEHNHn.HNKnKpnA XApHa 6yDte HXoQmTb HA HEKOTOP pACTOHIN OT CTeHb.
3. 1046879325333333333333333333333333333333333333333333333333333333333333
4. IpKoMHTe HIKHO KXAP MOHOTOPA K HACTEHMOHY MONTAHKOH KPOHJTHBNY,NTObICTABTNbH KHXHOHOPEKBY CACTMeu KPBILNBE H KIXHOHE MONTAHKOHE OTBPECTV COEHPHTBTOHO KPCHUHTHA
5. 406a npxpennntb cooepnntenrnae kponnneynk K GACTeE npxnenrrn, nOoHmne nane nnKx cooeepnntenbHex kponnneynbdo yno pa.
USA·8401 Eagle Creek Parkway, Suite 700·Savage, Minnesota 55378·800.572.1373
EMEA·+31(0)402668620
www.icmounts.com
©2011 Milestone AV Technologies. The iC Logo and StowAway are trademarks of Chief Manufacturing,
a products division of Milestone AV Technologies, a Duchossois Group Company. All rights reserved
Patents and patents pending. Milestone AV Technologies, Savage, MN 55378, USA
8805-002022 Rev 00
08/11