
Multistyler HP4698 - Hair Straightener PHILIPS - Free user manual and instructions
Find the device manual for free Multistyler HP4698 PHILIPS in PDF.
| Brand | Philips |
| Model | Multistyler HP4698 |
| Device type | 10-in-1 multistyle straightener and styler |
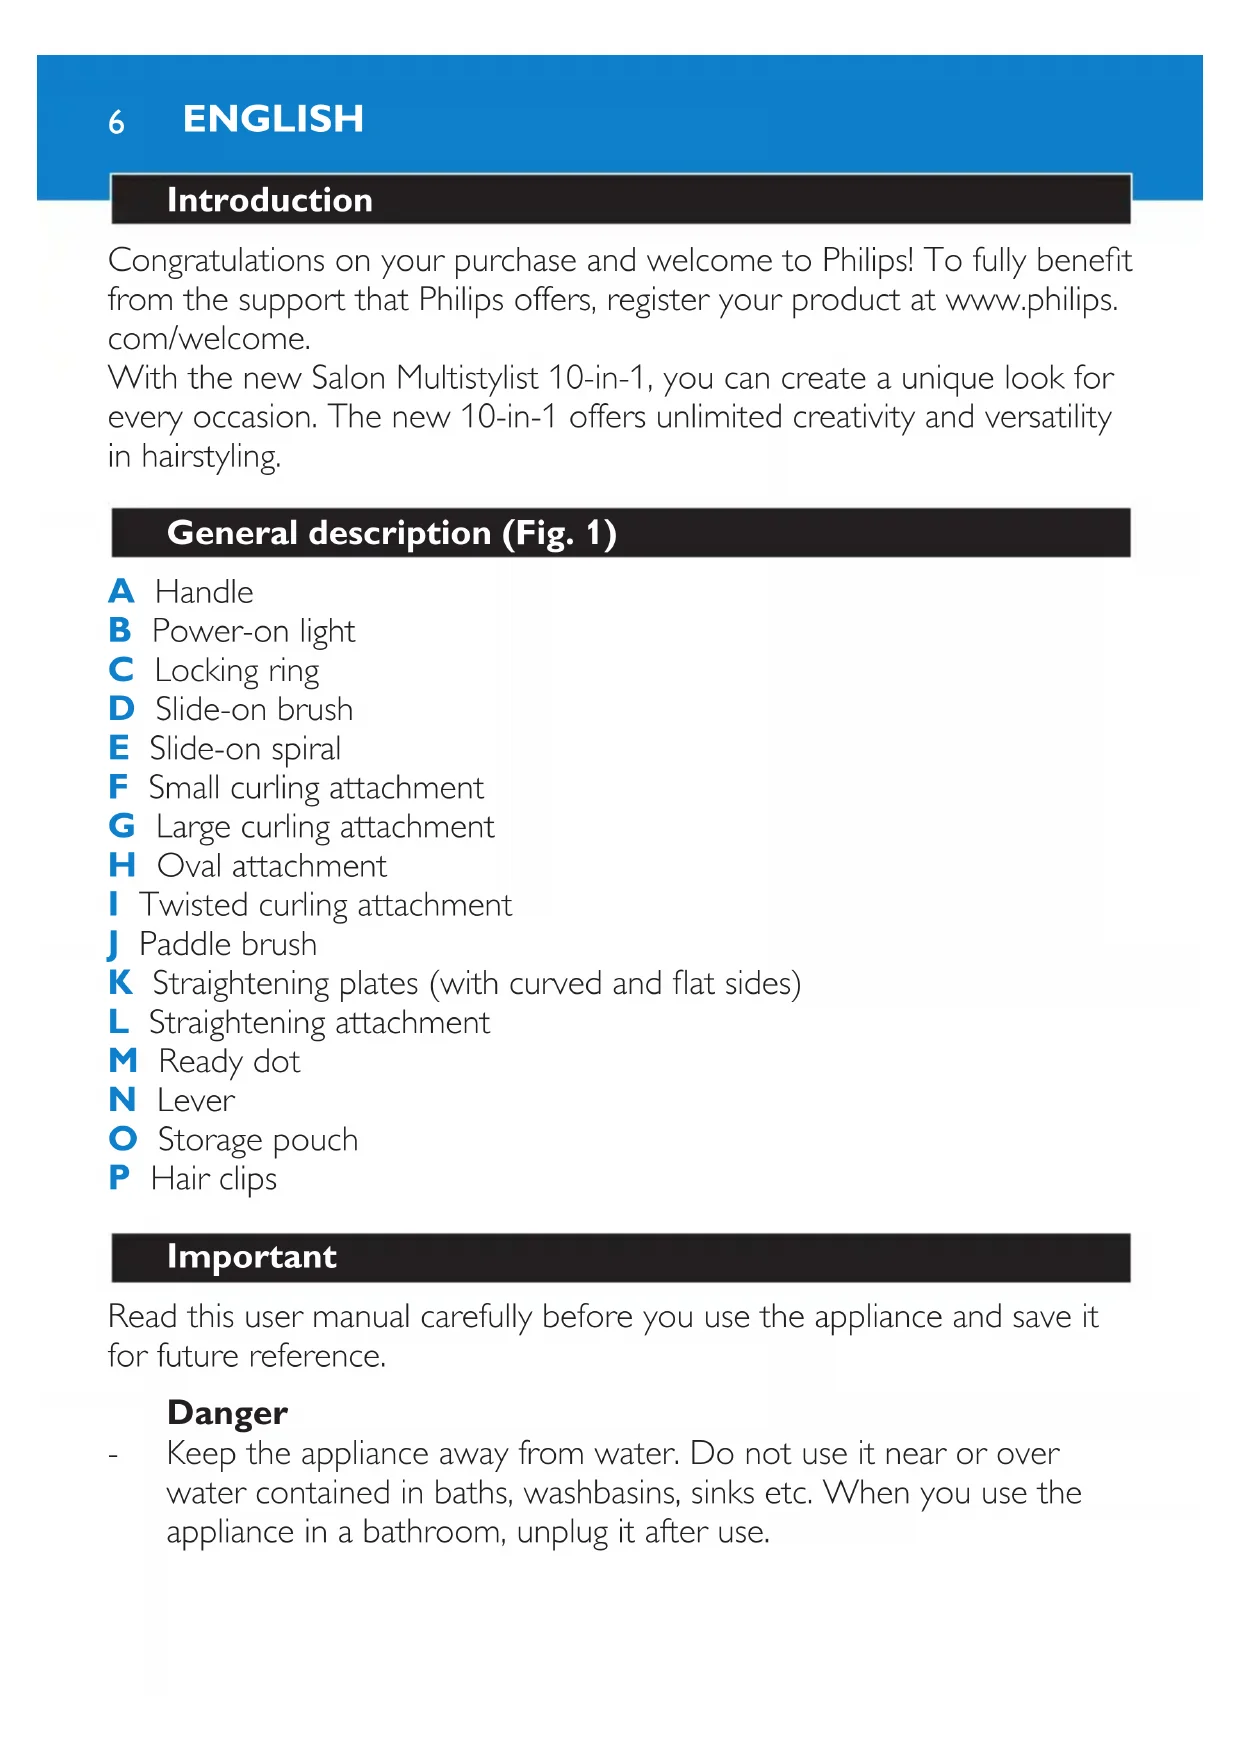
| Supplied accessories | Folding brush, sliding spiral, small curling iron, large curling iron, oval accessory, cylindrical curling iron, flat brush, straightening plates, straightening iron, storage case, hair clips |
| Number of accessories | 10 |
| Power supply | Mains, suitable voltage 220-240 V |
| Power | Approx. 60 W |
| Heating type | Ceramic |
| Heating indicator | Color-changing light indicator |
| Styling functions | Large/tight curls, waves, ringlets, oval curls, strands, straightening |
| Recommended use | Dry hair only |
| Heating time | A few seconds until the indicator changes color |
| Maximum temperature | Not specified, rapid heating |
| Cord length | Approx. 1.8 m |
| Weight | Approx. 400 g (without accessories) |
| Dimensions (handle without accessory) | Approx. 25 x 3 x 4 cm |
| Care and cleaning | Brush or dry cloth, do not immerse |
| Safety | Thermal auto shut-off (not specified), heating indicator, hot surface warning |
| Warranty | International Philips warranty |
| Country of manufacture | China (estimated) |
Frequently Asked Questions - Multistyler HP4698 PHILIPS
User questions about Multistyler HP4698 PHILIPS
0 question about this device. Answer the ones you know or ask your own.
Ask a new question about this device
Download the instructions for your Hair Straightener in PDF format for free! Find your manual Multistyler HP4698 - PHILIPS and take your electronic device back in hand. On this page are published all the documents necessary for the use of your device. Multistyler HP4698 by PHILIPS.
USER MANUAL Multistyler HP4698 PHILIPS
Register your product and get support at www.philips.com/welcome
HP4698
natural_image
Black-and-white product photo of a Philips curling iron with various hairpins and accessories (no text or symbols visible)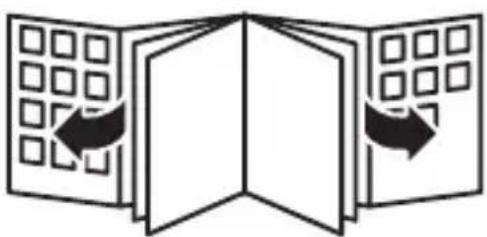
natural_image
Diagram showing a folded panel with grid patterns and directional arrows indicating movement or transformation (no text or symbols)
ENGLISH 6
DANSK 15
DEUTSCH 24
ΕΛΛΗΝΙΚΑ 34
ESPAÑOL 45
SUOMI 54
FRANÇAIS 63
ITALIANO 73
NEDERLANDS 83
NORSK 93
PORTUGUÊS 102
SVENSKA 111
TÜRKÇE 120

136

144
Introduction
Congratulations on your purchase and welcome to Philips! To fully benefit from the support that Philips offers, register your product at www.philips.com/welcome.
With the new Salon Multistylist 10-in-1, you can create a unique look for every occasion. The new 10-in-1 offers unlimited creativity and versatility in hairstyling.
General description (Fig. 1)
A Handle
B Power-on light
C Locking ring
D Slide-on brush
E Slide-on spiral
F Small curling attachment
G Large curling attachment
H Oval attachment
1 Twisted curling attachment
J Paddle brush
K Straightening plates (with curved and flat sides)
L Straightening attachment
M Ready dot
N Lever
Storage pouch
P Hair clips
Important
Read this user manual carefully before you use the appliance and save it for future reference.
Danger
- Keep the appliance away from water. Do not use it near or over water contained in baths, washbasins, sinks etc. When you use the appliance in a bathroom, unplug it after use.
Warning
- Check if the voltage indicated on the appliance corresponds to the local mains voltage before you connect the appliance.
- Check the condition of the mains cord regularly. Do not use the appliance if the plug, the mains cord or the appliance itself is damaged.
- If the mains cord is damaged, you must have it replaced by Philips, a service centre authorised by Philips or similarly qualified persons in order to avoid a hazard.
- This appliance is not intended for use by persons (including children) with reduced physical, sensory or mental capabilities, or lack of experience and knowledge, unless they have been given supervision or instruction concerning use of the appliance by a person responsible for their safety.
- Children should be supervised to ensure that they do not play with the appliance.
- Keep the appliance away from non-heat-resistant surfaces and never cover the appliance with anything (e.g. a towel or clothing) when it is hot.
- Keep the appliance away from flammable items.
- Never leave the appliance unattended when it is plugged in.
- Always unplug the appliance after use.
- Always return the appliance to a service centre authorised by Philips for examination or repair. Repair by unqualified people could cause an extremely hazardous situation for the user.
Caution
- For additional protection, we advise you to install a residual current device (RCD) in the electrical circuit that supplies the bathroom. This RCD must have a rated residual operating current not higher than 30mA. Ask your installer for advice.
- Keep the attachments clean and free of dust, dirt and styling products such as mousse, spray and gel. Never use the appliance in combination with styling products.
- The attachments and the plastic parts near the attachments reach a high temperature quickly. Prevent the hot surfaces of the appliance from coming into contact with your skin.
ENGLISH8
- The attachments have a ceramic coating. This coating slowly wears away over time. This does not affect the performance of the appliance.
- Do not leave attachments in your hair for more than a few seconds at a time, to prevent damage to your hair.
- Only use the appliance on dry hair.
- Do not use the appliance on artificial hair.
- Do not use the appliance for any other purpose than described in this manual.
- Wait until the appliance has cooled down before you store it.
- Do not wind the mains cord round the appliance.
Electromagnetic fields (EMF)
This Philips appliance complies with all standards regarding electromagnetic fields (EMF). If handled properly and according to the instructions in this user manual, the appliance is safe to use based on scientific evidence available today.
Preparing for use
Connecting/disconnecting attachments
This procedure applies to all attachments.
1 Slide the attachment onto the handle. Make sure that the support points downwards (Fig. 2).
2 Turn the locking ring on the handle to the right until the bold arrow on the locking ring is in line with the arrow on the handle (Fig. 3).
The attachment is now securely fixed to the handle.
3 To disconnect attachments, turn the locking ring to the left and pull the attachment off the handle.
Unplug the appliance when you remove an attachment after or during styling. Do not touch the metal and ceramic parts of the attachment, as they are hot.
Using the appliance
With the Salon Multistylist 10-in-1 you can create tight curls, large curls, waves, large or small ringlets, oval curls, flicks and a sleek look.
1 Comb or brush your hair so that it is disentangled and smooth.
2 Connect an attachment to the handle (see chapter ‘Preparing for use’). Make sure that the support points downwards.
3 Place the appliance on the support of the attachment.
4 Put the mains plug in the wall socket.
The power-on light goes on and the appliance heats up (Fig. 4).
The appliance is ready for use when the ready dot on the attachment changes colour (Fig. 5).
5 Style your hair. See the sections below for specific instructions for each attachment.
Note: When you use one of the curling attachments or the slide-on brush, always make sure that you wind the end of the lock in the required direction.
6 Leave the stylist in your hair for a few seconds.
How long you have to keep the stylist in your hair depends on the thickness of your hair.
Do not leave the styler in your hair longer than 10 seconds.
Large or tight curls
1 Connect the large or small curling attachment to the handle.
2 Take a lock of hair, press the lever to open the clip and place the lock between the barrel and the clip (Fig. 6).
3 Release the lever and slide the barrel to the end of the lock. Then wind the lock round the barrel.
Note: Make sure that you wind the end of the lock in the required direction.
4 Open the clip after 5 to 10 seconds and remove the barrel from the hair.
ENGLISH10
5 Let the curls cool down before you comb, brush or finger-comb the hair into its final style.
Tip: You can comb the curls with your fingers to add volume.
Waves
1 Connect the small curling attachment to the handle. Slide the slide-on brush onto the curling attachment.
2 Take a lock of hair and wind it round the slide-on brush (Fig. 7).
Prevent the slide-on brush from getting tangled in the hair in the following way:
- Do not put too much hair in one lock.
- Do not wind a lock of hair more than twice round the slide-on brush.
- When you unwind a lock of hair, make sure that you hold the slide-on brush away from the underlying hair.
3 Remove the slide-on brush from your hair after 5 to 10 seconds.
4 Let the waves cool down before you comb, brush or finger-comb the hair into its final style.
Large ringlets
1 Connect the large curling attachment to the handle. Slide the slide-on spiral onto the curling attachment.
2 Take a lock of hair, press the lever to open the clip and place the lock between the barrel and the clip (Fig. 8).
3 Release the lever and slide the barrel to the end of the lock. Then wind the lock round the barrel following the spiral profile.
Note: Make sure that you wind the end of the lock in the required direction.
4 Open the clip after 5 to 10 seconds and remove the barrel from the hair.
5 Let the ringlets cool down before you comb, brush or finger-comb the hair into its final style.
Small ringlets
1 Connect the twisted curling attachment to the handle.
2 Take a lock of hair, press the lever to open the clip and place the lock between the barrel and the clip (Fig. 6).
Note: Make sure that you wind the end of the lock in the required direction.
3 Open the clip after 5 to 10 seconds and remove the barrel from the hair.
4 Let the ringlets cool down before you comb, brush or finger-comb the hair into its final style.
Oval curls
1 Connect the oval attachment to the handle. (Fig. 6)
2 Take a lock of hair, press the lever to open the clip and place the lock between the barrel and the clip.
Note: Make sure that you wind the end of the lock in the required direction.
3 Open the clip after 5 to 10 seconds and remove the barrel from the hair.
4 Let the oval curls cool down before you comb, brush or finger-comb the hair into its final style.
Flicks
1 Connect the straightening attachment to the handle.
2 Slide the straightening plates into the attachment with the curved sides pointing towards each other (Fig. 9).
3 Take a lock of hair (max. 5 to 6cm wide). Press the lever to open the straightening attachment and place the lock between the plates (Fig. 10).
Decide if you want to create inward or outward flicks. Hold the appliance in such a way that the curved sides of the plates create the desired type of flick.
ENGLISH12
4 Slide the stylist gently down the length of the hair in a few seconds. When the plates are 3-5cm above the end of the lock, slightly twist the appliance inwards or outwards to create the desired type of flick.
Sleek look
1 Press the lever to open the straightening attachment.
2 Remove the straightening plates one by one. Grab the cool tip and pull each plate out of the straightening attachment (Fig. 11).
3 Turn the plates round and slide them back into the attachment with the flat sides pointing towards each other (Fig. 12).
You can now use the straightening attachment to create sleek hair without flicks.
Make sure that the edges of the plates are inserted properly into the grooves.
4 Take a lock of hair (max. 5 to 6cm wide). Press the lever to open the straightening attachment and place the lock between the plates.
5 Slide the stylister gently down the length of the hair in a few seconds.
6 Let the sleek hair cool down before you comb or brush it.
Cleaning
Never immerse the appliance in water or any other liquid, nor rinse it under the tap.
1 Unplug the appliance.
2 Place the stylist on the support of the attachment in a safe place and let it cool down.
3 Clean the appliance and the attachments with a small brush or a dry cloth.
Storage
1 Unplug the appliance.
2 Place the stylist on the support of the attachment in a safe place and let it cool down.
3 Store the appliance in a safe and dry place.
Do not wind the mains cord round the appliance.
Environment
- Do not throw away the appliance with the normal household waste at the end of its life, but hand it in at an official collection point for recycling. By doing this, you help to preserve the environment (Fig. 13).
Guarantee & service
If you need information or if you have a problem, please visit the Philips website at www.philips.com or contact the Philips Customer Care Centre in your country (you find its phone number in the worldwide guarantee leaflet). If there is no Customer Care Centre in your country, go to your local Philips dealer or contact the Service Department of Philips Domestic Appliances and Personal Care BV.
Troubleshooting
This chapter summarises the most common problems you could encounter with the appliance. If you are unable to solve the problem with the information below, contact the Customer Care Centre in your country.
Problem Solution
The appliance does not work.
Perhaps there is a power failure or the socket is not live. Check if the power supply works. If it does, plug in another appliance to check whether the socket is live.
| Problem Solution | |
| Perhaps the appliance is not suitable for the mains voltage to which it is connected. Make sure that the voltage indicated on the appliance corresponds to the local mains voltage. | |
| Perhaps the mains cord of the appliance is damaged. If the mains cord is damaged, you must have it replaced by Philips, a service centre authorised by Philips or similarly qualified persons in order to avoid a hazard. | |
| The styling results are not satisfactory. | Perhaps you did not let the appliance heat up long enough. Let the appliance heat up until the ready dot changes colour. |
| Perhaps you wound too much hair round the barrel or put too much hair between the plates. When you use the curling attachments or the slide-on brush, do not make the locks too thick. The thinner the lock of hair, the tighter the curl. When you use the straightening attachment, make sure the locks are no wider than 5 to 6cm for a good result. | |
| Perhaps you did not leave the styling attachment in your hair long enough. Keep the stylister in your hair for 5 to 10 seconds, depending on the thickness of your hair. | |
Introduktion
ت Winning the that is by what is a setting the greater of the greater
natural_image
Illustration of a hand holding a tool with a blue arrow indicating direction (no text or symbols)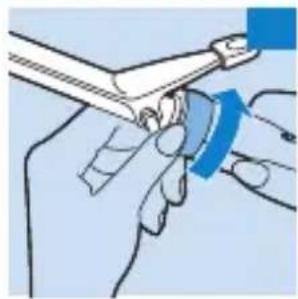
natural_image
Illustration of a hand holding a tool with a blue arrow indicating direction (no text or symbols)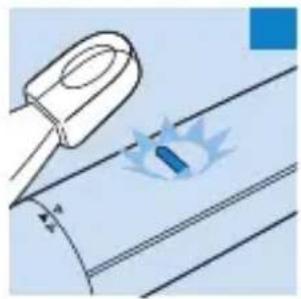
natural_image
Illustration of a tool interacting with a blue tool, showing motion lines and a magnified view (no text or symbols)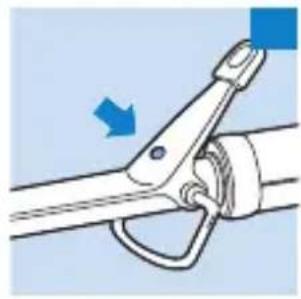
natural_image
Diagram of a mechanical clamp or clip assembly with a blue arrow indicating direction (no text or symbols present)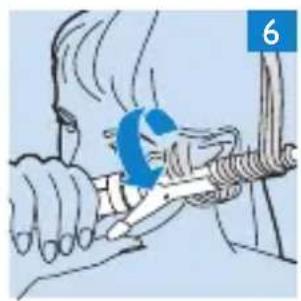
natural_image
Illustration of a hand using a tool to tie or snap a rope, no text or symbols present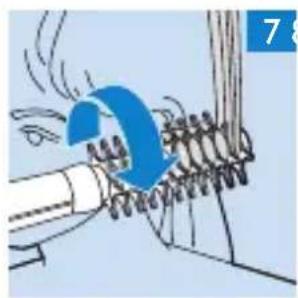
natural_image
Illustration of a mechanical assembly with a blue curved arrow indicating motion (no text or symbols)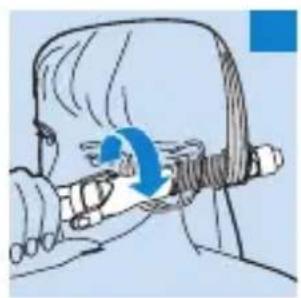
natural_image
Illustration of a hand holding a tool with a blue circular arrow indicating rotation (no text or symbols)
natural_image
Line drawing of a mechanical clamp or clip assembly (no text or symbols)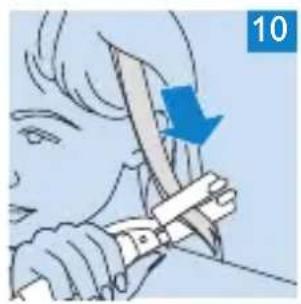
natural_image
Illustration of a person using a tool to cut or hold a piece, with a blue arrow indicating direction (no text or symbols)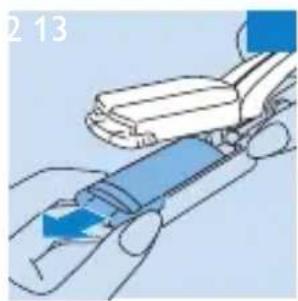
natural_image
Diagram of a robotic arm with blue highlighted movement, no text or symbols present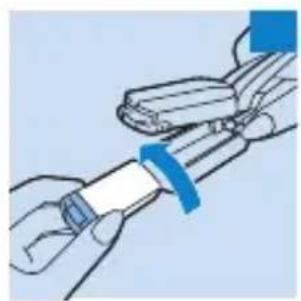
natural_image
Illustration of a hand holding a tool with blue tools, no text or symbols present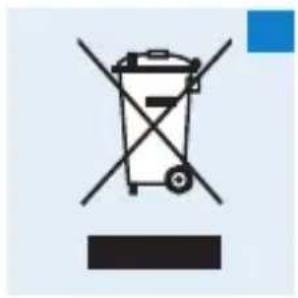
natural_image
Symbol of a trash bin crossed with two crossed lines, no text or numbers present
- Register your product and get support at www.philips.com/welcome
- Introduction
- General description (Fig. 1)
- Important
- Danger
- Warning
- Caution
- ENGLISH8
- Electromagnetic fields (EMF)
- Preparing for use
- Connecting/disconnecting attachments
- Using the appliance
- Large or tight curls
- ENGLISH10
- Waves
- Large ringlets
- Small ringlets
- Oval curls
- Flicks
- ENGLISH12
- Sleek look
- Cleaning
- Storage
- Environment
- Guarantee & service
- Troubleshooting
- Problem Solution
- Introduktion
Brand : PHILIPS
Model : Multistyler HP4698
Category : Hair Straightener