
CMT2D1T - Media player CONCEPTRONIC - Free user manual and instructions
Find the device manual for free CMT2D1T CONCEPTRONIC in PDF.
| Product type | Multimedia player and recorder with DVB-T tuner |
| Brand | Conceptronic |
| Model | CMT2D1T |
| Dimensions (approx.) | 200 x 150 x 50 mm |
| Weight (approx.) | 0.5 kg |
| Power supply | 12V DC, 5A (power adapter included) |
| Network connectivity | Ethernet 10/100 Mbit (model CMT2D1T); Wi-Fi 802.11n (model CMT2DW) |
| Video outputs | HDMI, composite (RCA) |
| Audio outputs | Stereo RCA, digital optical |
| USB ports | 3 USB host ports (1 front, 2 rear) + 1 USB port for PC connection |
| Main features | Playback and recording of DVB-T channels, playback of video/audio/photo files, creation of playlists, EPG guide, parental control |
| Supported file formats | See the list of codecs on the Conceptronic website |
| Maintenance and cleaning | Unplug the device, clean the ventilation openings with a dry cloth |
| Safety | Do not expose to water, heat or extreme humidity; provide a ventilation space of 10 cm around the device; do not open the casing |
| Spare parts and repairability | Contact technical support – no spare parts provided |
| Firmware update | Downloadable from the Conceptronic website |
Frequently Asked Questions - CMT2D1T CONCEPTRONIC
User questions about CMT2D1T CONCEPTRONIC
0 question about this device. Answer the ones you know or ask your own.
Ask a new question about this device
Download the instructions for your Media player in PDF format for free! Find your manual CMT2D1T - CONCEPTRONIC and take your electronic device back in hand. On this page are published all the documents necessary for the use of your device. CMT2D1T by CONCEPTRONIC.
USER MANUAL CMT2D1T CONCEPTRONIC
Conceptronic Media Titan
Gebruiksaanwijzing
flowchart
graph TD
    TV["TV"] -->|USB cable to PC| Audio["Audio"]
    Audio -->|USB cable to PC| Home["Home Device"]
    Home -->|USB cable to PC| External["External LAN"]
    External -->|USB cable to PC| External
    External -->|USB cable to PC| External
    External -->|USB cable to PC| External
    External -->|USB cable to PC| External
    External -->|USB cable to PC| External
    External -->|USB cable to PC| External
    External -->|USB cable to PC| External
    External -->|USB cable to PC| External
    External -->|USB cable to PC| External
    External -->|USB cable to PC| External

    subgraph Internal Components
        A["Radio Cable"] --> B["Antenna"]
        C["Satellite"] --> D["Satellite"]
        E["Analog"] --> F["Analog"]
        G["Video / Audio"] --> H["Video / Audio"]
        I["Optional Audio"] --> J["Optional Audio"]
        K["HDMI"] --> L["HDMI"]
        M["USB to Computer"] --> N["USB to Computer"]
        O["External LAN"] --> P["External LAN"]
    end
text_image
Diagram showing audio system connections between a computer and various audio devices including speakers, audio units, USB/USB 2.0, and HDMI.Analoog geluid:
text_image
Grab'n'GO® MediaTitan leading...[Laden]
text_image
Select your language Participate English[ Wizard instellingen]
text_image
Setup 12 channels found. They will now be saved. OK TV channels Nederland 1 66x Nederland 2 Canvas/Ketsnet Nederland 3 Nickeldeon/ComedyCe TV Finnoland Discovery Channel Veronica/Jetix Eurosport 1 RTL B Private Spice 12 Channelstext_image
02 Nederland 2 14:30: People on the mouse Time: 00:40 00:00 hrs. 06:00 Undefined instant[ TV - speler ]
text_image
TV 3 items TV Favorites My favorites My scheduled recordings Full Channel List Edit "My favorites" Remove "My Favorites" Remove "My Favorites" Remove "My Favorites"[ TV - opties ]
text_image
01 Nederland 1 14:00 NOT found Low 01.00 Underlined costtext_image
Channel Switzerland 1 My favorite Date 01 / 09 / 2008 Start time 14:26 End time 15:26 Frequency Only this time Number of recosing 00 Cancel Cancel[ TV - opname handmatig programmeren]
text_image
TV My scheduled recordings Nederland 1 (01/09/2008) → The Mon, 01 Sep 2008 From 15:00 To 15:30text_image
Setup 01/09/2008 02:56 PM 463.1GB available space PAL Ethernet network General Country Language Date and Time Access and protections France Germany Spain Portugal Other[ Instellingengedeelte]
text_image
Enter your current code[ Kinderslot - geheime code ]
text_image
Music New Volume My Music → Media Files Multimedia My Content[ USB-apparaat in navigator ]
Conceptronic Media Titan
User Manual
Congratulations on the purchase of your Conceptronic Media Recorder & Player.
This User Manual gives you a step-by-step explanation how to install and use the Conceptronic Media Recorder & Player.
When problems occur, we advise you to go to our support-site (go to www.conceptronic.net and click 'Support'). Here you will find the Frequently Asked Questions Database.
When you have other questions about your product and you cannot find it at our website, you can contact us by e-mail: support@concepttronic.net
For more information about Conceptronic products, please visit the Conceptronic Web Site: www.conceptronic.net
Tip : The Conceptronic Media Titan is firmware upgradable. To upgrade your Media Titan with the latest firmware version, you can visit the Conceptronic Web Site.
Tip : Please check www.conceptronic.net for the latest codec list of supported files.
1. Package Contents
The following items should be present in the package of the Conceptronic Media Recorder & Player:
- Conceptronic Media Titan (described as ‘unit’ or ‘Media Titan’ in the manual). **
The device in the package is 1 of the 2 models listed below:
- CMT2D [C08-140]: Media Titan with 10/100Mbit ethernet only.
- CMT2DW [C08-141]: Media Titan with 802.11n wireless and 10/100Mbit ethernet.
• Power supply (12V, 5A).
- Power cord.
- Remote Control.
• 2 AAA batteries for remote control.
- Composite Video Cable (Red, White, Yellow RCA Jacks).
- HDMI cable.
- USB Cable.
- This User Manual.
- Warranty card & CE declaration booklet.
** In this manual, some features are explained which are only valid for the CMT2DW (with 802.11n wireless).
These features are marked with **.
2. Notes & Cautions
Positioning / Ventilation:
- Leave a space of at least 10 cm around the product's air intakes in order to allow free circulation of air. Poor ventilation risks damaging the product.
- Do not put your product on a soft surface where it might sink in (bed, sofa, carpet or any other similar surface).
- In order to ensure the stability and correct functioning of your unit, please put it on a rigid and flat surface.
- Environments shut off to the flow of air such as cabinets and closed bookcases are not suitable unless they have appropriate ventilation installed.
- So that each of your devices is suitably ventilated, do not stack them or place them too close to one another, otherwise the devices will mutually transmit heat.
Moisture:
- Do not put your unit near any source of water such as a water container, bath, basin, tap, swimming pool, etc., in order to prevent electric shocks or damage to the product.
- In the event that water is accidentally splashed onto the unit, unplug it and contact an approved dealer.
- Do not expose the unit to any conditions of extreme humidity.
Sunshine / Heat:
- Do not put your product near any source of heat: direct sun, radiator, fireplace or any other similar source of heat. Do not put any source of heat on or near the unit (candle, ashtray, incense, etc.).
- The unit has been designed to function in environments where the temperature is not extreme. Excessively high or low temperatures are to be avoided.
Connecting to the electricity supply:
- Put the unit near an easily accessible A/C electrical socket. The rear of the product should be clear in order to have easy access for connections.
- The unit must only be powered by the external power supply provided. You must not under any circumstances try to operate the unit using another power supply.
- Using an external power supply other than the one supplied with the product might damage or cause the latter to malfunction.
• To turn off the power supply, unplug the unit from the wall socket. - Please connect the unit's cables and the power supply with care. Position the cables so they do not obstruct movement to avoid them being trodden on or tripped over.
- Please ensure that nothing is put on the cables.
- Please make a regular visual check of the cables to make sure that they are in good condition.
- During a storm, or when you are away or not using your unit for a long period of time, unplug the power supply, antenna and network cables. Taking this precaution, will prevent the unit from being damaged by lightning or surges.
General Recommendations:
- Do not insert any metallic object into the unit's openings.
- Only a qualified technician is authorised to open the unit’s housing.
- To maintain the product, clean any dust which has settled on the air vents using a dry, clean cloth, having first unplugged the product.
- If the unit is not working normally, particularly if it is giving off a smell or making strange sounds, unplug it immediately and contact a dealer or approved repair centre.
3. Product Overview
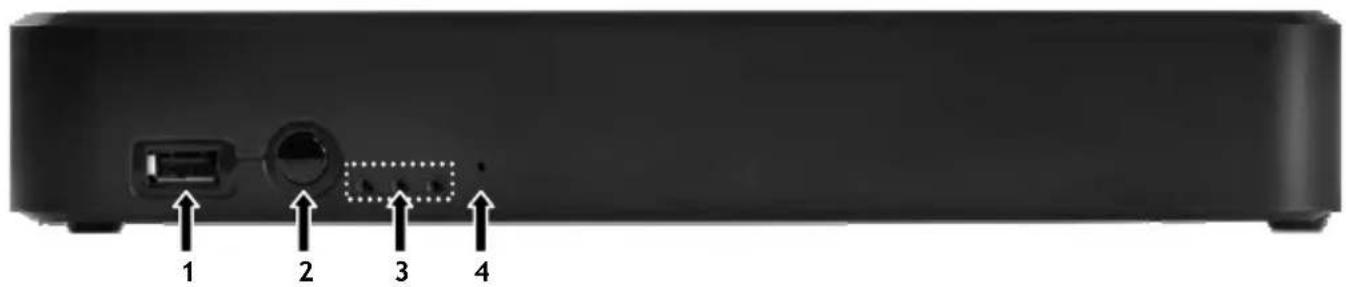
Front view
text_image
1 2 3 4Back view
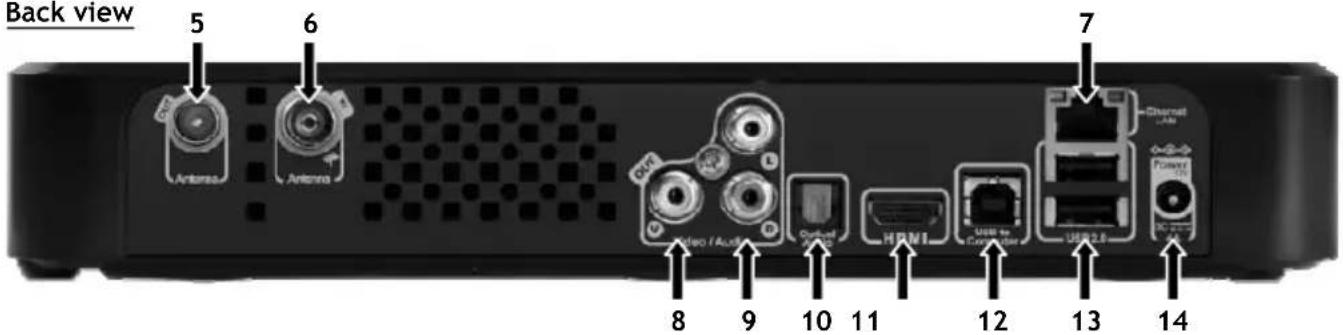
text_image
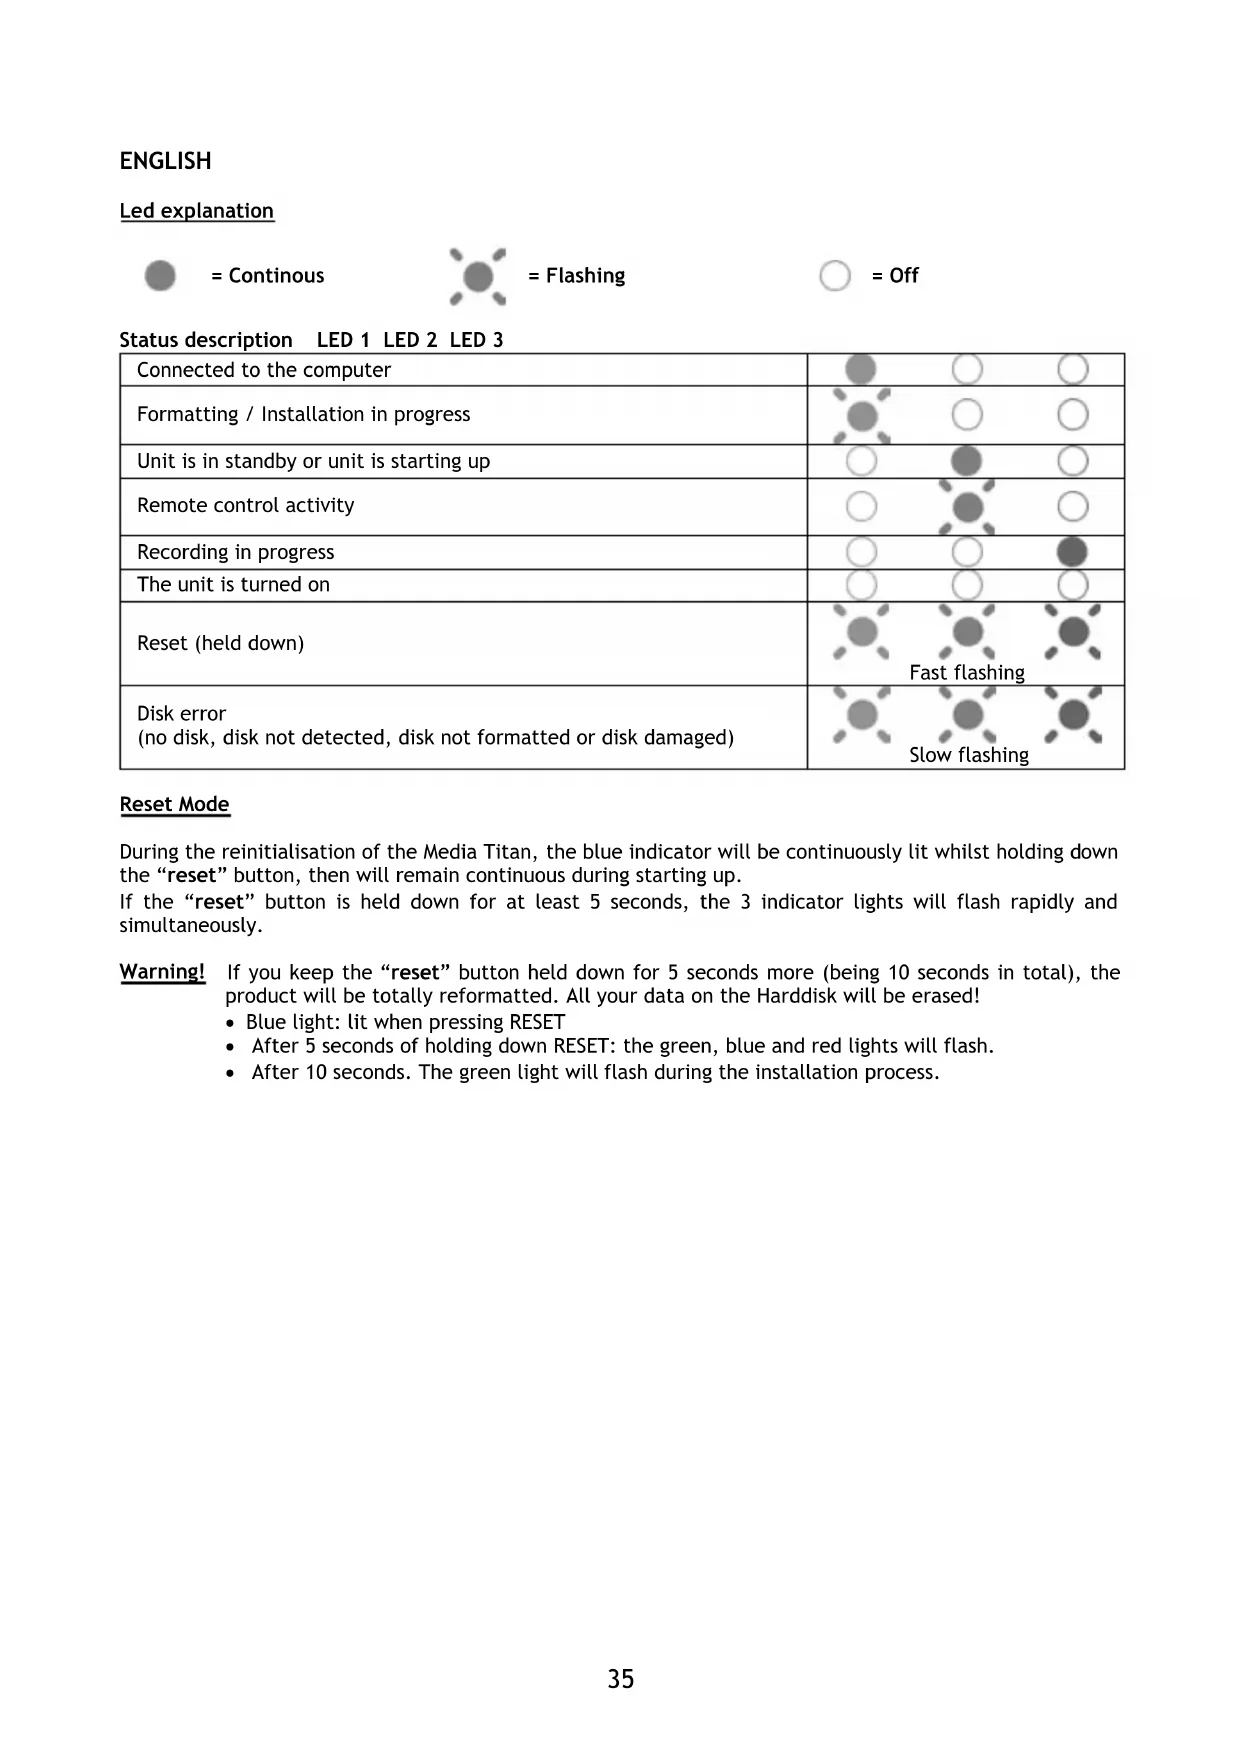
Back view 5 6 Antenna Antenna 7 Video / Audio Control USB1 USB2.8 8 9 10 11 12 13 14Status description LED 1 LED 2 LED 3
| Connected to the computer |  |  |  |
| Formatting / Installation in progress |  |  |  |
| Unit is in standby or unit is starting up |  |  |  |
| Remote control activity | [T50Z] | [W460] | [3W80] |
| Recording in progress |  |  |  |
| The unit is turned on |  | [SAA2] |  |
| Reset (held down) |  |  |  |
 | [AF4W] | [K0HX] | |
| Disk error(no disk, disk not detected, disk not formatted or disk damaged) |  |  |  |
| Slow flashing | |||
Reset Mode
During the reinitialisation of the Media Titan, the blue indicator will be continuously lit whilst holding down the “reset” button, then will remain continuous during starting up.
If the “reset” button is held down for at least 5 seconds, the 3 indicator lights will flash rapidly and simultaneously.
Warning! If you keep the "reset" button held down for 5 seconds more (being 10 seconds in total), the product will be totally reformatted. All your data on the Harddisk will be erased!
- Blue light: lit when pressing RESET
• After 5 seconds of holding down RESET: the green, blue and red lights will flash.
• After 10 seconds. The green light will flash during the installation process.
4. Remote Control Explanation
The remote control is used to control the unit. On the inside cover of this manual you will find a picture of the remote control. The numbers of the buttons correspond with the table below, to explain each function of the remote control.
| Nr | Button | Description | |
| 1. | WHEEL | Navigate through the menus | |
| 2. | HOME | Return to the main menu | |
| 3. | MARKER | Mark / unmark items | |
| 4. | RECORD | Start recording | |
| 5. | INFO | Show | info |
| 6. | VOLUME | - Decrease the volume | |
| 7. | STANDBY | Turn the unit on or to standby mode | |
| 8. | VOLUME + | Increase the volume | |
| 9. | MUTE | Mute / unmute the sound | |
| 10. | STOP | Stop playback / Stop recording | |
| 11. | HAND | Display the action menu | |
| 12. | NAVIGATOR | Switch between ‘Player’ mode and ‘Navigator’ mode |
The ‘Wheel’ is the most important key of the remote control and has multiple usage functions:
- You can rotate the wheel to navigate through the menus or adjust playback settings.
- You can press the wheel to confirm a selection, start playback or pause playback.
- You can press the corners of the wheel (◀, ▶, ▲, ▼) to go left, right, up or down.
5. Connecting the Media Titan
5.1 Basic Media Titan connection
flowchart
graph TD
    TV["TV"] -->|USB cable to PC| Audio["Audio"]
    Audio -->|USB cable to PC| Home["Home Device"]
    Home -->|USB cable to PC| External["External LAN"]
    External -->|USB cable to PC| External
    External -->|USB cable to PC| External
    External -->|USB cable to PC| External
    External -->|USB cable to PC| External
    External -->|USB cable to PC| External
    External -->|USB cable to PC| External
    External -->|USB cable to PC| External
    External -->|USB cable to PC| External
    External -->|USB cable to PC| External
    External -->|USB cable to PC| External

    subgraph Internal Components
        direction LR
        A["Radio Cable"] --> B["Antenna"]
        C["Satellite"] --> D["Satellite"]
        E["Analog"] --> F["Analog"]
        G["Digital Signal"] --> H["Digital Signal"]
        I["Video / Audio"] --> J["Video / Audio"]
        K["Optional Audio"] --> L["Optional Audio"]
        M["HDMI"] --> N["HDMI"]
        O["USB to Computer"] --> P["USB to Computer"]
        Q["USB 2.0"] --> R["USB 2.0"]
        S["Power/On/Ont"] --> T["Power/On/Ont"]
    end
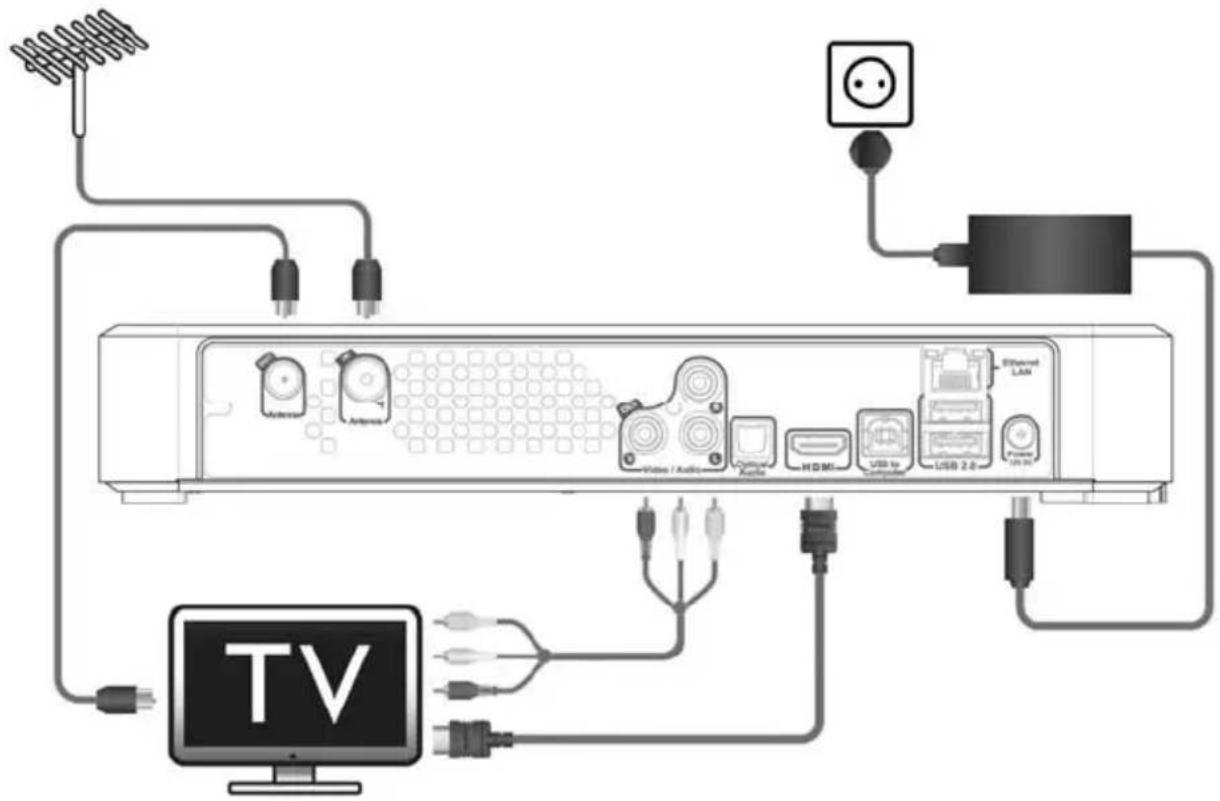
In order to use the Media Titan, you need to connect it to your TV and DVB-T antenna.
Antenna:
- Connect your DVB-T antenna to the 'Antenna in' [6] of the Media Titan.
- In case your TV is equipped with a DVB-T tuner, connect a RF antenna cable to the 'Antenna out' [5] of the Media Titan and to the Antenna in of your TV.
TV:
You can connect the Media Titan to your TV by HDMI or composite. In order to experience HD quality, you need to use the HDMI output of the Media Titan.
- Connect the HDMI cable to the 'HDMI output' [11] of the Media Titan and to the HDMI input of your TV.
When your TV is not equipped with HDMI, you can use the composite output of the Media Titan.
- Connect the composite cable to the 'Composite video output' [8] and the 'Stereo audio output' [9] of the Media Titan and to the composite input of your TV.
Power supply:
When the Media Titan is connected to your antenna and your TV, you can connect the power supply.
- Connect the power cable to the power supply and to a free wall outlet.
- Connect the power supply to the 'DC input' [14] of the Media Titan.
The Media Titan will automatically startup.
ENGLISH
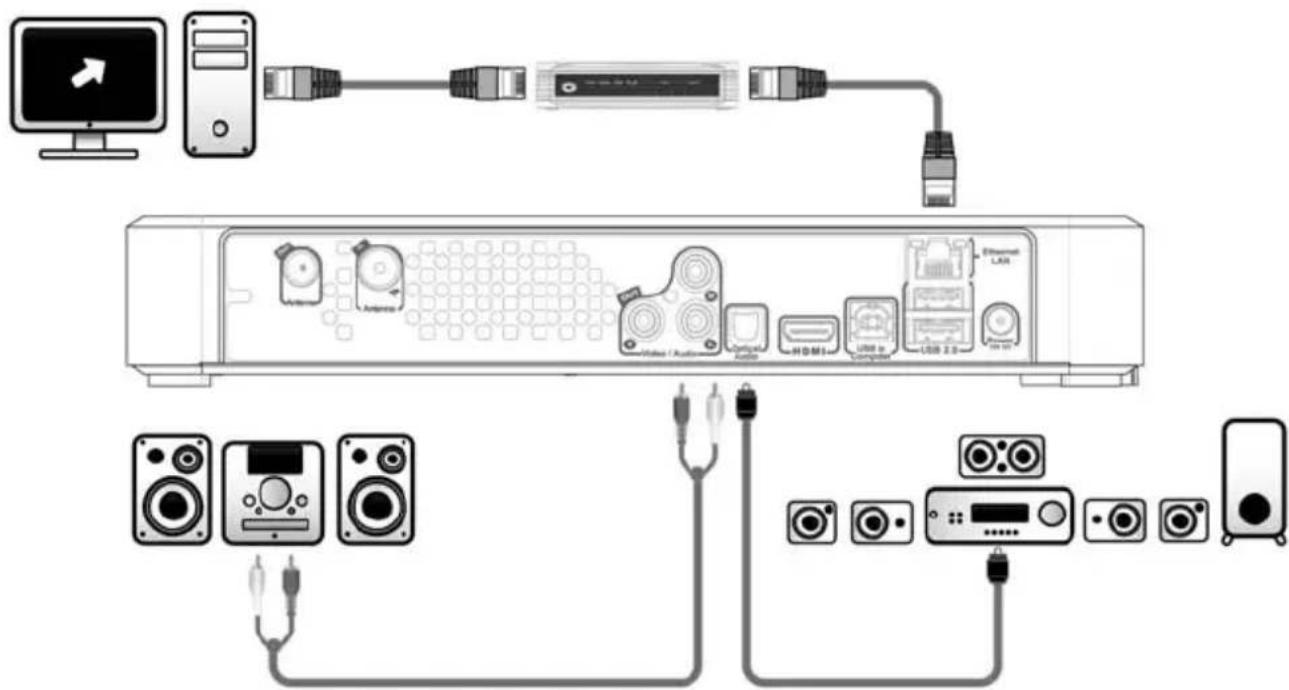
5.2 Advanced Media Titan connection
text_image
Diagram showing connections between a computer interface, audio equipment, and various audio devices with labeled components.Analog audio:
You can connect the Media Titan to your receiver to hear the sound of the Media Titan through your speaker system.
- Connect the red and white connectors of the composite cable to the 'Stereo audio output' [9] of the Media Titan and to the audio input of your receiver.
Digital audio:
To experience digital surround sound, you can connect the Media Titan digitally to your receiver.
- Connect an optical cable to the ‘Digital optical audio output’ [10] of the Media Titan and to the optical input of your receiver.
Network:
In order to use the network functions of the Media Titan, you need to connect it to your switch or router.
- Connect a RJ45 network cable to the 'Network connection' [7] of the Media Titan and to a free RJ45 LAN port on your router or switch.
** When you have the Media Titan with 802.11n wireless, you can also connect to your wireless network. See chapter 14 how you can connect to your wireless network.
6. First-Time Configuration
The Media Titan needs to be configured when you turn it on the first time.
- Select the correct input channel on your TV where the unit is connected to. (HDMI, or Composite).
Note: From this point, the manual is based on the fact that your TV is set to the input channel of the Media Titan. All steps described are related to the operation of the Media Titan.
Connect the power supply to the Media Titan if you have not connected it in chapter 5.1. The Media Titan will now startup.
Note : During the startup procedure of the Media Titan, the screen can stay black. During this procedure, the blue LED on the front of the Media Titan will burn. When the LED turns off, the loading screen will appear on the Media Titan.
text_image
Grab'n'GO® MediaTitan leading...[ Loading ]
text_image
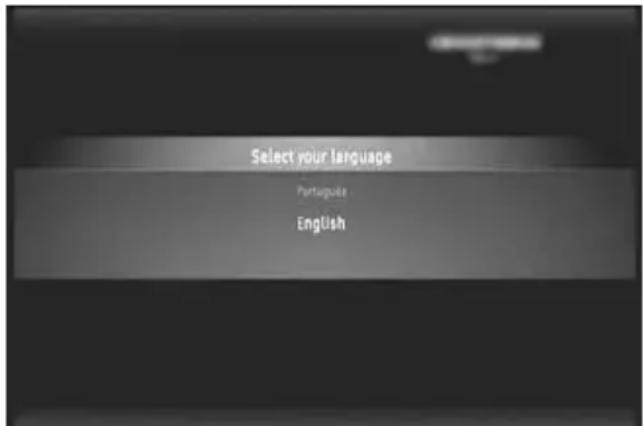
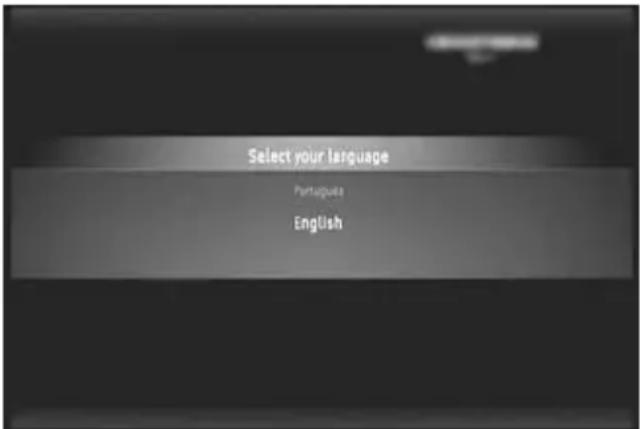
Select your language Portugues English[ Setup Wizard ]
Note : The total loading process can take up to 90 seconds.
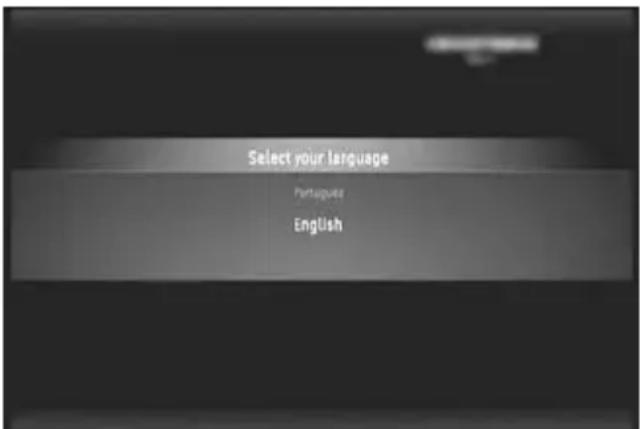
When the loading screen disappears, the initial setup wizard will be shown on your screen.
You can make selections in the setup wizard by scrolling the wheel or by pressing up or down on the navigation wheel. You can confirm your selection by pressing the wheel.
- Select your language.
- Select your country.
- Select your timezone.
- Enter the current date and time. You can switch between the fields on your screen by pressing left and right on the wheel.
- Select your TV aspect ratio.
- Enable or disable parental control.
- If you have enabled parental control, select your parental rating.
- Set a secret access code.
- Enter a secret question, in case you have forgotten the secret access code.
- Enter the answer to your secret question.
The initial setup is now complete and the Media Titan will show the Main Menu on your screen.
You can now proceed with chapter 7 for the basic Media Titan operation.
7. Basic Media Titan operation
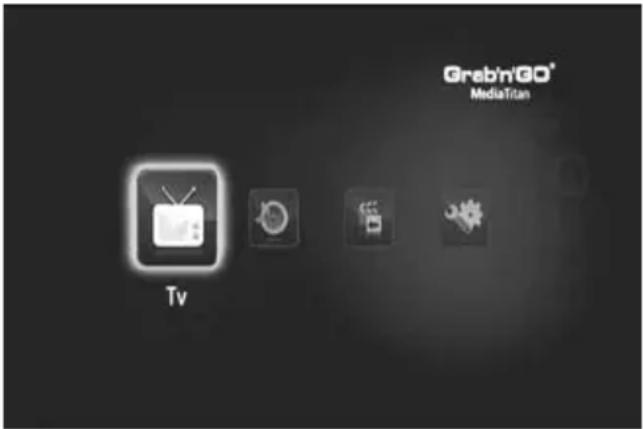
When the Media Titan is turned on and the initial setup wizard is completed, the Main Menu will appear on your screen.
text_image
GrabniGO® MediaTitan Tv[ Main Menu ]
The Main Menu is separated in 4 sections:
| TV Watch TV | organise recordings and view the electronic program guide.→ Go to chapter 8 for more details on this section. |
| Music | Listen to music and make playlists. This section brings together all the audio files.→ Go to chapter 9 for more details on this section. |
| Video/Photo | Watch your TV program recordings, create a photos slide show, watch your video camera recordings, etc. Access all image or video files in this section.→ Go to chapter 10 for more details on this section. |
| Setup View or | modify the settings of the Media Titan.→ Go to chapter 11 for more details on this section. |
Note : A section always includes a navigator mode and a player mode:
- The Navigator is used to select the media or the TV Channel.
- The player lets you watch/listen to the selected media.
You can access the navigator mode during playback by pressing the ‘Navigator’ button on the remote control.
Generic buttons
The following buttons have generic functions, no matter which section of the Media Titan is selected:
Button Description
 | Return to Main Menu | |
 | In Player mode, displays the NavigatorIn Navigator mode, displays the Player if running | |
 | Displays available options / actions | |
 | Mute | |
 | Decrease volume | |
| Increase volume | ||
 | Turn the unit on or to standby mode |
If you do not use the Media Titan for a period of time, a screen saver will start. To exit screen saver mode, press any button on the remote control.
8. Media Titan - TV section
In the TV section of the Media Titan, you can watch TV, organise recordings and view the EPG guide.
8.1 TV channel setup
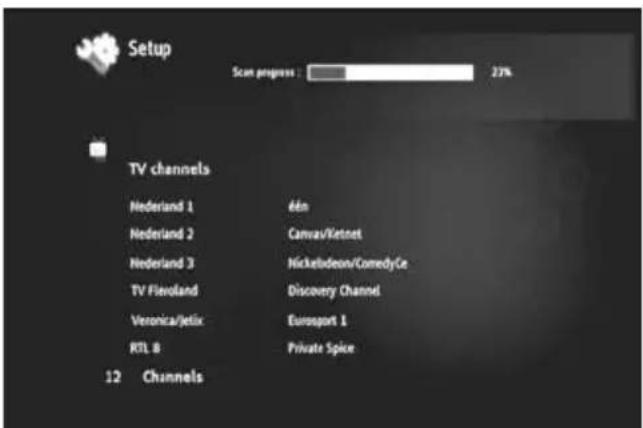
The first time you select the 'TV' section, the Media Titan will scan for available DVB-T channels in your area. In the top of the screen, you will see a progress bar indicating the scan progress. Below the progress bar, the found channels are listed.
text_image
Setup Scan progress : 23% TV channels Nederland 1 60n Nederland 2 Canvas/Vetnet Nederland 3 Nickelodeon/ComedyCe TV Flexoland Discovery Channel Veronica/Jelix Eurosport 1 RTL 8 Private Spice 12 Channels[ TV - Channel Scan in progress ]
Note: If no channels are found, check that your antenna is plugged in.
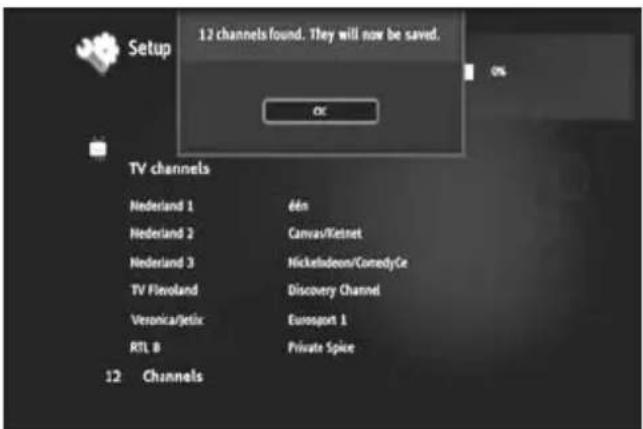
When the scan is complete, you will receive a notification popup. Click the navigation wheel to continue.
text_image
Setup 12 channels found. They will now be saved. OK TV channels Nederland 1 Nederland 2 Nederland 3 TV Flexoland Veronica/Jetix RTL B 6én Canvas/Kitnet Nickelodeon/ComedyCe Discovery Channel Eurosport 1 Private Spice 12 Channels[ TV - Channel Scan complete ]
Tip : If you want to scan again for channels, use the channel scan option in the Setup section, explained in chapter 11.
ENGLISH
8.2 The TV section explained
The TV section is organised in 2 parts: the TV player and the TV navigator.
You can switch between the 2 parts with the Navigator button (☐) on the remote control.
text_image
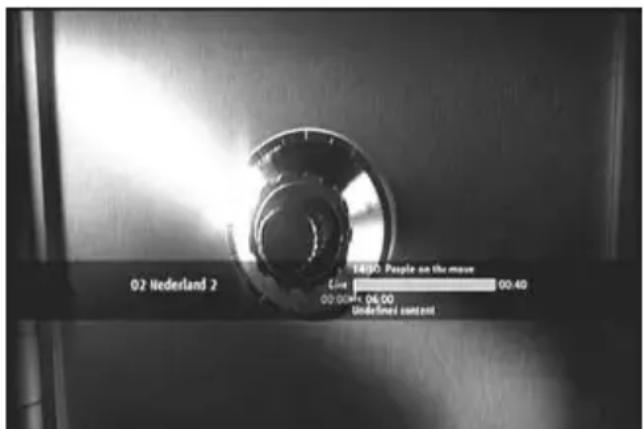
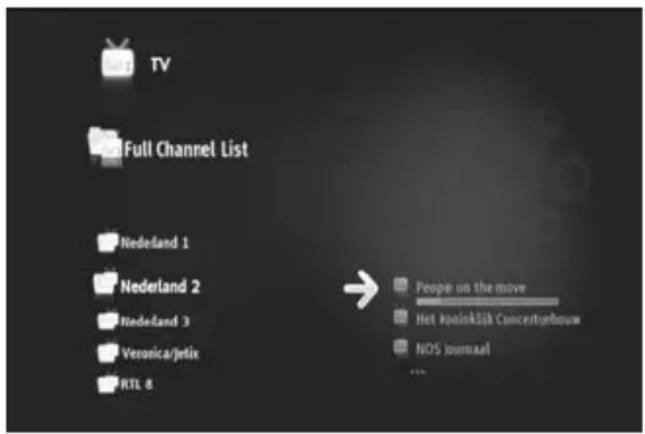
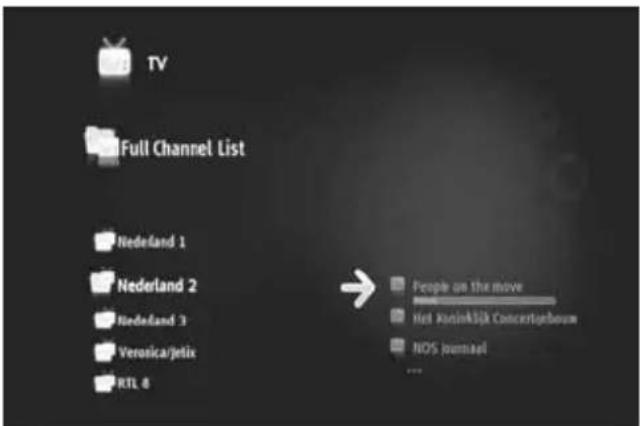
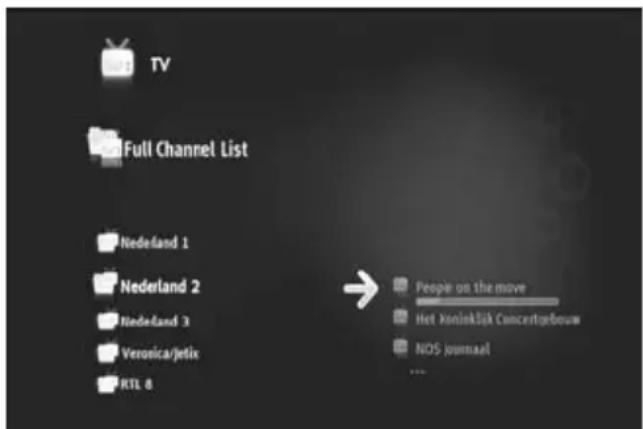
02 Nederland 2 14/30: People on the move Line 1 00.40 00.00 hrs. 06.00 Undefined constant[ TV - Player ]

Use the TV Player to :
- watch TV
- start a recording
- record programs
- freeze live pictures
- access the Electronic Program Guide (EPG) guide
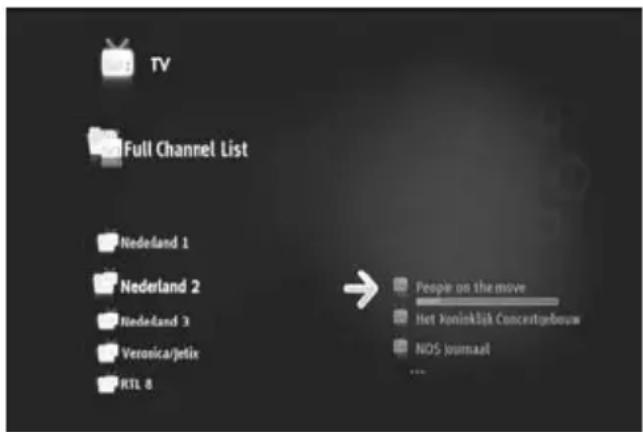
Use the TV Navigator to:
• display the list of available channels
- obtain information on programs present or future
• display programs on other channels without zapping
- Display the directory including:
- the list of all scanned channels
- the user list of favorite channels
- the folder « My programd recordings »
Press up or down on the wheel (▲, ▼) of the remote control to zap from channel to channel
Direct access to a specific channel
- Switch to the TV navigator
- Select the channel by navigating in the list of channels and press the wheel on the remote control.
The remote control has specific buttons for the TV section.
Button Player Mode Navigator Mode
 | Previous/ Following Channel Previous/Following Item | |||
| Return/Forward Exit/Enter Selected File | ||||
 | Play/ Pause | |||
 | Fast Rewind/ Fast Forward Previous/Following Item | |||
 | No Action | |||
 | Program a recording/change recording time | Program a recording from the Program Guide | ||
 | Stop Recording | No Action | ||
 | Display Information Box | Display details of selected Item | ||
ENGLISH
8.3 TV Info bar
When you switch channels, the TV info bar is shown on your screen for 5 seconds and gives you the following information:
- Program Name
- Program Type
- Start Time
- Duration
- Options available for the program: multi lingual, subtitles, etc.
- Age limit

text_image
20:30 Meet the Robinsons Live 1:45The options available for the TV info bar are displayed as icons in front of the info bar. The following options are possible:
| Icon | Description |
| You are watching live TV | |
| You are watching a TV program at a later time | |
| You are recording | |
| Fast forward/fast rewind during a program | |
| Program broadcasted in High Definition | |
| Program broadcasted in 16/9 format | |
| Encoded Channel. A subscription is necessary | |
| Several soundtrack languages are available. Press the 🎨 button to choose | |
| Several subtitle languages are available. Press the 🔊 button to choose | |
| The program has Deaf and Hard of Hearing subtitles. | |
| Audiovision: soundtrack for the Blind and Partially Sighted. | |
| Subtitles adapted for the Deaf and Hard of Hearing | |
| Each program has been examined by the TV Channel so that if you respect the notification you will protect your children. | |
| The soundtrack is in Home Cinema format. |
Tip: To see the info bar again, press the button on the remote control.
In the TV info bar, you will see the EPG (COLOUR) and timeshift (COLOUR) progress bar.
The EPG bar shows when a program is started and how long the program is already being broadcasted on the TV (elapsed time, pending time).
The timeshift bar starts at the point you changed to the current channel and shows the recorded timeshift buffer.
The timeshift buffer allows you to ‘pauze’ the channel and continue on a later time. When a channel is ‘pauzed’, the Media Titan will continue recording in the timeshift buffer on the background.
Note: If you change channels, the timeshift buffer is erased and starts over on the new channel.
ENGLISH
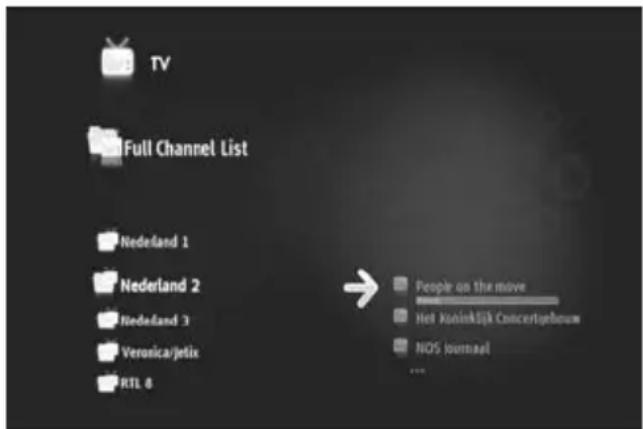
8.4 Creating a favorite channels list
You can create a favorite channels list in the memory of the Media Titan. This feature is added to:
- Organise the channels after a scan
- Decide in which order the channels should appear
- Group together channels by themes (sports, children, news, etc.)
- Avoid channels not covered by the subscription
To create a list of favorite channels, follow the next steps:
- Press the (navigator) button on the remote control.
- Use the _ (marker) button to mark your favorite channels in the list.
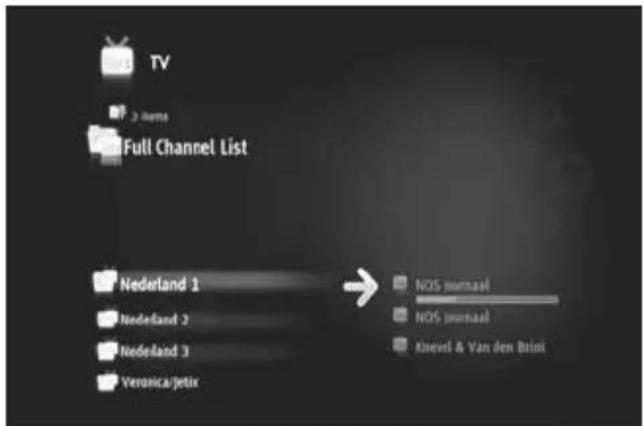
text_image
TV > Items Full Channel List Nederland 1 Nederland 2 Nederland 3 Veronca/jetix NOS jurnaal NOS jurnaal Knevel & Van den Brink[ TV - Navigator ]
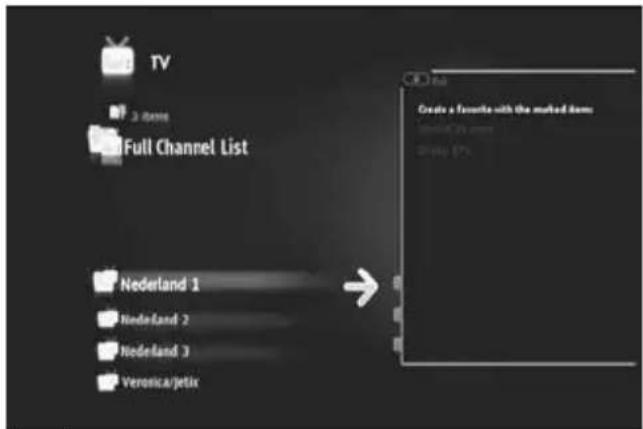
text_image
TV 3 items Full Channel List Nederland 1 Nederland 2 Nederland 3 Verona/jetix Create a favorite with the rooted item: seared to own dreddy (%)[ TV - options ]
- Press the 🎨 (hand) button to open the options menu and select “Create a favorite channels with marked items”.
- Give your favorite list a name.
ENGLISH
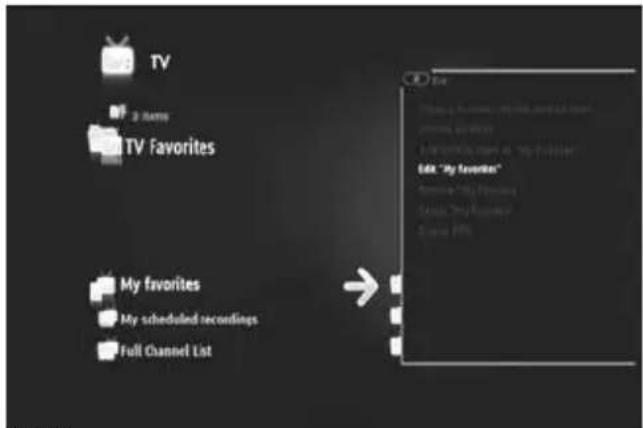
8.5 Modifying a favorite channel list
To modify a list with favorite channels, follow the next steps:
- Select the list you want to modify.
- Press the 🎨 (hand) button to open the options menu and select "Edit ...".
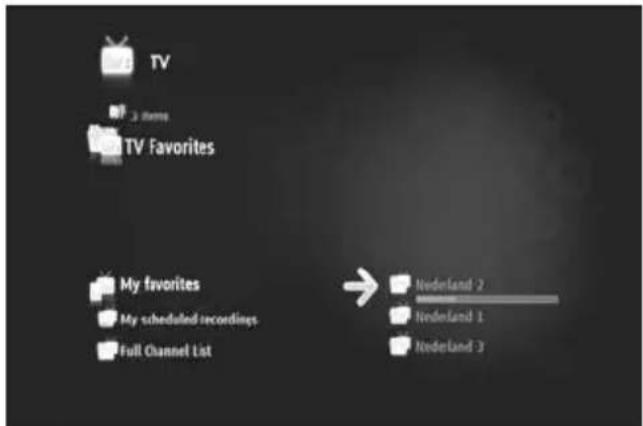
text_image
TV 3 Items TV Favorites My favorites My scheduled recordings Full Channel List Nederland 2 Nederland 1 Nederland 3[ TV - Navigator ]
text_image
TV 3 Names TV Favorites My favorites My scheduled recordings Full Channel List Edit "My favorites" Remove "My Preferred" Remove "My Preferred" Save 10%[ TV - options ]
- modify the order of channels in the list:
o Press ▶ to shift the selected channel to the right in order to move it.
o Press ▲ or ▼ to move the selected channel in the list.
- Press ◀ to put the channel in the desired location in the list.
To delete channels from a list with favorite channels, select the channel to be deleted from this list and press ■.
Note : When you delete a favorite channels list, the channels included in the list are not deleted. They are always available in the « full channel list » The « full channel list » and its channels cannot be deleted.
To add channels to a existing list of favourite channels, follow the next steps:
- Select the channels you wish to add with the _ (marker) button.
- Go to the favourite list where you want to add the channels.
- Press the 🎨 (hand) button to open the options menu and select "add marked items to...".
ENGLISH
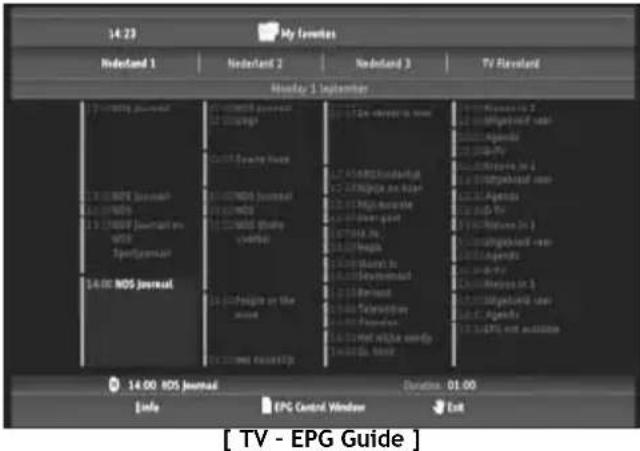
8.6 The electronic program guide (EPG)
The Media Titan receives the EPG guide through the built-in DVB-T tuner. You can use the EPG guide to:
- Get all the information concerning present and future programs.
- Organise recordings 7 days in advance by simply pressing a button.
The EPG information is displayed in various forms depending on where you are in the TV section:
- In TV Player mode: the TV info bar contains information on the program being shown.
- In Navigator mode: when you select a channel, the current and next program on that channel are displayed.
- In the EPG guide, the next 7 days' TV programs are displayed.
To display the EPG guide, press the 🎨 (hand) button to open the options menu and select "Display EPG". The EPG guide will be shown on your screen.
text_image
14:23 My Lowes Nedestand 1 Nedestand 2 Nedestand 3 TV Revivalent Monday 1 September 14:00 NOS Journal 14:00 NOS Journal 14:00 NOS Journal 14:00 NOS Journal Duration: 01.00 Info EPC Control Window Exit [ TV - EPG Guide ] TV - EPG GuideYou can navigate through the EPG guide with the ◀, ▶, ▲, ▼ buttons on the remote control.
Press the i (info) button to see detailed program information.
Press the (navigator) button to select search criteria.
Press the (record) button to set the selected program for recording.
Press the 🎨 (hand) button to exit the EPG guide.
ENGLISH
8.7 Recording your favorite TV programs
You can record TV programs on the Media Titan in 3 different ways:
- Instant recording
- Schedule a recording in the EPG Guide.
- Manually schedule a recording.
Note : You cannot make two recordings at the same time. This feature will be available in a later firmware version.
Note : A scheduled recording has priority to an instant recording. The instant recording will be automatically stopped when the scheduled recording starts.
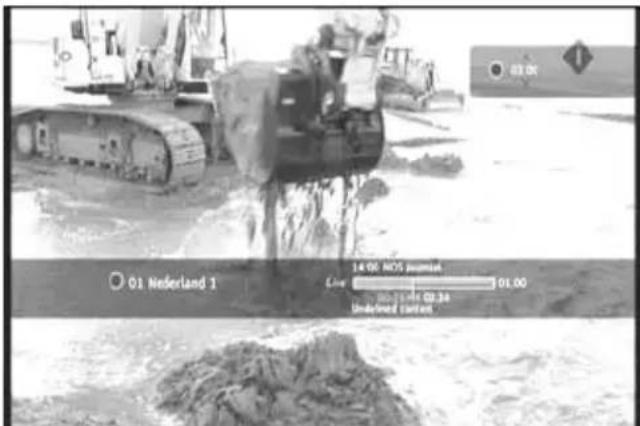
Instant recording
You are watching TV and you want to record the program you are watching.
- Press the (record) button on the remote control.
The Media Titan starts recording. In the upper right corner of the screen, the Media Titan shows the default recording length (3:00h).
text_image
01 Nederland 1 14:00 NOS timestamp Line 01.00 02.30 Undefined Currents[ TV - Instant Recording ]
- Press the ▲, ▼ buttons to increase or decrease the default recording time with steps of 30 minutes.
After a few seconds, the recording indicator on the screen will disappear.
If you want to modify the recording length while the recording is already in progress, you can press the (record) button again. The remaining recording time will be displayed in the upper right corner and can be adjusted with the ▲, ▼buttons.
ENGLISH
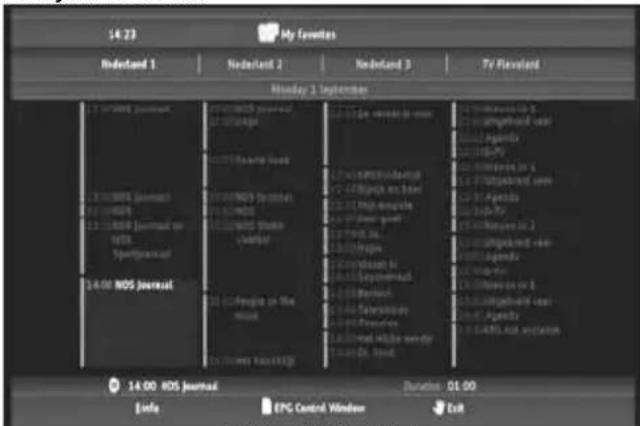
Schedule a recording in the EPG Guide
Scheduling a recording in the EPG guide allows you to schedule recordings for the next 7 days.
Note : The availability of the EPG guide depends on your country.
- Press the 🎨 (hand) button to open the options menu and select "Display EPG".
The EPG guide will be shown on your screen.
text_image
14:23 My Favorites Redund 1 Nederland 2 Nederland 3 TV FlavLand Monday 1 September 1.1 Sweden Journal 2.100000 Journal 2.100000 Journal on 14:00 RDS Journal 2.100000 Journal on the 14:00 RDS Journal Duration: 01:00 Info EPC Control Window Exit[ TV - EPG Guide ]
- Select the program you want to record in the EPG guide and press the (record) button to set the selected program for recording.
- Press the 🎨 (hand) button to exit the EPG guide.
Manually schedule a recording
The option to manually schedule a recording is very useful if you want to schedule programs which are shown every day, every week, etc.
- Press the 🎨 (hand) button to open the options menu and select “Program a recording”.
You will see the manual recording screen on your TV:
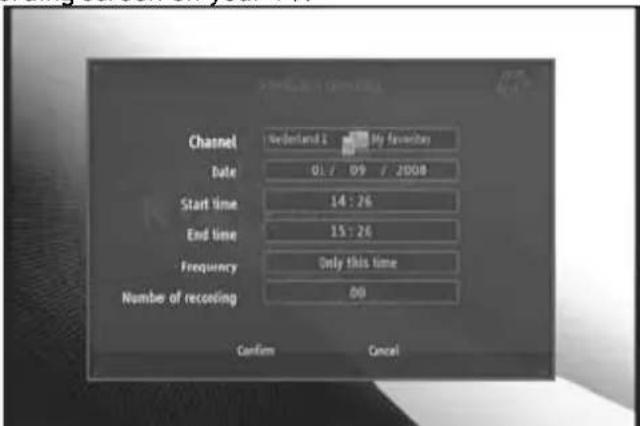
text_image
Channel Switzerland 1 My favorite Date 01:09 / 2008 Start time 14:26 End time 15:26 Frequency Only this time Number of recoding 00 Confirm Cancel[ TV - Manual Recording ]
- Select from which list you want to select a channel.
- Select from which channel you want to record.
- Set the Recording Date.
- Set the Start and End times.
- Set the recording frequency: daily, weekly or monthly.
- Set how many times you want to record this program.
ENGLISH
- Confirm the recording by selecting 'Confirm'.
- Enter a name for the scheduled recording and select 'OK' to confirm.
The scheduled recording will be stored in the ‘My scheduled recordings’ list.
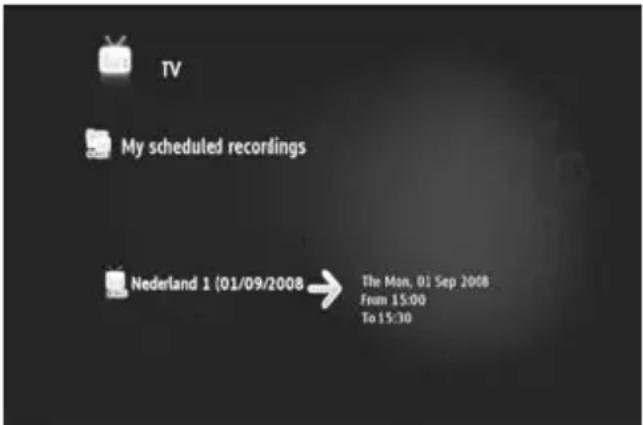
text_image
TV My scheduled recordings Nederland 1 (01/09/2008) → The Mon, 01 Sep 2008 From 15:00 To 15:30[ TV - My Scheduled Recordings ]
To view your scheduled recordings, press the 📄 (navigator) button to open the TV Nagivator. Press the ◀ button to exit the full channel list and select "My Scheduled Recordings".
Here you can find your scheduled records.
Tip : If you have set a scheduled recording to be repeated several times, you can deactivate it to prevent the next automatic recording. Select the scheduled record from the 'My Scheduled Recordings' list, press the and set the 'Activation' option to 'Inactive'.
All recordings (instant or programmed) are stored in the 'My Recordings' folder on the Harddisk, which can be accessed through the Video/Photo section of the Media Titan, described in chapter 10 of this manual.
9. Media Titan - Music section
In the Music section of the Media Titan, you can listen to your music and create your own playlists.
Note : In the Music section, you can only see music files on your Harddisk, USB drive or UPnP AV network share.
The Music section is organised in 2 parts: the Music player and the Music navigator.
You can switch between the 2 parts with the Navigator button (☐) on the remote control.
text_image
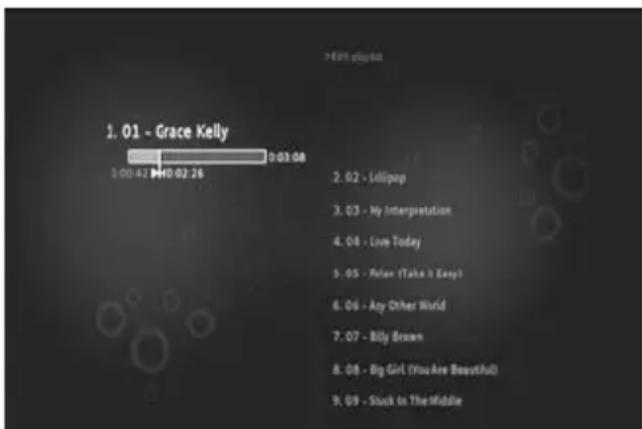
1. 01 - Grace Kelly 2:00:41 147:02:26 2. 02 - Lollipop 3. 03 - My Interpretation 4. 04 - Love Today 5. 05 - Peter (Take it Easy) 6. 06 - Any Other World 7. 07 - Billy Brown 8. 08 - Big Girl (You Are Beautiful) 9. 09 - Stuck in The Middle[ Music - Player ]
text_image
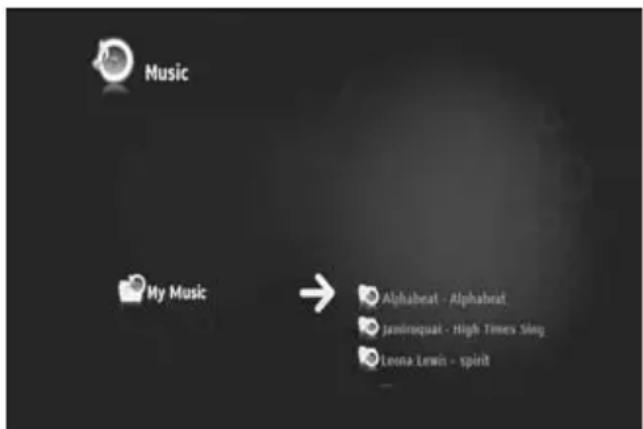
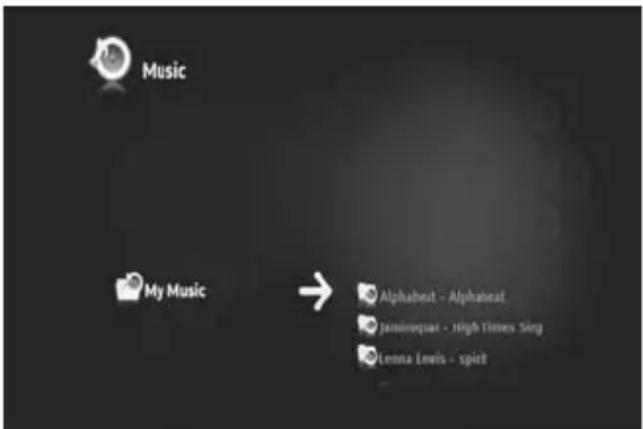
Music My Music → Alphabrat - Alphabrat Jaminquat - High Times Sing Leona Lewin - spirit[ Music - Navigator ]
You can use the Music Player to listen to music files
You can use the Music Navigator to:
• display the list of music available
- List / view playlists
- List / view different directories :
- external USB devices
○ UPnP
○ My Music
The remote control has specific buttons for the Music section.
Button Player Mode Navigator Mode
 | Previous/Next track Previous/Next item | ||
 | Display or hide the list of tracks being played | Exit/Enter selected item | |
 | Play/ Pause Read selected item | ||
 | Fast Rewind/ Fast Forward Previous/Next item | ||
 | No Action | Add/ Remove marked item to Marker List | |
 | No Action | ||
 | Stop Play and Return to Navigator | No Action | |
 | No action Display details of selected Item | ||
ENGLISH
9.1 Listen to music
When you select the Music section in the Main Menu, the Music Navigator is shown on your screen. In the left row, you can see the source or folder list. In the right row, you will see a preview of the files or folders in the currently highlighted source.
text_image
Music My Music → Alphabet - Alphabet, Jammuquat - High Times Sing Lenna Lewis - spict[ Music - Navigator ]
You can browse through the files or folders with the ◀, ▶, ▲, ▼ buttons on the remote control, or by scrolling the wheel.
To open a folder and browse its contents, press the ▶ button. To return to the previous folder, press the ◀ button.
To play a music file, select it in the file list and press the wheel to start the playback of the current file.
9.2 Create a playlist
Creating a Playlist allows you to make your own compilation for each situation. To create a playlist, follow the steps below:
- Mark the tracks you want to add to your playlist with the _ (marker) button.
The Navigator will show the amount of marked files in the upper left corner of the screen.
- Press the 🎨 (hand) button to open the options menu and select “Create a playlist with the marked items”.
- Give your playlist a name and select 'OK' to save the playlist.
Your Playlist is now created and saved in the root of the folder where you started creating the playlist.
Note : The files in the playlist are added in the order in which they were selected.
Tip : You can even add files to your playlist which are stored on your external USB device.
ENGLISH
9.3 Modify your playlist
Adding a file to the playlist
To add a song to an existing playlist, follow the steps below:

(marker) button.
- Mark the tracks you want to add to your playlist with the _ (marker) button.
- Select the playlist where you want to add the songs to.
- Press the 🎨 (hand) button to open the options menu and select "Add marked items to the playlist".
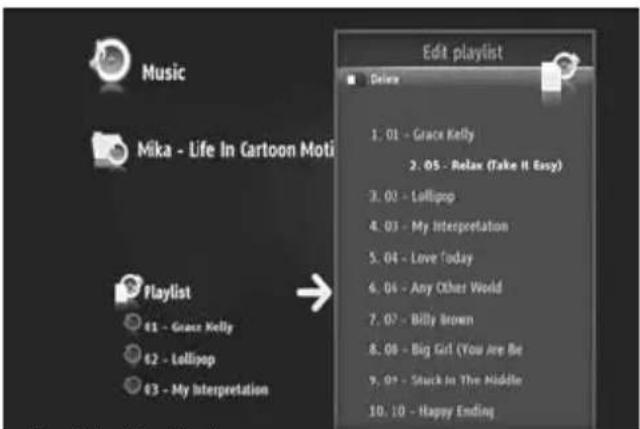
Changing the playback order of the playlist
You can change the playback order of the playlist.
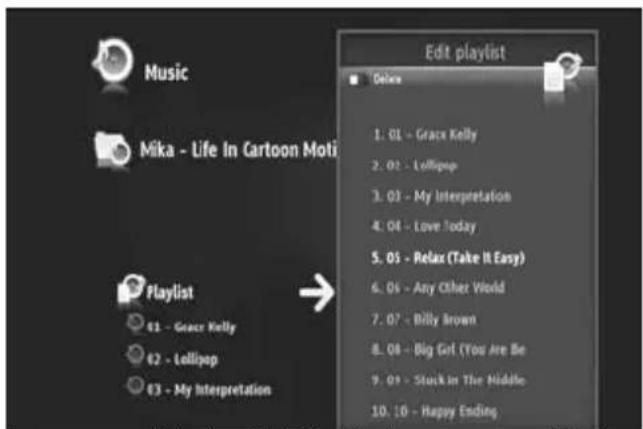
text_image
Music Mika - Life In Cartoon Moti Edit playlist Deluxe 1. 01 - Grace Kelly 2. 02 - Lollipop 3. 03 - My Interpretation 4. 04 - Love Today 5. 05 - Relax (Take It Easy) 6. 06 - Any Other World 7. 07 - Billy Brown 8. 08 - Big Girl (You Are Be 9. 09 - Stuck in The Middle 10. 10 - Happy Ending Playlist 61 - Grace Kelly 62 - Lollipop 63 - My Interpretation[ Music - Edit Playlist ]
text_image
Music Mika - Life In Cartoon Moti Edit playlist Delete 1. 01 - Grace Kelly 2. 05 - Relax (Take It Easy) 3. 02 - Lollipop 4. 03 - My Interpretation 5. 04 - Love Today 6. 04 - Any Other World 7. 07 - Billy Brown 8. 08 - Big Gift (You Are Be 9. 09 - Stuck in The Middle 10. 10 - Happy Ending Playlist 61 - Grace Kelly 62 - Lollipop 63 - My Interpretation[ Music - Move Track In Playlist ]
- Select the playlist where you want to change the order of.
- Press the ▶ button to edit the playlist order.
○ Select the track you want to assign a different location in the playlist.
o Press ▶ to shift the selected track to the right in order to move it.
○ Press ▲ or ▼ to move the selected track in the list.
- Press ◀ to put the track in the desired location in the list.
- Press ◀ to exit the playlist.
The modifications are automatically saved.
10. Media Titan - Video/Photo section
In the Video/Photo section of the Media Titan, you can watch (High Definition) movies, watch your recordings of TV programs, show your family and friends your holiday photos, etc.
Note : In the Video/Photo section, you can only see video and photo files on your Harddisk, USB drive or UPnP AV network share.
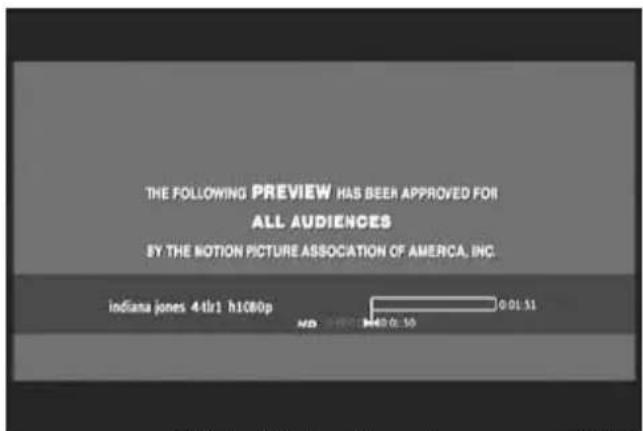
The Video/Photo section is organised in 2 parts: the Video/Photo player and the Video/Photo navigator. You can switch between the 2 parts with the Navigator button (☐) on the remote control.
text_image
THE FOLLOWING PREVIEW HAS BEEN APPROVED FOR ALL AUDIENCES BY THE MOTION PICTURE ASSOCIATION OF AMERICA, INC. indiana jones 44lr1 h1080p 0 01 51 MD: 0.50[ Video/Photo - Player ]
text_image
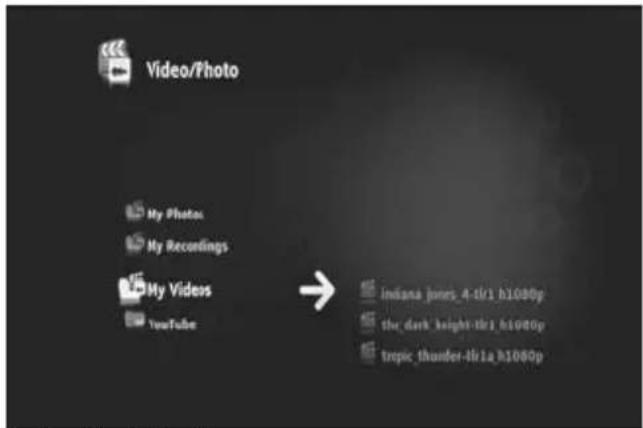
Video/Photo My Photos My Recordings My Videos YouTube → indana_jones_4-4/1 h1080p the_dark height-tlr_h1080p tropic_thunder-tlr_1a_h1080p[Video/Photo - Navigator]
You can use the Video/photo Player to look at your photos and watch your videos.
You can use the Video/photo Navigator to:
- access the library of all your photos and videos, stored on the Media Titan or on external peripherals
-
consult different directories :
-
external USB devices
○ UPnP
○ My photos
○ My recordings
○ My videos
The remote control has specific buttons for the Music section.
Button Player Mode Navigator Mode
 | Previous/Next file Previous/Next item | ||
| Video: Skip Back/Forward Exit/Enter selected item | |||
 | Play/ Pause Read selected item | ||
 | Fast Rewind/ Fast Forward Previous/Next item | ||
 | No Action | Add/ Remove marked item to Marker List | |
 | No Action | ||
 | Stop Play and Return to Navigator | No Action | |
| Display Information Box Display details of selected Item | |||
ENGLISH
10.1 Watching videos or photos
When you select the Video/Photo section in the Main Menu, the Video/Photo Navigator is shown on your screen. In the left row, you can see the source or folder list. In the right row, you will see a preview of the files or folders in the currently highlighted source.
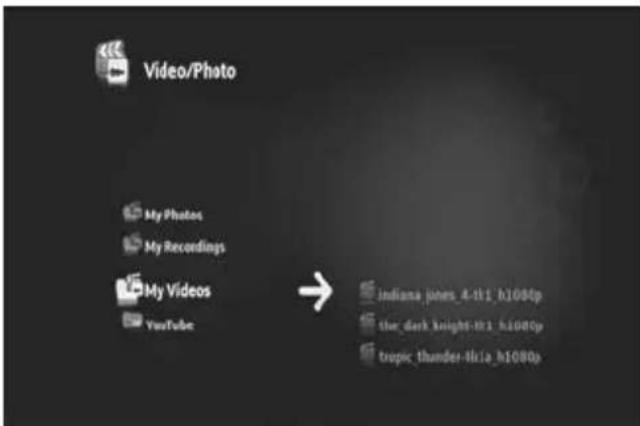
text_image
Video/Photo My Photos My Recordings My Videos YouTube → indiana.jones_4-t11_h1080p ther_dark_knight-h11_h1080p tropic_thunder-4-lia_h1080p[Video/Photo - Navigator ]
You can browse through the files or folders with the ◀, ▶, ▲, ▼ buttons on the remote control, or by scrolling the wheel.
To open a folder and browse its contents, press the ▶ button. To return to the previous folder, press the ◀ button.
To play a video or photo file, select it in the file list and press the wheel to start the playback of the current file.
10.2 Watching your TV recordings
In the Video/Photo Navigator, your TV recordings are stored in the 'My Recordings'. From that folder, you can play your recordings.
10.3 Restart video playback
When you press the ■ (stop) button on the remote control, the video playback is stopped. The Media Titan will remember where you stopped the video and stores this in the database.
When you want to watch the movie again and start the playback, the Media Titan will ask you “Resume Playback” or “Play”.
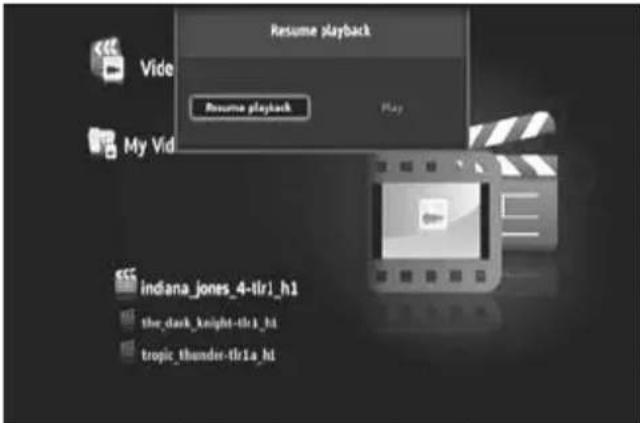
text_image
Resume playback Vide Resume playback My Vid indiana_jones_4-tlr1_h1 the_dark_knight-tlr1_h1 tropic_thunder-tlr1a_h1[ Video/Photo - Navigator ]
11. Media Titan - Setup section
The Setup section of the Media Titan allows you to change the configuration options of the unit.
The Setup section is splitted into different sections:
Top section: Showing the date and time, free Harddisk space, type of network connection and TV output resolution of the Media Titan.
Group section: Showing the different setup groups of the Media Titan.
Settings section: Showing the different configuration options and the chosen settings.
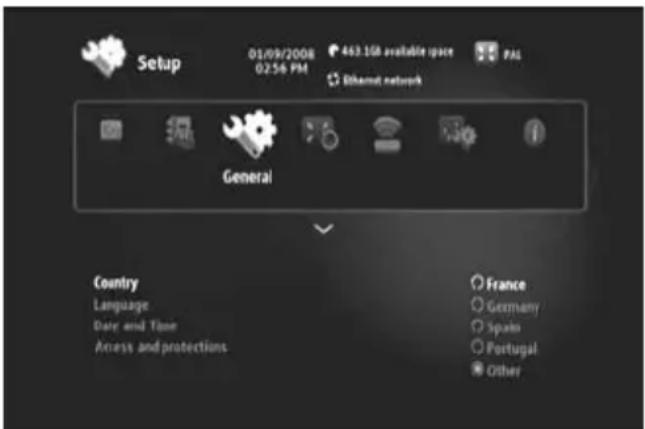
text_image
Setup 01/09/2008 02:56 PM 443.1GB available space PAL Ethernet network General Country Language Date and Time Access and protections France Germany Spain Portugal Other[ Setup Section ]
To adjust a setting in the Setup section, you first need to select the group in the group section.
- Use the ◀ and ▶buttons on the remote control to select a group.
The settings bar will change automatically, according to the active group.
- Press the ▼ button to switch to the settings section.
- Press the ▲, ▼ buttons to select a setting in the settings section.
- Press the ▶ button to list the available options for the selected setting.
- Press the ▲, ▼ buttons to choose an option for the selected setting and press the wheel to confirm the setting.
Each group has its own settings. Below you will find the group list with the available settings for each group.
ENGLISH
TV : Change the TV settings
| Time record margins | Set the amount of extra recording time just before and just after the program so that you do not miss the beginning or the end. |
| Channel search | Choose between scanning only free channels, or free and pay channels and start a new channel scan. |
| External antenna | When an internal antenna is used, the Media Titan will boost the reception of the antenna to find more channels. |
Video/photo : Change Video/photo settings
| Video parameters | Set the default audio track for video files. |
| Slideshow parameters | Set the default transition for photo slideshows. |
General : Change the general Media Titan settings
| Country Set your country. | |
| Language | Set your language. |
| Date and Time | Set the correct date and time, or set it to automatic to receive the correct date and time through the DVB-T signal. |
| Access and protections | Enable or disable parental protection. |
Connection : Change the TV output settings
| HDMI/YUV output resolution | Set the HDMI output resolution. |
| Composite output | Set the Composite output setting. |
| HDMI sound | Enable or disable sound through HDMI. |
| Automatic Framerate | Enable or disable Automatic Framerate for video playback. |
| SPDIF sound | Set SPDIF sound to 5.1 or stereo output. |
| Aspect ratio | Set the aspect ratio of your TV. |
Network : Change the network (Ethernet or Wifi) settings.
| Configure connection | Configure your Ethernet or Wifi connection. |
| Connection | Show the network connection details. |
Advanced : Advanced Media Titan settings
| • Box reset | Reset the Media Titan to the factory default settings.Note: When you reset the Media Titan to the factory default settings, only the settings are erased. The data on the Harddisk will not be deleted. |
Version : Media Titan version info
Show the software version, serial number or Copyright information of the Media Titan.
12. Advanced Media Titan operation
12.1 The Marker button ( )
The Marker button can be used to select files or folders for specific tasks.
For example:
- Mark photos on your USB stick to copy them to the internal Harddisk.
- Mark video files you have already seen so they can be deleted.
- Mark music files to add them to a playlist.
To mark an item, select it in the file / folder list and press the 📂 (marker) button.
Note: When a folder is marked, all its contents are marked as well.
Once an item is marked, the marker list indicator is displayed in the upper left corner of the screen, showing:
- The number of marked items (folders or files).
- The total size of the marked items.
text_image
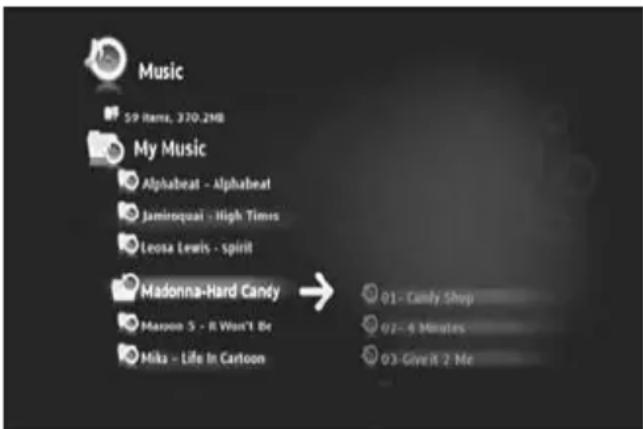
Music 59 Items, 370.2MB My Music Alphabeat - Alphabeat Jaminqueai - High Times Leosa Lewis - spirit Madonna-Hard Candy → Mason 5 - R Won't Be Miks - Life In Cartoon 01 - Candy Shop 02 - 4 Minutes 03 - Give it 2 Me[ Marked items in the Navigator ]
When files are marked, you can use them for specific tasks, which can differ for each section of the Media Titan. You can see the available tasks by pressing the 🎨 (hand) button: the options menu with the available tasks is shown on your screen.
Note: For more information on the 🎨 (hand) / options menu, see chapter 12.2.
Note : The marker list is not emptied when a task is completed.
You can unmark items by selecting the item and press the (marker) button: the file or folder will be removed from the marker list.
You can clear the complete marker list by pressing the 🎨 (hand) button to open the options menu and select “unmark all items”.
ENGLISH
12.2 The Hand button ( )
Use the 🎨 (hand) button to:
- Move, copy, rename or delete folders or files
- Rotate a photo
- Create a playlist, etc.
Whether you are in navigator or player mode, the 🎨 (hand) button displays the options menu with tasks for the section currently in use.
These tasks will differ for each section of the Media Titan.
12.3 Parental Protection
You can configure Parental Protection on the Media Titan.
There are 2 modes: the 'Parents' mode and the 'Children' mode.
In ‘Parents’ Mode, all features of the Media Titan can be used and all files and channels are visible. In ‘Children’ mode, only the files and TV programs which are available in this mode are visible.
Parental Control can be activated when booting up for the first time or through the Setup section → General → Access and protections → Parental Control.
When activating Parental Control you should:
- Indicate an age for restricting access to certain TV programs and files.
The default age limit is 12 years and this can be modified in the Setup section. - Enter a secret code to move from ‘Children’ mode to ‘Parents’ mode.
When Parental Control is activated and the Media Titan is in ‘Children’ mode, the Media Titan will ask for the secret code when an unauthorized channel is selected:
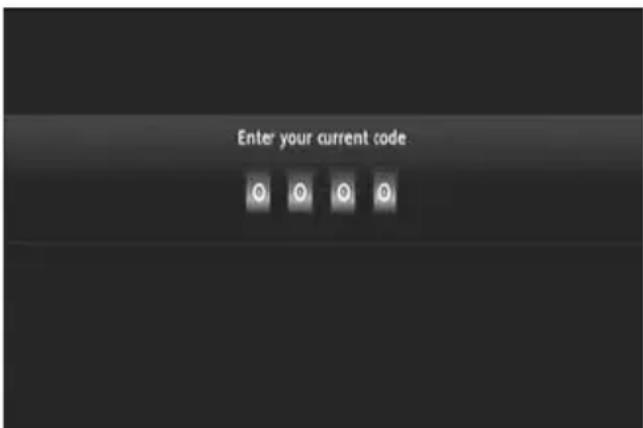
text_image
Enter your current code[ Parental Control - Secret Code ]
When the secret code is entered, the channel will be displayed on your screen.
13. USB connectivity
13.1 USB PC connectivity
You can transfer files from your PC to your Media Titan by connecting it to your computer.
Connect the power supply to the Media Titan. The device will boot.
Connect the USB Cable to the 'USB connector' [12] on the back of the Media Titan and to a free USB port on your computer.
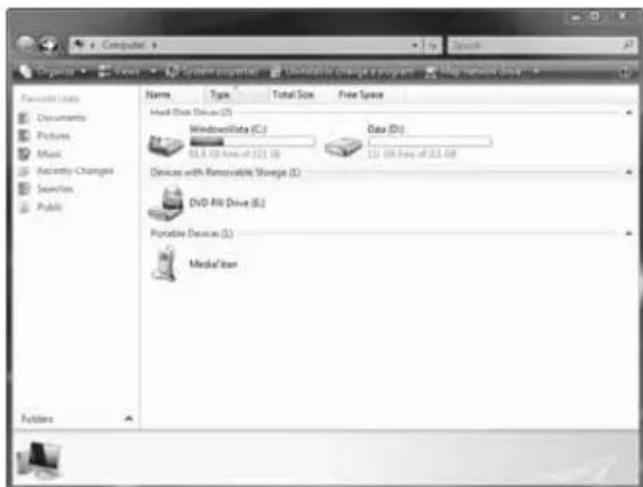
Your computer will recognize new hardware and will show the Media Titan as an external device in 'My Computer'.
text_image
Computer Organize... Features Documents Pictures Mask Activity Changes Search Public Name Type Total Size Free Space Hard Disk Drive (D) Windows/Video (C:) 81.8 (00 fps of 327.50) Data (D:) 121.69 fps of 324.08 Devices with Removable Storage (L) DVD-RW Drive (S:) Portable Devices (L:) Medal'Icon Folders[ My Computer ]

text_image
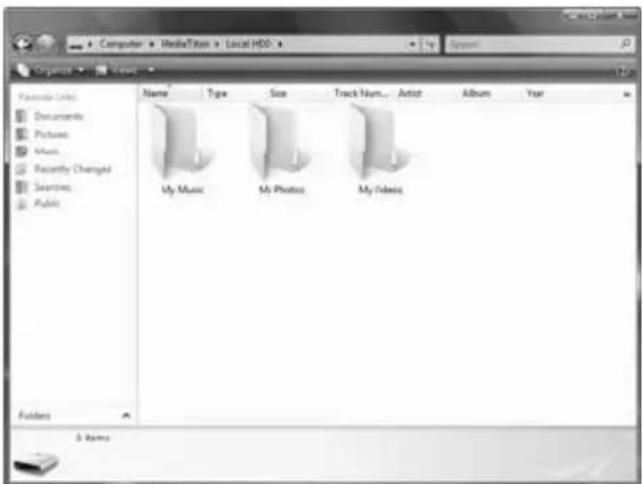
Computer > MediaTek > LocalHDD Organize > Views Favorites: 100% Documents Pictures Music Recently Changed Search Public Name Type Size Track Num... Artist Album-Year My Music My Photos My Idress Folders 3 Names[ Media Titan - Folder Structure ]
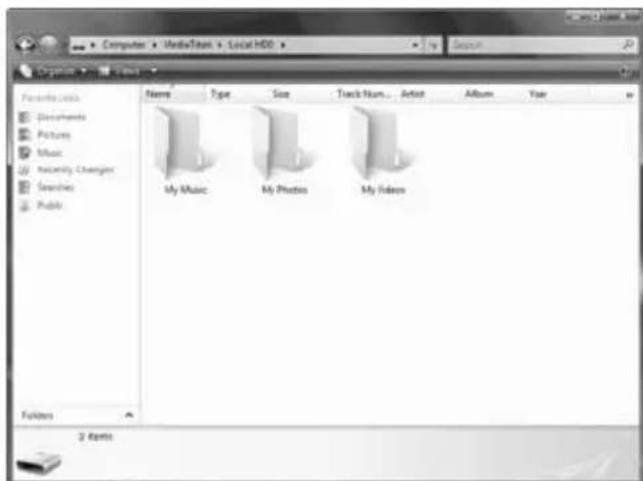
When you open the ‘Media Titan’ in the ‘My Computer’ window, you will see 3 predefined folders:
• My Music Folder for music files
• My Photos Folder for pictures and photos
• My Videos Folder for video files
These folders are related to the sections in the Media Titan menu:
- The Music section can only browse the files in the 'My Music' folder.
- The Video/Photo section can only browse the files in the 'My Photos' and 'My Videos' folder.
You can copy your media files to the corresponding folders on the Media Titan in order to view or listen them through your TV.
ENGLISH
13.2 USB Host connectivity
The Media Titan is equipped with 3 USB host ports: 1 on the front panel and 2 on the back panel. You can connect USB storage devices to these USB host ports to browse, play, or copy the files.
When you connect an USB storage device to any of the USB host ports of the Media Titan, the Media Titan will quickly index the USB storage device and show a popup message that a new device is plugged.
Note : If the USB storage device contains many files, it can take a little while before the Media Titan has indexed the files.
Note : If you connect a USB Harddisk without powersupply to the Media Titan, it is possible that the Harddisk is not detected. In that case, connect an external power supply to the USB Harddisk to provide extra power.
When the Media Titan has showed the recognition popup, your USB storage device will be listed in the Music section and Video/Photo section. Through these sections, you can browse, play or copy the files to the Media Titan.
text_image
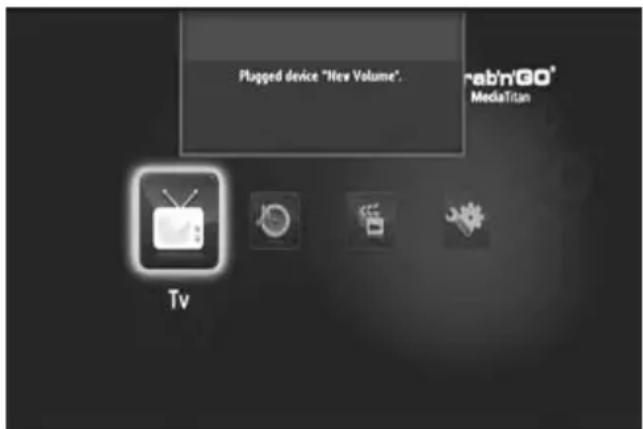
Plugged device "New Volume". rabnGO® MediaTitan Tv[ USB Connection Popup ]
text_image
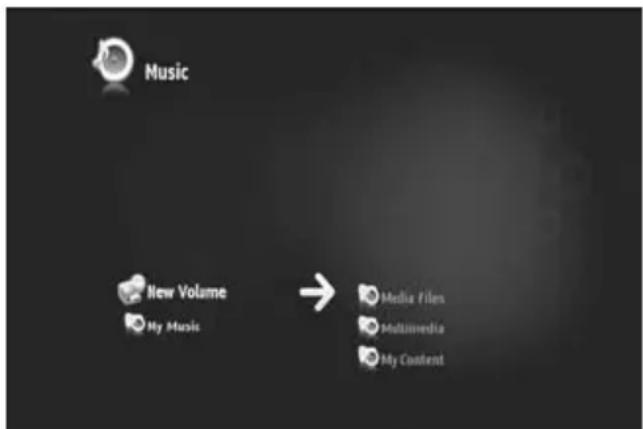
Music New Volume My Music → Media Files Multimedia My Content[USB Device in Navigator]
Copy files to your Media Titan
To copy files from your USB storage device to your Media Titan, follow the steps below:
- Mark the files on your USB storage device with the 📂 (marker) button.
- Go to the location on your Media Titan where you want to store the files.
- Press the 🎨 (hand) button to open the options menu and select “duplicate marked items”.
The files are now being copied to the Harddisk of the Media Titan.
Tip : With the steps above, you can also copy data from your Media Titan to an USB storage device.
14. Network connectivity
The network features of the Media Titan allow you to play media files from UPnP AV servers in your network.
Note : It is not possible to be connected to Ethernet and Wifi at the same time.
Ethernet Connection
If you plugged in the Ethernet cable before turning on the Media Titan, the Ethernet connection will be activated automatically.
If you plug in the cable after turning on the Media Titan, you will have to configure the Ethernet connection.
- Select the Setup section in the Main Menu
- Select the group 'Network'.
- Select the setting 'Configure connection'.
The Network Wizard will be shown on your screen.
- Choose your connection type : Ethernet.
- Choose ‘Automatic’ or ‘Manual’ IP address configuration. If you are not a network expert, select ‘Automatic’ to have the Media Titan to obtain an IP address from your network DHCP Server (router) automatically.
If you select 'Manual', you can enter the IP address, Subnet Mask, Gateway and DNS server manually.
The Media Titan will show a “Connecting to Ethernet” popup. When the popup disappears, the connection is made successfully.
Wireless connection \*\*
- Select the Setup section in the Main Menu
- Select the group 'Network'.
- Select the setting 'Configure connection'.
The Network Wizard will be shown on your screen.
- Choose your connection type : Wireless.
The Media Titan will search for available wireless networks and shows a list of found networks.
- Select the wireless network you want to connect to.
If the network is protected with an encryption key (indicated with a key in the network list), the Media Titan will ask you for the encryption key.
- Enter the encryption key and select 'OK' to continue.
- Choose ‘Automatic’ or ‘Manual’ IP address configuration. If you are not a network expert, select ‘Automatic’ to have the Media Titan to obtain an IP address from your network DHCP Server (router) automatically.
If you select 'Manual', you can enter the IP address, Subnet Mask, Gateway and DNS server manually.
The Media Titan will show a “Connecting to ...” popup. When the popup disappears, the connection is made successfully.
15. UPnP Media Servers for Windows
In order to browse the media files on your computer through the Media Titan, you need to setup an UPnP Media Server on your computer, or use a NAS storage box with built-in UPnP Media Server, like the Conceptronic CH3SNAS.
Microsoft Windows XP and Windows Vista
Microsoft Windows XP and Windows Vista offer a Media Server through the Windows Media Player.
Start the Media Player, select Tools, and library than configure Sharing. You can allow and customize the settings for the Conceptronic Media Titan.
Through the option Monitor Folders you can add or remove content you want to share.

text_image
Options Plugins Privacy Security File Types DVD Network Player Rip Music Devices Burn Performance Library Specify settings for organizing and sharing your digital media collection. Sharing Share my media with other computers and devices on my network. Configure Sharing... Update library by monitoring folders Customize the folders the Player monitors for digital media files. Monitor Folders... Delete files from computer when deleted from library Automatic media information updates for files Retrieve additional information from the Internet Only add missing information Overwrite allmedia information Rename music files using rip music settings Rename range music in rip music folder, using rip music settings Maintain my star ratings as global ratings in files OK Cancel Apply HelpNote: For Windows XP, you need at least Media Player 11 for this option.
Other alternative Software
Other alternative Software is:
TVersity : ____ www.tversity.com
TwonkyVision Media Server : www.twonkymedia.com
ORB : ____ www.orb.com
MediaTomb : www.mediatomb.cc
Note: If a Media Server device or software package cannot be detected by the Conceptronic Media Titan, please check the capabilities and setup of that particular device/software package. When the device is compatible and setup correctly our Media Titan will show the device as selectable device on your TV system.
Media Titan de Conceptronic
Manual del usuario
text_image
Diagram showing connections between a TV and audio equipment interface with labeled components like HDMI, USB 21, and power outlet.text_image
Diagram showing connections between a computer interface, audio equipment, and various audio devices including speakers, headphones, and USB ports.Audio analógico:
text_image
Grab'n'GO® MediaTitan leading .[ Cargando ]

text_image
Select your language Participate Englishtext_image
Setup 12 channels found. They will now be saved. or TV channels Nederland 1 6in Nederland 2 Canvas/Ketnet Nederland 3 Nickeldeon/ComedyCe TV Flovoland Discovery Channel Vesonica/Jelix Eurosport 1 RTL 8 Private Spice 12 Channelstext_image
TV 3 Names TV Favorites My favorites My scheduled recordings Full Channel List[ TV - Opciones ]
text_image
Channel Nederland 1 My favorites Date 01 / 09 / 2008 Start time 14 : 26 End time 15 : 26 Frequency Only this time Number of recording 00 Confirm Cancel[ TV - Grabación manual ]
text_image
TV My scheduled recordings Nederland 1 (01/09/2008) → The Mon, 01 Sep 2008 From 15:00 To 15:30[ TV - Mis grabaciones programadas ]
text_image
Setup 01/09/2008 02:56 PM 443.1GB available space PAL Ethernet network General Country Language Date and Time Access and protections France Germany Sparks Portugal Othertext_image
Enter your current code[ Filtro infantil - Código secreto ]
text_image
Computer Organize... Create Options projector Download to change a program Map network data Favorites lists Documents Pictures Mask Activity Changed Search Public Name Type Total Size Free Space Host Drive Devus (D) WindowsData (C:) Data (D:) 83.5 (D-Flow of 127.10) 121.09 (Flow of 127.09) Devices with Removable Storage (L) DVD-Risk Drive (E:) Portable Devices (L:) Media/Star Folders[ Mi PC ]

text_image
Computer > MediaTek > Local HDD Organize > View Favorites Documents Pictures Music Recently Changed Search Public Name Type Size Track Num... Artist Album Year My Music My Photos My Idress Folders 3 Names[ Media Titan - Estructura de carpetas ]
text_image
Music New Volume My Music → Media Files Multimedia My Contenttext_image
Options Plugins Privacy Security File Types DVD Network Player Rip Music Devices Burn Performance Library Specify settings for organizing and sharing your digital media collection. Sharing Share my media with other computers and devices on my network. Configure Sharing... Update library by monitoring folders Customize the folders the Player monitors for digital media files. Monitor Folders... Delete films from computer when deleted from library Automatic media information updates for files Retrieve additional information from the Internet Only add missing information Overwrite all media information Rename music files using rip music settings Rear range music in rip music folder, using rip music settings Maintain my star ratings as global ratings in files OK Cancel Apply HelpConceptronic Media Titan
Benutzerhandbuch
text_image
Diagram showing connections between a TV and audio equipment system, including USB 2.0, HDMI, and power outlet.text_image
Diagram showing audio system connections between a computer, audio devices, and an external network device with labeled ports and cables.Analog audio:
text_image
Grab'n'GO® MediaTitan leading .[Laden]

text_image
Select your language Portuguese Englishtext_image
Setup 12 channels found. They will now be saved. or TV channels Nederland 1 6in Nederland 2 Canvas/Ketnet Nederland 3 Nickeldeon/ComedyCe TV Flovoland Discovery Channel Vesonica/Jelix Eurosport 1 RTL 8 Private Spice 12 Channels[ TV- Kanal -Suche beendet ]
text_image
02 Nederland 2 14:00. People on the move Line 00:40 00:00 hrs 06:00 Underlined content[ TV-Player ]
text_image
TV 3 Items TV Favorites My favorites My scheduled recordings Full Channel List Edit "My Favorites" Remove "My Favorites" Save "My Associated" Save 10%[ TV - Optionen ]
text_image
Channel Date Start time End time Frequency Number of recording 01 / 09 / 2008 14 : 26 15 : 26 Only this time 00 Confirm Canceltext_image
TV My scheduled recordings Nederland 1 (01/09/2008) → The Mon, 01 Sep 2008 From 15:00 To 15:30text_image
Setup 01/09/2008 02:56 PM 463.1GB available space PAL Ethernet network General Country Language Date and Time Access and protections France Germany Spain Portugal Other[ Abschnitt Setup ]
text_image
Enter your current codetext_image
Organic Computer Search Favorites List Spectroscopy Pictures Music Security Checklist Searches Public Name Type Total Size Free Splice Hard Disk Drive (I) Windows/Video (C:) 31.8 (37 hours of 111.10) Date (D:) 32.10 (4th day of 15.10) Devices with Removable Storage (I) DVD RW Drive (B:) Portable Device (I) MediaXan Folders[ Mein Computer ]

text_image
Computer > MediaTek > LocalHD> Organize > Views Name Type Size Track Num... Artist Album.Year My Music My Photos My Videos 3 items[ Media Titan - Ordnerstruktur]
text_image
Plugged device "New Volume". rabnGO® MediaTitan Tvtext_image
Music New Volume My Music → Media Files Multimedia My Content[ USB-Gerät in Navigator ]
text_image
Options Plugins Privacy Security File Types DVD Network Player Rip Music Devices Burn Performance Library Specify settings for organizing and sharing your digitalmedia collection. Sharing Share my media with other computers and devices on my network. Configure Sharing... Update library by monitoring folders Customize the folders the Player monitors for digitalmedia files. Monitor Folders... Delete files from computer when deleted from library Automatic media information updates for files Retrieve additional information from the Internet Only add missing information Overwrite all media information Rename music files using rip music settings Rearrange music in rip music folder, using rip music settings Maintain my star ratings as global ratings in files OK Cancel Apply Helpnatural_image
Back view of a black electronic device with ports and a dotted-line connector (no text or symbols visible)text_image
Diagram showing connections between a TV and audio equipment system, including USB 2.0, HDMI, and power outlet.text_image
Diagram showing audio system connections between a computer, audio devices, and a server with labeled components like Ethernet LAN and USB 128.Audio analogique :
text_image
Grab'n'GO® MediaTitan leading .[Chargement]
text_image
Select your language Participate English[Assistant de Configuration]
8. Media Titan - Section TV
text_image
Setup 12 channels found. They will now be saved. Or TV channels Nederland 1 6én Nederland 2 Canvas/Ketnet Nederland 3 Nickelodeon/ComedyCe TV Flexoland Discovery Channel Veronica/Jetix Eurosport 1 RTL 8 Private Spice 12 Channelstext_image
TV 3 Items TV Favorites My favorites My scheduled recordings Full Channel List To: Browse a favorite, the old, used more women, women Self-monitoring home as "My Favorites" Edit "My favorites" Remove "My Preferences" Delete "My Favorites" Save URL[TV - options]
text_image
Channel Nederland 1 My favorites Date 01 / 09 / 2008 Start time 14 : 26 End time 15 : 26 Frequency Only this time Number of receiving 00 Confirm Cancel[TV - Enregistrement Manuel]
text_image
TV My scheduled recordings Nederland 1 (01/09/2008) → The Mon, 01 Sep 2008 From 15:00 To 15:30text_image
Setup 01/09/2008 463.158 available space PAL 02:56 PM Eberndel network General Country Language Date and Time Access and protections France Germany Spain Portugal Other[Section de Configuration]
text_image
Enter your current codetext_image
Computer Organize Documents Pictures Music Security Changed Search Public Name Type Total Size Free Space Hard Disk Drive (D) Windows Vista (C:) Data (D:) 81.6 (10) Free of 211.00 142 (99) Free of 211.00 Devices with Removable Storage (L) DVD Kit Drive (L) Portable Device (L) MediaTitan Folders[Mon Ordinateur]
text_image
Computer > MediaTek > LocalHDD Organize > Values Favorites lists Disclosures Pictures Music Recently Changes Searches Public Name Size Track Num... Artist Album Year My Music My Photos My Videos Folders 3 itemstext_image
Music New Volume My Music → Media Files Multimedia My Contenttext_image
Options Plugins Privacy Security File Types DVD Network Player Rip Music Devices Burn Performance Library Specify settings for organizing and sharing your digital media collection. Sharing Share my media with other computers and devices on my network. Configure Sharing... Update library by monitoring folders Customize the folders the Player monitors for digital/media files. Monitor Folders... Delete files from computer when deleted from library Automatic media information updates for files Retrieve additional information from the Internet Only add missing information Overwrite all media information Rename music files using rip music settings Rearrange music in rip music folder, using rip music settings Maintain my star ratings as global ratings in files OK Cancel Apply HelpConceptronic Media Titan
Manuale d'uso
text_image
Diagram showing connections between a computer interface, audio equipment, and various audio devices with labeled components.Audio analogico:
text_image
Grab'n'GO® MediaTitan loading .text_image
Select your language Participate Englishtext_image
Setup 12 channels found. They will now be saved. OK TV channels Nederland 1 6én Nederland 2 Canvas/Ketnet Nederland 3 Nickelodeon/ComedyCe TV Flexoland Discovery Channel Veronica/Jetix Eurosport 1 RTL 8 Private Spice 12 Channelstext_image
02 Nederland 2 14:35 People on the move Line 00:40 00:00+ 04:00 Undefined content[ TV - Lettore ]
text_image
TV 3 items TV Favorites My favorites My scheduled recordings Full Channel List Edit Close 1: Newsman, and the media/blogs Newsman at Fox? Add instructions to "My Favorites" Edit "My Favorites" Options "My Favorites" Options "My Associated" Options "FTP"[ TV - Opzioni ]
text_image
01 Nederland 1 14:00 NOT answered Line 01.00 00:00 Underground contenttext_image
Channel Switzerland 1 My favorites Date 0: / 09 / 2008 Start time 14 : 26 End time 15 : 26 Frequency Only this time Number of recording 00 Cancel Canceltext_image
TV My scheduled recordings Nederland 1 (01/09/2008) → The Mon, 01 Sep 2008 From 15:00 To 15:30[ TV - My Scheduled Recordings ]
text_image
Setup 01/09/2008 02:56 PM 463.1GB available space PAL Ethernet network General Country Language Date and Time Access and protections France Germany Spain Portugal Othertext_image
Enter your current codetext_image
Computer System properties Windows Notched a program Map network drive Favorites lists Documents Pictures Music Activity Changes Searchers Public Name Type Total Size Free Space Hard Disk Drive (I:) Windows/IO (C:) Data ID: 51.0, 63.0 free of 111.0 121.08.496 of 111.08 Devices with Removable Storage (I:) DVD-RV Drive (L:) Portable Device (L:) Media/Ion Folders[ Risorse del Computer ]
text_image
Computer > MediaTitan > Local HDD Organize > Views Name Type Size Track Num... Artist Album Year My Music My Photos My Videos Folders 3 Namestext_image
Music New Volume My Music Media Files Multimedia My Contenttext_image
Options Plugins Privacy Security File Types DVD Network Player Rip Music Devices Burn Performance Library Specify settings for organizing and sharing your digital media collection. Sharing Share my media with other computers and devices on my network. Configure Sharing... Update library by monitoring folders Customize the folders the Player monitors for digital media files. Monitor Folders... Delete films from computer when deleted from library Automatic media information updates for files Retrieve additional information from the Internet Only add missing information Overwrite all media information Rename music files using rip music settings Rear range music in rip music folder, using rip music settings Maintain my star ratings as global ratings in files OK Cancel Apply HelpConceptronic Media Titan
Manual do Utilizador
text_image
Diagram showing connections between a TV and audio equipment system, including USB 2.0, HDMI, and power outlet.text_image
Diagram showing connections between a computer, audio equipment, and various audio devices with labeled components.Áudio analógico:
text_image
Grab'n'GO® MediaTitan leading .[ A carregar ]

text_image
Select your language Participate Englishtext_image
Setup 12 channels found. They will now be saved. OR TV channels Nederland 1 46n Nederland 2 Canvas/Venet Nederland 3 Nickeldeon/ComedyCe TV Flexoland Discovery Channel Vesonica/Jelix Eurosport 1 RTL B Private Spice 12 Channelstext_image
02 Nederland 2 14:30. People on the move Close 00:40 00:00, 04:00 Undefined constant[ TV - Leitor ]
text_image
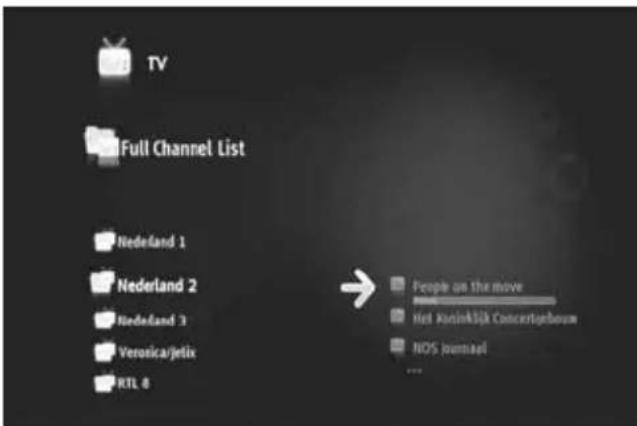
TV Full Channel List Nederland 1 Nederland 2 Nederland 3 Veronica/jelix RTL 6 People on the move Hot JuninkSA Concertgeboum NOS Journal ...[ TV - Navegador ]
text_image
TV 3 Items TV Favorites My favorites My scheduled recordings Full Channel List Edit "My favorites" Remove "COS" Preferences Remove "Drug" Preferences Save URL[ TV - opções ]
text_image
Channel Nederland 1 My Favorites Date 01 / 09 / 2008 Start time 14 : 26 End time 15 : 26 Frequency Only this time Number of recording 00 Confirm Canceltext_image
TV My scheduled recordings Nederland 1 (01/09/2008) → The Mon, 01 Sep 2008 From 15:00 To 15:30text_image
Setup 01/09/2008 463.158 available space PAL 02:56 PM Eberndel network General Country Language Date and Time Access and protections France Germany Spain Portugal Othertext_image
Enter your current codetext_image
Computer Organize Documents Pictures Music Security Changed Search Public Name Type Total Size Free Space Hard Disk Drive (D) Windows Vista (C:) Data (D:) 81.6 (10) Free of 211.00 142 (99) Free of 211.00 Devices with Removable Storage (L) DVD Kit Drive (L) Portable Device (L) MediaTitan Folderstext_image
Music New Volume My Music → Media Files Multimedia My Contenttext_image
Options Plugins Privacy Security File Types DVD Network Player Rip Music Devices Burn Performance Library Specify settings for organizing and sharing your digital media collection. Sharing Share my media with other computers and devices on my network. Configure Sharing... Update library by monitoring folders Customize the folders the Player monitors for digital media files. Monitor Folders... Delete files from computer when deleted from library Automatic media information updates for files Retrieve additional information from the Internet Only add missing information Overwrite all media information Rename music files using rip music settings Rearrange music in rip music folder, using rip music settings Maintain my star ratings as global ratings in files OK Cancel Apply HelpConceptronic Media Titan
text_image
Diagram showing connections between a computer and various audio equipment devices including speakers, audio units, USB ports, and an Ethernet LAN.Analog audió:
text_image
Grab'n'GO® MediaTitan leading .[ Betöltés ]

text_image
Select your language Participate Englishtext_image
Setup 12 channels found. They will now be saved. or TV channels Nederland 1 6in Nederland 2 Canvas/Ketnet Nederland 3 Nickeldeon/ComedyCe TV Flovoland Discovery Channel Vesonica/Jelix Eurosport 1 RTL 8 Private Spice 12 Channelstext_image
02 Nederland 2 14:30. People on the move Line 1 00:00 hrs 06:00 Undefined constant[ TV – Lejátszó ]
text_image
TV 3 items TV Favorites My favorites My scheduled recordings Full Channel List Edit "My Favorites" Remove "My Favorites" Remove "My Favorites" Remove "My Favorites"[ TV - Opciók ]
text_image
Channel Switzerland 1 My favorites Date 01 / 09 / 2008 Start time 14:26 End time 15:26 Frequency Only this time Number of recoding 00 Cancel Canceltext_image
TV My scheduled recordings Nederland 1 (01/09/2008) → The Mon, 01 Sep 2008 From 15:00 To 15:30[ TV — My Scheduled Recordings ]
text_image
Setup 01/09/2008 02:56 PM 463.158 available space PAL Ethernet network General Country Language Date and Time Access and protections France Germany Sparks Portugal Other[ Telepítőrész ]
text_image
Enter your current codetext_image
Computer Organize... Documents Pictures Music Activity-Changed Search Public Favorites links Documents Pictures Music Activity-Changed Search Public Name Type Total Size Free Space Hard Disk Device (D:) WindowData (C:) 83.8 (12 fps of 127.50) Gas (G:) 121.99 fps of 123.69 Devices with Removable Storage (L:) DVD-RW Drive (E:) Portable Devices (L:) MedalStar Folders[ My Computer ]

text_image
Computer > MediaTek > LocalHD Organize > View Favorites Documents Pictures Music Recently Changed Search Public Name Type Size Track Num... Artist Album-Year My Music Mi Photos My Video Folders 3 Names[ Media Titan — Mappastruktúra ]
text_image
Plugged device "New Volume". rabnGO® MediaTitan Tvtext_image
Music New Volume My Music → Media Files Multimedia My Contenttext_image
Options Plugins Privacy Security File Types DVD Network Player Rip Music Devices Burn Performance Library Specify settings for organizing and sharing your digital media collection. Sharing Share my media with other computers and devices on my network. Configure Sharing... Update library by monitoring folders Customize the folders the Player monitors for digital media files. Monitor Folders... Delete files from computer when deleted from library Automatic media information updates for files Retrieve additional information from the Internet Only add missing information Overwrite all media information Rename music files using rip music settings Rename range music in rip music folder, using rip music settings Maintain my star ratings as global ratings in files OK Cancel Apply HelpConceptronic Media Titan
Kullanıcı Kılavuzu
text_image
Diagram showing connections between a TV and audio equipment system, including USB 2.0, HDMI, and power outlet.text_image
Diagram showing connections between a computer, audio equipment, and various audio devices including speakers, audio amplifiers, and USB ports.Analog ses:
text_image
Grab'n'GO® MediaTitan leading .[ Yükleme yapıyor ]

text_image
Select your language Portugues Englishtext_image
Setup 12 channels found. They will now be saved. or TV channels Nederland 1 6in Nederland 2 Canvas/Ketnet Nederland 3 Nickeldeon/ComedyCe TV Flovoland Discovery Channel Vesonica/Jelix Eurosport 1 RTL 8 Private Spice 12 Channelstext_image
02 Nederland 2 14:30. People on the mouse Line 1 00:40 00:00% 06:00 Undefined constant[ TV - Oynaticı ]
text_image
TV Full Channel List Nederland 1 Nederland 2 Nederland 3 Veronica/jelix RTL 6 People on the move Not JustinkSI& Concertingboom NOS Journal[ TV - Gezgin ]
TV Oynaticıyı:
text_image
TV 3 Items TV Favorites My favorites My scheduled recordings Full Channel List Edit "My Favorites" Describe "My Favorites" Describe "My Recommendation" Describe "My Recommendation" Describe "My Info"[ TV - Seçenekler ]
text_image
14:23 My Favorites Redland 1 Nedland 2 Redland 3 TV Flavland Monday 1 September 1.1.10000 Journals 1.1.10000 Journals 1.1.10000 Journals on 1.1.10000 Journals on 1.1.10000 Journals on 1.1.10000 Journals on 1.1.10000 Journals on 1.1.10000 Journals on 1.1.10000 Journals on 1.1.10000 Journals on 1.1.100 14:00 RDS Journal 14:00 RDS Journal Duration: 01:00 Info EPC Control Window EnR[ TV - EPG Rehberi ]
text_image
Channel Nederland 1 My favorites Date 41 / 09 / 2008 Start time 14 : 26 End time 15 : 26 Frequency Only this time Number of recording 00 Confirm Canceltext_image
TV My scheduled recordings Nederland 1 (01/09/2008) → The Mon, 01 Sep 2008 From 15:00 To 15:30[Video/Photo - Gezgin]
text_image
Setup 01/09/2008 02:56 PM 463.158 available space PAL Ethernal network General Country Language Date and Time Access and protections France Germany Spain Portugal Othertext_image
Enter your current codetext_image
Computer Organize Documents Pictures Music Security Changed Search Public Name Type Total Size Free Space Hard Disk Drive (D) Windows Vista (C:) Data (D:) 81.6 (10) Free of 211.00 142 (99) Free of 211.00 Devices with Removable Storage (L) DVD Kit Drive (L) Portable Device (L) MediaTitan Folders[Bilgisayarım]

text_image
Computer > MediaTek > LocalHDD Organize > Views Favorites: Tools Disclosures Pictures Music Recently Changes Searches Public Name Size Track Num... Artist Album Year My Music My Photos My Videos Folders 3 itemstext_image
Plugged device "New Volume". rabnGO® MediaTitan Tvtext_image
Music New Volume My Music → Media Files Multimedia My Content[ Gezginde USB Aygit ]