WE 4125 - Radio AEG - Free user manual and instructions
Find the device manual for free WE 4125 AEG in PDF.
Download the instructions for your Radio in PDF format for free! Find your manual WE 4125 - AEG and take your electronic device back in hand. On this page are published all the documents necessary for the use of your device. WE 4125 by AEG.
USER MANUAL WE 4125 AEG
Overview of the Components Page 3
Technical Data Page 51
Overview of the settings Page 52
Overview of the Components
Thank you for choosing our product. We hope you enjoy using the device.
Symbols in these Instructions for Use
Important information for your safety is specially marked. It is essential to comply with
these instructions in order to avoid accidents and prevent damage to the machine:
This warns you of dangers to your health and indicates possible injury risks.
This refers to possible hazards to the machine or other objects.
This highlights tips and information.
General Safety Instructions
Read the operating instructions carefully before putting the appliance into operation and
keeptheinstructionsincludingthewarranty,thereceiptand,ifpossible,theboxwiththe
internal packing. If you give this device to other people, please also pass on the operating
• Toavoidtheriskofreoranelectricshock,youshouldnotexposethedevicetorainor
moisture. Consequently, do not use the device in the immediate vicinity of water - for
risk for the user. Do not use the device any more if it is damaged, but have it repaired
Children and Frail Individuals
• Inordertoensureyourchildren’ssafety,pleasekeepallpackaging(plasticbags,boxes,
polystyrene etc.) out of their reach.
Caution! Do not allow small children to play with the foil as there is a danger of suf-
• Thisdeviceisnotintendedtobeusedbyindividuals(includingchildren)whohave
restricted physical, sensory or mental abilities and/or insufficient knowledge and/or
experience,unlesstheyaresupervisedbyanindividualwhoisresponsiblefortheir
safety or have received instructions on how to use the device.
• Childrenshouldbesupervisedatalltimesinordertoensurethattheydonotplaywith
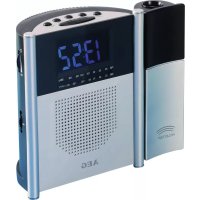
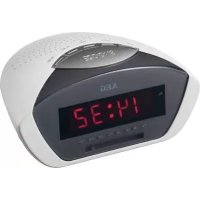
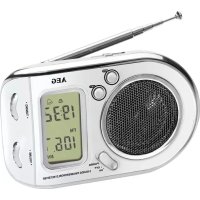
Overview of the Components
9 SW Frequency range selector
This device is used for the reception of radio programmes.
Itisintendedexclusivelyforthispurposeandmayonlybeusedassuch.
It may only be used in the manner described in these instructions for use. The device must
not be used for commercial purposes.English
Any other use of this device is considered to be contrary to the intended use and may
result in damage to materials or even personal injury.
The firm ETV – Elektro-Technische Vertriebsgesellschaft mbH does not accept any liability
for damage caused as a result of the use of this device contrary to its intended use.
Start-up of the device/Introduction
• Selectasuitablelocationfortheradiorecorder,suchasadry,flat,non-slipsurfaceon
which it is easy to operate the machine.
• Ensurethattheradiorecorderissufcientlyventilated!
Inserting the Batteries (notsupplied)
• Openthelidofthebatterycompartmentontheback.
• Insert2batteriesoftypeAAA/R031.5V.Matchthepolaritiescorrectly(seetheinsideof
the battery compartment)!
• Closethebatterycompartmentagain.
• Ifthedeviceisnotusedforalongperiodoftime,removethebatteriestoavoidthe
“spilling” of battery acid.
• Differentbatterytypesornewandusedbatteriesmustnotbeusedtogether.
used batteries at the relevant collection bin or at your dealer’s.
Donotexposethebatteriestohightemperaturesordirectsunlight.Neverthrowbatter-
ies into the fire. There is a danger of explosion!
Configuring the settings
Configure all settings with the MODE button. Change the currently selected mode with
the SET button. You can find a list of the individual modes on page 52/53.
Push the SET button during the time display to show the following settings: Set alarm
time, date, and seconds. If you push the MODE button while the seconds are shown,
you can reset it to zero.English
Switching the Device on and Off
MovethePOWERON/OFFswitch(7)totheONposition.Thecurrentlyselectedfrequency
will appear in the display.
Move the POWER ON/OFF switch to the OFF position.
Setting the time and date
2. PushtheSETbutton(3),untilthehourisprogrammedinthedesireddisplayformat.
3. Push the MODE button for confirmation. The minutes are shown.
4. Set the minutes with the SET button.
5. Push the MODE button to confirm.
6. When the colon lights up, press the SET button once more to complete the entry. The
colon will flash and show the current time.
The date is linked to the time. As soon as the time is adjusted and the date line is thus
exceeded,thedateisalsoautomaticallyadjusted.Wethereforerecommendtorstsetthe
time, and then the date.
1. Push the MODE button four times. The month is shown.
2. Set the month with the SET button.
3. Confirm your entry with the MODE button. The day is shown.
4. Set the day with the SET button. Press the MODE button three times to switch to
normal mode. The time is shown.English
1. Push the MODE button twice. The currently set hour of the alarm time will flash.
2. Push the SET button until the hour is set.
3. Push the MODE for confirmation. The minutes will flash.
4. Adjust the minutes with the SET button.
5. Push the MODE button. The time is shown.
Setting the alarm mode
1. Push the MODE button one time. The set alarm time will flash in the display.
2. Select the alarm mode with the SET button.
• Beep sound for 30 seconds:
If you push the SET button one time, the symbol “
“ will appear in the display.
When getting to the set alarm time, a beep sound will be heard. If no button is
pushed, the alarm sound will automatically turn off after 30 seconds.
• Beep sound + reminder function:
If you push the SET button twice, the symbols “
“ and “ “ will appear in the
display. When the set alarm time is reached, a beep sound will be heard. An indi-
vidual beep sound can also be heard at the top of every hour.
• Reminder function:
If you push the SET button three times, the symbol “
“ will appear in the display.
An individual beep sound can be heard at the top of every hour.
3. Push the MODE button three times to switch to normal mode. The time will be shown.
Turning off the alarm ahead of time
PushtheMODEbuttonwhilehearingthealarmsoundtoturnoffthealarmuntilthenext
Listening to the Radio
1. TurnthedeviceonbymovingthePOWERON/OFFswitch(7)totheONposition.Turn
the VOLUME control until you have reached the desired volume.
• Veryhighfrequency(VHF)=FM,
• Mediumwave(MW)=AM,
• Shortwave(SW)=SWswitch(1to7)
3. Pull out the telescopic antenna and change its position to improve the reception.
4. WiththeTUNINGcontrol(4)youcantuneintothedesiredstation.Thefrequencycur-
rently set is shown in the display.
5. Please turn the device off after use.
Cleaning and Maintenance
Battery operation: 2x1.5V,TypeAAA Radio section:
Frequency ranges: FM: 87.5 ~ 108 MHz
SW 7: 21.45 ~ 21.85 MHz
Net weight: 0.132 kg
Subject to technical changes without prior notice!
This device has been tested according to all relevant current CE guidelines, such as
electromagnetic compatibility and low voltage directives, and has been constructed in
accordance with the latest safety regulations.English
Meaning of the “Dustbin” Symbol
Protect our environment: do not dispose of electrical equipment in the domestic waste.
Please return any electrical equipment that you will no longer use to the collection points
provided for their disposal.
This helps avoid the potential effects of incorrect disposal on the environment and human
This will contribute to the recycling and other forms of reutilisation of electrical and elec-
Information concerning where the equipment can be disposed of can be obtained from
your local authority.
Overview of the settings
appears on the display.
Press2x Alarm and the reminder function
for the full hour are activated. The
is activated. The symbol “
pears on the display.
Press2x The hour of
Press until the hour
Press3x The minutes of
Press4x The month is
Press6x The hours of the
Press until the hour
is set in the desired
CTC Clatronic Sp. z o.o.