A-S201 - Audio Amplifier YAMAHA - Free user manual and instructions
Find the device manual for free A-S201 YAMAHA in PDF.

| Product Type | Stereo Integrated Amplifier |
| Brand | YAMAHA |
| Model | A-S201 |
| Output Power (8 Ω, 40 Hz - 20 kHz, 0.2% THD) | 100 W + 100 W (General, Korea, Australia, UK, Europe models) / 85 W + 85 W (China, Asia models) |
| Frequency Response (CD, etc., 20 Hz - 20 kHz) | 0 ± 0.5 dB |
| Total Harmonic Distortion (CD to Speakers, 50 W, 8 Ω, 20 Hz - 20 kHz) | 0.2% max |
| Signal-to-Noise Ratio (CD, etc., Input Shorted, IHF-A) | 100 dB min |
| Inputs | Phono (MM), CD, TUNER, LINE 1, LINE 2 (PB/REC) |
| Outputs | Speakers A/B, Headphones (PHONES), REC (Recording) |
| Main Functions | Pure Direct, Tone Control (Bass/Treble), Balance, Sleep Timer (SLEEP), Auto Power Standby (AUTO POWER STANDBY), Remote Control |
| Power Supply | AC 110-120/220-240 V, 50/60 Hz (General model); Other models: see manual |
| Power Consumption | 175 W (General, Korea, Australia, UK, Europe models) / 140 W (China, Asia models) |
| Standby Power Consumption | 0.5 W max |
| Dimensions (W × H × D) | 435 × 141 × 333 mm |
| Weight | 6.7 kg |
| Supplied Accessories | Remote Control, Batteries (AA × 2) |
| Maintenance and Cleaning | Clean with a dry, clean cloth. Do not use chemical solvents. |
| Safety | Do not expose to rain or moisture. Install in a well-ventilated area. Disconnect during storms. |
| Repairability | Do not open the cabinet. Refer all servicing to a Yamaha authorized service center. |
Frequently Asked Questions - A-S201 YAMAHA
User questions about A-S201 YAMAHA
0 question about this device. Answer the ones you know or ask your own.
Ask a new question about this device
Download the instructions for your Audio Amplifier in PDF format for free! Find your manual A-S201 - YAMAHA and take your electronic device back in hand. On this page are published all the documents necessary for the use of your device. A-S201 by YAMAHA.
USER MANUAL A-S201 YAMAHA
Important Notice: Guarantee Information for customers in EEA* and Switzerland
English
For detailed guarantee information about this Yamaha product, and Pan-EEA* and Switzerland warranty service, please either visit the website address below (Printable file is available at our website) or contact the Yamaha representative office for your country. * EEA: European Economic Area
Integrated Amplifier
1 To assure the finest performance, please read this manual carefully. Keep it in a safe place for future reference.
2 Install this sound system in a well ventilated, cool, dry, clean place - away from direct sunlight, heat sources, vibration, dust, moisture, and/or cold. For proper ventilation, allow the following minimum clearances around this unit.
Top: 30~cm
Rear: 20~cm
Sides: 20cm
3 Locate this unit away from other electrical appliances, motors, or transformers to avoid humming sounds.
4 Do not expose this unit to sudden temperature changes from cold to hot, and do not locate this unit in an environment with high humidity (i.e. a room with a humidifier) to prevent condensation inside this unit, which may cause an electrical shock, fire, damage to this unit, and/or personal injury.
5 Avoid installing this unit where foreign object may fall onto this unit and/or this unit may be exposed to liquid dripping or splashing. On the top of this unit, do not place:
- Other components, as they may cause damage and/or discoloration on the surface of this unit.
- Burning objects (i.e. candles), as they may cause fire, damage to this unit, and/or personal injury.
- Containers with liquid in them, as they may fall and liquid may cause electrical shock to the user and/or damage to this unit.
6 Do not cover this unit with a newspaper, tablecloth, curtain, etc. in order not to obstruct heat radiation. If the temperature inside this unit rises, it may cause fire, damage to this unit, and/or personal injury.
7 Do not plug in this unit to an AC wall outlet until all connections are complete.
8 Do not operate this unit upside-down. It may overheat, possibly causing damage.
9 Do not use force on switches, knobs and/or cords.
10 When disconnecting the power cable from the AC wall outlet, grasp the plug; do not pull the cable.
11 Do not clean this unit with chemical solvents; this might damage the finish. Use a clean, dry cloth.
12 Only voltage specified on this unit must be used. Using this unit with a higher voltage than specified is dangerous and may cause fire, damage to this unit, and/or personal injury. Yamaha will not be held responsible for any damage resulting from use of this unit with a voltage other than specified.
13 To prevent damage by lightning, keep the power cable and outdoor antennas disconnected from an AC wall outlet or this unit during a lightning storm.
14 Do not attempt to modify or fix this unit. Contact qualified Yamaha service personnel when any service is needed. The cabinet should never be opened for any reasons.
15 When not planning to use this unit for long periods of time (i.e. vacation), disconnect the AC power plug from the AC wall outlet.
16 Be sure to read the "TROUBLESHOOTING" section on common operating errors before concluding that this unit is faulty.
17 Before moving this unit, press (power) to set this unit to standby mode, and then disconnect the AC power plug from the AC wall outlet.
18 Condensation will form when the surrounding temperature changes suddenly. Disconnect the power cable from the outlet, then leave this unit alone.
19 When using this unit for a long time, this unit may become warm. Turn the power off, then leave this unit alone for cooling.
20 Install this unit near the AC wall outlet and where the AC power plug can be reached easily.
21 The batteries shall not be exposed to excessive heat such as sunshine, fire or the like.
22 Excessive sound pressure from earphones and headphones can cause hearing loss.
This unit is not disconnected from the AC power source as long as it is connected to the AC wall outlet, even if this unit itself is turned off by . This state is called the standby mode. In this state, this unit is designed to consume a very small quantity of power.
WARNING
TO REDUCE THE RISK OF FIRE OR ELECTRIC SHOCK, DO NOT EXPOSE THIS UNIT TO RAIN OR MOISTURE.

This label is required to be attached to a product of which the temperature of the top cover may be hot during operation.
For U.K. customers
If the socket outlets in the home are not suitable for the plug supplied with this appliance, it should be cut off and an appropriate 3 pin plug fitted. For details, refer to the instructions described below.
Note
The plug severed from the mains lead must be destroyed, as a plug with bared flexible cord is hazardous if engaged in a live socket outlet.
Special Instructions for U.K. Model
IMPORTANT
THE WIRES IN MAINS LEAD ARE COLOURED IN ACCORDANCE WITH THE FOLLOWING CODE:
Blue: NEUTRAL
Brown: LIVE
As the colours of the wires in the mains lead of this apparatus may not correspond with the coloured markings identifying the terminals in your plug, proceed as follows:
The wire which is coloured BLUE must be connected to the terminal which is marked with the letter N or coloured BLACK.
The wire which is coloured BROWN must be connected to the terminal which is marked with the letter L or coloured RED.
Make sure that neither core is connected to the earth terminal of the three pin plug.
CONTENTS
INTRODUCTION
USEFUL FEATURES. 1
SUPPLIED ACCESSORIES 1
CONTROLS AND FUNCTIONS 2
Front panel 2
Rear panel 4
Remote control. 5
Using the remote control 7
PREPARATION
CONNECTIONS 8
Connecting speakers and source components. 8
Connecting power cable 9
BASIC OPERATION
PLAYBACK 10
Playing a source 10
Enjoying pure, high fidelity sound (Pure Direct).... 11
Using the sleep timer 11
ADVANCED OPERATION
SETTING THE OPTION MENU FOR EACH
INPUT SOURCE. 12
Option menu items. 12
ADDITIONAL INFORMATION
TROUBLESHOOTING 13
SPECIFICATIONS. 15
About this manual
indicates a tip for your operation.
- The instructions in this manual describe the operation of this unit with the supplied remote control. You can also use the buttons or knobs on the front panel if they have the same or similar names as those on the remote control.
USEFUL FEATURES
This unit allows you to:
Enjoy pure, high fidelity sound by using the Pure Direct function (see page 11)
Use the remote control of this unit to operate a Yamaha tuner and/or CD player (see page 6)
Save power by using the AUTO POWER STANDBY function (see page 12)
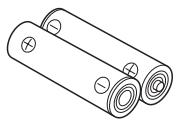
SUPPLIED ACCESSORIES
Please check that you received all of the following parts.

Remote control
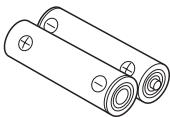
Batteries (x2) (AA, R6, UM-3)
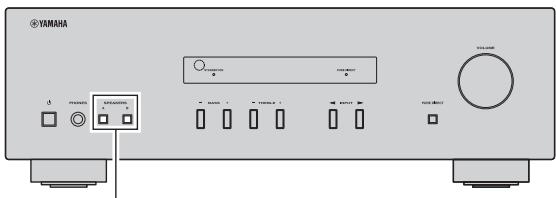
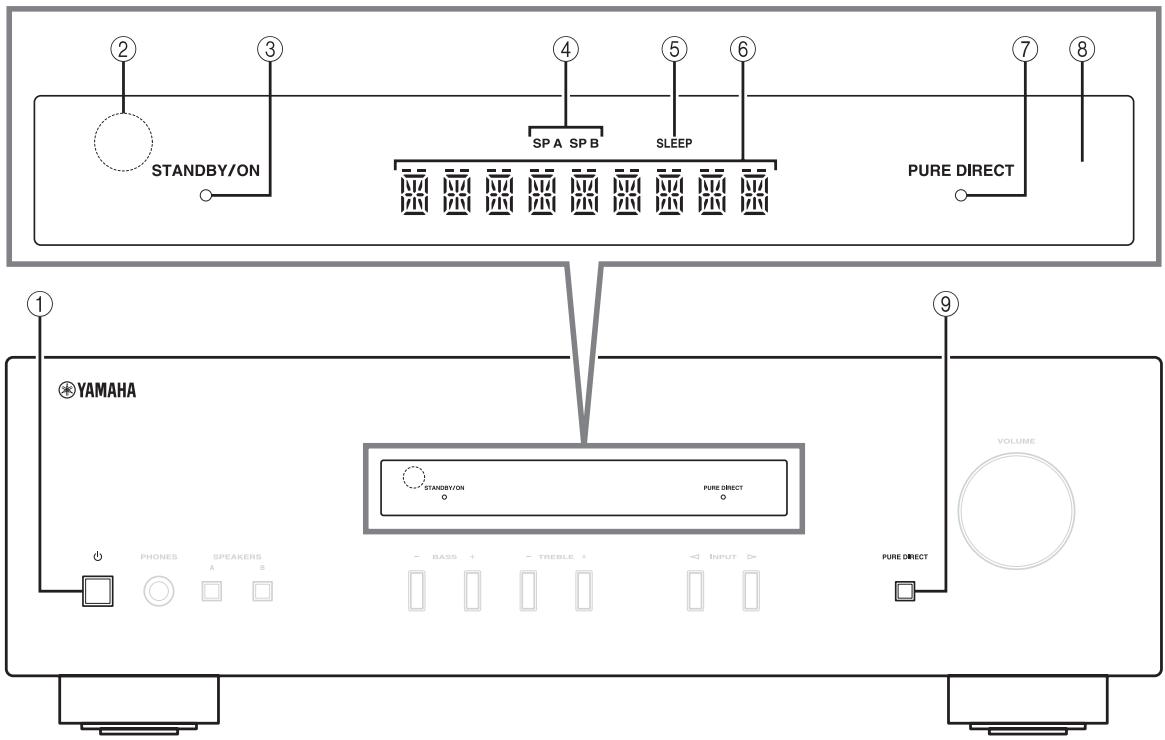
Front panel

① (power)
Turns this unit on, or sets it to standby mode.
Note
This unit consumes a small amount of power even when in standby mode.
② Remote control sensor
Receives infrared signals from the remote control.
③ STANDBY/ON indicator
| Indicator | Status |
| Brightly lit | The power of this unit is “on”. |
| Dimly lit | This unit is in “standby” mode. |
| Off | The power of this unit is “off”. To turn off this unit, disconnect the power cable from an AC wall outlet. |
④ SP (SPEAKERS) A/B indicators
Light up according to the set of speakers selected.
Both indicators light up when both sets of speakers are selected.
⑤ SLEEP indicator
Lights up when the sleep timer is turned on (see page 11).
^6 Multi-information display
Shows information when adjusting or changing settings.
⑦ PURE DIRECT indicator
Lights up when the Pure Direct function is on.
⑧ Front panel display
Shows information about the operational status of this unit.
PURE DIRECT button
Reproduces any input source in the purest sound possible. (see page 11).
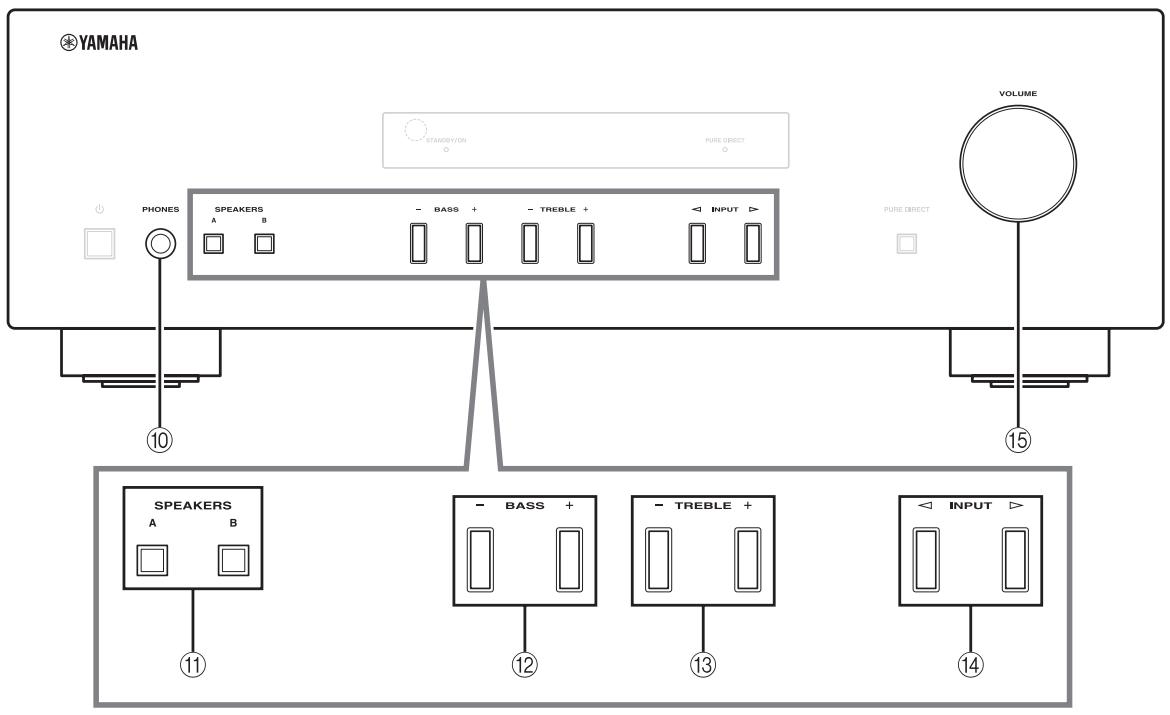
10 PHONES jack
Outputs audio to your headphones for private listening.
Note
Press SPEAKERS A/B so that the SP A/B indicators (see page 2) turn off before you connect your headphones to the PHONES jack.
⑪ SPEAKERS A/B
Turns on or off the speaker set connected to the SPEAKERS A and/or SPEAKERS B terminals on the rear panel each time the corresponding button is pressed (see page 10).
② BASS-/+
Increases or decreases the low frequency response. Control range: -10dB to +10dB
⑬ TREBLE -/+
Increases or decreases the high frequency response. Control range: -10dB to +10dB
(14) INPUT /
Selects the input source you want to listen to.
15 VOLUME control
Increases or decreases the sound output level.
Rear panel
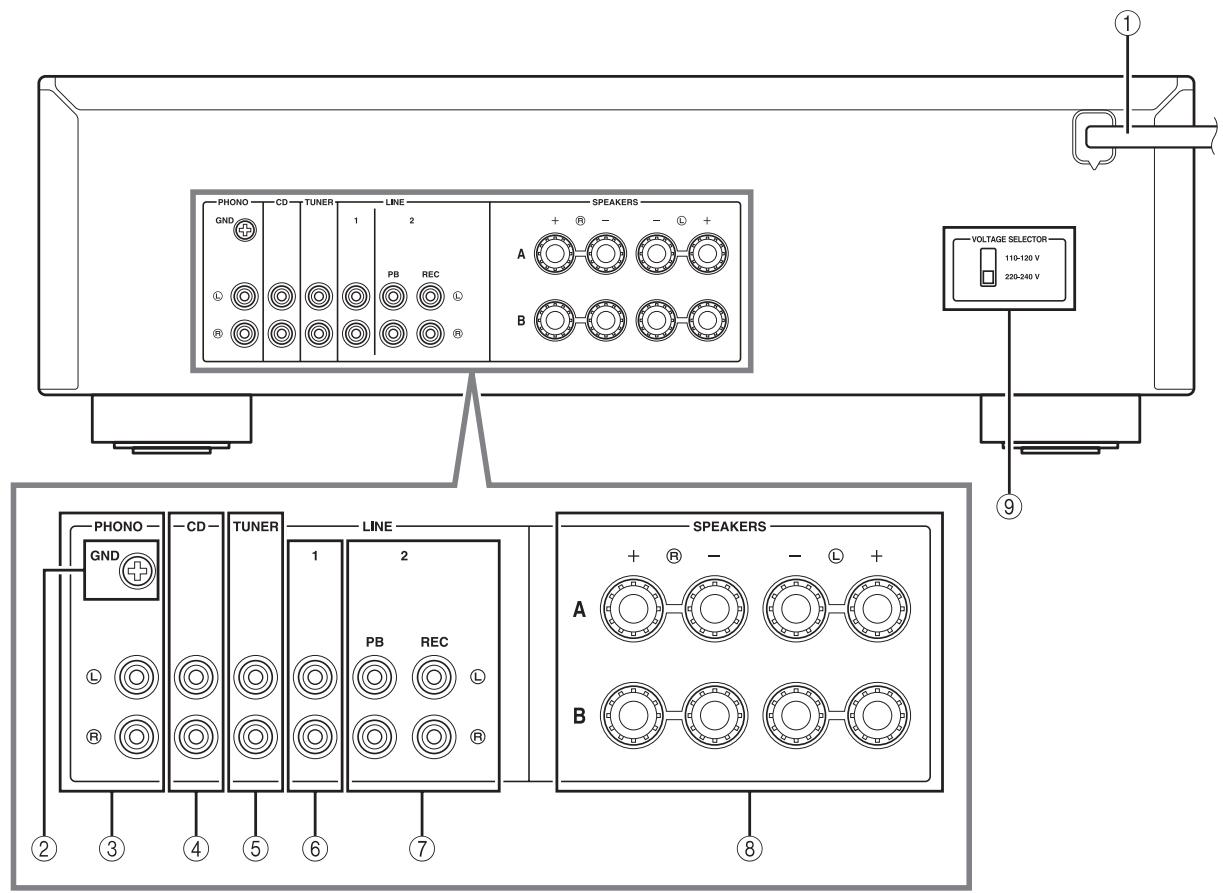
① Power cable
For connecting this unit to an AC wall outlet (see page 9).
② GND terminal
Used to connect a turntable (see page 8).
③ PHONO jacks
Used to connect a turntable (see page 8).
④ CD jacks
Used to connect a CD player (see page 8).
⑤ TUNER jacks
Used to connect a tuner (see page 8).
(6) LINE 1 jackets
Used to connect audio components (see page 8).
LINE 2 jacks
PB (Playback) jacks
Used to connect to audio output jacks of an audio component.
REC (Recording) jacks
Used to connect to audio input jacks of an audio component.
⑧ SPEAKERS terminals
Used to connect speakers (see page 8).
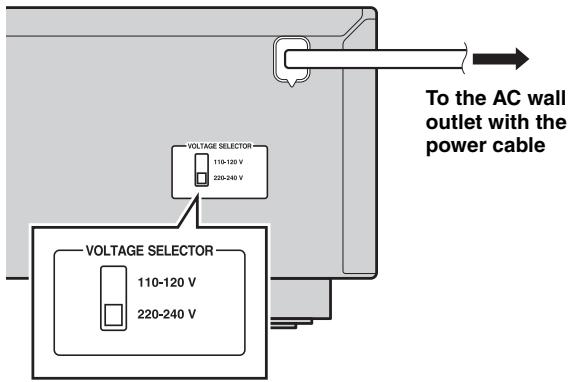
(9) VOLTAGE SELECTOR (Only for General model)
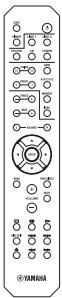
Remote control
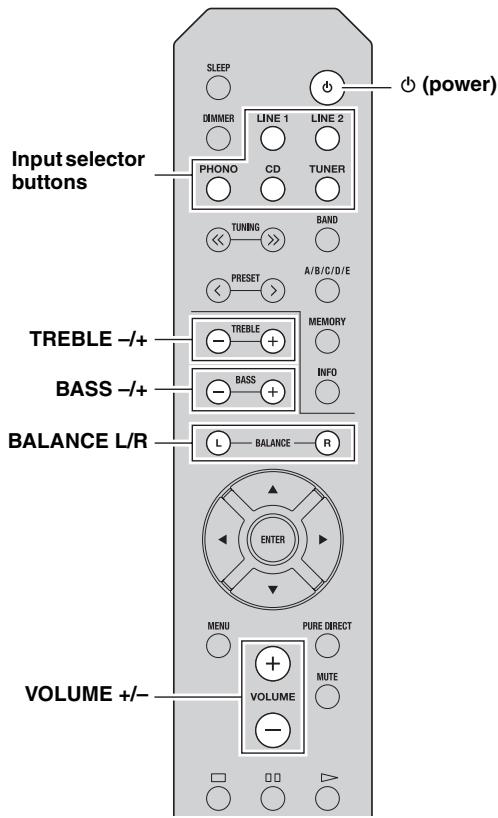
Common controls
The following parts and controls can be used no matter which input source is selected.
① Infrared signal transmitter
Sends infrared signals.
② (power)
Turns this unit on, or sets it to standby mode.
③ SLEEP
Sets the sleep timer (see page 11).
④ DIMMER
Select the brightness level of the front panel display from 3 levels by pressing this button repeatedly.

- This setting is retained even if you turn off this unit.
- The default setting is the brightest.
(5) TREBLE -/+
Increases or decreases the high frequency response.
Control range: -10dB to +10dB
⑥ BASS-/+
Increases or decreases the low frequency response.
Control range: -10dB to +10dB
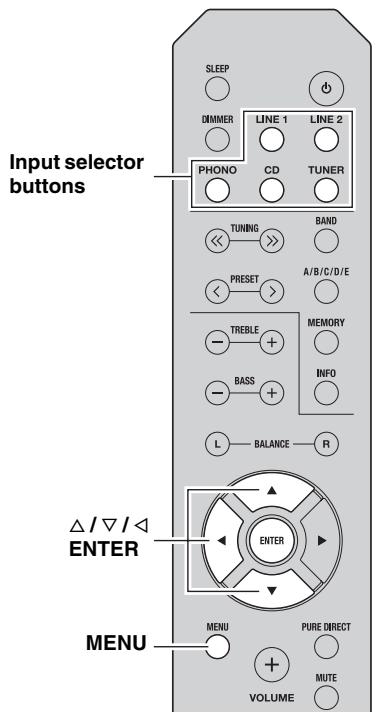
⑦ △/▽/△/▽/ENTER
Selects and confirms items in the Option menu (see page 12).
⑧ MENU
Turns the Option menu on and off (see page 12).
⑨ VOLUME +/-
Increases or decreases the sound output level.
10 Input selector buttons
Select the input source you want to listen to.

The input source names correspond to the names of the connection jacks on the rear panel.
11 BALANCE L/R
Adjusts the sound output balance of the left and right speakers to compensate for sound imbalances.
Control range:

The opposite side of channel is muted.
The opposite side of channel is muted.
12 PURE DIRECT button
Reproduces any input source in the purest sound possible (see page 11).
13 MUTE
Mutes the sound output. Press again to restore the sound output to the previous volume level.
- Yamaha tuner control buttons The following buttons can be used to control various functions of a Yamaha tuner.
(14) TUNING / Selects the tuning frequency.
A/B/C/D/E, PRESET<1>
Selects a preset FM/AM station.
A/B/C/D/E: Selects the preset group from A to E.
PRESET < / > : Selects the preset number.
BAND
Selects the reception band (FM/AM).
MEMORY
Stores the current FM/AM station as a preset.
INFO
Only for Europe model: Switches information shown on the front panel display.
Note
Even when using a Yamaha tuner, certain components and features may not be available. Refer to your component's owner's manual for more information.
Yamaha CD player controls
The following buttons can be used to control a Yamaha CD player.
15 Yamaha CD player control buttons
□ Stops playback
Pauses playback
Starts playback
DISC SKIP Skips to the next disc in a CD changer
Skips backward
Skips forward
Ejects the disc
Rewinds playback
Fast-forwards playback
Note
Even when using a Yamaha CD player, certain components and features may not be available. Refer to your component's owner's manual for more information.
Using the remote control
Installing batteries
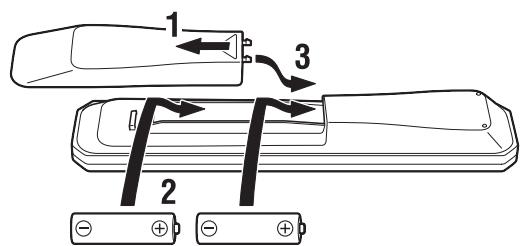
AA, R6, UM-3 batteries
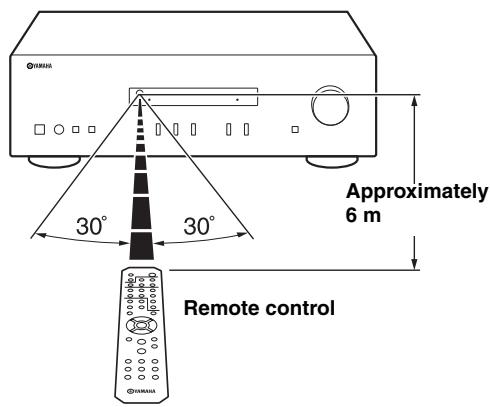
Operation range
Point the remote control at the remote control sensor on this unit and remain within the operating range shown below.
Notes on remote control and batteries
- The area between the remote control and this unit must be clear of large obstacles.
- Be careful not to spill water or other liquids on the remote control.
- Be careful not to drop the remote control.
- Do not leave or store the remote control in the following conditions:
places of high humidity, such as near a bathroom
places of high temperatures, such as near a heater or stove
places of extremely low temperatures
- dusty places
- Change all batteries if you notice the operation range of the remote control narrows.
- If the batteries run out, immediately remove them from the remote control to prevent an explosion or acid leak.
- If you find leaking batteries, discard the batteries immediately, taking care not to touch the leaked material. If the leaked material comes into contact with your skin or gets into your eyes or mouth, rinse it away immediately and consult a doctor. Clean the battery compartment thoroughly before installing new batteries.
- Do not use old batteries together with new ones. This may shorten the life of the new batteries or cause old batteries to leak.
- Do not use different types of batteries (such as alkaline and manganese batteries) together. Batteries that look the same may have a different specification.
- Before inserting new batteries, wipe the battery compartment clean.
- Dispose of batteries according to your regional regulations.
- Keep the batteries in a location out of reach of children. Batteries can be dangerous if a child were to put in his or her mouth.
- If you plan not to use this unit for a long period of time, remove the batteries from this unit. Otherwise, the batteries will wear out, possibly resulting in a leakage of battery liquid that may damage this unit.
CONNECTIONS
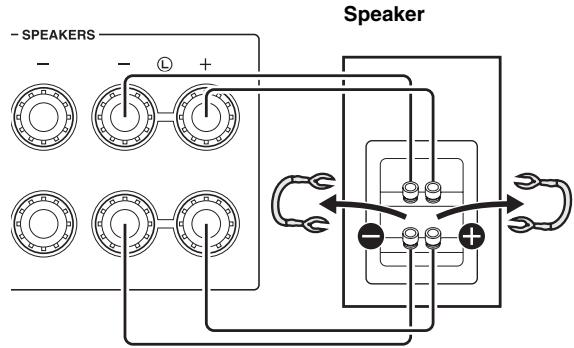
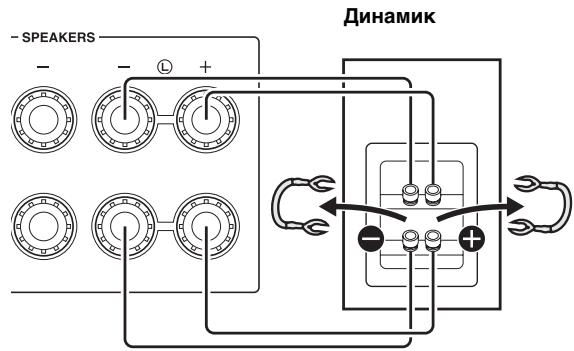
Connecting speakers and source components
Make sure to connect L (left) to L, R (right) to R, "+" to "+" and "-" to "-" If the connections are faulty, no sound will be heard from the speakers, and if the polarity of the speaker connections is incorrect, the sound will be unnatural and lack bass. Refer to the owner's manual for each of your components.
Make sure to use RCA cables to connect audio components.
CAUTION
- Do not connect this unit or other components to the main power until all connections between components are complete.
- Do not let bare speaker wires touch each other or any metal part of this unit. This could damage this unit and/or the speakers.
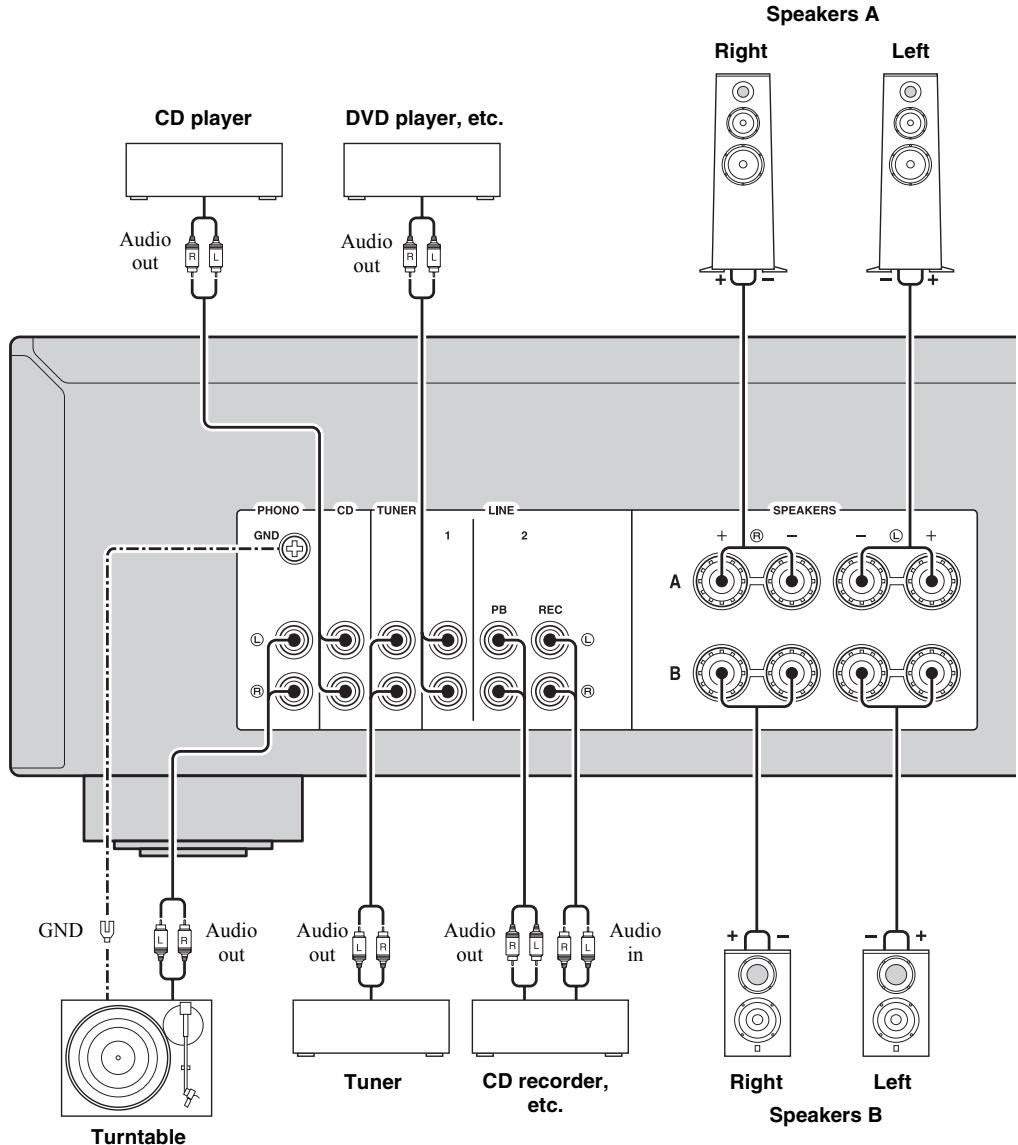

- The PHONO jacks are designed for connecting a turntable with an MM cartridge.
- Connect your turntable to the GND terminal to reduce noise in the signal. However, for some turntables, you may hear less noise without the GND connection.
REC jacks
- The REC jacks output audio signals of the currently selected input (except when LINE 2 is selected).
Volume level, tone control, balance and Pure Direct settings do not affect the REC jacks.
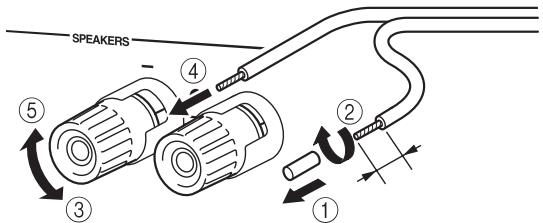
Connecting speaker cables
① Remove approximately 10mm of insulation from the end of each speaker cable.
② Twist the bare wires of the cable firmly together.
(3) Unscrew the knob.
④ Insert one bare wire into the hole in the side of each terminal.
⑤ Tighten the knob to secure the wire.
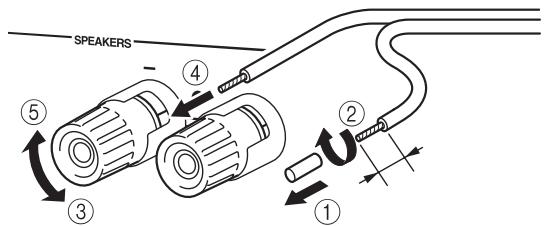
Red: positive (+) Black: negative (-)
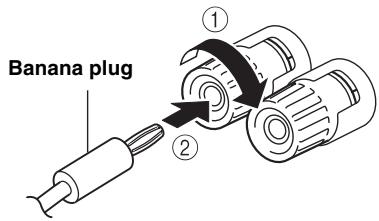
- Connecting via banana plug (Except for Asia, U.K. and Europe models)
① Tighten the knob.
② Insert the banana plug into the end of the corresponding terminal.
CAUTION
Speaker impedance must be set as shown below.
| Speaker connection | Speaker impedance |
| SPEAKERS A or SPEAKERS B | 8 Ω or higher |
| SPEAKERS A and SPEAKERS B | 16 Ω or higher (except for North America model) |
| Bi-wiring | 8 Ω or higher |
Bi-wire connection
Bi-wire connection separates the woofer from the combined midrange and tweeter section.
A bi-wire compatible speaker has four binding post terminals. These two sets of terminals allow the speaker to be split into two independent sections. With these connections, the mid and high frequency drivers are connected to one set of terminals and the low frequency driver to another set of terminals.
Rear panel
Connect the other speaker to the other set of terminals in the same way.
Note
When making bi-wire connections, remove the shorting bridges or cables on the speaker.
To use the bi-wire connections, press SPEAKERS A and SPEAKERS B on the front panel so that both SPA and B light up on the front panel display.
Connecting power cable
Plug the power cable into an AC wall outlet after all other connections are complete.
CAUTION
Only for General model:
Before connecting the power cable, make sure you set VOLTAGE SELECTOR of this unit according to your local voltage. Improper setting of VOLTAGE SELECTOR may cause fire and damage to this unit.
Playing a source
SPEAKERS A/B
1 Press (power) to turn on this unit.
2 Press one of the Input selector buttons to select the desired input source.
3 Press SPEAKERS A and/or SPEAKERS B on the front panel to select desired speaker(s).
Notes
- When one set of speakers is connected using bi-wire connections, or when using two sets of speakers simultaneously (A and B), make sure SP A and SP B are displayed on the front panel display.
- When listening with headphones, turn off the speakers.
SPA SPB

4 Play the source.
5 Press VOLUME + / - to adjust the sound output level.

You can adjust the tonal quality by using BASS - / + TREBLE - / + and the left/right sound balance of speakers by using BALANCE L/R (see page 5).
6 When finished listening, press (power) to set this unit to standby mode.
Press (power) to turn this unit on again.

- You can also use the buttons or knobs on the front panel if they have the same or similar names as those on the remote control.
- For recording, see page 4.
Enjoying pure, high fidelity sound (Pure Direct)
The Pure Direct function bypasses unnecessary circuitry in this unit to reduce electrical noise when playing the selected source. This allows you to enjoy high fidelity sound quality.
The PURE DIRECT indicator lights up and the front panel display turns off after a few seconds.
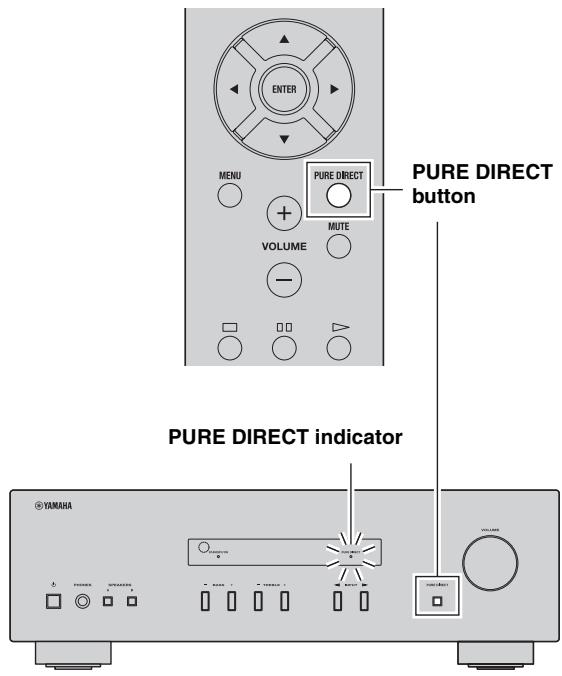
Note
The BASS, TREBLE, and BALANCE controls do not function while the PURE DIRECT feature is turned on.
Using the sleep timer
Use this feature to automatically set this unit to standby mode after a certain amount of time. The sleep timer is useful when you are going to sleep while this unit is playing or recording a source.

Press SLEEP repeatedly to set the amount of time before this unit is set to standby mode.
Each time you press SLEEP, the front panel display changes cyclically as shown below.
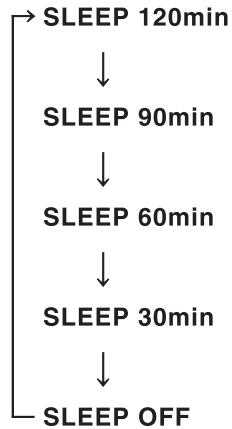
The SLEEP indicator blinks while setting the amount of time for the sleep timer.

If the sleep timer is set, the SLEEP indicator on the front panel display lights up.

To cancel the sleep timer, do one of the following:
- Select "SLEEP OFF".
- Set this unit to standby mode.
SETTING THE OPTION MENU FOR EACH INPUT SOURCE
The Option menu allows you to configure various settings for each input source and recall those settings automatically when an input source is selected.
1 Press one of the Input selector buttons to select the desired input source.
2 Press MENU.
3 Press / to select the desired menu item, and then press ENTER.
4 Press / to change the settings.

The default settings are marked with **.
- For certain menu items, you must press ENTER to save the new setting.
- To return to the screen where you can select menu items, press .
5 To exit the Option menu, press MENU.
Option menu items
| Menu item | Description |
| MAX VOL | Sets the maximum volume level so that the volume will not be accidentally increased above a certain level. Adjustable range: 01 to 99, MAX* |
| INITIAL VOLUME (INIT VOL) | Sets the volume at the time this unit is turned on. When this parameter is set to “OFF”, the volume level used when this unit was set to standby is applied. Adjustable range: OFF*, MUTE, 01 to 99, MAX |
| AUTO POWER STANDBY (AUTO STBY) | Sets this unit to standby mode automatically if no operation is performed in the specified time. Choices: OFF/2H/4H/8H*/12H |
TROUBLESHOOTING
Refer to the chart below if this unit does not function properly. If the problem you are experiencing is not listed below or if the instructions below do not help, set this unit to standby mode, disconnect the power cable, and then contact the nearest authorized Yamaha dealer or service center.
General
| Problem | Cause | Remedy | See page |
| This unit fails to turn on. | The power cable is not connected or the plug is not completely inserted. | Connect the power cable firmly. | — |
| The impedance setting of the connected speaker is too small. | Use speaker(s) with proper speaker impedance. | 9 | |
| The protection circuitry has been activated because of a short circuit, etc. | Check that the speaker wires are not touching each other and then turn the power of this unit back on. | 8 | |
| This unit has been exposed to a strong external electric shock (such as lightning or strong static electricity). | Set this unit to standby mode, disconnect the power cable, plug it back in after 30 seconds, then use it normally. | — | |
| No sound | Incorrect input or output cable connections. | Connect the cables properly. If the problem persists, the cables may be defective. | 8 |
| No appropriate input source has been selected. | Select an appropriate input source by pressing one of the Input selector buttons on the remote control (INPUT </▶ on the front panel). | 10 | |
| The SPEAKERS A/B switches are not set properly. | Turn on the corresponding SPEAKERS A or SPEAKERS B. | 10 | |
| Speaker connections are not secure. | Secure the connections. | 8 | |
| Output has been muted. | Deactivate the mute function. | 5 | |
| The MAX VOL or INITIAL VOLUME setting is set too low. | Set the setting to a higher value. | 12 | |
| The component corresponding to the selected input source is turned off or is not playing. | Turn the component on and make sure it is playing. | — | |
| The sound suddenly goes off. | The protection circuitry has been activated because of a short circuit, etc. | Check that the speaker wires are not touching each other and then turn the power of this unit back on. | 8 |
| This unit has become too hot. | Make sure the openings on the top panel are not blocked. | — | |
| The AUTO POWER STANDBY or SLEEP function has set this unit to standby mode. | Change the AUTO POWER STANDBY setting to a longer setting or OFF from the Option menu by pressing MENU. | 12 | |
| Only the speaker on one side can be heard. | Incorrect cable connections. | Connect the cables properly. If the problem persists, the cables may be defective. | 8 |
| Incorrect setting for the BALANCE L/R setting. | Set the BALANCE L/R setting to the appropriate position. | 5 | |
| There is a lack of bass and no ambience. | The + and – wires are connected in reverse at the amplifier or the speakers. | Connect the speaker wires to the correct + and – phase. | 8 |
| A “humming” sound can be heard. | Incorrect cable connections. | Connect the audio plugs firmly. If the problem persists, the cables may be defective. | 8 |
| No connection from the turntable to the GND terminal. | Make the GND connection between the turntable and this unit. | 8 |
TROUBLESHOOTING
| Problem | Cause | Remedy | See page |
| The volume level cannot be increased, or the sound is distorted. | The component connected to the LINE 2 PB/REC jacks of this unit is turned off. | Turn on the power of the component. | — |
| The sound is degraded when listening with headphones connected to a CD player connected to this unit. | This unit has been set to standby mode. | Turn on the power of this unit. | 10 |
| The BASS, TREBLE and BALANCE settings do not applied to the sound. | The PURE DIRECT function is turned on. | The PURE DIRECT function must be turned off to apply these settings to the sound. | 11 |
| The remote control does not work nor function properly. | Wrong distance or angle. | The remote control will function within a maximum range of 6 m and no more than 30 degrees off-axis from the front panel. | 7 |
| Direct sunlight or lighting (from an inverter type of fluorescent lamp, etc.) is striking the remote control sensor of this unit. | Reposition this unit. | — | |
| The batteries are weak. | Replace all batteries. | 7 | |
| Your tuner and/or CD player cannot be operated with the remote control. | The remote control does not support the tuner and/or CD player. | Refer to the owner's manual supplied with the tuner and/or CD palyer. | — |
| "OVER HEAT" appears on the front panel display. | This unit has become too hot. | Make sure the openings on the top panel are not blocked. | — |
| "CHECK SP" appears on the front panel display. | Speaker cables got shorted out. | Twist bare wires of speaker cables firmly, and then connect to this unit and speakers properly. | — |
SPECIFICATIONS
AUDIO SECTION
Minimum RMS output power (8Ω, 40 Hz to 20 kHz, 0.2% THD) [General, Korea, Australia, U.K. and Europe models] 100 W + 100 W [China and Asia models] 85 W + 85 W
- Input sensitivity/Input impedance (1 kHz, 100 W/8 Ω)
PHONO (MM) 10.0 mV/47 kΩ
CD, etc. 500 mV/47 kΩ
Output level/Output impedance CD, etc. (Input 1 kHz, 500 mV) REC 500 mV/2.2 kCD, etc. (Input 1 kHz, 500 mV, 8 PHONES 470 mV/470
Frequency response CD,etc. (20Hz to 20kHz) 0±0.5dB CD,etc.(10 Hz to 100 kHz) 0±3.0 dB
- RIAA equalization deviation
PHONO (MM) ± 0.5 dB
Total harmonic distortion PHONO (MM) to REC (20Hz to 20kHz,2V) .. 0.025% or less CD, etc. to SPEAKERS (20Hz to 20kHz,50W,8) . 0.2% or less
- Signal to noise ratio (IHF-A network)
PHONO (MM) (10 mV input shorted) 75 dB or more
CD, etc. (500 mV input shorted) 100 dB or more
- Residual noise (IHF-A network) 70 μV
- Tone control characteristics
- BASS
- Boost/Cut (50 Hz) ± 10 dB
- TREBLE
- Boost/Cut (20 kHz) ± 10 dB
GENERAL
Power supply [General model] AC 110-120/220-240 V, 50 / 60Hz [China model]. AC 220 V, 50Hz [Korea model] AC 220 V, 60Hz [Australia model] AC 240 V, 50Hz [U.K. and Europe models] AC 230 V, 50Hz [Asia model] AC 220-240 V, 50 / 60Hz
Power consumption [General, Korea, Australia, U.K. and Europe models] 175 W [China and Asia models] 140 W
- Standby power consumption [China, Korea, Australia, U.K., Europe and Asia models] 0.5 W or less
- Dimensions (W × H × D) 435 × 141 × 333 mm
- Weight 6.7 kg
* Specifications are subject to change without notice.
Information for Users on Collection and Disposal of Old Equipment and Used Batteries


Pb
These symbols on the products, packaging, and/or accompanying documents mean that used electrical and electronic products and batteries should not be mixed with general household waste. For proper treatment, recovery and recycling of old products and used batteries, please take them to applicable collection points, in accordance with your national legislation and the Directives 2002/96/EC and 2006/66/EC.
By disposing of these products and batteries correctly, you will help to save valuable resources and prevent any potential negative effects on human health and the environment which could otherwise arise from inappropriate waste handling.
For more information about collection and recycling of old products and batteries, please contact your local municipality, your waste disposal service or the point of sale where you purchased the items.
[Information on Disposal in other Countries outside the European Union]
These symbols are only valid in the European Union. If you wish to discard these items, please contact your local authorities or dealer and ask for the correct method of disposal.
Note for the battery symbol (bottom two symbol examples):
This symbol might be used in combination with a chemical symbol. In this case it complies with the requirement set by the Directive for the chemical involved.
ATTENTION : VEUILLEZ LIRE CE QUI SUIT AVANT D’UTILISER L’APPAREIL.
ACCESSIONES FOURNIS. 1
COMMANDES ET FONCTIONS 2
Panneau avant 2
Panneau arrriere 4
Télécommande 5
(1) b (alimentation)
(Pure Direct) genieBenn 11
uttag for REC (Recording)
IIPIJIaIaEMbIe IIPIHAdJIExKHOCTN....1
JIEMETbI YIIPABJEHIN
ФУHKUHOHAJIbHbIe
BO3MOXHOCTH 2
IpeHnaHeJIb. 2
3aIHHaIIeJIb. 4
IyIbT IY 5
HcIOJIb3OBAHHe IyJIbTa JY. 7
IODIOTOBKA
IIOJKJIOUeyHn8
ПОДКЛIOЧЕНС ДИHAМИКOB И KOMПОHETOВ
HCTOuHnKOB. 8
IoiKJIIOUeHHe Ka6eJIA IHTaHHN 9
OCHOBHbIE ΦYHKLIMN
BOCIPON3BEDEHNE 10
Bocpon3BeJeHHe 3Byka HcToHHKa. 10
IOCTHKeHHe BbICOKOrKaueCTBa HcNCTOTbI
3Byka (Pure Direct) 11
HcnoJb3ObaHne TaHmepa cIIaIeRo pexHa.....11
DONOJIHNTIELbIeΦYHKLIM
HACTPOIKA MEHIO OPTION JIJA
KAKIOTO HCTOHHKA BXODHO
CHHJAIA 12
TEXHINUeCKNE XAPAKTEPHCTUKK...15
06 3TOM pyKOBoDCTBE
CHMBOJOMIIOmeyaeTcOBETJIIO6JIeYHnYIIpaJIeHn.
B TOM pyKOBOCTBe OINcHbIaEeTcYIIpaJIeHHe aIIIAPAeTc IIOMOIbIoo IIpHJIraeMOrO IIyJIbTa IY. MoKHO TaKKe HIOJIb3OBaTb KHOIIKN IpeYJIArTOpbI Ha IpeIeHNe IaHEJI, ecJIOn OHN HMeIOT Ha3BaHnE, OINHaKOBbIe HJN IOIO6HbIe 3JIeMeHTam YIIpaJIbHnHa IIyJIte IY.
ПОЛЕ3ныIEФУHKЦИОHAЛьНыIEBO3MOЖHOCTN
C IIOMOIbI OTOI aIIIapata MOXHO BbIIOJIHITb OINCAHHbIe HNKe JeIcTBnIa:
IocTHraTb BbICOKOTo KaYeCTBa H NcHcTOTbI 3ByKa C IIOMOIIbIO yHkUHH Pure Direct (cm. cTp. 11)
IpaJIaTb TIOHepOM H (HJIN) IIPOHrpIBaTeJIeM KOMIIaKT-JIcKOB Yamaha c IIOMOIbIO IIyJIbTa JY daHHoro aIIIapata (cm. cTp. 6)
ΘKOHOMHTb 3JIeKtpo3HeprTHIO c IIOMOIIbIO yHKIIN AUTO POWER STANDBY (cM. cTp. 12)
ПРИЛАГЕМБIE ПИНДЛЕЖHOCTN
Y6eIHTecb B HauJInuHn IpeueHcJIeHHbIX HINKe KOMIOHeHTOB.
IyIbT dY
BaTapeKn (2 wt.)
(AA, R6, UM-3)
3JIEMETbI YNPABJIeHnI ΦYHKUHOHAJIbHbIE BO3MOXHOCTN
Передна панень.
(ПиТане)
BkIIOUeHHe IaHHoro aIIIapara TJIIN IpeBoJ erO B peKIM OxNJaHHJ.
PpMueaHne
IaKe BpeKHe M OJHJaHH JaHHbI aIIIapat IIOHp6JIaET He6OJIbIIOe KOJIINcTBo 3HeprHn.
② CechopДy
Pnem HnΦpaKpaChbIX cHrHaJIOB OT NjIbTa IY.
③ ИнданkaTop STANDBY/ON
BbIOⅡ 3ByKa Ha HayIIHHKN IJIa HINHBNyAJIbHOI IpOcJyIHHBaHN.
PpmeaHne
Ipepe IIOKJIIOUeHHeM HayIIHHKOB K rHe3y PHONES HauHMaTe KHOIIky SPEAKERS A/B, IIoka He IIOraCyHT HINIIKAToPbI SP A/B (cm. cTp. 2).
11 SPEAKERS A/B
BkJIOUeHHe HIN BbIKJIOUeHHe KOMJIIEKTa IHHAMHKOB, IIOKJIIOUeHHOro K pa3beMaM SPEAKERS A n/HJIN SPEAKERS B Ha 3aJHeI NaHeJIi, KaJbIpa3 IIpH HaKaTHi COOTBeTCTByIOIIe KHOIIKN (CM. cTp. 10).
② BASS-/+
YBeJIHueHHe HJIn yMeHbIeHHe TeM6pa Hn3KHX YaCTOT.
Bb6op HcToHnKa BxOJHOro CnHaJa, KOTOpbI Tpe6yeTcI pOcJyuaTb.
15 PerylaTop VOLUME
YBeJIHueHHe HJIyMeHbIeHHe ypOBHrPOMKoCTn 3ByKa.
3aHЯ paHeIb

① Ka6eJb nHTaHn
IIJIIOIJKJIIOUeHnAIIIIapaTaK PO3EtKe ceTH IIepeMeHHOrTo TOKa (cm. cTp. 9).
② Pa3bem GND
NcIOJIb3yIOTc IJIa IIOKJIHOueHnI npOHrpBbAteJIa (cm. cTp. 8).
③ Геда PHONO
NcIOJIb3yIOTcJIIJIIOKJIHOUeHnI IIPOHrpBbAteJIa (cm. cTp. 8).
④ THe3da CD
NcIIOJIb3yIOTcI IJIIOIKJIOUeHII npOHpIBaTeJI KOMIIaKT-ⅡHCKOB (cm. cTp. 8).
⑤ THe3daTUNER
IcIIIOJIb3yIOTcIJIa IIOJIKJIIOUeHnI TIOHepa (cm. cTp. 8).
⑥ THe3da LINE 1
IcIOJIb3yIOTcIJIYIOIKJIOUeHnA ayIOKOMIOHeTOB (cm. cTp. 8).
⑦ THe3da LINE 2
THe3da PB (Bocnpon3BeDeHne)
HcIIOJIb3yIOTcJIIJIIOIKJIOUeHHN K RHe3IaM BbIXOJa 3ByKa ayINOKOMIOHeHTOB.
Tne3da REC (3aIncb)
HcIIOJIb3yIOTcIJIIA IOIKJIOUeHHN K rHe3IaM BXOJa 3Byka ayINOKOMIIHOHTOB.
(8) Pa3beMbl SPEAKERS
HcIOJIb3yIOTcIJIa IIOIKJIIOUeHnI INHaMHKOB (cm. cTp. 8).
Bb6op Iuaa3oHa IIpneMa (FM/AM).
MEMORY
CoxpaHeHne TeKyuIe FM/AM-cTaHIIIN B cIIINcKe IIpeDyuctaHOBOK.
INFO
ToIbKO IJIa MoJeJIeI, IIpeHa3HaueHHbIX IJIa EbpOJIbI:
IpekeJIIOUeHHe INHΦOpMaIIHH, OTO6paKaeMoI Na IINcIIIEe IpeEINHe IIaHEJN.
PpmeaHne
IaKe IpiH NcIOJIb3OBAHn TIOhepaYamaha HeKOTOpbIe KOMIOHEHTbI H cyHKIIHOHaJIbHbIE BO3MOxHOCTN MOrYT 6bITb HEIOCTUINbI. IIOIOJIHNTEJIbHbIE CBeJeHHa CM.B HHCTpyKIIHN IO 9KCIJIyAtaIINI IOKJIIOuAeMORO KOMIOHEHTa.
3JIeMeHTbI ynpaBHeHn npOnrpbIbATEJIeM KOMNaKT-DnCKOB Yamaha
IpeueHcJIeHHbIe HnKHe KHOIIKN IcIOJIb3yOTcra JJIa yIpaBJIeHHI IIPOIHrpblBaTeJIeM KOMIIaKT-ⅡNCKOB Yamaha.
15 KhoNKn ynpaBHeHnI npOnrPbIBaTeJeM KOMNaKT-ДИСКOB Yamaha
| □ | Остановka BOCIPROH3BVeДeHЯ |
| 田田 | Прионстадовka BOCIPROH3BVeДeHЯ |
| > | Начало ВOCIPROH3BVeДeHЯ |
| DISC SKIP | Перекхов К следуюшем ДИСКУВ ПереклочаTeЛКOMПАКТ-ДИСКOB |
| 田田 | Перекхов НаЗд |
| 田田 | Перекхов Впэрел |
| Извileчени ДИСКА | |
| 田田 | ПерекOTКа НаЗд |
| 田田 | ПерекOTКа Впэрел |
PpmeaHne
- Mexy IIyIbTom IY nIaHHbIM aIIIapaTOM He IOJIJKHO 6bITb IIpeIeIATCTBn.
- I36eraTe POnaIaHnHa NpIbT YBOBbI NApYrHex KJIKoCte.
He poHraIte IyIbT IY.
He xpaHHTe H He oCTaBJIaIte IyJbT IY B TaKHX MeCTax:
C BbICOKO BJiaJXHOCTbIO, HApIMeP, PAnOM C BaHHoK KOMHaTOI;
- C BbICOKOJI TeMIIePaTyPOJ, HAnpIMep, PjaIOM c O6oRpeBaTeJIeM IJIIN IIeYbIO;
C OUeHb HN3KHMn TeMIIpeaTypaMn;
c60JIbIIOH KOHNHTpaIIHe IbJIIN.
-Пи уменин pa6оуero Дианаэоги пьыт aY замение BCE saтapeКн.
- EcJH 6aTapeKn pa3pIaTcR, HeMeJIeHHo H3BJIeKHTe Hx H3 IIyIbTa IY, YTO6bI H36eKaTb B3pbIbA HJIyTeUKN KNCJIoTbI.
- O6hApyKnB yTeUky JnIiKocTn Ha 6aTapeHkax, HemeJIeHHO I36abBbTeCb OT TaKHX 6aTaapeEK, HN B Koem cIyuae He IIpHKacAcb K BbITeKIIeMy BeIeCTBy. EcJIN BbITeKIIeE BeIeCTBO IIoJaIO Ha KOKy, B rJa3a IIJn pot, IIpOMOIte MeCTO IIoIaIaHnBaIoi N HemeJIeHHO 6bpaHTeCb K BpaY. IIpeJ yCTaHOBkoHOBbIX 6aTaapeE K TIIaTeJIbHO OUnCTHrTe OTCek IJIa 6aTaapeEK.
He hnoJIb3yIte cTapeBcIKN BMeCTe C HOBIM. 3TO MOKe T IIpHBeCTN K COKpaIIeHHIO cPoka cJIyK6bl HOBIX 6aTapeek IIN K IIpoTeKaHHIO cTapeix 6aTapeek.
He hnoJIb3yIte pa3JInuHbIe TINbI 6aTaapeek OINHOBpeMeHHO (HaIIpHMeP, IIeJOUHbIe H MapraHIIeBBIe). IIOxOJIe BHeIIHe 6aTaapeKIMoYr TMeT bpa3HbIe XapaKTepHCTNKn.
- IpeepyctaHOBKOHOBbIX6aTaapeeKHaHcToIpoTpHTeOTcEKJIA6aTaapeek.
- YTNJIH3NpyIte 6aTaapeiKn cOgJaLacHO MeCTHOMy 3aKOHOJaTeJbCTBY.
- IepKHTe 6aTapeEKN BHe IOcraeMocTHIeTei. Pe6eHOK MoKeT B3rTB 6aTapeEky B pot, a 3TO OueHb OnaCHO.
- BbHbTe 6aTapeKn H3 aIIIapata, ecJH He 6yJeTe HcIOJIb3ObaTb erO IOJIroe BpeM. B IpOTHBOM cIJyae 6aTaapeKn pa3pIaTcA, a 3TO MOKeT IIpNBecTH N IIpoTeKaHHIO XHdkocTH H3 6aTaapeek, KOtopa CIOco6Ha IIOBpeINtB aIIIapat.
ПОДКЛЮЧЕНЯ
- ΠHe3Дa REC CJIyXaT JIIЯ BBIBOДa ayINOCHraJIOB OT BbI6paHHORo BXOДa (KpOME Tex CJIyuaEB, KOrJa BBI6paHo LINE 2).
HacTPOIKN yPOBNr rPOMKoCTn,TeM6pa,6aJIaHca H Pure Direct Ha rHe3Ja REC He BJIInyOT.
IopKJIoueHne Ka6eNei DnHaMnKOB
① CHHMHTE IIpHMEPHO 10 MM I3OJIaHH C KaJIOK OOHIIa Ka6eJIa IOIKJIIOUeHHI INHAMKOB.
② KpeIIKO cKpyTHTe orOJIeHHbIe IPOBOJa Ka6eJIa.
③ OcJa6bTe pyKy.
④ BcTaBbTe OROJIeHHbI KOHeII IIOBOJa B OTBepCTHe, paCIOJIOJKeHHoe Ha 6OKOBIO IIOBePXHOCTN KaKJIOrO pa3'beMa.
⑤ 3akpyTHTe pyKy, YTO6bI HAIeJxHO 3aKePENITb IPOBOJ.
Kpacha: noIOXHTeIbHbIKoHTaKT (+)
UepnHa:OTpNzateIbHbI KOHTaKT(-)
IopoKJIoueHne c NOMOu bIO uTeKepa c npoJOnbHbIMN IOIpUxHnBaIOuMn KOHTaKTamn (Kpome MoJeIeI dJa A3nn, BeINko6pTuHaHm n EBrpoNbl)
① 3aKpyTHTe pyKy.
② BcTaBbTe IIIKepe C IIPOIOJIbHbIMN IIOIIpyKHHBaIOIIMN KOHTaKTAMN B KOHeIC COOTBeTCTByIOIeIro pa3'beMa.
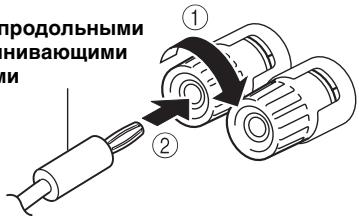
Utekepc npoOJbHbIMn npoIpyxHHBaIOUIMM KOHTaTAMN
BHIMMAHNE
ПОЛhoe coIIpOTnBJIeHne IINHaMHKOB IOJIxHO COOTBeTCTBOBaTb yKa3aHHOMy HNKe.
IopoKJIouHeHc nOmoUIO Ka6eJIaBi-wire
IIpi IIOKJIIOUeHHN C IOMOIIbIO Ka6eJIa Bi-wire 3ByK KaHaJa Hn3KOyAcTOTHO DnHaMnKa OTJeJIeH OT O6bEiINHeHHORO KaHaJa cpeIHeuAcTOTHO N BbICOKOyAcTOTHO DnHaMnKB. IIiHAMHK, IIoJIepJXHBaIOHne IIOKJIIOUeHHe c IOMOIIbIO Ka6eJIa Bi-wire, OcHaIeHbI YeTbIPbMg pa3bEmAMn C KJIeMMaMn. C IOMOIIbIO 3THX DByX Ha6OpOB pa3bEmOB 3BYK DnHaMnKB OMOHO BVIBODHTB IO IIbym He3ABNCIMbM KaHaJIaM. C IOMOIIbIO 3THX CoEiINHeH N DnHaMnKcpeIHHX N BBICOKHX YAcTOT MOxHO IIOKJIIOHtB K OdHOMy Ha6OpY pa3bEmOB, a DnHaMnK Hn3KNX YAcTOT - K dpyTOMy Ha6OpY pa3bEmOB.
3aHnaheB
AHAJIOTHNBIM O6pa3OM IIOJKJIOHTe Ka6eJIINIHHAMIKOB K JpyrOmy Ha6Opy pa3beMOB.
PpMueaHne
Пи ПОДКЛЮЧЕНС ПОМОШь Кабел Bi-wire ChHIMTe IpepeMbIчК ИЛКабелДИнHaMnka.
TEXHINUeCKNEXAPAKTEPNUCTNKN
PA3DEJI AYINO
MHINMAJIbHAByBIXOJHARMOIIOCTbRMS (8OOT40TID20KII,IOJIbIKoAΦHIIHeHT rapMOHNueCKHXNCKaXKeHH (THD) 0.2% [O6IIaM OMeJIb H MoEJIIN IJIa KOpEn, ABcTpajHH, BeJIHKoBpHTaHHN I EBoPbI] 100BT+100BT [MoJIeJI N IJIa KHTaYn A3HH] 85BT+85BT
- UyBCTBHTeJIbHOCTb HbXOJe/BXoJHoe COIIPOTHBJIeHHe (1 KΓI, 100 Bt/8 Ω) PHONO (MM) 10,0 MB/47 KΩ CD I T.I. 500 MB/47 KΩ
BbIXOHOyPOBEHb/BbIXOHOoe COIpoTHBJIeHHe CDnT.I. (BXoJ1 KΓI, 500 MB) REC 500MB/2,2KΩ CDnT.I. (BXoJ1 KΓI, 500MB,8Ω) PHONES 470MB/470Ω
- Chactotnha xapaKtepncnka CD nT. (OT 20 _ do 20 _ ) 0 ± 0,5 nB CD nT. (OT 10 _ do 100 _ ) 0 ± 3,0 nB
- OTKJIOHeHHe BbIpaBHHBaHHa IIO RIAA PHONO (MM) ... ±0,5 nB
ПлJBиКоэфнIHENT rapMOHnK PHONO (MM) K REC (ot 20 Iиdo 20 kIi, 2 B) ... He 6oJIe e 0,025% ot CD n T.I. K SPEAKERS (ot 20 Iиdo 20 kIi, 50 Bt, 8 Ω) ... He 6oJIe e 0,2%
- OTHOIIeHHe cHHaJI/IIyM (ceTb IHF-A) PHONO (MM) (BXoI 10 MB 3aKOpOyeH) .... He MeHee 75 IBCD II. II. (BXoI 500 MB 3aKOpOyeH) .... ... He MeHee 100 I
- OctaToCHbI IIyM (ceTb IHF-A) 70 mKB
XapaKTepeHCTnKN peRyJInpOBKn TeM6pa BASS IOnIbI dHaIa3OH peRyJInpOBKn (50 T) ... ± 10 nB TREBLE IOnIbI dHaIa3OH peRyJInpOBKn (20 K) ... ± 10 nB
OBUHE XAPAKTEPNCTUKN
-Питаннe [Оьшая модел] 110-120/220-240Вперм.TOKA,50/60T [МоделДлЯКита] .220Вперм.TOKA,50T [МоделДляКори] .220Вперm.TOKA,60T [МоделДляАстрали] .240Вперm.TOKA,50T [МоделДляВелкобртугни ИЕрпь] 230Вперm.TOKA,50T [МоделДляАзи] .220-240Вперm.TOKA,50/60T
IOTpe6JIeMaJ MOIIHOCtB [O6IIaMoJIb H MoJIeJIH IIa KopeH, ABCtpaJIHH, BeJIHKo6pHTaHH N EBypoIIb] 175 B[MoJIeJIH IIa KHTaI N A3HH] 140BT
ПOTpe6JIЯмая мошноctь в ржиме ожндали
[МоJeJINДЛЯ КНТая,Кори,Абстрали,ВeJIиКОБрптанн,
ЕврòIи A3Ии]............ He 6oJIee 0,5 BT
- Γαδαριντβι (III × B × Γ) 435 × 141 × 333 MM
Bec 6,7K
*TexHHueckHe XapaKTepHCTHKM OryT H3MeHrTbc8 6e3 yBeJOMJIeHHI.
HΦopMaζηДЯ NOJb3OBaTeJIeI NO c6OpU yTnJIH3aζN C TaPoi annapaTypbl N NCNoJIb3OBaHHbIX 6aTapeek

3TH 3HaKn Ha aIIIapaType, yIIaKOBkax H B COIIPOBOJNTeJIbHbIX OOKyMeHTax Yka3bIBaIOT Ha TO, YTO IIOpJxAHHbIe 3JIeKtpnueckne H 3JIeKtpoHHbIe Ipi6OpbI H 6aTaPeYKN He IOnJXHbI BbI6paCbIBaTbc BMeTe C 06bIYHbIM IOMaIIHHM MycOpom.
IIpaBnIbHOn 6oPa60TK, XpaHeHHn H yTHIN3aHm C TaPoA aHnapaTpyb I NcHIOJIb3OBAHHbIX 6aTapeek, IIOkaJyHcTa cdaBaHte Hx B COOTBeTCTByIOHne C6OpHbE IyHKtB, COrJIaCHO BaIIeMy HAIOHOJIbHOMy 3aKOHDoTeJIbCTBy I nHpeKTHB 2002/96/EC n 2006/66/EC.

Ipn HauJIeXaIIeYtINH3aIIIN 3THX TOBAPOB I 6aTapeEK, BbI IOMoRAeTe COxpaHrTB IeHHbIE pecypcI I IIpeIOIbPAaIIaTb BpeIHOe BJIINHHe Na 3IOPOBBe JIOJeI N OKpyKaHOUYO cpeNy, KOTOpOE MOKeT BO3HNKHyt Ib-3a HeCOOTBeTCTBYIOIIeO O6paIIeHnC OTXoJAMn.
3a 60JIe eIIOJPO6Hoi INHΦOpMaIIeH O c6ope H yTHJIIN3aIIHH CTapbIX TOBAPOB H 6aTapeek, IIOJaIyIcTa O6paIIaIIteCb B BAIIY JOKaJIbHyIO aIMMHHCtPaIIHIO, B BAII II pHiEMbI IIyHKT IIIN B MaIgA3IH Ie B bI IIpHOb6peJIH 3TH TOBApBI.

[Infopmaunno ytnin3aunn B dpynx ctpanax 3a npedeJamn Ebponeckoro Coo3a]
3TH 3NaHn DeIcTBHTeJIbHbI ToJIbKO Ha TeppHTOpHH EByoIIeCKORO CoIO3a. EcIN BbIXOTHTe H36aBHTbcr O TTHX IIpeIMTeOB, IOKJIyHcTa O6paTHTecb B BaIIy JIOKaJIbHyIO aDMHNCTpaIHIO HJIN IIpoIaBHy I cPiocHTe O IIpaBIIbHOM cNOC6e yTHJIN3aIIHN.
06paTnte BnMaHne Ha 3HaK dJa 6aTapeeK (Ba 3HaKa Ha 3aDHei CTopoHe):
3TOT 3HaK MoKeT HcIOJIb3OBAbTcB KOM6HHaIHH CO 3HaKOM yKa3bIBaIOIIHM O cOpeJkaHH XMHKAJIH. B 3TOM cIyae 3TO yIOBJIeTBOpAe Tpe6OBAHm yCTaHOBJeHHbIMN IIpeKTHB0I IO HCIOJIb3OBAHnIO XMHKAJIH.