
CA6 N3B3YTB - Built-in oven CANDY - Free user manual and instructions
Find the device manual for free CA6 N3B3YTB CANDY in PDF.
| Product type | Built-in oven |
| Brand | CANDY |
| Model | CA6 N3B3YTB |
| Power supply | 230 V, selectable 13-16 A |
| Maximum power | Approximately 3 kW |
| Cooking functions | Eco, Natural convection, Multi-level, Supergrill, Gratin, Air fry, All-in-one bakery, Pizza |
| Special functions | Rapid preheat, Delayed start, Timer, Alarm, Remote control |
| Cleaning | Pyrolysis (410 °C), Aquactiva (steam), Catalysis (panels) |
| Safety | Door lock (pyrolysis), heating elements stop when door opens, screen lock |
| Connectivity | Wi-Fi IEEE 802.11 b/g/n, Bluetooth v4.2, hOn app |
| Lighting | LED bulb, energy efficiency class G, replaceable |
| Supplied accessories | Wire rack, baking tray, deep tray, drip pan, rotisserie spit (depending on model), telescopic guides (depending on model), smart tray (depending on model) |
| Installation | Built-in, in a column or under worktop, ventilation required |
| Maintenance | Pyrolysis, aquactiva or catalysis cleaning; removal of glass door for cleaning; bulb replacement |
| Repairability | Bulb and spare parts available via customer service |
Frequently Asked Questions - CA6 N3B3YTB CANDY
User questions about CA6 N3B3YTB CANDY
0 question about this device. Answer the ones you know or ask your own.
Ask a new question about this device
Download the instructions for your Built-in oven in PDF format for free! Find your manual CA6 N3B3YTB - CANDY and take your electronic device back in hand. On this page are published all the documents necessary for the use of your device. CA6 N3B3YTB by CANDY.
USER MANUAL CA6 N3B3YTB CANDY
Thank you for choosing our product. To ensure your safety and get the best results, please read this manual carefully, including the safety instructions, and keep it for future reference.
Before installing the oven note the serial number, which you might need for repairs. Check for any damage during transportation and consult a technician if you're unsure before using it. Keep packaging materials away from children.
NOTE: Please note that the oven's features and accessories may vary depending on the model you purchased.
-
SAFETY INFORMATION
-
PRODUCT INTRODUCTION
2.1. Overview of the product
2.2. Accessories
2.3. Control panel
2.4. Connectivity -
BEFORE STARTING
3.1. Information to start
3.2. First usage
3.3. Preliminary cleaning
- OPERATION OF PRODUCT
4.1. How the product works
4.2. Cooking functions
4.2.1. Standard functions
4.2.2. Special functions
- COOKING GUIDELINES
5.1. General Cooking tables
5.2. Everyday Cooking tables
- CARE & CLEANING
6.1. General recommendations
6.2. Cleaning the oven
6.2.1. Inside the oven: cleaning functions
6.2.2. Outside the oven: removal and cleaning the glass door
6.3. Cleaning of accessories
6.4. Maintenance
-
TROUBLESHOOTING
-
ENVIRONMENTAL PROTECTION & DISPOSAL
8.1. Appliance disposal
8.2. Saving and respecting the environment
9. INSTALLATION
GENERALWARNINGS
- Do not use a steam cleaner for cleaning operations.
- A CAUTION: in order to avoid a hazard due to inadvertent resetting of the thermal cut-out, this appliance must not be supplied through an external switching device, such as a timer, or connected to a circuit that is regularly switched on and off by the utility
- During use the appliance become hot. Care should be taken to avoid touching heating elements inside the oven.
Use in accordance with attendend use
- Only use the oven for its intended purpose, that is only for the cooking of foods: any other use, for example as a heat source, is considered improper and therefore dangerous. The manufacturer cannot be held responsible for any damage resulting from improper, incorrect or unreasonable usage.
Use limitations
- The appliance can be used by children aged from 8 years and above and persons with reduced physical, sensory or mental capabilities or lack of experience and knowledge if they have been given supervision or instruction concerning use of the appliance in a safe way and understand the hazards involved. Children shall not play with the appliance. Cleaning and maintenance shall not be made by children without supervision.
- This appliance is not intended to be used by persons (including children) with reduced physical, sensory or mental capabilities, or lack of experience and knowledge, unless they have been given supervision or instruction concerning use of the appliance by a person responsible for their safety.
Children should be supervised to ensure that they do not play with the appliance. - AWARNING: the appliance and its accessible parts become hot during use. Care should be taken to avoid touching heating elements Children less than 8 years of age shall be kept at away unless continuously supervised.
children should be kept away.
INSTALLATIONWARNINGS
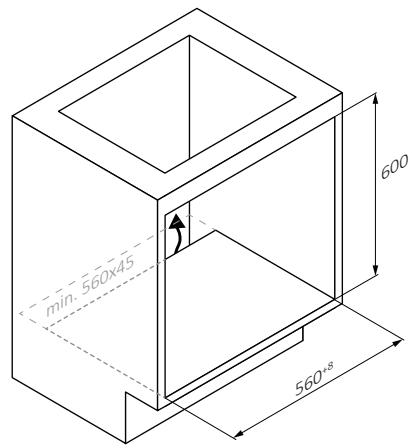
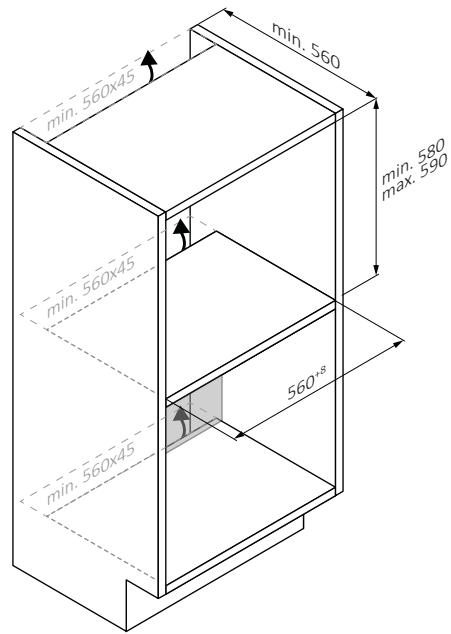
- The oven can be located high in a column or under a worktop.
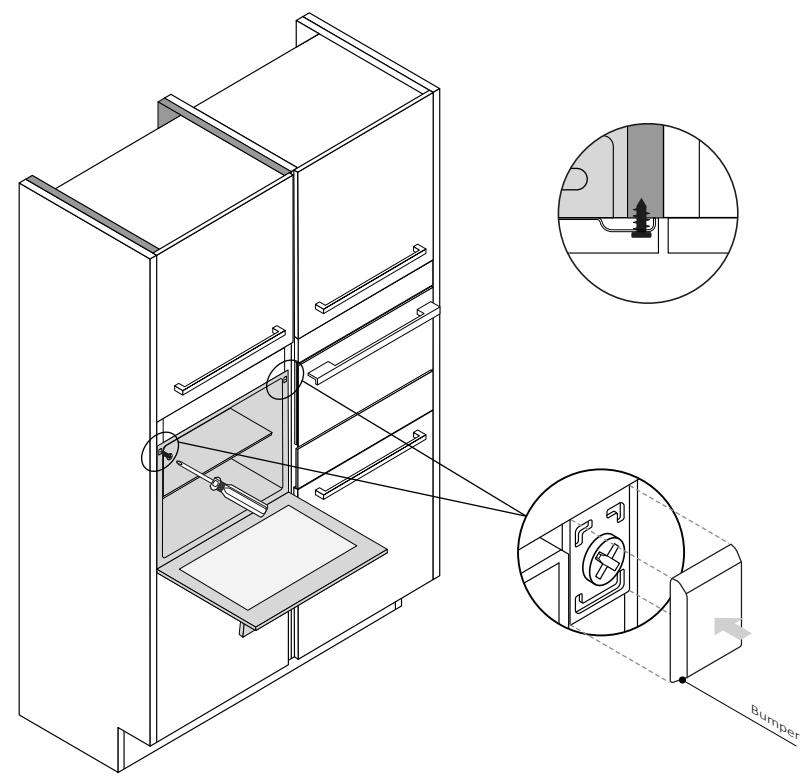
- Before fixing, you must ensure good ventilation in the oven space to allow proper circulation of the fresh air required for cooling and protecting the internal parts. Make the openings specified on the illustrations according to the type of fitting. Always fix the oven to the furniture with screws provided with the appliance.
- No additional operation/setting is required in order to operate the appliance at the rated frequencies.
- The appliance must not be installed behind a decorative door in order to avoid overheating.
- During installation the oven should be disconnected from the mains to avoid overheating.
- If the assistance of the manufacturer is required to rectify faults arising from incorrect installation, this assistance is not covered by the guarantee. The installation instructions for professionally qualified personnel must be followed.
- Incorrect installation may cause harm or injury to people, animals or belongings. The manufacturer cannot be held responsible for such harm or injury.
- Installation must be carried on by a qualified technician who must know and respect the laws in force in the country of installation and the manufacturer's instruction.
- After unboxing the appliance, always check it is not damaged, in case of issue contact the customer service before installing and do not connect to the power supply.
- Remove the packaging material before operating the appliance.
- During installation do not use the oven door's handle to lift and move the oven.
- The installation furniture and the adjacent ones must with stand temperatures of 95^ C .
It is recommended to wear protective gloves during installation to avoid cut injuries. - Do not install the product in open environments exposed to at-
This appliance is designed to be used at altitude lower than 2000m.
ELECTRICALWARNINGS
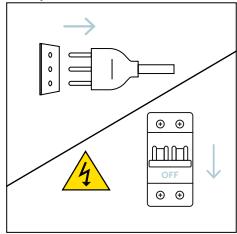
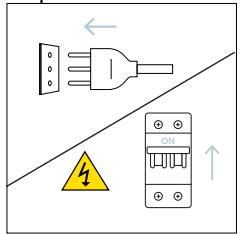
- The socket must be suitable for the load indicated on the tag and must have ground contact connected and in operation. The earth conductor is yellow-green in colour. This operation should be carried out by a suitably qualified professional.
- Connection to the power source can be made by plug or by fixed wiring placing an omnipolar breaker, with contact separation compliant to the requirements for overvoltage category III, between the appliance and the power source that can bear the maximum connected load and that is in line with current legislation.
- In case of incompatibility between the socket and the appliance plug, ask a qualified electrician to substitute the socket with another suitable type. The plug and the socket must be conformed to the current norms of the installation country.
- The yellow-green earth cable should not be interrupted by the breaker. The socket or omnipolar breaker used for the connection should be easily accessible when the appliance is installed.
- If the supply cord is damaged, it must be replaced by the manufacturer, its service agent or similarly qualified persons in order to avoid a hazard. For any repairs, refer only to the Customer Care Department and request the use of original spare parts.
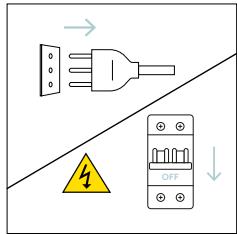
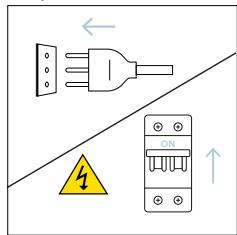
- Disconnect the appliance from the mains electricity supply before carrying out any work or maintenance on it.
- A WARNING: ensure that the appliance is switched off before replacing the bulb, to avoid the possibility of electric shocks.
- The oven must be switched off before removing the removable parts. After cleaning, reassemble them according the instructions.
-
The use of any electrical appliance implies the observance of some fundamental rules:
-
do not pull on the power cable to disconnect the appliance from the power source;
- do not touch the appliance with wet or damp hands or feet;
- in general the use of adaptors, multiple sockets and exten
in case of malfunction and/
appliance and do not tamper with it.
NOTE: as the oven could require maintenance work, it is advisable to keep another wall socket available so that the oven can be connected to this if it is removed from the space in which it is installed.
- Any repair, installation and maintenance not carried out correctly can seriously endanger the user.
- The manufacturing company hereby states that it does not assume any responsibility for direct or indirect damages caused by incorrect installation, maintenance, or repair work. Furthermore, it is not liable for damages caused by the absence or interruption of the grounding system (e.g., electric shock).
- A CAUTION: in order to avoid a hazard due to inadvertent resetting of the thermal cut-out, this appliance must not be supplier through an external switching device, such as a timer, or connected to a circuit that is regularly switched on and off by the utility.
- The appliance is not designed to be activated by an external timer or separate remote control system.
USE & MANTEINANCE
- The dripping pan collects the residues that drip during cooking.
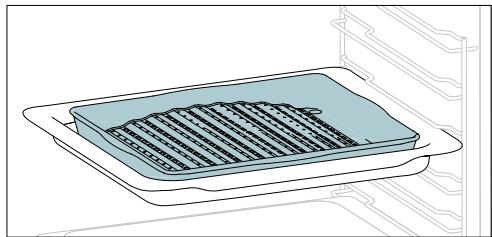
- When you place the grid on the side racks, make sure that the shorter section of the side (between the stop and the extremity) is directed towards the interior of the oven. If the grid has a decorative metal bar, pay attention to position it on the exterior of the oven so that the brand logo can be visible and readable. For the correct positioning refer also to the image in the Accessories section of this user manual.
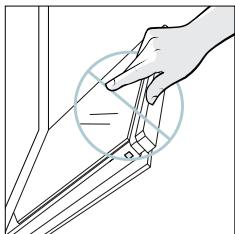
- Do not use harsh abrasive cleaners or sharp metal scrapers to clean the oven door glasses, since they can scratch the surface, which may result in shattering of the glass.
- Only use the temperature probe recommended for this oven.
- During cooking, moisture may condense inside the oven cavity or on the glass of the door. This is a normal condition. To reduce this effect, wait 10-15 minutes after turning on the power before
pears when the oven reaches the cooking temperature.
- Cook the vegetables in a container with a lid instead of an open tray.
- Avoid leaving food inside the oven after cooking for more than 15/20 minutes.
- A long power supply failure during an occurring cooking phase may cause a malfunction of the monitor. In this case contact customer service.
- A WARNING: Do not line the oven walls with aluminium foil or single-use protection available from stores. Aluminium foil or any other protection, in direct contact with the hot enamel, risk melting and deteriorating the enamel of the insides.
- A WARNING: Never remove the oven door seal.
- A CAUTION: Do not refill the cavity bottom with water during cooking or when the oven is hot.
- For a correct use of the oven it is advisable not to put the food in direct contact with the racks and trays, but to use oven papers and/or special containers.
WARNING (*FOR PYRO OVENS)
- Excess spillage must be removed before cleaning.
- WARNING: before initiating the automatic cleaning cycle:
Clean the oven door;
- Remove large or coarse food residues from the inside of the oven using a damp sponge. Do not use detergents;
- Remove all accessories and the sliding rack kit (where present);
- Do not place tea towels.
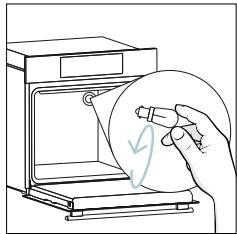
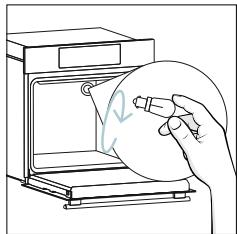
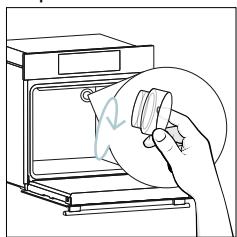
- In ovens with meat probe it is necessary, before making the cleaning cycle, close the hole with the nut provided. Always close the hole with the nut when the meat probe is not used.
- During the pyrolytic cleaning process (if available), the surfaces may get hotter than usual and children should be kept away.
- If a hob has been fitted above the oven, never use the hob while the Pyrolizer is working, this will prevent the hob from overheating.
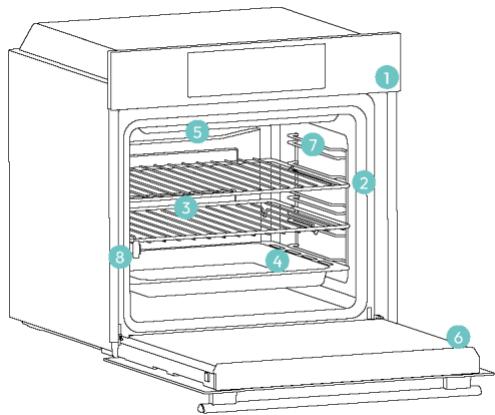
2.1. OVERVIEW OF THE PRODUCT
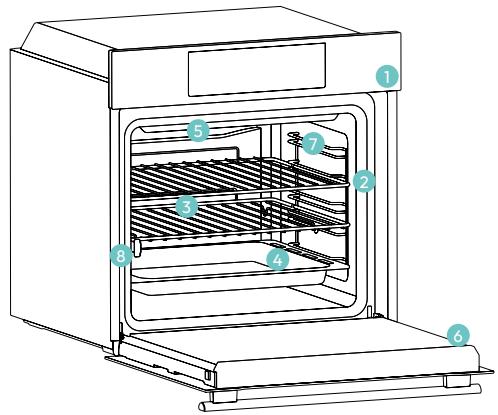
2.2 ACCESSORIES
- Control panel
- Shelf positions numbers
- Grids
- Trays
- Fan cover
- Ovendoor
- Lateral wire grids (if present: only for flat cavity)
- Serial number & QRcode

Write here your serial number for future reference.
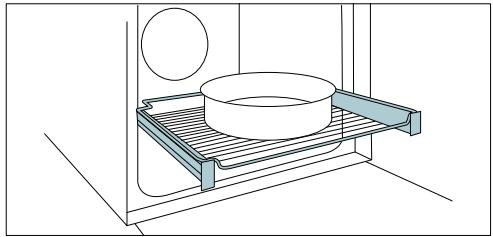
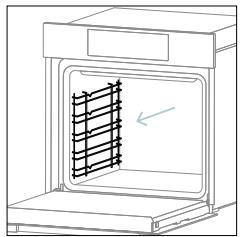
Lateral wire grids (only if present*)
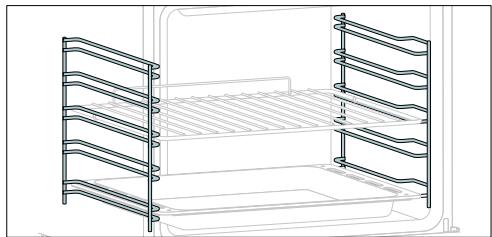
Located on both sides of the oven cavity, the side racks are designed for placing baking tray and grids during the cooking.
NOTE: 6 or 7 levels depending on the model.
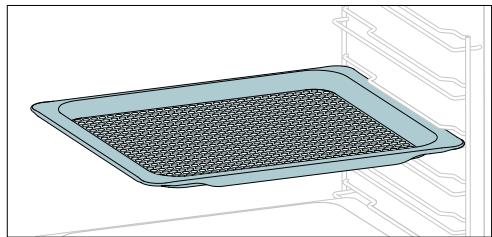
Baking tray (only if present*)
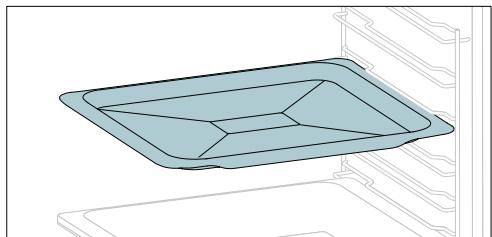
A baking tray is ideal for achieving even bottom browning, making it perfect for cookies and pastries due to its shallow, flat design. Additionally, placing it under a cooking grid can help collect drips and prevent messes in the oven.
Metal grid

A metal grid in an oven is a removable, adjustable shelf that supports cookware, ensuring even cooking, and makes cleaning easy. It can be used to hold plates and pans at different heights for various cooking needs.
Deeper Tray
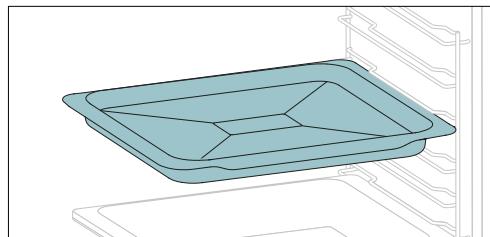
The deeper tray is ideal for recipes with added liquids or layers, such as casseroles or roasts. Its depth is specifically designed to ensure the desired consistency of the food prepared in it.
Telescopic Guides (only if present*)
Telescopic oven rails are shelves that can be extended, making it easier to place or remove items, without the need to reach deep inside a hot oven. They improve safety, stability, and can be adjusted at different level positions.
Smart Tray - BBQ mode (only if present*)

The concave shape allows a correct circulation of humidity generated in cooking, keeping the food humidity rate high. According to the quantity of water inserted in the tray, a drier or more "wet" cooking will be obtained.
Turnspit (only if present*)
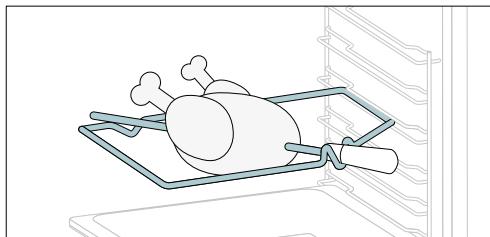
The turnspit works together with the top heating element, by rotating the food can be cooked omogeniously. It is best used for medium-sized food. Ideal for rediscovering the taste of traditional roast.
Softclose/Soft open hinges (only if present*)
Soft close and open hinges control the door's motion, ensuring smooth movement and preventing slamming.
Smart Tray - STEAM mode (only if present*)
The convex shape is suitable for grilling in the oven at high temperature (220^) allowing a BBQ result even at home with little smoke thanks to the drainage action of the fats on the bottom of the tray.
Airfry tray (only if present*)
The air fry tray ensures that hot air reaches the food evenly and tridimensionally, resulting in a crispier exterior while maintaining tenderness inside. To collect juices and breading, place it on top of the baking tray.
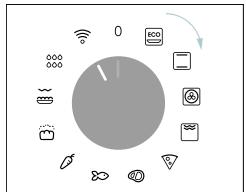
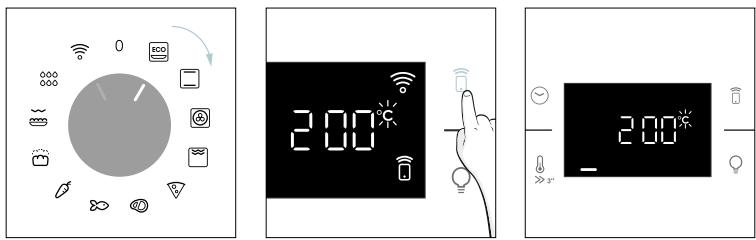
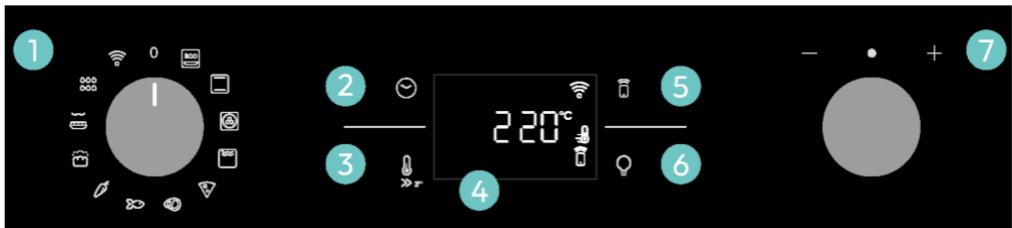
2.3 CONTROL PANEL

Functions and functions
- Function selector knob
- Time
- Temperature
- LED display
- Remote control
- Lamp
- Dial control
MAIN FUNCTIONS
The display has 4 main functions:
| Symbol | Function | Description |
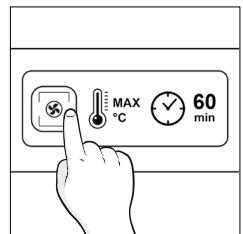
| Time | Press once for cooking duration, twice for the minute minder (available in standby mode), three times for the time of day, and four times for delay start. In standby mode, only the kitchen timer is accessible. | |
| Temperature | Press once to check the cavity temperature, press and hold for 3 seconds to activate the fast-Pre-heating option (only available during the oven's preheat phase). When the preheat is active, the releated icon will be shown on the display. | |
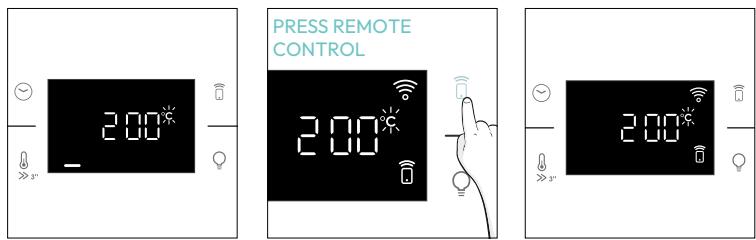
| Remote Control on/off | Press the button to activate remote control, after pairing the oven with the hOn app (through the application). | |
| Light | Press to turn on/off the oven cavity light. |
2.4 CONNECTIVITY
Wireless parameters
| Technology | Wi-Fi | Bluetooth |
| Standard | IEEE 802.11 b/g/n | Bluetooth v4.2, BR/EDR, BLE |
| Frequency Band(s) [MHz] | 2401÷2483 | 2402÷2480 |
| Maximum Power [mW] | 100 | 10 |
Product information for networked equipment
Power consumption of the product in networked standby if all wired network ports are connected and all wireless network ports are activated: 2,0 W.
How to activate wireless network port:
WIFI module switches on as soon as the function knob is set to a position different to zero.
How to deactivate wireless network port:
WIFI module is always off when the function knob is set to zero position.
If the knob is set to different position, go to WIFI menu and select off to deactivate the WIFI.
Hereby, Candy Hoover Group Srl declares that the radio equipment is in compliance with Directive 2014/53/EU and with the relevant statutory requirements for the UK market.
The full text of the declaration of conformity is available at the following internet
address: www.candy-group.com
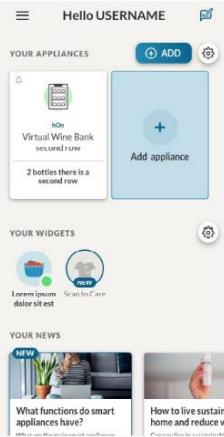
HOW TO INTERACT WITH THE APP
Your appliance may be connected to your home wireless network and operated remotely using the app. Connect your appliance to ensure it stays up to date with the latest software and features.

NOTE
- Once the oven is turned on, the WIFI icons blinks for 30 minutes. During this period it's possible to enroll the product.
- Ensure your home Wi-Fi network is turned on.
You will be given step by step guidance on both your appliance and mobile device.
It may take up to 10 minutes to connect your oven.
For further guidance and troubleshooting, please refer to the app.


Available on the App Store

GET IT ON Google Play
NEW USER REGISTRATION
- Click on "Register"
You can register through social accounts or sign up with your personal email

Welcome!
Sign in to enter in your home page
ENTER
REGISTER
Are you new to hOn?
Click below to learn about our products
TRY DEMO
X

Do you already have a thousand passwords?
Register with your social accounts
and log in in the easiest and fastest way

WITH GOOGL
SIGN UP WITH GOOGLE
SIGN UP WITH FACEBOOK
No information relating to you will be shared
and we will not post anything from you.

Iready registered?
m = 311
LOGIN
LOGIN
LOGIN
Step 2
- Allow your location permission.

Allow your location permission
To enhance your experience, please allow location permission to hOn app in the next step.


CONTINUE
Step 3
- Select oven from the appliance category.

Select your appliance category

Search your appliance

Washing machine

Washer dryer

Tumble dryer

Dishwasher

Air conditionair

Air purifier

Air scanner
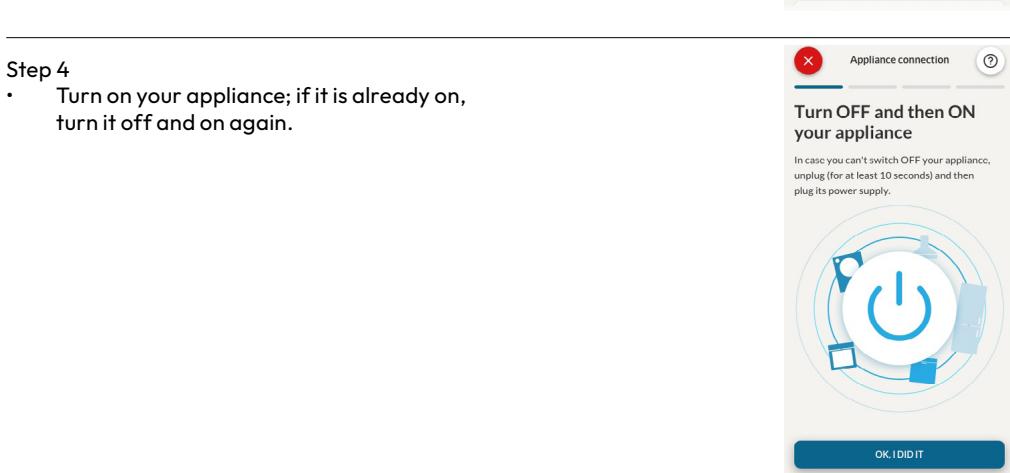
Step 4
- Turn on your appliance; if it is already on, turn it off and on again.
Appliance connection

Turn OFF and then ON your appliance
In case you can't switch OFF your appliance, unplug (for at least 10 seconds) and then plug its power supply.
OK|IDIDIT
Step 5
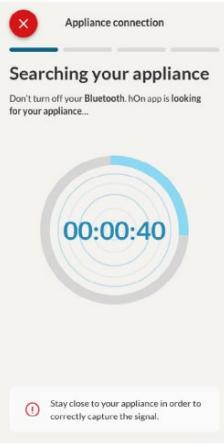
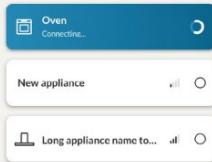
After turning on, the hOn app will start searching for your home appliance.

Appliance connection
Searching your appliance
Don't turn off your Bluetooth. hON app is looking for your appliance...


Stay close to your appliance in order to correctly capture the signal.
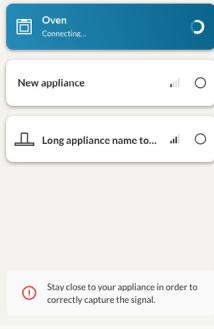
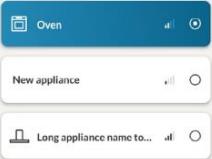
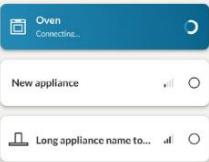
Step 6.1-6.2
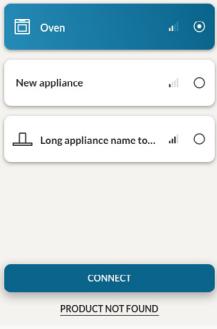
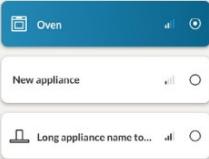
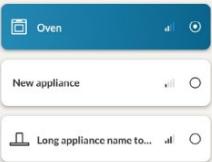
- Select your home appliance, tap on "connect" and wait a few seconds.

Appliance connection
Searching your appliance
Don't turn off your Bluetooth.

Appliance connection
Searching your appliance
Don't turn off your Bluetooth.
Step 7
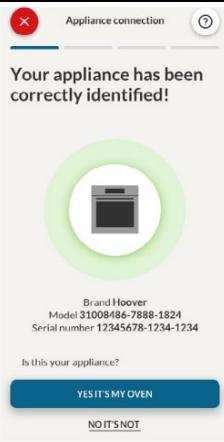
- Your Oven will be found and you can control it through hOn.

Appliance connection

Your appliance has been correctly identified!
Brand and Hoove Model 23-15468-1234-1234 Serial number 12345678-1234-1234
Is this your appliance?
YES IT'S MY OVEN
NO IT'S NOT

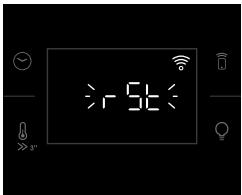
HOW TO CHANGE WIFI SETTINGS
Once the appliance is enrolled, the user can change the WIFI settings between:
- WIFION: It is only possible to monitor the oven status by App.
- WIFI OFF: The oven is not connected but still enrolled with network credentials saved.
-
WIFI RESET: The connection is reset and a new enrollment is possible.
-
Turn the function knob on WIFI menu.
- On display appears "On".
- Rotate the dial control until "Off" or the reset setting "rSt" will be showed.


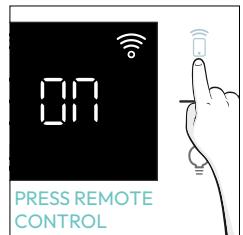
REMOTE CONTROL
The Remote Control offers numerous advantages for users, enhancing convenience, efficiency, and the overall cooking experience, by giving the capability to control the product directly from both the appliance and hOn App
This function allows, through your device, to enjoy various features, such as: instant or scheduled start of recipes or cooking programs already available in the app; real-time monitoring of the progress of your recipes; adjustment of the cooking parameters in use.
Furthermore, it is possible to receive notifications once programs or recipes are completed.
The Remote Control can be activated exclusively when the product is enrolled.
NOTE: It is available for all cooking functions on the product, except for Gratin and Supergrill programs.
How to activate Remote Control:
- Turn the function knob on WIFI menu.
- Press .
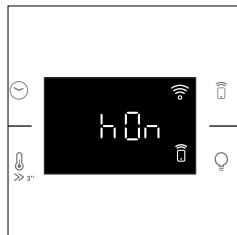
- On display appears "hOn". Both WIFI and Remote Control icons will be shown.
- Access to the App, select a program and let the cooking starts. During the process is possible to control and change the program parameters from both product and App.
It's also possible to activate Remote Control during cooking process by pressing related button.
How to stop Remote Control:
While the cooking program is in progress, it can be stopped directly from the product itself by rotating the function knob to a different position. These actions interrupt the cooking process.
Another way is by pressing the corresponding button of Remote Control that came with your appliance. These actions interrupt the cooking process.
You can also stop the cooking program remotely using the app by clicking the 'STOP' Button on display device. The oven will automatically stop the cooking.
NOTE: If the user stops the cooking in progress from the oven, simultaneously the stopped cooking will be seen in the App.
3. BEFORE STARTING
3.1. INFORMATION TO START
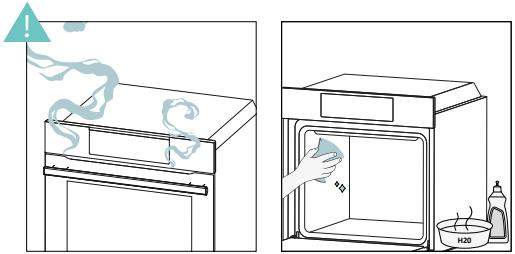
When you first turn on the oven, you might notice some smoke. Don't worry, just wait for the smoke to clear before using the oven.
How door works
For functions that use the grill, thanks to the door switch technology the oven will automatically pause the heating elements when you open the door and continue cooking once you close it.
This feature is available only on specific oven configurations. All the pyro models have it.
During the pyrolytic cleaning process, the oven door remains locked at all times. If it's not locked, the oven will display error code 24 and pause the cleaning function.
How illumination works
The oven cavity is illuminated by one or more light bulbs, typically activated each time a cooking function begins.
For ovens equipped with a door switch (see below), the light automatically turns on when the door is opened.
For ovens equipped with lamp button, it can also be used to activate the lighting.
If the oven door remains open for more than 10 minutes, the lights will automatically turn off.
During pyrolytic cleaning process light remains off. *
How cooling fan works
The cooling fan is responsible for dissipating the heat, keeping the oven and its surroundings from getting too hot, as well as protecting kitchen appliances from the effects of high temperatures. For this reason, the cooling fan remains audible for a period of time even after the oven is turned off. It operates during and after cooking cycle in relation to the internal temperature of the oven.
When the cooling fan is operational, it usually generates a gentle humming or whirring noise. You may also notice a warm air flow emanating from the gap between the oven door and the control panel.
During pyrolytic cleaning and when door is locked, cooling fan is switched on. *
During ECO function the light will remain off.
(*only for pyro ovens)
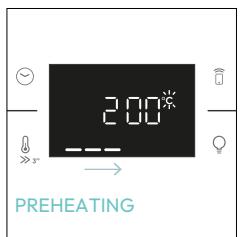
How status bar works
The status bar, based on the set programs, simplifies monitoring of temperature and time. Specifically, for functions involving preheating, it displays the temperature increase during this phase. In cooking programs and the pyrolytic cleaning function, it shows the countdown of cooking time and the cleaning cycle, respectively.
3.2. FIRST USAGE
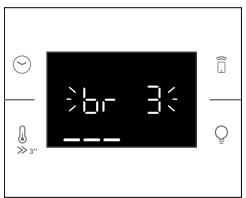
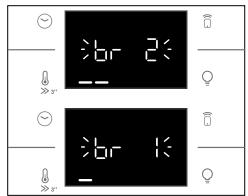
When the appliance is switched On for the first time, the initial step is to set time of day, choose between 13 ampere or 16 ampere, select brightness and sound level.
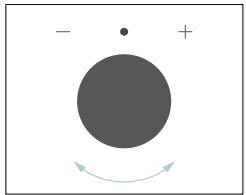
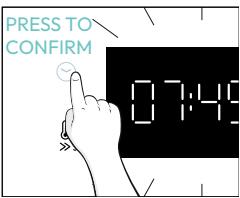
- SET THE TIME: The display will show the blinking preset time '12:00'. To modify it, press and use the right knob to adjust the current hour. Press again and follow the same procedure to set the minutes. To confirm, press once more.


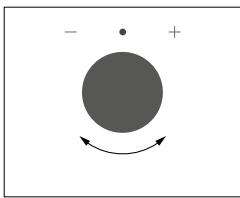
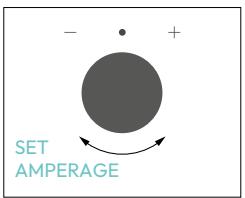
- AMPERAGE: By default, the oven is set to work with higher power suitable for households with more than 3 ~kW (16 A). If your home has lower power, you can change this setting to 13 A. This setting affects how quickly the oven heats up. Choosing the higher option (16A) means it heats up faster (because the power absorption is increased). On the display, you'll see two choices: 13A and 16A. Just turn the right knob to pick the one you want, then press to confirm.
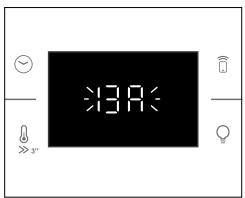
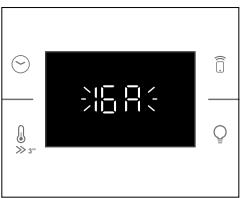

NOTE: The option to set the amperage is only available during the initial installation. To modify the set amperage, please refer to the post-installation instructions.
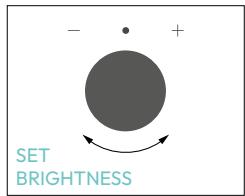
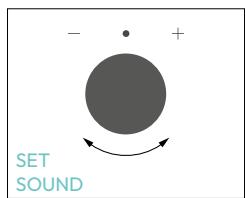
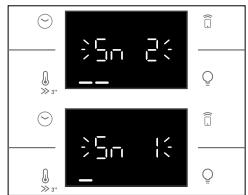
BRIGHTNESS: The display shows the symbol “br”. The numbers represent the level of brightness intensity, editable turning the right knob. To confirm press

SOUND: The display shows the symbol "Sn". The numbers represent the level of sound intensity, editable turning the right knob. To confirm press


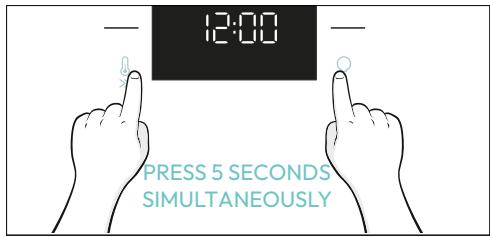
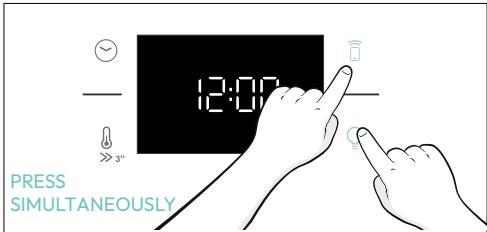
When oven is in stand-by mode, it is possible to go back to initial settings by pressing simultaneously Temperature and Lamp buttons for 5 sec.
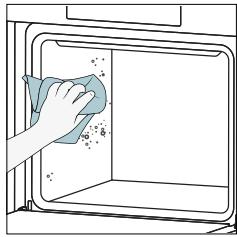
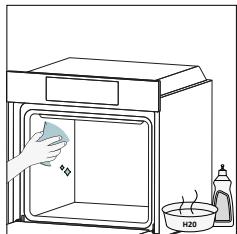
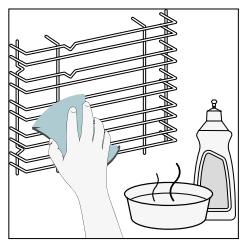
3.2. PRELIMINARY CLEANING
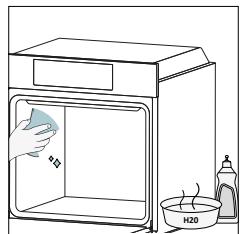
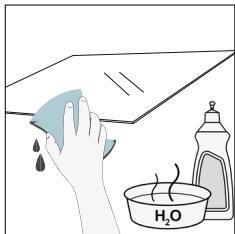
Clean the oven before using for the first time. Wipe over external surfaces with a damp soft cloth. Wash all accessories and wipe inside the oven with a solution of hot water and washing up liquid. Set the empty oven to the maximum temperature and leave on for about 1 hour, this will remove any lingering smells of newness.

4. OPERATION OF PRODUCT
4.1. HOW THE PRODUCT WORKS
SWITCHING ON/OFF THE OVEN
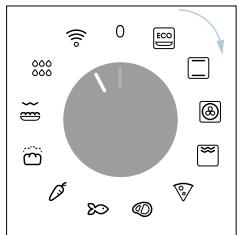
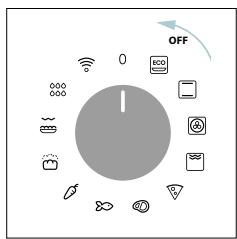
To turn ON the oven rotate the function knob (clockwise/counterclockwise) and select a cooking program. To turn it OFF, set the function knob to the 'O' position.
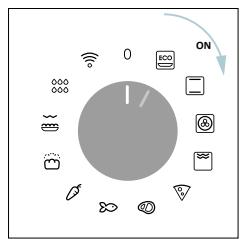
SET COOKING PROGRAM
Turn the function knob and select the desired program. On display will appear a default temperature that can be edit in every moment turning the right knob (clockwise to increase and counterclockwise to decrease the temperature).
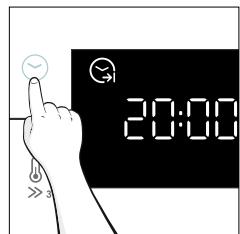
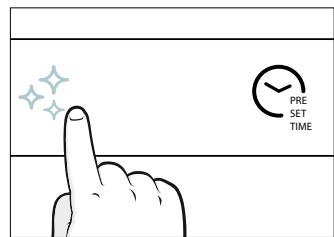
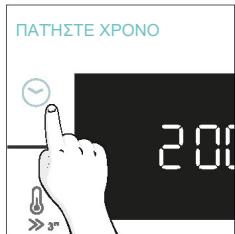
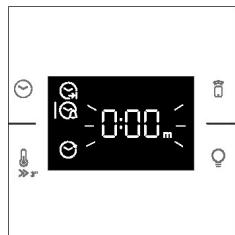
TIME MENU
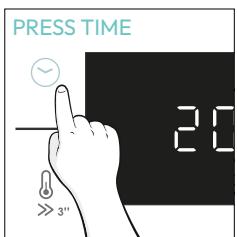
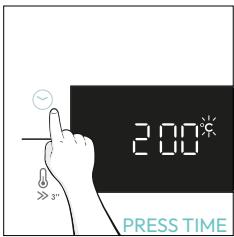
Access the Time menu by pressing . To navigate into tap as many times as is needed to enter in the following settings:


NOTE: several parameters cannot be set at the same time, therefore only the last set remains in memory while the previous one is deleted.

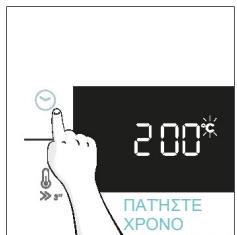
COOKING DURATION
Allows to preset the cooking time required for the recipe chosen.
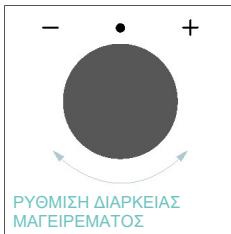
ACTIVATION: press to enter in the Time menu. Tap as many times as you need to select "Cooking duration" function. Then use the dial control to regulate the value.
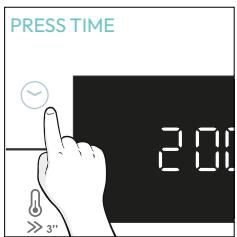

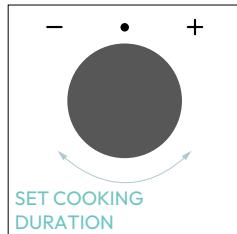
The countdown starts at the end of preheating (if present). During cooking phase is possible to change the duration value by turning the right knob. When duration is elapsed the cooking stops.

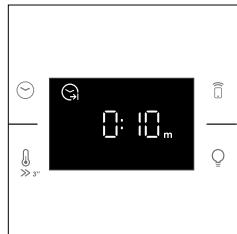
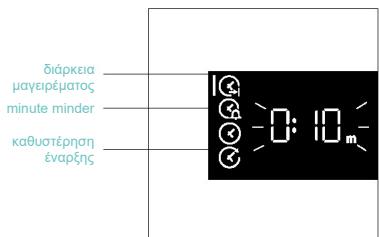
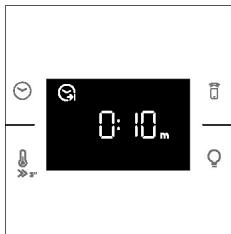
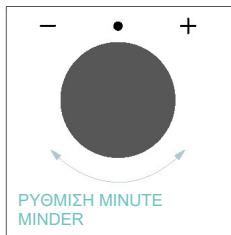
1. MINUTE MINDER
Allows to use the oven as alarm clock.
ACTIVATION: press to enter in the Time menu. Tap as many times as you need to select "Minute minder" function. Then use the dial control to regulate the value.

When the function is set, the primary information showed on display is always the time. To edit the temperature, press to enter dedicated edit mode. When duration is elapsed, the cooking continues until the left knob is turned in O position.
This function can be set also when the oven is in stand by mode by pressing . When activated, the minute minder operates independently of the oven's cooking functions.

DELAY START
Allows to choose the cooking start time.
ACTIVATION: press to enter in the Time menu. Tap as many times as you need to select "Delay start" function. Then use the dial control to set the start time of cooking.
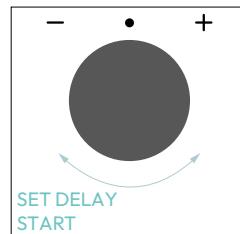
NOTE: Delay start is activable only after setting Cooking Duration and it is not available with grill's functions.
This function allows you to lock the screen to prevent any unwanted use by minors. To activate the screen lock, press and hold down the Remote Control and Lamp buttons simultaneously. Repeat the same action to deactivate the lock.
4.2. COOKING FUNCTIONS
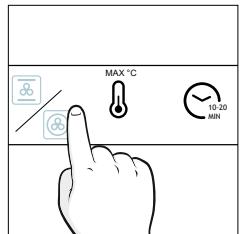
FAST PREHEATING OPTION
In order to accelerate preheating phase, the fast-preheating option can be selected by pressing the temperature icon for 3s after having selected cooking program and temperature. This option will activate a combination of fan and heating elements regardless of the chosen cooking function.
To save energy, when fast preheating is activated the cavity fan will be turned OFF until the oven reaches the desired temperature.
4.2.1. STANDARD FUNCTIONS
NOTE: for functions that require preheating, ensure all accessories are removed during this phase.
| Symbol | Function | T°C default T°C range | Suggested shelf position | Preheat | Suggestions |
| ECO | *ECO | 190 °C 150-220 °C | L3/L4 | NO | IDEAL FOR: cooking meat, fish or vegetablesThis function allows to save energy during cooking keeping the food moist and tender.Cavity lamp is switched off |
| *Conventional | 30-250°C | L2/L3 | Yes/Fast preheat | IDEAL FOR: cakes, breads, biscuits, quiches on one level using both upper and lower heating.Can be used with Heat Feel Sensor. | |
| Multi-Level | 160°C 50-250°C | L4 (one tray) L2+L5 (two trays) L2+L4+L6 (three trays) | Yes/Fast preheat | IDEAL FOR: cakes, biscuits and pizzas on one or more levels.ideal to cook different foods.Can be used with Heat Feel Sensor. | |
| **Supergrill | 05 01-05 | L6 | NO | IDEAL FOR: big quantities of sausages, steaks and toast bread.The entire area below the grill element becomes hot.Use with the door closed.Turn food two thirds of the way through cooking (If necessary). | |
| **Gratin(***) | 200°C 150-250°C | L4/L5 | Yes/Fast preheat | IDEAL FOR: whole pieces of meat (roasts) or gratinated foods. Use with the door closed. Slide the drip tray under the shelf to collect juices. Turn food over half-way through cooking if needed. | |
| Air fry(***) | 200°C 150-250°C | L3/L4 | NO | IDEAL FOR: preparing frozen foods or breaded par-cooked foods which are usually fried. Thanks to the dedicated tray, the hot air can flow evenly over the foods. | |
| Bakery all-in | 200°C | L2 | NO | IDEAL FOR: foods that require automatic leaven-ing and baking. |
- Tested in accordance with the EN 60350-1 for the purpose of energy consumption declaration and energy class.
Use with the door closed.
* Depending on the oven model.
4.2.2. SPECIAL FUNCTIONS
| Symbol | Function | T°C default T°C range | Suggested shelf position | Preheat | Suggestions |
| Pizza | 300°C 200-300°C | 2/3 | NO | IDEAL FOR: all kind of pizzas without preheating the oven. Use lower temperatures for frozen items and 300°C for home-made recipes | |
5. COOKING GUIDELINES
5.1. GENERAL COOKING TABLE
| Category | Recipe | N°of levels | Cooking program | T°C | Preheat | Cooking accessory | Shelf position | Cooking time after preheating* (min) |
| Sweet bakery | Small cakes/Muffins | 1 | Static Multilevel | 175°C 160°C | Baking tray Baking tray | L3 L4 | 20-30 30-40 | |
| 2 | Multilevel | 150°C | Y | Baking + Deeper trays | L2+L5 | 30-40 | ||
| 3 | Multilevel | 140°C | Baking trays | L2+L4+L6 | 40-50 | |||
| Sponge cakes(26 cm Ø) | 1 | Static | 170°C | Metal grid + Cake tin | L2 | 30-40 | ||
| Multilevel | 150°C | Y | Metal grid + Cake tin | L4 | 40-50 | |||
| 2 | Multilevel | 150°C | Metal grids + Cake tin | L1+L4 | 50-60 | |||
| Biscuits/Shortbreads | 1 | Static Multilevel | 150°C 150°C | Baking tray Baking tray | L3 L4 | 25-30 30-40 | ||
| 2 | Multilevel | 140°C | Y | Baking + Deeper trays | L2+L5 | 30-40 | ||
| 3 | Multilevel | 140°C | Baking trays | L2+L4+L6 | 35-40 | |||
| Choquettes | 1 | Static | 190°C | Baking tray | L4 | 25-35 | ||
| 2 | Multilevel | 170°C | Baking tray | L3 | 25-35 | |||
| Yorkshire pudding | 1 | Static | 200°C | Y | Baking tray | L3 | 20-30 | |
| Meringues | 1 | Multilevel | 90°C | Y | Baking tray | 90-160 | ||
| Macaron | 1 | Static | 150°C | Y | Baking tray | L3 | 15-20 | |
| Apple pie | 1 | Static | 185°C | Y | Metal grid + Cake tin | L2 | 60-70 | |
| 1 | Multilevel | 170°C | Y | Metal grid + Cake tin | L4 | 65-75 | ||
| Tarte tatin | 1 | Static | 170°C | Y | Metal grid + Cake tin | L2 | 40-60 | |
| Chocolate souffle | 1 | Static | 200°C | Y | Baking tray + molds | L3 | 10-15 | |
| Cheesecake | 1 | Static | 150°C | Y | Metal grid + Cake tin | L2 | 50-65 | |
| Frozen croissants | 1 | Static | 180°C | Y | Baking tray | L3 | 20-25 | |
| 2 | Static | 180°C | Baking trays | L2+L5 | 25-35 | |||
| 3 | Multilevel | 160°C | Baking trays | L2+L4+L6 | 30-40 | |||
| Strudel, frozen | 1 | Static | 210°C | Y | Baking tray | L3 | 30-45 | |
| Breads and Flatbread | Toast bread | 1 | Supergrill | 5 | N | Metal grid | L6 | 4-6 |
| Focaccia | 1 | Static | 200°C | Y | Baking tray | L2 or L3 | 25-35 | |
| Bread, whole | 1 | Static | 200°C | Y | Baking tray | L3 | 35-50 | |
| Savory pies and casseroles | Salty cakes / Quiches (26 cm Ø) | 1 | Static | 200°C | Y | Metal grid + Quiche tin | L1 or L2 | 30-50 |
| 2 | Multilevel | 180°C | Y | Metal grid + Quiche tin | L1+L4 | 50-70 | ||
| Cheese souffle | 1 | Static | 200°C | Y | Baking tray + molds | L3 | 20-35 | |
| Lasagna, fresh | 1 | Static | 200°C | Y | Metal grid + ovenproof dish | L3 | 40-60 | |
| Lasagna, frozen | 1 | Static | 180°C | Y | Metal grid + ovenproof dish | L3 | 50-60 | |
| Cannelloni, frozen | 1 | Static | 180°C | Y | Metal grid + ovenproof dish | L3 | 45-55 | |
| Baked pasta | 1 | Gratin | 200°C | Y | Metal grid + ovenproof dish | L4 | 20-30 | |
| Pizza | Pizza, fresh (Tray) | 1 | Static | 250°C | Y | Baking tray | L2 or L3 | 15-20 |
| Pizza, fresh (Tray) | 1 | Pizza | 250°C | N | Baking tray | L2 or L3 | 18-25 | |
| 2 | Multilevel | 180°C | Y | Baking + Deeper trays | L2+L5 | 25-35 | ||
| Pizza, fresh (Round) | 1 | Static | 250°C | Y | Baking tray | L2 or L3 | 8-10 | |
| Pizza, fresh (Round) | 1 | Pizza | 300°C | N | Baking tray | L2 or L3 | 15-20 | |
| 2 | Multilevel | 180°C | Y | Baking + Deeper trays | L2+L5 | 30-40 | ||
| Pizza, frozen (thin crust) | 1 | Static | 220°C | Y | Metal grid | L3 | 10-15 | |
| 2 | Multilevel | 200°C | Metal grid | L2+L5 | 15-25 | |||
| 3 | Multilevel | 180°C | Metal grid | L2+L4+L6 | ||||
| Pizza, frozen (thin crust) | 1 | Pizza | 200°C | N | Metal grid | L2 | 10-15 | |
| Meat & Poultry | Roasted whole chicken (1-1.2kg) | 1 | Gratin | 220°C | Y | Metal grid/L4 Place Backing tray at L1 with 150ml of water | L4 | 40-60 |
| Chicken thighs | 1 | AitFry** | 220°C | N | Air fry tray** | L4 | 30-50 | |
| Roasted duck | 1 | Gratin | 200°C | Y | Metal grid + Ovenproof dish | L3 | 50-60 |
| Category | Recipe | N°of levels | Cooking program | T°C | Preheat | Cooking accessory | Shelf position | Cooking time after preheating* (min) |
| Meat & Poultry | Rooster | 1 | Gratin | 220°C | Y | Metal grid Place baking tray at L1 | L4 | 20-40 |
| Roasted Turkey | 1 | Gratin | 200°C | Y | Metal grid + Ovenproof dish | L3 | 50-60 | |
| Pork ribs (1000-1200g) | 1 | Static | 200°C | Y | Metal grid + Ovenproof dish | L3 | 80-100 | |
| Sausages | 1 | Supergrill | 4 | Y | Metal grid | L5 | 40-50 | |
| Beef fillet (1000-1500g) | 1 | Gentle cooking** | 60°C | N | Metal grid + Ovenproof dish | L3 | 60-80 | |
| Roast beef (500g) | 1 | Gratin | 220°C | Y | Baking tray | L3 | 20-40 | |
| Meatloaf (1000-1500g) | 1 | Static | 180°C | Y | Baking tray | L3 | 40-50 | |
| Roasted chicken with potatoes | 1 | Gratin | 200°C | Y | Deeper tray | L4 | 45-60 | |
| Fish and Seafood | Grilled seafood | 1 | Supergrill | 4 | N | Metal grid | L5 | 15-30 |
| Frozen fish sticks | 1 | AirFry** | 200°C | N | Air fry tray** | L4 | 20-25 | |
| Baked fish | 1 | ECO | 200°C | N | Metal grid Place baking tray at L1 | L3 | 40-60 | |
| Vegetables | Vegetable gratin | 1 | ECO | 200°C | N | Metal grid + Ovenproof dish | L3 | 80-90 |
| Frozen french fries (300-500g) | 1 | AirFry** | 220°C | N | Air fry tray** | L4 | 18-25 | |
| Potato gratin | 1 | Gratin | 200°C | Y | Metal grid + Ovenproof dish | L4 | 15-25 | |
| Roasted potatoes | 1 | Static | 200°C | Y | Baking tray | L4 | 30-50 |
Cooking times may vary according to consumer's recipe and ingredients.
if preheating required
* Depending on the oven model.
NOTE: For cooking cakes, quiches and other recipes that require a mold or a container on 2 levels, place the staggered: the upper tray on the left side and the lower tray on the right side.
5.2. EVERYDAY COOKING TABLE
Food category menu allows to cook a variety of recipes without preheating the oven, thanks to dedicated cooking programs tailored to each category needs.
After selecting the cooking program, the default time will be shown and can be edited by turning the right knob; cooking temperature can be changed by pressing the dedicated icon. Both parameters can be set within a limited range as shown in the table below.
| Sym-bol | Descrip- tion | Pre- heat | Shelf position | Tempera- ture range (℃) | Time Range (min) | Heat Feel Sensor tem- perature (if available) | Description |
| Meat | NO | 2-3-4 | 180-200 | 20-80 | 55-85°C | For beef, veal and pork roasts, poultry and cuts of meat. | |
| Fish | NO | 3-4 | 160-180 | 15-45 | 55-65°C | For whole fish and fillets. | |
| Vegetables | NO | 3-4 | 180-200 | 30-80 | 70-90°C | For roasted vegetables and potatoes |
NOTE: if, after turning off the oven, there is a need to continue cooking, it's recommended avoiding th use of everyday cooking programs and instead opting for standard functions.
| Recipe | Serving size | Cooking program | T°C | Cooking accessory | Shelf position | Cooking time (min) |
| Beef roast | 500-800g | Meat | 190°C | Metal grid | L3 | 30-40 |
| Beef fillet | 200g | Meat | Metal grid | L3 | ||
| Meatloaf | 1000-1500g | Meat | 180°C | Metal grid | L3 | 40-50 |
| Beef wellington | 500g | Meat | 200°C | Metal grid | L3 | 50-80 |
| Port roast | 800-1000g | Meat | 200°C | Metal grid | L3 | 40-70 |
| Pork ribs | 1000-1200g | Meat | 200°C | Metal grid | L3 | 80-100 |
| Lamb rack | 800-1000g | Meat | 200°C | Metal grid | L3 | 60-80 |
| Lamb leg | 1500-2000g | Meat | 190°C | Metal grid | L3 | 80-100 |
| Salmon fillets | 200-600g | Fish | 170°C | Baking tray | L3 | 20-35 |
| Tuna steaks | 600g (app. 4 pcs) | Fish | 180°C | Metal grid | L3 | 10-20 |
| Swordfish steaks | 700g (app. 4 pcs) | Fish | 200°C | Baking tray | L3 | 15-20 |
| Cod fillet | 600g (app. 4 pcs) | Fish | 150°C | Baking tray | L3 | 10-20 |
| Seabream, whole | 1 | Fish | 170°C | Baking tray | L3 | 35-45 |
| Seabream, fillet | 600g (app. 4 pcs) | Fish | 150°C | Baking tray | L3 | 10-20 |
| Seabass fillet | 600g (app. 4 pcs) | Fish | 150°C | Baking tray | L3 | 10-20 |
| Salt baked fish | 1 | Fish | 220°C | Baking tray | L3 | 30-40 |
| Fish skewers | 8 pieces | Fish | 150°C | Metal grid | L3 | 20-30 |
| Stuffed squid | 4 pieces | Fish | 180°C | Baking tray | L3 | 25-40 |
| Whole bread | 1 | Bakery | 200°C | Metal grid | L3 | 35-50 |
| Rye bread | 1 | Bakery | 190°C | Metal grid | L3 | 35-50 |
| Sandwich loaf | 1 | Bakery | 200°C | Metal grid | L3 | 35-50 |
| Frozen baguettes | 1 | Bakery | 200°C | Metal grid | L3 | 15-25 |
| Frozen puff pastry snacks | 1 | Bakery | 190°C | Metal grid | L3 | 20-30 |
| Fennels | 1 tray | Vegetables | 200°C | Metal grid | L3 | 30-40 |
| Mixed vegetables | 1 tray | Vegetables | 190°C | Metal grid | L3 | 40-45 |
| Cauliflower | 1 tray | Vegetables | 190°C | Metal grid | L3 | 40-50 |
| Pumpkins, cubed | 1 tray | Vegetables | 200°C | Metal grid | L3 | 30-40 |
| Stuffed peppers | 1 tray | Vegetables | 180°C | Metal grid | L3 | 70-80 |
| Stuffed zucchini | 1 tray | Vegetables | 190°C | Metal grid | L3 | 35-45 |
| Carrot sticks | 1 tray | Vegetables | 180°C | Baking tray | L3 | 35-40 |
| Broccoli | 1 tray | Vegetables | 190°C | Baking tray | L3 | 30-40 |
| Ratatouille | 1 tray | Vegetables | 190°C | Metal grid | L3 | 40-45 |
| Vegetable flan | 6 ramekins | Vegetables | 180°C | Baking tray + molds | L3 | 25-35 |
6. CARE & CLEANING
6.1. GENERAL RECOMMENDATIONS
Regular cleaning can extend the lifecycle of your appliance. Wait for the oven to cool before carrying out manual cleaning.
After each use of the oven, a minimum of cleaning will help keep the oven perfectly clean.
- Do not line the oven walls with aluminum foil or single-use protection available from stores. Aluminum foil or any other protection, in direct contact with the hot enamel, risks melting and deteriorating the enamel of the insides.
In order to prevent excessive dirt of your oven and the resulting strong smokey smells, we recommend not using the oven at very high temperature. It is better to extend the cooking time and lower the temperature a little.
In addition to the accessories supplied with the oven, we advise you only use dishes and baking molds resistant to very high temperatures.
6.2. CLEANING THE OVEN
6.2.1. INSIDE THE OVEN: cleaning functions
Pyrolytic cleaning (*depending on the oven model)
This process relies on the chemical process bearing the same name, which involves the decomposition of complex substances through the application of heat treatment.
Once initiated, it automatically locks the oven door and swiftly elevates the temperature to a searing 410^ .
At the end of the cleaning cycle, all that remains within the cavity is a minimal deposit of dust, easily wiped away with a damp cloth.
How does it work:
- Remove any accessories from the oven, such as grids, side racks and side racks screw (^*)
- Turn function knob on . Turn the dial control to set the Pyrolytic program; Allow the function to operate for the preset time. During this process and the following cooling phase, the oven door will remain locked.
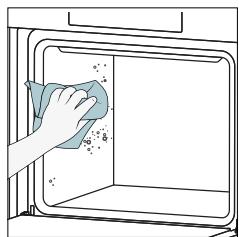
- When the appliance is cool, clean the inner surfaces of the oven with a cloth.
A WARNING: Make sure that the appliance is cool before you touch it. Care must be taken with all hot surfaces as there is a risk of burns. Use distilled or drinkable water.
(^*) only for models with 7 levels.
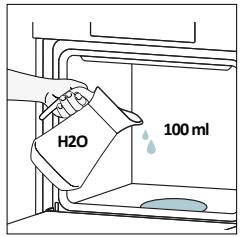
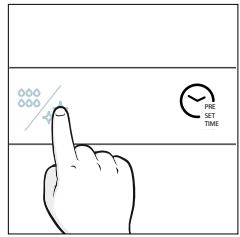
Aquaactiva
The Aquactiva function is designed to effortlessly tackle light dirt and provide a quick and eco-friendly solution for cleaning your oven cavity using the power of steam.
How does it work:
- Pour 100ml of water into the bottom embossment of the oven.
- Turn the knob on 水水 . If necessary, turn the dial control to set the Hydro clean program. Allow the function to operate for the preset time.
- At the end of the cleaning process, allow the oven to cool down.
- When the appliance is cool, clean the inner surfaces of the oven with a cloth.
- WARNING: Make sure that the appliance is cool before you touch it. Care must be taken with all hot surfaces as there is a risk of burns. Use distilled or drinkable water.
Catalytic cleaning
The Catalytic panels line the oven cavity and grant you the luxury of never having to contend with a dirty oven.
The panels are coated with a specialized enamel that boasts a microporous structure, adept at absorbing absorbs grease from splashes.
Through a catalytic chemical reaction, they efficiently convert the absorbed grease into gaseous elements when exposed to high temperatures.
Recommendation: Consider replacing the catalytic panels after approximately three years of use, especially if you use your oven for two to three cooking cycles per week. This ensures optimal performance and cleanliness.

6.2.2. OUTSIDE THE OVEN:
removal and cleaning the glass door
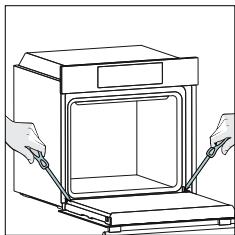
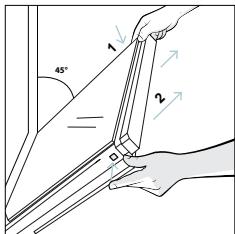
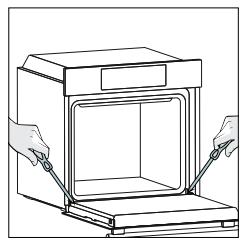
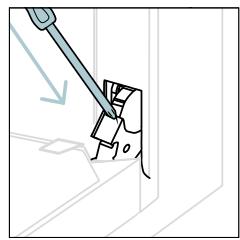
- Position the door at 90^ . Rotate the hinge locking tabs outward from the oven.
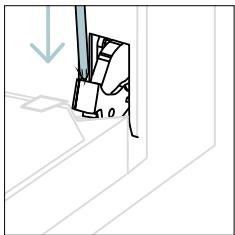
- Position the door at 45^ . Simultaneously press the two buttons on both the sides of the door's lateral shoulders and pull towards yourself to remove the upper glasses' door cover.
- Very carefully remove the oven glass, starting with the inner one. During the procedure, firmly hold the glass with both hands and place them on a cushioned flat surface (e.g., on a fabric).
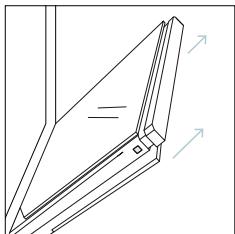
- WARNING: The outer glass is not removable.
- Clean the glass using a soft cloth and suitable cleaning products.
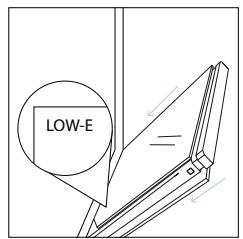
- Insert the glass panels, making sure that the "Low-E" label is correctly readable and positioned on the lower left side of the door, near the left-side hinge. This way, the printed label on the first glass will remain on the inside of the door.
- Reattach the upper glasses' door cover by pushing it inwards until you hear a click from the two side buttons.
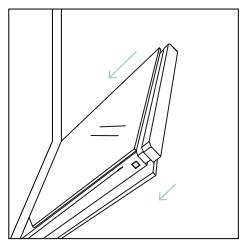
- Then, bring the door back to 90^ and rotate the hinge locking tabs inward towards the inside of the oven.
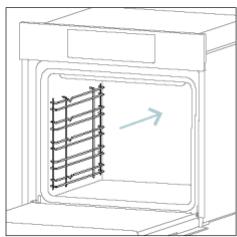
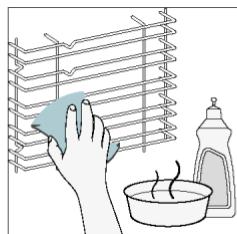
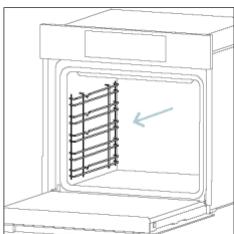
6.3 CLEANING OF ACCESSORIES
Ensure that you clean the accessories thoroughly after every use and dry them using a towel. For persistent residues, consider soaking the accessories in a mixture of water and soap for approximately 30 minutes before giving them a second wash.
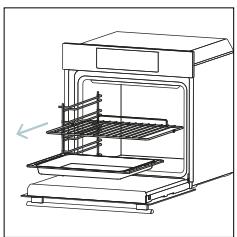
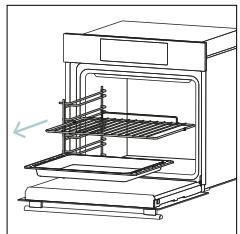
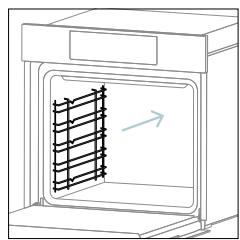
CLEANING OF SIDE RACKS:
6 levels model
- Remove the side racks by pulling them in the direction of the arrows.
- To clean the side racks either put them in the dishwasher or use a wet sponge, ensuring that they are dried afterwards.
- After the cleaning process install the side racks in reverse order.
6.4 MAINTENANCE
COMPONENTS REPLACEMENT
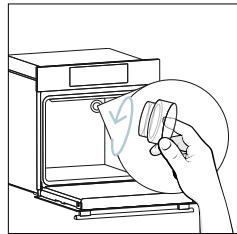
Changing the bulb on top:
- Disconnect the oven from mains supply.
- Remove the lamp's glass cover.
- Disassemble the bulb.
- Replace the bulb with a new one of the same type.
- Relocate the lamp's glass cover.
- Reconnect the oven from mains supply.
Step 1
Step 2
Step 3
Step 4
Step 5
Step 6
This product contains one or more light sources of energy efficiency class G (Lamp)
Changing the lateral bulb:
- Disconnect the oven from mains supply.
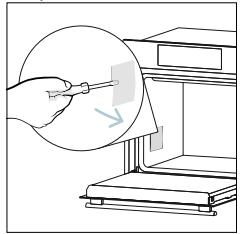
- Use a flat-head screwdriver by positioning it to the side of the protective glass and gently apply pressure to remove it.
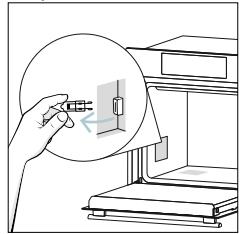
- Carefully grasp the bulb from its base.
- Insert the new one.
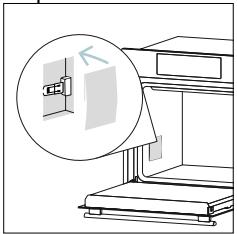
- Reinstall the protective glass by pressing it gently until it's locked into position.
- Reconnect the oven from mains supply.
Step 1
Step 2
Step 3

Step 4
Step 5
Step 6
This product contains one or more light sources of energy efficiency class G (Lamp)
If, during oven use, an error occurs, the display will show the code "ER" followed by two digits, which will identify the error.
Proceed by turn off the oven and un Plug it, wait for a few minutes, and then reconnect it.
If the error disappears, you can resume using the oven. If it doesn't, call customer service and communicate the code (ERXX) you see on the display.
Error

Smoke
8. ENVIRONMENTAL PROTECTION & DISPOSAL
8.1.APPLIANCE DISPOSAL
This appliance is labelled in accordance with European Directive 2012/19/EU regarding electric and electronic appliances (WEEE). The WEEE contain both polluting substances (that can have a negative effect on the environment) and base elements (that can be reused). It is important that the WEEE undergo specific treatments to correctly remove and dispose of the pollutants and recover all the materials.
Individuals can play an important role in ensuring that the WEEE do not become an environmental problem; it is essential to follow a few basic rules:
- the WEEE should not be treated as domestic waste;
- the WEEE should be taken to dedicated collection areas managed by the town council or a registered company.
In many countries, domestic collections may be available for large WEEEs. When you buy a new appliance, the old one can be returned to the vendor who must accept it free of charge as a one-off, as long as the appliance is of an equivalent type and has the same functions as the purchased appliance.
8.2. SAVING AND RESPECTING THE ENVIRONMENT
Where possible, avoid pre-heating the oven and always try to fill it.
Open the oven door as infrequently as possible, because heat from the cavity disperses every time it is opened. For a significant energy saving, switch off the oven between 5 and 10 minutes before the planned end of the cooking time, and use the residual heat that the oven continues to generate.
Keep the seals clean and in order, to avoid any heat dispersal outside of the cavity. If you have an electric contract with an hourly tariff, the "delayed cooking" programme makes energy saving simpler, moving the cooking process to start at the reduced tariff time slot.


Vista posteriore
Vista laterale


CANDY
KOMPLETTES BENUTZERHANDBUCH

(DE) Kurzanleitung I (FR) Guide rapide (IT) Guida veloc
www.candy-home.com
CANDY HOOVER GROUP Via Comolli 16 Brugherio - Italien
WILLKOMMEN
Sign in to enter in your home page
ENTER
REGISTER
Are you new to hOn?
Click below to learn about our products
TRY DEMO

Do you already have a thousand passwords?
Register with your social accounts
and log in in the easiest and fastest way

SIGN UP WITH GOOGLE
SIGN UP WITH APPLE
SIGN UP WITH FACEBOOK
No information relating to you will be shared.
and we will not post anything from you.
。
SIGN UP WITH EMAIL
Already registered?
LOGIN
To enhance your experience, please allow location permission to HON app in the new version.


CONTINUE

Select your appliance category

Search your appliance

Washing machine

Washer dryer

Tumble dryer

Dishwasher

Air conditionair

Air purifier

Air scanner

Appliance connection

Turn OFF and then ON
your appliance
In case you can't switch OFF your appliance,
unplug (for at least 10 seconds) and then plug its power supply.

OK.I DIDIT

DE 14
DE 15

Schritt 5
COMMENT INTERAGIR AVEC L'APPLICATION
Sign in to enter in your home page
ENTER
REGISTER
Are you new to hOn?
Click below to learn about our products
TRY DEMO

Do you already have a thousand passwords?
Register with your social accounts and log in in the easiest and fastest way.
SIGN UP WITH GOOGLE
SIGN UP WITH APPLE
IGN UP WITH FACEBOOK
No information relating to you will be shared and we will not post anything from you.
。
SIGN UP WITH EMAIL
Already registered?
LOGIN
APPAIRAGE RAPIDE
Étape 1
Allow your location permission
To enhance your experience, please allow location permission to HON app in the new version.


CONTINUE

Select your appliance category
Q Search your appliance
Washing machine
Washer dryer
Tumble dryer
Dishwasher
Air conditionair
Air purifier
Air scanner
FR 15

Appliance connection

Turn OFF and then ON your appliance
In case you can't switch OFF your appliance, unplug (for at least 10 seconds) and then plug its power supply.

OKLDIDIT
Étape 5
Stay close to your appliance in order to correctly capture the signal.
Étape 6.1-6.2
Allow your location permission
To enhance your experience, please allow location permission to HON app in the next 12 months.


CONTINUE

Select your appliance category

Search your appliance

Washing machine

Washer dryer

Tumble dryer

Dishwasher

Air conditionair

Air purifier

Air scanner

Appliance connection

Turn OFF and then ON your appliance
In case you can't switch OFF your appliance, unplug (for at least 10 seconds) and then plug its power supply.

OK. I DID IT
Passo 5
Allow your location permission
To enhance your experience, please allow location permission to HON app in the next version.


CONTINUE

Select your appliance category

Search your appliance

Washing machine

Washer dryer

Tumble dryer

Dishwasher

Air conditionair

Air purifier

Air scanner

Appliance connection


Turn OFF and then ON your appliance
In case you can't switch OFF your appliance, unplug (for at least 10 seconds) and then plug its power supply.

OKIDIDIT
Paso 5
Sign in to enter in your home page
ENTER
REGISTER
Are you new to hOn?
Click below to learn about our products
TRY DEMO

X
dy have a thousand passwords?
with your social accounts
and log in in the easiest and fastest way

SIGN UP WITH GOOGLE
SIGN UP
IGN UP WITH FACEBOOK
No information relating to you will be shared.
SIGN UP WITH EMAIL
Already registered?
LOGIN
ERTPAΦ'H ΓP'HΓOPH Σ ANTIΣTOIXHΞH
Bnμα 1
Eπiεξτε"PpooθηκnσoʊkeuΩζ".

Bnua 2
Allow your location permission
To enhance your experience, please allow the enrollment permission to HnApp in the next step.


CONTINUE

Select your appliance category
Search your appliance
Washing machine
Washer dryer
Tumble dryer
Dishwasher
Air conditionair
Air purifier
Air scanner

Appliance connection

Turn OFF and then ON your appliance
In case you can't switch OFF your appliance, unplug (for at least 10 seconds) and then plug its power supply.

OKIDIDIT


Bnua 5
Méta to avauma, n εφαρμoγn hOn θα apxioεi va αvaζητa TIV oikiaκn σας σοκεύπ.
Bnμα 6.1-6.2
EIIAETE TnV OIKIaKn OaC OoKEuN, TnTnOte "ouvOeON" KAI TEPiIeVEt EpePKa DcETeP0AETTTa.
Bnua 7
ENEPTI0I1H2H/ANENEPTIOI1H2H TOY O'YPNOY
Tia va avayete ToV foOpvno TepipteTcToV diakottnn aeitoupyiac (deiiooppa/ apiotepoortpopa) kai eTTIeEe eva TPOypaumu mayeipepaatoC. Tia va ToV aBhoTe, thee ToV diakottnn aeitoupyiac oTn thc0n "0".
PYOMIENIPOPGAMMATO MAREIPEMATO
Iepiotpeyte Tov diakottnn leitoupyiac kai etiieTe to etioumuia. 2tnv obovn ta epaioei ia TPOeTIeYevn thepokpaia iou mtopei va tpoTIOINthe kae otiyu npivcovtac tov deio diakottn (deiooppa yia va auhoene kai apoteoopopaa via va meiwate n the pokpaia).
MENOY XPONOY
ATOKTnOte TPOaON OTO MEVOU Xpovou TATWtac .Tia va TEPiynTheE VTOc TATnote Toes φopec oEs XpeiaCovTai yia va EIOAeTe OTs akokloue CpUoiie:

EHMEIOEH: eivai duvatn n tauroxpvn puthetaiion TOnAaw TTapapeTpw, EToeVwO mOvo n teLeutia pUthetaiion Tpanapevei otN vynu N TpOnyoumuevn diaypafetai.
IAPKEIA MATEIPEMATO
Zaç ðiveɪ Tn òuvatɔtnta va puθμiəTe EK Tuv πpɒtpωv Tov xpóvo μayεipéμatoç Tnou aɪaɪteɪtai yɪa TnV Επɪλεγμevn ōuvtay'n.
ENEPTONIOIHsH: nTnote 念 ia va eioeAteE tO oevou xpovou. nTnote 念 ooeC opecxpeiaZetai via va eTIaIeEETn aeIoupyia "AiaPkeia maayepmuoC". Tn ouvexia xpnoiOpToInote tov etIIaoyea Eelyxou ia va puOuioTe Tnv tiun.
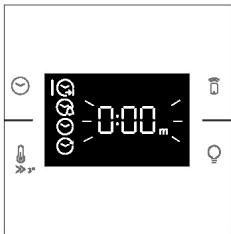
H avitotpopn metponon ekiva me to teLoC nTn pOtepuavons (eav utapxei).Kat a th diapkeia ngs paonc mayepaato civai duvatn n aaayn Tns tiu ncs diapkeia c tepofovtac tov d6io diaokott. Otav napelaei n diapkeia, to mayeipema otaatá.
MINUTE MINDER
ETIITpETTEI Tn xpHON Tou FOUPVou GUTNVTHPI.
ENEPTONIOIHsH: nntote yia va eioeAtee oTo mevoxpoov. nntote ooeC opocxpeiaZeaiy ia va eTnleTe Tn aeitoupyia "Minute minder". Tn ouvexia xnpoiotoinoTe tov eTNIoyea eEyxou yi a puOmuTe Tnv Tiun.
Otav n leitoupyia eivai puthetauieyn, n kupia tllnpoopopia Tou epaivzetai otny oovn eivai naiva npa. Iia va etteepyaote iTe 0epkoopaia, pntnoTe yia va ealeeTEe OTNY EIDIKN leitoupyia etteepyaaic. Otav npapeAei n diapkeia, to paevipeua ouvexizetai xepi va TEPIOPTpaeio apiotepos diakottns ot thc0
H eitoupyia autn mtopei etiongs va puthetaiote otav o pfoupvoic bioketai oe kaataaon avauovns Ttawvtaos. Otav evepyotointhe, to minute minder leitoupye avexapntta ato tic eitoupyie ayepmuoc tou pfoupvou.
KAOYΣTEPHΣH ENAPΞH
EtipTei Tny EtiOyoN Tns Wpac Evapns mayepaatos
ENEPTOIOIH : a t o e ia va e i oEaTe e T O m e vou x povou. P a t n o t e oe c fopec xpeiaetai ia va e t i IAEeTe n aeitoupyia "Kaouotepnon evapns". Tn ouvexia, xpooiuotoinoteTov etiioye a eEyxou ia va puthetaiae Te w opa evapnc Tou ayieipmuatoc.

- WERKING VAN HET PRODUCT
4.1. HOE HET PRODUCT WERKT
4.2. KOOKFUNCTIES
4.2.1. STANDAARDFUNCTIES
4.2.2. SPECIALE FUNCTIONS
ALGEMENE WAARSCHUWINGEN
Allow your location permission
To enhance your experience, please allow location permission to HON app in the next version.


CONTINUE
Stap 3
- Selecteer 'Oven' in de apparaat categorie.

Select your appliance category

Search your appliance

Washing machine

Washer dryer

Tumble dryer

Dishwasher

Air conditionair

Air purifier

Air scanner
Stap 4
Appliance connection


Turn OFF and then ON your appliance
In case you can't switch OFF your appliance, unplug (for at least 10 seconds) and then plug its power supply.

OK. I DID IT

NL 14
NL 15

Stap 5
4.1. HOE HET PRODUCT WERKT
DE OVEN AAN/-UITZETTEN
Available on the App Store
GET IT ON Google Play
Welcome! Sign in to enter in your home page

REGISTER
Are you new to hOn?
Click below to learn about our products
TRY DEMO

Do you already have a thousand passwords? Register with your social accounts and log in in the easiest and fastest way.
SIGN UP WITH GOOGLE
SIGN UP WITH APPLE
SIGN UP WITH FACEBOOK
No information relating to you will be shared and we will not post anything from you.
01
SIGN UP WITH EMAIL
Already registered?
LOGIN
Allow your location permission
To enhance your experience, please allow location permission to HON app in the next 12 months.


CONTINUE
Passo 3
Select your appliance category
Search your appliance
Washing machine
Washer dryer
Tumble dryer
Dishwasher
Air conditionair
Air purifier
Air scanner
Passo 4
Appliance connection

Turn OFF and then ON your appliance
In case you can't switch OFF your appliance, unplug (for at least 10 seconds) and then plug its power supply.

OKIDIDIT
Passo 5
adrese: www.candy-group.com
AKO KOMUNIKOVAT'S APLIKÁCIOU
JAK KORZYSTAC Z APLIKACJI
Welcome! Sign in to enter in your home page

Are you new to hOn?lick below to learn about ourproducts
TRY DEMO

×
Do you already have a thousand passwords? Register with your social accounts and log in in the easiest and fastest way.
SIGN UP WITH GOOGL
SIGN UP WITH APPLE
SIGN UP WITH FACEBOOK
No information relating to you will be shared and we will not post anything from you.
or
SIGN UP WITH EMAIL
Already registered?
SZYBKA REJESTRACJA PAROWANIA
Krok 1
Allow your location permission
To enhance your experience, please allow location permission to HON app in the next 12 months.


CONTINUE

Select your appliance category

Search your appliance

Washing machine

Washer dryer

Tumble dryer

Dishwasher

Air conditionair

Air purifier

Air scanner

Appliance connection


Turn OFF and then ON your appliance
In case you can't switch OFF your appliance, unplug (for at least 10 seconds) and then plug its power supply.

OKIDIDIT
Krok 5
Appliance connection
Searching your appliance
Don't turn off your Bluetooth.hOn app is looking for your appliance...


Stay close to your appliance in order to correctly capture the signal.
Krok 6.1-6.2
Appliance connection
Searching your appliance
Don't turn off your Bluetooth.


Appliance connection
Searching your appliance
Don't turn off your Bluetooth.

Stay close to your appliance in order to correctly capture the signal.
Krok 7
www.candy-group.com.
JAK KOMUNIKOVAT S APLIKACI
Appliance connection
Searching your appliance
Don't turn off your Bluetooth.hOn app is looking for your appliance...


Stay close to your appliance in order to correctly capture the signal.
Kroky 6.1-6.2
Appliance connection
Searching your appliance Don't turn off your Bluetooth.


Appliance connection
Searching your appliance Don't turn off your Bluetooth.


Stay close to your appliance in order to correctly capture the signal.
Krok 7
- Trouba bude nalezena a muzete ji ovladat pomoci aplikace hOn.

JAK ZMENIT NASTAVENI WIFI
- INAINTE DE A INCPEPE
3.1. INFORMATII PENTRU A NCEPE
3.2. PRIMA UTILIZARE
3.3. CURÄTAREA PRELIMINARÄ
- UTILIZAREA PRODUSULUI
4.1. CUM FUNCTIONEAZA PRODUSUL
4.2. FUNCII DE GATIT
4.2.1. FUNCITII STANDARD
4.2.2. FUNCII SPECIALE
- RECOMANDÄRI PENTRU GÄTIT
5.1. TABEL GENERAL DE GÄTIT
5.2. TABELUL EVERYDAY COOKING
- INGRIJIRE SI CURATARE
6.1. RECOMANDÄRIGENERALE
6.2. CURATAREA C UPTORULUI
6.2.1. CURATAREA INTERIORULUI CUCTORULUI: functii de curatare
6.2.2. CURATAREA EXTERIORULUI CUCTORULUI: indepartarea 山 curataea usi di sticla
6.3. CURATAREAACCESORIILOR
6.4. INTRETINEREA
-
DEPANARE
-
PROTECTIA MEDIULUI SI ELIMINAREA
8.1. ELIMINAREAAPARATULUI
8.2. PROTECTIA SI RESPECTAREA MEDIULUI - INSTALLARE
AVERTISMENTEGENERALE
Allow your location permission
To enhance your experience, please allow location permission to HON app in the next 12 months.


CONTINUE
Pasul 3
Select your appliance category
Search your appliance
Washing machine
Washer dryer
Tumble dryer
Dishwasher
Air conditionair
Air purifier
Air scanner
Pasul 4
Appliance connection

Turn OFF and then ON your appliance
In case you can't switch OFF your appliance, unplug (for at least 10 seconds) and then plug its power supply.

OKIDIDIT


Pasul 5
2.3. NADZORNA PLOŠCA
Available on the App Store
GET IT ON Google Play
REGISTRACIJA NOVEGA UPORABNIKA
Allow your location permission
To enhance your experience, please allow location permission to HON app in the next version.


CONTINUE
3.korak
- Izberite pečico v kategorijah aparatov.

Select your appliance category

Search your appliance

Washing machine

Washer dryer

Tumble dryer

Dishwasher

Air conditionair

Air purifier

Air scanner
- korak
Vklopite aparat; Če je Že vklopljen, ga izklopite in ponovno vklopite.

Appliance connection

Turn OFF and then ON your appliance
In case you can't switch OFF your appliance, unplug (for at least 10 seconds) and then plug its power supply.

OKIDIDIT
5. korak
CISCENJE BOCNIH NOSACA:
- Model sa 6 nivoa
- Uklonite bočne nosače povlačenjem u pravcu strelica.
- Da biste očistiliŽičane nosače, stavite ih u mašinu za pranje sudova ili koristite vlažni sunder i obavezno ih posle osušite.
- Nakon procesa Čiśćenja, postavite Žićane nosače obrutim redosledom.
6.4. ODRŽAVANJE
ZAMENA KOMPONENTI
Welcome! Sign in to enter in your home page

Are you new to hOn?
Click below to learn about our products
TRY DEMO

Do you already have a thousand passwords? Register with your social accounts and log in in the easiest and fastest way.
SIGN UP WITH GOOGL
SIGN UP WITH APPLE
SIGN UP WITH FACEBOOK
No information relating to you will be shared and we will not post anything from you.

SIGN UP WITH EMAIL
Already registered?
KIIRUHENDAMINE
- samm
Valige, Lisa seade.

Allow your location permission
To enhance your experience, please allow location permission to HON app in the next version.


CONTINUE

Select your appliance category
Search your appliance
Washing machine
Washer dryer
Tumble dryer
Dishwasher
Air conditionair
Air purifier
Air scanner

Appliance connection
Turn OFF and then ON your appliance
In case you can't switch OFF your appliance, unplug (for at least 10 seconds) and then plug its power supply.

OKIDIT
5. toiming
-
DROŠIBAS INFORMÁCIJA
-
PRODUKTA IEVADS
2.1. PRODUKTA PÄRSKATS
2.2. PIEDERUMI
2.3. VADIBAS PANELIS
2.4. SAVIENOJAMIBA
- PIRMS SAK'SANAS
3.1. INFORMÁCIJA, LAI SAKTU
3.2. PIRMA LIETOŠANA
3.3. IEPRIEKSEJA TIRISANA
- PRODUKTA DARBIBA
4.1. KÄ PRODUKTS DARBOJAS
4.2. EDIENA GATAVOSANAS FUNKCIJAS
4.2.1. STANDARTA FUNKCIJAS
4.2.2. IPASAS FUNKCIJAS
- EDIENA GATAVOSANAS VADLINIJAS
5.1. VISPAREJA GATAVOSANAS TABULA
5.2. EVERYDAY COOKING TABULA
- APKOPE UN TIRISANA
6.1. VISPÄRIGI IETEKUMI
6.2. CEPEŠKRASNS TIRISTANA
6.2.1. CEPEŠKRÁSNS IEKŠPUSE: tīršanas funkcjjas
6.2.2. CEPEŠKRÁSNS ARPUSE: stikla durvju nonemšana un tīršana
6.3. PIEDERUMU TIRISHANA
6.4. APKOPE
-
PROBLEM NOVER'SANA
-
VIDES AIZSARDZIBA UN UTILIZACija
8.1. IERICES UTILIZACija
8.2. VIDES GLÁBSANA UN SAUDZÉSANA - UZSTÄDISHANA
VISPÄRIGI BRIDINÄJUMI
2.1. PRODUKTA PÄRSKATS
Welcome! Sign in to enter in your home page

Are you new to hOn?
Ick below to learn about oC products
TRY DEMO

Do you have already a three thousand passwords? Register with your social accounts.
SIGN UP WITH GOOGL
SIGN UP WITH APPLE
SIGN UP WITH FACEBOOK
No information relating to you will be shared and we will not post anything from you.
or
SIGN UP WITH EMAIL
Already registered?
ATRA PARA REGISTRACIJA
- darbiba
Atlasiet "Pievienot ierici".

2. darbiba
- Atlaujiet pieklut jusu atrasanas vietai.
3. darbiba
Allow your location permission
To enhance your experience, please allow location permission to HON app in the new version.


CONTINUE

Select your appliance category
Search your appliance
Washing machine
Washer dryer
Tumble dryer
□Dishwasher
Air conditionair
Air purifier
Air scanner

Appliance connection
Turn OFF and then ON your appliance
In case you can't switch OFF your appliance, unplug (for at least 10 seconds) and then plug its power supply.

OK. I DID IT

5. darbiba
Appliance connection
Searching your appliance
Don't turn off your Bluetooth. hOn app is looking for your appliance...


Stay close to your appliance in order to correctly capture the signal.
6.1.-6.2.daribiba
- Atlasiet savu sadzīves tehniku, pieskarieties pie "Savienot" un uzgaidiet daß zas sekundes.

Appliance connection
Searching your appliance
Don't turn off your Bluetooth
CONNECT
PRODUCT NOT FOUND

Appliance connection
Searching your appliance
Don't turn off your Bluetooth

Stay close to your appliance in order to correctly capture the signal.
7. darbiba
Appliance connection

Your appliance has been correctly identified!
Brad Hoove
Model 3658-1000-248-1824
Serial number 12345678-1234-1234
Is this your appliance?
YESITSMYOVEN
NO IT'S NOT

WI-FI IESTATJUMU MAINA
Kadiericeirégistéta,lietotājsvarmainitWIFI iestatijumusstarp:
- I P E D N DA 3 A O U H E T E
3.1. INΦOPMALIJI 3A HAHAJOTO
3.2. ПьрвонаЛну NOTPE6A
3.3. IPEДВAPNTIELNO IOYNCCTBAHE
- PABOTACIPOJyKTA
4.1. KAK PAБОТИ ПОДУКТБ
4.2. ΦΥΗΚΙΝΙΜ 3Α ΓΟΤΒΕΗ
4.2.1. CTAHДAPTHIФУHKLIMN
4.2.2. CNEUJANH FYHKLIIN
- HACOKN 3A TOTBEHE
5.1. OБЛАТАБЛИСА 3А ГТBEHE
5.2. TABJINLA ,EVERYDAY COOKING
- PnIXNIOUHCTBAHE
6.1. OБцИ ПЕПОРьКИ
6.2. IOUHCTBAHE HA FyPHATA
6.2.1. BbTPE BbB ΦYPHATA: noounctbaaun ΦyHKuIN
6.2.2.ИЗВьнФУРHATA:премaxbaHeи поисваеHa CTыклЕнTaВраТa
6.3. IOUHCTBAHE HA IPIHAIDLEXKHOCTN
6.4. IOIDPbXKKA
-
OTCTPAHRAHE HA IPOBJEMN
-
ONA3BAHE HA OKOJIHATA CPEDA N I3XBbPJIaHE
8.1. 3XBbPJIaHE HA YPeDA
8.2. ONA3BAHE IN 3AUYTAHE HA OKOJIHATA CPEDA - MOHTIPAHE
OBUIN PEPDUNPEKDEHNA
He n3noJ3BaIte npoUncTaUKN 3a noUncTbaHe.
BHIMAHNE: 3a Da n36erHeTe onachocT nopadn HeBOJHO HynipaHe Ha TOnJIHHNJa PpeDna3HTeJ, He Tp8Ba Da 3axpaHBAte UpeDa Ype3 BbHsHo NpeBkIIOUcBaUO yCTpoiCtBO, KaTo TaImep, INI Da rO CBbp3BaTe KbM Bepira, KOrTO peIDOBHO Ce BKJIIOUcBA uN3KJIIOUcBA OT eJIeKTPnueckaTa MpeXa
- По врeme на унотpeba урдьт ce harpaBa. Трава за ce вимаBa Да He се дOKOCBaT HarpeBaTeJHn eIemEnTи BbTpe BbB ФунaТа.
I3noJ3BaIte B cBJoTBeTCTBnE C npeDnHeHaTa yNtpe6a
- Изполизваи Te Фурнata само по педнаЗнayенe, t.e. endHCTBeHo 3a пи�отьг He Ha XpaHa: BcякakbB Дpyr BnД yNTope6a, Hanpimep KaTo n3TOUHnK Ha TOnJIHa, ce cHTa 3a He npabuJleH n NopaDi ToBa OnaceH. Пpon3BOdIteJIaT He Hocn OTROBOPHOCT 3a UeTeN, Bb3HNKHaJIn NopaDi HnpabuINHa nII Hepa3yMHa yNTope6a.
OrpanuHneHa yIIOTe6aTa
- YpeIbT MoKe Da Ce I3NoJ3Ba OTe Dea Ha Bb3pact NaI 8 roDHH N OT IInCa C OrpaHnueHn Fn3nueckn, CetNBn IIn yMCTBeHN cNoCoBHOCTn IIn C HeIOCTaTBueH ONIT N PO3HaHnA, Ako Ca NOD HaI3Op, IIN Ako PpeIBaPHTeHNO Ca NOLyUHn Yka3aHnA OTHOCHO Be3OpanachTa UnoTpe6a Ha yPeDa n pa3bnpat KaKBr Ca NotEHnAJIHnTe onacHOCTN. DeaTa He 6bBa Da I3NoJ3BaT ypeDa 3a Irpa. IOniCTBaHeto N PoIDpbXkKaTa Ha ypeDa He 6bBa Da ce I3BbPbBAT ot Deza 6e3 HAD3Op.
To3n ypei He e npedHa3NaueH da ce 3noJI3Ba OT JIuca (BkIouHTeJIHO dea) c HamaJIeHN fN3NuYeCKn, CeTbHN JIIN yMCTBeHN CnOcO6HoCTn JIIN JIIN Ca HA ONIT IIO3HaHnJ, OCBEN AKO He ca NOD Ha6JIIODeHne JIIN ca 6NI INHCTpyKTIpaHn OTHOcHO 3NoJI3BaHeTO Ha ypeDa OT JIInce, OTROBOPHO 3a T8XHATA 6e3OnaCHOCT. - Deuata Tp8bBa da 6bDat noi HabnOHeHne, 3a Da ce rapaHTnpa, ye He cn nIgpaT c ypeDa.
-
I NPEdUnPExKDeHHe: I O BpeMe Ha pa6oTa ypeBt I DoCTbHnTe My qactn Ce HaroPeuBaT. Tp6Ba Da ce BnImaBa Da He Ce DOKocBaT HarpeBaTeJHnTe eJeMeHTN. Deua Ha Bb3pAcT nOd 8 rOdnH Tp6Ba Da ce DbpxKaT HacTpaHa, OcBeH aKO He ca nOd HeIpeKbChat NaD3Op.
-
ПЕДУПЕЖDEHNE: Р Врeme на уноТpe6а ДocТьнITEч actи може дa ce haropeшт. Малкдeца Трябвдa ce дbpxkATHa pa3ctOЯнe.
ПРЕДУПЕЖДECHИ ПРИ MOHTAX
- Φурнata може да бъдe pa3положина Habисоко в Колона Или под pa6отен плот.
- Преши Фнксраие Трябва Да Осигурпe Добpa BeHTиlaць
В постранстВOTO на Фурнata, 3a Да NOЗВОЛNTe правилha сИрКУлAsc
На CBexь Вьздух, HeoБхODIM 3a OXлжданe И 3aДиТа На ВьТpeшнITE
чacter. HanpaBete OTbOPnTe, РOCоЧENH Na NIIOCtPaUcNITe, B 3aВиСИмocT
OT ТИпа Ha MOntажа. Виаги 3akpenBaIte Фурнata КыМ MeбелNTe
С ВИНTOBeTe, Пре dioCTaBeHи C урда.
He ce n3nckBa dOnbJIHnTeJIHa Oepaun/HaCTpOJa 3a ekCnIooaTcJNa Ha ypeDa pni HOMnHaJIHnTe YecToTn. - YpeIbT He 6nBa Da ce MoHTnpa 3aI DeKOpaTINBHa BpTa, 3a Da ce n36erHe npErpRAhe.
- По врeme Ha монтaxа Фурнata Трябba Да Бдe Изклоча OT eЛжТрчeckaТа Мржа, 3a Да се ИЗБергпергьаHe.
- Ako ce n3nCKBa cBdeIcTBnETo Ha npOn3BOIDnteJra 3a KopnInpaHe Ha HEn3PpABHOCTN, Bb3HNKHaJI NopaIN HeNpaBnJIeH MOHTaK, TOBa cBDeIcTBnE He Ce pOKpINAoT rapaHcIyTA. Tp6Ba Da ce cIeDbat INCTpyKUInTE 3a MOHTaX 3a npOpeCnOHaJIe KBAJIOpuIpaH nepcoHaJI.
- HenpaBnHnT MoTax MoKe Da npuHnI ΜeTn nHapaHbAHnHa Xopa, XIBOTn nNl Beu. PpO3BOJTeJIr T He HOCN OTROBOPHOCT 3a TAKnBa ΚeTn nHapaHbAHn.
- MoNTaXbT Tp86Ba Da ce N3BbPbBA OT KBaJIINΦnIupaH TexHnK, KOItO Tp86Ba Da IIO3HaBa N Cpa3Ba 3aKOHInTe, DeIcTBaU B DbPkaBaTa Ha MOHTaJa, INHCTpyKcUNTe Ha IPOUN3BOIDInTeJ.
Clek KaTo pa3oNakOBaTe ypeDa, BnHaRn npOBepraBaiTe daJIH He e NOBpeDeH, B cLyuAa H a np6IeM ce CBbPKeTe C OTdeJa 3a o6cLyXBAHe Ha KIneHTN, PpeDN da rO MOHTnpaTe, IN He rO CBbp3BaIte KbM eJektpuYeckaTa MpeKa. - OtrctpaHeTe onaKOBbUHnMaTePnaI, npei Da 3aNoUHeTe pa6Ota c ypeHa.
- ПО Врeme На мот taxa He Използbaite ДрьжkaTa Ha BpaTaTa Ha Фурнata, за я NOВдигate И пpeMeCTBaTe.
- MebeJInte 3a MoNTaJN I npUJIeXaIuTe KbM TЯx MebeJIIn TpIbBa Da n3dIbPjKAT Ha TeMpepaTpyn ot 95^
- Пренинтугелно сда Нocитп рькавици по Врему моHTажа, за дд збогнete поеЗни наразяваня.
He mOnTupaIte npOdykTa B OTKpNTn IpoCTpaHcTba, n3JIOxHeN Ha aTMocΦepHN areHTN.
To3n ypeI e npoeKtnpaH da ce n3POn3Ba Ha HauMOpcka BnOcUnHa no-HnCka ot 2000 m.
ПЕДУПЕХДECHИ OTHOCHO EJEKTPNUECTBOTO
- Георустору Трябва да с похаяцу за указань на ETИКЕТ TOВAP и Трябва дa Има Свьрзан И равOTУ 3a3eMNTeJIEN KOHTAKT. 3a3eMЯВацит повODн� e cжblт И зелен CBRT. Ta3n ONEpaцу Трябва дa с ИЗБьршИ ONТ KBALINФицпарпnpoфесnoHaJINC.
Bpb3kaTaN3TOUHnKa Ha 3aXpaHbAHe MoKe Da Ce OcbIeCTBN Upe3 IeNCEJI NIIu Ype3 fIKCupaHO OKa6eJIbaHe, KaTO Ce NoCTaBN OMHNIOJApEn IpekbcBaay C OTDeJIaHE Ha KOHTaKTITe, OTROBapJIo HA N3NCKBaHnTa 3a CBpBXHaNPexEne HcKateropnI III, MeJy ypeJa N3TOUHnKa Ha 3aXpaHbAHe, KOJTo MOKe Da N3DbPjN MaKcMmaJIHnBA CBbp3aH TOBAP IN KOJTO OTROBapr Ha TeKyuIOTo 3aKOHOdaTeJICTBO.
BcnyaHa HecbBMeCTHMOCMeJy KOHTaKaTa nIeNceJa Ha ypeJa nonckaIte OT KBaJIHΦnIupaH eJeKTPoTEXHnK Da 3aMeHN KOHTaKaTa cDpyr NODXODaTtN. IeNceJIbT n IHe3dOTo Tp8Ba Da otROBaPrt Ha TEkyuIte CTaNaprTa B CtpaHaTa Ha MOHTaK. - JbIto-3eHnT 3a3eMnteHn Ka6n He 6nBa Da ce npeKbcBa OT npeKbcBau. IHe3dOTo INMHOrOIOJIOCHnT npeKbcBau, IN3NoJ3BaH 3a Bp3kata, Tp8Ba Da 6bJe JecHo DoCTbNeH, CJeD KaTO ypeDbTe MOHTnpaH.
Ako 3axpaHbauT Ka6eI ce NOBpei, ToI Tp8Ba Da 6bJe 3aMeHe OT IPOINBOJNTeJIa, HeIOB OBCnykBaU PpeCDaBnTeJI NII JInCe C NOO6Ha KBaINΦNkaIaIa, 3a Da Ce I36eHne IOTeHuaJIHa ONaCHoCT. 3a peMOHTI CE O6pbIaIte eDINHCTBeHO KbM OTDeJIa 3a OBCnykBaHe Ha KJIeHTNI INI3NCKBaIte I3IPOJ3BaHETo Ha OPINHaJIH Pe3epBHN YacTI. - Izhknoyete ypeda ot rnaBHOTo eNeKtpuyecko 3axpaHbAHe npedn 3BbPbBaHe Ha KaKBnTo n da e pa60Tu No NpDpBxka No Hero.
- I PPEdUYPExJEHHe: yBepTe ce, ye ypeIbT e n3KJIoueH npei Da cMeHЯTe KpyuKaTa, 3a da n36erHeTe eJekTpueeKn ydap.
- Φурнanta Трава Да се Изклочи п dedи Извajdahe Ha pa3rно6яваци te ce уacr. Спед поисваце crлобete OTHOBO sbглacho ИHCTpykциTe.
-
YnOtpe6aTa Ha BCEKn eNeKTpNueckn ypei npeIOnaRa cna3BaHeTo Ha HЯΚΟ OCHOBΗ πραΒΙΝΑ:
-
He nbpnaite Ka6eJa, Korato n3KlHObBaTe ypea ot eJekTp03axpaHbAHeTo;
- He dokocBaIte ypeDa c MOKpn IInn BJIaJHn pblce IInn KpaKa;
- По пинци He ce npenopbчBa n3no3BaHeTo Ha aanTepn, pa3KnOHnTeJI nJIn yIbJxHnTeJI;
- B cnlyaŋ Ha Heɪn3npaBHoCT n/ɪn BNoʊeHa pa6Ota nɪkʌHoyete ypeədɪ NHe nɪ3BbPbSbAŋTe HɪkɑkBm Maɪnɪylaɪzɪn No Hero.
3ABeJIeKKA: TbI KaTo MoXe Da ce HaIoXn N3BbPbBaHeTo Ha NoIdpbXka NO cyphata, e npenopbUHTeHNo Da ce OCTaBn I dpyr CBO6OJeH CTeHEn KOHTaKT, KbM KOITo Da MOxE Da ce CBpXe cyphata, aKO 6bIe N3BaIeHa OT IpocTpaHCTBOTo, B KOEt o MOnTpapaHa.
- Bcekn peMOHT, MOHTaK I NOIDpbXka, KOINTo He ca N3BbPseHn npaBnIHO, MORaT cepNo3HO da 3acTpawat Notpe6nteJ.
- Kompanheta npOn3BODiTel 3a8yBa, Ye He NoeMa HnKaKBa OTROBOPHOCT 3a npEKN IIN KOCBeHN UeTNI, pPunHeH NT HeNpaBnJIeH MOHTAK, POnIpbXka NII peMOHT. OCBEN TOBA TRe H HocN OTROBOPHOCT 3a UeTI, npUChHeH NT JInCATA NII npEKBcBAHeTO Ha 3a3EMNTJIHaTa CnCTema (HaNP. TOKOB yDap).
BHIMAHHE: 3a Da n36erHeTe onacHocT nopadn HeBOJIHO Hynipane Ha TOnPiHHNpypeDnA3nTeJ, He Tp8Ba Da 3axpaHBaTe UpeDa Ype3 BbHsHo npeBkIIOuBaUO yCTpoiCTBO, KaTo TaIMep, IIN Da rCByp3BaTe KbM BepURA, KOYTO peoBHO ce BkIIOUBA N I3KIOUBA OT eJeKtpnueckaTa MpeXa.
- YpeiT He e npedHa3HauEn Da ce 3aJeicTbA OT BbHseH TaMep IJIOTdEJIHa CnCTema 3a DnCTaHcNHOynpaBJIeHne.
YNOTPEBAI NODPbXKA
- Tabata 3a OTUeKdAHe Cb6npa COKOBTe, KOnTO KaIrT NO BpeMe Ha rotBeHe.
Korato noctabraye peweTkata Bbpxy ctpaHnHnte ckapn, ce yBepete, ye nO-Kbcata yact Ha cTpaHaTa (MeJdy orpaHnHTeIy KpaHata qact) e HacoueHa KbM BbTpewHocCTta Ha cyphata. Ako peWeTkata IMa DeKopatNBHa MeTaNHa JeHTa, obpHeTe BHNMaHne DaJI N TRe pa3noJoxeHa OT BbHsHata cTpaHa Ha cyphata, Taka Ye JloroTo Ha MapKaTa Da Ce BVXda uyeTe. 3a npaBnHOTO pOnuOHnpaHe BVxTe CbIo H3O6paKeHneTO B pa3dJe ,PpHaadJeXHocTNa Ha HactoJIoTO pbKOBOcTBO 3a NoTpe6nteI.
He n3noJ3BaIte rpy6n abpa3nBnIOuNCtBaUIpenapATn UINOCTPM MeTALHcTbprAJIKN 3a NOUncTBAHe Ha cTbKNaTa Ha BpaTaTa HaΦypHaTa, TbN KaTo Te MoRat Da NaDpaCKaT NOBbpxHocTTa, KOETO MOKe Da DOBeDe Do CUYBaHe Ha cTbKnOTO. - Използваши само Temператуна за COнда, КаяTO ce пpenopьва за ТаЗИ Фурна.
-
По врeme Ha rotBeHe може за ce образуВа кондeнзaция по NOBbpx-HocCTTа Ha KaMepaTa Ha ФурHаТилNo CTbKnotO Ha BpaTaTa. Toba e HopMaJIHc CBSTOrHnE. 3a HamaJIЯBaHe Ha To3n eФeKT n3uKaJaTe 10 - 15 MINHT cIeД BKIIIOUBAHe Ha 3axpaHbaHeto,пpeДи DA NOCTaBnTe xpaHaTa BbTpE bB ФурHaТa. ПрИ BCINKn Clyuay KOndEh3bT n3Ye3Ba, KOrato ФурHaТДОCTURHe TemNepaTpya 3a rotBeHe.
-
ПиноТяп Te 3eJIeHcUTe B CbД C KaПаК BMeCTo B OТКрИТa Taba.
- ɪəsərbaɪte έа ocTæbTe xpaHa BbB φуpHaTa 3a nOBeue ot 15/20 mɪnHTu cneɪ ᵠpɪrOβrAHeTo ð.
- Дылги пекьсваня на 3axpaHbaцаТа Мржа, ВьзнКнали ВьВ Фа3aТа
- на ГOTBEHe, мога Тд рпчИнг HeN3правнон.Tа eЛeКТpOMOTopa.
- B Тakьссунай се CBpЖeteс отдела 3a обс顺序БаHe на КПЕNTN.
- PPEdUnpeJxDEHHe: He nokpnbaiTe cTeHnTe Ha yypHaTa C aIyMnHneBO fOJIIO IIN C 3aunTHn MaTePnAIn 3a eDnHOKpaTHa yNoTpe6a, KaBnTo ce npednarat B mara3HNHe. Ppi npK KOHTaKT Ha aIyMnHneBO fOJIIO IIN dpyr BnD 3aunTeH MaTePnAIn C ropeuia EmaJIc Ce cb3daBa pNCK OT pa3ToPnBAHe i HapuBaHe Ha emJa n IO BbTpeHnTE NOBbpxHOCTn.
- I PPEdUYPExJEHHe: HnKora He oTcTaHЯBaIte yNtBTHeHneTo Ha BpaTaTa.
BHIMAHNE: He nbJIHeTe nbHOTo Ha KaMepaTa C BODa NO BpeMe Ha rotBeHe nII KOraTo cyPHaTa e ropeu.
3a npabnHa ynoTpe6a Ha fypHaTa ce npenopbUba Da He ce nocTaBxaHa B npK KOHTaKT C peWeTKIte N TaBtE, a Da ce N3POn3Ba XapTna 3a neueHe N/INN CneuHaHn CbdoBe.
ПРЕДУПЕЖDEHЯ (*3A ПИРОЛNTИЧН ΦΥРΗN)
- ɪnʌnɪnɪŋt paɪənɪb TpərəbBa Da ce OTCpaɪnɪ npɛdi NɔʊnCTbaHe.
- ПЕДУПЕЖDEHNE: ПpeДи ИнцИраHe Na aВТOMaTчeH сИКьЛ На поИСТВаHe:
-Почисте ВраТаТа На Фурнata;
- OtctpaHete BcKaKBN TJIeMN NII NTBbPDeHN OCTaTbCNI OT XpHa OT BbTpEshHaTa CTPaHa Ha yPhaTa C NOMOHTa Ha BJaXHa Tb6a. He n3no3BaIte npenapatn;
- OtcpaHete BCnUKN npHaJNeJXHOCTN, KaKTO N KOMnJIeKTa nIb3raUnc ce peWeTKN (aKO e BKNIOUcH TaKbB);
He nocTabraIte KxHHeNcKn KbPnn.
BbB cyprHn cbc coHda 3a Meco e Heo6xOJMo npeDn da N3NbJHnTe CIKbJI 3a NOUcTBAHe, Da 3aTBOpHTe OTBopa c PpeIOCTaBeHaTa raikka. BInHarN 3aTBapRyIe OTBopa c raikkata, KOraTO COHdaTa 3a Meco He ce n3PON3Ba.
- По врeme на проча на пиролитунноочтванe (ako Има ТаКьВ) NOBbpxHOCHTITE MORAT Да се Нагошягповechе OT obuHaNoTo N DeцаТ Трабва Да се Дьржат HabTpaHa.
- Ako haç φуphata mma MOHTupaH pIOT, HNKORA He ro n3PON3BaITe, DOKaTo pIPOJIN3aTOpbT pa6OTn. Taka ige ce npedotBpaTn nperepRBAHe Ha pIOTA.
Sign in to enter in your home page
ENTER
REGISTER
Are you new to hOn?
Click below to learn about our products
TRY DEMO

X
Do you already have a thousand passwords?
Register with your social accounts
and log in in the easiest and fastest way

SIGN UP WITH GOOGLE
SIGN UP WITH APPLE
SIGN UP WITH FACEBOOK
No information relating to you will be shared.
and we will not post anything from you.
0
SIGN UP WITH EMAIL
Already registered?
LOGIN
3AПИСBAHE 3A ББРЗО СДВОВАBE
CTbNka1
I36epeTe ,IO6abYHe Ha ypeD
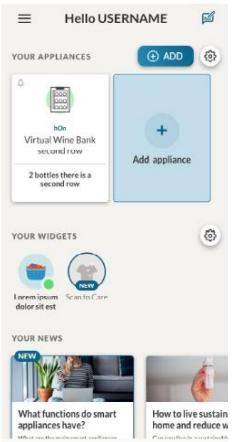
CTbNka 2
- Pa3peWeTe DoCTbna Do MeCTOnONoJKeHHeTo cN.
CTbNka 3
- Ⅰзбере Te Фурна OT kateropma Na урда.
CTbNka 4
BkIIOUeTe ypeDa cn;ako Bueye BkJIIOUeH,IMKIIIOUeTe rO IRO BkJIIOUeTe OTHOBO.

Allow your location permission
To enhance your experience, please allow location permission to HON app in the next 12 months.


CONTINUE

Select your appliance category
Q Search your appliance
Washing machine
Washer dryer
Tumble dryer
Dishwasher
Air conditionair
Air purifier
Air scanner

Appliance connection

Turn OFF and then ON your appliance
In case you can't switch OFF your appliance, unplug (for at least 10 seconds) and then plug its power supply.

OKIDIDIT
CTbInka 5
Cne KaTo Ce BkIIOU, npInIOxKeHnETo hOn 7e 3anoHe da Tbpcn Baunia DomaWeH ype.

CTbIka 6.1-6.2
I36peTe cB0r DomaWeH ypeI, HATINCHETe "CBp3BaHe" N I3yakaTHe HRAKOJIKO CEkyHdN.
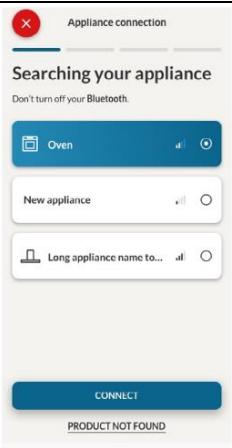
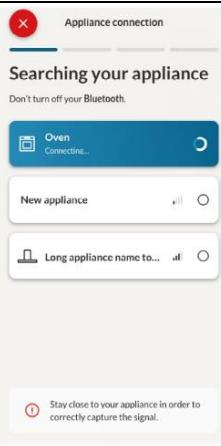
CTbNka7
BaShaTaФунaиьдe habepeHa mOxkeTeДЯУnpabIbArteЧрЗ hOn.
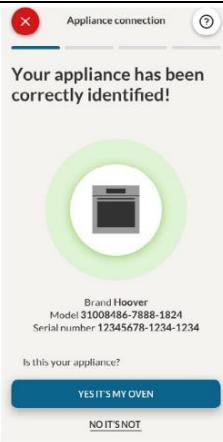

KAKДА ПОМЕнHACTPOИКITE HA WIFI
CneI KaTo ypeBbT 6bIe peRnCTpnpaH, nOtpBeNtTeJrT MoKe Da I pOmeHЯ HAcTpoKnTe Ha WiFi MeJky:
WiFi ON:Bb3MOxHO e da NaabIIOdaBaTe cbCToHHeTo Ha ypaHaTa eHNCTBeHo Ype3 npNIoxKeHneTO.
WiFi OFF:Фурната He e CBbP3aHa, Ho BCE oоше e peRnCTpnpaHa Cbc 3aNa3eHn МpeKOBn ndeHTuФиkaCNoHHn DaHHN.
HJINPAHE HA WIFI:Bp3kaTaCe HJInpa nE Bb3MOXHO HOBO 3aNcBaHe.
- 3aBbptTe KOnUeTo 3aФyHKuIN Do MeHIO To WIFI.
- Ha nucnner ce noBra, Bkn.
- 3aBbptTe KOHTPOHnIaNck, DOKaTO ce NOKaKe ,N3Kn." IIN HAcTPOkKaTa 3a HynipaHe ,rSt"
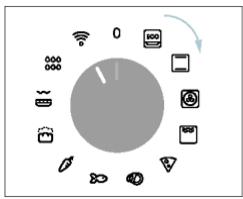

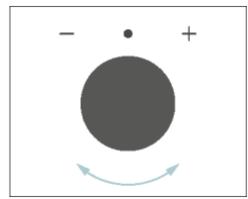


ДИСТАНЦИОНно УПВАЛЕнUE
IuctaHIOHHOTy npabHeHne npednara MHoKecTBO npedmCTBa 3a noTpe6nteHTe,poO6pBAIKyDobCTBOTO,epeKTNBHOCTTa n cyIocTHOTO n3XKNBBAHe pnp roTBHe, KaTO daBa Bb3MOxHOCT3a ynpabHeHne Ha npodukTa dIpeKTHO kaTo OT ypeDa, taka n OT npinloKeHneTo hOn
Ta3nФyHKIpy IO3BOJYBa Upe3 BaUeTo yCTpoIcTBo Da ce HacnaIITe Ha pa3JIuHnФyHKIpy, KaTO HApnpMep: He3a6abNHO IIN PIIaHInpaHO cTAPtnpAne Ha peueNTn IIN pIpOpaMn 3a rotBeHe, KOINTo BeYe ca NaIiUHb IN pIINIOKeHNeTo; Ha6JIIODeHne B peAnHO BpeMe Ha HappeBka Ha BaUnTe peueNTn; peryIlnpAne Ha n3IOn3BaHInTe napMeTpN 3a rotBeHe.
OcbEN TOBa e B3MOxH0 Da nOlyuHaBte N3BeCTnI, KOraTO npOrpaMITe NJIpeCenTtTe ca 3aBbPseHN. DcTaHcIOHHOTo ynpabLeHne MoKe da ce akTINbPa caMo KOraTo npOdyKtBt e peRncTpnpaH.
3A6EJIEXKKA:Прдага се за BCИЧКИ Φункции 3a ГТБе He Na поДуКТа,сИЗКЛЮчЕпe He Na рогамITE OrpeTeH И Cyneергп.
Kak da akTbBnPaTe duCTaHcNHOHOTo ynpaBHeHne:
- 3aBbPteTe konyeTo 3aФyHKUIM Do MeHIO TO WIFI.
- HatncheTe
- Ha dinçnPJIeCe nOyBЯBa "hOn". Ⅱe ce nokKaAT nKoHnTe KaKTo 3a WiFi, taka n 3a dinCTaHcNoHNO ynpabJIeHne.
- BJIe3Te B npINIOxHHeTo, n36peTe npOrpMa u HeKa roTBeHTo Da 3aNoUHe. ITO BpeMe Ha npOceca e Bb3MOxHo Da ce KOHTpoJnPaT u npOMEHr T npAmeTpnte Ha npOrpaMaTa KaKTo OT npOdykTa, Taka u OT npINIOxHHeTo.
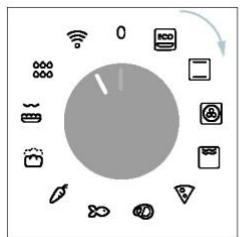

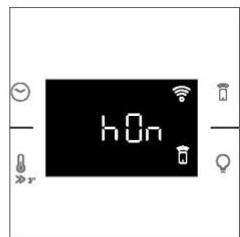
Bb3MOxH0 e cbIoo TaKa da aKTINBnPaTe DnCTaHcUHOHOTo ynpabJIeHne IIO BpeMe Ha npOceca Na rotBeHe Ype3 HATNCKaHe Ha cBOTBeTHn8 ByTOH.
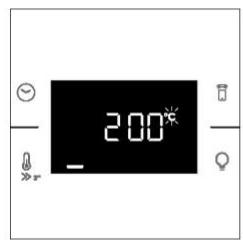
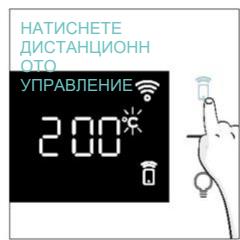
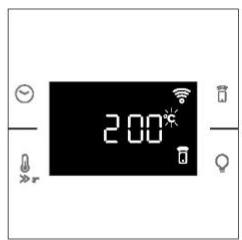
Kak da cnpete dncstahunohnto ynpabneHne:
Дokат nporpa mata 3a rotBeHe e B xOД, ТЯ мож鉴定бдспян DipeKTHO OTcamn npodyKTчe3 3aBbptaH He yHKUHOHaHOTo KOnHe Ha pa3nHnHa nO3n. Te3n DeiCTBnI pekcbat npocca H a rotBeHe.
Дрг haин eчрз haTиСкане Ha cБOTВeTHи 6уTOH HaДиСТаHцИоНHTo ynpaВлeпHe, ДОCTаBEHo C bAшь урED. Te3n DeiIcTBи npEkbCBat npOuceHa roTBeHe.
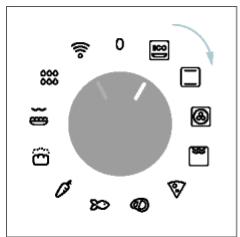
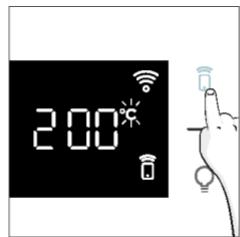
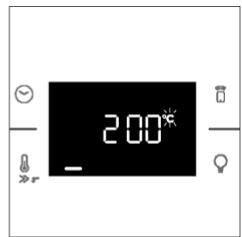
Moxete cIto taka da cnpe Te nporpaMaTa 3a roTBeHe nCTaHcUHO, KaTo n3nO3BaTe npIIoKeHHeTo, KaTo upaKHe Tbpy 6yToHa ,CTO' Ha dncnJe Ha yctpoiCTBOTo. FypHaTa ABTomAtuH Oe cnpe roTBeHeTo.
3A6EJIEXK4: Ako nTopeBnteIaT cInpe TekyIoTO rotBeHe OT cyPhaTa, cnprHTo rotBeHe 1e Ce BnDn BcBtoTO BpeMe B npInIOxJHeNTo.

3. ПЕДи ДА 3АПОЧЕТЕ
3.1.ИнфОРМALEЗЯ 3A HACHAJOTO
Korato 3a nbpBn nT BKNIOHte fpyhata, MoKe Da 3a6eJIeXtme MaIko dIM. He ce npITecHraBaiTe, IpocTo N3UaKaIe Te Dmbl T da ce pa3cee, IpeDn Da n3NoJ3BaTe fpyhata.
Kak pa6oTn BpaTaTa
3aФyHKUIN, KOnTO nI3NoI3BaT rPnI, 6IarOdapeHne HaTexHONOrnTa 3a npEeKlIOuYBaHe Ha BpaTaTa, cyphHaTa aBtOMaTUnH Oe NocTaNbHa Naay3a HArpeBaTeHNHTe EneMeHTN, KOrATo OTBOpNTe Bpata Ta I ue pOdbJnx Da rotBn, CJIe KaTo r 3aTbOpNTe.
TasnФyHKiueHaHnUHa cAmo npn onpeJeHn KOHfNpyaun Ha fypHaTa. BcUnn nipOnmTuHn MOpJIn yImaT.
IIO BpeMe Ha Ipoceca Ha IInpoJIInTnHNO NocHTBaHe BpaTaHa Na cyphHata OCTaBA 3akJIOueHa Ipe3 cIJIto BpeMe. Ako He e 3akJIOueHa, cyphHata ige nokaxe KOD 3a rpeuKa 24 i ige nocTabn H na npy3a cyHKUraTa 3a NoCTBaHe.
Kak pa60tn oCBetJneHneTo
Kamepata Ha Φуна ta ce ocBETaBa OT eHa nnn nobehe eNeKtpnueckn KpyuKn, KOnto ObHKHObeHo ce aKTHBnpat BCEkn Pt, KOraTo 3anOHe yHKnur 3a rotBeHe.
3aФурни,оборуданиспpeвключытелнаВраТаТa(BИЖTe ПО-ДОЛY),СБЕТЛINHaTа ce BKNIOUBA abTomatnHOr, KORATo BpaTaTa ce OTBOpN.
3aФурн,обор央вин c 6byToH 3a JAMna,TOI MOKe Da ce n3noJ3Ba u 3a akTINBpaH e Ha OCBetJIeHneTO. Ako BpataHa fypHaTa ocTaHe OTbOpeHa nobYe o10 MInHyTN,OCBeTJIeHneTo ige ce n3KlnOuH aBTOMaTnUHO.
IIO Bpeme Ha Ipoceca Ha IIPOJNTNUHO NOpHCTBaHe CBETNIHaTa OCTaBa N3KJIOneHa.
Kak pa60tn oxlaaiaaert BeHTnlaTOp
OxnaaiaaIeBENTnIaTOP cnyk3a pa3ceBaHTo Ha TOnIIHaT, npedna3Ba yphata N OKJIOCTNTE OT ppeKaneHO HaroepuBaHe, KaKTo 3aIITaBA KyXHeHCKeTteypeNOT Bb3deiCTBnETo HA BnCOKTe TEMpepaTyPi. Iopadn Ta3n npuHa OxnaKaIaIeR BENTnIaTop npoIbIkaBa Da ce cyBa n3BeCTHO BpeMe DOpN CLeD KAto yphTa e n3KnUoyea.
ToI pa60Tn IO BpeMe I cIeI ZIkbl Ha roTBHe B 3aBncmOcT OT BbTpEwHaTa TemnPepa TpyHa. KaTO oxnaKdaunr BeHTnnaTop pa60Tn, ToI o6NIKHOBeHO rHeHepura Jek UyM INN bpbMueHe.
Mожсьшо да завелжente толь ВьздушенnotOK,ИЗинзац ot polукata МжdyВратata Naфчatura и КОНтpoлня панел.По Врeme на пиролntично поисвае И korato Bpaatata e 3akluуeha,oxlaackdauшгВeHTINlTaTOp e Bklnoueh.
IIO Bpeme Ha cyHKuYra, EK0" CBeTInHaTa 1e ocTaHe N3KnUoyeHa.
(*cama 3a nipoIHTuHnФyPnH)
Kak pa60tn IeHTata Ha cBCTOHHneTO
JIeHTaHa cBcToHHeTo, Bb3 OCHOBa Ha 3aJaDeHnTe npOrpAmn, yIeChraBa HabIoJeHnTe Ha TeMnepaTpaTa n BpeMeTo. IIO-KoHKpeTHO, 3a fynKUm, BkIIOuBaUm npEiBaPntEnHO 3arpaBaHe, TЯ NOKa3Ba NOBIIaBAHaTo Ha TempePaTpaTa no BpeMe Ha ta3N φa3a. B npOrpamite 3a rotBeHe n fynKUma Ta 3a NiPoJNTuHo NoOuCTBaHe NOKa3Ba o6paTHOto 6poeHe Ha BpeMeTo 3a rotBeHe n CbOTBEThO uKbJaHa NoOuCTBaHe.
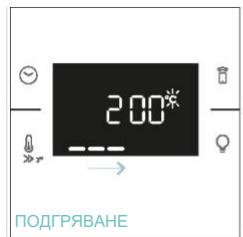
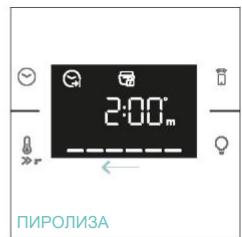
5.2. TABJIHULA ,EVERYDAY COOKING
MeHIOTo nO kateropnXpaHn p03BOJRABa roTBeHe nO pa3NmHn peeIeNT 6e3 noDprBaHe Ha fypHaTa, 6laoradepHne Ha cneuaJIHn npOrpamn 3a roTBeHe, CbO6pa3eHn c HxJdIte Ha BCsKa kateropn. CTeK kaTO n36peTe npOrpamata 3a roTBeHe, BpeMeTo nO npOpa36bpAne He e Ce nokae N MoKe Da ce peDaKtnpa Ype3 3aBbPTaHe Na DcHOTo KOnue; TEMpePaTypaTa Ha roTBeHe Moke Da ce IpomEHn Ype3 HATUckaHe Ha cneuaJIHnata IKoHa. NDbTa npaMeTbpa Morat Da 6bDat 3aJaDeHn B OrganuHc Dnana3OH, KaKTo e POKa3aHo B Ta6JIuCaT aNo-DoNy.
4. I P E D Y N P E X D E H N E:
BbHnHOTo CbKIO He ce cBaJr.
CmHa Ha KpyuKaTa OTrope:
- ɪzhkliúyete φурнata OT rnaBHOTO 3axpaHbAhe.
- OTeTpaHeTe CtbKJIeHnKaIaK Ha IaMaNaTa.
- Pa3BbPTeTe KpyuKaTa.
- CmeHeTe kpykKaTa c HOBa OT cbIur TnI.
- Bbphete cTbKneHnKaanHaJaMaNaTa.
- CbþkTe OTHOBO cyphHaTc eJIeKtpnueckaTa Mpeka.
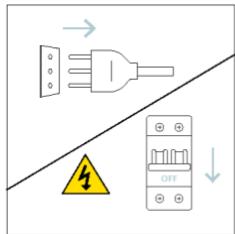
Ctbnka 1

Ctbnka 2

CTbIka 3
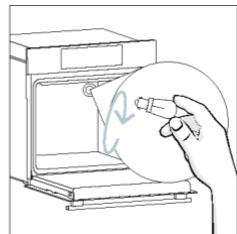
Ctbnka 4

CTbIka 5
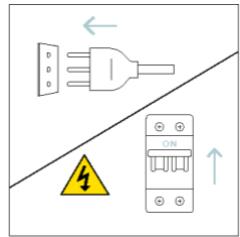
Ctbnka 6
To3n npOykt cBdbrpka eINH INIIOBHe N3TOUHnIHa cBETNHa cKnac 3a eHeprInHa eEeKTHBcOT G (naMa)
CmHa Ha cTpaHnUHaTa KpyuKa:
- ɪЗклічete Фурнaitо от главно зхранbahe.
- Изпождаме OTВерета с плоска Гльва, Кату я поционире OTСтрави на заши THOTО CTькю и леско HaTисе, за на OTСтрави.
- BhIMateJIHO OTOCTpaHete KpyIkaTa OT OCHOBaTa.
- NocTaBeTe HOBaTa.
- IocTabete OTHOBO 3aunTHOTOCbKIO, KaTO rHaTnCHeTe JekO, DOKaTO DoCTnHRe KpaHOTOnI NOJIOKeHne.
- CbpxKeTe OTHOBO cyphHaTc eJekTpueckaT Mpeka.
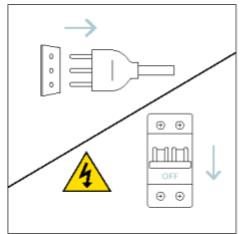
Ctbnka 1
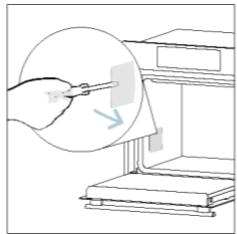
CTbIka 2
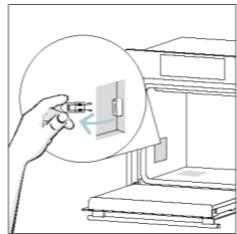
CTbNka 3
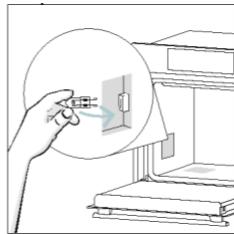
CTbNka 4
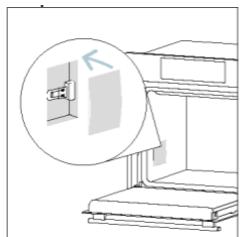
Ctbnka 5

CTbIka 6
To3n npodyKT cbdbpxka eHIN HJIN NOBuee n3TOUHNiHa CBETNIHa c KNaC 3a eHeprnHa eEeKTHBHOCT G (Jamna)
Ako no Bpeme Ha n3noI3BaHe Ha cyphHata Bb3HnKHe rpeJka, dinCnIeT ige nokaxe KoJa ,ER", nocJeBaHOT DBe UcFpn, KOITTO ue NdeHTnFmUcapat rpeJkata.
Allow your location permission
To enhance your experience, please allow location permission to HON app in the next 12 months.


CONTINUE
3veiksmas
Select your appliance category

Search your appliance

Washing machine

Washer dryer

Tumble dryer

Dishwasher

Air conditionair

Air purifier

Air scanner
4veiksmas
Appliance connection


Turn OFF and then ON your appliance
In case you can't switch OFF your appliance, unplug (for at least 10 seconds) and then plug its power supply.

OKIDIDIT
5veiksmas
- Jungus programéle „nOn" pradés iěskoti jusu buitinio prietaiso.

Appliance connection
Searching your appliance
Don't turn off your Bluetooth. hOn app is looking for your appliance...


Stay close to your appliance in order to correctly capture the signal.
6.1-6.2 veiksmai
- Pasirinkite savo buitinji prietaisa, bakstelèkite „Prijungti“ ir palaukite kelias sekundes.

Appliance connection
Searching your appliance
Don't turn off your Bluetooth.
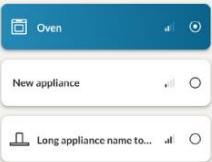
CONNECT
PRODUCT NOT FOUND

Appliance connection
Searching your appliance
Don't turn off your Bluetooth


Stay close to your appliance in order to correctly capture the signal.
7veiksmas
Jusu orkaite bus rasta ir ja galésite valdyti "nOn"programéle.
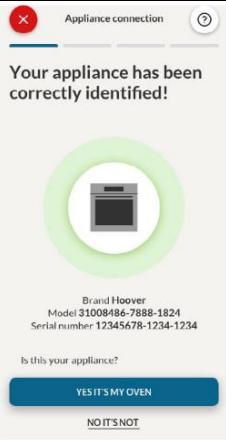

KAIP PAKEISTI „WI-FI“ NUSTATYMUS
4.1. KAIP GAMINYS VEIKIA
ORKAITEJUNGIMAS / ISJUNGIMAS
Noredami jungti orkaite, pasukite funkine rankenèle (pagal / pries laikrodzio rodykle) ir pasirinkite maisto ruosos programa. Noredami ja ISJUNGTI, nustatyke funkine rankenèle i padeti ^0^
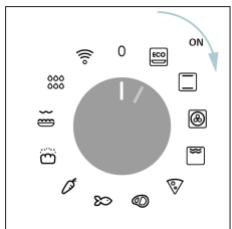
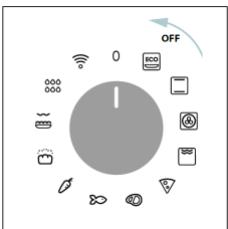
KAIP NUSTATYTI MAISTO RUOSOS PROGRAMA
Pasukite funkcine rankenèle ir pasirinkite norim programa. Ekrane bus rodoma numatyoti temperatura, kuria galima redaguoti akimirka sukant desinija rankenèle (pagal laikrodzio rodykle, jei norite padidinti, ir pries laikrodzio rodykle -sumažinti).
LAIKO MENIU
Available on the App Store
GET IT ON Google Play
REGISTRERING AF NY BRUGER
Klik på "Register"
Du kan registriere dig via dine SoMe-konti aller tilmelde dig med din personlige e-mailadresse

Welcome! Sign in to enter in your home page

REGISTER
Are you new to hOn?
Click below to learn about our products
TRY DEMO


Do you already have a thousand passwords? Register with your social accounts
and log in in the easiest and fastest way.
SIGN UP WITH GOOGL
SIGN UP WITH APPLE
SIGN UP WITH FACEBOOK
No information relating to you will be shared and we will not post anything from you.

SIGN UP WITH EMAIL
Already registered?
LOGIN
TILMELDING TIL HURTIG PARRING
Trin 1
Allow your location permission
To enhance your experience, please allow location permission to HON app in the new version.


Trin 4
Select your appliance category
Search your appliance
Washing machine
Washer dryer
Tumble dryer
Dishwasher
Air conditionair
Air purifier
Air scanner

Appliance connection
Turn OFF and then ON your appliance
In case you can't switch OFF your appliance, unplug (for at least 10 seconds) and then plug its power supply.

OK.DIDIT
Trin 5
Allow your location permission
To enhance your experience, please allow location permission to HON app in the next 12 months.


CONTINUE

Select your appliance category
Search your appliance
Washing machine
Washer dryer
Tumble dryer
□Dishwasher
Air conditionair
Air purifier
Air scanner

Appliance connection
Turn OFF and then ON your appliance
In case you can't switch OFF your appliance, unplug (for at least 10 seconds) and then plug its power supply.

OK.DIDIT
Vaihe 5
Appliance connection
Searching your appliance
Don't turn off your Bluetooth. hOn app is looking for your appliance...


Stay close to your appliance in order to correctly capture the signal.
Vaihe 6.1-6.2
Appliance connection
Searching your appliance
Don't turn off your Bluetooth

CONNECT
PRODUCT NOT FOUND

Appliance connection
Searching your appliance
Don't turn off your Bluetooth


Stay close to your appliance in order to correctly capture the signal.
Vaihe 7
Appliance connection

Your appliance has been correctly identified!

Brad Hoove
Model 3658-1000-248-1824
Serial number 12345678-1234-1234
Is this your appliance?
YES IT'S MY OVEN
NO IT'S NOT

NAIN MUUTAT WIFI-ASETUKSIA
4.2. RUOANVALMISTUDOIMINNOT
NOPEA ESILÄMMITYSVAIHTOEHTO
4.2.2. ERIKOISTOIMINNOT
5.2. EVERYDAY COOKING -TAULUKKO
Available on the App Store
GET IT ON Google Play
NY BRUKER-REGISTRERING
Klikpaa"Registrar
Du kan registre deg via sosiale kontoer aller registre deg med din personlige e-post

Welcome!
Sign in to enter in your home page

REGISTER
Are you new to hOn?
Click below to learn about our products
TRY DEMO

Do you already have a thousand passwords? Register with your social accounts and log in in the easiest and fastest way.
SIGN UP WITH GOOGLE
SIGN UP WITH APPLE
SIGN UP WITH FACEBOOK
No information relating to you will be shared and we will not post anything from you.

SIGN UP WITH EMAIL
Already registered?
LOGIN
HURTIGPARING-REGISTRERING
Trinn 1
Velg "Legg til enchet".

Trinn 2
Allow your location permission
To enhance your experience, please allow location permission to HON app in the next 12 months.


CONTINUE
Select your appliance category
Search your appliance
Washing machine
Washer dryer
Tumble dryer
□Dishwasher
Air conditionair
Air purifier
Air scanner
Trinn 4
Appliance connection


Turn OFF and then ON your appliance
In case you can't switch OFF your appliance, unplug (for at least 10 seconds) and then plug its power supply.

OK.1IDIDIT
Trinn 5
webbadress: www.candy-group.com
HUR DU INTERAGERAR MED APPEN
Welcome! Sign in to enter in your home page

Are you new to hOn?
Click below to learn about our products
TRY DEMO

Do you already have a thousand passwords? Register with your social accounts and log in in the easiest and fastest way.
SIGN UP WITH GOOGLE
SIGN UP WITH APPLE
SIGN UP WITH FACEBOOK
No information relating to you will be shared and we will not post anything from you.
or
SIGN UP WITH EMAIL
Already registered?
SNABBREGISTRERING
Steg 1
Välj "Lagg till enchet".

3AΓΑJIbHI 3ACTEPEXEHH
He BnKOpncToBvIe IJIa YIISeHnB NIpO6y NapooUChNk.
OBEPEXHO!Дя ункення He6e3neKn BHaCnIDOK HeHaBMnCHOrO cKndaHЯ TepMo3aNo6ixHnka 3a6oponeHo 3diNCHOBaTи XnBLeHnЯпILAdy 3a DoNOMoTOO 3OBHIshhboro PrncToPO 3 BMnKaUem (3OKpeMa, TaImepa) abo NiI'EdHyBaTu nPnlaD IO MEPexi, kky peYIpaRHO BMnKaTe BA BMnKae KOMyHaJIbHe NiIpNIcEMCTBO.
- Під час викорисань пилад сильно harpiBaetbся. Слід 6утп обержнми, зоб He TopkaTися harpiBaJIbHnx eIeMeHTiB ycepeDnHi nevi.
BnkopncTahnHa 3a npn3HaueHHaM
BnKOpNCToByIte DuxOby 7a4y BnKJIIOUHO 3a Iprn3HaueHnM, T6TO TiIbKn DnI npiroToYBaHH iXi: 6yIb-kae IHwe BnKOpNCtAHN, 3OKpeMa Jk DxkepeNa TeIIa, yBaKaetbcn HnPaBnblHm i He6e3neuHm. BInpo6nK He Hece BiINoBIaJIbHoCTi 3a 6yIb-kai NOnKoJKeHHn PrnAdy, CnpuHHei NOro HeHaJIeXHM, HnPaBnblHm a6o Heo6rpyHTObaHm BnKOpNCtAHNAM.
06mexehn BnKOpncTaHn
- Zei npilad Moxe BIKOPNCTOBvBaTnCRAITbMn BIKOM 8 pOKIB i CTapshIMN, a TAKOX OcO6aMn 3 o6mexKeHIMN φi3uHIMN, CEHCOPHIMN N PO3yMOBIMN MOKJINBOCTaMn, HeIOCTaTHIM DOCBIDOM i 3HaHHaMn 3a yMOBn, ZO BOHN Ipe6yBaIOTb NiD HAnEJKHM HaJIaDM o6o npoiHCTpykTObAHi ZOdo NopAky 6e3neUHO KOpNCTuBaHHN prnilaDM Ta YCBIDOMIIOBTb NOB'3aHI 3 ZIM He6e3neKn. He Do3BOJrTe DITaM rpaTnC 3 npiladom. DiTAM 3a6bOpHeNo PpOBODHTn YNuEHHY n OBcnyROvBAHnnpilaNy 6e3 HaIydy.
- Zei npilad He npin3hauehen dIy BnKOpncTaHnO oc6amn (B TOMy cnI iTbMn) 3 obmexeHnIM i3nHnIM, ceHCOPHM n POzymOBnM MoJINBOCTaMn, HeIOCTaTHIM DOCBIDOM i 3HaHHaMn, kUso BOHn He nepe6yBaOTb NiD HaneXHnM Harnlqom OC6u, BiNObiJaNbHOi 3a IXHIO 6e3neky, a6o He npoiHcTpKToBaHi ciEIO OC6oO uOdo BnKOpncTaHHn npnilady.
He 3aIIuIe Te iTei He 6e3 HaIy, 06 BOH He rpaIncs 3 npIuaIOM. -
PONPEDEXEHH. Bnpi6 i Iyoro Doctyni YactuHn CnIbHo Harpibaotbcra nid yac BnKOpncTahnnr. CnId 6ytu obepexHmN, 0o6 He TopkaTnca HarpibaJIbHnx eJeMeHTiB. DITeBikOMdo8pokIB BKJIOUHO cnID Donyckatn do npnilady Niue pnd noCTiHmH Harnlqdom dopocnX.
-
PONEPEDJXEHH.Пд час ВИКОРиСТання пиладу чаCTINH,якх може ТорkaTиСя КОпICTУВaч, можуть HarpiBaTиСя. МалeнькxДiTei He сдд ДОпуSCКATи До пиладу.
PONEPEDEXEHHI OIO BCTAHOBJIENH
- Duyxoba ⅢaΦa Moxe 6ytn po3taoBaHa Bropi B KOJIOHi a6o NiD CTinbHnIeIo.
- Pered KpiHnHm CnI3a6e3neuTn XopoWy BeHTnIaIy y BiDciKy,do YKOrO BCTAHOBIOETbCn DuyOBA 7aΦa, 7o6 3a6e3neuTn HaJeXHy CuPKyIaIcIO CBIXOR NOBITpR, Heo6XiHOrO DnA OXoJIoJxHeHH Ta 3axNCTy BHYTpIHx YacTHN. 3po6iTb OTBOPn, 3a3NaueHi Ha iInocTpaIcx, 3iINHO 3 TINOM 3'6HaHn, Pn PrnkPiHnHn DUYBOI WdHn IOn Me6PiB
Oob'3KOBO BnKOpNCObyIte rBnHTN, kI NOCTaAOTbC8 3 npnilaDOM. .JnE KcPnyatauui npnany 3 HOMHaHbHmU YactOTAMHe NpTpiBHi
IdoataKobii afo hanaStyBaHn.
3a6bOpoHeNo BCTaHOBJIIOBaTn npIpa 3a DeKopaTINBHNIMn DBePcYTaMn, OckIbKn Ye MoKe npN3BecTn Do nepeperpiBaHH. - Плд час Встановлины духова Шафmaе 6утп вдкюец на лесгтромереки за залобiraонни поеррив.
-Якшдя усуненн HecnpaBHOCTe, lo BnHKnBhacIdoK HnpaBnIbHOro BCTaHOBLeHH, noTpi6Ha DoNOMora 3 60ky Bnpo6Hnka, II He npeEd6aueHo rapaHTieO. IprofeciHn KBaJIΦiKOBaHn nepcoHaMaE DToTPmYBaTncb IHcTpyKci3 YcTaHOBNeHH. - HenpaBnIbHe BCTaHOBJIeHHa MoKe IprN3BeCTn Do NpUkOJXeHb MaHa a6o TpaBMyBaHHa JIOdei YH TBapHn. BInpo6HnK He Hece BiDIOBIdaIbHocTi 3a TaKi NpUkOJXeHHa a6o TpaBMn.
BCTaHOBJIeHnI NOBInHNO 3dIChIOBaTnC KBaJIiΦiKOBaHm TexHiuHm CneUaJIcTOM, AKN IIOBHeH 3HaTN i DoTPmYBaTnC 3aKOHiB, YHHnx y KpaIHbCTaHOBJIeHnI, Ta IHCTpyKciB BnO6Hnka. - Pizjra po3nakyBaHnry npuJaIy 3aBxdi npeBipraIte NOro Ha BiDcyTHicTb noXkoJKeHb. Y pa3i BInHKHeHnry npo6JIeMn 3BepHiTbcr Do cnyK6nPiTpIMKn IpeEd yCTaHOBKOIO Ta He NiDKIIOUaIte npuJaIdo dXkepeNa KINBJIeHHra.
Budaiitb nakybaJIhI matepiJn neped ekcnlyatauieo npunaay.
-Плд час BCtaHOBJIeHHЯ He BИКОпСТоВуЛte рчку ДверцгТ духовишадлдя II пidиму та помішени. - Me6JI I y BCTaHOBLeHH Ta npUnerI Do HIX NOBHHI BHTpIMyBaTH TeMnepaTpy 95^
-
PekomeHnyeTbcB BdIraTn 3axncHi pyKaBnKn NiJ Yac MoHTaJy, IIO6 yHnKHyTu TpaBM BiD nopizIB.
He BCTaHOBJIOnIte Bnpi6 Ha BiIDKpNTOMy NOBITpi, De BIH MOKe PiJaBaTnCRA BnJIInBy aTMocdpehnx fakTopiB. -
LcEi npuIad npu3HaueHn Ipn BnKOpncTaHHa HbNCOTi HxKHe 2000 M.
PONEPEDEXEHHI OODO EJEKTPNUHIX CNTTEM
- Po3eTka Maé 6bytn npndaTHOIO dIy HaBaHTaXeHHra, 3a3HaueHOro Ha etnKeTci, a TakoK OchauSeHOIO pID'EdHaHIM po6OuHM KOHTaKTOM 3a3eMJIeHHra. IpOBiDNHK 3a3eMJIeHHra Maé XOBTO-3eJIeHHr KOnIp. Lio OnpaIIO NOBHeH BVKOHyBaTn faxIBEcI 3 HAJExHOO KBaJIiΦikaIeIo.
- ПідкнluуehняdoДжеретаЖИВлснгМожна3diIChNTn3aДОПOMOrOuUSTeNcJIbHOi BnIKn a6oФikCoBaHOi NPOBODK, BCTaHOBNBuN 6araTOnOJIIOCHN BmNKauch i3 po3diJIeHHYm KOHTaKTiB,ЯкN BiDIOBIaE BmORam KaTERopi III IJIoNopeHaNPyrn,a TAKoX 3daTeH BnTPMByBaTN MakcIMaJIbHe,piI'6dHaHe,HaBaHTaJeeHn,Ta3aIOBOJIbHRe,BmOrN
YHHHOrO 3aKoHOJaBCTBa.
Y pa3i HecymicHOcti po3eTKn Ta 7TeNceJIbHOI BUNK npnilaIy nonpocITb KBaIiΦIKOBaHOrO eJNeKTpNa 3aMInHTu po3eTKy Ha iHsu DeTaIb npndaTHoro Tnny. BUNka I po3eTKa MaOTb BiIDNoBIaTn YHHIM HopMaM KpaIH, De 3diCHIOEbCra BCTaHOBJIeHHra. - JXOBTO-3eJIeHn Ka6eIb 3a3eMJIeHn He MaE nepepNBaTncs 3a DOnOMoTOB BmNKaUa. Po3eTKa a60 aBTOMaTHN BmNKaU, kAi BnKOpNCToBHyOTbcr dIy 3'EDHaHH, MaOTb 6yTN JeRKOJocTyHnMM NiicJI BCTAHOBLeHn npuJaY.
- Y BnnaDky noWkoJKeHHKa6eJIIO JINBJeHHdIy yHnKHeHH MoJNBOi He6e3neKn Ioro 3aMIny MaE npOBoHTN Bnpo6Hnk, Ioro cepBicHni PpeDCTaBnK a60 oc6b3 nOdi6HO KBaJIiΦiKaizieI.ДЯ 6yDb-ЯKOro peMOHTy 3BeptaIteCra NiSe Do BIdiIny o6cnyroByBaHHKnIEHTIB i BmaraIte BnKOpNCtAHN OpiRiHaJIbHNX 3aNaChNX YaCTNH.
- Perш Нix повODHTи 6yd-b-яki робOTи ChI O6cLyroBvBaHnЯ npuJaY, BiD'edHaIte NOro BiД Мерекi eNeKtpOxNIBJIeHHN.
- PONPEJXEHNJI. Npej 3amIOJ lamnoKNI pekeHnTeCJ, IIO npIaB BmKHeHO, I06 yHnKHyTIN MOxInBOrO ypaXeHHJeEKeTpUHnM CTpyMOM.
-
Perш Нix ДемоHTуВаТи 3нимп DeТаNi, NotpiбHo ВИМКHyТи ДУХОВ Уафу. Псяя OчишЕНь BCTaHOBiTb IX Ha Мicе 3riДNo 3 iHCTpyKciЯМN.
3acToCyBaHnHa 6yNb-yaKOro eNeKTpOpiNlaNy nepeIb6aaye DoTpMaHHn HBeHNx OCHOBHn NpaBn, kki 3a3HaueHo HnxUe: -
He Taryntb 3a Ka6eNb XnBHeHnI dIy BiI'edHaHnI npuIaNy BiI dKepeNa XnBHeHnI;
- He TopkaǐTecs ānpiǎny MOKpɪmɪ pykʌm abo Horamn.
- 3araIOM He peKOMeHdyeTbcB BNIKOpNCTOByBaTI aIaITePn, eIekTpUHi po3raJyJxByaui NIOOBxByaJIbHI ka6JIi.
-
Y pa3i HecnpaBHOCTi / a6o HeHaJIeXHoi' po60Tu BUMKHiTb npuJaI He HAMaRaiTeCra po3i6paTu Ioro.
-
I IPNIMITKA. Ockijbkn Mojke BUNHKHyTN NoTpe6a B Texhichomy 06cnyroByBaHHi dYxOBOI Wafn, DozijbHO 3aJINsHTN DocTyHNOU ige Ondhy HactiHny po3eTKy dJa nii'EdHaHHy dYxOBOI Wafn B pa3i iI DEMONTaxy 3 nonepedHbOro Micra.
-Будь-який peMOHT, BCTaHOBJIeHЯ Ta TextHiye 6cIyROByBaHHЯ, BnKOHaHI HeHaJIeXHM YInHOM, MOxYb CTBOpITN cepNo3Hy He6e3NeKy ДЯ KOpIcTsyBaça. - Kompania-Binpo6nK 3aBna, 10 He Hece JODHOI BiINOBiAalbHocTi 3a npami Hnnpami 3bNTKn, cnpuHHeHnpaBnBnM BCTaHOBneHnM, o6cnyroBvBaHHam a6o peMOHTom. Kpim Toro, kompania He Hece BiINOIAJIbHoCTi 3a 3bNTKn, cnpuHHeH bIDcyTHicTIO a6o nepePbAHnM CnCTeMn 3a3emJehn (HaipNKnAd, ypaxeHHra eJeKtpnuHm CTpyMOM).
OBEPEXHO!Дя ункенн Hebe3neBnHacIIOK HeHaBMnCHOrO cNdaHnTepMo3anobixHnka 3abOpOHeHO 3diChIOBaTu JKNBLeHH npuJaTy 3a DOnOMoTO 3OBHIshHbO rPncTpO TO BmNKaUeM (3OKpeMa, Taimepa) a6o Ni'dENHyBaTN pnpuaD IO MEPexi, kky peRyJIrpHo BMkae Ta BmNKae KOMyHaJIbHe NiIprnEMCTBO. - Пилад He пиз haueHn Дя BMKaHHЯ NOrO 3OBhiUHIM TaMepom a6o OKpeMOIO CNTeMOIO DnCTaHciHOrO KepyBaHHra.
EKCJIpyATAUIA TAOBCJLYROBYBAHHRA
- IotoK dIy Kpanelb HakoNHye 3aJIuShKn, kKi CTiKaIoTb NiD Yac npiroToYBaHHJ.
KoIbN KlaTe peiItky Ha 6iHi CTiIKn, NepeKOHaTecr, 10 KoPOTsha qactNa 6iHoi YactHn (MIX yIopom i KInCeM) CnpMaOBaHa BCEpeDHy dYxOBoi 7aΦn. JkIo peiItka MaE DeKopaTnBHy MeTaJIeBy PnAkHz, 3BepHITb YBaIy Ha Te, 106 po3TaUyBaTn II Ha 3OBHIshbOMy 6oCi dYxOBoi 7aΦn, 106 IorOtIN 6peHdy 6ylo BnHO, N BiH YntABc. Ipn PaBnIbHOrO po3TaUyBaHHra DnB. TaKoX MaIIOHOK y po3diNi "PpIaNJa" cIbO rnoocihnka KopncTyBaua.
He BnKOpNCToBvIe JxOpCTki abpa3nBHi 3ac06n dIy uHSeHHa 6o roctpi MeTaeBi cKe6Kn dIy OuyuSeHHa cKn aDBePcT nei, ockInbKn BOHN MOKyTb NopraNaTn NOBepXHIO, 1O MoKe Ipn3BecTn Do p03bTTa cKnla. - BnKOpncTobyIte IInIe TepMoUyn, peKOMeHDoBaHn dIa ciEi dYXOBoI 1wafn.
-
Плд час пи�罗тувангя iж BOLORA може кондсуватся Всередни Камерни духовошафиabo на склдовцг.TеHopмальни стан.Поб 3меншити цe eфekt, зачекайte 10-15 xВИЛINH пicя уВIMКненняЖИВЛЕння,порш НIXКlaCTN CTpaBy Всередни духовошафи.Y6yДьЯКOMУ BИПадкУ кОндссаТЗИКаE, кOLN духовашафадocягаTeМператури пи�罗тувангя.
-
FotyuTe OBOUi B EMHOCtI 3 KpuuKoIO 3aMicTb BiDkpntoro Deka.
He 3aIIuIaIte Iky BcepeDInHi dYxOBoI IuaΦn nicJ npNroTyBaHn8 6IbI HIX Ha 15-20 XbUInH. - TpmbaIIIM 36iJXINBJIeHHHa eTani npnroTyBaHnI iXi MoKe npn3BeCTN Do HecnpabHocTi MOHToPA. Y cIbOMy pa3i 3BepHiTbcr Do cIyXbN PiIDTpIMKn KJIeHTIB.
- NOPEDEXEHH. He BnCTnJaTe CTHKn DuxOBoi 7aФn aIIOHmIHcBOIO fOJbFOIO abo OndHopa3OBIMN 3axNCHMn eJeMeHTaMn, 70 npOdaIOTBcR MaRa3INHax. AIIOMHiEBA fOJbRa a6bYdb-aykn IHsIn 3axNCnMaTePiaI, 70 6e3NocepEdHbO KOHTaKtYe 3 rapAHO EmaJIHO, MOKe pO3PiNaBNTncr Ta 3iNCyBaTn EmaJb Ha BHyTpIshIX NOBepxHx.
- PONEPEДЖЕHHЯ. Yжодому pa3i He 3HIMaITe yuJIbHeHnY DBepTuT duXBOIo IuaΦn.
OBEPEXHO! He DoJIbAitTe Body Ha IDo KaMepn iIac nprirotyBaHnI iXi a6o KoJI NyxOba waopa rapa. - Дя павиьног ВИКОПИСТАНHAухоВIДаФи ДОцINьНpo3MiuYBaTN npOdykTn TAK, lo6 BOH He KOHTaKtUBAJIb 6e3nocepeDHBo 3 pewiITkAmN DeKAMn. HAtOMicTb peKOMeHdYeTBcR BИКОПИСТOByBaTN nAnip DЯ BvniKaHnTa (a60) cneuaJIbHi EmHOCTi.
PONEPEDEXEHHRA \*IJIPEH3 IPOJITNUHM OUYUENHREM
- Pered noatakom npoceduyn ouuueHHn pOtpitb yci Micya, de 6yno po3nto 6araTo piDHH.
-
1 NONEPEIXEHHJ. Ipei 3anyckom zukny aBTOMaTHHORO OuHsEHnBnKoHaIte 3a3NaeHi HxJy di:
-
Ounchitb DBepuTa duXoBoi waΦn.
- Приберіт b Велік i abo 3a rpy6iJI 3aIIuIck iXi 3cepeHn DuyxOBoI 7aФи 3a ДОПOMOrO H BOrOoi ry6kn. He BnKOpncTObYnte MInOci 3acobn.
- 3HimiTb yce npiJaTЯ KaOMnJIeK TBNCyBHNx NOIuCb (3a HaYBHOCTi).
-
Pπi6epiTb i3 npiJaу kxyoHHi pyuHnKn.
-
Y dyxobn x iaqax i3 Tepmoynom noTpi6Ho neped zuklom ouuueHna 3akpntoTBip 3a donomoroTo raikn, zo BXoNTb Do KOMnKeTy. O6OB'3KObO 3akpnbaiTe oTBip 3a donomoroTo raikn, KOJI N Tepmoyn He BvKOpNCTOByeTbcra.
- Пд уac поцecу nipolitуного очиени (3a haBhocti) NOBepxHi MOkyTB harpiBaTnca 6IbSe, hIX 3a3Bnua, TOMy ditei cnid TpIMaTI noanl.
- YKsqo NaD dYXBOO UafoIO BCTaHOBJeHO BApNbHy naHeJIb, y KODHomy pa3i He BnKOpNCToBvIe Te 10 naHeJIb iId qac po6OTn npoiI3aTopa, 106 yHnKHyTn II nepeRpiBaHHra.
2.1.ОГЛДВИРБУ

- ΠaHénb KepyBaHnHa
- Homepi no3nui no nui
- PeuitKn
- Deka
- Kpnska BeHTnIaTopa
- DBepeTa dyXoBOI waФn
- BùHí jiǎpòrī hāi pèi tǐnq. Tá nàHBOCTi: Tǐnbk yán lìn àncǒkīn nopóxkhmīn)
- CepiHn Homep i QR-koD

3aBHHT TUT cEBHINN HOMEP CBOO BFOBy IaNDaBHsO RBOVPCHTAHN.
2.2.IPIJIAIJI
Biyhi npotrahi HanpymHI (JInuhe 3a HaBbHocTi\*
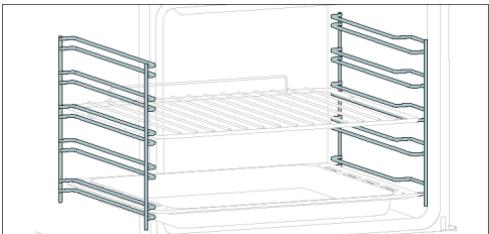
Po3aioBahi no 6nBa 60Kn Kaempi DxyOBoi 7aepn 6iuHi HapmHi np3HaueHdi nI pyo3MiueHHe deko Ta pewiTOK niJ vac npiroToyBaHH.
1 NpMITKA. 6 a6o 7 pIBHb 3aIeXHo BID MoJeJI.
YK B3AEMODIYTN 3 DODATKOM
Bau npnad MoKHa NiKIOHTN Do DomaHbOi 63pOTOBIO Mepexi Ta KepyBaTu Hm DiCTAUHHO 3a DonOMorO IOdaTka. PdIKIQUITb Cbi npCtpi, Oo6 3a6e3neHTN Ioro OHOBENHr 3 HaHOBiIMnpOrpAMHM 3a6e3neueHHM i fHyKUJMI.

ПРМITKA
- Пися увимкенна духоишашиnikтогама Wi-Fi блима пotingROM 30 xвилн. ПotingROM zuboro уасу можна заесстувати вирб.
- PepekoHaTeCra, 10 doMaunHIO Mepexy Wi-Fi yBIMKHeHO.
Bam 6ydyb Hadahi NOKPOKOBi Bka3iBKN JaH BaWOMy npnlaDi, TaK i Ha Mo6iNbHOMy npncTrooi.
PiiknoueHHaOBoI MoKe TpNBaTn Do 10 XbNJH. - Ⅲo6 i3HaTnca 6iJIbIe Ta yCyHyTu HecnPpABHocTi, 3BepHiTbcrdo Do doaTkU.
3aBaHTaxTe Ha cMapTfoH.


HaTnCHiB "3apeecTpByBaTncra
Bn moKeTe 3apeeCTpyBaTncype3 obnikobi 3aIncn B coUiaIbHnx Mepekax abo 3apeeCTpyBaTncs 3a DOnomoroO oocnbctoi eNeKtpoHHOI noHTN


WBnIKA PECCTPAUJ3'6DHAHH
Kpok 1
BübepiTb "DOnaTu npnnaI."

Kpok 2
- 03BOJIbTe IOCTyn Do daHnX npo BaIe Micce3HaXOJKeHHa.
Kpok 3 Bn6epitb duyobv uadpy 3 kateropii npnilaib.
Kpok 4
- yBIMKHiTb npnla;якso Bih Bxpe yBIMKHeHni, BIMKHiTb NOrO Ta yBIMKHiTb 3HOBy.

Allow your location permission
To enhance your experience, please allow location permission to HON app in the next version.


CONTINUE

Select your appliance category
Search your appliance
Washing machine
Washer dryer
Tumble dryer
Dishwasher
Air conditionair
Air purifier
Air scanner

Appliance connection

Turn OFF and then ON your appliance
In case you can't switch OFF your appliance, unplug (for at least 10 seconds) and then plug its power supply.

OKIDIDIT


Kpok 5
Picn yBimKHeHn DoaToK hOn noHne noSyk BaWoI noByTOBoI TexHIn.
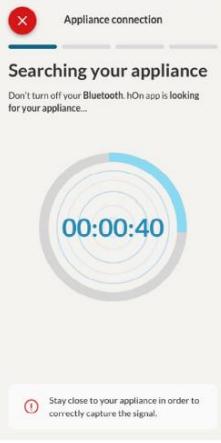
Kpok 6.1-6.2 Bn6epitb cbi nobytobni npnilad, HATINCHITb "PiDKHNUHTNcra" i 3auekaTe KJIbka ceKHyD.
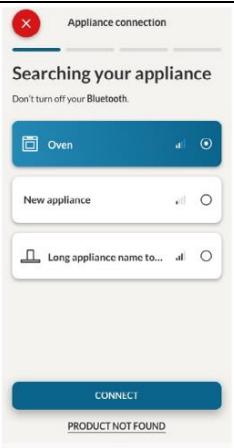
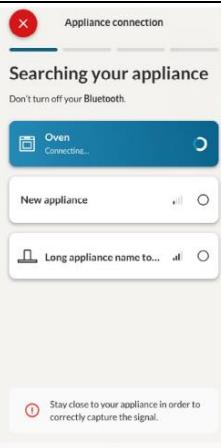
Kpok 7
BauyuDyXoBy 6afo 6yde 3HaJDeHo,i Bn 3MoKeTe KepyBaTu Heo Uepe3 hOn.
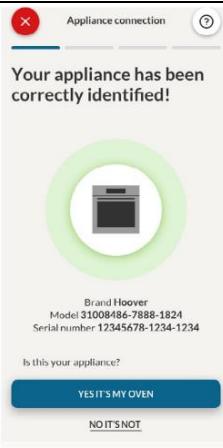
IicJIpeecTpaCii npuJaNy KOpncTyBaU MoKe 3mHInTu HaJaSuTyBaHnR Wl-FI mix:
Bn Takok Moxete 3ynHHnI nporpaMy roTyBaHnI dncTaHcHIO 3a donOMoroIO daTka,HaTNCyBnI KhoNky "CTO" Ha nCnIeI npicToHO. DxyOba IaP aABTomTuHIO npinnHt b roTyBaHnI.
1 PnIMITKA. JaKIO KOpNCtByaB npINHHe npiroTyBaHnI iXi B dYxOBi IaΦi, OJHOacHO B DoaTky BiO6paKaTImeTbC3yINHka npiroTyBaHH.
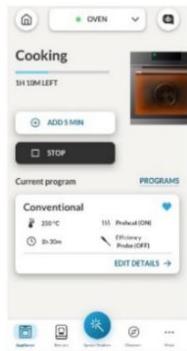
3. ПЕД NOЧАКOM
3.1. IHΦOPMAUÇIДЛ NOYATKY POBOTN
KoIN Bn Bneppe BmkaTe DxyOBy 7afoy, BN MoKeTe NOMITTN dIM. He XbNJIIOIeCra, npocTo 3aueKaaiTe, nOKn DM p03BicTbcra, nepu HIX BnKOpNCTOByBaTu NiY.
JaK npauoIOb DBepcraTa
Дяфункii,яki ВИКОРИСТОВИТугпь,ЗАБДЯКИТExHONORiIpeNeДВЕЦТДУХОВашада abTomatMuHO npu3yUnHЯpo6Oу harpiBaIbHnx eJemeHTIB,KOLIN Bn BiDUnHЯTeДВЕЦТa,i 3HOby BMINKAeIX,KOLN Bn 3aChHЯTeДВЕЦТa.
Lc yhkuia doctynha nmepe nneBnHex konphiirpaui dyxoboio wa. Yci moJIe 3 nipoiizom MaHOt b II. Pid cac npocecy nipolitunHoro ouuien Hra DberpTa dyxoboio wa 3aBXKn 3aIIuauTbc8 3abokobAHmN. KaIO npuaad He 3abokobAoHo, Ha dyxobii wa biO6pa3ntb8 cod nomnkn 24 i 6yde npin3yInHeo fynkuio ouhieneHH.
JaK npaucIOcOCBITJeHHA
Kamepa dxyoBoI 7aΦn OCBITIIeTbcO ndHIO a60 DeKiJIbKOMa IaMNoYkAMN, kI 3a3BvuaB MInKaIOTBcA Ⅲop3y, KOJI 3anyckaTeBCs yHKiJ npiroToBaHH.
Дя dухobux wαф,обаднаниь Вмикayem Ha Деврcaтax (ДИВ.НИКУ),OCBIТЛЕHHЯ ABTomaTHHO BMnkaETbCS,KOJIN DBeprTa BiDUnHЯIOTbCS.
Длп пechи,обаднанх KНОКЮ Лмпи, IIТаКоМоЖь ВИКОPGИСТОВУВАТИ Длг BMИКАнг OCBITПЕНHA.
Якso Деверцая духови залшатимутбя BiДКрNTIMи 6iЛьшe 10 xВИЛиH, OCBITПЕнHa ATOmATUHOBIMKHTbCry.
IiD yac npoecy nipoiitunHoro OunuHnO cOBiTJeHHa 3aJIIMsaETbc BUMKHeHm.
JaK npaioe BENTINrTop oxoJIOxehn
BentnIaTOp oxoJxHn BldnoiHa 3a po3ciobHn TeHnla, 3anobirHn 3aHaITO BWCOKMy HarpBaHHIO duXoBOI uafni HABKOnlunHbOro cepeDOBuIa, a TaKoK 3a 3axNC TkyOHNX npIuaIB BID BnInBy BcOKnx TemnepaTyp. 3uiEi npUHNn BENTnIaTOp oxoJxHn 3aIIuAeTbcra UyTHM npToTOM neBHOr nepioD yacy HabItb nicLn BmKHeHH dyXoBOI uafn.
BIn npaioe niz cac ta nicn zukny npirotoybanHH 3anexkHO bID BNYtpiHbO iTemnpaTpy dYxOBoi Wafni. KOnn BeHTnIaTOp oxoJooKeHHN ppaioe, Bin 3a3Bnuay rehepye leKnn ryn a60 dznKuHaHH. Bn TAKOK MOKeTe NOMITn Tepnn noTik nobITpr, 10 BNXODITb i3 3a3opy mix DBePzTaM N DxyOBKn Ta naHeHH KepyBaHH. Pid cac niponitunHoro OunueHH Ta KOJI DBePzraTa 3abokobani, BeHTnIaTOp OXIOJDOKeHHB BMKaEcTbcra.
Iiucfynkui ECOocBtTneHn3aIIuHaTmMeTbCBAIMKHeHIM.
(^* 且 且 且 且 且 且 且 且 且 且 且 且 且 且 且 I
Ja npaioe pdoK cTahy
Praok cTany Ha ochobi BcTaHOBLeHn nporpam cnpoUe MOHITOpHHr TemnepaTy p Ta yacy. 3OkpeMa, nIpyHKui, nob'zahnx 3 nonepedHim posirpiBaHHm, BiH BiIObpaKa e NiIBuNceHHa TEmnpaTyPi d Yac ciEi pa3n. Y nporpamax npiroTuBaHH iXi Ta IpnIy PhHKii npoiitTuHoro OUYueHHBIObpaKaetbca 3BopOTHn BiNik uacy npiroTuBaHH i Nkny OUYueHH BIDNOBIDHO.
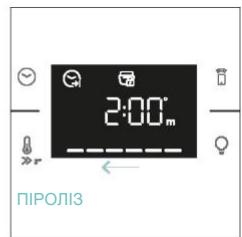
3.2.IEPWE BINKOPUCTAHN
KoII npIauB BMnkaeTbcra BnepSe, nepuIM KpOKOM e BCtaHOBJIeHHa cacy do6n, Bn6ip MIX 13 a60 16 ampeamn, Bn6ip JckpaBOcTi ta pIBH 3ByKy.
YCTAHOBITb TAIHEM: HaIcnPiEi 6bnMaTmme nonepeHbO BcTaHOBneHn Yac "12:00". 3mHNTn Ioro, HATNCHTb i cKOpNCTaIteCra npaBOIO pyuKOIO, 1o6 HanaU TyBaTN IOTouHy roDInHy. HATNCHTb 1e pa3 i BvkoHaIte Ty JnpOeDpy, 1o6 BCtAHOBNTn XBUNHN. 1o6 NiIDTBepdNTn, HATNCHTb 1e 1pa3.


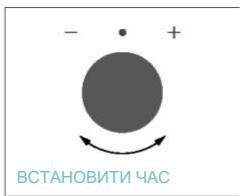


CINLA CTPYMY: 3a 3amOBuyBaHHm iH uHaIaHToBaHa Ha pOBoTy 3 bIbIoo IOTyKHiCTU, OIO nIXoIITb DnI DmOrOcNOpApCTB 3 NToYkHiCTU NoHaI 3 KBT (16 A). JIku BoIe NOMEuKaHHa MaE MeHsu NToYkHiCTB, Bn MOKeTe 3MInTu Ne H aHaIaSTyBaHHa Ha 13 A. Lc H aHaIaStyBaHHa BnIIBaE Ha WbUdKiCTb HarpiBaHHa DuxOBoi UaФn. Bn6ip BinbS BvCoKOro BapiaHTy (16A) O3NaueA, 0n iHarpBaTcBcra WbUdUe (ocKnBkn NOrnHaHHa eHeprii 36IbUyEbCS). Ha DnCnIe BiOobpaXaTmUyTbCg Da BaBapiaHTN: 13A i 16A. PpocTo nobepHtB npaBy puKy, 0oB Bv6paTn NotPi6Hy, a NotIM HATncHIt IpnTBePdxKeHHa.
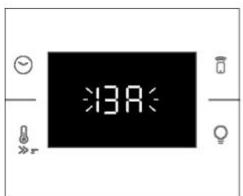
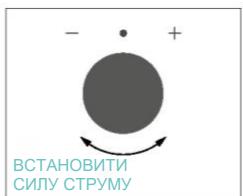
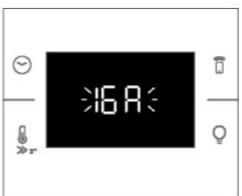

1PIMITKA. OniHaJauaHTyBaHn CnIe CTpyM DoCTynHa IInse Niac NoaTkoBOro BCTaHOBJIeHH. 306 3mHITn HanaTobAHy CnIy CTpyMy, 3BepHiTbcrdo IHCTpyKcij no BVKOpNCtAHIO nicJI BCTaHOBJIeHH.
ACKPABICTb:HaIncnIeBIO6paXaTbcraCmBOBn"br".LINpRBIIO6paXaHObpiBeHbIHTehCNBHOcti AOKpaBOcTi,AKM MoKHa peDaryBaTu,NOBepTaOuN npaby pyky.ДЯ NiITBepdKeHnHaTNCHtB
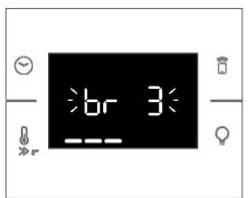
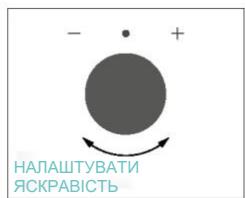
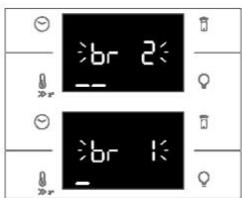

3BYK:HaIinCnIeBIO6paXaETbCSNMBON"Sn.LINpRnBIIO6paXaHOtpiBeHbIHTeHCNBHOCTi 3ByKy, kmy MoxHa peaLyBaTn, NOBepTaIOuHN pApBy pyky. Iy n iNTBepdxEHHaHTNCHITb
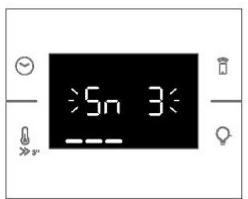
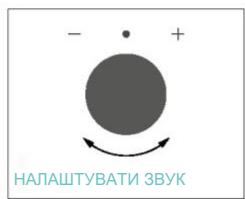
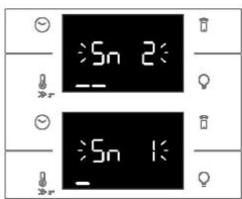

Koln duyxoba 7aapa nepe6ybae B pexmi OikyBaHH, MoXHa NOBepHyTncsdo NoouaTKOBHX HanaIbTuBaHb, oNHOacHo HATNCyBUn KONKn TempepaTpa Ta IAmna npotraRm 5 cekyHd.

3.3.ПОЕPEDHС OYIIENHЯ
OuHCTIb dYxOBky neped nepShm BnKOpncTaHnRy. IpoTpItb 30BHiU HOBepXHi BOJorHO M'AKoHO tKaHNHO. BmNtte BCE npnAaJa Ta npOtpItb BHyTpiHIO uactHy dYxOBoI waΦi 3acTOcYBaHNMy po3UnHy rapaoyo BVOn MmHoPiDHH. YctahOBiTB MaKcMaJIbHy po6Ouy TempepaTy pOPOXHbO i dYxOBoI waΦn np6bn3No Ha 1 roDHy, Uo6 BnDaIHTN BCI cTIki 3anaxn HOBO Ripo6y.
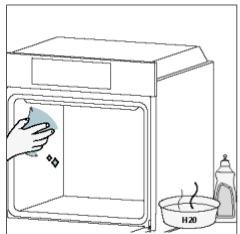
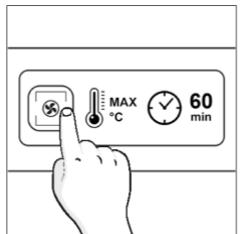

4.1. ПИNHцИн ДII BИPOБУ
YBIMKHEHHRAUMKHEHHDyXBOI UAΦN
IooB yBIMKHyTn DyXOBy 7afo, noBepHItb nepeMnKaU cyHKuJ (3a roDHHNKOBIO CTPIIKO/npOTn roDHHNKOBOI CTPIKN) i Bn6epiTB nporpamy npriroTyBaHH. IooB BIMKHyTn II, BCtAHOBiTb nepeMnKaU cyHKuiy y noLoJKeHHN "0".
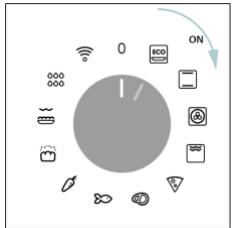
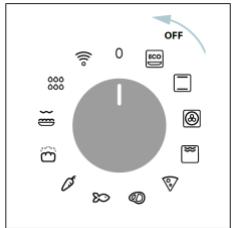
HAJIASTYBATI NPOPGPAMY NPIHOTYBAHH
5.2. TABJIICRA IPOPTPAM EVERYDAY COOKING
MeHIO kaTERopi II npOdykTIB Do3BONJe roTyBaTI pi3HomaiHTI peceNTn 6e3 nonepedhoro po3irpiBaHHaDyXBOOI 7aФN 3aBdAkn CneUiaJIbHM KJIiHaPmN pOrpamam, aAnTObaHm Do nOTpe6 KoxHOI KaTERopiII.
Picra Bn6py nporpamn npiroToyBaHHB BiOobpaKaTHMeTbC8 cac 3a 3AmOBuBaHHM, kKm MoxHa peDaYBaTN, NOBepTaOnU npaby pykky; TempepaTy piroToyBaHH MoxHa 3MiHtN, HATnCKaOnu CneiaJIbHy nIKtorpamy. Ondba npamaTpni MoxHa BCTaHOBHTN B oSmexKeHOMy dIana3OHi, kNokasaHO B TabLiNi HiXNe.
| Символ | Опис | Пone- раздень posirpi- ванья | Поло- жени полци | Темпера- тугий дiamazon °C | Дiannazon часу (xВ) | TempepaType термоцуна Heat Feel (а насысти) | Опис |
| М'ясо | HI | 2-3-4 | 180-200 | 20-80 | 55-85°C | Для сможени Яковский, Телегин, Свинник, рtiци Ташаткib M'яса. | |
| Риба | HI | 3-4 | 160-180 | 15-45 | 55-65°C | Для цioл рибий фine. | |
| Овочi | HI | 3-4 | 180-200 | 30-80 | 70-90°C | Для сможени овочи i kartonni. |
1 PNPMITKA.Якло nicявимкингдуховишфиnotriбноюдькпгotувашиpekomehydetybcar yHnkaTn BkOpncTaHHN NOBcKaDeHHx nporpam npiroToyBaHHa (everyday cooking),a 3amictb zufo BO BVbpaTn cTaHndapTHi cyHKuii.
- IONEPEJXEHHJ. 3OBHIJIHe cKIO He 3HIMHe.
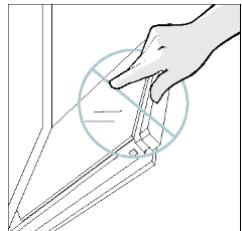
- OuNCTIb cKlO 3a DonomoroIO M'koIT KaHnHn Ta BiDnOBiDnHex 3acobIB dIy HJUeHHJ.
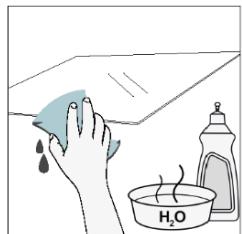
- BcTaBTe cKJHi nAHeJI, nepeKoHaBShncb, 10 eTNKeTka "Low-E" npaBnIbHo 1HTaETbcra Ta po3TaUObaHa B HnKHi IiBiY qactHni DBePcT, 6Ia JIBoI neTJI. TaKIM YINHom, dpyKOBaHa eTNKeTka Ha nepShOMy cKJI 3aJIuShaTmEeTbcr Ha BHyTpIshHl CTOpOHi DBePcT.
- BctaHOBiTb Ha Micce KpuuKy BepxHboroCKna DBepaT, HATnCHyBwn II BCEpeDmHy, POKn He NouyTe KnaCaHHra DBOX 6iUHnx KHOPOK.
- Iotim nobephiB DBepuTa ha 90° i nobepHtB pfikcatoPi TeTeIb BCEpeDnHy Do BHYTpiiHbOi YacTInH dyXOBKn.
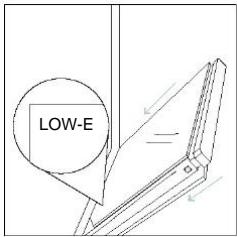
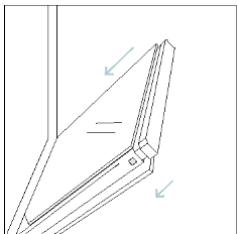
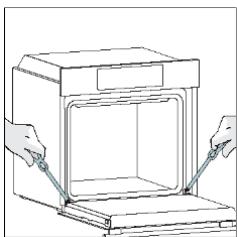
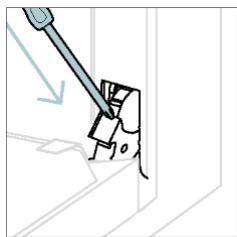
6.3. OUYIUEHHN PNIJIAIDJ
PeTeIbHo OuyuYte npUaIg NiCnKoXHOrO BnKOpIcTaHn Ta BnCyUyTe NOrO 3a DonOMorOIO pyuHnka. Y pa3i CTIKnx 3aIINkIB 3aMoOITb npUaIg y cyMiI BoN Ta MIna npi6IIN3HO Ha 30 XbIIHH nepeD nobTOrPHM MTTTAM.
Allow your location permission
To enhance your experience, please allow the enrollment permission to HnApp in the next step.


CONTINUE

Select your appliance category

Search your appliance

Washing machine

Washer dryer

Tumble dryer

Dishwasher

Air conditionair

Air purifier

Air scanner

Appliance connection

Turn OFF and then ON your appliance
In case you can't switch OFF your appliance, unplug (for at least 10 seconds) and then plug its power supply.

OKIDIDIT


Adim 5
Appliance connection
Searching your appliance
Don't turn off your Bluetooth. hOn app is looking for your appliance...


Stay close to your appliance in order to correctly capture the signal.
Adim 6.1-6.2
Appliance connection
Searching your appliance
Don't turn off your Bluetooth.

CONNECT
PRODUCT NOT FOUND

Appliance connection
Searching your appliance
Don't turn off your Bluetooth
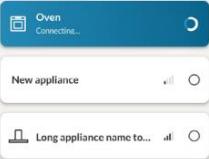

Stay close to your appliance in order to correctly capture the signal.
Adim 7
Appliance connection

Your appliance has been correctly identified!

Brad Hoove
Model 3658-1000-2000-1824
Serial number 12345678-1234-1234
Is this your appliance?
YES IT'S MY OVEN
NO IT'S NOT

WIFI AYARLARI NASIL DEGISTIRILIR
8.1. CIHAZIN BERTARAF EDILMESI

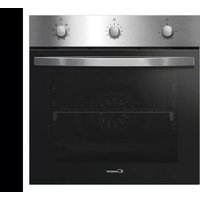
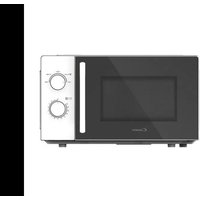
- GENERALWARNINGS
- Use in accordance with attendend use
- Use limitations
- INSTALLATIONWARNINGS
- ELECTRICALWARNINGS
- USE & MANTEINANCE
- WARNING (*FOR PYRO OVENS)
- OVERVIEW OF THE PRODUCT
- ACCESSORIES
- Lateral wire grids (only if present*)
- Baking tray (only if present*)
- Metal grid
- Deeper Tray
- Telescopic Guides (only if present*)
- Smart Tray - BBQ mode (only if present*)
- Turnspit (only if present*)
- Softclose/Soft open hinges (only if present*)
- Smart Tray - STEAM mode (only if present*)
- Airfry tray (only if present*)
- CONTROL PANEL
- MAIN FUNCTIONS
- CONNECTIVITY
- Product information for networked equipment
- How to activate wireless network port:
- How to deactivate wireless network port:
- HOW TO INTERACT WITH THE APP
- NOTE
- NEW USER REGISTRATION
- Step 2
- Allow your location permission
- Step 3
- Select your appliance category
- Step 4
- Turn OFF and then ON your appliance
- Step 5
- Step 6.1-6.2
- Step 7
- HOW TO CHANGE WIFI SETTINGS
- REMOTE CONTROL
- How to activate Remote Control:
- How to stop Remote Control:
- BEFORE STARTING
- INFORMATION TO START
- How door works
- How illumination works
- How cooling fan works
- How status bar works
- FIRST USAGE
- PRELIMINARY CLEANING
- OPERATION OF PRODUCT
- SWITCHING ON/OFF THE OVEN
- SET COOKING PROGRAM
- TIME MENU
- COOKING DURATION
- MINUTE MINDER
- DELAY START
- COOKING FUNCTIONS
- FAST PREHEATING OPTION
- STANDARD FUNCTIONS
- COOKING GUIDELINES
- EVERYDAY COOKING TABLE
- CARE & CLEANING
- GENERAL RECOMMENDATIONS
- CLEANING THE OVEN
- INSIDE THE OVEN: cleaning functions
- How does it work:
- Catalytic cleaning
- OUTSIDE THE OVEN:
- CLEANING OF ACCESSORIES
- CLEANING OF SIDE RACKS:
- levels model
- MAINTENANCE
- COMPONENTS REPLACEMENT
- Changing the bulb on top:
- Changing the lateral bulb:
- ENVIRONMENTAL PROTECTION & DISPOSAL
- 8.1.APPLIANCE DISPOSAL
- SAVING AND RESPECTING THE ENVIRONMENT
- CANDY
- KOMPLETTES BENUTZERHANDBUCH
- WILLKOMMEN
- Schritt 5
- COMMENT INTERAGIR AVEC L'APPLICATION
- APPAIRAGE RAPIDE
- Étape 1
- FR 15
- Étape 5
- Étape 6.1-6.2
- Passo 5
- Paso 5
- ENTER
- ERTPAΦ'H ΓP'HΓOPH Σ ANTIΣTOIXHΞH
- Bnμα 1
- Bnua 2
- Bnua 5
- Bnμα 6.1-6.2
- Bnua 7
- ENEPTI0I1H2H/ANENEPTIOI1H2H TOY O'YPNOY
- PYOMIENIPOPGAMMATO MAREIPEMATO
- MENOY XPONOY
- IAPKEIA MATEIPEMATO
- MINUTE MINDER
- KAOYΣTEPHΣH ENAPΞH
- ALGEMENE WAARSCHUWINGEN
- Stap 5
- HOE HET PRODUCT WERKT
- DE OVEN AAN/-UITZETTEN
- AKO KOMUNIKOVAT'S APLIKÁCIOU
- JAK KORZYSTAC Z APLIKACJI
- SZYBKA REJESTRACJA PAROWANIA
- Krok 1
- Krok 5
- Krok 6.1-6.2
- Krok 7
- JAK KOMUNIKOVAT S APLIKACI
- Kroky 6.1-6.2
- JAK ZMENIT NASTAVENI WIFI
- AVERTISMENTEGENERALE
- Pasul 5
- NADZORNA PLOŠCA
- REGISTRACIJA NOVEGA UPORABNIKA
- korak
- CISCENJE BOCNIH NOSACA:
- - Model sa 6 nivoa
- ODRŽAVANJE
- ZAMENA KOMPONENTI
- KIIRUHENDAMINE
- toiming
- VISPÄRIGI BRIDINÄJUMI
- PRODUKTA PÄRSKATS
- ATRA PARA REGISTRACIJA
- darbiba
- darbiba
- darbiba
- Searching your appliance
- 6.1.-6.2.daribiba
- darbiba
- Your appliance has been correctly identified!
- WI-FI IESTATJUMU MAINA
- OBUIN PEPDUNPEKDEHNA
- I3noJ3BaIte B cBJoTBeTCTBnE C npeDnHeHaTa yNtpe6a
- OrpanuHneHa yIIOTe6aTa
- ПРЕДУПЕЖДECHИ ПРИ MOHTAX
- ПЕДУПЕХДECHИ OTHOCHO EJEKTPNUECTBOTO
- YNOTPEBAI NODPbXKA
- ПРЕДУПЕЖDEHЯ (*3A ПИРОЛNTИЧН ΦΥРΗN)
- 3AПИСBAHE 3A ББРЗО СДВОВАBE
- CTbNka1
- CTbNka 2
- CTbNka 3
- CTbNka 4
- CTbInka 5
- CTbIka 6.1-6.2
- CTbNka7
- KAKДА ПОМЕнHACTPOИКITE HA WIFI
- ДИСТАНЦИОНно УПВАЛЕнUE
- Kak da akTbBnPaTe duCTaHcNHOHOTo ynpaBHeHne:
- Kak da cnpete dncstahunohnto ynpabneHne:
- ПЕДи ДА 3АПОЧЕТЕ
- 3.1.ИнфОРМALEЗЯ 3A HACHAJOTO
- Kak pa6oTn BpaTaTa
- Kak pa60tn oCBetJneHneTo
- Kak pa60tn oxlaaiaaert BeHTnlaTOp
- Kak pa60tn IeHTata Ha cBCTOHHneTO
- TABJIHULA ,EVERYDAY COOKING
- I P E D Y N P E X D E H N E:
- CmHa Ha KpyuKaTa OTrope:
- CmHa Ha cTpaHnUHaTa KpyuKa:
- 5veiksmas
- 6.1-6.2 veiksmai
- 7veiksmas
- KAIP PAKEISTI „WI-FI“ NUSTATYMUS
- KAIP GAMINYS VEIKIA
- ORKAITEJUNGIMAS / ISJUNGIMAS
- KAIP NUSTATYTI MAISTO RUOSOS PROGRAMA
- LAIKO MENIU
- REGISTRERING AF NY BRUGER
- TILMELDING TIL HURTIG PARRING
- Trin 5
- Vaihe 5
- Vaihe 6.1-6.2
- Vaihe 7
- NAIN MUUTAT WIFI-ASETUKSIA
- RUOANVALMISTUDOIMINNOT
- NOPEA ESILÄMMITYSVAIHTOEHTO
- ERIKOISTOIMINNOT
- EVERYDAY COOKING -TAULUKKO
- Available on the App Store
- GET IT ON Google Play
- NY BRUKER-REGISTRERING
- HURTIGPARING-REGISTRERING
- Trinn 5
- HUR DU INTERAGERAR MED APPEN
- SNABBREGISTRERING
- 3AΓΑJIbHI 3ACTEPEXEHH
- BnkopncTahnHa 3a npn3HaueHHaM
- 06mexehn BnKOpncTaHn
- PONEPEDEXEHHI OIO BCTAHOBJIENH
- PONEPEDEXEHHI OODO EJEKTPNUHIX CNTTEM
- EKCJIpyATAUIA TAOBCJLYROBYBAHHRA
- PONEPEDEXEHHRA \*IJIPEH3 IPOJITNUHM OUYUENHREM
- 2.1.ОГЛДВИРБУ
- 2.2.IPIJIAIJI
- Biyhi npotrahi HanpymHI (JInuhe 3a HaBbHocTi\*
- YK B3AEMODIYTN 3 DODATKOM
- ПРМITKA
- WBnIKA PECCTPAUJ3'6DHAHH
- Kpok 5
- Kpok 7
- ПЕД NOЧАКOM
- IHΦOPMAUÇIДЛ NOYATKY POBOTN
- JaK npauoIOb DBepcraTa
- JaK npaucIOcOCBITJeHHA
- JaK npaioe BENTINrTop oxoJIOxehn
- Ja npaioe pdoK cTahy
- 3.2.IEPWE BINKOPUCTAHN
- 3.3.ПОЕPEDHС OYIIENHЯ
- ПИNHцИн ДII BИPOБУ
- YBIMKHEHHRAUMKHEHHDyXBOI UAΦN
- HAJIASTYBATI NPOPGPAMY NPIHOTYBAHH
- TABJIICRA IPOPTPAM EVERYDAY COOKING
- OUYIUEHHN PNIJIAIDJ
- Adim 5
- Adim 6.1-6.2
- Adim 7
- WIFI AYARLARI NASIL DEGISTIRILIR
- CIHAZIN BERTARAF EDILMESI
Brand : CANDY
Model : CA6 N3B3YTB
Category : Built-in oven