
BMG2120B - Microwaves BRANDT - Free user manual and instructions
Find the device manual for free BMG2120B BRANDT in PDF.
| Product type | Built-in microwave with grill |
| Brand | Brandt |
| Model | BMG2120B |
| Power supply | 230 V ~ 50 Hz |
| Microwave power (output) | 900 W |
| Grill power | 1000 W |
| Microwave input power | 1450 W |
| Capacity | Approximately 21 L (estimate) |
| Control type | Electronic with buttons and LED display |
| Main functions | Microwave cooking, grill, combined, weight/time defrost, 8 auto menus, quick start, timer, clock |
| Number of microwave power levels | 5 (100%, 80%, 50%, 30%, 10%) |
| Turntable | Yes, glass, diameter not specified |
| Safety | Child lock, automatic stop when door opens, mandatory earthing |
| Maintenance | Regular cleaning with damp cloth; do not use steam cleaner |
| Installation | Built-in in a 60 cm wide cabinet, minimum height 85 cm |
| Included accessories | Glass tray, turntable ring, grill rack, instruction manual |
| Spare parts and repairability | Use only original parts; contact an authorized service center |
| Consumer service | 0 892 02 88 01 (0.50 €/min + call price) or 09 69 39 25 25 |
| Website | www.brandt.fr |
Frequently Asked Questions - BMG2120B BRANDT
User questions about BMG2120B BRANDT
0 question about this device. Answer the ones you know or ask your own.
Ask a new question about this device
Download the instructions for your Microwaves in PDF format for free! Find your manual BMG2120B - BRANDT and take your electronic device back in hand. On this page are published all the documents necessary for the use of your device. BMG2120B by BRANDT.
USER MANUAL BMG2120B BRANDT
Instructions concerning l'installation
1- RELATIONS CONSOMMATEURS FRANCE
8. Kuchynsky Časovač
6. Afrimning after tid
LES NØYE OG BEHOLD FOR FREMTIDIG REFERANSE
WEEE) WEEE-WEEE-WEEE-WEEE-WEEE

yupn 19
,nnn nn n nn ,nynpn 2 nnnn
.
."5:00" nynnnynnn nn nnnn " -/+" by ynb
."P100"nnxynnnn,nnxdy".yip+yn+ynyn"byyn
."7:00" ynnnyy nnynn nynnnn " -/+ " by ynb
nnnnnnnnnnnnnnnnnnnnnnnnnnnnnnnnnnnnnnnnnnnnnnnnnnnnnnnnnnnnnnnnnnnnnnnnnnnnnnnnnnnnn
yynn m;nn 1910 nn
,nnn nn nnnn nn nnnn nn nnnn nn nnnn nn nnnn nn nnnn nn nnnn nn nnnn nn nnnn nn nnnn nn nnnn nn nnnn nn nnnn nn nnnn nn nnnn nn nnnn nn nnnn nn nnnn nn nnnn nn nnnn nn nnnn nn nnnn nn nnnn nn nnnn nn nnnn nn
.ynnnnnnnn
nppn.10
"pp+pa+pa" by yn, byn bn bn bn bn bn
. 3 3 3 3 3 3 3 3
37y 1 ynnn nn nnnn nn nnnnnnnnnnnnnnnnnnnnnnnnnnnnnnnnnnnnnnnnnnnnnnnnnnnnnnnnnnnnnnnnnnnnnnnnnnnnnnnnnnnnnnnnnnnnnnnnnnnnnnnnnnn
nynynnnp.11
yynn nn yynn,nyn 3 nyn "ny" by yn,nnn nn:ny
.0:00" yyn nnnn nnx, nnnn nyyn nxyn nynnny
pnnnnn
y 3 y
.ynnnn nn nynnn
U7n .12
.
.5nynynnnn .
.21
.00:00 nnnn nn,nnx yy "ny/ny" by ynb
.95 1n nn nnnn nn .n nn nn nn nn nn nn nn nn nn nn nn nn nn nn nn nn nn nn nn nn nn nn nn nn nn nn nn nn nn nn nn nn nn nn nn nn nn nn nn nn nn nn nn nn nn nn nn nn nn nn nn nn nn nn nn nn nn nn nn nn nn nn nn nn nn nn nn nn nn nn nn nn nn nn nn nn nn nn nn
"nnn" by ynb
,(niv 24 nyn) nn nywn ox .ny5 5 ynn ,nunn nyyn
nynnynn
,100 30"nnn" by yn, nn
95-30-nn nn nnnn nn nnnn nn nnnn nn nnnn nn nnnn nn nnnn nn nnnn nn nnnn nn nnnn nn nnnn nn nnnn nn nnnn nn nnnn nn nnnn nn nnnn nn nnnn nn nnnn nn nnnn nn nnnn nn nnnn nn nnnn nn nnnn nn nnnn nn nnnn nn nnnn nn nannn nn nnnn nn nnnn nn nnnn nn nnnn nn nnnn nn nnnn nn nnnn nn nnnn nn nnnn nn nnnn nn nnnn nn nnnn nn nnnn nn nnnn nn nnnn nn
.
, 100% by y n y
"nnn"
bvn n nnyn .5
.2000- 100 ynnn nn nnnn" - /+ " by
.ynnn"nnn"byyn
nivn.6
."dEF2" ynnn,yny "ny/ypyn nyn" byyn
.7nnn nn nnnn" -/+ " by yn
.ynnnn"nnnn"byyn
unuiX u7n.7
"8"A1",yyn
.1191 npn, nTn n19n, n09, npn
"nn" by yn
. 1nnn nn nnnnnnnnnnnnnnnnnnnnnnnnnnnnnnnnnnnnnnnnnnnnnnnnnnnnnnnnnnnnnnnnnnnnnnnnnnnnnnnnnnnnnnnnnnnnnnnnnnnnnnnnnnn
.1nnn"nn"byyn
350 3n nn nnnn nn nn nn
'A6' yy yy " + " by yynb
.7y7n"nn"byyn
.350" nynn ny nyn npnn nn no " -/+ " by ynb
.1nnn"nn"byyn
| כלה | כלה | כלה הכלה | +/+/+/+/+/+/+/+/+/+/+/+/+/+/+/+/+/+/+/+/+/+/+/+/+/+/+/+/+/+/+/+/+/+/+/+/+/+/+/+/+/+/+/+/+/+/+/+/+/+/+/+/+/+/+/+/+/+/+/+/+/+/+/+/+/+/+/+/+/+/+/+/+/+/+/+/+/+/+/+/+/+/+/+/+/+/+/+/+/+/+/+/+/+/+/+/+/+/+/+/%/+/+/+/+/+/+/+/+/+/+/+/+/+/+/+/+/+/+/+/+/+/+/+/+/+/+/+/+/+/+/+/+/+/+/+/+/+/+/+/+/+/+/+/+/+/+/+/+/+/+/+/+/+/+/+/+/+/+/+/+/+/+/+/+/+/+/+/+/+/+/+/+/+/+/+/+/+/+/+/+/+/+/+/+/+/+/+/+/+/+/+/+/+/+/+/+/+/+/+/+ - | %100 | P100 | 1 |
| %80 | P80 | 2 | ||||
| %50 | P50 | 3 | ||||
| %30 | P30 | 4 | ||||
| %10 | P10 | 5 | ||||
| %100 | %0 | G | 6 | |||
| %45 | %55 | C-1 | 7 | |||
| %64 | %36 | C-2 | 8 |
3
by ynb nn nn xyn "P100",nnx oy .nnp+ +nnp" by ynb
nynnnn nnnn nn nnnn nnnnnnnnnnnnnnnnnnnnnnnnnnnnnnnnnnnnnnnnnnnnnnnnnnnnnnnnnnnnnnnnnnnnnnnnnnnnnnnnnnnnnnnnnnnnn
Jn nn n nn "C-2" 11 "C-1", "G"-1, nn
y n nn nnnn nnnn" - /+ " by y n , nnnn " nnnn " by y n
.95:00 T y 0:05-n
.
C-1) 45-55
.10
.P100"nn nn nn,nn nn y"."nip+na+yn"byyn
" 11111111111111111111111111111111111111
.1yn
.1n nn nnnn nn ,"y/na" yynb
.59--0 1y n y np n np np np np np np np np np np np np np np np np np np np np np np np np np np np np np np np np np np np np np np np np np np np np np np np np np np np np np np np np np np np np np np np np np np np np np np np np np
.ynnnn,anana":".nynnnnnnnnnnnn"yynn
:
. yin xin yin yin yin, nian yin nyin ox (1
1n nn nnnnnnnnnnnnnnnnnnnnnnnnnnnnnnnnnnnnnnnnnnnnnnnnnnnnnnnnnnnnnnnnnnnnnnnnnnnnnnnnnnnnnnnnnnnnnnnnnnnnnnnnn
.
2
"P100" xyn nyn".yyn+yn+ynyn" by yyn
nynynnnn nnnn" -/+" by ynb x nybnyn" .ynp+yn+ynp" by yn
Jn"P10",P30",P50",P80",P100"
y n nn nnnn" y n nn
.95:00 T y 0:05-n
.
3 / 3KcPJIyATAUJII IPIbOPA. 19
- YctaHObKa yacOB. 20
2.ΓOTOBKa B MINKPOBOJHOBOI neu 20
3.Грльилkomбиноровнаютовka 21
4.Быстры зауск 22 - Pa3mop03ka no mace 22
- Pa3mop03ka no BpeMeHn 22
- ABTO MeHIO 22
- Kyxohnhb TaMep 23
9.MhoroctyneHuaTaRa roTOBka 24
10.ФункцяЗаразca 24
11.ФункцяблOKирOBКоТДeTei 24 - TexHnueckne xapaKTepeNCTnKN 24
- OtkpbTne DBepuI neu 24
4 /Диагнoctикa и устра themselves HeNCnpaBncteI 25
MEPBI IPEIOCTOPOXHOCTN BO N36EKAHNE 4PE3MEPHOROB03DEICTBNA MKNPOBOJHOBOJ 3HEPNI
—He nbTaIteScb
NCSIOJIb3OBAToIpeYbC OTKpbIToI DBeRcE, NOCOKJbKY 3TO MOKeT BbI3BaTb BPeHoe BO3dIeICTBHe MIKPOBOJHOBOI 3Heprn. He DoyncKaETcra POJOMka IIN MoiΦnKaZna 3aUHTbIX 3aMKOB.
3aIpeuaeTcI NOMEuATb IIObIe OBeKtBIMexkU IINCeBOI CTOpHOI neu IN DBepueNIIIN DOyCKaTb CKOpJIeHHe rP3N IIN OCTaTKOB UICTaIeRo CpeDCTBa Ha YILOTHHTeJIbHbIX IOBepxHOCTaX.

BHIMAHHE!
B clyae noBpeXdEHHaBepnIyIyIIOHTHeHn 3aIpeuaeTcAICNoJIb3OBAtB Neyb, POKa OHa He 6yJeT OTpeMOHTnpoBaHaKOMNeTeHTNbIM CneuJaNCTOM.
ДОПОЛHENHIE
—EcIn He nOndepxNtB TaHaJIeXaUyU YnCTOTy Pn6opa,ero NOBepxHocTb MOKeT 6bITb NOBpeXdHa, UTO NOBJnAeT Ha cPOK CnyK6bl Pn6opa I MoKeT PnVBecTI K ONaCHOI CNTyaun.
TexHnueckne xapaKTepeNCTnKN
YTo6bI CHN3NTb ONaCHOCTb
POnKapa, NopaxKeHnY TOKOM,
TpaBm N Upe3MepHoro
BO3dEiCTBnA 3HePnN
MnKpOBoJHoBOI Neu npN
IcnoJIb3OBAHnI np60pa
Heo6xOДIMOCo6IIOaTb
6a30bIe Mepbl
PpeIOCTOpOxHOctn, B TOM
CNCe CLeDyUoIne:
—PpOuHTaTe n co6JIouaTe
cneyuouee:
«MEPbI INPEIOCTOPOXKHOCTN
BO N36EXKAHNE
UPE3MEPHOBO3ENCTBNA
MINKPOBOJHOBOI 3HEPRINN»
—Прибор можеТ
NcNoJIb3OBAtBcA DeTbMn OT 8
JIETIINZUAMNC
OrpaHnueHHbIMn Φn3nuecknMn,
ceHCOPbIMNJIIN
PNCXNUeCKMBO3MOXHOCTaM
HIN He IMeIOUIMN
Heo6xOdmoTO onbTaN
3HaHn,ecIn OHN HaxOJaTcA
PoiHaD3OpOMIINIPOJUChJIi
HCTpykunn no 6e30napchomy
IcnoJb3ObaHIO np6opa n
HOMMaOT COnyTCTBvUoUne ONaCHOCTN.
Ipeed 3aMeHOn JIaMnbl
Heo6xOdmo y6eINtbcra, YTO
YCTPOIcTBO BbIKJIIOUeHo.

BHIMAHNE!
BbInolHeHne cepBnCHbIX nIi
peMOHThblx pa60t co ChrTnEM
KpbIiWKn, 06ecneuNbauoJe
3aunTy OT BO3dEICTBnMnKpOBoJHOBOJ 3Heprn,ONaCHO dJa BCex,KpomeKOMPeTeHTbIX CpeZnaJIncTOB.

BHIMAHNE!
3aIpeuaeTcHarpeBaTb
KnIKoCTN IN DpyrHe PpOdyKTbl
B 3aKpbITbIX KOHTeINHepaX,
NOTOMY YTO OHN MOyT
B3OpBaTbcra.
—ПринharpeBaHnnpOdyKTOB BПlaCTNKOBbIX nIIN 6ymaxKhbIX KOHTeHepaX Heo6xOdIMO Ha6JIIOdaTb 3a NeybuB CBra3N C ONaCHOCTbIO BO3rOpaHnY.
IcnoJb3OBaTb MOxHOTolbKO Nocydy,npedHa3HaueHHyIO dIaMnKpOBoNHOBbIX Nee..
BcIyuae IoRbIeHnI DblMa Heo6XoIIMO BbIKIOuHTb UCTPOICTBO NIN OTKIOUHTb EROOT 3JIeKTPOCETN IOCTaBNTb DBepCy 3aKpbITOn, UTO6bl PIIaMn IORacNo.
—HaRpeBaHne HaNTKOB B MmKpOBoJHOBOI Neu MoKeT npNBecTI K OTLOXKeHHOMy B3PbIBHOMy KInPeHIO, N IO3TOMy Prn IpeHoCe KOHTeINHepa C TaKIMN HaNTkAmN CJIeDyET CO6JIHOaTb OCTOpOxHOCtB.
—CoepeKmOe 6ytbIIOuekДЯ KOpMJIeHnI 6aHOK CDeTCKIM NITaHHeM Heo6XoDmO pa3MeuATb IJIINOTPraCTN, a nepeI erO yNoTpe6JIeHnEM Heo6XoDmO npOBepHTb Tempeatypy BO n36exKaHne OxKOrOB.
-3anpeuaeTcHarpeBaTbBMNKpOBOJHOBbIX neayx myca BCKOpLyPe N cIeIbIe yMa,CBapeHHbIe BKpyTuIO,POCKoJIbKy OHN MOrYT B3OpBaTbCra DaJxe PocJe OKOHuaHnHaRpeBaHnY.
Heo6xOIMO peYIarpNo npOBODnTb ONUCTKU neu C ydaJIeHnEM IIO6bIX OTLOXeHn IINSeBbIX pODoYKTOB.
HeCnOcObHocTb OBeCneuHTb
YnCTOTy PEn MoXeT PnVBecTN
K NOBpeJdeHnIO NOBepxHOCTN,
YTO MOXeT OTPuCaTeJbHO
PONJIaTb Ha CpOK CnyK6bl
YCTPOIcTBa N MOXeT PnVBecTN
K ONaCHO CNTyaUIN.
—ДоуckaetcaИСпОЛьЗВаТь TOльКо ДaТчИКи TemпepaТypbl, peKOMeHДОВaHHbIe ДЯ ДaHHOJI peuN.(ДЯ ПeчЕ, OБорУДОВaHHbIX ДЯ ИСПОЛьЗОВaHHЯ ДaТчИКOB TemпepaТypbl.)
—MnKpOBoJHOByIOp neyb CJIeDyET NcNoJIb3OBAtB npN OTKpbIToN DeKopaTINBHOI DBepue.(JIa NeeyC DeKopaTINBHOI DBepue).
—Данhoe yctpoICTBO npedHa3NaueHo Дя
NcNoJIb30BaHnB B DOMaShnX INHbIX NODObHbIX YCIOBnAx:
- Ha KuxhXДЯперсоналВ MaRa3nHax, OΦиСax Иpyrnx pa6OuHxnomeUeHryx;
- KJIneHTaMn B OTeJx, MOTEJx IN HbIX NODObHbIX 3aBeDeHnIx;
- Ha ΦepMax;
- B MecTaX, rIe IpeoCTaBJIOTcH OchJIer n 3aBtpaK.
MnKpOBoJHOBaj neyb
IpeHa3NaueHa dJa IIOdOrpeBa
IpoDyKTOB NITaHnYi
HaNTKO.BcUka IPOdYKTOB
NITaHnI INI ODeXDbI,
IOdOrpeB rpeLok,TanOK,
BlaJxHoT KaHn, r60K n HbIX
IpeDMeTOB BJIeueT ONaCHOCTb
TpaBMbl INI BO3rOpaHnY.
3aPpeuTcI NcNoJIb30BaTb B MmKpOBoJHOBOI Neu MeTaJIInueCKNe KOHTeHepbl Dlra PPOyKTOB HApNTKOB.
3aπpeucaetc ouuaTb yctpoiCTBa C IOMOuIIO npoBOrO OUHCTITeJI.
—Bo n36eXaHne nepeRpeBa 3aIpeuAeTcya UCTaHaBnBaTb np60p 3a DeKopaTnBHOJ DBepuei. (3TO He OTHOCITcK yCTpoiCTBaM, o6OpyIOBaHHbIM DeKopaTnBHOJ DBepuei)
—MnKpOBoJHOBaNeychBbIeTcBCTpaINBaEmbIM npI6Opom.
—ИЗВЛЕКА KOНTeHepbl n3 npIbopa, cIeIyET cIeIITb 3a TeM,чTOБbl He CMeCTnTb NOBOPOTbI CTOJ.
(3TO Kacaetcra CtauHOHbIX IN BCTPOeHHbIX Pn6OpOB, KOToPbIE NcNoJIb3yIOTc Ha BbICote He MeHee 900 MM OT nOJa n IMeIoT CbeMHbIe IOBOPOTbIe CToJIbI. OdHaKO 3TO He OTHOCITcK Pnp6opam C rOpN3oHTaJIbHOI OTKnIDbIBaIOSeiCBn3 DBepei.)
-3anpeuaeTcI NCNoJIb30BaTb napOBoOuHCTnTeJIb.
—Поверхноctьяшикадлхраненя может награватбя.
3aπpeuaetc nCnOJIb3OBaTb
JxecTkne a6pa3nBhIe
YnCTaUne CpeCTBa IIN
MeTaJIInueCKne CKe6Kn Dlan
OuNCTKn CTekla DBePcbl Neu,
NOTOMy UTO OHN MOrUT
nozaapanaTb NOBepxHocTb, Bpe3yIbTaTe yero CTeklO MOKcT pa3pyuINtbcra.

BHIMAHNE!
Bo BpemnncnoB3OBAHnna
npnbop n ero doctynbIe
yactn HarpBaIOTc. He
kacaiTeCb HarpBaTeJIbHbIX
3JeMeHTOB.Detam MlaIWe
8 let He pa3peaETcra
HaxoDntbcn B6n3n
yCTpoiCTBa,ecn OHn He
hXoJdTcN oD HaD3OpOM.
—Bo BpemnncnoB3OBAHnna
npnbop HarpBaETc. He
kacaiTeCb HarpBaTeJIbHbIX
3JeMeHTOB BHyTpN peuN.

BHIMAHNE! Bo Bpem
NcNoJIb30BaHnI DoCTyINHbIe
Yactn MoIgTuHaIpeBaTbcr.
MaIeHbKnx DeTei He CLeIyET
NoIpyCKaTb K npIbOpy.

BHIMAHNE!
Korda npnbop pa6oTaet B
KOM6HnHropOBaHHom pexIme,
DeTAM pa3pe7aETc
NCIOJIb30BaTb Neyb TOJbKO IOd
Ha6JIIODeHHeM B3pOCSbIX B
CBa3N C BBICOKO TempepaTpyoJ.
1/UBEOMJIeHnIyIJIa IIOJIb3OBATEJIa
1) HOMHaJIbHbIe 3JIeKTpUeCKNe npaMeTpbl 5Hypa IINu YdJIInHITeIa 0JXHbI 6bITb He HIXe 3JIeKTpUeCKNX npaMeTPOB yCTpO'CTBa.
2)Дяудинтел
ДОпуньается ИСПОЛьЗВаТь
Только 3-пpoвODнOH 小Hyp
С 3a3eМлЕнem.
3)ДиHHbIshHypdoJxhen 6bITb paCnoLoXeH TaK, UTO6bl OH He BnCeI HaI CTOJIeShnUeI INI pa6OueI NOBepxHOCTbIO, rDe erO MOxHc SNyauHIO 3auePiTb INI rDe eRO MOrYT NOTAHyTB DeTI.
OuHCTKA
Heo6xOIMO OTKJIIOHTb yCTPOIcTB OTO INCTOUYHka NITaHn.
- BnHTpeHHIOI NOBepXHocTb Neu CJeDyeT OOnUaTb NocLe IcNoJIb3OBAHnC NOMoUb BLnJxHO TkaHn.
-
Akceccyapbl cIeOuHtB 0bUHbCnOC6OM CnIOJIb3OBaHNEMMbIbHO BODbl.
-
Pama Дверцы, улочени И пилегаюше Deтали Нeo6ходимо AkкypаТно Очидаь Влжног Тkaнью В сlyчae ИX 3aэрзеня.
- 3anpeuaeTcN hCNoIb3OBA Tb JxecTkne a6pa3nBhIe YnCTaUne cpeDCTBa IIN MeTaJIInueckNe cKpe6Kn DIA OChCTKN CTeKJa DBepCuI Peu, NOTOMY UTO OHN MOyT NOpapaNaTb NOBepXHOCTb, B pe3yIbTaTe ueTo CTeKIo MOKeT pa3pyuHtBcra.
- COBET NO OUHCTKe---Дл yDObCTBa OUHCTKn BHyTpeHHIX CTeHOK Пech, C KOTOpbIMN MOJIIN COPnIKacTbcr ПИSeBVeIe прODYкы: ПОмecТиTe ПОЛOBинКу ЛIMOHaВ ГлУБOKуTO TapeLKy, НалейTe 300 МЛ (1/2 ПИNTы) ВODы И HarpeBaIte Ha MoцHoCTN 100 %В TeчЕпe 10 МИЧТ. ПрOTРпTe пechь НаИСТо MЯrkоВ BlaJxHOr TKaHbЮ.
IOCYDA
OCTOPOXKHO
Ipeed yctaHOBKO BVHMaTeIbHO O3HaKOMbTeCb C pyKOBoDCTBOM
O6paTne BHNMaHne 3JeKtpnueckme coeDInHeHnpey Meet wTekep. Ee cIeNyET
Bo Bpempa60tbldoctynhble nobepxHOCTNMOYr 6bITb ropayMN.
NODKJIUOaTb TOJbKO K HAdIeKaIzIM
06pa3OM UCTaHOBLeHNO 3a3EmLeHHo
PO3ETKe. YCTaHABINBaTb PO3ETKy I
3aMeHnTb COeINHTeNbHbI Ka6JIb
DOJIeKHe TOLbKO KBaINΦuCIPOBaHHbI
3JIeKTpNK B COOTBeTcBN C
DeICTBYIOUIMM HOPMaMNI.
EcIn NocJe UCTaHOBKn WTekeP
CTaHOBNTcR HeIOcRAeMbIM,Ha LIHNII
PiTaHnI prn6OpA Heo6XoDmO
YCTaHOBNTB BCEIoJIIOCHbI
pa3BeiINHTeB C pAcSTOrHnEM
pa3MbIKaHnI KOHTaKTOB He MeHee 3 MM.
B WkaFy, B KOTOpBI YCTaHABINBaETcR
neHb,He DOJIxHO 6bITb 3aDHeI CTEHKn
No3aDi np6Oba.
MHHMaJIbHaB BbICota yCTaHOBKn: 85 cm. He 3aKpbIbAIte BeHTnJIaCIOHhbIe N Bo3dYxO3a6OpHNKn.
Приимechаши.
He 3aueemnTe n He nepern6aTe shhpy nITAHn.
Ecnn npnbop He ochaueh
ceTeBbIMKaBelemN BnIKoN NnI DpyrM
CpeCTBOMdIaOTKIOUChEnra
OTcETN C KOHTaKTbIM OTBepCTnEM
Ha KaJDon POJIooCTO,TO CorJaCHO
COOTBeTCTBYUOUM yCNoBnM III
KaterOpN npeHApJxKeHNn IJnPOHOn
n3OlauN, B CTAUHOAPHO UCTaHOBJIeHHyU
3JeKTPnueCKyU OCTAHOBKy DOJXHO 6bltB
BCTPoeHO hONIpuyOuCeE yCTpOJCTBO B
COOTBeTCTBnC nPaBnJaMn
yCTaHOBKn.
Ecni npn6op He ochauen CeTeBbIM Ka6eIem N BnIKoN nn DpyfumN CpeCTBaMn, n3OJIaCnT CtaunOHapHOI npOBdKn DoJXHa 6bTb 3aunSeHa, HApnpMe, n3OJIaUNHOH MyfToi C COOTBeTCTByUeH HOMHaNbHOI TEMnepaTpyo.
Ha cToPoHe yCTaHOBKn DoJIxHo 6bITb MHOrONoJIIOCHoe pa3beINHЯIOUe ee YcTpoIcTBo C 3a3OpOM MeKdY KOHTaTMn He MeHee 3 MM.
Pn60p HeIb3a yCTaHaBJIiBaTb B uKaΦ.
He nCNoJb3yIte Poi Pa6Ouei
NOBepXHOCTbIO H He BvJIINBaITe I3
KoHTeHepa Ha NOBepXHOCTb, K KOTopoI
KpeIITcra pnp60p.
A. BctpoeHHaMe6eIb
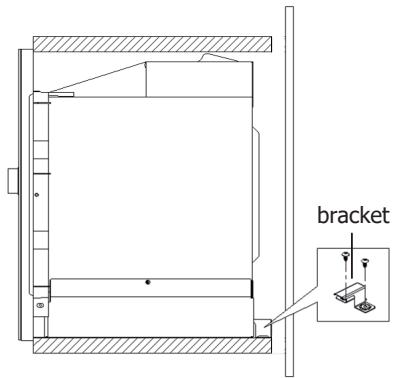
B. Побrotовkaшкафа
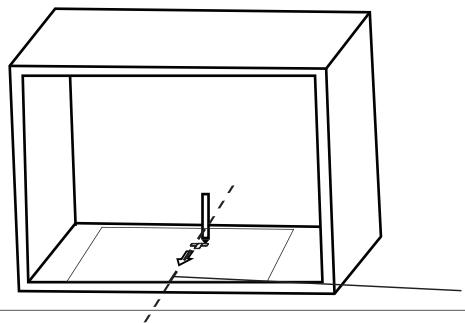
- O3HaKOMbTeCb c nHCTpykUnei K LJIABLOHOY dJIa HIXKHeJ YACTN LJKAΦA. IomeCTnTE 7a6LoH Ha HIXKHOIO CTeKNy 7kaΦa.

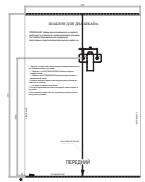
- Cénaïte OTMeTkn Ha HnKHei CTeHKe ⅢkaΦa corJaCHO OTMeTKam «a» Ⅲa6JIoHa.
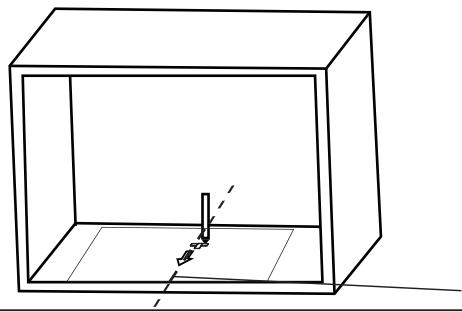
Lentpahlha liHnna
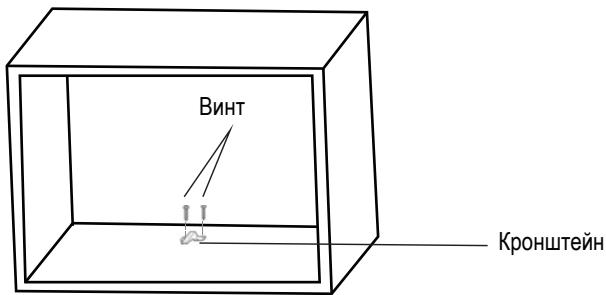
BnHT

KpOnHTeH

- Y6epnte 7a6noH HxKHeO 7kaΦa n 3aΦnKcnpyTe KpOnuTeH C NOMoCbIO BnHTa.
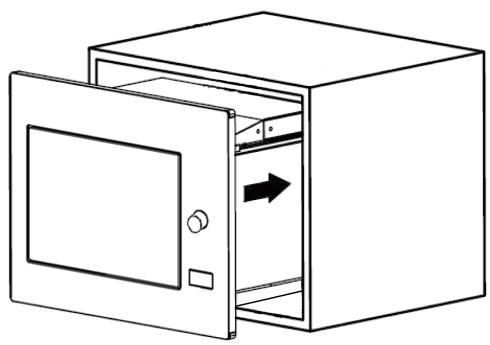
C. UctaHOBka neyn
- YctaHOBInTe neyb B wkaΦ
1)Y6eDntecb,HTO3aHnraYacTbNeu3aΦnKcnpoBaHa KpOHTeHOM.
2) He 3aueMJIte n He nepeRn6aIte shHy pntaHnJ.
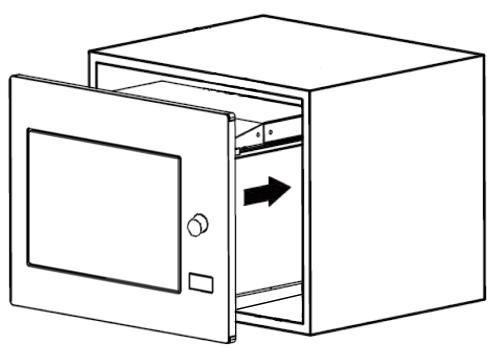
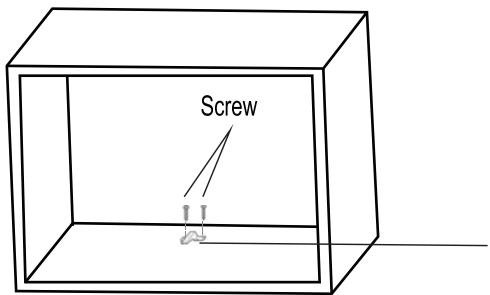
- OTKpoIte DBepy, 3aФИKcnpyIe neYb B WkaФy c NOMOuB BuHTa B MOHTaXHOM OTBepCTnN. 3aTeM 3aФИKcnpyIe PJIaCTnKOByI O HAKlaIky BuHTOM B MOHTaXHOM OTBepCTnN.
HCTpykunno3KcnlyaTaun
1. YctaHOBka yacob
5---10 MIn :30 cekyHd
10---30 MHH : 1 MInHyTa
30---95 MHH : 5 MHNyT
You have just acquired a BRANDT product and we would like to thank you.
We have designed and made this product with you, your lifestyle and your requirements in mind so that it meets your expectations. We have devoted our know-how, our innovative spirit and the passion that has been guiding us for over 60 years.
In an effort to ensure that our products meet your requirements in the best possible way, our Customer Relations department is at your disposal, to answer all your questions and to listen to all your suggestions.
Visit our website www.brandt.com where you will find our latest innovations, as well as useful and complementary information.
BRANDT is delighted to assist you every day and hopes you get the most out of your purchase.
https://brandt.com/


Important: Before using your appliance, read this user guide carefully. miliarise yourself more quickly with its operation.
1/NOTICES TO THE USER 4
IMPORTANT SAFETY INSTRUCTIONS 5
CLEANING 10
UTENSILS 10
Materials you can use in microwave oven 12
Materials to be avoided in microwave oven 13
2 / INSTALLATION 14
SETTING UP YOUR OVEN 14
Installation and connection 15
3/ USING THE APPLIANCE 19
- Clock Setting 20
- Microwave Cooking 20
- Grill or Combi. Cooking 21
- Quick Start 22
5.Defrost By Weight 22
6.Defrost By Time 22
7.Auto Menu 22
8.Kitchen Timer 23 - Multi-section cooking 24
- Inquiring Function 24
- Lock-out Function for Children 24
- Specification 24
13.Open the oven door 24
4/ Trouble shooting 25
PRECAUTIONS TO AVOID POSSIBLE EXPOSURE TO EXCESSIVE MICROWAVE ENERGY
-
Do not attempt to operate this oven with the door open since this can result in harmful exposure to microwave energy. It is important not to break or tamper with the safety interlocks.
-
Do not place any object between the oven front face and the door or allow soil or cleaner residue to accumulate on sealing surfaces.

WARNING:
If the door or door seals are damaged, the oven must not be operated until it has been repaired by a competent person.
ADDENDUM
- If the apparatus is not maintained in a good state of cleanliness, its surface could be degraded and affect the lifespan of the apparatus and lead to a dangerous situation.
Specifications
| Model: | BMG2120X/BMG2120B/BMG2120W |
| Rated Voltage: | 230V~50Hz |
| Rated Input Power(Microwave): | 1450W |
| Rated Output Power(Microwave): | 900W |
| Rated Input Power(Grill): | 1000W |
IMPORTANT SAFETY INSTRUCTIONS

WARNING
To reduce the risk of fire, electric shock, injury to persons or exposure to excessive microwave oven energy when using your appliance, follow basic precautions, including the following:
— Read and follow the specific:
"PRECAUTIONS TO AVOID POSSIBLE EXPOSURE TO EXCESSIVE MICROWAVE ENERGY".
- This appliance can be used by children aged from 8 years and above and persons with reduced physical, sensory or mental capabilities or lack of experience and knowledge if they have been given supervision or instruction concerning use of the appliance in a safe way and understand the hazards
involved.
Children shall not play with the appliance. Cleaning and user maintenance shall not be made by children without supervision.
- Keep the appliance and its cord out of reach of children less than 8 years.
- If the supply cord is damaged, it must be replaced by the manufacturer, its service agent or similarly qualified persons in order to avoid a hazard.

WARNING: Ensure that
the appliance is switched off before replacing the lamp to avoid the possibility of electric shock.

WARNING: It is
hazardous for anyone other than a competent person to carry out any service or repair operation that involves
the removal of a cover which gives protection against exposure to microwave energy.

WARNING: Liquids and
other foods must not be heated in sealed containers since they are liable to explode.
- When heating food in plastic or paper containers, keep an eye on the oven due to the possibility of ignition.
- Only use utensils that are suitable for use in microwave ovens.
- If smoke is emitted, switch off or unplug the appliance and keep the door closed in order to stifle any flames.
Microwave heating of beverages can result in delayed eruptive boiling, therefore care must be taken when handling the container. The contents of feeding bottles and baby food jars
shall be stirred or shaken and the temperature checked before consumption, in order to avoid burns.
— Eggs in their shell and whole hard-boiled eggs should not be heated in microwave ovens since they may explode, even after microwave heating has ended.
- The oven should be cleaned regularly and any food deposits removed.
— Failure to maintain the oven in a clean condition could lead to deterioration of the surface that could adversely affect the life of the appliance and possibly result in a hazardous situation.
- Only use the temperature probe recommended for this oven. (for ovens provided with a facility to use a temperaturesensing probe.)
The microwave oven
must be operated with the decorative door open. (for ovens with a decorative door.
- This appliance is intended to be used in household and similar applications such as:
- staff kitchen areas in shops, offices and other working environments;
- by clients in hotels, motels and other residential type environments;
- farm houses;
- bed and breakfast type environments.
The microwave oven is intended for heating food and beverages. Drying of food or clothing and heating of warming pads, slippers, sponges, damp cloth and similar may lead to risk of injury, ignition or fire.
Metallic containers for food and beverages are not allowed during microwave cooking.
The appliance shall
not be cleaned with a steam cleaner.
- The appliance must not be installed behind a decorative door in order to avoid overheating. (This is not applicable for appliances with decorative door.)
The microwave oven is intended to be used built-in. - Care should be taken not to displace the turntable when removing containers from the appliance.
(For fixed appliances and built-in appliances being used equal or higher than 900mm above the floor and having detachable turntables. But this is not applicable for appliances with horizontal bottom hinged door.)
— Steam cleaner is not to be used.
Surface of a storage drawer can get hot.
— Do not use harsh abrasive cleaners or
sharp metal scrapers to clean the oven door glass since they can scratch the surface, which may result in shattering of the glass.

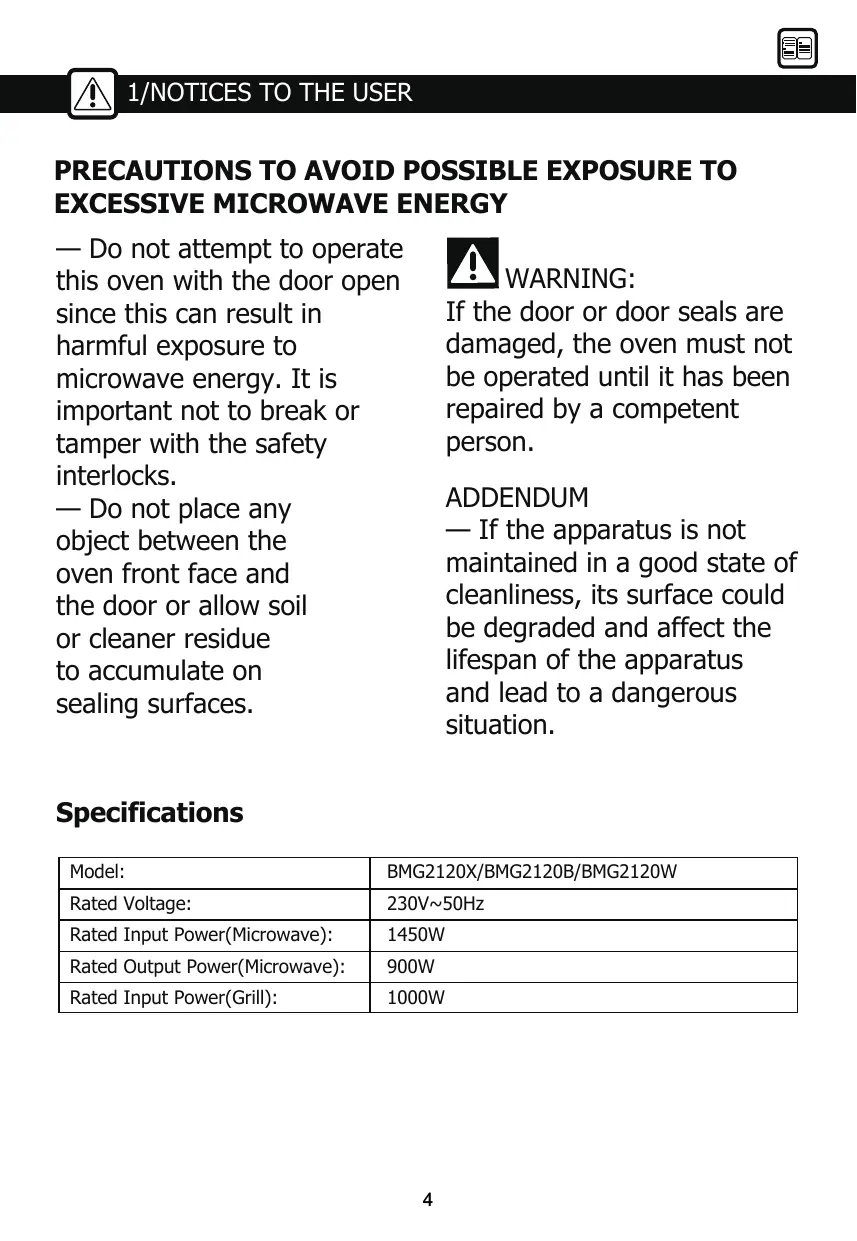
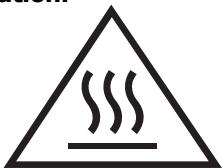
WARNING: The
appliance and its accessible parts become hot during use. Care should be taken to avoid touching heating elements. Children less than 8 years of age shall be kept away unless continuously supervised.
During use the appliance becomes hot. Care should be taken to avoid touching heating elements inside the oven.

WARNING: Accessible
parts may become hot during use. Young children should be kept away.

WARNING: When the
appliance is operated in the combination mode, children should only use the oven
under adult supervision due to the temperatures generated.
READ CAREFULLY AND KEEP FOR FUTURE REFERENCE
To Reduce the Risk of Injury to Persons Grounding Installation

DANGER
Electric Shock Hazard Touching some of the internal components can cause serious personal injury or death. Do not disassemble this appliance.

WARNING
Electric Shock Hazard Improper use of the grounding can result in electric shock. Do not plug into an outlet until appliance is properly installed and grounded. This appliance must be grounded. In the event of an electrical short circuit, grounding reduces the risk of electric shock by providing an escape wire for the electric current. This appliance is equipped with a cord having a grounding wire with a grounding plug. The plug must be plugged into an outlet that is properly installed and grounded.
Consult a qualified electrician or serviceman if the grounding instructions are not completely understood or if doubt exists as to whether the appliance is properly grounded.
If it is necessary to use an extension cord, use only a 3-wire extension cord.
- A short power-supply cord is provided to reduce the risks resulting from becoming entangled in or tripping over a longer cord.
- If a long cord set or extension cord is used:
1) The marked electrical rating of the cord set or extension cord should be at least as great as the electrical rating of the appliance.
2) The extension cord must be a grounding-type 3-wire cord.
3) The long cord should be arranged so that it will not
drape over the counter top or tabletop where it can be pulled on by children or tripped over unintentionally.
CLEANING
Be sure to unplug the appliance from the power supply.
- Clean the cavity of the oven after using with a slightly damp cloth.
- Clean the accessories in the usual way in soapy water.
- The door frame and seal and neighbouring parts must be cleaned carefully with a damp cloth when they are dirty.
- Do not use harsh abrasive cleaners or sharp metal scrapers to clean the oven door glass since they can scratch the surface, which may result in shattering of the glass.
- Cleaning Tip---For easier cleaning of the cavity walls
that the food cooked can touch: Place half a lemon in a bowl, add 300ml (1/2 pint) water and heat on 100 % microwave power for 10 minutes. Wipe the oven clean using a soft, dry cloth.
UTENSILS
CAUTION
Personal Injury Hazard It is hazardous for anyone other than a competent person to carry out any service or repair operation that involves the removal of a cover which gives protection against exposure to microwave energy.
See the instructions on "Materials you can use in microwave oven or to be avoided in microwave oven." There may be certain non-metallic utensils that are not safe to use for microwaving. If in doubt, you can test the utensil in
question following the procedure below.
Utensil Test:
- Fill a microwave-safe container with 1 cup of cold water (250ml) along with the utensil in question.
- Cook on maximum power for 1 minute.
- Carefully feel the utensil. If the empty utensil is warm, do not use it for microwave cooking.
- Do not exceed 1 minute cooking time.
Materials you can use in microwave oven
| Utensils | Remarks |
| Browning dish | Follow manufacturer's instructions. The bottom of browning dish must be at least 3/16 inch (5mm) above the turntable. Incorrect usage may cause the turntable to break. |
| Dinnerware | Microwave-safe only. Follow manufacturer's instructions. Do not use cracked or chipped dishes. |
| Glass jars | Always remove lid. Use only to heat food until just warm. Most glass jars are not heat resistant and may break. |
| Glassware | Heat-resistant oven glassware only. Make sure there is no metallic trim. Do not use cracked or chipped dishes. |
| Oven cooking bags | Follow manufacturer's instructions. Do not close with metal tie. Make slits to allow steam to escape. |
| Paper plates and cups | Use for short-term cooking/warming only. Do not leave oven unattended while cooking. |
| Paper towels | Use to cover food for reheating and absorbing fat. Use with supervision for a short-term cooking only. |
| Parchment paper | Use as a cover to prevent splattering or a wrap for steaming. |
| Plastic | Microwave-safe only. Follow the manufacturer's instructions. Should be labeled "Microwave Safe". Some plastic containers soften, as the food inside gets hot. "Boiling bags" and tightly closed plastic bags should be slit, pierced or vented as directed by package. |
| Plastic wrap | Microwave-safe only. Use to cover food during cooking to retain moisture. Do not allow plastic wrap to touch food. |
| Thermometers | Microwave-safe only (meat and candy thermometers). |
| Wax paper | Use as a cover to prevent splattering and retain moisture. |
Materials to be avoided in microwave oven
| Utensils | Remarks |
| Aluminum tray | May cause arcing. Transfer food into microwave-safe dish. |
| Food carton with metal handle | May cause arcing. Transfer food into microwave-safe dish. |
| Metal or metaltrimmed utensils | Metal shields the food from microwave energy. Metal trim may cause arcing. |
| Metal twist ties | May cause arcing and could cause a fire in the oven. |
| Paper bags | May cause a fire in the oven. |
| Plastic foam | Plastic foam may melt or contaminate the liquid inside when exposed to high temperature. |
| Wood | Wood will dry out when used in the microwave oven and may split or crack. |
SETTING UP YOUR OVEN
Names of Oven Parts and Accessories
Remove the oven and all materials from the carton and oven cavity. Your oven comes with the following accessories:
Glass tray 1
Turntable ring assembly 1
Instruction Manual 1

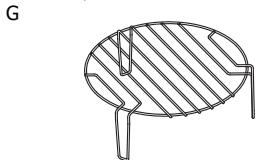
Grill Rack( Can not be used in microwave function and must be placed on the glass tray )
A) Control panel
B) Turntable shaft
C) Turntable ring assembly
D) Glass tray
E) Observation window
F) Door assembly
G) Safety interlock system
Turntable Installation

a. Never place the glass tray upside down. The glass tray should never be restricted.
b. Both glass tray and turntable ring assembly must always be used during cooking.
c. All food and containers of food are always placed on the glass tray for cooking.
d. If glass tray or turntable ring assembly cracks or breaks, contact your nearest authorized service center.
Installation and connection
- This appliance is only intended for domestic use.
- This oven is intended for built-in use only. It is not intended for countertop use or for use inside a cupboard.
- Please observe the special installation instructions.
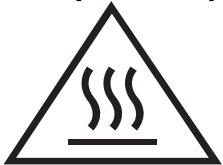
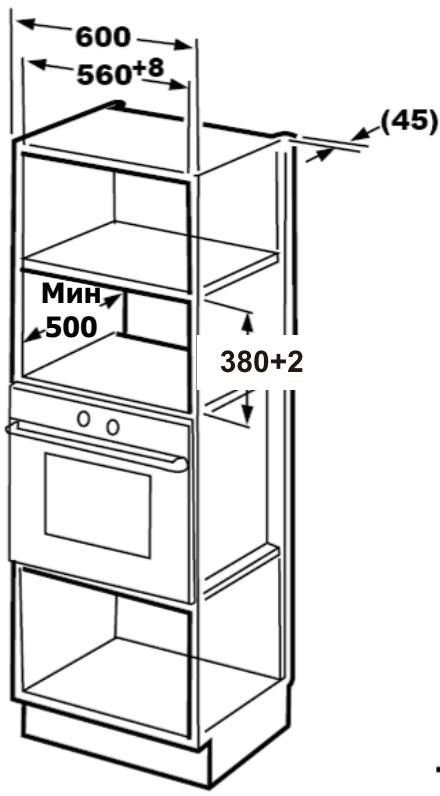
- The appliance can be installed in a 60cm wide wall-mounted cupboard.
- The appliance is fitted with a plug and must only be connected to a properly installed earthed socket.
- The mains voltage must correspond to the voltage specified on the rating plate.
- The socket must be installed and connecting cable must only be replaced by a qualified electrician. If the plug is no longer to accessible following installation, an all-pole disconnecting device must be present on the installation side with a contact gap of at least 3mm.
- Adapters, multi-way strips and extension leads must not be used. Overloading can result in a risk of fire.
Installation Instructions
Please Read the Manual Carefully Before Installation
Please note
Electrical connection The oven is fitted with a plug and must only be connected to a
The accessible surface may be hot during operation.
properly installed earthed socket. The socket must only be installed and the connecting cable must only be replaced by a qualified electrician, and in accordance with the appropriate regulations.
If the plug is no longer accessible following installation, an all-pole isolating switch must be present on the installation side with a contact gap of at least 3 mm.
If an appliance is not equipped with a mains cable and a plug or other means for disconnecting from the mains with a contact opening on each pole complying with the conditions of overvoltage category III for full isolation, an isolating device must be incorporated into the permanently installed electrical installation in accordance with the installation regulations.
If a nipple is not equipped with a mains cable and a plug or other means the fixed wiring insulation must be protected, for example, by insulating sleaving having an appropriate temperature rating.
An all-pote disconnecting device must be present on the installation side with a contact gap of at least 3mm.
The appliance must not be placed in a cabinet
Don't use under the worksurface and that it must not be subject to spillage from containers onto surfaces under which the appliance is installed.
The fitted cabinet must not have a back wall behind the appliance.
Minimum installation height: 85~cm
Do not cover ventilation slots and suction holes.
Note:
Do not trap or bend the power cable.
A. Built-in furniture


B.Prepare the cabinet
- Read the instruction on the BOTTOM CABINET TEMPLATE, put the template on the bottom plane of cabinet.
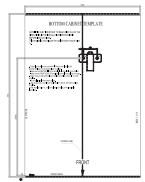
- Make the marks on the bottom plane of cabinet according to marks" a " of the template.
Centre line
Screw

Bracket

- Remove the bottom cabinet template and fix the bracket with screw.
Bracket
C.Install the oven
- Install the oven to the cabinet
1) Make sure the back of the oven is locked by bracket.
2) Do not trap or kink the power cord.
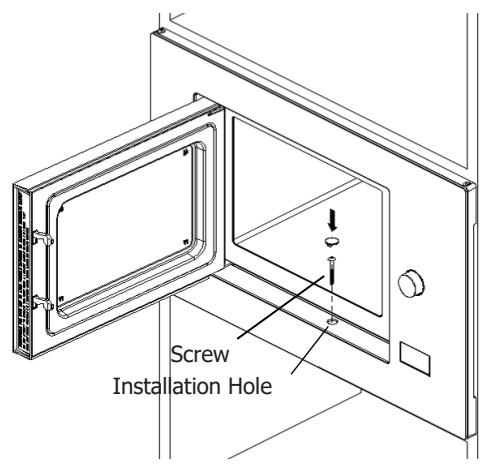
- Open the door, fix the oven to the cabinet with Screw, at the installation hole. Then fix the Trim-kit plastic cover to the installation hole.

Operation Instructions
1. Clock Setting
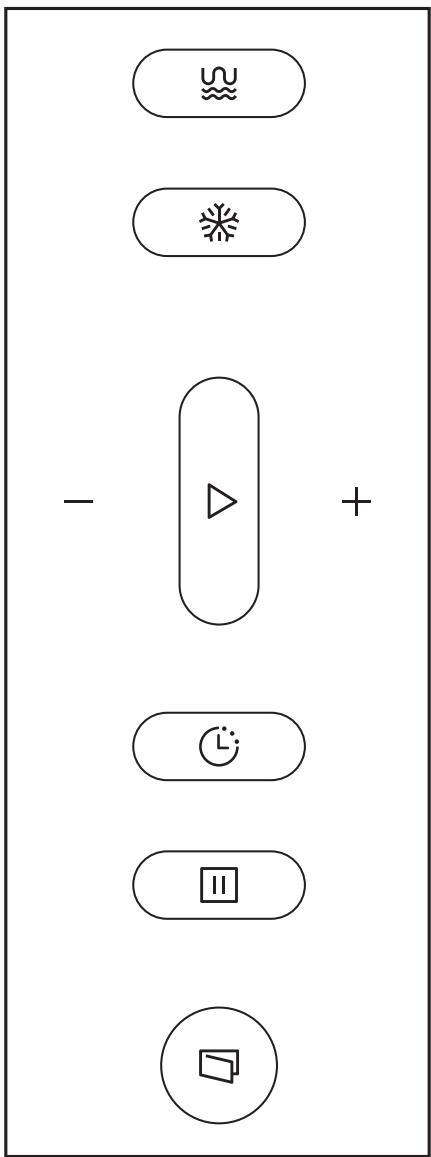
When the microwave oven is electrified, the LED will display "0:00", buzzer will ring once.
- Press " Timer/Clock " twice, the hour figures will flash.
- Press -/ + to adjust the hour figures,the input time should be within 0--23.
- Press "Timer/Clock", the minute figures will flash.
- Press "-/+ " to adjust the minute figures, the input time should be within 0--59.
- Press " Timer/Clock" to finish clock setting.":will flash, and the time will light. Note:
1) If the clock is not set, the clock would not function when powered.
2) During the process of clock setting, if you press "Stop", the oven will go back to the previous status automatically.
2. Microwave Cooking
- Press " MW+Grill+Combi. " the LED will display "P100"
- Press " MW+Grill+Combi. " for times or press" - / + " to choose the power you want, and "P100", "P80", "P50", "P30" or "P10" will display for each added press.
- Then press " Start " to confirm, and press "-/+ " to set cooking time from 0:05 to 95:00.
- Press "Start" again to start cooking.
Example: If you want to use 80% microwave power to cook for 20 minutes, you can operate the oven as the following steps.
- Press " MW+Grill+Combi. " once, the screen displays "P100".
- Press " MW+Grill+Combi. " once again or press" -/+ " to choose 80% microwave power.
- Press " Start " to confirm, and the screen displays "P80".
Press - / + to adjust the cooking time until the oven displays "20:00". - Press " Start " to start cooking .
Note: The step quantities for the adjustment time of the coding switch are as follow:
| "MW+Grill+Combi." Order | Pad instructions Display | Microwave Power | Grill Power |
| 1 | P100 | 100% | |
| 2 | P80 | 80% | |
| 3 | P50 | 50% | |
| 4 | P30 | 30% | |
| 5 | P10 | 10% | |
| 6 | G | 0% | 100% |
| 7 | C-1 | 55% | 45% |
| 8 | C-2 | 36% | 64% |
3. Grill or Combi. Cooking
- Press " MW+Grill+Combi. " once, "P100" displays and then press " MW+Grill+Combi." for times or press the "-/+ " to choose the power you want, and "G", "C-1" or "C-2" will display for each added press.
- Then press " Start " to confirm, and press " -/+ " to set cooking time from 0:05 to 95:00.
- Press " Start " again to start cooking.
Example: If you want to use 55% microwave power and 45% grill power(C-1) to cook for 10 minutes, you can operate the oven as the following steps.
- Press " MW+Grill+Combi. " once, the screen displays "P100".
- Press " MW+Grill+Combi. " for times or press " -/+ " to choose combi. 1 mode.
- Press " Start " to confirm, and the screen displays "C-1".
- Press" -/+ " to adjust the cooking time until the oven displays "10:00".
- Press " Start " to start cooking .
Note:
If half the grill time passes, the oven sounds twice, and this is normal. In order to have a better effect of grilling food, you should turn the food over, close the door, and then press "Start" to continue cooking. If no operation, the oven will continue cooking.
4. Quick Start
- In waiting state, press " Start " to start cooking with 100% power, each added press will increase 30 seconds cooking time up to 95 minutes.
- In microwave, grill, combi. cooking, each press of " Start " can increase 30 seconds of cooking time.
- In waiting state, press " - " to set cooking time with 100% microwave power, then press Start "to start" cooking.
5. Defrost By Weight
- Press "Weight/Time Defrost" once, and the oven will display "dEF1".
Press - / + to select the weight of food from 100 to 2000 g. - Press " Start " to start defrosting.
6. Defrost By Time
- Press "Weight/Time Defrost" twice, and the oven will display "dEF2".
- Press" -/+ " to select the defrost time.
- Press " Start " to start defrosting.
7.Auto Menu
- Press "+" to choose the menu, and "A1" to "A8" will display, which means pizza, meat, vegetable, pasta, potato, fish, beverage and popcorn.
- Press " Start " to confirm.
- Press" - / + " to choose the default weight as the menu chart.
- Press " Start " to start cooking.
Example: If you want to use "Auto Menu" to cook fish for 350g.
- Press "+" till "A6" displays.
- Press " Start " to confirm.
- Press" -/+ " to select the weight of fish till "350" displays.
- Press " Start " to start cooking.
The menu chart:
| Menu | Weight | Display |
| A1 Pizza | 200 g | 200 |
| 400 g | 400 | |
| A2 Meat | 250 g | 250 |
| 350 g | 350 | |
| 450 g | 450 | |
| A3 Vegetable | 200 g | 200 |
| 300 g | 300 | |
| 400 g | 400 | |
| A4 Pasta | 50g(with 450 ml cold water) | 50 |
| 100g(with 800 ml cold water) | 100 | |
| A5 Potato | 200 g | 200 |
| 400 g | 400 | |
| 600 g | 600 | |
| A6 Fish | 250 g | 250 |
| 350 g | 350 | |
| 450 g | 450 | |
| A7 Beverage | 1 cup(120 ml) | 1 |
| 2 cups(240 ml) | 2 | |
| 3 cups(360ml) | 3 | |
| A8 Popcorn | 50 g | 50 |
| 100 g | 100 |
8. Kitchen Timer
- Press " Timer/Clock" once, LED will display 00:00.
- Press " -/+ " to enter the correct time.(The maximum cooking time is 95 minutes.)
- Press " Start " to confirm setting.
- When the kitchen time is reached, the buzzer will ring 5 times. If the clock has been set(24-hour system), LED will display the current time.
Note: The kitchen Time is different from 24-hour system Kitchen Timer is a timer.
9. Multi-section cooking
At most 2 sections can be set for cooking. In multi-section cooking, if one section is defrosting, then defrosting shall be placed in the first section.
Example: If you want to defrost food for 5 minutes and then cook with 80% microwave power for 7 minutes, operate it as the following:
- Press "Weight/Time Defrost" twice, and the oven will display "dEF2".
- Press " -/+ " to select the defrost time till "5:00" displays.
- Press " MW+Grill+Combi. " once, the screen displays "P100".
- Press " MW+Grill+Combi. " once again or press " -/+ " to choose 80% microwave power.
- Press " Start " to confirm, and the screen displays "P80".
- Press " -/+ " to adjust the cooking time till the oven displays "7:00".
- Press " Start " to start cooking, and buzzer will sound once for the first section, defrosting time counts down; Buzzer will sound once again entering the second cooking. When cooking finishes, buzzer sounds five times.
10. Inquiring Function
- In states of microwave, grill and combination cooking, press "MW+Grill+Combi.", the current power will be displayed for 3 seconds. After 3 seconds, the oven will turn back to the former state.
- In cooking state, press "Timer/Clock" to inquire the time and the time will display for 3 seconds.
11. Lock-out Function for Children
Lock: In waiting state, press "Stop" for 3 seconds, there will be a beep denoting entering the children-lock state and the current time will display if the time has been set, otherwise, the LED will display "0:00". The lock indicator will light.
Lock quitting: In locked state, press "Stop" for 3 seconds, there will be a "beep" denoting that the lock is released. The lock indicator will go out.
12. Specification
- " Start " must be pressed to continue cooking if the door is opened during cooking.
- Once the cooking programme has been set, " Start " is not pressed in 5 minutes. The current time will be displayed. The setting will be cancelled.
- The buzzer sounds once by efficient press, inefficient press will be no response.
- The buzzer will sound five times to remind you when cooking is finished.
- Press " " button, the oven door will be opened.
| Normal | |
| Microwave oven interfering TV reception | Radio and TV reception may be interfered when microwave oven operating. It is similar to the interference of small electrical appliance, like mixer, vacuum cleaner, and electric fan. It is normal. |
| Dim oven light | In low power microwave cooking, oven light may become dim. It is normal. |
| Steam accumulating on door, hot air out of vents | In cooking, steam may come out of food. Most will get out from vents. But some may accumulate on cool place like oven door. It is normal. |
| Oven started accidentally with no food in. | It is forbidden to run the until without any food inside. It is very dangerous. |
| Trouble | Possible cause | Remedy |
| Oven can not be started. | 1. Power cord not plugged in tightly. | Unplug. Then plug again after 10 seconds. |
| 2. Fuse blowing or circuit breaker works. | Replace fuse or reset circuit breaker (repaired by professional personnel of our company) | |
| 3. Trouble with outlet. | Test outlet with other electrical appliances. | |
| Oven does not heat. | 4. Door not closed well. | Close door well. |

According to Waste of Electrical and Electronic Equipment (WEEE) directive, WEEE should be separately collected and treated. If at any time in future you need to dispose of this product please do NOT dispose of this product with household waste. Please send this product to WEEE collecting points where available.
Brandt
CÓMOCONFIGURAR SU HORNO

- Instructions concerning l'installation
- 1- RELATIONS CONSOMMATEURS FRANCE
- Kuchynsky Časovač
- Afrimning after tid
- LES NØYE OG BEHOLD FOR FREMTIDIG REFERANSE
- yupn 19
- nppn.10
- nynynnnp.11
- U7n .12
- bvn n nnyn .5
- nivn.6
- unuiX u7n.7
- 3
- 2
- / 3KcPJIyATAUJII IPIbOPA. 19
- /Диагнoctикa и устра themselves HeNCnpaBncteI 25
- MEPBI IPEIOCTOPOXHOCTN BO N36EKAHNE 4PE3MEPHOROB03DEICTBNA MKNPOBOJHOBOJ 3HEPNI
- BHIMAHHE!
- BHIMAHNE!
- BHIMAHNE! Bo Bpem
- 1/UBEOMJIeHnIyIJIa IIOJIb3OBATEJIa
- OuHCTKA
- IOCYDA
- OCTOPOXKHO
- Bo Bpempa60tbldoctynhble nobepxHOCTNMOYr 6bITb ropayMN.
- BctpoeHHaMe6eIb
- Побrotовkaшкафа
- UctaHOBka neyn
- HCTpykunno3KcnlyaTaun
- YctaHOBka yacob
- 1/NOTICES TO THE USER 4
- / INSTALLATION 14
- 3/ USING THE APPLIANCE 19
- 4/ Trouble shooting 25
- PRECAUTIONS TO AVOID POSSIBLE EXPOSURE TO EXCESSIVE MICROWAVE ENERGY
- WARNING:
- ADDENDUM
- IMPORTANT SAFETY INSTRUCTIONS
- WARNING
- WARNING: The
- WARNING: Accessible
- WARNING: When the
- READ CAREFULLY AND KEEP FOR FUTURE REFERENCE
- To Reduce the Risk of Injury to Persons Grounding Installation
- DANGER
- CLEANING
- UTENSILS
- CAUTION
- Utensil Test:
- Materials to be avoided in microwave oven
- SETTING UP YOUR OVEN
- Turntable Installation
- Installation and connection
- Installation Instructions
- The accessible surface may be hot during operation.
- Built-in furniture
- B.Prepare the cabinet
- C.Install the oven
- Operation Instructions
- Clock Setting
- Microwave Cooking
- Grill or Combi. Cooking
- Note:
- Quick Start
- Defrost By Weight
- Defrost By Time
- 7.Auto Menu
- Kitchen Timer
- Multi-section cooking
- Inquiring Function
- Lock-out Function for Children
- Specification
- Brandt
- CÓMOCONFIGURAR SU HORNO
Brand : BRANDT
Model : BMG2120B
Category : Microwaves