USER MANUAL 8VGS2-3IN1.12 STERWINS
Colocar e mudar as láminas 2.1 a 2.9
11.1 A NOSSA GARANTIA
2.2 SYMBOL NA PRODUKCIE
11.1 NASZA GWARANCJA
11.2 ELEMENTY NIE OBJECT GWARANCJA
2.4 B301NACHOCTb PABOYTO MECTA
- OBECEIeYbTE UCHOTOTV NOCBELUeHHOCTb PA6OueFO MECTA. 3ATPOMOKJdeHbIE INIIOXO OCBELUeHHbIE MECTA CTVKAT PIPINHHO HECyACTHBx CTVyAEB.
HE MCTIOJIb3YJTE 3JEKTPOMHCTPYMEHTI BO B3PbBOOPIACHbIX MECTAX, HAPYMPEB BYIM3N TOPOUHX JIKKOCTE, FA3OB NIM
TbIM.3TEKTPOMHCTPYMEHTbI TEHEPMPYOT NCKbI, KOTOPbIE MOTYT BOCTIAMEHHTb TbITb MNTNCTAPEHWA.
HEIIO3B0JIATEDETAMIOCTOPOHMMHAXOIMTBcBAIM3N PABOTAOUJTOE3JEKTPOMHCTPYMEHTA.OTBIEKAOLIIYEAKTOKPbI MOYITIPMBECTNI KTIOTEPEKOHTPONIA
2.5 ΘΙΕΚΤΡΟTEXΗΥΕCKΑ ΒΕ3ΟΝΑCHOCTb
BIVIKA 3JIeKTPOMHCTPymeHTA DIOJIXHA COOTBETCTBOBATb PO3ETKE. HNKoTDA HE IPEPeDJIbBAITE BIVIKY. HE NCTOJIb3UITE HNKAKME TEPEXODHNIKIM DIA BIVIOK 3JIeKTPOMHCTPymeHOB C 3A3EMLHEHM. IVCTIOJIb3OBAHIME OPINIHAIbHbIX BVIOK IN COOTBETCTBYOLIIxIM PO3ETOK YMEHbIJAE TPOCK TIPAXEHNIA JIeKTPMueCKIM TOKOM.
N36EgAITNE PPNKOCBOHEHIM K 3A3EMJIeHHbIM O6BeKTAM, TAKIM KAK TPYbI, PAINATOPbI, PIIHTbIM XOJIOMlbHNIK.MPCK IPOAPXEHNA 3JIEKTPUHCCKM TOKOM BbILIE, KOITA TEIO 3A3EMJIeHO. HE IOIBVEPTAITE 3JIEKTPOMHCTPYMEhtb BO3DEIcTBNO DIXD WIM BnATN. PIP NIOIADAHNI B0DbB 3JIEKTPOMHCTPYMEHT YBEIWUMBAETC PICK IPOAPXEHNA 3JIEKTPUHCCKM TOKOM.
OBPAUANTECBCKABENEMAKKYPATHO.HNKOTDAHEIPEHOCMTE, HE TAHNTME HHE BbIKJHOUYAHTE3JIKTPOMHCTPYMEHT3A KABEL. DEPKNTE KABELIOJADJIbLIEOTNCTOCHNKOBTEPIIA,MACIA, OCTbIXIIPEDMETOBIMINIBNXUYXCSCACTEH.IOBPEXJEHHBIE IIM3AUYTAHHBIEKABELIONBbILJAOTPNCIPOPAXEHN 3JIKTPUeCKIMTOKM.
I PA60TbC3NEKTPOMHCTPYMEHTOM BHE IOMELUEHINNCTOJIb3YITE TPEJHA3HAVEHHBIMIITTOI YDIMHNTIEHBH
2.10 NHCTPYKUINI IO TEXHNIKE B3OPIACHOCTN IPNI NCIOJIb3OBAHIN KYCTOPE3A
- TPEIOCTEPEXEHM06OITACHOCTHIPMNCTIOHB3OBAHMN KVCTOPE3A
CIEIINTE 3A TEM, YTObIyACTIn TEJA HAXOJIINICb HA PACCTOAHIM OT PEXVLIeTo 3JIEMEHTA. He yBMPaIte CPE3AHHbIe YACTn H HE DEPKITE O6PE3AEMBie YACTN BO BPEM BPAUeHMe IPEXUeTo 3JIEMEHTA. IIOCTE BYIKJIOUEHHEY UCTPOCTBA PEXVLIe 3JIEMEHTb IPTPOJOJIaKOT BPALLATbCS ELLIE HEKOTOPOE BPEM. JAXE KPATKOBPEMEHHAR HEBHMATEJIbHOCTb IPIW NCIOTL3OBAHIM YCTPOCTBA MOKET IPIPBECTN KCEPB3HbIM TIPBABAM.
IPEHOCNTE KYCTOPE3A PYKOTKY PIPN OCTAHOBIEHHOM PEXKULEM 3JIEMHE T NCIEDNTA TEM, YTOBtHE HAXATb HA BbIKJIOATEJB NTAHNA.HADJIXKALEE O6PALLIEHIVE C KYCTOPE3OM
CHIXKAET PIVCK CIVYAHHOTO 3ATIVCKA MITIOYUEHMR TPABMB PE3VIIbTATE KOHTAKTACPEXVLLJMMI QIEMEHTAM.
- BO BPEM TPAHCTIOPTMPOBKN MYN XPAHEHMA PEXYULIM 3JEMEH TDOJIIXEH 6bITb 3AKPbIT YEXIOM. HADJENXALLIEE IVCTOJIb3OBAHME KVCTOPE3A CHNIXAET PNCK TIOJIYUEHMA TPABM B PE3UYbTATE KOHTACTC PEXYULIMM 3JEMEHAM.
- PIM N3B7EUEHMH 3ACTPRAUETO MATEPNALIA IN PEOHOHTE YCTPOINCTBA UBEINTECB, YTO BCE BbIKIOUATEEN IINTAHN HAXOJTCB A BbIKIOUEHHOM IOIOXEHM, AAKKUMYJTOP N3B7EUEHMH INOTCOEINHE. CIIUYAHAR AKTINBALUNK CYTOPE3A PIM N3B7EUEHMH 3ACTPRAUETO MATEPNALIA IN PEOHOHTE MOXET PIPIBECTNI KCEPB3HBMTPABMAM.
- DEPKNTE KYCTOPE3 TOIbKO 3A TIOBEPXHOCTM C3ALIMTHbIM NOKpbITMEM, TAK KAK PEXKYUIM 3NEMENT MOKET KOCHYTBcR CKpBITO3NEKTPOINPOBOIKM. KACAHIE PEXKYUIM 3NEMENTOM ITOBOJIKI POID HATPRJXEHHEM MOKET TEPEIDATb HATPRJXEHHE HA METAIIMUVECKME YACTIN KYCTOPE3A IM TPMBECTN KTIOPAXEHIO ONEPATOPA 3NEKTPIWCEKIM TOKOM.
- DEPXNTBE BCE KABEJIM TITAHNIA IODAJIbIe OT PABOYEN30HbI. BO BPEM WCIIOJIb3OBAHNIA KABEJIb MOKET 3ATEPRITCBK BYKCTAX IN CJUYAIHO NIOACTb IIOI PEXKYUULIN 3JEMEHT.
HENCIOJIb3yIte KUCTOPE3 PIPINIOOXM NTOFOHbIX YCIOBHXOCOBEHNO BTP03Y.3TOIO3BOITMCHN3MTbPICKUYDAPAMOHNIVEI.
2.11ДОПОЛНHTENbHbIeMHCTPyKcIINTOTEXHnKEBE3OpACHOCTNIPNMCIOJIb3OBAHmKycTOPE3ACyBEJIuHcHHOДOCaRAEMoCTbIO
IIOIOIHNTIELbHIEITPABIMIABE3OPIACHOCTINIPM NCTIOJIb3OBAHIMKYCTOPE3ACVBYENUHHOIOCSRAEMOCTbIO
IINCHIXEHHN PNCKAIIOPAXHEH3JTEKTPWUECKM TOKOM HMKOTDA HE NCTOJIb3YUITE KYTOPE3 C YBEIMUEHHOJ IOCAIAEMOCTBPORDMC JINHMAMNI 3JETKPOIEPEDA. KOHTAKTC JINHMAMNI 3JETKPOIEPEDAHMI NCTOJIb3OBAHME YCTPOIcTBAPOM C HMMIO MOKET IPNBECTNI KCEPB3HON TPABME NIIN CMEPTIELHOMY IPOXAHMO 3JETKTPWUECKM TOKOM.
BCEETAUYIPABTMEYCTPOCTBOMOSEMMPYKAMN.B0 13EKAHNEIOTEPNI KOHTPOJIIEPXMTE KYTOPE3CYBEJWHEHHO IDOCAIAEMOCTBIOIBVMYPYKAMN.
- PPNCAIOJIb30BAHIMN YCTPOINCTBA BbILIE YPOBHNI FOIOBB1BCEITDA NCIIOJIb3YWTE 3ALNTHBn IFOIOBHOM Y6OB.PTADHEHIVE MYCOPA MOKET TIPMBECTNI KIIOYUEHINO CEPbE3HbIXTPABM.
2.12 INCHCTPYKUINIIO TEXHNIKBE3OINACHOCTNДJI3APJHOYCTPOINCTBA
3TIMYCTPOICTBOMMOTYIIOJIb3OBATbC4ETMCTAPLIE8IET, A TAKKJE IINLA CO CHNXEHHbIMNΦHNECKIMN, CEHCOPHBIMNI IMI MEHTAIBHbIMN B03MOXHOCTaMI INICHENOCTATOHbIMOTbITOM 3HAHNMN, PIPY CYTOBIMN PIPMCOTPA 3A HIMNI ININHCTPYKTAKA OTHOCITEbHO BEE3O1PACHOTIOCTOJIb3OBAHMY EYTOPICTBAI IIOHMAMNA BO3MOXHOIPTACHOCTN. HEIO3BOJMATEDETREMNTPATB
CDAHbIMYCTPOICTBOM.HEIIO3B0JIATEDETAMBbIIOJIHTbOCHCTKY INTEXHUECKOEOBCLNYKBAHMEYCTPOICTBABE3HAEBIOHEHM B3POCJIbIX.
ECLIN KAGEJI BIVTAHNIAIIOBPEXDEH,TO BO M36EJXAHEIPOPAXEHNA 3JEKTPUWECKIM TOKOM ETOIOJXEH 3AMEHHTb IV3OTOBATEJI, EFO
TEXHUMECKM IPIPEDCTABITIEL WIMI DPYTOI KBAJINMOPOBAHHBIC TELMAJIMCT.
CTEJNTTE 3ATEM, YTO5bIETM HE INTPAIM C3TMM 3APRdHbIM UCTPOINCTBOM.
- PINEJMCIOJIb3OBAHnEM 3APRHOHOYCTPOICTBA IPOUHTAITBE NHCPTPYKLIIMN IN3YUITE PINEJYNPEXDAIOLLYIO MAPKIPOBKY HA3APRIHOM YCTPOICTBE INAKKYMNYATope.
- HE ПытайТЕСь JСТПОЛБ3OBATВ 3APДИhoe YCTPOICTBO ДПЯЗAPДКМ
ДРУТИХ AKKUMYЛТОПВ, KPOME BXODДLIMX B KOMПЛК. 3APДИhoe
YCTPOICTBO И AKKUMYЛТОР CTELMЛь HO P3PA5OTAHь ДПЯ
COBMECTHON PA5OTbl.
3APJXAKIYE AKKYMUYIATOP TOJIbKO B TIOMEUHEHIMTAK KAK 3APJYHOE YCTPOICTBTOIPTEHHA3HauEHO DITRAUCTIb3OBAHIMTTOJIbKO B TIOMEUHEHIX.
- HEΠbTΑΠTECb 3APRJXATb HENIEPE3APRJAEMbIe 5ATAPEYIKN.
3ALLIMLIAMITE 3APARHOE YCTPOICTBOOT BOBbIN BIAIM.CUYLECTBYET OIACHOCTb IOPAXEHNJ EJIKTPUWECKNIM TOKOM.
- OBECEIYBTE HADJIENEXALIYU BEHTIMJIUNIO BO BPEM3AJPRIK.
2.13 OCTATOUHbIE PNCKN
- O3HAKOMbTEcB C TIPABWIMAMN NCTOJIb3OBAHM 3TOFOYCTPOICTBA B HACTOJIEM PYKOBOIDCTBE.3AIOHMNHIE WHCTPYKUIMI TO TEXHMIKE BE30IAPACHOTIN TOUHO CO5IIIOJDAIITE INX.3TOIIMOXET IPTEOITBPATNTB PICKN OTACHBIE CMTYALIM.IPNIOTIOJIb3OBAHM 3TOFOYCTPOICTBA BVIDTB EBNIMATEJIbHI, YTOBJCBOEBPMEHHO IPTEOJEIMTN BYCTPAHNTB PICKN.BICICTPOEBMELLIATEJBCTBO MOXET IPTEOITBPATNTB CEPIE3HbIE TPABMbIJN HAHECEHNE MATEPMAITbHOTO YUIEPSA.IPNI B03HNKHOBEHWM HENCIPABHOCTB BYIKJIHOVITE UCTPOICTBO.
DAKTEPOTOMC0BIOHEHM BCEXHCTPYKLMCYLIECTBYIOT HEKOTOPbIEQAKTOpBI,KOTOpBIeMOYTPINBECTNKPNCKAM,TAKVEKAK
OTSPACbBAEMbIEYACTM3AFOTOBKM;
BMBPALMOHHbIE TPABMbI:NCIOJIb3VITCECTILMAJIbHbIE PYKOKTIVCTAPAITECbCOKPATIVB BPEMRAPOBTbIN BC3DEJNTCBMI BMBPALIM
-TPABMb,BlB3BAHbHbE LLIYMOM:HAIEBAWITE CPEIDCTBA 3ALIMTBI YLUEN COKPAUATTBE BPEM PABOITBI BO3JECTBNI LLIYMA;
BbIXAHMEIbIMINMELKIMXACTHIL
BOIM36EKAHNEIPEPTPEBAHECTABTEHA3APREHOEYCTPOICTBO TAKJEJIbIEIPTEDMETBI. HEPA3MELLAHTE3APREHOEYCTPOICTBO PADIOM CINTOUYHKAMNTENDA.
- ICSIOJIb3VITe UINHINHTIEb TOIbKO B CIVYAE KPAHHEI HEO5XIDIMMOCTN. ICSIOJIb3OBAHME HEPIOJXODJIUETO YINHMITEJMOKETIIPINBECTIK BO3TOPAHIOI IOPAXEHHIO JIKETPVUCEKM TOKOM.
- HE NCTOJIb3yIte 3APJIDHOE YCTPOIMCTBO, ECNIIOHOIOTDBEPTAIONCBCMlbHbIMUdAPAM, PAIDEHNRMNINbIIO KAKIM-NI5O CTOCOSOMTOBPEJDEHO.ITOBEPSTE INOTPEMOHTIVPYTE 3APJIDHOE YCTPOIMCTBOABTOPM3OBAHHOMCEPBCHOMLIEHTPE.
- HE PA36MPAITE 3APARHHOYUCTPOMCTBO. HEPABINHBHA C5OPKA MOXET PIPBECTIKIPOXAPY, IOPAXEHHIO 3JIKTPUeCKIM TOKOM WIM CMEPTN OT YDAPA 3JIKTPUeCKIM TOKOM.
-ДПТССССССССССССССССССССССССССССССССССССССССССССССССССССССССССCSCSCSCSCSCSCSCSCSCSCSCSCSCSCSCSCSCSCSCSCSCSCSCSCSCSCSCSCSCSCSCSCSCSCSCSCSCSCSCSCSCSCSCSCSCSCSCSCSCSCSCSCSCSCSCSCSCSCSCSCSCSCSCSCSCSCSCSCSCSCSCSCSCSCSCSCSCSCSCSCSCSCSCSCSCSCSCSCSCSCSCSCSCSCSCSCSCSCSCS
3. TEXHnueCKNE XAPAKTEPNCTNKN
*PyneBaTpy6Ka He BxOДNTВ KOMПЛeKТ.
- HAIDEBAIITE PEPUATKIN BO BPEM PACIAKOBKN.
HENCTIOJIb3yIeDIIPACTIAKOBKNPE3AKHOXIKINIVWIMJIOBIOIpyTOIIOIOBHyIMHCTPYMEHT.
- PIIPEHOCMTIEMHCTPYMEHTTOJIbKO3APYK0RTKY1MNI14N22(C PYIIEBOITPY6KOJ).
COXPAHNTE UTIAKOBKY DIIA DAIbHEIMLIETO MCTIOJIb3OBAHNI (TPAHCTIOPTINPOBKN IM XPAHENIA).
XPAHMTPE PYKOBODCTBOIIO 3KCTIVATALIMB CYXOM MECTE INCIOJIb3OBAHMA B BYDYLEM.
4.2 YCTAHOBKA

DAHHbIE AKKyMylrTOPHbIE NHCTPymeHtbiIOCTABJIOTcB IIOJIHOCTbIO CO6PAHHOM BnDE C PPEJYCTAHOBJIeHHbIMN JIe3BnAMN.
4.3 INEPBOE INCIOJIb3OBAHNE

ПЕДУПЕЖДEHWE! ПЕДИ NSСПОЛБ3OBAHMEM DAHHORO YCTPOINCTBAПОЧNTAITE PA3DEJI《ИHCTPYKLIIMI NOTEXHNIKE BE30PACHOCHTI》BHAUAJE DAHHOTO PYKOBODCTBA,BKJIIOUAY BECb TEKTПОД 3AFOJOBKOM.

AKKUMYJTOP IOCTABJETCJ YACTNUHO 3APJXEHHbIM.
06paTnTe ocOboe BHMaHHe Ha nepBoe nCnoJb3ObaHne ycTpoNCTBa: cKOHcHTpnpuyTecb N ydeJIte BCE BHMaHne nepBOMy nCnoJb3ObaHnIO. IcNbTaIte ycTpoNCTBO Ha CBO6oHOM npocTpaHCTBe 6e3 npenTCTBn IN OKpyKaUoLnx npedMeTOB.
4.4 INCIOJIb3OBAHNE
3apka yctpoicTb:a:ncyHKn c 3.2 no 3.4
IocTaBnAeMoE 3apJHoe yCTpoNCTBO COBMeCTMIO C IINTN-NOHHbIM aKKyMylTOpOM, YCTaHOBnEHbIM B INHcTpymHe. He IONb3yIeTcB DpyrIMN 3apJHbIM NycPoNCTBaMn. IINTN-IoHHbI aKKyMylTOp 3aUuIeH OT rIy6Oko pa3pIaKn. KOrDa aKKyMylTOp IOnHOCTbI Opa3pIaKeH, yCTpoNCTBO ABTOMaTHueCKN OKKNoaTe TpI NMOUaC TpI NMOUaN 3aUHTO H cIeN. Ie3Bne 60JIbIe He 6yIeT DBrIraTbc, n 6yIeT CblIseH Cna6bI CBNC7aUH 3ByK. 3apJkaTe aKKyMylTOp B TeueHne 3 uAcob, 3aTeM IcNoJIb3yIte erO Do IOnHoro pa3pJa (T. e. Ioka IHcTpymEt He NaHET pa6oTaTb MeJeHHo). Ipeed Bo3o6HOBNeHem pa6oTb ChOBA 3apJdnte aKKyMylTOp B TeueHne 3 uAcob.
PNEyPExKJHHe. IpoIOnJknteIbHoe n Ype3MepHoe NcNoIb3OBaHne KypKOBOrO nepeKnIOuAteIa MoKeT PnIBecTN K Heo6paTumOMy NOBpeXdEHNO JNTN-NOHOrO aKKymyIaTopa.

BHUMAHNE! DAHHOE 3APJHOOYCTBO HE OTKJIHOYAETCA ABTOMATNUECKN POCJIPOJHON 3APJDKN AKKYMЛATOPA. CTAPAANTECb HE OCTABJIATb AKKYMЛAToPHbIE MHCTPYMEHTbI NOДКJIHOUeHHbIMN K
3APAnHOMU YCTPOINCTBY.
IIO 3aBepueHn 3apJKn BbIKHouHte 3apJdHoe ycTpoiCTBO nIN OTCoEduHnte erO OT 3JIeKtpocTeN.
PIMMEUAHNE. CBeToIONoHbI INHnKaTOp yPoBHa 3aJa 6yJeT CBeTtbcr KpaChbIM, KOrda 3apJdHOe yCTPOINTO NOKJIIOueHO n 3apJxae T caIOBBie HOXHNzI. Korda aKKyMylrTophIE caIOBle HOXHNzI pONHOCTbO 3apJraTcR, CpeHNI CBeToIONoHbI INHnKaTOp HauHET CBETtbcr 3eJIeHbIM.
CIOCTOPOHHMMIPEDMETOMIPIPOBEPKIMYCTPOINCTBAHAHAMHE IIOBPEXDEHMI.
06uhe yka3aHnI IO 3KcIIyatauHn: pncyHKn c 4.1 no 4.9
Korda Heo6xOIMo 6pe3aTb MHOrO cTapoi KINBOI n3rOpOiN, IcnoJIb3yIe ceKaToPbI nnI npyrooe
yctpoiCTBOIgObe3aHn60nee TOncTbIX BeTBei (DnaMeTpom 60nee 8 MM) Do JKeJaemoi DInHbI nepei
Hauanom pa60tbc HnctpymehTom. TTo6bI npndaTb n3ropoOn ToUHy oOpMy, npotraHnte Jecky Mejdy KpaMn JkBOI n3ropoOn, a 3aTeM opeXbTe BETB VdoJI BcEi DInHb I neckn. Y6eintecb, yTO pexyui nn 3neMeHT He KOHTaKTHnpyeT C TBePdbIM MaTePiAnAMn, KOtopbIe MOrTy NOBpeNtB erO, HApnPmep C MetaIIuuecko PpOBoNOKo INI Mn MetaIIuueckmN CTOnKaMn dJa pactehn.
CobetblnoctpnKke
1.PnpdaHne fOpMbI
11.2 NCKJIIOUeHnIgAPAHTnI
Данная rapaHTЯ He paCnpoCTpaHЯETcHa npo6IeMbI Ил ИнцIeHTbI, CBЯЗHHble C HENpaBUNbHbIM IcNoJIb3OBAHHeM N3dEInN.
TapaHTnHa pacnpocTpahReTcHa cIeNyUOuNe cIyuaH:
- INHCTpyMeHT NcNoJIb3OBAIcR HeNpaBnIbHO;
- NOBpeKdEHH B03HKnI npTpAHCnOpTnPoBKe nIe MoTtKe N3dEJIy;
- pemont n (nll) 3aMeHa YacTeH yCtpoCTBa IPOBOIDINCB TpeTBmN LIuCaMn;
-
NOBpeKdEHNb BO3HKnBcIeDCTBHe BHeLHnX ΦaKTOpOB IJI IN BO3JeICTBnA NocToPOnHHNx IpeDMeTOB, TaKnx KaK PecOK IJI IN KaMHN;
-
NOBpeKdEHN B03HnKlB pe3yIbTaTe HecO6JIoDeHn IHHCTpyKcIe No TexHnKe 6e3OpaCHOCTu INcNoJIb3ObaHnIO;
HCTpyMeHT pa36npanc nIN BCKpbIaIc;
- INHCTpymENT NOBBePraIcB O3dEiCTBnIO BnaJHoI cpeIb (pOca,doXkb, nOrgPyKeHne BVoDy);
- INHCTpyMeHT INCNoJIb3OBAIcR B INpoΦeCCnHOHaJIbHbIx ΚeJIaX;
- INHCTpymEnT NOIDBepraIcB O3DeIcTBnIO TeMpepaTypbI, BbIXoJaIeN 3a IpeJeblI dnaNa3OHa, yKa3aHHoro B pa3dene «XpaHeHne».
UcTpoIcTB Heo6xOJIMO 3KcPnIyATnpOBaTB B HopMaJIbHbIX YCIOBnIX H He IcNpOJIb3OBA Tb B npOeCCNOHaJIbHbIX ZelJX. PoTOMy DaHHa RapaHTnI He paCnpocTpahJeTcHa YcTpoIcTaBa, IcNpOJIb3yEmbl CeAoBOdUeCKIMN KOMpaHnIMN, MeCThblMn OprHaAMN BlaCTN, a TaKKe KOMpaHnIMN, PpeINaIraIouIIMN PIIaTHyU apEHyu NII NbcPnAIthbl IpokoAt o6OpdyoBaHnI.
B cnyae BO3HKnHOBeHn Ipo6bEmblIIN o6hApUKeHn IeΦeKta Heo6xOJIMo npexKe Bcero 6bpatntbcra K dInepy KompanHH Sterwins. B 60JIbSUNCTBe cnyaEB
| CE | Еурonaльк STандартая сайес каледи: 6ун 6алги осы Курьлфын
Колданылайын урonaльк Дуpeковарая сайес калдигин жэne осы
Дуpeковарая сайессген 6ilдipeи. |
| EAC | Кeding Oдаfterи муше салдерін
Нарыгында озмдерін
айналымы жэнihderi 6ibigнfv
6elri. | | Украиналык сайеспк 6ел Rici. |
| II Кл actы Корогьic. | | Tek 6eлme iшinde падалануfa
apналган, жанбьр acына
Коиmaнь3. |
| Li-Ion | Батаяр SFLOKТарын Cурамында kayinti 3aTTAP 6lonatbHndykTAH, onap
Коршаган optafas kээne adam DeHCaylbfын kayin TseHdipyIMyMKiH. |
| Li-Ion | Плтын-юнды SFATЯр. SFYI eHIM SFakpbik SFakapя SFakapь SFakapь SFakapь SFakapь SFakapь SFakapь SFakapь SFakapь SFakapь SFakapь SFakapь SFakapь SFakapь SFakapь SFakapь SFakapь SFakapь SFakapь SFakapь SFakapь SFakapь SFakapь SFakapь SFakapь SFakapь SFakapbay SFakapь SFakapь SFakapь SFakapь SFakapь SFakapь SFakapь SFakapь SFakapь SFakapь SFakapь SFakapь SFakapь SFakapь SFakapь SFakapь SFakapь SFakapь SFakapь SFakapь SFakapь SFakapь SFakapь SFakapь SFakapв SFakapь SFakapь SFakapь SFakapь SFakapь SFakapь SFakapь SFakapь SFakapь SFakapь SFakapь SFakapь SFakapь SFakapь SFakapь SFakapь SFakapь SFakapь SFakapь SFakapь SFakapь SFakapь SFakapь SFakapь SFakapBay SFakapBay SFakapBay SFakapBay SFakapBay SFakapBay SFakapBay SFakapBay SFakapBay SFakapBay SFakapBay SFakapBay SFakapBay SFakapBay SFakapBay SFakapBay SFakapBay SFakapBay SFakapBay SFakapBay SFakapBay SFakapBay SFakapBay SFakapBay SFakapBay SFakap Bay SFakapBay SFakapBay SFakapBay SFakapBay SFakapBay SFakapBay SFakapBay SFakapBay SFakapBay SFakapBay SFakapBay SFakapBay SFakapBay SFakapBay SFakapBay SFakapBay SFakapBay SFakapBay SFakapBay SFakapBay SFakapBay SFakapBay SFakapBay SFakapBay SFakap bay SFakapBay SFakapBay SFakapBay SFakapBay SFakapBay SFakapBay SFakapBay SFakapBay SFakapBay SFakapBay SFakapBay SFakapBay SFakapBay SFakapBay SFakapBay SFakapBay SFakapBay SFakapBay SFakapBay SFakapBay SFakapBay SFakapBay SFakapBay SFakapBay SFakapBai SFakapBay SFakapBay SFakapBay SFakapBay SFakapBay SFakapBay SFakapBay SFakapBay SFakapBay SFakapBay SFakapBay SFakapBay SFakapBay SFakapBay SFakapBay SFakapBay SFakapBay SFakapBay SFakapBay SFakapBay SFakapBay SFakapBay SFakapBay SFakapBay SFakapВai SFakapBay SFakapBay SFakapBay SFakapBay SFakapBay SFakapBay SFakapBay SFakapBay SFakapBay SFakapBay SFakapBay SFakapBay SFakapBay SFakapBay SFakapBay SFakapBay SFakapBay SFakapBay SFakapBay SFakapBay SFakapBay SFakapBay SFakapBay SFakapBay SFakopBay SFakapBay SFakapBay SFakopBay SFakapBay SFakopBay SFakapBay SFakopBay SFakapBay SFakopBay SFakapBay SFakopBay SFakapBay SFakopBay SFakapBay SFakopBay SFakapBay SFakopBay SFakapBay SFakopBay SFakapBay SFakopBay SFakapBay SFakopBay SFakapBay SFakopBay SFakapBay SFakopBay SFakopBay SFakapBay SFakopBay SFakapBay SFakopBay SFakapBay SFakopBay SFakapBay SFakopBay SFakapBay SFakopBay SFakapBay SFakopBay SFakapBay SFakopBay SFakapBay SFakopBay SFakapBay SFakopBay SFakapBay SFakopBay SFakapBay SFakopBay SFakapBay SFakapBay SFakopBay SFakapBay SFakopBay SFakapBay SFakopBay SFakapBay SFakopBay SFakapBay SFakopBay SFakapBay SFakopBay SFakapBay SFakopBay SFakapBay SFakopBay SFakapBay SFakopBay SFakapBay SFakopBay SFakapBay SFakapBay SFakopBay SFakapBay SFakapBay SFakopBay SFakapBay SFakopBay SFakapBay SFakopBay SFakapBay SFakopBay SFakapBay SFakopBay SFakapBay SFakopBay SFakapBay SFakopBay SFakapBay SFakopBay SFakapBay SFakopBay SFakapBay SFakopBay SFakopBay SFakapBay SFakopBay SFakapBay SFakapBay SFakopBay SFakapBay SFakopBay SFakapBay SFakopBay SFakapBay SFakopBay SFakapBay SFakopBay SFakapBay SFakopBay SFakapBay SFakopBay SFakapBay SFakopBay SFakapBay SFakopBay SFakapBay SFakopBay SFakopBay SFakat Bay SFakopBay SFakat Bay SFakopBay SFakat Bay SFakopBay SFakat Bay SFakopBay SFakat Bay SFakopBay SFakat Bay SFakopBay SFakat Bay SFakopBay SFakat Bay SFakopBay SFakat Bay SFakopBay SFakat Bay SFakopBay SFakat Bay SFakopBay SFakat Bay SFakopBay SFakat Bay SFakopBas SFakat Bay SFakopBay SFakat Bay SFakopBay SFakat Bay SFakopBay SFakat Bay SFakopBay SFakat Bay SFakopBay SFakat Bay SFakopBay SFakat Bay SFakopBay SFakat Bay SFakopBay SFakat Bay SFakopBay SFakat Bay SFakopBay SFakat Bay SFakopBay SFakat Bay SFakopBay SFakat bay SFakopBay SFakat Bay SFakopBay SFakat Bay SFakopBay SFakat Bay SFakopBay SFakat Bay SFakopBay SFakat Bay SFakopBay SFakat Bay SFakopBay SFakat Bay SFakopBay SFakat Bay SFakopBay SFakat Bay SFakopBay SFakat Bay SFakopBay SFakat Bay SFakopBay SFakat Bay SFakopBai SFakat Bay SFakopBay SFakat Bay SFakopBay SFakat Bay SFakopBay SFakat Bay SFakopBay SFakat Bay SFakopBay SFakat Bay SFakopBay SFakat Bay SFakopBay SFakat Bay SFakopBay SFakat Bay SFakopBay SFakat Bay SFakopBay SFakat Bay SFakopBay SFakat Bay SFakopBay SFakat Baf Bay SFakopBay SFakat Bay SFakopBay SFakat Bay SFakopBay SFakat Bay SFakopBay SFakat Bay SFakopBay SFakat Bay SFakopBay SFakat Bay SFakopBay SFakat Bay SFakopBay SFakat Bay SFakopBay SFakat Bay SFakopBay SFakat Bay SFakopBay SFakat Bay SFakopBay SFakat Bay SFakot Bay SFakat Bay SFakot Bay SFakat Bay SFakot Bay SFakat Bay SFakot Bay SFakat Bay SFakot Bay SFakat Bay SFakot Bay SFakat Bay SFakot Bay SFakat Bay SFakot Bay SFakat Bay SFakot Bay SFakat Bay SFakot Bay SFakat Bay SFakot Bay SFakat Bay SFakot Bay SFakat Bay SFakot Bay SFakat bay SFakot Bay SFakat bay SFakot Bay SFakat bay SFakot Bay SFakat bay SFakot Bay SFakat bay SFakot Bay SFakat bay SFakot bay SFakat bay SFakot bay SFakat bay SFakot bay SFakat bay SFakot bay SFakat bay SFakot bay SFakat bay SFakot bay SFakat bay SFakot bay SFakat bay SFakot bay SFakat bay SFakot bay SFakat bay SFakot bay SFakat bay SFakot bay SFakat bay SFakot bay SFakat bay SFakot bay SFakat Bay SFakot bay SFakat bay SFakot bay SFakat bay SFakot bay SFakat bay SFakot bay SFakat bay SFakot bay SFakat bay SFakot bay SFakat bay SFakot bay SFakat bay SFakot bay SFakat bay SFakot bay SFakat bay SFakot bay SFakat bay SFakot bay SFakat bay SFakot bay SFakat bay SFakot Bay SFakat bay SFakot bay SFakat bay SFakot bay SFakat bay SFakot bay SFakat bay SFakot bay SFakat bay SFakot bay SFakat bay SFakot bay SFakat bay SFakot bay SFakat bay SFakot bay SFakat bay SFakot bay SFakat bay SFakot bay SFakat bay SFakot bay SFakat Bay SFakot bay SFakat Bay SFakot bay SFakat bay SFakot bay SFakat bay SFakot bay SFakat bay SFakot bay SFakat bay SFakot bay SFakat bay SFakot bay SFakat bay SFakot bay SFakat bay SFakot bay SFakat bay SFakot bay SFakat bay SFakot bay SFakat bay SFakot bay SFakat bay SFakot Bay SFakat bay SFakot Bay SFakat bay SFakot bay SFakat bay SFakot bay SFakat bay SFakot bay SFakat bay SFakot bay SFakat bay SFakot bay SFakat bay SFakot bay SFakat bay SFakot bay SFakat bay SFakot bay SFakat bay SFakot bay SFakat bay SFakot bay SFakat Bay SFakot bay SFakat bay SFakot bay SFakat Bay SFakot bay SFakat bay SFakot bay SFakat bay SFakot bay SFakat bay SFakot bay SFakat bay SFakot bay SFakat bay SFakot bay SFakat bay SFakot bay SFakat bay SFakot bay SFakat bay SFakot bay SFakat bay SFakot bay SFakat bay SFakot Bay SFakat bay SFakot bay SFakat bay SFakot Bay SFakat bay SFakot bay SFakat bay SFakot bay SFakat bay SFakot bay SFakat bay SFakot bay SFakat bay SFakot bay SFakat bay SFakot bay SFakat bay SFakot bay SFakat bay SFakot bay SFakat bay SFakot bay SFakat bay SFakot bay SFakat Bay SFakot bay SFakat Bay SFakot bay SFakat Bay SFakot bay SFakat bay SFakot bay SFakat bay SFakot bay SFakat bay SFakot bay SFakat bay SFakot bay SFakat bay SFakot bay SFakat bay SFakot bay SFakat bay SFakot bay SFakat bay SFakot bay SFakat bay SFakot bay SFakat bay SFakot Bay SFakat bay SFakot Bay SFakat bay SFakot Bay SFakat bay SFakot bay SFakat bay SFakot bay SFakat bay SFakot bay SFakat bay SFakot bay SFakat bay SFakot bay SFakat bay SFakot bay SFakat bay SFakot bay SFakat bay SFakot bay SFakat bay SFakot bay SFakat Bay SFakot bay SFakat bay SFakot bay SFakat bay SFakot bay SFakat Bay SFakot bay SFakat bay SFakot bay SFakat bay SFakot bay SFakat bay SFakot bay SFakat bay SFakot bay SFakat bay SFakot bay SFakat bay SFakot bay SFakat bay SFakot bay SFakat bay SFakot bay SFakat bay SFakot Bay SFakat bay SFakot bay SFakat bay SFakot bay SFakat bay SFakot Bay SFakat bay SFakot bay SFakat bay SFakot bay SFakat bay SFakot bay SFakat bay SFakot bay SFakat bay SFakot bay SFakat bay SFakot bay SFakat bay SFakot bay SFakat bay SFakot bay SFakat bay SFakot bay SFakat Bay SFakot bay SFakat bay SFakot bay SFakat Bay SFakot bay SFakat Bay SFakot bay SFakat bay SFakot bay SFakat bay SFakot bay SFakat bay SFakot bay SFakat bay SFakot bay SFakat bay SFakot bay SFakat bay SFakot bay SFakat bay SFakot bay SFakat bay SFakot bay SFakat bay SFakot Bay SFakat bay SFakot bay SFakat bay SFakot Bay SFakat bay SFakot Bay SFakat bay SFakot bay SFakat bay SFakot bay SFakat bay SFakot bay SFakat bay SFakot bay SFakat bay SFakot bay SFakat bay SFakot bay SFakat bay SFakot bay SFakat bay SFakot bay SFakat bay SFakot bay SFakat Bay SFakot bay SFakat Bay SFakot bay SFakat bay SFakot bay SFakat Bay SFakot bay SFakat bay SFakot bay SFakat bay SFakot bay SFakat bay SFakot bay SFakat bay SFakot bay SFakat bay SFakot bay SFakat bay SFakot bay SFakat bay SFakot bay SFakat bay SFakot bay SFakat bay SFakot Bay SFakat bay SFakot Bay SFakat bay SFakot bay SFakat bay SFakot Bay SFakat bay SFakot bay SFakat bay SFakot bay SFakat bay SFakot bay SFakat bay SFakot bay SFakat bay SFakot bay SFakat bay SFakot bay SFakat bay SFakot bay SFakat bay SFakot bay SFakat bay SFakot bay SFakat Bay SFakot bay SFakat Bay SFakot bay SFakat Bay SFakot bay SFakat Bay SFakot bay SFakat bay SFakot bay SFakat bay SFakot bay SFakat bay SFakot bay SFakat bay SFakot bay SFakat bay SFakot bay SFakat bay SFakot bay SFakat bay SFakot bay SFakat bay SFakot bay SFakat bay SFakot Bay SFakat bay SFakot Bay SFakat bay SFakot Bay SFakat bay SFakot Bay SFakat bay SFakot bay SFakat bay SFakot bay SFakat bay SFakot bay SFakat bay SFakot bay SFakat bay SFakot bay SFakat bay SFakot bay SFakat bay SFakot bay SFakat bay SFakot bay SFakat Bay SFakot bay SFakat bay SFakot bay SFakat bay SFakot bay SFakat bay SFakot bay SFakat Bay SFakot bay SFakat bay SFakot bay SFakat bay SFakot bay SFakat bay SFakot bay SFakat bay SFakot bay SFakat bay SFakot bay SFakat bay SFakot bay SFakat bay SFakot bay SFakat bay SFakot Bay SFakat bay SFakot bay SFakat bay SFakot bay SFakat bay SFakot bay SFakat bay SFakot Bay SFakat bay SFakot bay SFakat bay SFakot bay SFakat bay SFakot bay SFakat bay SFakot bay SFakat bay SFakot bay SFakat bay SFakot bay Sfakat bay Sfakot bay Sfakat bay Sfakot bay Sfakat bay Sfakot bay Sfakat bay Sfakot bay Sfakat bay Sfakot bay Sfakat bay Sfakot bay Sfakat bay Sfakot bay Sfakat bay Sfakot bay Sfakat bay Sfakot bay Sfakat bay Sfakot bay Sfakat bay SsFakat bay Sfakot bay Sfakat bay Sfakot bay Sfakat bay Sfakot bay Sfakat bay Sfakot bay Sfakat bay Sfakot bay Sfakat bay Sfakot bay Sfakat bay Sfakot bay Sfakat bay Sfakot bay Sfakat bay Sfakot bay Sfakat bay Sfakot bay SsFakat bay Sfakot bay Sfakat bay Sfakot bay Sfakat bay Sfakot bay Sfakat bay Sfakot bay Sfakat bay Sfakot bay Sfakat bay Sfakot bay Sfakat bay Sfakot bay Sfakat bay Sfakot bay Sfakat bay Sfakot bay Sfakat bay Sfakhoy Sfakhoy Sfakhoy Sfakhoy Sfakhoy Sfakhoy Sfakhoy Sfakhoy Sfakhoy Sfakhoy Sfakhoy Sfakhoy Sfakhoy Sfakhoy Sfakhoy Sfakhoy Sfakhoy Sfakhoy Sfakhoy Sfakhoy Sfakhoy Sfakhoy Sfakhoy Sfakhoy Sfakhoy Sfakhay Sfakhoy Sfakhoy Sfakhoy Sfakhoy Sfakhoy Sfakhoy Sfakhoy Sfakhoy Sfakhoy Sfakhoy Sfakhoy Sfakhoy Sfakhoy Sfakhoy Sfakhoy Sfakhoy Sfakhoy Sfakhoy Sfakhoy Sfakhoy Sfakhoy Sfakhoy Sfakhoy Sfakhoy Sfakhuy Sfakhoy Sfakhoy Sfakhoy Sfakhoy Sfakhoy Sfakhoy Sfakhoy Sfakhoy Sfakhoy Sfakhoy Sfakhoy Sfakhoy Sfakhoy Sfakhoy Sfakhoy Sfakhoy Sfakhoy Sfakhoy Sfakhoy Sfakhoy Sfakhoy Sfakhoy Sfakhoy Sfakhoy Sfakhory Sfakhoy Sfakhoy Sfakhoy Sfakhoy Sfakhoy Sfakhoy Sfakhoy Sfakhoy Sfakhoy Sfakhoy Sfakhoy Sfakhoy Sfakhoy Sfakhoy Sfakhoy Sfakhoy Sfakhoy Sfakhoy Sfakhoy Sfakhoy Sfakhoy Sfakhoy Sfakhoy Sfakhoy Sfakhony Sfakhoy Sfakhoy Sfakhoy Sfakhoy Sfakhoy Sfakhoy Sfakhoy Sfakhoy Sfakhoy Sfakhoy Sfakhoy Sfakhoy Sfakhoy Sfakhoy Sfakhoy Sfakhoy Sfakhoy Sfakhoy Sfakhoy Sfakhoy Sfakhoy Sfakhoy Sfakhoy Sfakhoy Sfakhary Sfakhoy Sfakhoy Sfakhoy Sfakhoy Sfakhoy Sfakhoy Sfakhoy Sfakhoy Sfakhoy Sfakhoy Sfakhoy Sfakhoy Sfakhoy Sfakhoy Sfakhoy Sfakhoy Sfakhoy Sfakhoy Sfakhoy Sfakhoy Sfakhoy Sfakhoy Sfakhoy Sfakhoy Sfakhoidny Sfakhoy Sfakhoy Sfakhoy Sfakhoy Sfakhoy Sfakhoy Sfakhoy Sfakhoy Sfakhoy Sfakhoy Sfakhoy Sfakhoy Sfakhoy Sfakhoy Sfakhoy Sfakhoy Sfakhoy Sfakhoy Sfakhoy Sfakhoy Sfakhoy Sfakhoy Sfakhoy Sfakhoy Sfakhov Sfakhoy Sfakhoy Sfakhoy Sfakhoy Sfakhoy Sfakhoy Sfakhoy Sfakhoy Sfakhoy Sfakhoy Sfakhoy Sfakhoy Sfakhoy Sfakhoy Sfakhoy Sfakhoy Sfakhoy Sfakhoy Sfakhoy Sfakhoy Sfakhoy Sfakhoy Sfakhoy Sfakhoy Sfakhoyalny Sfakhoy Sfakhoy Sfakhoy Sfakhoy Sfakhoy Sfakhoy Sfakhoy Sfakhoy Sfakhoy Sfakhoy Sfakhoy Sfakhoy Sfakhoy Sfakhoy Sfakhoy Sfakhoy Sfakhoy Sfakhoy Sfakhoy Sfakhoy Sfakhoy Sfakhoy Sfakhoy Sfakhoy Sfkhoy Sfkhoy Sfkhoy Sfkhoy Sfkhoy Sfkhoy Sfkhoy Sfkhoy Sfkhoy Sfkhoy Sfkhoy Sfkhoy Sfkhoy Sfkhoy Sfkhoy Sfkhoy Sfkhoy Sfkhoy Sfkhoy Sfkhoy Sfkhoy Sfkhoy Sfkhoy Sfkhoy Sfkhoy SfKHoy SfKHoy SfKHoy SfKHoy SfKHoy SfKHoy SfKHoy SfKHoy SfKHoy SfKHoy SfKHoy SfKHoy SfKHoy SfKHoy SfKHoy SfKHoy SfKHoy SfKHoy SfKHoy SfKHoy SfKHoy SfKHoy SfKHoy SfKHoy SfKHoy SfKhoy SfKHoy SfKHoy SfKHoy SfKHoy SfKHoy SfKHoy SfKHoy SfKHoy SfKHoy SfKHoy SfKHoy SfKHoy SfKHoy SfKHoy SfKHoy SfKHoy SfKHoy SfKHoy SfKHoy SfKHoy SfKHoy SfKHoy SfKHoy SfKHoy SfKNHoy SfKNHoy SfKNHoy SfKNHoy SfKNHoy SfKNHoy SfKNHoy SfKNHoy SfKNHoy SfKNHoy SfKNHoy SfKNHoy SfKNHoy SfKNHoy SfKNHoy SfKNHoy SfKNHoy SfKNHoy SfKNHoy SfKNHoy SfKN Hryshny SfKhyhny SfKhyhny SfKhyhny SfKhyhny SfKhyhny SfKhyhny SfKhyhny SfKhyhny SfKhyhny SfKhyhny SfKhyhny SfKhyhny SfKhyhny SfKhyhny SfKhyhny SfKhyhny SfKhyhny SfSfKhyhny SfSfKhyhny SfSfKhyhny SfSfKhyhny SfSfKhyhny SfSfKhyhny SfSfKhyhny SfSfKhyhny SfSfKhyhny SfSfKhyhny SfSfKhyhny SfSfKhyhny SfSfKhy hny SfSfKhyhny SfSfKhyhny SfSfKhyhny SfSfKhyhny SfSfKhyhny SfSfKhyhny SfSfKhyhny SfSfKhyhny SfSfKhyhny SfSfKhyhny SfSfKhyhny SfSfKhyhny SfSFgRySfSfKhyhny SfSfKhyhny SfSfKhyhny SfSfKhyhny SfSfKhyhny SfSfKhyhny SfSfKhyhny SfSfKhyhny SfSfKhyhny SfSfKhyhny SfSfKhyhny SfSfKhyhny SfSf Khyhny SfSfKhyhny SfSfKhyhny SfSfKhyhny SfSfKhyhny SfSfKhyhny SfSfKhyhny SfSfKhyhny SfSfKhyhny SfSfKhyhny SfSfKhyhny SfSfKhyhny SfSfKhyhny sflSfKhyhny SfSfKhyhny SfSfKhyhny SfSfKhyhny SfSfKhyhny SfSfKhyhny SfSfKhyhny SfSfKhyhny SfSfKhyhny SfSfKhyhny SfSfKhyhny SfSfKhyhny SfSfKHYN SfSfKHYN SfSfKHYN SfSfKHYN SfSfKHYN SfSfKHYN SfSfKHYN SfSfKHYN SfSfKHYN SfSfKHYN SfSfKHYN SfSfKHYN SfSfKHYN SfSfKHYN SfSfKHYN S/efSfKHYN S/efSfKHYN S/efSfKHYN S/efSfKHYN S/efSfKHYN S/efSfKHYN S/efSfKHYN S/efSfKHYN S/efSfKHYN S/efSfKHYN S/efSfKHYN S/efSfKHYN S/efSfKNYS/efSfKNYS/efSfKNYS/efSfKNYS/efSfKNYS/efSfKNYS/efSfKNYS/efSfKNYS/efSfKNYS/efSfKNYS/efSfKNYS/efSfKNYS/efSfKNYS/efSfKNYS/efSfKNYS/EFKNYS/efSfKNYS/efSfKNYS/efSfKNYS/efSfKNYS/efSfKNYS/efSfKNYS/efSfKNYS/efSfKNYS/efSfKNYS/efSfKNYS/efSfKNYS/efSfKNYS/efSfKNYS/efSfK NYS/efSfKNYS/efSfKNYS/efSfKNYS/efSfKNYS/efSfKNYS/efSfKNYS/efSfKNYS/efSfKNYS/efSfKNYS/efSfKNYS/efSfKNYS/efSfKNYS/efSfKNYS/efSfKNYS/ | | |
| 3πeκtrpničk Κηmdeρίι TyρmbicStbк Κηmdeρмнбipre Kɔkblckca Tactayfa
60lmaɪdʒi. ПаɪdanaHbɪnfaɪn эπeκtrpničk Κηmdeρίι 6θeλeK Jxɪnəpɑn, ось мakcat
γшɪn 6epiɪræŋ Kɔkblc Jxɪnəy opbɪndapbɪha Jxɪbepу kαжeτ. Kaɪta ΘeJdey 60bɪnɪsə
Keheç aany γшɪn Jxɪрriñkɪtɪ ekilneTTi opraɪndapfA Hemece dinepre xábaɪnacbɪhɪz. |
| θΗΠίι ΚολdaHap aɪdBɪnda
6aplbɪk Ḥχckaynpdɪ bɪ Okbɪn,
Tycɪnɪn, 6aplbɪk eCKeptuŋep
Meh KAYɪncɪdɪ KUχckaynpbɪN
Opbɪnʌdɪbɪz. | IPX1 | bɪnflaɪdən Kɔpflæbɪc DeHreɪi |
| *θΜβe6an:Tek Sterwins UP20,
Lexman UP20 Jxəne Dexter UP20
θΗΠεdερίmeν γιηειδmɪdɪ. | 87 | ДыБьС КуТыНВйКеплд i DeHreɪi
(2005/88/EC Tγ3eTy i 6ap 2000/14/
EC dɪpektɪBacbɪha cəɪkec
Tekcepɪn'ren). |
| θΗΠίι JxɑnБbɪp acMbɪHa Hemece
bɪnflaɪdʒi Jxερηρre KɔɪMaɪbɪz. | | ΚΑΥΙΝ - ΚολdApɪbɪcɪ3dɪ Jxγ3re
JxɑkblɪdʌTpaɪbɪz |
| Kɔpflaɪbɪc KθεɪnɪdiPirɪn Taɪbɪbɪz
Jxəne backa apHaɪnfən Kɔpflaɪbɪc
Kɔpflaɪbɪn Kniɪi3 | | Kɔpflaɪbɪc Kɔlflaɪbɪn Kniɪi3 |
| Kɔpflaɪbɪs ĀrK Kniɪm Kniɪn Jxþrɪniz | | Пайдаианушьɪ HúcKaylɪbɪn Okblɪn
Ubɪfblɪbɪz |
| БатAPEЯнbl 50°C-dan Təmēn
TempepaTyrada Naɪdɑlaɪbɪbɪz
Jxəne caKtʌbɪz. | | БәлшeКтЕмeɪzɪ3, Jxahʌbɪməbɪz3,
100°C-dan Jxɔfapbɪ TEmpepaTyrada
Kbɪ3dɪpMaɪbɪz |
| Eckenpyt: Kɔpən MOTOp ŒlşkeHHen
Keyɪn de Kecydi Jxɑlɪfactbɪpaɪdɪ | | Жакblɪn Maɪdaflbɪ aɪdʌmɪap aɪʌsaɪk
Tуруbl Kaʌket |
| Kɔpflaɪbɪs ĀrK MOTOp JxɛnlɪeppiHen
JxetKɪnɪkTi apɑkʌbɪkTbɪkTa
YCTaʌbɪz. | | Tok cory KauŋiN a3aɪTy γʌsiH, cy
Turiqɪs3eHɪz. |
2.3OCblHYCKAYIbIKTAFblBENJIIEP
| !! | Kayin Tурі көніе Көзі: Oсы{kayin
Тураліb eckeptуді саКтмay дeHe
Жарakatbɪha Hemece оліm're окellyi
МУМкɪH. | ! | Kayin Tурі көніе Kөзі: Бүл
бүлгі осы eckeptуді саКтмay
салдарынан Күрьлгыfa,
Коршаган opТаfla Hemece
Басka мүлінke зakсы кени
МУМкɪн'dirɪn көрстeti. |
| i | EckenTpne: 6yll 6eleni əнімdi Жаçсы
ТусінHy ушін Mahtызді aknapaTTb
Керстetei. | | Hүckayныktы Okынbl3:
6yll 6eleni пайданушы
Hүckayныktын Мүйят Okын
Шыfı kepektirɪn 6il'dipei. |
| X.XX | КiTаПшаньи сонындаы сөйkeс cypetті караньз. | | Бүлүйді кайтai он'deуге 6олады. Бүдэн bүлай пайдалану мүмін 6олмаса, оны КOKысты кайтai он'deу optaПы fын a.apaрыньз. |
| Өнімнін кajтамасын кайтai он'deнi3. | | Өнін hyскayль'tы кайтai он'deнi3. |
KyPbIJIbIbIH KAYINCI3ДIIT BOYbIHJIA JKAJIbI ECKEPTUNEP

ECKEPTY:OCbI 3JIEKTP KYPALbIMEH BIPRE BEPIITEN H BAPJIbIK KAYINCI3IKTEXHNKACbIHbIHECKEPTUJIPEIH,HYCKAYLAPDbI, CYPETTEPJI JXHE TEXHNKAJIbIK CNIATTAMAJLAPDbI OKbI IN bIFbIHbI3. TOMEHNE KOPCETIJIENH BAPJIbIK HYCKAYLAPDbI OPbIHdAMAY CAJIAPbIHAH 3JIEKTP TOrbIHbIH COfYbl, OPT LbIFybl JXHE/HEMECE AByIP XAPAKAT OPbIH AJIybIMYMKIH.
BAPbIK ECKEPTyIeP MEH HcKAYApIbI BOJALIAKTA KAPAY YLIHH CAKTAN KOnbIHbI3. ECKEPTyIePJIeI "JIEKTP KYPaJIbI" TEPMNHI 3JEKTP JEKICIMEH KYMbIC ICTENTIH (CbIMdbI) 3JEKTP KYPaJIbIH HEMECE BATAPEHbI bINlIPEdi.
2.4 KYMbIC OPhbIHbIH KAYINC13dI
- XYMbIC OPHbI TA3A OPI JXAPbIK 50JbI KAXET. XyMbIC OPHbIHJIAC HEMECE KAPAHbI 50JbI OKbIC OKYfAIAPbIH TAMDA 50JbIHA CEEBI 50JbIbl.
3NEKTP KYPALDAPbIH TYTAHfbIICYbIKTbIKTAP,FA3dAP HEMECE LHAH CNAKTbI 3ATTAP 50JIATbIH XAPbIJcKAYTI BAP
OPTAPDAIPIAIDAIANH5AHbI3.3JIKTP KYPARI DAPBI LIAHII BHEMECE TYIHITYTAHIDIPyBIMYMKINYLLKBIHDAPLILIFAPAIBI.
3NEKTP KYPALIBH IIMIADIAIHAFAH KE3JE, BAIJIAP MEH 60TIDE ADAMJAP AIIJAK TYPbI KAXET. BACKA HOPCETE AIAHJAY CAIJIAPbIHAN KYPAJIbI BACKAPA IIMAI KAUYbIbI MYMKIH.
ECKPTNE: Kayinci KylbInTay Tymeci Ke3deCOK icKeKocbIny KayinH a3aInTaDbI.
KypaIbI ΘLIIpy yIiH KOCY/θLIIpy ayIcTbIpbI-N-KOCKbIu TeTirIH 6oCaTbIbI3.
ECKEPTIE: Backapy Tytirihn FyhknqnaIapbl KHe 6ackapy Tytirih KInHaFaHnHaK KeiH KypaIdbkocy Hemece eWipy FyhknqnaIapbl (6ackapy Tytirih KOCY/OLIPy Tprrrp KockbIbbl kHe 6ackapy Tytirihn Kayinc3 KylbIITay Tymeci) bipJe60anaBl.

A6AJIAHbI3: KYPALIbI KAJIbIH BYTAFA CAJIbIN, OFAH KYLI TYCIPMEHl3. ETEP KY3DEP BAUYLACA, XbIJAMDbIKTbI A3AHTbIHbI3. KY3DEP KEITTEJIIN KAJCA, TPNIETEPDI DEPEY BOCATbIHbI3.
KENTTEJIHTEHKY3DEPDIIBOCATYYUHCAYCBiHB13IbIINAAJAHBAHbI3. KENTTEJIHTEH KY3DEP KEHET BOCAN, AByIP JAKAPAKATKA OKEJYIMMYKIH. KYMBIC KE3IHDE KY3OUBIFbIH YCTAMAHbI3 XHE BATAPEAAPKbIbIy KYMBIC ICTEITIH LIOI KECETIH KAIUBIHbI IANDAJAHSAFAH KE3JE DEOTKIP KNEKTEPDEH AJLJAK KYPIH3.
LJIeN KeceTIN KaIbHbIKocydbIH aIbIHda 6OC KymbIC aMafbIHda Tene-TeHdiKti caKTan TyPfAHbIHbI3Fa Ke3 JkETKI3IH3.
KyTuYmeci
Backapy TyTirIH XnHaFAHH KeiH Ieepin KeceTIH KaIbMeH Kymbc icTeydiH YJXymbc Kyi 6oanda.
Kymbic icten TypfaH KypaIbI bAckapy yuIH eH KaKcbI Kymbic KyiH TaHday YuHbAckapy TyTirihderi Kyu TynMecin HacbHbI3.
Paindanahy kayinci3diri 6oibHwa eceptynep:
- 3PbIP TIAIDAIAHAP AIIbIHDA OHIMDE XOHHE 3APRITAF bILU KYPALDA, COHDAI-AK KEPEK-XAPAKTAPDA 3AKbIMDAPbIH BAP-KOFbIH TEKEPIH3. OHIM 3AKbIMDAIFAH HEMECE TO3FAH BOJICA, OHBI IAI DAIAH5AHbI3.
- KEPEK-JXAPAKTAP MEH JXA6IbIKTAPDbIH IYPBIC BEKITJTEHH EKI PET TEKCEPIH3.
- OHIMI GPDAMbIM TYTKACbIHAH YCTAHb3. KAYITC13 BACKAPYbI KAMTAMcB13 ETV YLLH TYTKAHbI KYPFAK KYIHHDE YCTAHbI3.
- AYA KEJIDETIKILLITEPIIH 60EJIMETEHHE XGHE T3A EKEHIEK03 KEJIKI3H3.KAXET 501CA,ONAPbI XYMCAK KbJILLJAJKTEH
TA3AIAHb3. BITEIIEH AYA KEIETKILUTEPI OHIMHH Kb3bI IN KETYHE KGHE 3AKbIMDAITyBHa AGKEIENII.
TYPAKTBIKAJIbITATYPHBbI3XJHETENTE-TEHJTIKTICAKTAHbI3.
KATTbI KYLLJXYMCAmAHbI3.KATTbI KYLLJXYMcAY TEJI-TEHJIKTI KOFAITyFA OKEJIYIMMYKMH.IEICTE OPRdAMbIM KADAMdApbIHbI3FA HA3AP AVdApbIHbI3.
BARYJXPYI13,ELUKALUAH JXYTIPMEH3.BAPILIK DEHE MYLIJIETEPIH3JI KE3KENTEH XbIITbIMAIbI BOIIJIIEKTEPEH AIIJA KCTAHbI3.
TNTICTJXABIDIK BEKITIJINMECE,OHIMDIICKEKOCIaHb3.
- ΘHIMTE ELLUKAHDAI Θ3TEPIC EHI13BEH3 HEMECE OHIDIPYLJI YCbIHbAFAH 60JILUEKTEPDI HEMECE KEPEK-JXAPAKTAPDbI TAIJANAHSAHbI3.
KAVIITI JbIJIbXbIMAbI bOJIJIeKTEPDI KYPbIJfBi XEJIiDEH
AIXbIPATbIJIMAIbIHLLJxAJOHE JbIJIbIMAbI bOIJIUEKTEP TOJIbIK
TOKTAMMbIHLLJA YCTAMAH3

ETEP OHIM KYJIANI KETCE, KATTbI COKKbIFA YLIbIPACA HEMECE DIPIIIDEN BACTACA, OHIMDI DEPEY TOKTATbIN, 3AKbIMIIAUYIBIH BAP-KOFBIH TEKCEPIH3 HEMECE DIPIIIN CE6EBIH AHBIKTAHbI3. KE3 KEJIIEH 3AKbIMDAJFAH BOJIILJEKTI YOKIJIETTI KbI3MET KOPCETY OPTALbIFbIHDAXOHNEY HEMECE AYbICTbPY KEPEK.
AHHAIIMJIbI 60NIUKEKTEPHIN TIVTN KETYIVE BAIIAHBICTBI TYIHDAFAH JAPAKAT AUY KAYINI H A3AIYU YLIHN, KEIECI JAF DAJIAPIA OPRDAJBIM KPYBILFbIHbI TOKTATbI, BAPITIK XbIJIbIMJIbI 60NIUKEKTEPHIN TOKTAFAHbIHKAQ3XETK3IH13:
-TA3AJAYHEMECE BITEJIETHEKJEPIEPEI TAI3AJAY KE3HID
-OHIMDI KAPAVCbI3 KAIJIbIDIPFAH KE3JE
-TIPKEMEJIPEIOPHATNIACHEMECEAJbII TACTAMAC6yPBiH
- OHIMDI TEKCEPY, TEXHINKALI KbI3MET KOPCETY HEMCE BACKA DA
JYMYBCTAP JXYPR13Y ANIIBHDA
-ETEP KYPbIfbl KaJIbIcB3 IIPIJEN BACTAC (DEPEY TEKCEPIH3)
-KYbIFbIHbIH 3AKbIMDAIVbIH TEKCEPY YLLH BOTDE 3ATTIE COKtIfbcIH KAFFAHHAH KEMH
Kaalnb naaanaHy:4.1-4.9-cypeTTeP
YIKeHipeK 6yTaIapDbI yIKeH KJIeMDe Kecy KepeK 6oJCa, IeN KeceTiH KaIbIMeH JyMbIC icTeydi
6acTaMaC 6ypbH KaIbIbIpaK 6yTaKTapDbI (DnAmEtpi 8 MM-DeH yIKeH) KaJcETTI y3bIHbIKKa Kecy aIbIHda
KbIPKy KaIbIaPbIH HeMece 6acka KpyblfHbI NaIaIaNbHbI3. Ty3y Kecy yUH 6ytanapdbH bI TpyfAH IETepi apacbIHda Cb3bIK Jxpr3IN, Cb3bIK 6oBbIme KeciH3. Jx3dIH 5ap6akTBH cbIMbI HeMece ecimdkTHm TaPeKtepi CnKtB1 Jx3di 3aKbIMaI aIaTbIH KaTbI MaTePnAaH XacanFaH Ke3 KeIReh 3atne H tyicnereHine Ke3 KeTki3H3.
Kecy 60bIHwa KeHeCTep
1.Пишінdehy
6ytanap eki xafbHa taMeHRe Kapa Keheoi ywiH, onapdbI traneuia niwihnekecyKepek. CoHa TaMeHri XaFbHa da KaPbIK Tycedi. JaaNbI 6arblTay cb3bIfbI 6ytanap 6niktirih ap6ip1 MeTpine LkaKaHa dla WamaMeH 10cm enic Typinde 6oJabl.
- Kecypertiniri
AJIbIMeH eki KafbIH, TMeHri KafbIHaH 6acTan, YcTIHri KafbHa Kapa KeciH3: coHda KeciIreH 6yTaKTap Kymblc OphbHb3fa KynamaJdbI.
3.Yctih kecy
bTyakTap TbIM y3bH 60bn ECKeh Kepde, 6yTaHbI 6ipHeUe KaadamHe KeciH3. KbicKa keciIreH 6yTaKapKomnocT yLHJHKapaIbI.
PaiandaHyaHKeiH
TheMdi eLipin, cyblbHbI3.
TemeHnde cInaTTanFaHdai eHimDi TeKcepiH3, Ta3aJahb3 XHe CaKaTaHbI3.
5. TACbIMAJIAY
KypbIbHbI TaCbMaIy aeiH3re TaH 6eJIiI bip TaanTapFa cai 60nybI Taan eTy i MyMkiH. TaanTapDbH 6apbIbH opBnay yuH eniH3iH eKinetti opraHdapbHa xa6apnacbl, OanpaHbH opBnHaTaHa Ke3 KeTki3iH3. TaCbMaNay Ke3Hderi TempePata "CaKtay" TapaybHa beepilreH TempePata aykbmbHa H TBc emecirHe Ke3 KeTki3iH3
5.1 KYPbIJIfblHbI TAcblMAJlAY
HIM i eipin, 6atapehbl tobik 3apraTahbi. Ky3 Ka6bH 6ektiH3. ΘHimdi Ke3 KeIreH aybp biknlaan Hemece konik iuiH de tacbimanay KeiHne naJa 6onyu MyMKIn KaTTb i dipinH Kopfahbl3. ΘHIMHH cbipfn Hemece Kylan Ketye H konl 6epmey yuHn OHbl 6ekitiH3.
6. KblCTAY
Tomehderi «CaKtay» TapaybHdaIb 6apbIK HcyckaynapdbOpbHdaHbI3. Bi3 eHIMdi caKtay YwIH TynHcka opamDbI naJaIaHaYfA HeMece Obl IaHaHaH Kopfay YwIH XkapamDbI MaTaMeH HeMece XabHMeH Xabyfa KeHeC 6epeM13.
7. CAKTAY
KypblfblbTek Ta3a, Kypfa, KkaCbI JeNdeTineTih Keppe 4^ - 24^ apalbfbldaBbTeMnepaTypada caKaTbH3. Ohb KocbIMwa KopfaHbcnEh KaTAmcbl3 ety yuH jaybIn KObHb3. bi3 eHimdi caTay yuHtynHycKa opambl naHaJaNHyFa Hemece OHbl uHaHaH Kopfay yuH japaMdbi MaTameH Hemece kabHmeh kabyfa Kehec 6epem3. KypblfblbTaCbImdny Ke3HneMHdtTIypde 6ekitihi3
7.1 KYPbIJfblHbI CAKTAY
6.1 -cypTe
3NeKtp KypanbH eUipiH3. KypblfBda To3faH, 6ocan KeTkeH Hemece 3aKbIMaIFaH360nIKTeepiH 6ap-koftbH TeKcepin 5bIfbHb3. KypblfBhlCaTay anbHda Ta3aIaH5bIfbHb3. OHIMdi KYN Ceyneci TycetIH Xepre KOImaHb3. OHIMHI CybIK JxHe bInFaHbOpTaahApdaBim KopfAnFaHBHa Ke3 KeTki3iH3.
8. TEXHNIKAJIblK Kbl3MET KOPCETY

KAYIN! TOK COFyIaH JXAPAKAT AJY KAYII BAP. 3JIeKTP KYPALbIH PETTEV, TEKCEPY, TA3AJAY HEMECE CAKTAY AJIbIHDA OllIPIH13.
8.1 TA3AJIAY
5.1 -5.3 -cypTRep
BapnbK caKaTaNbIbPbIbW KypblIbIaIbpI, KeIeTeTy caHbIaayIbpH KHe K03faNTkbIbKopnycbH KOkbc NeH KipdeH Ta3a YcTaHb3. Ka6blIKbIb W6peKeHn XHe/HemecKbICbIMdJaHaH ayameH Ta3aHaHb3. KypblIbHbIbOp paNdaHaHaHaHaH KeiH Ta3aHaHaH KeH.
Ta3anaftbIw KypanapdbI KOndaH6aHbI3,ce6ebi onap nlaactnke acep etin,6aTaper apkblbl JyMbic icTeiTH wen KeceTI H KaIWBihK KypbblmbIK 6YtIHirH NaapLaTybl MyMkiH.
Ky3eepi Ta3anay MeH MaIay
KoJn JbIbn TImDi JxHe JxHIn JxMlbicTb KaMTaMaCbI3 eTy yUin, LbIpbl Ne H KOKbc JxHaHbIn KaIca Hemece oMip cypin JxKaTkaH JxepiH3 KymDbI 60nca, Jx3di Ta3anan Tpy Kepek. Kokbc eTe yNKeH 60nca, Jx3di 5bIapBn Any KaKet 60nyb MyMKIn. Oha naiDalahy Xhe Jy3di H KbiMeT eTy Mep3imH y3apTy yUin, ap naDalaHy anDbIHda Hemece naDalaHydah KeinH, 6yTa KecklSti MaIIaHbI3. OHIMDi TOKtaTbHbI3. BaTaper apKbIbI JxMybIC icTeuTH Wen KecetIH KaIbHbI Teric 6eTke KObHbI3. YcTHi Jx3X NneriHIN 60bIMeh XeHIN Ohim MaBih KaFbHbI3. Erep baTaper apKbIbI JxMybIC icTeuTIH wen KeceTIH KaIbHbI y3aK YaKbIT 60bl NaJaIaHaTbH 60nCaHbI3, Jx3di KaIta MaNlay yUin JxMybICtB MeP3imDi Tpyde TokTay YCbHbJIaDbI.
ECKEPTIe:BATAPERAPKbIbIXyMbICICTEITIHJIOJIKECETIHKAIIbIHbIXyMbIC ICTEN KATKAHDA MAJILAMAHbI3.
8.2 AYbICTbIPY
Ky3depi opHaJaclbipy MeH aybICTbipy 2.1-2.9
BaTape apKbIbI JxMbic icTeiTih 6eKecTeIH KaIbIeki e3apa aybcIbipIaTbIH Jx36eh
JXabIKTaTaNFaH. ByTa KeckIiX Jy3 6yTa MeH 6yTaKaIaIapDbI Kecyre apHaIFaH, an BaTape apKbIbI JxMbic icTeiTih 6eKecTeIH KaIbIe IeN XeHe 6yTaIapDbI XiHiIiKe Kblbn Kecyre
apHaIFaH.
1.Bepik Xepide 6ip KOnMeH yctan, 6aTape apKbIbI JxMbIC icTeiTH Wen KeceTIH KaIuBihb TENKepiH3.
Ky3 KaKaIbIbIH TaKaTaNbIaBbI aKbIpbIH KeTeepi, KaKaIaNbIHFaHlHa apTbHa bICbIpbIHbI3.
2.Batapera apKbIbI Kymbc icTeiTih Wen KeceiTn KaIbI KypbIbnCbHaH Xy3diH WeTiH KTepey apKbIbI KY3di aKbIpbH aNbIH bI3.
3.Motop KopnycbHbH Heri3iHe KaKeTTi Ky3di Kipri3iHi3.
4. 46ekitkiu tiKayinci3ophaanactbipy yuih TypanaHbi3. Ky3diH opTacbHdaftb 6epinic 6iniri de TypanaHykepK.
5.Ky3 opHbHa KoBbIrfaHHaH KeiH, KY3 KaKNaFbIH MOTOP KopnycbHbH Heri3iHderi OyblKTapbImEHTypaHaHbI3.
6.Ky3 KaKaNaFbH cbPfblTbn, opHbHa cbPT eTIN TycKeHwe anFa nTePiH3. BaTape apKbIbI KMybcicTeeTIH wen KeceTIN KaWbI naJaAnaHy WsiH daMbH.
Ky3diany
1.Bepik Kepie 6ip KOMMeH yCTan, 6atape apKbIbIy MybIC iTeiTH Wen KeCetIH KaUbHB TeHKepeH3. Ky3 KaKaNaBbIH TaKaTaNacbIH aKbIPbIH KeTePIn, Ky3 KaKaNaBb IaNbIHFaHbApTbHa bCbIPbHbI3.
2.BaTape apKbIbI Kymblc icTeiTH Wen KeceiT H KaIbI KypblfbcHaH Ky3diH WeTIH KTepey apKbIbI KY3di I AkblpblnAbnHbI3.
3.Ky3i6eKiTy yuH IN «Ky3eepi opHaIaCTbIpy MeH aybcIbpy" 6eJIIMiHi2 - 6 KaIaMdapbHOpbIHaHbI3.
Backapy Tytirih KHHay
ECKETTNE: Bacekapy Tytirih XnHay Kymbic TaNa6bHa TayeenDi 6oJa.
- Batapea apkblb jymbic icTeiTH wen KeceTIN KaIuBihb 6ackapy TytiriHn OnbfbHa kipri3iH3.
- BaTapeApKbIbI Kymbic icTeiTiH IeN KeceiT H KaIbIbIH po3eTKacbiHa backpy TYTirIH aAcbH KaIfahbl3.
3.AbnTacTay ywiH 6ackapy Tyirih aAshaBHaXbIpaTbn, 6aTaper apKbIbJ Kymblc icTeiH Wn KeceTIN KaWbHbO bIKTaH anBn TactAhB3.
8.3 BÖLJI山JEKTEJIΓEHN KÖPIHICI

| Сатын Any opны | СИПATTAMACbl | CAHbl | КОСАЛКы IБОЛшЕКТЕРДИН,ЖAPAMДыЛыкЖылДAPbl |
| 2 | электонодьк Курамдастар | 1 | 5 |
| 3 | Батуэрны яkinay | 1 | 5 |
| 4 | Жылумен Тартылaitын Кубbl | 0,02 | 5 |
| 5 | эздігінен оятын 6уразда | 2 | 5 |
| 6 | Сол жak корпунс | 1 | 5 |
| 7 | Тутka триг复发ин серіпесi | 1 | 5 |
| 8 | 2-туг复发 Коссыbl | 1 | 5 |
| 9 | Сэндік kaкпak | 1 | 5 |
| Сатын Any opны | СИПATTAMACbl | CAHbl | КосалкblьөлшЕКТДИН
ЖAPAMдылblжылдapbl |
| 10 | Мотор | 1 | 5 |
| 11 | Шаftын Тершік | 1 | 5 |
| 12 | Буразда | 2 | 5 |
| 13 | Берлис коравы | 1 | 5 |
| 14 | ТerICTeY Тесемi | 2 | 5 |
| 15 | Косалкbl TEREPшік | 1 | 5 |
| 16 | Е тэрізdi TOKтАТьlliSCaКинa | 1 | 5 |
| 17 | Улken TEREPшік | 1 | 5 |
| 18 | Он жak корпuc | 1 | 5 |
| 19 | Сортыш kілмшe | 1 | 5 |
| 20 | Табан | 1 | 5 |
| 21 | Жуздін Корfaныс
Жалгасылшы | 1 | 5 |
| 22 | Тоітarama | 3 | 5 |
| 23 | Жуз icstiri | 3 | 5 |
| 24 | Жогары Jжуз | 1 | 5 |
| 25 | Төmenгі куз | 1 | 5 |
| 26 | Кайшы Kaibs | 1 | 5 |
| 27 | Кайшыны Бекітuy icstiri | 1 | 5 |
| 28 | Жогары Lлөр
Кесетін Кайшы Jжуз | 1 | 5 |
| 29 | Төmenгі Lлөр
Кесетін Кайшы Jжуз | 1 | 5 |
| 30 | Зэрдагылsh Kүрал | 1 | 5 |
| 31 | Розетka Күлары | 1 | 5 |
| 32 | Күлыntay
батырмсы | 2 | 5 |
| 33 | Күлыntay 6atbypma
серіпесi | 2 | 5 |
| 34 | Жыл汞men
Тартыларын Күыр | 0.06 | 5 |
| 35 | ПышakЖинавы | 1 | 5 |
| 36 | ПышakЖинавы | 1 | 5 |

KAYIN! TOK COFYDAH JAPAKAT ALY KAYNI BAP. ECKEPTY! KE3 KEJIIEH AKAYIbIKTAPDbI XOIODAH bYPbIH OHIMDI OLLIPIH13.
10. KOPLJAAFH OPTAHbI KOPFAY
3JNeKtpnIK eHIMdepIN KANDbIKTapBIn TpyMbICbIK KOkbIcKa TAcTayfA 60MaNdbI. EyponaIbIK 6bapeaIapFa KaTbCTbI DnpeKTNbAfa CαNKeC, aKaybl 6ap Hemece NaIdaNaIbIHaN 6batape 6bOKTapBn/6batapeIapDbI 6eNEK JINHAp, KopShaHaOpTaFA 3N8K KeTIpMeiTH JQOMHe KOKbIcKa TAcTay KaKeT. KaDeRe JkapaTyra apHaIIaH apHaIIb MeKEmepe 60IcKa, KpaIbI bKaIe Re JkapaTbHbI3. KaDeRe JkapaTy 60bIHwa KeHec any yuH JkeprinikTi oKlneTTi opraHdapRa HeMece cayda opHbHa xabapNaCbHbI3. OhJI KOpShaHaOpTaFA Kepi acepiH Ttriz6ey yuH kaiTa eHdeNi I HeMece 6eIWeKeTei. Batape 6NoBtBuH/6batapeJaapDbIH KypamblHa Kayinti 3aTAP 60NaTbHdbIKTaH, onap KopShaHaOpTa MeH aadAm DeHcaylbfbHa Kayin TeHdipyI MymKiH.
11. KENIIIDIK
11.1 bI3dIH KENIIIDIGIMI3
STERWINS əHimdepi TybIHy HapbIbIbIh EhIMdepihe apHaIraH eH Jozapbl Cana cTaHdapTTapbHa cAkec XacanfaH. ByI caty KeiINdi IeHIMdi catbI anfah KyyHHeh 6actan 5 Kbl 6oIby XapaMdbI. ByI KeiINdi MATEpnaIadap MeH canaF aBnlaNbIcTbI 6apnbIK akaynapFa KOJIaHbIaNabI: JeTeICneTInH 6eJWeKTEp MeH 3JeMeHTepre, coHda-ak KaIbINTbI naJaIaNhy KaFdaNbIHa 6ObaTbH 3aKbIMdApFa. KeHDey XeHe 6eJIWeKTEpDi aybICTbpy caIdapbIHn 6bacTankbI KeiINdi Ke3eHi y3apMaIdbI. C13 6yI eHIMdi catbI anly Ty6ipTerih XeHe catbI any KyHIn YcBHa any bHbI3 Kepek. KeiINdi OcbI eHIMHH KyHbIme HweKeTenei.
11.2 KENIIIKTE KAMTbIMAIaMThbIN JKAfDAIJIAP
HIMI dypbic naiaaHaaydaH TybHaaTbH akaybIKtap Hemece OKifaap ocbl KeiinikTe KaMTbImaIbl.
KeinDikTe KeNeci KaFdaNap KaMTbImaIdbI:
KypaIbIHpybIC naJaIaNbIMaybi;
-6yIeHIMdiTacbMaJday Hemece opHaTy Ke3iHne NaJda 60NaTbH 3aKbIM;
- yuHui TapanneH Ky3ere acbipbnfah 6eIWeKTepei XeHney XaHe/Hemecae aybictbipy KMybICTapbl;
- CbIPTKbl KaTOpJap HeMece Kym, TaCTap CnAaTApJbTb6e3aTTapHaT TybHJaFaH 3aKbIM;
- Kayinci Teknik MeH NaandaHy HcayapbH caTamay caIapbHaH 6oJFaH 3aKbIM;
Kpaandbin6oIwKeTenyi Hemece aIbIybi;
-biIfaiOpTaia(LbIK,kaH6bIp,cyfa6aTbIpblfah,T.6.)naIdaHaHbIfaHkypaI;
-Kcci6mMaKcaTTa naJaIaHaH KypaJ;
«CaKtay» TaaybHnda KepcTeIReH ayKbIMHaH TbIC TeMnepaTypa ocepHe yUbipaHaN Kypan.
HIM KaIbITbJ KMyBc JKaTdaiNapbIHda KHe Kc6iE mEc MaKcTAPda NaIaHaJIybl Tnic. CoHbIKTaH OcbI KeiINdiKke 6ay-6aKlAmeh aHaNbICaTBH KOMnHaHnIap, XeprinikTi AkiMUsiK JxHe Jka6DbIKtbl aKbIbI HeMece aKbICb3 Jxanfa 6epTeH KOMnHaHnIap NaIdaJaHaTbIH eHIMdep KipMeiDi.
Mace He Mece akay TybHdaFaH KaFdaIa, aPdAaIM aIbMeH Sterwins dInepiHe xaapnacy kepek.KeN KaFdaIa
Sterwins dinnepi mocenehi ueyre Hemece akaydbI ty3etyre kabineTTi 60ana. LIoT-phiKtypaHbI Hemece Ty6ipTeKTi caKaTaHbI3: 6yn KxKaTTap IaFBIM JkacaFaH Ke3de Kepek 60ana.
ДякуемВамзвибipцьоговорosity。Pozpoobny Ta BnroTOBnaHnHaU npOdyKciIO, MнДokладаemOBcix3ycuNb,zo63a6e3neuHTN BiDmIHHy kicTb,ka BiNObiJa eNotpe6am KopncTyBaivI.ДotpmaHHaXInCTpyKciJ Do3BOnITb ONTmIm3yBaTN TepmiCny6n.
BAXJIHBO!ДЛЯTOROUOBCEINBNIPIIIOBHICTHO3AIOBOJbHAB BACПДЧАС HANALUTYBAHH,BNKOPNCTAHNA TOBCLNYOBYAHN,MNPEKOMEHIDyEMO YBAXHO IPOYNTATU CEINIOCIBHNI KNEPED BNKOPNCTAHNM BNUPOBy. ByIb JIACKA,3BEPHITb YBARY HA NONEPEDJXEHHIQUO BOEKN TA 3BEPEKITb CII INOCIBHNIДЯ NOADJIbLIOB NKOPNCTAHH.N

BAJKIINBO! 3BEPEXITb LII NOCIBHNKДЛЯ ПОДАЛБЛОTO BKNOPNUCTAHн: YBAJKHIO ПОЧNTАТЕ
3mict
- BnKOpNCTaHHa 3a npN3HaueHHa makymyIaTOpHnx rA3OHHx HOXINCb
2.Правида Тхнік 6e3пекn
- TexhiuHa
- CknaaHnA
- TpaHcnpTyBaHHa
-
36epiraHHB3IMky
-
36epirahnra
8.Доглар
- KiHeuB TepMHy cnIyX6n
- rapaHTiA
1. BKNOPNCTAHHЯ 3A IPN3HAUECHHЯKUMYJIATOPHNX RA3OHHNX HOXNUcB
Ley Bnpi3NaHEn TjBkn DnBnKOpNCTAHHa BiDkPntomy nobITpi. He BnKOpNCTOByIe NOrO BCEpeHi6yIbI 3aXoDnHexOcbTaN.HAcymJrTporHi Ra3OHHi HOxNt i nBnKOpNCTAHn TjBkn B cyuxi I do6pe OCBiTJeHNx yMOBX. Lc AkyMJIrTOpHi ra3OHHi HOxNt i np3NaHe HtiBkn Dny NiDi pI3yBaHN JKBONlOTIB, YarapHNI KIB I TpaBN, Ta ix MoKHa IerKo BnKOpNCTOByBatn y BaWOMy caNy. He BnKOpNCTOByIe ix dIy IHsIXzIeN.CiI DiOpIMyBaTnc 3NaueHHMaKcImaIbHOi NotyKHOCTi pi3AHN. 3a6OpOHETbcR pi3Atn rIKN 3 NotyXhICTeIOHcTpymEHTA, 10 nepeBUNUe BkA3aHy. Bni6 He np3NaHeHn DnBnKOpNCTAHn DITbMn a60 OC6aMn 3 O6MeKeHmN f3NuHMn, po3yMOBmN a6o CEHCOPHmMoKJINBOCTAMN.
P03nAkyBaHn ynaKOBKn nepeKoHaTecra B HaaBHOCTi BCbOro npuJaIaIy, IIO BXoINt b y KOMnEKT (JkTo Take e). JkUO Bnpi6 POnKoJKeHn a6o Mae 6ydb-RAKNI DeΦeKT, He BVNKOpNCTOBynte NOro Ta NOBepHiTB NOro CBOEmy DInlepy.
Akyo Bn daCTe ue iHctpyMeHT HsIM JIOdAm, daTe IM TAKOJKUHcTpyKciio.
3BepHt b ybary, 0e iHcTpMeHT He npn3haueHn dIy B NKOpncTaHHB KOMepuHnx, Toprobx a6o npomcnobnx ciJax. Tapaantia 6yde anylboBaHa, kUso iHcTpMeHT BNKOpncTOByBaTmEtbCBA KOMepuHnx, Toprobx, npomcnobnx a6o cxOxnx ciJax. Cei Bnpi6 6ybP3pO6JIeHn dIy BNKOpncTaHHN pOToTgrom 6 pokib (ouikybaHn Tepmin cnyk6n).
2. ПAPВИАТEXHIКБE3NEKIN

PONEPENJXEHH: PPOUYTAITE BCI PONEPENJXEHH LIOI OTEXHIK B3NEKN.TA IHCTPYKLI. HEOTPMAHH PONEPENJXEHb TA BKA3IBOK MOXE CTATN PPNUHOYUPAXEHH EJEKTPNUHM CTPYMOM, PONEXKI TA/ABO
BAXKOIT TPABMN.
36EPIAITE BCI IONEPEIXEHHRA IHCTPYKII JIJI NOJALBLOTO BHKOPNUCTAHNIA.
2.13AΓaJIbHI IIPABNJIa TEXHIKn Be3IeKN
HE BVKOPMCTOBYTE FA30HHI HOXMIJI IOPY 3I CKJIHIMN OTOPOXAMN, ABTOMOBJAMN, BAHTAKIBKAMN, BIKOHIMN KOIOIOIA3AMN, BIIDBAIANM TOLIO BE3IPABNJIBHOPEYIHOBA UJII BKKMDY.
HEIIOABAHTE3CUNIbIHEIIEPEBAHTAXUYATEBIMIB.BIH BYIIEIPIALIOBATINKPAUJIeTABE3JIENHILLIE,RAJILOJIOIOTBIKNOPWCTOBYBATNI LUBNIKICTHO,IJIRAKOIBIPO3PAXOBAHM.
JAKLIO BIMIPB BJECKNJADEHNIPEEPI NOTO BIKOPUCTAHNMR JAKLIO
BVIIP TPE6A CKIACTN CAMOCTIHNO, TIOCTRA BMDAJIEHNA YTAKOKKN TEPEKOHAITECSA, LIO BCI ELEMHTN, LIO NTOPI5HI DIA HAIALLITYBAHHN LAOTOBVBIPOBY, C B KOMNIKEKTI. AKLIO BVIIP TOLIKODJEHMI ABO MAE DEOEKTI, HE BVKOPMCTOBYTE MOTO TA TIOBEPHITb MOTo DO HAMBLINXQHO MAF3INHY.
TEPMH "EIEKTPOIHCTPMEHT" YIIOPIEJXHEHHX CTOCYtbcRA EIEKTPUHOTIO IHCTPMEHTA, LIO IIPALIOC BID EIEKTPOMEPEXI (HEPE3 LIHYP) A50 BIД AKYMILTAPOA (B6E3 LIHYPA).
2.2 CIMBOJIH HABNPOBI
PONEPEIXEHH: PPOHTAITE BCI PONEPEIXEHH, IHCTPYKlII, O3HAJOMTEcR 3 IJIIOCTPAUIMN TA TEXHUYHMN DAHUMN, JAKI DODAOTbC RDO EJEKTPOIHCTPYMEHTA.
HENDOTPMAMHH HABEDEEHX HIXKYE IHCTPYKUIM MOXEPIN3BECTNI IO YPAXEHHRA EIEKTPNCHM CTPYMOM,IOXEXI TA/ ABOCEPN03HNX TPABM.
36EPIAITE BCI NONEPEIXEHHA TA IHCTPYKUII JIY IIOJALBLOTO BMKOPNCTAH. TEPMIH "EIEKTPOIHCTPYMEHT Y NONEPEIXEHHAX CTOCYETbCRA EIEKTPINHOTO IHCTPYMEHTA, LIO IPAICIOE BID EIEKTPOMEPEXI (YEPE3 LIHUP) ABO BID AKUMYJIATOPA.
2.4 B63NEKA PO6OoI 30H
- POBOYA 30HA MAC BYTN YI CHTOIO TA DOBPE OCBITIEHOIO. HETIPMBPAHA A50 ITOFAHO OCBITIEHOA POBOYA 30HA MOXE CTATI PPNHIO HO HELLIACHNX BIMADKIB.
HEIPIAUOITE3EINKTPOHCTPYMEHTOMY BMSXHOHE63NECHOMYCEPEIOBNIUHANPMKIAID, Y IIPCYTHOCTIIETKO3AIMMCTHXPIINH,TASIBAB0TIIMLY.II
2.5 EJNEKTPOBE3NEKA
- LITENCEJIHBIUKN EJIKTPOHCTPUMEHTA MAOTb TINXODMTN IOPO3ETOK.3ABOPOHEHO MOIDIKYBATNI LITENCEJIbHY BUNKY BUYIb-YKMM YHOM. HE BUKOPMCTOBVITE XOOHNIEPEXIDHNKII P05OTN 133AEMLEHMM EJIKTPOHCTPUMEHTAMN. BOKPWTAHN OPWTHAIJIbHOI LITENCEJIbHOI BUNKI TA HAIJEKHOI PO3ETKMI MEHLIYUC PI3NK UPAXEHHH EJIKTPWCHIM CTPYMOM.
- YHKMATE KOHTAKTY ACFTHI TIIA I33A3EMTIEHMNIOBEPXHAM, TAKUMN KTPVbN, BATAPEI, PINTNTA
YACPO6OTN EIEKTPHOHCTPYMEHTNYTBOPHOITb ICKPN,AKIMOKVtB TIPN3BECTN DO 3AIMAHHNIPIIV ABO BNTIAPIB.
HE DONYCKAITE BIM3bKO DIITEI CTOPOHHIX PIIU YAC PO6OTM 3 ELEKTPOIHCTPYMEHTOM. CE MOXE BIIDBOJIKATN BACI IIPMN3BECTIN DO BTPATNI KOHTPOJIO.
XOJDMJIbHmK.N. YPA3I 3A3EMTEHH TIIA 3BJLILVCTCBc PVMJK YPAXEHH EJEKTPWCHM CTPYMOM.
HE 3AJLIIAJATE EJIEKTPOIHCTPymeHT PIDOLUEM ABO BYMOBAX PIIIBNUEHOI BONTOCTI. BOJA, LIOIOTPAIMNA B EJIEKTPOHCTPymeHT, PIIIBNILUCYPM3NK YPAJXEHHRA EJIEKTPWCHM CTPYMOM.
HE BIKOPUCTOBYITE LHPY XMBLEHHRA 3 IOPPYUEHHRM HOPM EKCIPLYATAUJI. HKONIM HE BIKOPCTOBYITE LHPY XMBLEHHRA
JIJIIEPEHECEHHH,IEPETAYBAHHJ EJEKTPOHCTPYMEHTA ABO BMMAHNNBILIKN3PO3ETKN.3AXUAAITE LHHYXMBIIEHHBIBII TEPIIA,OIII,TOCTPMX KYTIB ABO PYXOMNX YACTMH.
TOLIKOJXEHI A603ATNVTAHI LUSHYPM XMBTEHHH 3611bLLUYOTb PM3NK YPAXEHHH EJEKTPVHHM CTPVOM.
- PPMPOBOTI EJIEKTPOIHCTPYMEHTA HA BIDIKPNTOMY IOBITPI BMKOPMCTOBYUITE NOIOBXXBAH,ДЯЦБОТРМ3HAUYH.
2.6 INДИВIDУАЛБHA TEXHIKA Be3ПЕКИ
ПИД YAC P6OToN 3 EJKTPOIHCTPymeHTOM BUDte YBAxHI, CTEXTE 3A CBOIMI DIAIMTAMMCITb PO3CUDIMBO. HE IPIALIOITE 3 EJKTPOIHCTPymeHTOM, RAUIO BV TOMJIeH, INPEBvBACTE PIIIDIO HAPKOTWHNX PEoBH, AJIKOTIO ABO PIKIB. HABITb MTTCBA HEYBAxHICTb IIN YAC P6OToN 3 EJKTPOIHCTPymeHTOM MOJE PIPIM3BECTIN DO BAxKOIT PABMI.
KOPNCTUYTECb3AC06AMn IHINMBIDYALHbHO 3AXNCTy.3ABKIM HADIATME 3AXMCHIOKYIAPN.BNKOPNCTAHNBy BIDIOBIDHX YMOBAX TAKNX 3AXMCXHIX 3AC06IB,AKIPOTINIMIOBNI PECTIATOP, HEKOB3HE 3AXNICHE B3YTJ,LLIONM-KACKA T A HABUYHNI KDOIOMOXE 3MEHLWNTIN P3NK TPABMYBAHH.
- YHMKAITE BIVIADIKOBOTO 3ATYCKY IHCTPYMENA. PIIPLHIX PIIDKIOUATN EJEKTPOIHCTPYMEHT DO MEPEXIK JXNBIEHNHA OAO AKMYIATOPA, BPATN ABO IPEHEOCNTN IOTO, IPEBIPTE, YBCCTAHOBIEHO IPEEMNKAY YIIOJOXEHHA "BIMKHEHO". RKLIOI PEHEHCOTN EIEKTPOIHCTPYMEHT, TPIMAIOUYI PAIELiB HA IPEEMNKAIJ XJMBIEHHN, ABO IIDKIOUATN MOTO DO IJXEPEIAJ XJMBIEHHN, KOJI N IPEEMNKAY XJMBIEHHN IPEEBVBAIC B IIOJOXEHHI "YBMKHEHO", LE MOKE IPIIN3BECTN IO TPABMYBAHHN.
IPEUHIXYBIMKHYTN ELEKTKPOIHCTPYMEHT,3HITMB YCI PETYIKOBALHI KJIINHJI TA TAIKOBI KJIIOUJ.RAKLIQ 3AJIIMLWTN
BKKOPVCTAHHHIPOOBKYBAHA,IPM3HAVEHOIIN3OBHILIHIXPOBIT, 3MEHLUYPCN3IKYPAKEXHHEIEKTPMHCMCTPOMM.
IAKUHOHEMOXJIHBOYHMKHUYTHBVKOPNCTAHHH ELEKTPOINCTPYMEHTA YBOIOTOMYIPMIMILCEHHI, BHKOPNCTOBVNTPEPNCPTPI3AXMHOTOBIDKJIOUEHHA (T3B). BHKOPNCTAHHH TAKOTO PNPCTPOIO3MEHLJYG PV3NKYPAXEHHH ELEKTPUHMMCTPUMOM.
TAKIM KJIIOH HA PXYOMI YACTMH IENEKTPOIHCTPYMEHTA,LE MOKE TIPV3BECTN DO TPABMYBAHH.
- HE DOTYAYTECB 3 IHCTPYMEHOM BYKAX. 3ABXJIN 3EBPIAITEI KE IIOXGEHHI TIA TA TPIMAIET PIBHOBYAT. UDEIO3BOJAE KPAUJE KEPYBATNI EJEKTPOIHCTPYMEHOTYM PA3I BUNHKHEHHI HENPEIDAHYBAHIX CHTYALII.
HADATATE BUIDIOBIDHM OJIT. HE HADRAIATE BILHBHM OJAT ABO IPRKPCN. BOLOCC, OJAT TA PYKABUN MAOTb BYTN HA BE3NEUHIM BIDCTAHI BIDPYXOMNX YACTNH. BILHN OJAT, IPRKPCN ABO IOBTE BOLOCCA MOXYTB IOTPATNTIN BY PXYOMI YACTMHN.
- Y PA3I HABHOCTI PIPNCTPOIB DIIA TIIKJIOUOEHHCA NCTEMMBIDBEJEHHRA 36BPAHHA TINIV,IX CNIID OOB'3KOBOB BCTAHOBATNA BMKOPNCTOBYBATN 3A TIPN3HAUEHHAM.BNKOPWCTAHH YA PIMCTPOIO DIIA 35BAHHA TINIV MOKE 3MEHLUMTNHEBE3TEKV,PIOB'3AHY 3TINLOM.
HE BTPAUYIte YBAJXHOCTI YEPE3 3ACTE BMKOPMCTAHHIAHCTPYMEHTA.UE HE JO3B0JIbT BAM PO3CJIaBNTcRA TIPOIT HOPYBATNI PIMHUNTI MTEXHIK 5E3NEKNI.HEOJEPEXHHI DIIMOXYTB MMTGBO IPIN3BECTIN DOCEPIO3HXI TPABM.
2.7 BKNKOPNUCTAHNA TAOJNIA 3A EJEKTPOIHCTPYMEHTOM
- HE IPEBAHTAXUYTE EJEKTPOHCTPYMEH. BHKOPMCOTBYITE HAIJEXHM EJEKTPOHCTPYMEH BIDIOBIDHO IOIOTPE6N. IPIPABILHO PIIIBPAHNI EJEKTPOHCTPYMEH DITOMOXE KPAUIE TA 5E3NE4HIJIIE 3POBNTIPO8OTY 3IWBINKICTIO,RAKA JINIA HbOTo IPEDEBAUEHA.
HE BHKOPNCTOBYITE EIEKTPOHCTPymeHT,AKLIOIPEPMKAY HE BMNKAC ABO HE BMNKAC HOTO.YCI EIEKTPOHCTPymeHTM
JAKIMHHEMOXIVBBO KEPYBATN 3A JOIOTOMOFOIO TEPEMNKAACTAHOBITb HEBE3PIKV TA IOTPEBYOTPB EMOHTY.
- PEPLI HIX PPOBODINTI BUYB-RAH HAIALLUTYBAHH,3AMIHOBATN
PIMIAIDIA, A TAKOX PIEPED 35EPIAHAHN BMIMITb LHTENCEJIb 3
PO3EKMI A60 AKUMYJATOP 3 IHCTPYMEHTA. TAKI 3ANOSIKHI 3AXOJIN
TEXHIKM 5E3TEKN 3MEHLJYOTb PN3NK BNTIAKOBOT 3ATVCKY
EJEKTPOIHCTPYMEHTA.
36EBPIAITE IHCTPMEHTN,IOHE BMKOPNCOTBYOTbCRAIPOJIIBIDITIEIHEIO3BOJIAEOCOBAM,KIHE MAOTBDOCBIVYPOBJT3 TAKIMMHCTPMEHTAMN ABO HE 3HAOMI3UMMIHCTPYKLIAMN,KOPNCYBATNCb EIEKTPOIHCTPMEHTOM.EIEKTPOIHCTPMEHTN CTAHOBJIaTB HeBE3TEKY BYKAXHEEOCBIDUEHIX KOPMCYBAHIB.
BVKOHUYTE HAJIEXKHE TEXHUIHcO6CUYTOBYAHHH ELEKTPOIHCTPymeHTA.IPEBIPRAITE IX HA IIPEDMET PO3IAIHAHHY CHI BLOKYBAHHpyXOMHX YACTIN, A TAKOX ByJB-kyx MObCTABHH, KKI MOXYb BIIHNHYTHn HA PO8OTY IHCTPymeHTA.Y PA3I NIOUKOJXEHHH ELEKTPOIHCTPymeHT CIIID 3DATN BPEMOHT, PEPLI HIX KOPMCTYBATNCa Hm. YACTO HELUACHI BMIAIKI TPAIIJHOBTcB HACNIQK HEHALTEXKHO T EXHUYTO OBCTTOBYAHHH ELEKTPOIHCTPymeHTIB.
TPMMAIe PIIXUYIHCTPMEHTN FOCTPMN T A YUCTMM. HAIJEXHM UHHOM DQITYPIIXUYIHCTPMEHTN 3 FOCTPMN PIIXVIMM KPAAMMI PDIJIUE BLOKYOTCBT A HMM JIEFLI KEPYBATM.
KOPNUTECAEJEKTPOHCTPMEHOTM,PNIAIADAM I HACAKAMINIIHCTPMEHTA3IHO3IeIOIHCTPYKUIEO, 3BAXAIOHNPAOBOUYMOBNATPOBOTY,KUYCLIDBMKOHATN. BIKOPVCTAHNJEKTPOHCTPMEHTABCYIPEUEPIPV3HAeHHIO MOXE CTATIPWNIHO BVNHKHEHHHE6E3IeHHX CNTAYLIM. PUYKN IHCTPMEHTA TAOBEPXHI 3AXONJIeHHMAOTb BYT3ABXJNCYXMM,YCHTMUN,BE3JHPYTA BpDY.CIM3bKI PYH IOBEPXHI 3AXONJIeHHHE 3AE3IeEHyB3IeHHIOBOJXHIT A KOHTPOJIHCTPMEHTA B HECTIOIBAHNX CNTAYLIXX
2.8 BUKOPUCTAHNAI OJIGIA 3A AKUMYJIATOPHIM IHCTPYMEHTOM
3APJXAJE TINUIE 3A DIOIOMOTO 3APJHOTOPINCTPOIO, BUN3HAUEHOB BINO5HNKOM. 3APJHNI PPNCPTPI, AKNI PIIXODNTB DIA AKMYNJATOPIB OJNDTO BVDY,MOKE CTPMNHTN PN3NK POXEXY BIVNAJKY NOTO BIKOPICTAHNN 3IHLLIMAKMYNJATOPOM.
3 EJIKTPOIHCTPYMEHTAMN CIII BVKOPUCTOBYBATN IINIIE PIPN3HAUHEnI IJIH NIX AKUMYJIATOPHI BATAPEI. BVKOPICTAHHByBb-RAKNX IHLLINX AKUMYJIATOPIB MOJE PIPN3BECTI DO TPABMN ABOIIOXEKJI.
KOLIN AKYMUYIATOPHE BHKOPNCTOBYCTBcA,IOTO CIIID TPIMATNI OKPEMO BIIT METALJEBHX IPEDMETIB-3ATNCKAUBIANEPEY,MOHET, KIIOUH,UIBXH,LIUPYNB TAIHIUXIPIBHXI PDEMETIB, RIKMOXYTB 3AMKHNYKLEMM.KOPOTKE 3AMIKAHN KIEM AKYMUYIATOPAO MXXE CTATI PUNHIO OTIKB ABOIIOXEXKI.
- Y HADTO BAXKMX YMOBAX EKCPIIYATAUJI 3 AKMYJYATOPA MOXE BNTIKATNI PDIINA; HE TOPKAIMTECb II. JAKLIO BNTIAKOBO BN BCE J TOKPHYNCSII, CE MICLE CINIPOMITN BOYO. JAKLIO PIINHA IOTPANIIA B OCI, CINID 3BEPHYTNC 3A MEIMNUHOI DOTOMOTOH.
2.9 CEPBICHE OBCIyFOBYBAHHA
- OBCNYYOBYBAHHJ EJIEKTPOHHCTPYMEHTA IOBNIHEH IPOBODMTN TINbKN KBAJIΦIKOBAHM CTELIJIANT, BMKOPMCTOBYOUH BNKJIIOUHO OPMIHAJIbHI 3ANACHI YACTNH.UE 3A6E3PIeHTb HADIMHY POBOTY IHCTPYMEHTA.
PIINHA,IAKABNCTUYIAE3AKYMYIATOPA,MOKXECTPNUHHTNIPOJPA3HEHHRA60ONIKN.
- HE BMKOPUCTOBYIte AKMYJLTOP ABO IHCTPMEHT,AKUO BOHNIPOUKOIXEHI ABO MOIMOKOBAHI. PONLUODXEHAI ABO MOIMOKOBAHI AKMYJLTOPIN MOXYTB MATI HENPEIDBAUYBAHY IOBEINKUY,LIQIPN3BOIDITb DO IIOXEXKI, BIVBXYAXO PN3IKY TPABMYBAHH.
OBSEPIAANTAE AKYMUYTAPOT ABO IHCTPYMENT BID BOHIO ABO HADMIPOI TEMTEPATPUN. IJI BORTHIO ABO TEMTEPATPN BILLIJE 130 ^ C MOXBE NKIMKATN BIVBX.
- DTPYMUYTECEIHCTPYKLIUOIO 3APYJXAHHRA TE 3APYJXAHTAE KMYNJATOP ABO IHCTPYMEHTA MEXAMN DIAPIA3OHY TEMIEPATYP, 3A3HAUEHNB B ICHCTPYKLI. HETIPABINbHE 3APYJXAHHRA BOI TEMIEPATYPA 3A MEXAMN BKA3AHOTO DIAPIA3OHY MOXE PIIOLIKIDNTI INAKMYNJATOP 13bJIbLLJNTI PN3NK BUNHKHEHHI POKEXI.
HIKOMHEOSCTYTOBYITEIOLIKOJXEHAI KMYJITOPNI. OCSCTYTOBYAHHAKMYJITOPIBMAOTB BIKOHBYATINTILKN BMPOSHIKAOBTOPI30BAHACEPBICHA MAHCTEPHRA.
2.10 IOATKOBI IONEPEIXEHHI IOIO B3NEKN POBOTN 3 RA3OHHMM
HOXNUZAMN
POTIEPEJIXEHHH LIOOJE3PIKMIPO60TN3TA3OHHMHOKM:
- HE TOPKAITECJXODHMMYCACTNHAMMYIPI3AJIbHOTOPINIAIDJI.PIUDACPYXPI3AJBHOTOIPWIAIDJIHEITPMIBNPAHTBEPIAHM MATEPIAI1HETPMAITE MATEPIAN,JKMI CNIPIATNI. TICNA BIMNKAHNG MOTOPY PI3AJBHE PIMIAIDJIPOIOBXYPCYAXTCN.MITb HEYBAKHOCTIPIUACPOBOTN3HOXNUJMNMOEETPIM3BECTINOBAKNXTPABM.
IPEHOCITb FA3OHHI HOXMI 3A PYKU TIIbKM TICN3YUMHKPI3JIbHOTo IIPWIAIDTA TIOIBAANTE IPO TE, UO5HE YE YBMKHYTIPEEMNKAY KMBIEHH. IPIPABINbHE PEPHECEHHHOKMLb3MEHLJNTb PI3IK HEHABMCHOTI VCKY TA OTPIMAHHA TPABMUEPE3 PI3AJBHe IPIPJAIDRA.
IITPAHCTIOPTYBAHHA 053BEPIFAHNNRAOHHMXHOHXU3ABXIMBCTAHOBJNHTE3AXMCHM KOKYXPI3ALbHOTOPINJIAI. HAIEXHE IIOBOJXEHNN3FAOHHMMHOHXUAM3MEHLWNTPB3NKTPABMYAHHHPI3ALbHMIPINJIAI.
ПИД.YAUC OUMULEHЯ BID 3ACTPRAIITO MATEPIAIV A60 OBCNYTOBVAHHI HCTPYMEHTA PEPEKOHAITECE, LIO BCI IPEEMNKAUJ XMBNLHNA BIMKHYI, A AKYMUYIATOP BIMNAYTMI ABO BID"CDHAHNI. HECTIOUBAHNI 3AITYCK TAOHHNX HOXMJI.PI YAC OUMULEHЯ BID 3ACTPRAIITO MATEPIAIV A6O BCNYTOBVAHHI MOJE PIM3BECTI DO OTPMAMHH CEPIM3HOITPABMI.
- TPMMAIE HOKNUI IUNUE 3A I3OJIbOBAH POKPITTA, OCKIN KI PI3ALBE TPINIAIDMOXE TOPKHHTNCA TPNXOBAOI PPOBOKM. KOHTAKI PIGAJHOTOP TPNIAID3 IPTOM NIH HAPYTOI TPN3BOIMTB DOIOABN HATPYTN HA METATEBNX YACTNHAX HOKNUB, LJO MOXE TIPIN3BECTIN D0 UPAKEHHN OTEPATOPA CTYMOM.
TPMMAIETBCLIHUPNJXWBLEHHA TKASEJIYKOMOFAIADI BID30HNOBPI3AHH.NLHYPNJXWBLEHHA A50KASEJIIMOXYTB IIPXOBATNCB JXWBOTNIOTAX A50KUYLAXIBNIAKOBOBYTNIEPEPI3AHMMPI3ALHBHMIPINPAIADJAM.
HE BHKOPUCTOBYTE TAOHHI HOXMII TPNI NOTAHMX IIOFOIHNYMOBAX,OCOBINBO JAKLIO ICHYEC P3NK YDAPY BIMCKABKM.JI 3MEHLINTb PN3NK YDAPY BIMCKABKOIO.
2.11 OoATKOBI INPABNIA TEXHIKN B3NEKN IJI TENECKONIH KULOPI3IB
I ODAATKOBI NIOPEPDXEHHN LIOO B3NEKN PO5OTM 3 TEIECKONIHMM KUOPI3OM:
LIOB 3HIMNTNPN3IKYPAXHEJELKTPUHNMCTPUMOM, HIKOLINHE BVKOPNCTOBYTE TELECKOPIUYKUOPI3I0bIM3Y 3JIHIAIMENEILKTPONEPECUHAHH. KOHTAK ABO BVKOPCTAHNNIPOBIM3Y LIHI N EILKTPONEPECUHAHH MOJE PUN3BECTM DO CEPIO3HIMX TPABM ABO YPAXEHN EILKTPUHNM CTPUMOM, LIO IPN3BEDE D0CMEPTI.
- PPNPO5OTI3TEIECKOPIHNM KUYLIOP13OM 3ABXJINTPMMAITE NOFO O5OMAPYKAMTNPMMAITE TEIECKOPIHNI KUYLIOP13OBOMAPYKAMN,LI05HE BTPATNTKOHTPOJIb.
- PPNPOBOTI 3 TENECKOPIHUM KYLIQUPI3OM BUNIE PIBHRA FIOOBN 3ABXINBHKOPUCTOBYTE 3AXMCHNIUOLOM. PAIDHHCRMTTR MOJE PIPIM3BECTIN TO TAKKNX INPECOHAJIbHNX TPABM.
2.12 IOATKOBI IONEPEJXJEHH3BE3NEKNIJI3APJHNO PNPCTPOIO
- CEINHCTPymeHT MOKYTB BIKOPNCTOBYBATU DITN CTAPLII 8 POKIB 1OC05N3 O6MEKHEHMNI Φ3N4NHMM, CEHCOPHHM TA PO3YMOBMM 3DIIbHOCTMn A5O OOCBNI 3 HEIOCTAHIM DCOBIDOM A5O 3HAHHJMM, JAKLIO BOHN IPAUQOTB PIII HAFNJDOM A5O BYIN IPOIHCTPYKTOBAHI CTOCOBHO BIKOPNCATAHJ IHCTPymeHTA TA JAKLIO BOHN PO3YMIOHBMOXINBY HEBE3NEKY. DIYAM 3A50POHJREcBcT PATNC3 IHCTPymeHTOM. DIYAM 3A50POHJREcBE3 HAFNJDY UCHNTN TA OBCLTVOBYATN IHCTPymeHT.
3AMIHYILOUKODJEKHO ENEKTPUHOTO LHHYPAJXMBIEHNR MAG BMKOHBYATM BNIPOBHK,ΦAXIBELCEPBICHOTQEHTPY ABOOCBA 3 BIIDIOBIHOHO KBALIΦIKALICIO.
CIIH HATIADATM3A DITbMMTAHEIOBBOJYTMIMPATNC13 3APREHMIPNCTPOGM
- PIIEPD BIVKOPNCTAHHMA3APRJHOIPOIPIPCTPOI IPOUMTAITE BCI IHCTPYKUJI TA IIOPEPJXVBAJIH HAIINCS HA 3APRJHOMY IPIPCTPOI TA AKMYNJATOPI.
- HE HAMAGAITECE3AJPJXATN AKYMUYIATOPNI HE 3 KOMTIKEKTY. 3APJHNI PPNCPTPI T A AKYMUYIATOP,AKNI POCCTAACTBC3 HNM, PIPIN3HAUEHI DIIBA NKOPMCCTAHNA PA3OM.
- AKYMUYIATOP CNTID 3APYJXATN JINLIE Y TPIMILUEHHI, OCKJIbKNI 3APYHNI PIPCTPIN PIPN3HAUYEHNI DIAPOBOTNI JINLIEY TPIMILLEHHI.
3A6OPOHJCTbCZAPJIXATM BATAPEI,HE TIPIM3HAUYHI DIIPIEPE3APJIKN.
3AXMCITb 3APRdHIM PIPCTPI BID BOIOTN TABOITNX MOB. LEMOKE CTATI PIMUHIOY YPAKEHN EIEKTPMHNCTPVMOM
PIM3APJDAKAHHH3A5E3NEYTEFAPHYBEHTNIJIUHO.
HE KJIADITb HA 3APRINHIMIPICTPIHIGKI IPEIMETIN, OCKJIbKNI LEOXMEIPIN3BECTINIOJMOIOTIPEPPIBAHH. HE TPIMAITEAIPDHIMIPICTPIIIOPRID13DKEPEIOMTEIIIA.
2.13 3AJIHILIKOBI PN3IKN
O3HAIOMTCEb 3BVKOPNCTAHNNM Lb0FOI HCTPYMEHTA 3A DIONOMOTOIO Lb0FO IIOCSBHKA 3EKCTIYATAJI. 3AIPAM'RTAITE TPABNIA TEXHIKIN 6E3PIEKNI TOUHO DQTPMUYNTCb IX. LEI DIIONOMOJE 3AN0BITPN3NKAM IHEBE3PELI.3ABXDN BYDTE HANOITOTBI IPR IN BOKOPCTAHHHI Lb0FO IHCTPYMEHTA, LI05 BN 3A3DAIEFIIIB 3MOFTIPO3IIHATNI CTPABNTNCb 3PNI3NKAMN. LIUBDKE BTPUACHN MOKE 3AI0BITNI CEPNO3HN MTPBABM I PONLKOJXEHHO MAHA. BMINKAITE NOTO, RKLIO BUNHKIN BYD-BAKI DEQKTIN.
HABITBJKLIQHTKOIOTPIMYBATNCABCIXIHCTPYKLJIM,BCEXDEAKIΦAKTOPN,RKMOMKytIPN3BECTINDOHE6E3NEKN,HAPPNKJIAD
-
BIDKIMDAHNAACTIN INPEIDMETIB,LIIO 05P05JIIOIOTbC4.
-TPABMI BIDI BISPAJI: BIKOPCTOBYTE CTIELIJIbHI PYKNI TA HAMATAI TEC3MEHLLINTN PO6OWM YAC I BNLIM.
-TPABMN BIDLLUYM: HADJIAIATE 3ACO6NI 3AXNCTY OPAHIB CIIYYTA HAMATIAECE 3MEHLLNTIN POBOUH YAC I BYINB.
-
HE BIVKOPICTOBYITE IOIOBOKYBAU, JAKLIOUE HE I E ABCOITHO HEOBXIDHIM. BIVKOPICTAHNHA HEHAIEXHOTIO TPOIDOBXYBAUA MOJE TIPIN3BECTI NO PIW3IKY BUHINKHEHHI POIXEKI A50 YPAXKEHHA ELEKTPNUHMM CTPYMOM.
-
HE KOPNCTUYTECS3APJNDHM PIPCTPOCM, JKLIOHOTOCINLBO BIDAPNI, BYCTNJN A50 NOLIKODNI INHLNM YMHOM.ДЛТПЕВIPKIN TAPEMHTY BIDDAITE 3APJNDHIM PIPCTPII DOYTOBHOBAXEHOFO CEPBICHOTO CEHTPY.
HEPO36bUPAIe 3APJHIM PIPCTPI. HETPABMlBHe CkJIaDHnH 3APJHOFO PIPCTPOJO MOXJE PIP3BECTINoTOXEXJI A5O YPAXEHHH EJEKTPWCHIM CTPUMOM.
LIOB3MEHLLNTINPIMIKYPAJXEHHNIEEKTPUHNMCTPVMOM, BIDGCHNYTE 3APRHNIPNCTRPIBMDPEXIXJXMBNEHHN, PEPLI HIX YICTNTNIHO. RILLOIMLIE BIMHNATN AKUMYJIATOP, LPEPMIKY HE 3MEHLLYC.
-
BDXHANHHIIMNHYTAACTOK.
-3ABXIMHADJRAITE3AXMHCIOKUYIAPN.
KILIOIYAC BIKOPVCTAHH IHTPYMEHTA BHNKHE BUYB-RAKNI 3LNXOAKTOPIB, BIMKHITb IHCTPYMEHT I HETAIHO 3BEPHTbCJIO PIKAPR.
- TPABMMOMOXYb BYTN BIKIMKAIH ABOIIOCNIEHI BHACJIIDOK TPBBAJTOB BIKOPMCTAHHH IHCTPMEHTA. IPIN BIKOPMCTAHHI BYDb-RAKO IHCTPMEHTA IPOTATOM TPBBAJTOO YACY PEGYIAHPOPOBITb PIIPEPBNI.
- PIP TNPMBANIOMY BVKOPMCTAHHI HCTPYMEHTA HA KOPMCTYBAU A DIC BISPAUJRAKA MOKE BVKIMKATN CTAH, BIDOMM RA K BISPAUHHE 3AXBOPBOAHHH, HAPPIKJIAD, BIJIHOTb PAJIbLI, A TAKOK CTIEUHQUHE 3AXBOPBOAHHH, HAPPIKJIAD, TYHEJIHm CINHDPOM 3ATYACTKA.
LJIO53MEHLIIMTN LIEI PUNIKTPIN BMKOPVCTAHII IHCPTYMEHTA, 3ABXDN HADRAITAE 3AXNCI PYKABNI LI TATPNMAITE PYKMBTEPII.
3. TEXHIYI DAHI
AKUMYJIATOPHI T30HHI HOXNUI NOCTAUAOTbCRA IOBHICTIOCKLAIDEHIMN 3 BCTAHOBNEHIM PI3AJbHIM PPNIAIDJM IITPABN.
4.3 IEPLIIE BKNOPNUCTAHN

PONPEJXEHH! PPOUHTAITE PO3IIN «IPABNIA TEXHIKN 6E3NEKIN HA NOYATKY UBOTO NOCIBNKA, BKJIIOHYBECb TEKCT Y IIN3AFOJIOBKY, INEPHI HIX BHKOPNCOTOBYBATN CEIN BVPI6.

KINBOONIT cniO6pi3yBaTn IJRA DOCARHeHH TpaneCiIeNoi6HoI φOpMN, BIn NOBHeH p03UHPOBAtncra do
Hn3y 3 60x 60kIB. Lc nokpaulye npohkneHH CbITna do HnKHX rINOK. 3aaraBHa peKoMeHdaIa- ce haxnl np6bn3HO 10cm Ha KoxeH 1 MeTp BvCOTn JxBONNoTy.
8.4 YCYHEHH HECNPIPABHOCTE

HE6E3IeKA! PN3nK TPABMn YEPE3 YPAXKeHHa EJekTPuHm CTPyMOM.
PONEPENJXEHH! PEPEN BIKOHAHNM ByNb-RAKNX POBIT 3 UCYHENH HECNPABHOCTEN BMKHITb BNPI6.
11.2 BUKJIIOUeHHRA TAPAHTI
Rapantia He noiupoeTbca Ha npo6nem Ta iHcndeHTN, 00 BnHnKaOTb y pe3yIbTaI HnpaBnBHO BnKOpNCtAHN BnPo6y.
TapaHTi He NOnuPioEbCn Ha:
-Bnpi6,aykn BnKOpNCTOBvBaBCa HeHaJIeXHIM YINOM,a6o
-Bnpi6,aykn6yno nooKoJKeHO BHaCniOk TpaHcnpTyBaHHa60 HanaaTbAHn,a60
-Bnpi6,kyiBvBipemontobAHn a6o npoOuJIac3aMHa deTaIe CTOpOHIMNOC6AMn, a60
- noKoJxHnB iD nii 3OBHIhIX fakTopiB a60 cTOpOHix npedMeTIB (nicKy, kaHHaToI), a60
- Bπi6,якni 6byno noшкожеho BHacniδOK HeIoTpmaHHЯ npaBnI Texhikn 6e3neKn a60 iHCTpyKciJ 3 BnKOpncTaHHa, a60
-Bnpi6,aykn po3bpaan a6o BiKpnuBaan,a6o
-Bvpi6 nepe6yBaB y BOJorOmy cepeIOBnIi (pOca,doI,3aHypenHny BODy ToIoo),a6o
Bnpi6,aykn BnKOpncTOByBaBCa3 npoΦeciHIO MeToHO,a60
- Bπi6, kπi πiδaBabCτeMπepaTpyam, ξιο BνxOДЯΤb 3a Mεχι, Bka3aHι B pɔ3dini «36epirahn».
Bnpi6 Mae BnKopncTObyBaTncb y 3BnuaHnX yMObax ekCnpyaTaCi, a He IJI npOphi ciHnx CJIne. Tomy rzaHTi He po3IOBcIOxKyEcbra Ha BnpoN, IIO BnKOpncTObYOTbcr KOMpaHiaMn 3 6bnfooyctpo Ta 03eJeHeHHa, MicceBmU opraHaMn BlaDi, a TAKOX KOMpaHiaMn, kki npOnHOHyTO pONaYBaHn a60 beOPLaTHn npOKaT OblaHaHH.
Y pa3i BnHnKHeHHI npo6IeMn a60 BnAByHennI DeΦeKTy Heo6xIiHO cNoaTky 3BepHyTuCJIO dInIepa STERWINS. Y 6ilbIooCTI BnuaKIB
came biN 3MOxKe BnpiiUnTI npO6IeMy uYCyHyTI neΦeKTe. 36epiraTe paxyHok-kaKtpy a60 KBNTaHciU, ockInbKn iX Heo6XiDiHo 6yJe ppeJ'ABTu nIg o6p6Kn 6yDb-ЯKnx npTeH3iI.

Introducere
11.2 EXCLUDING GARANTIEI
Thank you for choosing this product. Upon designing and manufacturing our products, we place all of our efforts into ensuring an excellent quality that meets the needs of the users. Following these instructions allow to optimize the lifetime
IMPORTANT! IN ORDER TO OBTAIN THE UTMOST SATISFACTION FROM THIS PRODUCT UPON SETTING IT UP, USING IT, AND MAINTAINING IT, WE RECOMMEND THAT YOU CAREFULLY READ THIS USER MANUAL BEFORE USING THE PRODUCT. PLEASE PAY ATTENTION TO BASIC WARNINGS RELATING TO SAFETY WITHIN THIS MANUAL, AND KEEP THE MANUAL FOR LATER REFERENCE.

IMPORTANT, KEEP THE MANUAL FOR LATER REFERENCE : READ CAREFULLY
Contents
- Intended use of Battery Grass Shear
- Safety Instructions
- Technical data
- Assembly
- Transportation
-
Wintering
-
Storage
- Maintenance
- End of life
- Warranty
1. INTENDED USE OF BATTERY GRASS SHEAR
This product is intended for outdoor use only, and must not be used inside a building under any circumstances. The cordless grass shear is only intended for use in dry and well-illuminated conditions. This battery grass shear is only intended to be used for trimming hedges, shrubs and grass, and can be used easily in your garden. Do not use it for others purposes. The maximum cutting capacity must be observed. Do not cut branches exceeding the stated maximum capacity. The product is not intended to be used by children or persons with reduced physical, mental or sensory capabilities.
After unwrapping the packing, make sure that the product is complete with its accessories (if any). If the product is damaged or has any defect, please do not use it and bring back it to your dealer.
If you give this tool to another people, please give him also this instruction manual.
Please note that our equipment has not been designed for use in commercial, trade or industrial applications. Our warranty will be voided if the machine is used in commercial, trade or industrial businesses or for equivalent purposes. This product has been designed to be used over a period of 6 years (Expected lifetime).
2. SAFETY INSTRUCTIONS

WARNING:READALL SAFETYWARNINGSANDALLINSTRUCTIONS. FAILURE TO FOLLOW THE WARNINGS AND INSTRUCTIONS MAY RESULT IN ELECTRIC SHOCK, FIRE AND/OR SERIOUS INJURY.
SAVE ALL WARNINGS AND INSTRUCTIONS FOR FUTURE REFERENCE.
2.1 GENERAL SAFETY WARNINGS
- DO NOT OPERATE THE GRASS SHEAR NEAR GLASS ENCLOSURES, AUTOMOBILES, TRUCKS, WINDOW WELLS, DROP-OFFS, ETC. WITHOUT PROPERLY ADJUSTING THE AIM OF THE DISCHARGE.
- DO NOT FORCE OR OVERLOAD THE PRODUCT. IT WILL PERFORM BETTER AND SAFER WHEN IT IS USED AT THE RATE THAT IT WAS DESIGNED TO WORK AT.
IF THE PRODUCT IS ALREADY ASSEMBLED, PLEASE MAKE SURE THAT ALL SREWS ARE TIGHTLY FIXED BEFORE USING IT. IF THE PRODUCT REQUIRE
THAT YOU ASSEMBLE IT, PLEASE MAKE SURE UPON OPENING THE PACKAGE THAT ALL THE ELEMENTS NEEDED FOR SETTING UP THE PRODUCT HAVE BEEN PROVIDED. IF THE PRODUCT IS DAMAGED OR HAS DEFECTS, DO NOT USE IT AND TAKE IT BACK TO THE NEAREST STORE.
- THE TERM "POWER TOOL" IN THE WARNINGS REFERS TO YOUR MAINS-OPERATED (CORDED) POWER TOOL OR BATTERY-OPERATED (CORDLESS) POWER TOOL.
2.2 SYMBOLS ON THE PRODUCT
| CE | Complies with European standards: This symbol means that this appliance is compliant with the applicable European directives, and a test of compliance with these directives has been performed. |
| EAC | Single mark of circulation of products on the market of the Member States of the Customs Union. | | Ukrainian conformity marking. |
| Protection Class II. | | For indoor use only, do not expose to rain. |
| Li-Ion | Battery packs can be hazardous for the environment and for human health since they contain hazardous substances. |
| Li-Ion | Li-ion battery. This product has been marked with a symbol relating to 'separate collection' for all battery packs and battery pack. It will then be recycled or dismantled in order to reduce the impact on the environment. |
| 130°C | With fuse (130 °C) | ○-○-○ | Polarity |
2.3 SYMBOLS IN THIS MANUAL
| Electrical products should not be discarded with household products. Used electrical products must be collected separately and disposed of at collection points provided for this purpose. Talk with your local authorities or dealer for advice on recycling. |
| Read and understand all instructions before operating the product, follow all warning and safety instructions. | IPX1 | Degree of protection against moisture. |
| UNIVERSAL POWER
20 | *Universal: compatible only with Sterwins UP20, Lexman UP20 and Dexter UP20 products. | 87° | Guaranteed sound power level (tested according to Directive 2000/14/EC as amended by 2005/88/EC). |
| Do not expose the product to rain or wet conditions. | | DANGER - Keep hands away from blade |
| Wear eye and head protection | | Wear protective gloves |
| Wear safety boots | | Read operator's manual |
| 50°C | Use and store the battery within an temperature below 50°C. | | Do not disassemble, crush, heat above 100°C |
| Warning: cutting means continues to run after the motor is switched off | | Keep bystanders away |
| 10m | Warning: cutting means continues to run after the motor is switched off | | To reduce the risk of electric shock, do not expose to water. |
| Type and source of the danger : Failure to observe this warning may result | Type and source of the danger : This symbol indicates that damage to the appliance, the environment or other property may occur as a result of non-observation of this warning. |
General Machine SafetyWarnings
| i | Note: This symbol indicates important information for better understanding of the product. | | Read the manual: This symbol indicates that you need to read the user manual carefully. |
| X.XX | Please refer to the corresponding illustration at the end of the booklet. | | This product is recyclable. If it cannot be used anymore, please take it to waste recycling centre. |
| Recycle the packaging of the product. | | Recycle this instruction manual |

WARNING: READ ALL SAFETY WARNINGS, INSTRUCTIONS, ILLUSTRATIONS AND SPECIFICATIONS PROVIDED WITH THIS POWER TOOL. FAILURE TO FOLLOW ALL INSTRUCTIONS LISTED BELOW MAY RESULT IN ELECTRIC SHOCK, FIRE AND/OR SERIOUS INJURY.
SAVE ALL WARNING AND INSTRUCTIONS FOR FUTURE REFERENCE. THE TERM "POWER TOOL" IN THE WARNING REFERS TO YOUR MAINS-OPERATED (CORDED) POWER TOOL OR BATTERY-OPERATED (CORDLESS) POWER TOOL.
2.4 WORK AREA SAFETY
- KEEP WORK AREACLEAN AND WELL LIT. CLUTTERED OR DARK AREAS INVITE ACCIDENTS.
DO NOT OPERATE POWER TOOLS IN EXPLOSIVE ATMOSPHERES, SUCH AS IN THE PRESENCE OF FLAMMABLE LIQUIDS, GASES OR DUST. POWER TOOLS CREATE SPARKS WHICH MAY IGNIT THE DUST OR FUMES.
2.5 ELECTRICAL SAFETY
- POWER TOOL PLUGS MUST MATCH THE OUTLET. NEVER MODIFY THE PLUG IN ANY WAY. DO NOT USE ANY ADAPTER PLUGS WITH EARTHED (GROUNDED) POWER TOOLS. UNMODIFIED PLUGS AND MATCHING OUTLETS WILL REDUCE RISK OF ELECTRIC SHOCK.
-
AVOID BODY contact WITH EARTHED OR GROUNDED SURFACES, SUCH AS PIPES, RADIATORS, RANGES AND REFRIGERATORS. THERE IS AN INCREASED RISK OF ELECTRIC SHOCK IF YOUR BODY IS EARTHED OR GROUNDED.
DO NOT EXPOSE POWER TOOLS TO RAIN OR WET CONDITIONS. WATER ENTERING A POWER TOOL WILL INCREASE THE RISK OF ELECTRIC SHOCK.
-
KEEP CHILDREN AND BYSTANDERS AWAY WHILE OPERATING A POWER TOOL. DISTRACTIONS CAN CAUSE YOU TO LOSE CONTROL.
DO NOT ABUSE THE CORD. NEVER USE THE CORD FOR CARRYING, PULLING OR UNPLUGGING THE POWER TOOL. KEEP CORD AWAY FROM HEAT, OIL, SHARP EDGES OR MOVING PARTS. DAMAGED OR ENTANGLED CORDS INCREASE THE RISK OF ELECTRIC SHOCK.
- WHEN OPERATING A POWER TOOL OUTDOORS, USE AN EXTENSION CORD SUITABLE FOR OUTDOOR USE. USE OF A CORD SUITABLE FOR OUTDOOR USE REDUCES THE RISK OF ELECTRIC SHOCK.
- IF OPERATING A POWER TOOL IN A DAMP LOCATION IS UNAVOIDABLE, USE A RESIDUAL CURRENT DEVICE (RCD) PROTECTED SUPPLY. USE OF AN RCD REDUCES THE RISK OF ELECTRIC SHOCK.
2.6 PERSONAL SAFETY
- STAY ALERT, WATCH WHAT YOU ARE DOING AND USE COMMON SENSE WHEN OPERATING A POWER TOOL. DO NOT USE A POWER TOOL WHILE YOU ARE Tired OR UNDER THE INFLUENCE OF DRUGS, ALCOHOL OR MEDICATION. AMOUNT OF INATTENTION WHILE OPERATING POWER TOOLS MAY RESULT IN SERIOUS PERSONAL INJURY.
- USE PERSONAL PROTECTIVE EQUIPMENT. ALWAYS WEAR EYE PROTECTION. PROTECTIVE EQUIPMENT SUCH AS DUST MASK, NON-SKID SAFETY SHOES, HARD HAT, OR HEARING PROTECTION USED FOR APPROPRIATE CONDITIONS WILL REDUCE PERSONAL INJURIES.
- PREVENT UNINTENTIONAL STARTING. ENSURE THE SWITCH IS IN THE OFF-POSITION BEFORE CONNECTING TO POWER SOURCE AND/OR BATTERY PACK, PICKING UP OR CARRYING THE TOOL. CARRYING POWER TOOLS WITH YOUR FINGER ON THE SWITCH OR ENERGISING POWER TOOLS THAT HAVE THE SWITCH ON INVITES ACCIDENTS.
- REMOVE ANY ADJUSTING KEY OR WRENCH BEFORE TURNING THE POWER TOOL ON. A WRENCH OR A KEY LEFT ATTACHED TO A ROTATING PART OF THE POWER TOOL MAY RESULT IN PERSONAL INJURY.
- DO NOT FORCE THE POWER TOOL. USE THE CORRECT POWER TOOL FOR YOUR APPLICATION. THE CORRECT POWER TOOL WILL DO THE JOB BETTER AND SAFER AT THE RATE FOR WHICH IT WAS DESIGNED.
- DO NOT USE THE POWER TOOL IF THE SWITCH DOES NOT TURN IT ON AND OFF. ANY POWER TOOL THAT CANNOT BE CONTROLLED WITH THE SWITCH IS DANGEROUS AND MUST BE REPAIRED.
- DISCONNECT THE PLUG FROM THE POWER SOURCE AND/OR THE BATTERY PACK FROM THE POWER TOOL BEFORE MAKING ANY ADJUSTMENTS, CHANGING ACCESSORIES, OR STORING POWER TOOLS. SUCH PREVENTIVE SAFETY MEASURES REDUCE THE RISK OF STARTING THE POWER TOOL ACCIDENTALLY.
- STORE IDLE POWER TOOLS OUT OF THE REACH OF CHILDREN AND DO NOT ALLOW PERSONS UNFAMILIAR WITH THE POWER TOOL OR THESE INSTRUCTIONS TO OPERATE THE POWER TOOL. POWER TOOLS ARE DANGEROUS IN THE HANDS OF UNTRAINED USERS.
-
MAINTAIN POWER TOOLS AND ACCESSORIES. CHECK FOR MISALIGNMENT OR BINDING OF MOVING PARTS, BREAKAGE OF PARTS AND ANY OTHER CONDITION THAT MAY AFFECT THE POWER TOOLS
-
DO NOT OVERREACH. KEEP PROPER FOOTING AND BALANCE AT ALL TIMES. THIS ENABLES BETTER CONTROL OF THE POWER TOOL IN UNEXPECTED SITUATIONS.
- DRESS PROPERLY. DO NOT WEAR LOOSE CLOTHING OR JEWELLERY. KEEP YOUR HAIR, CLOTHING AND GLOVES AWAY FROM MOVING PARTS. LOOSE CLOTHES, JEWELLERY OR LONG HAIR CAN BE CAUGHT IN MOVING PARTS.
- IF DEVICES ARE PROVIDED FOR THE CONNECTION OF DUST EXTRACTION AND COLLECTION FACILITIES, ENSURE THESE ARE CONNECTED AND PROPERLY USED. USE OF DUST COLLECTION CAN REDUCE DUSTRELATED HAZARDS.
- DO NOT LET FAMILIARITY GAINED FROM FREQUENT USE OF TOOLS ALLOW YOU TO BECOME COMPLACENT AND IGNORE TOOL SAFETY PRINCIPLES. A CARELESS ACTION CAN CAUSE SEVERE INJURY WITHIN A FRACTION OF A SECOND.
OPERATION. IF DAMAGED, HAVE THE POWER TOOL REPAIRED BEFORE USE. MANY ACCIDENTS ARE CAUSED BY POORLY MAINTAINED POWERTOLDS.
- KEEP CUTTING TOOLS SHARP AND CLEAN. PROPERLY MAINTAINED
- CUTTING TOOLS WITH SHARP CUTTING EDGES ARE LESS LIKELY TO BIND AND ARE EASIER TO CONTROL.
- USE THE POWER TOOL, ACCESSORIES AND TOOL BITS ETC. IN ACCORDANCE WITH THESE INSTRUCTIONS, TAKING INTO ACCOUNT THE WORKING CONDITIONS AND THE WORK TO BE PERFORMED. USE OF THE POWER TOOL FOR OPERATIONS DIFFERENT FROM THOSE INTENDED COULD RESULT IN A HAZARDOUS SITUATION.
- KEEP HANDLES AND GRASPING SURFACES DRY, CLEAN AND FREE FROM OIL AND GREASE. SLIPPERY HANDLES AND GRASPING SURFACES DO NOT ALLOW FOR SAFE HANDLING AND CONTROL OF THE TOOL IN UNEXPECTED SITUATIONS.
- RECHARGE ONLY WITH THE CHARGER SPECIFIED BY THE MANUFACTURER. A CHARGER THAT IS SUITABLE FOR ONE TYPE OF BATTERY PACK MAY CREATE A RISK OFFIRE WHEN USED WITH ANOTHER BATTERY PACK.
- USE POWER TOOLS ONLY WITH SPECIFICALLY DESIGNATED BATTERY PACKS. USE OF ANY OTHER BATTERY PACKS MAY CREATE A RISK OF INJURY AND FIRE.
- WHEN BATTERY PACK IS NOT IN USE, KEEP IT AWAY FROM OTHER METAL OBJECTS, LIKE PAPER CLIPS, COINS, KEYS, NAILS, SCREWS OR OTHER SMALL METAL OBJECTS, THAT CAN MAKE A CONNECTION FROM ONE TERMINAL TO ANOTHER. SHORTING THE BATTERY TERMINALS TOGETHER MAY CAUSE BURNS OR A FIRE.
- UNDER ABUSIVE CONDITIONS, LIQUID MAY BE EJECTED FROM THE BATTERY;AVOID CONTACT. IF CONTACT ACCIDENTALLY OCCURS,FLUSH
2.9 SERVICE
- HAVE YOUR POWER TOOL SERVICES BY A QUALIFIED REPAIR PERSON USING ONLY IDENTICAL REPLACEMENT PARTS. THIS WILL ENSURE THAT THE SAFETY OF THE POWER TOOL IS MAINTAINED.
WITH WATER. IF LIQUID CONTACTS EYES, ADDitionally SEEK MEDICAL HELP. LIQUID EJECTED FROM THE BATTERY MAY CAUSE IRRITATION OR BURNS.
- DO NOT USE A BATTERY PACK OR TOOL THAT IS DAMAGED OR MODIFIED. DAMAGED OR MODIFIED BATTERIES MAY EXHIBIT UNPREDICTABLE BEHAVIOUR RESULTING IN FIRE, EXPLOSION OR RISK OF INJURY.
DO NOT EXPOSE A BATTERY PACK OR TOOL TO FIRE OR EXCESSIVE TEMPERATURE. EXPOSURE TO FIRE OR TEMPERATURE ABOVE 130^ MAY CAUSE EXPLOSION.
- FOLLOW ALL CHARGING INSTRUCTIONS AND DO NOT CHARGE THE BATTERY PACK OR TOOL OUTSIDE THE TEMPERATURE RANGE SPECIFIED IN THE INSTRUCTIONS. CHARGING IMPROPERLY OR AT TEMPERATURES OUTSIDE THE SPECIFIED RANGE MAY DAMAGE THE BATTERY AND INCREASE THE RISK OFFIRE.
- NEVER SERVICE DAMAGED BATTERY PACKS. SERVICE OF BATTERY PACKS SHOULD ONLY BE PERFORMED BY THE MANUFACTURER OR AUTHORIZED SERVICE PROVIDERS.
2.10 SAFETY INSTRUCTIONS FOR HEDGE TRIMMERS
HEDGE TRIMMER SAFETY WARNINGS:
- KEEP ALL PARTS OF THE BODY AWAY FROM THE BLADE. DO NOT REMOVE CUT MATERIAL OR HOLD MATERIAL TO BE CUT WHEN BLADES ARE MOVING. BLADES CONTINUE TO MOVE AFTER THE SWITCH IS TURNED OFF. A MOMENT OF INATTENTION WHILE OPERATING THE HEDGE TRIMMER MAY RESULT IN SERIOUS PERSONAL INJURY.
CARRY THE HEDGE TRIMMER BY THE HANDLE WITH THE BLADE STOPPED AND TAKING CARE NOT TO OPERATE ANY POWER SWITCH. PROPER CARRYING OF THE HEDGE TRIMMER WILL DECREASE THE RISK OF INADVERTENT STARTING AND RESULTANT PERSONAL INJURY FROM THE BLADES.
- WHEN TRANSPORTING OR STORING THE HEDGE TRIMMER, ALWAYS FIT THE BLADE COVER. PROPER HANDLING OF THE HEDGE TRIMMER WILL DECREASE THE RISK OF PERSONAL INJURY FROM THE BLADES.
- WHEN CLEARING JAMMED MATERIAL OR SERVICING THE UNIT, MAKE SURE ALL POWER SWITCHES ARE OFF AND THE BATTERY PACK IS REMOVED OR DISCONNECTED. UNEXPECTED ACTUATION OF THE HEDGE TRIMMER WHILE CLEARING JAMMED MATERIAL OR SERVICING MAY RESULT IN SERIOUS PERSONAL INJURY.
HOLD THE HEDGE TRIMMER BY INSULATED GRIPPING SURFACES ONLY, BECAUSE THE BLADE MAY CONTACT HIDDEN WIRING. BLADES CONTACTING A "LIVE" WIRE MAY MAKE EXPOSED METAL PARTS OF THE HEDGE TRIMMER "LIVE" AND COULD GIVE THE OPERATOR AN ELECTRIC SHOCK.
- KEEP ALL POWER CORDS AND CABLES AWAY FROM CUTTING AREA. POWER CORDS OR CABLES MAY BE HIDDEN IN HEDGES OR BUSHES AND CAN BE ACCIDENTALLY CUT BY THE BLADE.
- DO NOT USE THE HEDGE TRIMMER IN BAD WEATHER CONDITIONS, ESPECIALLY WHEN THERE IS A RISK OF LIGHTNING. THIS DECREASES THE RISK OF BEING STRUCK BY LIGHTNING.
2.11 ADDITIONAL SAFETY INSTRUCTIONS FOR EXTENDED-REACH HEDGE TRIMMERS
-
EXTENDED-REACH HEDGE TRIMMER SAFETY WARNINGS:
-
TO REDUCE THE RISK OF ELECTROCUTION, NEVER USE THE EXTENDED-REACH HEDGE TRIMMER NEAR ANY ELECTRICAL POWER LINES. CONTACT WITH OR USE NEAR POWER LINES MAY CAUSE SERIOUS INJURY OR ELECTRIC SHOCK RESULTING IN DEATH.
-
ALWAYS USE TWO HANDS WHEN OPERATING THE EXTENDED-REACH HEDGE TRIMMER. HOLD THE EXTENDED-REACH HEDGE TRIMMER WITH BOTH HANDS TO AVOID LOSS OF CONTROL.
- ALWAYS USE HEAD PROTECTION WHEN OPERATING THE EXTENDED-REACH HEDGE TRIMMER OVERHEAD. FALLING DEBRIS CAN RESULT IN SERIOUS PERSONAL INJURY.
2.12 SAFETY INSTRUCTIONS FOR CHARGER
- THIS APPLIANCE CAN BE USED BY CHILDREN AGED FROM 8 YEARS AND ABOVE AND PERSONS WITH REDUCED PHYSICAL, SENSORY OR MENTAL CAPABILITIES OR LACK OF EXPERIENCE AND KNOWLEDGE IF THEY HAVE BEEN GIVEN SUPERVISION OR INSTRUCTION CONCERNING USE OF THE APPLIANCE IN A SAFE WAY AND UNDERSTAND THE HAZARDS INVOLVED. CHILDREN SHALL NOT PLAY WITH THE APPLIANCE. CLEANING AND USER MAINTENANCE SHALL NOT BE MADE BY CHILDREN WITHOUT SUPERVISION.
- IF THE SUPPLY CORD IS DAMAGED, IT MUST BE REPLACED BY THE MANUFACTURER, ITS SERVICE AGENT OR SIMILARLY QUALIFIED PERSONS IN ORDER TO AVOID A HAZARD.
- CHILDREN SHOULD BE SUPERVISED TO ENSURE THAT THEY DO NOT PLAY WITH THE CHARGER.
BEFORE USING THE CHARGER, READ ALL THE INSTRUCTIONS AND CAUTIONARY MARKINGS ON THE CHARGER AND BATTERY PACK.
- DO NOT ATTEMPT TO CHARGE BATTERY PACKS OTHERWISE SUPPLIED. THE CHARGER AND BATTERY PACK SUPPLIED WITH IT ARE SPECIFICALLY DESIGNED TO WORK TOGETHER.
- CHARGE THE BATTERY PACK INDOORS ONLY AS THE CHARGER IS DESIGNED FOR INDOOR USE ONLY.
2.13 RESIDUAL RISKS
FAMILIARISE YOURSELF WITH THE USE OF THIS PRODUCT BY MEANS OF THIS INSTRUCTION MANUAL. MEMORISE THE SAFETY DIRECTIONS AND FOLLOW THEM TO THE LETTER. THIS WILL HELP TO PREVENT RISKS AND HAZARDS. ALWAYS BE ALERT WHEN USING THIS PRODUCT, SO THAT YOU CAN RECOGNISE AND HANDLE RISKS EARLY. FAST INTERVENTION CAN PREVENT SERIOUS INJURY AND DAMAGE TO PROPERTY. SWITCH OFF IF THERE ARE MALFUNCTIONS.
- EVEN IF ALL INSTRUCTIONS ARE STRICTLY FOLLOWED, THERE ARE STILL SOME FACTORS THAT COULD LEAD TO HAZARDS, SUCH AS:
-THROWNOUTPIECESOF THEWORK PIECE.
- DO NOT CHARGE NON-RECHARGEABLE BATTERIES.
- PROTECT THE CHARGER AGAINST MOISTURE AND WET CONDITIONS. THERE IS A DANGER OF ELECTRIC SHOCK.
- ENSURE PROPER VENTILATION WHEN CHARGING.
- DO NOT PLACE ANY OBJECT ON TOP OF THE CHARGER AS IT COULD CAUSE OVERHEATING. DO NOT PLACE THE CHARGER NEAR ANY HEAT SOURCE.
- DO NOT USE AN EXTENSION CORD UNLESS IT IS ABSOLUTELY NECESSARY. THE USE OF AN IMPROPER EXTENSION CORD COULD CAUSE THE RISK OF FIRE, ELECTRIC SHOCK OR ELECTROCUTION.
- DO NOT USE THE CHARGER IF IT HAS BEEN SUBJECTED TO A HEAVY KNOCK, DROPPED OR OTHERWISE DAMAGED IN ANY WAY. HAVE THE CHARGER CHECKED AND REPAIRED BY AN AUTHORISED SERVICE CENTRE.
- DO NOT DISASSEMBLE THE CHARGER. INCORRECT RE-ASSEMBLY MAY RESULT IN THE RISK OF FIRE, ELECTRIC SHOCK OR ELECTROCUTION.
-
DISCONNECT THE CHARGER FROM THE POWER SUPPLY BEFORE ATTEMPTING TO CLEAN IT TO REDUCE THE RISK OF AN ELECTRIC SHOCK. REMOVING THE BATTERY PACK ALONE DOES NOT REDUCE THE RISK.
-
VIBRATION INJURIES: USE DESIGNATED HANDLES AND TRY TO REDUCE WORKING TIME AND EXPOSURE.
- INJURIES CAUSED BY NOISE: WEAR EAR PROTECTION AND REDUCE WORKING TIME AND EXPOSURE.
- INHALATION OF DUST AND PARTICLES.
- WEAREYE PROTECTION AT ALL TIMES.
IF YOU EXPERIENCE ANY OF THESE FACTORS WHILE USING THE MACHINE, STOP THE MACHINE CONSULT YOUR DOCTOR IMMEDIATELY
- INJURIES MAY BE CAUSED OR AGGRAVATED BY PROLONGED USE OF A TOOL. WHEN USING ANY TOOL FOR PROLONGED PERIODS,ENSURE YOU TAKE REGULAR BREAKS.
PROLONGED USE OF THE PRODUCT EXPOSES THE USER TO VIBRATIONS THAT CAN CAUSE A RANGE OF CONDITIONS COLLECTIVELY KNOWN AS HAND
ARM VIBRATION SYNDROME (HAVS) E.G. FINGERS GOING WHITE; AS WELL AS SPECIFIC DISEASES SUCH AS CARPAL TUNNEL SYNDROME.
TO REDUCE THIS RISK WHEN USING THE PRODUCT, ALWAYS WEAR PROTECTIVE GLOVES AND KEEP YOUR HANDS WARM.
- TECHNICAL DATA
| Model | 8VGS2-3IN1.12 |
| Battery voltage (V d.c.) | Max 8V d.c. |
| Battery type | Li-Ion |
| Battery capacity | 2000mAh |
| Strokes | 1250min-1 |
| Charger model | JLH161051300G |
| Charger (included) input | 100-240V~ 50-60Hz 20W |
| Charger (included) output | 10.5 V DC, 1300 mA |
| Battery run-time max. | 40 min |
| Charging time max. | around 2h |
| Cutting width of grass shear blade | 96 mm |
| Cutting length of hedge trimmer | 136 mm |
| Machine weigh | Max 1.3 kg (with long pole) |
| Guaranteed sound power level (dB(A)) | 87 dB(A) |
| Measured sound power level (dB(A)) | 84 dB(A), K=3dB(A) |
| Sound pressure level (dB(A)) | 73 dB(A),K=3 dB(A) |
| Working current | 2.5 A |
| Maximum current | 22 A |
| Vibration level (K=1.5m/s2) | 3.32 m/s2 |
| No-load speed (min-1) | 1250 |
Note
- The declared vibration total value(s) and the declared noise emission value(s) have been measured in accordance with a standard test method and may be used for comparing one tool with another;
- The declared vibration total value(s) and the declared noise emission value(s) may also be used in a preliminary assessment of exposure.
Warning:
- The vibration and noise emissions during actual use of the power tool can differ from the declared values depending on the ways in which the tool is used especially what kind of workpiece is processed;
- The emissions value need to identify safety measures to protect the operator that are based on an estimation of exposure in the actual conditions of use (taking account of all parts of the
operating cycle such as the times when the tool is switched off and when it is running idle in addition to the trigger time).
Recommendation for the operator to wear hearing protection.
4. ASSEMBLY

WARNING! THE PRODUCT MUST BE FULLY ASSEMBLED BEFORE OPERATION! DO NOT USE A PRODUCT THAT IS ONLY PARTLY ASSEMBLED OR ASSEMBLED WITH DAMAGED PARTS!
4.1 UNBOXING

- Handle
- Safety lock-off button
- Motor housing
- Grass shear blade
- Charging socket and steering tube's socket
- Charge level indicator
- ON/OFF trigger switch
- Blade cover
- Hedge trimmer blade
- Grass shear blade sheath
- Hedge trimmer blade sheath
-
Charger
-
Charger plug
- Steering tube's handle
- Steering tube's ON/OFF trigger switch
- Telescopic tube
- Steering tube's plug
- Wheels
- Slot
- Position button
- Steering tube's safety lock-off button
- Auxiliary Handle
*The steering tube is not supplied.
- WEAR GLOVES WHEN UNBOXING.
- DO NOT USE CUTTER, KNIFE, SAW OR ANY OTHER SIMILAR TOOL FOR UNBOXING.
CARRY THE TOOL ONLY BY THE HANDLE 1OR 14 AND 22 (WITH STEERING TUBE).
- KEEP THE BOX FOR FURTHER REUSE (TRANSPORT AND STORAGE).
- KEEP INSTRUCTION MANUAL IN A DRY AREA FOR FURTHER CONSULTATION.
4.2 INSTALLATION

THIS CORDLESS BATTERY GRASS SHEAR COMES COMPLETELY ASSEMBLED WITH THE GRASS SHEAR BLADE PRE-INSTALLED.
4.3 FIRSTUSE

WARNING! READ THE « SAFETY INSTRUCTION » SECTION AT THE BEGINNING OF THIS MANUAL INCLUDING ALL TEXT UNDER SUBHEADING THEREIN BEFORE USING THIS PRODUCT.

THE BATTERY IS NOT FULLY CHARGED AT THE TIME OF PURCHASE.
Pay particular attention using the machine for the first time: focus and dedicate all your attention to this first use. Make the first trial on a free space with no obstacle and no surrounding element
4.4 OPERATION
Charge the product: illustration 3.2 to 3.4
The battery charger supplied matches the lithium-ion battery installed in the tool. Do not use other battery chargers. The lithium-ion battery is protected against deep discharging. When the battery is empty, a protective circuit will automatically switch OFF the product. The blade will no longer move and a slight whistling sound will be heard. Charge the battery for 3 hours then use it until it runs down (i.e. the tools starts to operate slowly). Recharge for 3 hours again before resuming operation.
WARNING : Continued and excessive overuse of the ON/OFF trigger switch can permanently damage the lithiumion battery.

CAUTION : THIS CHARGER DOES NOT AUTOMATICALLY TURN OFF WHEN THE BATTERY IS FULLY CHARGED. PLEASE TAKE CARE NOT TO LEAVE THE BATTERY GRASS SHEAR PLUGGED INTO THE CHARGER.
Switch off or unplug the charger at the mains when charging is complete.
NOTE : The charge level indicator LED light will illuminate red when the charger is plugged in and is charging the grass shear. The middle LED light will turn green when the battery grass shear is fully charged.
The charging process starts as soon as the charger is plugged into both the proper electrical outlet 230V and the tool.
- During the charging procedure, the handle of the tool will feel slightly warm to the touch. This is normal.
- When no further use is planned for an extended period of time, disconnect the battery charger from the outlet and the unit.
- Do not use the tool during the charging procedure.
Battery charging: The length of service between each charging varies depending on the type of work you are doing. The battery in this battery grass shear has been designed to provide maximum trouble-free life. However, like all batteries, it will eventually wear out. To obtain the longest possible battery life, we suggest the following:
- Store and charge your battery grass shear in a cool area. Temperatures above or below normal room temperature will shorten battery life.
- Never store the battery grass shear with the battery in a discharged condition. Recharge the unit immediately after it is discharged.
- All batteries gradually lose their charge. The higher the temperature is, the faster they lose their charge. If you store your battery grass shear for long periods of time without using it, recharge the battery every 6 months. This will extend battery life. Do not charge the battery pack when the air temperature falls below 4^ or above 40^ . Following these safety measures will prevent damage to the battery pack.
- Plug the charger adaptor into an appropriate AC power outlet. Connect the AC adaptor charger plug into the charging socket of the battery grass shear and to start charging.
- The battery will take approximately 3 hours to charge. Charging may take up to 5 hours due to the level of charge left in the battery and the ambient temperature.
NOTE : A charge level indicator LED light will always be illuminated when the charger is plugged in and the mains power is turned on. The charge indicator indicates the charge status of the battery grass shear as shown below :
| Condition | Colour of LED's |
| Charging | Red |
| Fully Charged | Green |
| Low Charge | Yellow |
Switching on/off: illustration 4.2 to 4.3

WARNING : ENSURE THE BLADE DOES NOT TOUCH ANY OBJECTS BEFORE TURNING ON THE PRODUCT.
To turn the tool ON, push and hold the safety lock-off button with your thumb, while pressing the ON/OFF trigger switch with your forefinger. Once the trigger switch engages, you can release the safety lock-off button and proceed with operation.
NOTE: The safety lock-off button reduces the risk of accidental starting.
To turn the tool OFF, release the ON/OFF trigger switch.
NOTE : The steering tube has the same functions (steering tube's ON/OFF trigger switch and steering tube's safety lock-off button) to switch the tool on or off after assembling the steering tube.

CAUTION: DO NOT FORCE THE BLADES THROUGH DENSE GROWTH. IF THE BLADES SLOW DOWN, THEN REDUCE YOUR CUTTING PACE. SHOULD THE BLADES JAM, RELEASE THE TRIGGER IMMEDIATELY.
DO NOT USE YOUR FINGERS TO FREE UP JAMMED BLADES. JAMMED BLADES CAN RELEASE SUDDENLY CAUSING SERIOUS INJURY. NEVER TOUCH THE BLADE RAIL WHILE IN OPERATION AND BE AWARE OF SHARP EDGES EVEN WHEN THE BATTERY GRASS SHEAR IS NOT IN USE.
Always ensure you are securely balanced with a free work area before switching on the grass shear.
There are three working positions to operate the grass shear after assembling the steering tube.
Push the position button of the steering tube to choose the best working position to operate the tool working.
Operation safety warnings :
- CHECK THE PRODUCT AND CHARGER AS WELL AS ACCESSORIES FOR DAMAGE BEFORE EACH USE. DO NOT USE THE PRODUCT IF IT IS DAMAGED OR SHOWS WEAR.
- DOUBLE CHECK THAT THE ACCESSORIES AND ATTACHMENTS ARE PROPERLY FIXED.
- ALWAYS HOLD THE PRODUCT ON ITS HANDLE. KEEP THE HANDLE DRY TO ENSURE SAFE SUPPORT.
- ENSURE THAT THE AIR VENTIS ARE ALWAYS UNOBSTRUCTED AND CLEAR. CLEAN THEM IF NECESSARY WITH A SOFT BRUSH. BLOCKED AIR VENTIS MAY LEAD TO OVERHEATING AND DAMAGE THE PRODUCT.
- SWITCH THE PRODUCT OFF IMMEDIATELY IF YOU ARE DISTURBED WHILE WORKING BY OTHER PEOPLE ENTERING THE WORKING AREA. ALWAYS LET THE PRODUCT COME TO COMPLETE STOP BEFORE PUTTING IT DOWN.
- DO NOT OVERWORK YOURSELF. TAKE REGULAR BREAKS TO ENSURE YOU CAN CONCENTRATE ON THE WORK AND HAVE FULL CONTROL OVER THE PRODUCT.
BEFORE SWITCHING THE PRODUCT ON, CHECK WHETHER IT HAS BEEN ASSEMBLED CORRECTLY AND ALL THE MOVING PARTS ARE RUNNING SMOOTHLY.
-
WE RECOMMEND SLIGHTLY DAMPING SURFACES IN DUSTY CONDITIONS OR USING A MISTER ATTACHMENT.
-
OPERATE THE PRODUCT ONLY AT REASONABLE HOURS - NOT EARLY IN THE MORNING OR LATE AT NIGHT WHEN PEOPLE MIGHT BE DISTURBED.
- AVOID USING THE PRODUCT IN BAD WEATHER CONDITIONS, ESPECIALLY WHEN THERE IS A RISK OF LIGHTNING. DO NOT OPERATE THE PRODUCT IN POOR LIGHTING. THE OPERATOR REQUIRESC A CLEAR VIEW OF THE WORK AREA TO IDENTIFY POTENTIAL HAZARDS.
OPERATING SIMILAR TOOLS NEARBY INCREASES BOTH THE RISK OF HEARING INJURY AND THE POTENTIAL FOR OTHER PERSONS TO ENTER YOUR WORK AREA.
- KEEP FIRM FOOTING AND BALANCE.
DO NOT OVERREACH. OVERREACHING CAN RESULT IN LOSS OF BALANCE. ALWAYS BE SURE OF THE FOOTING ON SLOPEs.
- WALK, NEVER RUN. KEEP ALL PARTS OF YOUR BODY AWAY FROM ANY MOVING PART.
- NEVER RUN THE PRODUCT WITHOUT THE PROPER EQUIPMENT ATTACHED.
- DO NOT MODIFY THE PRODUCT IN ANY WAY OR USE PARTS AND ACCESSORIES THAT ARE NOT RECOMMENDED BY THE MANUFACTURER.
- DO NOT TO TOUCH MOVING HAZARDOUS PARTS BEFORE THE MACHINE IS DISCONNECTED FROM THE MAINS AND THE MOVING HAZARDOUS PARTS HAVE COME TO A COMPLETE STOP

-
TO REDUCE THE RISK OF INJURY ASSOCIATED WITH CONTACTING ROTATING PARTS, ALWAYS STOP THE MACHINE AND MAKE SURE ALL MOVING PARTS HAVE STOPPED:
-
BEFORE CLEANING OR CLEARING A BLOCKAGE
-
WHEN LEAVING THE PRODUCT UNATTENDED
-
BEFORE INSTALLING OR REMOVING ATTACHMENTS
-BEFORE CHECKING, MAINTAINING OR WORKING ON THE PRODUCT
- IF THE MACHINE STARTS TO VIBRATE ABNORMALLY (INSPECT
IMMEDIATELY) AFTER STRIKING A FOREIGN OBJECT TO INSPECT THE MACHINE FOR DAMAGE,
General operation:illustration 4.1 to 4.9
When older hedges are to be cut back a substantial amount, use pruning shears or some other device to trim thicker branches (greater than 8mm diameter) to the desired length before starting work with the grass shear. To shape precisely, run a taught line between the extreme edges of the hedge and then trim along the length of the line. Ensure that the blade does not come into contact with any object made of hard material that could damage it, such as fencing wire or metallic plant supports.
Cutting tips
1. Shaping
The hedge should be trimmed to achieve a trapezoidal form, it should widen toward the bottom at both sides. This improves the penetration of light to the lower extremities. A general guideline is approximately 10cm slant for each 1 meter of hedge height.
2. Cutting sequence
First cut both sides, starting at the bottom and working to the top: this prevents cuttings from falling into the area where you are still to work.
3. Trimming the top
Where the branches have grown extremely long, cut back the hedge in several stages. The shorter cuttings obtained are better suited for composting.
After use
Switch the product off and let it cool down.
Check, clean and store the product as described below.
5. TRANSPORTATION
Transporting the machine may require that you meet certain requirements specific to your country. Please make sure to respect them by contacting the authorities of your country, in order to respect them all. Ensure temperature during transportation will never be out of temperature range given on chapter storage
5.1 TRANSPORT THE MACHINE
Switch the product off and fully charge the battery. Attach the blade sheath. Protect the product from any heavy impact or strong vibrations which may occur during transportation in vehicles. Secure the product to prevent it from slipping or falling over.
6. WINTERING
Follow all instructions given on chapter storage below. We recommend using the original package for storage or covering the product with a suitable cloth or enclosure to protect it against dust.
7. STORAGE
Only store the machine in a clean, dry, ventilated place with a temperature range of 4^ to 24^ . Cover it in order to provide added protection. We recommend using the original package for storage or covering the product with a suitable cloth or enclosure to protect it against dust. Be sure to secure the unit while transporting
7.1 STORE THE MACHINE
Illustration 6.1
Shutdown the power tool. Examine the unit thoroughly for worn, loose or damaged parts. Clean the unit before storing. Do not expose the product to sunlight. Make sure the product is always protected from cold and humidity.
8. MAINTENANCE

DANGER! RISK OF INJURY DUE TO ELECTRIC SHOCK.
SHUTDOWN THE POWER TOOL BEFORE ADJUSTING, INSPECTING, CLEANING OR STORING THE PRODUCT.
8.1 CLEANING
Illustration 5.1 to 5.3
Keep all safety devices, air vents, and motor housing free of debris and dirt. Wipe down the equipment with a cloth and/or compressed air. It is highly suggested that you clean the device after every use.
Do not use cleaning agents, as these can attack the plastic and weaken the structural integrity of the grass shear.
Clean and lubricate the blades
To ensure many years of efficient and trouble-free operation, blade cleaning should be performed if sap and debris have built-up, or if you live in an area where the soil is sandy. Cleaning unusually heavy deposits may require removal of the blades. For easier operation and longer blade life, lubricate the hedge trimmer blade before and after each use. Stop the product. Lay the battery grass shear on a flat surface. Apply lightweight product oil along the edge of the top blade. If you will be using the battery grass shear for an extended period, it is advisable to stop work intermittently in order to re-oil the blade.
NOTE: DO NOT OIL WHILE THE BATTERY GRASS SHEAR IS RUNNING.
8.2 REPLACEMENT
Fitting and changing the blades 2.1 to 2.9
The battery grass shear is equipped with two interchangeable blades. The hedge trimmer blade is used to cut hedges and shrubs while the grass shear blade is used to cut grass and hedges where finer detail is required.
- Turn the battery grass shear upside down holding in one hand on a hard surface.
Gently lift the tab of the blade cover and slide back until the cover can be removed.
2.Gently remove the blade by lifting the end tip of the blade off of the battery grass shear unit.
3.Insert the desired blade into the base of the motor housing.
- Align the 4 lugs for a secure fitment. The gear shaft in the middle of the blade also has to be aligned.
5.Once the blade is in position, align the blade cover with the slots in the base of the motor housing.
6.Push forward on the blade cover until it slides and clicks into place. The battery grass shear is now ready for use.
To remove a blade
- Turn the battery grass shear upside down holding in one hand on a hard surface. Gently lift the tab of the blade cover and slide back until the blade cover can be removed.
2.Remove the blade gently by lifting the end tip of the blade off the battery grass shear unit.
3.Follow steps 2 - 6 of "Fitting and changing the blades" to secure the blade.
Assemble the steering tube
NOTE: It depends on your working demand whether assembling the steering tube.
- Install the grass shear into the slot of the steering tube.
- Connect the steering tube's plug to the socket of the grass shear.
- To remove, unplug the steering tube's plug and remove the grass shear form the slot.

| POS | DESCRIPTION | NUM | AVAILABILITY YEARS OF SPARE PARTS |
| 2 | Electronic components | 1 | 5 |
| 3 | Battery assembly | 1 | 5 |
| 4 | Heat shrinkable tube | 0,02 | 5 |
| 5 | Self tapping screw | 2 | 5 |
| 6 | Left housing | 1 | 5 |
| 7 | Handle trigger spring | 1 | 5 |
| 8 | Switch trigger 2 | 1 | 5 |
| 9 | Decorative cover | 1 | 5 |
| 10 | Motor | 1 | 5 |
| 11 | Small gear | 1 | 5 |
| 12 | Screw | 2 | 5 |
| 13 | Gear box | 1 | 5 |
| 14 | Grinding pad | 2 | 5 |
| 15 | Duplicate gear | 1 | 5 |
| 16 | E retaining ring | 1 | 5 |
| 17 | Big gear | 1 | 5 |
| 18 | Right housing | 1 | 5 |
| 19 | Sponge mats | 1 | 5 |
| 20 | Base | 1 | 5 |
| 21 | Blade Protective Sleeve | 1 | 5 |
| 22 | Rivet | 3 | 5 |
| 23 | Blade pin | 3 | 5 |
| 24 | Upper blade | 1 | 5 |
| 25 | Lower blade | 1 | 5 |
| 26 | Scissor sheath | 1 | 5 |
| 27 | Scissor fixing pin | 1 | 5 |
| 28 | Upper shear blade | 1 | 5 |
| 29 | Lower shear blade | 1 | 5 |
| 30 | Charger | 1 | 5 |
| 31 | Socket cover | 1 | 5 |
| 32 | Lock push button | 2 | 5 |
| 33 | Lock push button spring | 2 | 5 |
| 34 | Heat shrinkable tube | 0.06 | 5 |
| 35 | Knife set | 1 | 5 |
| 36 | Knife set | 1 | 5 |
8.4 TROUBLESHOOTING

DANGER! RISK OF INJURY DUE TO ELECTRIC SHOCK.
WARNING! BEFORE ANY TROUBLE SHOOTING, SWITCH OFF THE PRODUCT.
| Problems | Probable causes | Solutions | Qualification required |
| Product does not start | Battery is not charged | Charge the battery according to the instructions included with your model | - |
| ON/OFF trigger switch not set on ON position | Refer to chapter “Switching on/off” |
| Product does not reach full power | Battery capacity too low | Charge battery | - |
| Vibration or noise is excessive | Bolts/nuts are loose | Tighten bolts/nuts | - |
| Product suddenly stops | Battery discharged | Charge battery pack | - |
| Battery too hot | Let it cool down |
| Product maybe over current* | Stop the product and wait for 3 minutes to restart |
*Over current means "Self-protection". "Self-protection" mode is a degraded mode, limited in time (we recommend a maximum duration of 5 minutes) during which the use of the product is made impossible so that the product can recover its initial state.
9. END OF LIFE
Electrical products should not be discarded with household products. Used electrical products must be collected separately and disposed of at collection points provided for this purpose. Talk with your local authorities or dealer for advice on recycling.

The batteries are installed so that they can be removed only by an expert, batteries are built into the device, and the device must be disposed of therefore only by a specialist.
10. ENVIRONMENTAL PROTECTION
Waste electrical products must not be disposed of with household waste. According to the European Battery Directive, defective or used battery packs/batteries, must be collected separately and disposed of in an environmentally correct manner. Please recycle where facilities exist. Check with your local authorities or retailer for recycling advice. It will then be recycled or dismantled in order to reduce the impact on the environment. Battery pack/ batteries can be hazardous for the environment and for human health since they contain hazardous substances.
11. WARRANTY
11.1 OUR WARRANTY
STERWINS products are designed according to the highest quality standards for products intended for the consumer market. This sale warranty covers a period of 5 years as of the date of purchase of the product. This warranty covers all defects in materials and workmanship: missing parts and elements, and damage occurring under normal use circumstances. Repair and replacement of parts do not lead to an extension of the initial warranty period. You must be able to provide proof of the purchase for this product and the date of purchase. Warranty coverage is limited to the value of this product.
11.2 WARRANTY EXCLUSIONS
This warranty does not cover problems nor incidents resulting from incorrect use of the product.
The following items are not covered by warranty :
- The tool have been used incorrectly; or
- Damage occurring upon transporting or setting up this product; or
- Repairs and/or change of parts carried out by a third party; or
- Damage caused by external factors or foreign objects such as sand or stones; or
- Damage resulting from non-compliance with the safety and usage instructions; or
- The tool have been disassembled or opened; or
- The tool have been in a wet environment (dew, rain, submerged in water...); or
- The tool has been used for professional purpose; or
- The tool has been exposed to a temperature out of the range specified in chapter "storage"
The product must be used under normal usage circumstances, and for non-professional purposes. Therefore, excluded from this warranty are products used by gardening companies, local authorities, as well as companies offering paid rentals or free loaning of equipment.
In the event of a problem or defect, you should first always consult your Sterwins dealer. In most cases,
the Sterwins dealer will be able to solve the problem or correct the defect. Keep your invoice or your receipt: these documents will be requested upon processing any claims.
815949
8V Battery Grass Shear
815949 - EAN Code: 3276007392685
Industrial Type Design Reference: 8VGS2-3IN1.12
STERWINS
SN SSSSS XX DDMMYY nn PPPPPP (SN: Serial No., SSSSSS : Supplier code, XX : Factory ID, DDMMYY: Production date, nn: number of version of product, PPPPPP : Incremental number)
Directive 2000/14/EC Annex V and 2005/88/EC
ISO 11094:1991
EN ISO 3744:1995
EN ISO 3744:2010
Measured Sound power level:83.95 dB(A)
Guarantee sound power level:87 dB(A)
International Project Quality Leader
Ronchin France
16/12/2022
815949
La presente dichiarazione di formità e rilascata alla sbudile escludi da le fabbricante Nijnejda deciarajza zgodnosi wydata zostane na wylzq an opdwiedzioa producte JEmuvujia kai duuovun toukauoakoum tou eoouonouvou avmpoiourou Denureim a s adresa producrutorui sa representatunu auikoratur:
ADEO Services, 135 Rue Sadi Carnot - CS 00001 59790 RONCHIN - France
La presente dicharistica de formazione il sottasa le responsabilità esclusiva del fabricante [Nimjese delekarata zgondoslva Wynda stazete na wylqzcn opdowiezalnoce producanta]H tropoia 6uonu ouuopoucoen cokfioi tucnau kockouen Declarazione de forma conluate est emisa de rispondere exulasi e producaturou]
8V Battery Grass Shear
815949 - EAN Code: 3276007392685
Industrial Type Design Reference: 8VGS2-3IN1.12
STERWINS
SN SSSSSS XX DDMMYY nn PPPPPP (SN: Serial No., SSSSSS : Supplier code, XX : Factory ID, DDMMYY: Production date, nn: number of version of product, PPPPPP : Incremental number)
L'oggetto della dichiarazione di cui sopra e conformate alla pertinente normativa di armonization delle Unione/Wymionien powy2e pridemoti ninijsiekj der decankiz est jzgrod y odonsnmi wymagamiani uninjego pradoiwadstha harmonizc enegno/Je oro ngoc, m5/Baouco trosmpoepofoe de la cieare, a l'oeio (m) oyn, cmo) wvne, 1000. [Oboletal: Oboletal: Oboletal: Oboletal: Oboletal: Oboletal: Oboletal: Oboletal: Oboletal: Oboletal: Oboletal: Oboletal: Oboletal: Oboletal: Oboletal: Oboletal: Oboletal: Oboletal: Oboletal: Oboletal: Oboletal:
Riferimenti alle pertuneri norme armonizateizzutate o alle specifiche in relationazione alle quali e chiudirata la conformita)Odoliana do odonsihy norm zharonizomany, kote zastoswano, lub do specifikaci; w odiesieniu do ktohrky delkariaweta jest zgodnisc; (Mvela tuyn ogenovcr evaporotovcu vucu ovoi ovoi ovoi ovoi ovoi ovoi ovoi ovoi ovoi ovoi ovoi ovoi ovoi ovoi ovoi ovoi ovoi ovoi ovoi ovoi ovoi ovoi ovoi ovoi ovoi ovoi ovoi ovoi ovoi ovoi ovoi ovoi ovoi ovoi Otic n crticocr Kxivctan uonupoucoqur; [Referinte lstandaler ordarionate relevante folloso sue referenitete specificitati in legaturla cui se decalar conformitatea]
Dove applicable "Il nome e l numero del lavoratorio notificato che ha risilacato la certificazione e il refersimento al documento|W stowsomewny przechypadkach notifikowana nazwu i匿名lorumtorium, krote ywdalocertifikat oraz odieniesiezione do documentsi|Orto uyoi to ywovuoToivovu ovoa kai to vapboyou To evpavtovipou ToEvjoue To mytoTovopou To myavopodTo EvyypopoUnde this cazui numere di numurdal de Iavoratorenotificare ac eliberat certificareae s trimiterita du document
2006_42_EC_MACHINE
macchine|maszyn| oxetikα με τα μηχανματαlechipamentele tehnice
EN 62841-1:2015
EN 62841-4-2:2019
EN 50636-2-94:2014
2014 30 EU EMC
nxtropiaty eletromatrkiotompatiymotie electromagneticz [n]xntopotipniynu oriotrotoe compatiblete electromagnetic
ENIEC55014-1:2021
EN IEC 61000-3-2:2019+A1:2021
EN 61000-3-3:2013+A1:2019
EN IEC 55014-2:2021
RoHS Directive (EU) 2015/863 amending 2011/65/EU
IEC 62321-1:2013
IEC 62321-2:2021
IEC 62321-3-1:2013
IEC 62321-4:2013+A1:2017
IEC 62321-5:2013
IEC 62321-6:2015
IEC 62321-7-1:2015
IEC 62321-7-2:2017&ISO 17075-1:2017
IEC 62321-8:2017
ENIEC63000:2018
2011 65 EU RoHS
Directive 2000/14/EC Annex V and 2005/88/EC
ISO 11094:1991
EN ISO 3744:1995
EN ISO 3744:2010
Measured Sound power level:83.95 dB(A)
Guarantee sound power level:87 dB(A)
2000_14_EC_NOISE
International Project Quality Leader
Complato, firmato in vece e periconto diOpracowano, podpisano w imieniu[UnvovdxnKx, unovpoxf] yia kai _c ovovatoc[Complat, semmat de si in numele]
Luogo e data del rilasso[Data wydania i migliorse]Tomoc kai nyzpouwnyia [kdoohn]
Ronchin France
16/12/2022
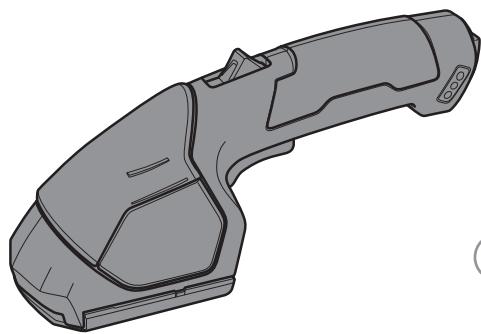
A
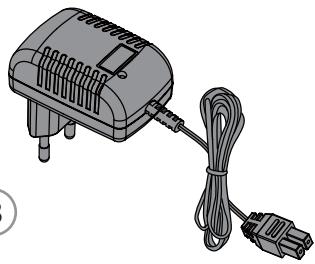
3

C
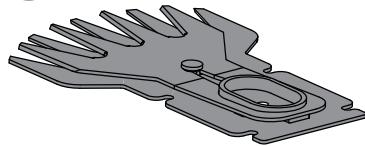
E
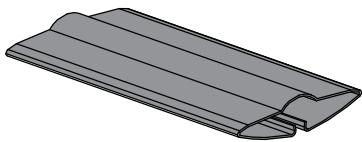
D

F
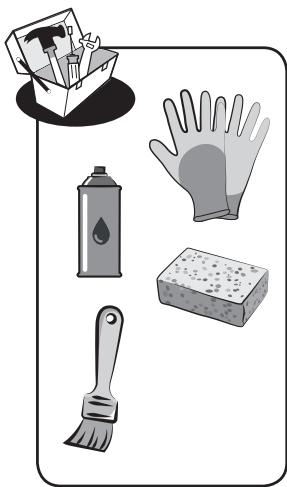
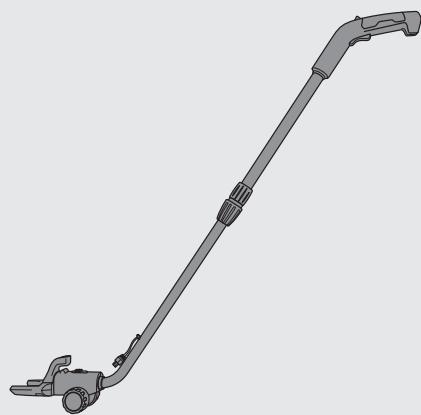
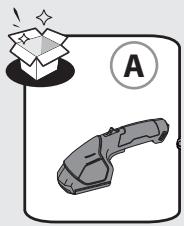

2.1

2.2
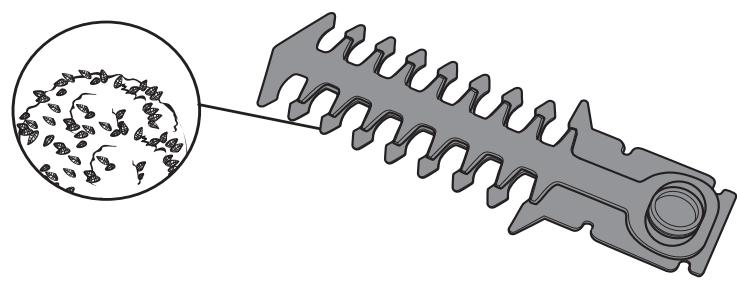
2.3
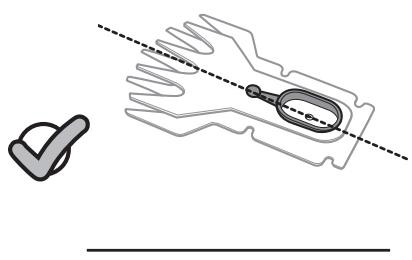

2.4
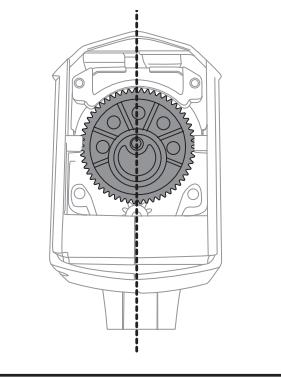

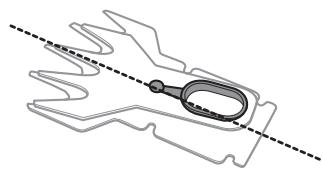


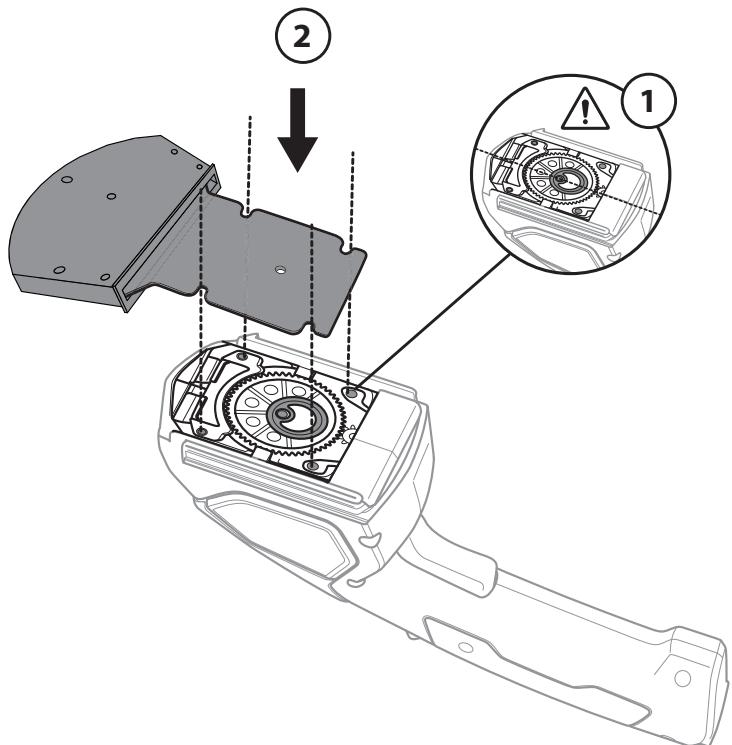
2.5
2.6

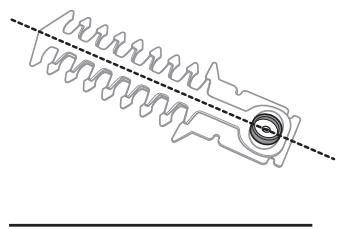

2.7

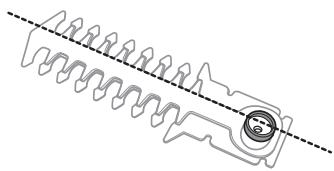

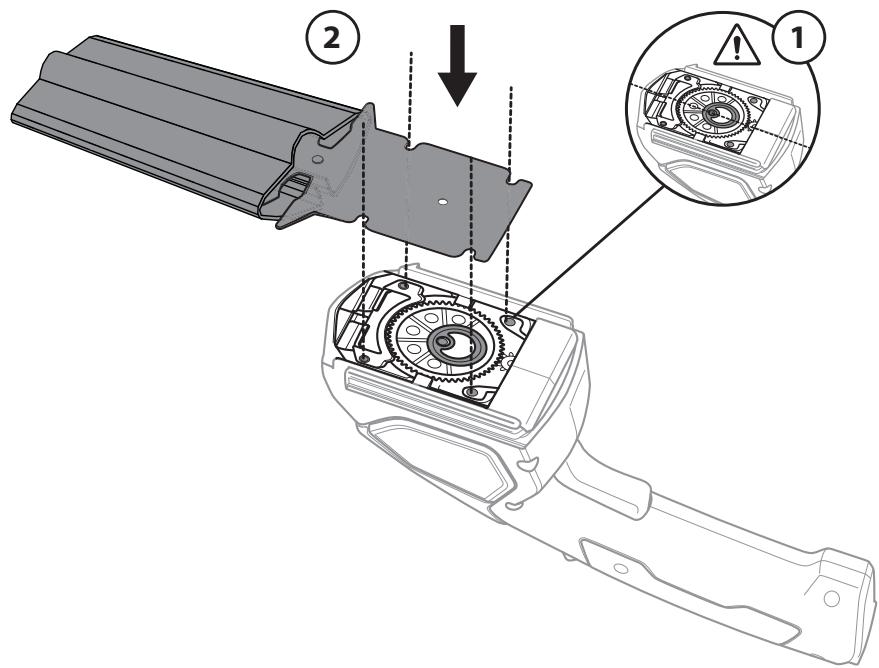
2.8
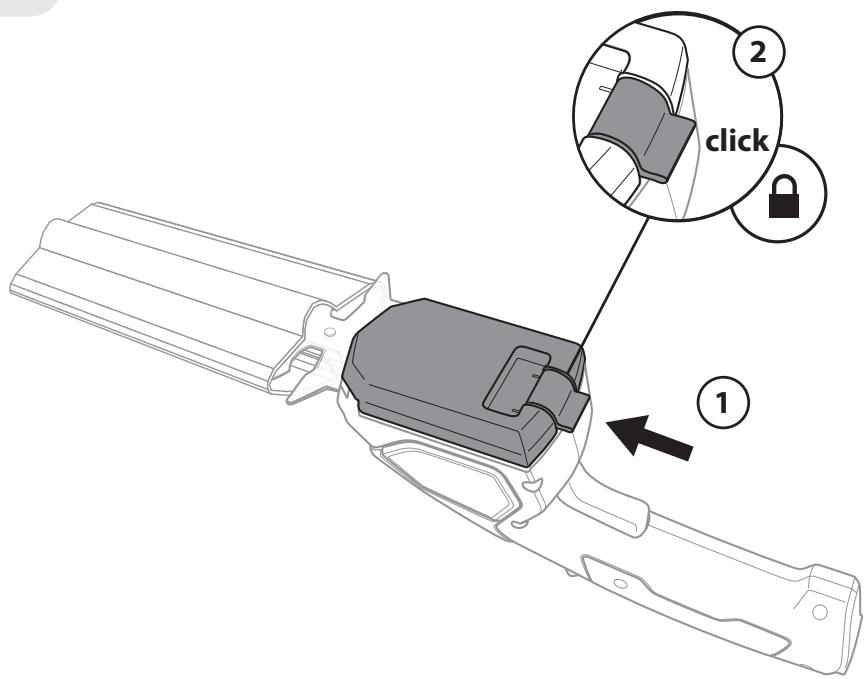
2.9
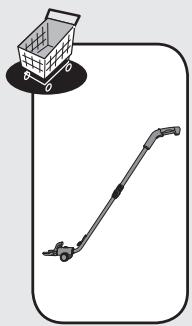

2.10
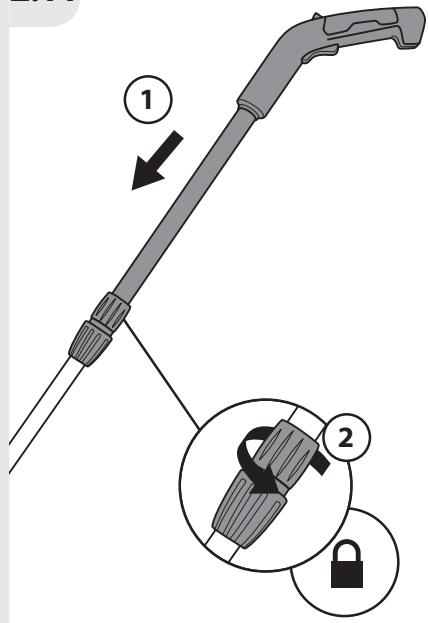
2.11
2.12
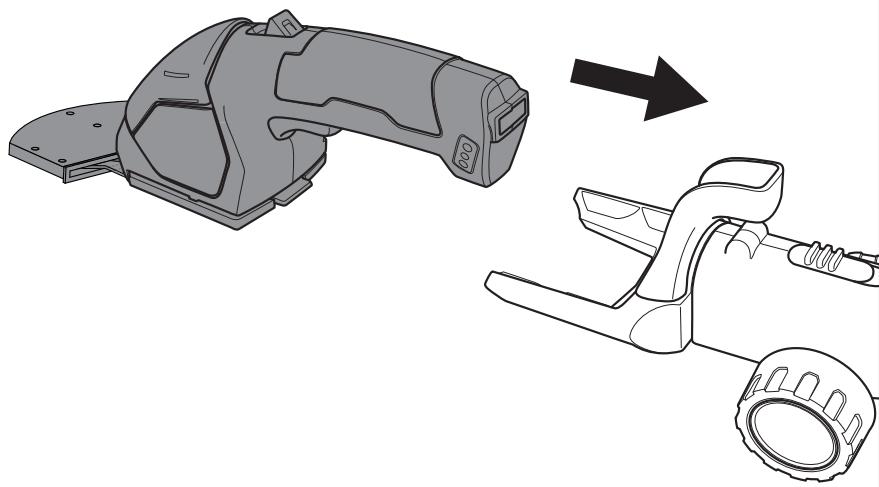
2.13
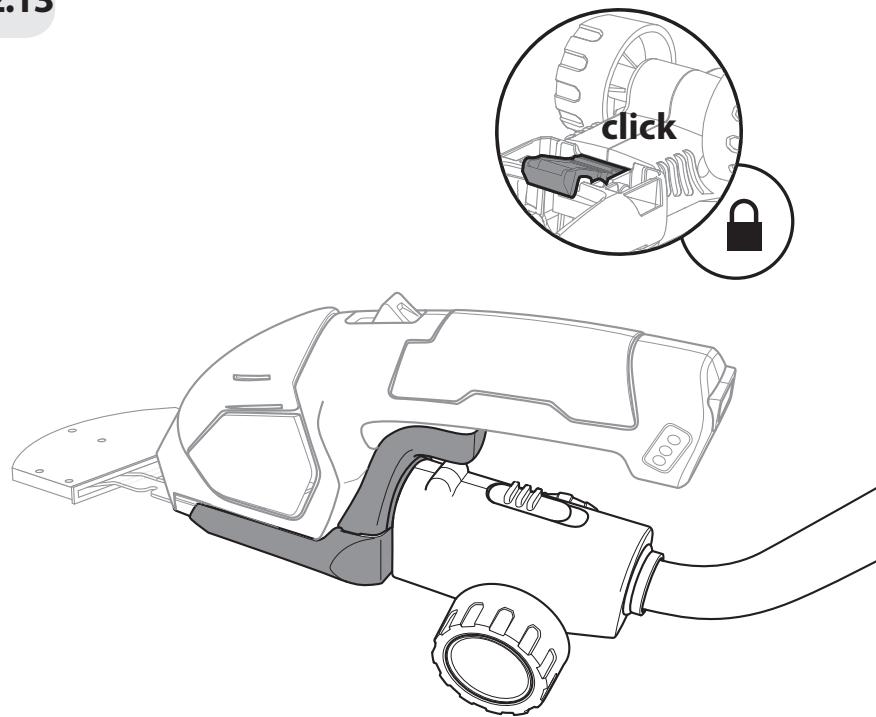
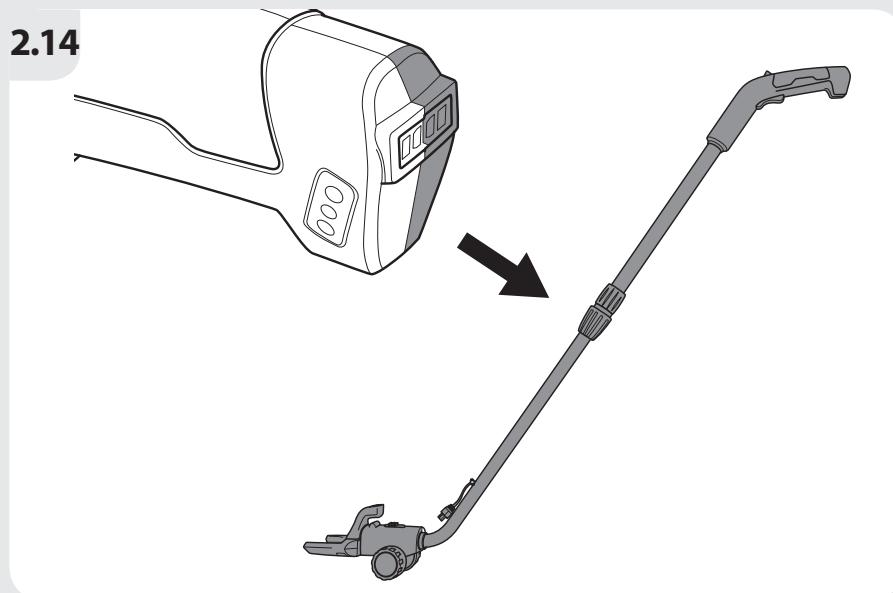
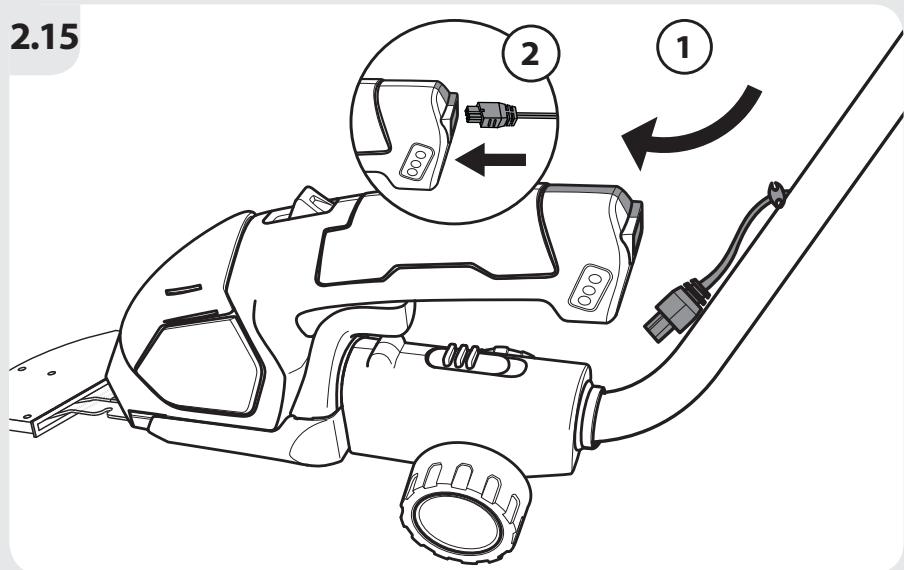
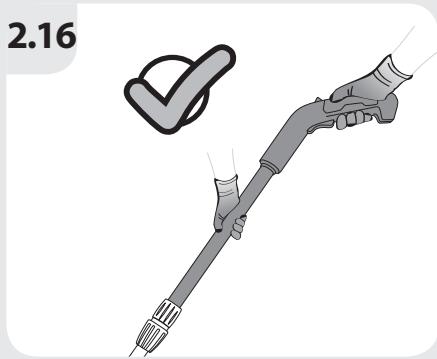
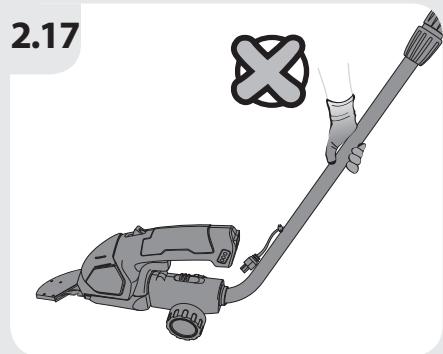

3.1


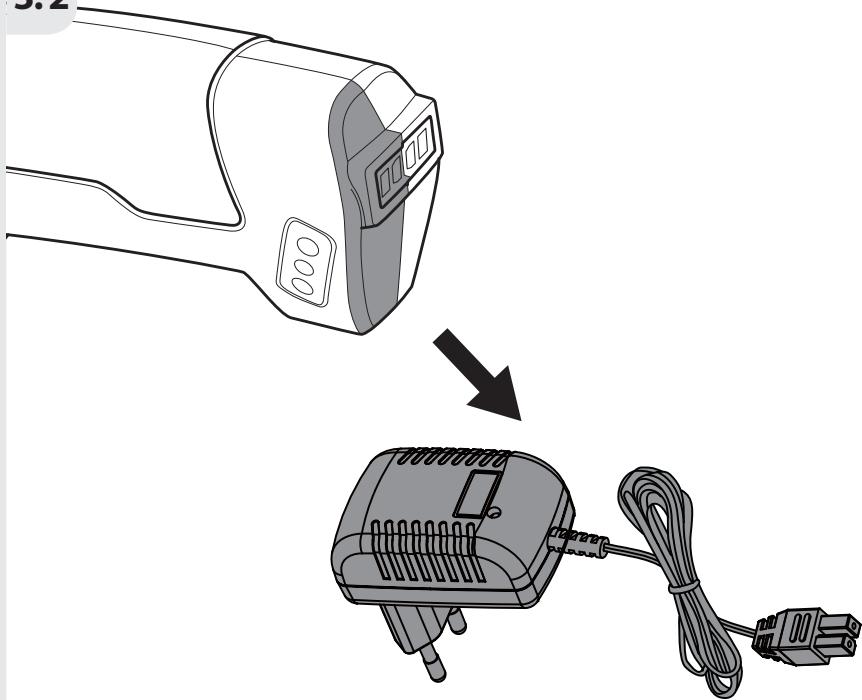
3.2
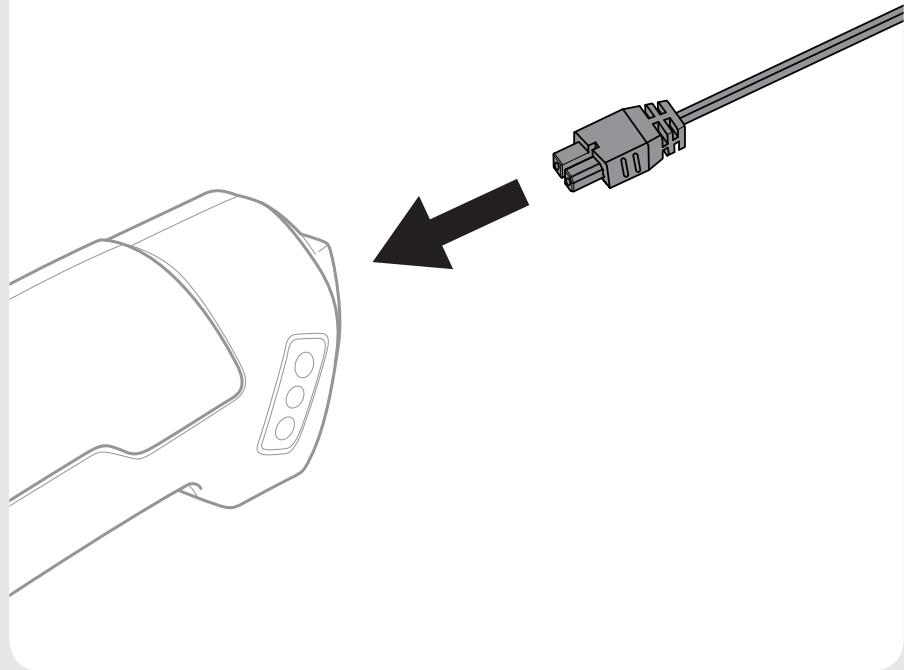
3.3
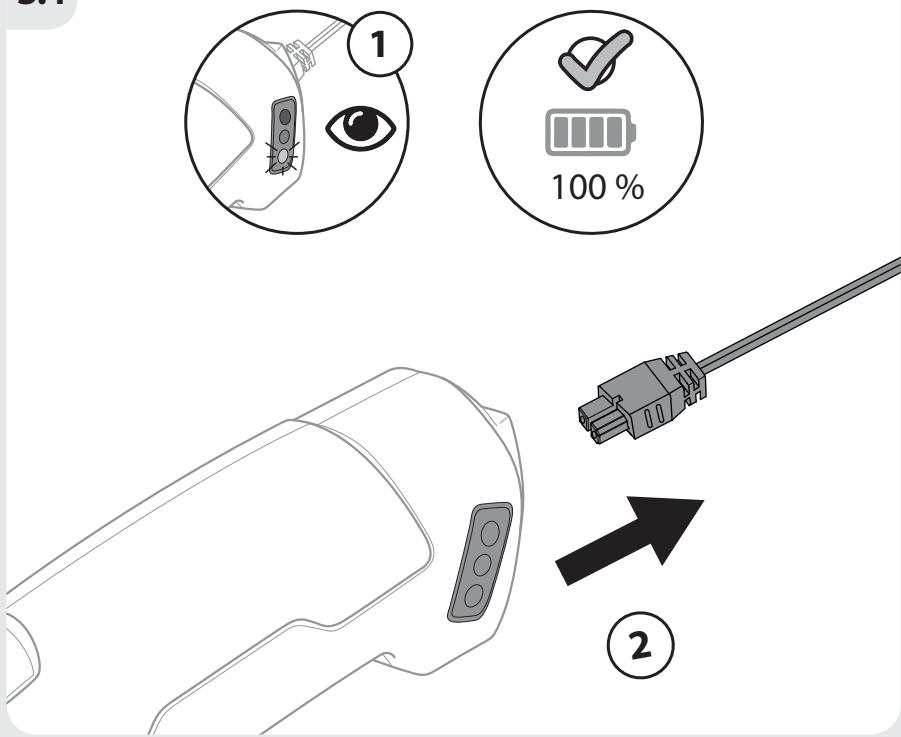
3.4
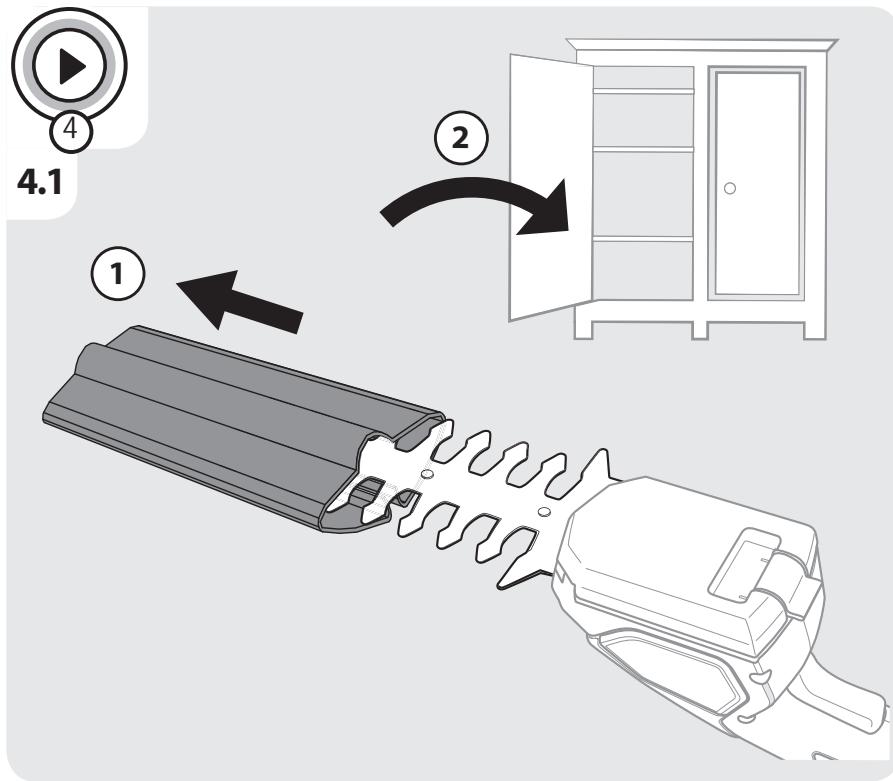
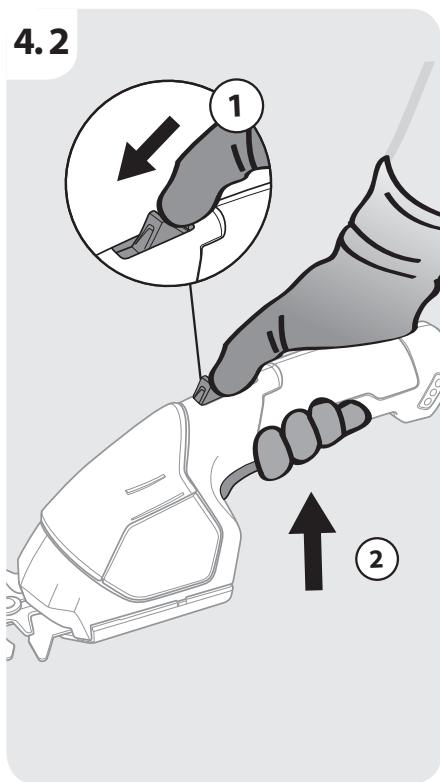
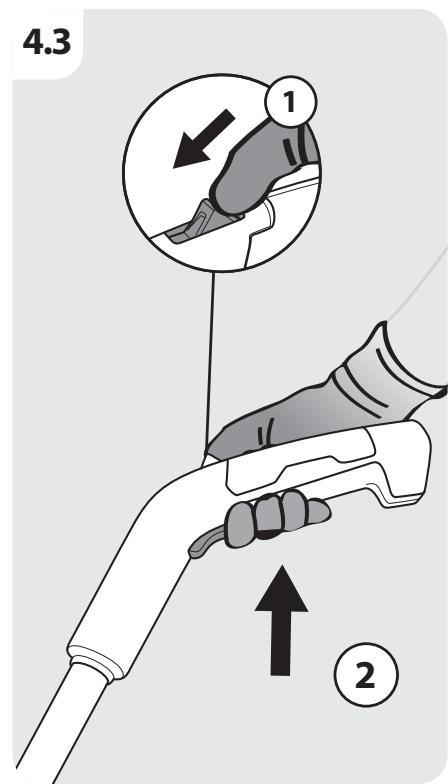
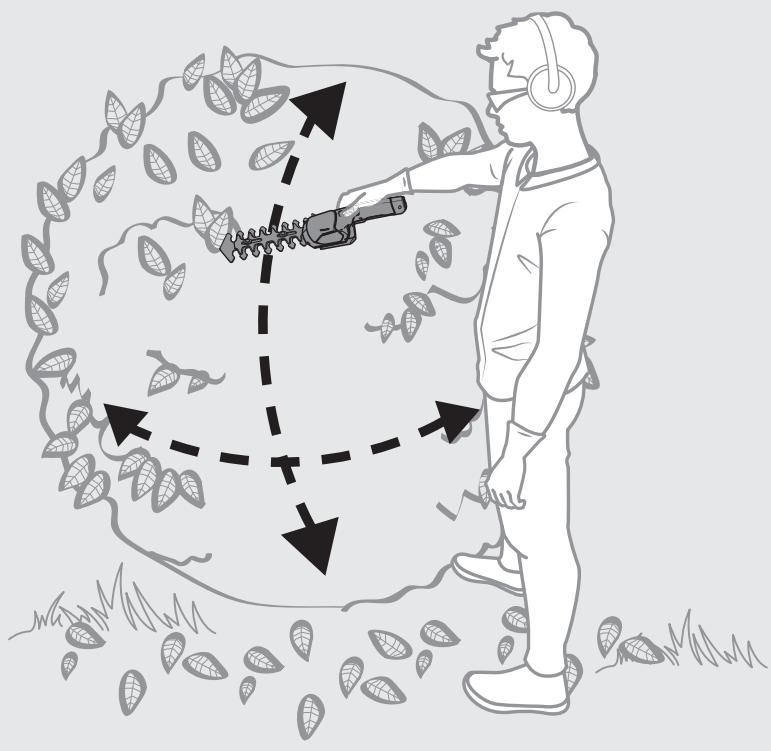
4.4
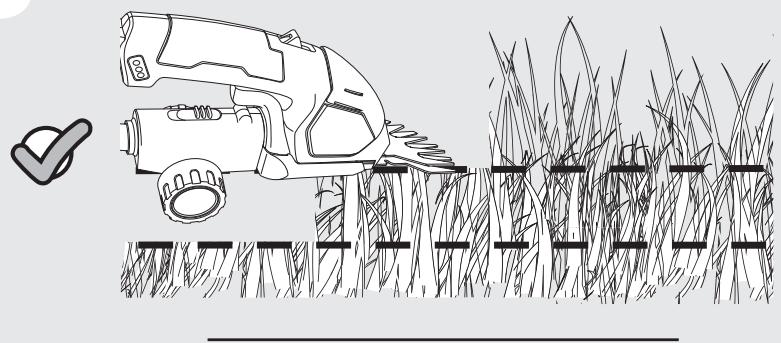
4.5
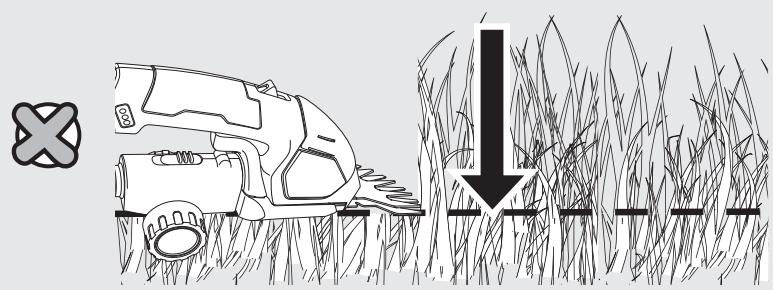
4.6
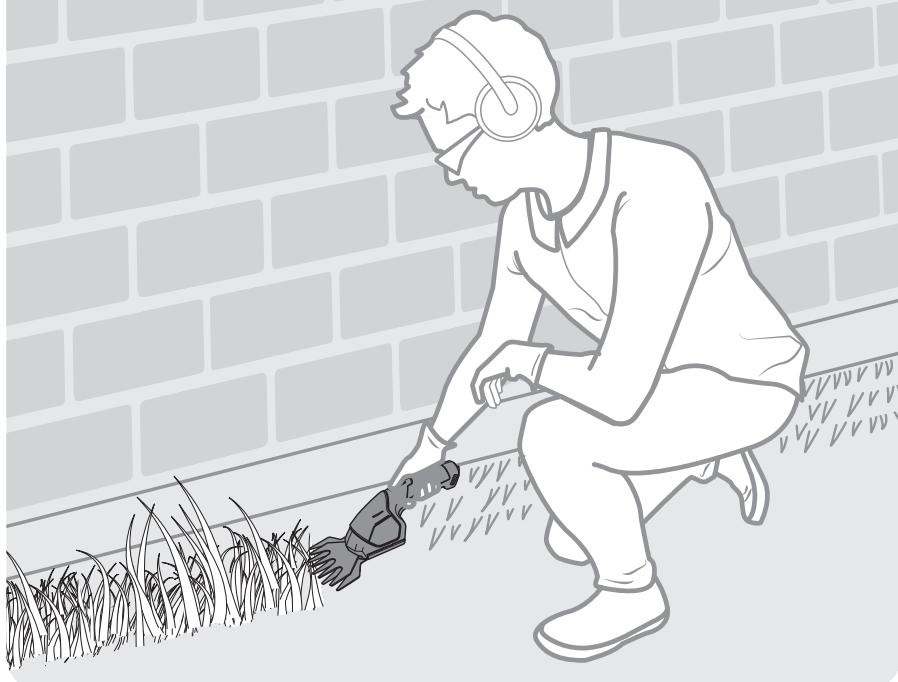
4.7
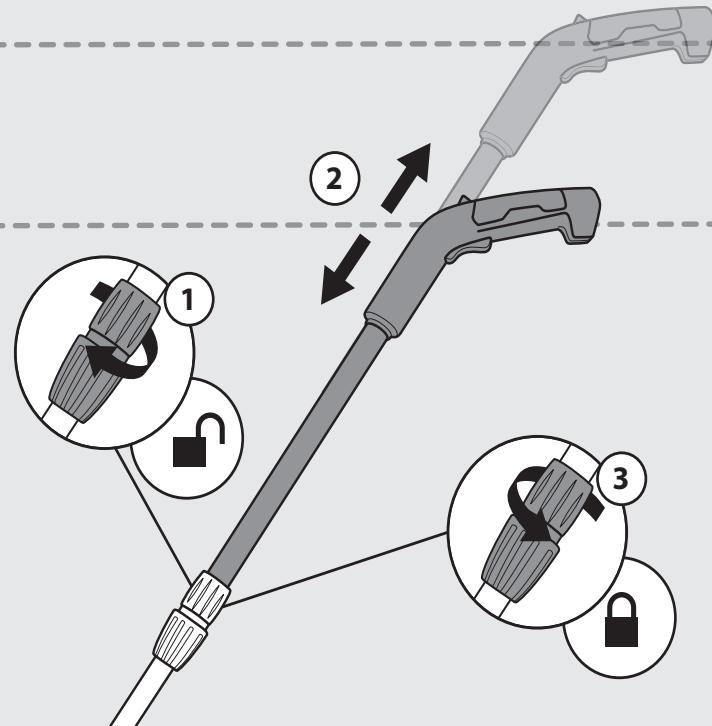
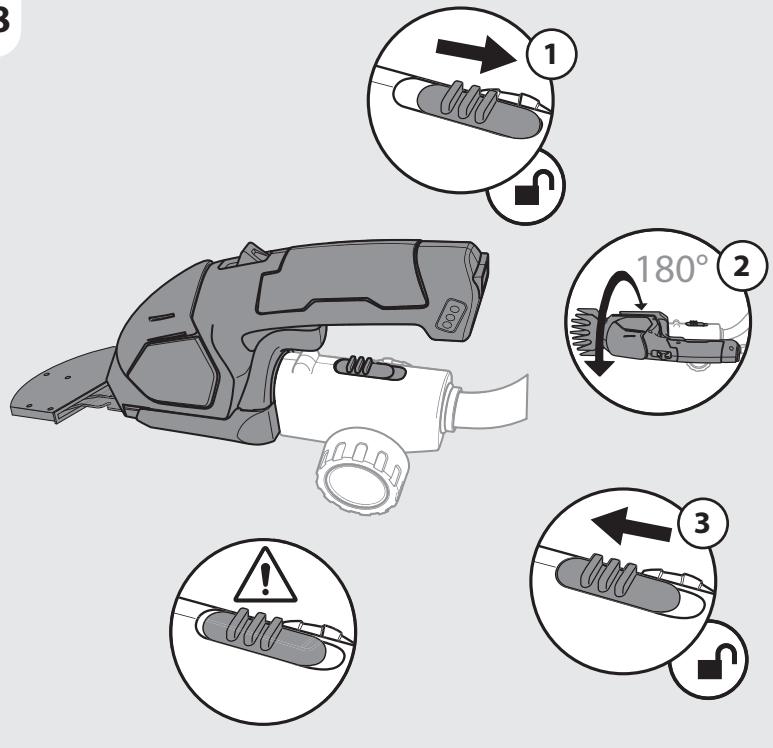
4.8
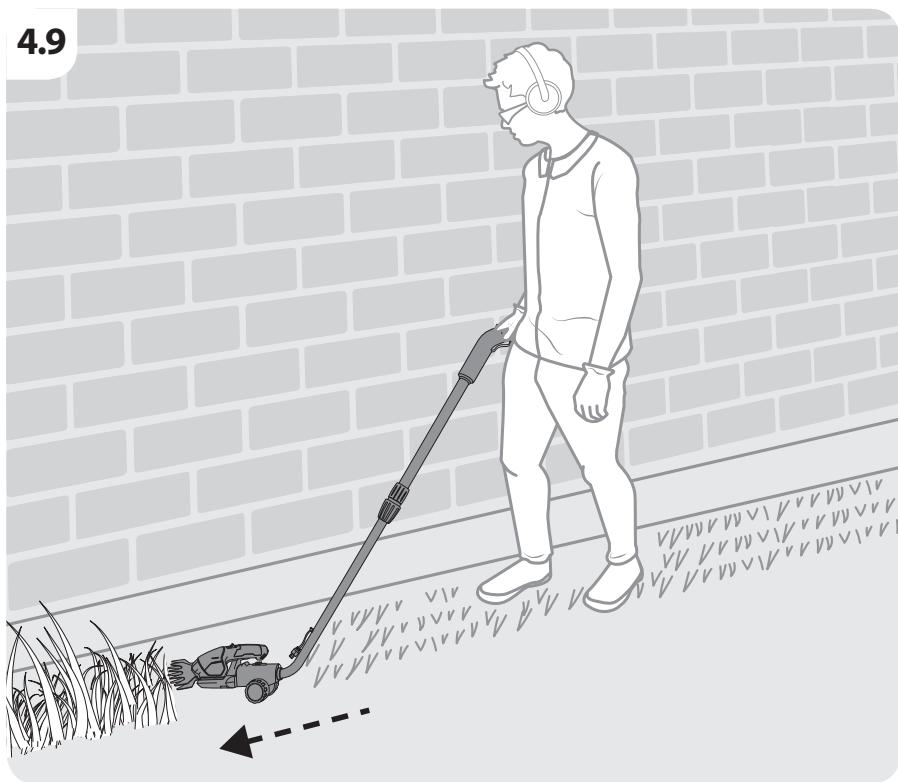
4.9
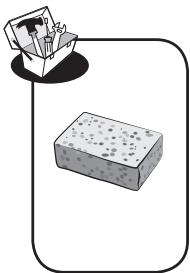

5.1

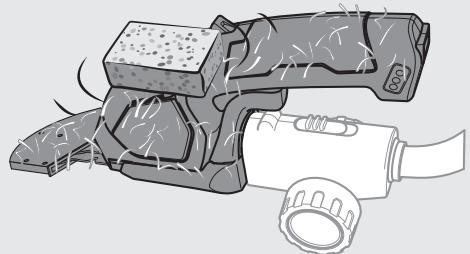

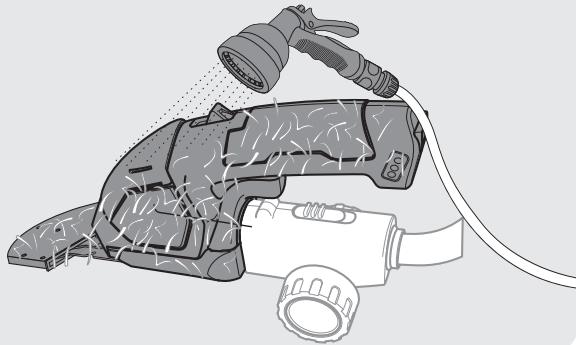
5.2
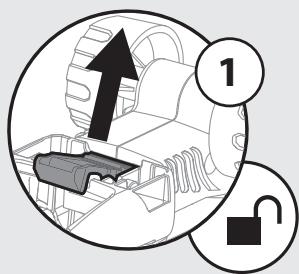
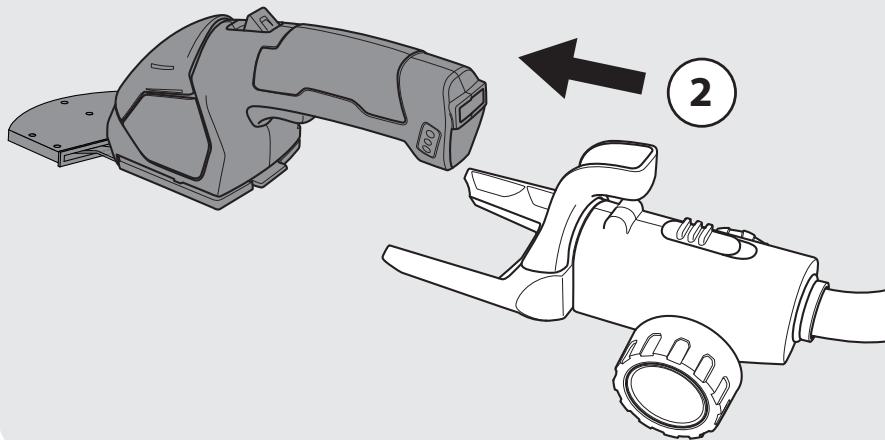

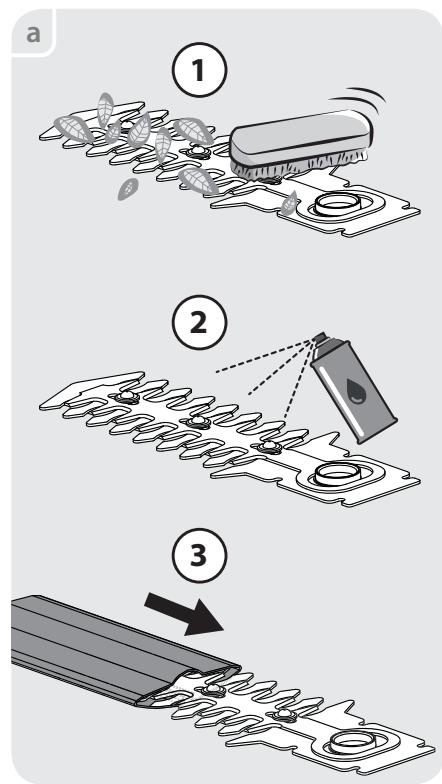
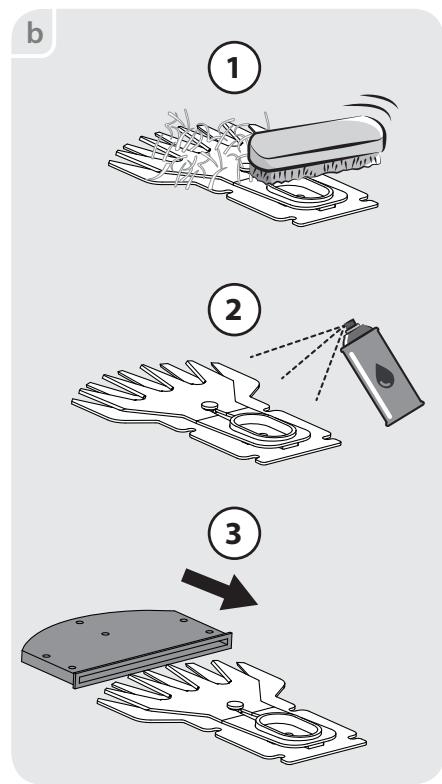

6.1
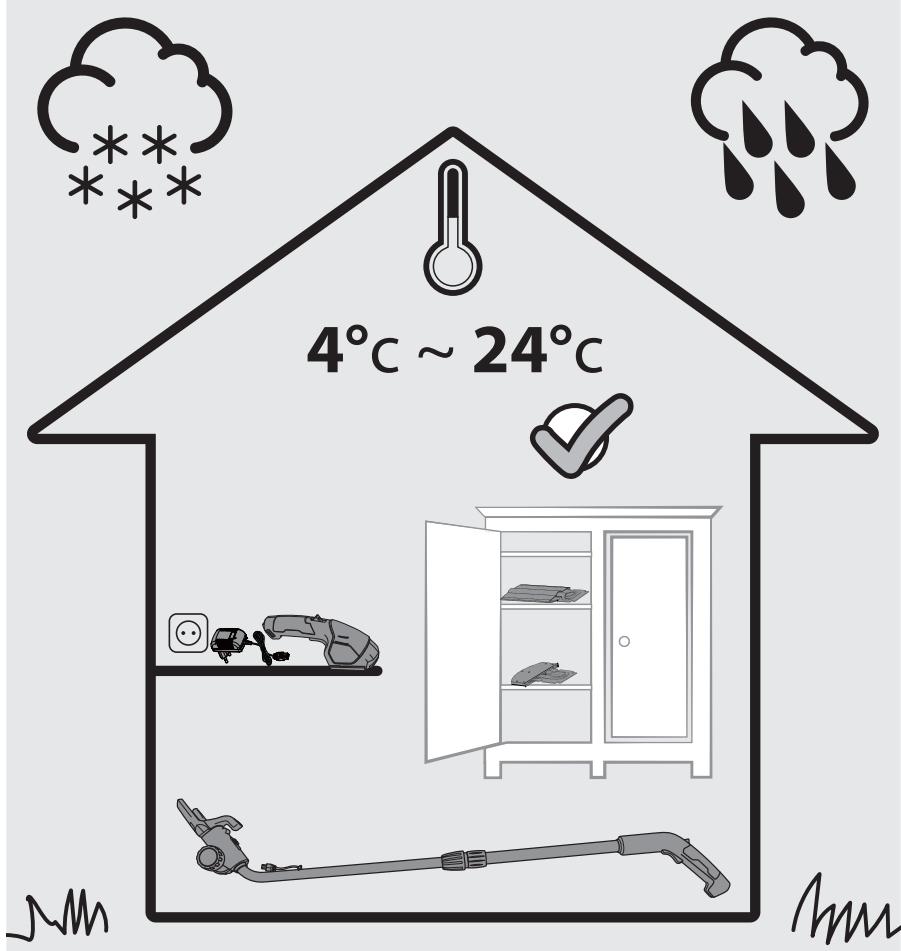
FR Ce produit est recyclable. S'il ne peut plus etre utilise, amenez-le a un centre de recyclage des déchets.
Este producto es reciclable. Si ya no se possible usar, llevelo a un centro de reciclaje de residuos.
Pf Este produits e reciclavel. SeDEXAR de outilizar,entrege-o num centro de reciclagem de residuos.
13 Questo prodotto può essere riciclato. Se deve essere smaltito, portalo presso un centro de reciclaggio.
Auto to npoiov elvai avakukwio. Eav mopei naoiv xa pnoiopoioin8ei, metaepeet e nV oe kantoio kevtpo avakkwoan anoppmuatuv.
Ten produit poddawany jest recycl Klingowski, kiedy przystaje byc uzyteczny danezy dostarczyc go do punktu zbiórki odpadów.
3To n3dene IopIeKt yTnIaCNI. Ecn ero 60JIe HeJIb3aNCIOB3OBA Tb, cJaTe erO B NHT no nepepa60Te oTxOIOB.
byN hIM kaTaN thNeyre KeJeDi. Ohbl api KOndaHyfa 6oImaTbIH KaFdaJa, OHbl KaNTa eHneTIH opTaIbIKKa TaNCbIPyblHb3dbIeTIHeMl3.
A Κeπ npOyKT moKe nepepO6IaTncr. JaKUo BOHO 6IbIe He C npIaTne IJRA BnKOpNCtYBaHnR, 3daIte NOro BVynlIaCiiHnIeHTP.
Aceast produs este reciclabil. Daca nu mai poate ti folosit, va rugam sa il aducei intr-un centru de reciclare a deseurilor.
EN This product is recyclable. If it cannot be used anymore, please take it to waste recycling centre.
C E
EAC


Made in China / 3po6neHOBKtai/CdenaHOBKnTae/KbItaJaXacanfah

N3rotobteIb/0Hdipyw:
JKeKnHaR TJIeKTPknA NtIJIaE Hc, TII. dApEc/MeEKHeA: No.150 B3bIyN PoA, IOnCInh TaYh, NaHxvIcNPTKt, L3aHIn, Yc3aJ3Aa, KItaN/YkTai
Manufacture date /Даразпponзвоства /Дайындангуни
SERIAL NUMBER
- Garantie 5 ans / 5 afoes de garantia/ Garantia de 5 anos/ Garanzia 5 anni / Eyyuŋən 5 etuw/Gwarancja 5-letnia/ GapaTnla 5 net/ Keninjik 5 kbln/ GapaTnla 5 pokiv/Garantie 5 ani / 5-year guarantee
Cpok cnjx6bl 5 neT / Kbi3MeT mep3iM: 5 xbln

ADEO Services
135 Rue Sadi Carnot - CS00001
59790 RONCHIN - FRANCE
UImopotep (Bnpo6bHK):TOB "Jepe Mya Pepenhy UkpyA04201 UykaHai, M.K.NiB, Byn. IolpaHya 17A+, 3804 449 484 60
Daane IIipnpncmctBO npnmae IpeTeH3ii bID CNOKVAubiv IOIO TOBAYA,TOAKPOIPOBOINb IYORO pEmoHT,TEXHiHe i rapaHTiNe 06CNyOByBaHH
RU MMNOPTep/IpOdaBaeU/OprAma3aZn,ynONHOOMeHHAA PPINHMAHbI pTeTeh3nNO KauCTbY ToBaP a Bp:OOO JEPYA MEPIEH BOCTOK),141031,POccna,MockOBckcA6 O6nI, rMbTuCnO,OctaUKBCKoe WooCC, d.1
SA Imported by Adeo South Africa (PTY) LTD T/A Leroy Merlin, Hosted in Leroy Merlin Fourways Store 35 Roos Street, Witkoppen Ext 97, Sandton, 2191 Johannesburg, Gauteng, South Africa Tel: +27 10 493 8000 Email: contact@leroymerlin.co.za
JMPOPTAYLb/ CAtyLb/ Ka3AKCTan Pecny6nKacbHaDaaHIM CanaBc 60bHINla HAparaBbIbKTapdb Ka6bJaTaBH YvHM: JTepya MepehN Ka3AKCTaH' KJI.LC.050000, Ka3AKCTan Pecny6nKacbA, AmatbIa K, KOaEae KeLueci, 77 yy, 'PARK VIEW' E0, 6-Ka6at, 07-KeHCe.
Hmnpotep/IpnoaBeu/Oprhna3auJa,piHnHMaOuaJ
IpeTeHNnIO NaKeCTbY IpOdyKunB B Pecny6Nke
KaXaaCTAN:TOO IePya MepEnk KaXaaCTaN.050000,
Pecny6Nka KaXaaCTAN, r.AnMabTu,yn.KyHaebA, d.77,BU
"PARK VIEW",63tAn,0fNcN° 07.