
20VRH2-17.11 - Rotary hammer DEXTER - Free user manual and instructions
Find the device manual for free 20VRH2-17.11 DEXTER in PDF.
| Product type | Cordless rotary hammer |
| Brand | DEXTER |
| Model | 20VRH2-17.11 |
| Rated voltage | 18 V DC (20 V Max) |
| Rated speed | 1400 min⁻¹ |
| Impact rate | 0 - 4500 bpm |
| Impact energy | 1.7 J |
| Tool holder | SDS-Plus |
| Max. drilling diameter (concrete) | 16 mm |
| Max. drilling diameter (wood) | 20 mm |
| Weight | 2 kg |
| Sound pressure level | 93 dB(A) |
| Sound power level | 101 dB(A) |
| Vibration (drilling with percussion) | 7.82 m/s² |
| Vibration (chiseling) | 5.61 m/s² |
| Operating temperature | 10 °C to 30 °C |
| Compatible batteries | 2.0 Ah, 2.5 Ah, 4.0 Ah, 5.0 Ah (Lithium-ion) |
| Compatible chargers | 20CH2-3A.2, 20VCH1-3A.1, 20VCH2-6A.1 |
| Tool warranty | 60 months |
| Battery/charger warranty | 36 months |
| Operating modes | Drilling without percussion, drilling with percussion, chiseling, chisel position change |
| Included accessories | Auxiliary handle, 2 stone drill bits (6 mm and 8 mm), 1 flat chisel |
| Additional features | LED work light, rotation direction indicator, mode selector |
| Maintenance | Clean with a dry cloth and compressed air (max 3 bars) |
| Repairability | Spare parts available through authorized center |
Frequently Asked Questions - 20VRH2-17.11 DEXTER
User questions about 20VRH2-17.11 DEXTER
0 question about this device. Answer the ones you know or ask your own.
Ask a new question about this device
Download the instructions for your Rotary hammer in PDF format for free! Find your manual 20VRH2-17.11 - DEXTER and take your electronic device back in hand. On this page are published all the documents necessary for the use of your device. 20VRH2-17.11 by DEXTER.
USER MANUAL 20VRH2-17.11 DEXTER
Thank you for purchasing this product. We recommend that you read the installation, user and maintenance instructions carefully. We have designed this product to ensure your complete satisfaction. If you require assistance, the team at your retailer is on hand to help you.


Attention danger / Atencion: Peligro / Atencion perigo / Attenzione pericolo / PpoooxkivduvoC / Uwaga niebezpieczeiStwo / BnHMaHne! Onacno! / Ybara! He6e3neuHo! / Atentje, pericol / Caution danger
EN: Legal & Safety Instructions
6→337

FR: Montage / ES: Montaje / PT: Montagem / IT: Montaggio /
EL: Suvapuoloyon / PL: Montaz / RU: C6opka / KZ: MoTakkay /
UA: 36ipka / RO: Montaj / BR: Montagem / EN: Assembly
338→341

Universal: Compativel apenas com Sterwins UP20, Lexman UP20 e Dexter UP20

BEZPIECZENSTWO W MIEJSCU PRACY
YTO6bI CBeCTN K MHNMMy Bn6paun N BO3JeCTBne 7yMa, PpIMTe BO BHMaHHe cJeDyUOune peKOMeHdaun.
IPEyIPEXKDEHNE! Ipeed nCnoB3OBAHNEM yctpoiCTBO Heo6xOIMO nonHOCTbIO co6paTb! He nCnoB3yIte yctpoiCTBO, KOTOpoe co6paHO He nONHOCTbIO nn COePjNT nobpekdeHHble qaCTn.
PnBbInOpHeHHMOHTaXbHx paObT HaDeBaIte 3aunTHbIe nepaTkn N Bcerda KlaInte n3JeHnHa pOBHyIO u yCToIuByIO IOBepxHOCTb BO Bpemr c6OpKn.
Cnedyte nHctpykun no c6opke 7a 3a 7arom n NcnoIb3yIte npedocTabneHHbe nnHoctpaun, yTO6bl neKo c6paTb yCTpoICTBO.
PNEyIPEXJEHNE! UcpoJCTBO n erO ynaKOBka He AIBnIoTc irpyuKAMn dJeTei! He pa3peaIe TdEM mIrpaTb C PnactIKOBbIMn NaKeTaMn, NICTAmN MeJIKMm DetalamN. CyseCTByET
Onachoctb ydyuweHn nporlaTbIbAHna!
IIOIROTOBKA
IpepeBbIIOJIHeHMe pa6oT c3JIeKtpOINHCTpymeHtOM (HaNPIMep,TexNIueCKOrO 6cNlyXnBaHnIA, 3aMeHbI pexJyUeIero INHCTpyMeHTa n T. d.) IN3BLeKeNTe IN3 Hero aKKyMynIaTOp.AKKyMynIaTOp TAKKc CNeJyET IN3BLeKaTaB pepe TpaHCnOPTnpOBKn I xpaHeHMe.CuIeCTByET ONaCHocTb NOnyEHHra TpaBM BpeZylTaTe HnpeDnHaMepeHHORo HaxKaTna BbIKlOuaTeIIa.
3APJDAKKYMJTOPHO BATAPEI
IcnoB3yTe ToJIbKO 3apJHbIe yCTpoCTBa n aKKymJrTOpbl (He BXoJrT B KOMnEKT NoCTaBKn), Yka3aHbIe B TexHuecknx XapaKTePrcntkax 3neKTPoHnCTpyMeHTa. TOnbKO 3ApJHbIe yCTPOCTBa n aKKymJrTOpbl COBMeCTmbl dpyr C npYrom n C daHHbIM 3JeKTPoHnCTpyMeHTom. CNeDyTe IHCTpyKzIaM no IcnoJb3OBAHnIO 3apJHO rO yCTpoCTBa n (nII) aKKymJrTOpa.
PpmeaHna. DAnHHa HOpMaunn PnpBedeHa dIa cnpaBKn. IJIa NOnyehn DOONHHTbHO IHOpMaunn O3HaKOMbTeCb C INCHtpkCnei K 3apdHOMy yCTpoNCTBY.
5.3KcPJIyATAUIA
YCTAHOBKA BCIIOMOTATEJIbHOI PYKOKTKI

I P E D Y N P E X K D E H N E! I p n B b i n O N H e H N I I O b 6 x p a 6 0 T C y c t p o i c T B O M B C N O M O r a T e h a r y p k o r t k (10) d o j k h a 6 b t B C e r d a h a d e k h o 3 a k p e n l e h a.

He MoDInΦuIpyTe BCnOMoTaTeMbHyU pyKoTky KaKIM-Im6o 0bpa3Om. IpeKpATteNCIOJIb3OBAHHe 3JKeTKPOINHCTpyMeHTa, eCNI BCNOMoTaTeMbHa ryKoTka NOBpeXJeHa.
- COBMECTIte KOJIbO BCNOmOraTeJIbHOpyKoTKn C MyToI WINHdJeA.
- ПовернITE BCNOMORAteNBHyO pyKoTky NO yacOBоI CTpeJIke, YTO6bl NaIeJXHO 3aKpeINtB ee.
3.Дя установки BCNOMORATEJIbHоpyKoTkn B COOTBETCTBYUOe eI NOJOKeHne ChaJaI naOBepHnTe ee npOTNB YacOBoi CTpeKN, yTObI Ocna6nTb. - HadejHo 3aKpeJnIe TcBcNOMOrTaIbHyIO pyKoTky IpeE KaxkDbIM NcOJIb3OBAHHeM.
CBEPIO/3yBnIO

PENEUPPEXJEHNE! Bcerda nCIOB3yTe CBepla B COOTBETCTBm Cnx Ha3NaueHnEM.
IpimueaHne. N3 coo6paXeHn 6e3oNaChOCTN BbIKJIOuateTb NITaHnHa NHCTpyMeHte He MoXeT 6b1b 3a6IokIpOBaH, OH dONKeH OCTaBaTbCra HaaTbIM Ha IpOTaKeHn BCero BpeMeHn pa60TbI.
HACTPOIKA CKOPOCTN BPAUSEHN I CNJIby YDAPA
Ckopocb BpaueHnI n cnny ynapa BkIIOueHHOrO 3neKTPoINHCTpyMeHTa MoXHO N3MeHrTb CnMOou HcNbl HaKaTnBbIKIOuTeJIy.
Hn3kajcokopctb n cuna yapa doCTnraOTc n NOMOJIbIO JERKOrO HaxaTna Ha BblKIOUaTeIb nITAHNA. Yem 6oJIbe cuna haxaTna, TEM BblSe ckopoc7b n cuna yapa.
CBEPJIEHNE
INDIBIyAJIbHA TEXHIKA 6E3NEKNI
1.Пдчacpo6OTn3eNEKtpoHcTpymeHOM6ydbTe yBaXHi,CTeXTe 3a CBOIMN DIAIMn Ta MNCJITb po3cydlnBO .He npaIOJIte 3 eNEKtpoHcTpymeHOM,Якso BV BTOMLeHI,pepe6yBaTe NiД DiIcH NapKOtUHnx peOBoH,anKOrOJIIO a60 NIKIB.HaBiTb MNTTEBa HeyBaXHICTbПдчacpo6OTn3eNEKtpoHcTpymeHOMMOxe npu3BeCTn Do BaXkoITpabMn.
B. KopnctyTeCb 3ac06amn iHmBiyalbHoro 3axncty. 3aBXdHaiaIte 3axnci Okylapn. BnkopnCTaHHy BVIDNOBIDHX yMOBAX TaKnx 3axnCHNX 3ac06IB, YK npOTnINIOBni pecnipaTOp, HEKO83He 3axNChe B3yTTA, I0JOM-KACKa Ta HABuSHNKn DOnOMOKe 3MeHNITn Pn3NK TpaBMvBaHHra.
C.Унkaite BUnadkoBOrO 3anycky iHcTpymeHTa.прш nix πiДкlioЧт eJektpoIHcTpymeHTdoМepeksiЖиВлeHHa60 akymynaTopa,6patn a60 nepehocTu moro,nepebiTe,ч
2. ПРавILA TEXHIKи BE3ПЕКИ
BCTaHOBNeHo nepEMKau y noLOXeHHA «BIMKHeHO». RaIoo nepehocuTneEkeTpOIncTpymEnT, TpImaOnn paleCb Ha nepemKaui XNBHeHn, a60 NiDKJIouatN Ioro Do JxKepeNa XNBHeHn, KOIN nepemKau XNBHeHn nepe6yBaC B noLOXeHHI "YbIMKHeHO", ce MoKe np3BeCTn Do TpaBMvBaHH.
D. Перш Нix увимкуну т eльсторпстумент, 3himitb yci peryuBoalbHI Клии та raikobi Кюч.Якso Залштн Тakm KliouHa pyxomiЧастни eльсторпстумента, Ze може пиЗвectи до TpaBMyBaHHa.
E. He doTaryuTeCb 3 IHCTpyMeHToB pykax. 3aBXKn 36epiraTe CTiKe nOIOXeHHa Tina Ta TpImaIte pIBHObary. Ue dae 3Mory KpaSe KepyBaTN eJEKTpoIHCTpyMeHToM y paazi BuHNKHeHHa HenepeDabuyBaHnx CHTyaCiN.
F. Hājraīte BīdnoBīdHn oJyR. He Hājraīte BīlbHn oJyR a60 npɪkρaɪn. BōloSSc, oJyR ta pyKaBùci MaIOTb 6yTn Ha 6e3neuHni BīdCTaHI Bīd puyxOMux qactuH. BīlbHn oJyR, npɪkρaɪn a60 doBRE BōloSSc moJxTy b IotpɑnITn B puyxomi qactuH n IHCTpyMeHTa.
G.y pa3i haBhoCTi npCtpoB IJnPiKlOueHH CnCTeMH BiDBeHHe Ta 36npaHnI pNly, iX cIiD o6OB'3KOBO BCTaHOBTu Ta BnKOpCToByBaTu 3a npn3HaueHHm. BnKOpCTaHH npiCtpoI dnn 36npaHnI pNly MoKe 3MeHUnTn He6e3neky, NOB'3aHy 3 nIOM.
BVKOPNUCTAHN T A D OΓλД 3A EJEKTPOIHCTPYMEHTOM
- He nepeBaHTaJxuIte eJekTpoIHcTpymeH. BnKOpNCTObuyTe HaneXHH eJekTpoIHcTpymeH BiINOBiIDHO do Notpe6n. IpaBnIbHo nii6paHn eJekTpoIHcTpymeH dOIpOMoJke KpaIe Ta 6e3neHiSe 3p06ntu po6Ot Yu 3i WbUdkICTU, Jka Ipn HbOro nepeIb6aHeHa.
B. He BnKOpNCObyIe eNeKtpoiHCTpyMeHT, kKIO nepemNkau He BMnKae a6o He BmNkae Ioro. Yci eNeKtpoiHCTpyMeHTn, kKIMN HeMOxJIInBO KepyBaTu 3a DoNOMOToI OpeMnKaua, CTaHOBnTb He6e3neKy Ta Notpe6yIoTB peMOHTy.
C. BuntarHitb BnIky 3 po3etkn Ta/a6o akymyIaTOp 3 iHcTpymeHTa nepei Tm k 3miHIOBaTN 6yd-b-aki HanaWtYBaHH, 3amHrtu KOMnEkTyOci qactHn a6o nepei 36epirAHm iHcTpymeHTa. Taki 3anobixhhi 3axoDi 6e3neKn 3MeHNyIb pN3NK BnIaNKOBOrO 3aNyCKy eJeKtpoiHcTpymeHTa.
2. ПРавида TEXHIКи БЕЗПЕКИ
D. 36epiraTe IHcTpymeHTn, 90 He BnKOpNCTOByIObC8a, NODani BiD iTei I He Do3BOJYte OcO6am, Jaki He MaIOTb DOCBiPy pO6OtN 3 TakIMN IHcTpymeHTAmn a6o He 3HaIOMi 3 cIMN IHcTpkyiAmn, KopNCtBuTncb eEKeTpoIHcTpymeHTom. EKeTpoIHcTpymeHTn CTaHOBJIaTb He6e3NeKy B pykax HeIOcBiJaUeHnx KopNCtBuAivB.
E. BnkoHnyTe HaneXHe TexhIyHe 6cnyroByBaHHa eKtpoiHCTpymeHa. IpeBipYte NOro Ha npedMeT 3MiueHH a60 3aTnCKyBaHH pyxomux qactuH, 3naMaHx qactuH Ta 6yb-aynx iHmX yMOB, kki MOkyt b BnInHyTu Ha po6oty IHCTpymeHa. Y pa3i NowKOJxehnA eKtpoiHCTpymeHT cId 3dATN B peMOHT, nepu HIX KOpNCTyBaTnc Hm. Yacto HeuaChi BnpaIKn CTAIObCBAHcIIOK HeHaJIeXHOrO TexHicHoro 6cnyroByBaHH eKtpoiHCTpymeHTiB.
F. TpmaTe pixyci iHcTpymEnTu roCTpMn Ta uNCTUMn. HanexHM m HINOM DoTJIaHyTI pIXyci iHcTpymEnTu 3 roCTpMn pIXyUHM KpaAMn pIiue 6bOkJuTbcra Ta HmN IeIwe KepyBaTu.
G. KopnctyItecb eektpoiHCTpymeHOM, akcecyapamn Ta Hacadkamn dIy IHcTpymeHTa ToIO 3rIiHO 3 ciEIO IHcTpkyciEIO Ta 3BaJauOHa po6oHi yMOBn i po6Otu, Aky cIiD BVKoHaTn. BnkopnstAHnA eektpoiHCTpymeHTa BCynepeu npn3NaueHHIO MoKe CTATN npnHHIO He6e3neuHX CITyaui.
BNUKOPUCTAHNA D0IJI3A AKYMylrTOPHIM IHCTPYMEHTOM
- 3apaykaite nIwe 3a donomoro 3apyHoro npnctpo, Bn3haeHoro Bnpo6nKOM. 3apyHni npnctpi, kynPiXoNDtB dny akyMylTopiB OndHO RnuDy, MoKe CnpuHHTu pN3NK PoJexki y BnPaKnY noTO BnKOpNCtaHn3 iHNIM akyMylTopOM.
B.3 eJektpoHcTpymeHTamn cIi BUKOpNCTOByBaTu Nlle npu3NaueHi dny Hnx akymyIaTOPhi 6aTaapei.BukOpNCtAHNb 6yDb- kNx iHxNx akymyIaTOPiB MOKe pUn3BeCTn Do TpaBMn a60 nojExki.
C. Koln akymylatop He BnKOpncToBcytbcra, noo cnid TpMaTn OkpeMo BiD metaneBux npedMeTIB - 3aTnCKaivB panepy, MoHeT, KIouiB, ZbAxiB, wypynib Ta iHux dpi6hNx npedMeTIB, kki MOxytb 3aMKHyTu Klemn. Kopotke 3aMnKaHHN Klem akymylatopa MoKe CTaN pInuHIO OniKiB a60 nOxEki.
D. y haIto Baxknx yMObax ekcnlyaTaucii 3 akymyIaTopa MoKe
2. ПРавILA TEXHIKи Б3пЕКи
BNTiKaTn piDInHa; He TopKaIteCb ii. JaKsO BUnaIkoBO BV BCE JkTopKnHyncra ii, ce Mlcse cnId npomTu BOIOJ. JaKsO piDIna NotpannA B oOi, cnld 3BepHytncra 3a MednHOJ DOnOMoroIO. PiDIna, jka BnCTyNae 3 akymylTopa, MoKe CnpuHHTn Iopda3HeHHa abo onIKn.
OBCJYTOBYAHH
- 06cIyroBvBaHNe eIeKtpoiHCTpymeHTa NOBHeH npOBoHTn TINbKN KBAJIΦIKOBaHn CneUaIcT, BVKOpNCTOByUOu BNKJIooH OpuRiHaBHi 3anachi ChTuHn. Lc 3a6e3peuNTb NaIiHy po6Otu IHCTpymeHTa.
PONPEJXEHNA OIOO B3NEKN PPN PO60TI 3 BIDBIHMMOJOTKOM
- Kopnctyteca 3ac6amn 3axncty opranib cnyx. Iia shymy moke CTaTN pniuHIO BtpaTn cnyx.
B. KopnctyntecbdoaTKOBOIO(nMn) pyuKOIO(AMN), kkuo BOHa(n) BXoNTb(AYt) do KOMnIeKTy nocTaBKn. Btpata KOHTpOJIHO NaI HCTpyMeHToM MoKe CTaTn PnpUHIO TpaBM.
C.Якwo pixyue npinadja a6o 3aTnckau moke nid yac po6otu TOpkaTncpnxOBAHOINPOBOkN,TPmaIeEneKTpoIHCTpyMeHT 3a i30nbObany pyky.KoHTaKT pixyuoro npinadja Ta 3aTnckau 3 IpoTOM nID HAnpyroIO npin3BOdntb Do NOBn HAnpyrB M MeTaJIeBHX qactInhax eJekTPOIHCTpyMeHtA, zo MoKe npin3BcTe N do ypaXeHHN npaizBnka eJekTPnHIM CTpyMOM.
D. BinkopncToBvIte BiINOBiDiHl DeTEKTopn, 0o6 3HaHTnpnxObaHI KOMyHikauiHi IInii B pOboiH 3oHi, a60 3BepHITbCra Do KOMyHaJIbHOi KOMNaHII 3a DonomorOIO. KOHTaKT 3 eJekTpOpanObiDHeIO MoKe npU3BeCTn Do noXeKi a60 ypaXeHHa eJekTpNCHM CTpymOM. PoUkOJKeHHa ra3OBHX Tpy6 MoKe npU3BeCTn Do BV6uXy. POnKoJKeHHa BoNDHO Tpy6OpPBOy MoKe npU3BeCTn Do POnKoJKeHHa MaHa a60 Do ypaXeHHa eJekTpNCHM CTpymOM.
E. HadiiHno 3aTgHiTb DOnaTKOBy pyuKy, TpMaIte iHCTpyMeHT MiHo oboma pykAmn NiJ qac po6OTn Ta 3aBxKn 36epiraTe CTiKe NonoXeHHra Ta TpMaIte pIBHObary. IHCTpyMeHT HadiiHo KepyETbcra 06oMa pykAmn.
2. ПРавида TEXHIКи БЕЗПЕКИ
F. 3aφikcynte 3arotibky. 3arotibka, IPA Ka 3aφikcoBaHa 3a DOnOMorIO 3aTnCKHx npIcIpoIB a60 IeuaT, yTpMMyETbcra 6ilbH HAdiHn HIX pyKaMn.
G. Дябетудого Севарно B depebniH, MeTani, KepaMIci Ta Пл actNY, a TAKOJ Дя укручвань ГИNTIB BUNOPICTOBYOTc Hacadkn He SDSplus (HapruKlad, Cberdla 3 uniHpruHm XBOCTOBOKM).Дя сих habадok notpi6eн БЗКЛIOUOBn abo KJIIOUOBn CEBPdNlBn NaTPOH.
H. Heraiho 3amihitb nowkodxehni nno3axnchn KOBnaoyok. nno3axnchn KOBnaoyok B 3nauchni Mpi 3axuae Tprmaay npnilaand Bid notpanlaHHn pny BiD cBepdlinHn niud yac po6otn. Ppi BctaHOBLeHni npilaand 3BeptaTe yBary Ha Te, 0o KObnaoyK He noWKoJxhen.
I. Пил Вд тaknx MaTepiaiB,ян PokpTTЯ 3 yMiCTOM CBHnIO,deaKi BnД DepeBnH, mHepaIiB Ta MeTany MoKyTB 6yTu ShKIDJIbI BДЯ 3dOpOB"ЯТ BA NkLNkATn aneprichny peAkciio, npu3BecTndo pecnipatopnHex infekui Ta/a6o paky.MaTepiaiN,ЯKN MICTaTb a36ect,MoKyTB o6ro6blOBaTn TInbKn Cneuaianictn.
- Hackinbki ue MOxJIbBO, BnKOpNCtOBuYe BiIDNoBIDHy CnCTeMy NiJIOBnDaJIeHnI.
3a6e3neuTe xopoUy BeHTnlaucio pOboQOro Micua. - PekomeHnyetbca HadaRaTn pecnipatop KlaCy φiNbtpa P2.
Дotримуитесь BiДиовднх HOpM y CBoi KpaHi ΣODo MaTepiAny, 3 YKIM npaioTe.
J. 3anobirauteckynueHnnaCyHoHa cboemy po6oyomMiCi.Inn MOxKe JERKO 3aHrTnCra.
K.Пд час CBepdlinHH6byBaTak,оо СерdeuHnK /CBepdno 3acptraeВ materiaJIЯкIMCBepdInTBcR.Зe npin3BODHTdo TOrO,оо nepphiopot HaMaraCTbCRAOBKOHO CBepdNtHa,MOxJIbBO,BINPBETbcr 3 BaIHXpyK.цe nepphiopatop SDS MaE MexaHIzM 3anobIXHO 3uePENHn.цeMexaHIzM 3anobIXHO 3uePENHn 6yJe aKTIBoBAHO, Ta BIn 3ynHNbpyx npINBOda CBepdla,ALIE tIbKn,Якso BV 6yDeTe YHHTOnOpip NOUATKOBm Cnilam,яKI BnKNIkaHI 3acptpraHHaM CBepdNa, TpIMaIOHn nepphiopatop O6OMa pykAm. OckIbKn Ze duXke notyxHnI nepphiopatop,zi Cnil 3naHni.
L. HIKOJIH He BMKaiTe nepphiTop i3 cepdenuKoM a60 CBeplom, AKN 3aCTpRHyB.
M. HE HanpyxuTecs ytpumannn nepopatopa. He cBepdntb
2. ПРавILA TEXHIKи BE3ПЕКИ
Bnue BnCOTn Pnuee a6o HnXue pIBH KOnIH, OCKIbKN TaK HeMOxJIuBO NaiHo yTpmyBaTu nepΦopaTop.
N. Hikonn He cBepdntb OTBOpn, diAmTp kKx 6ilbwe hIX Bka3aHm MaKcImaJIbHn DiAmTp B ucbomy noci6Hnky.
0.Двici nepebipte,о npniladЯ Ta Hacadkn 3akpinneHi HanexHmM YHHOM.KopotKOro TeCTyBaHnHa XOIOCTomy xOdi 6yde DoCTaTHbO IJIЯ BnRABHeHn6yIb-IAKnx IpO6Jem.
P. Cbeplno, naTPOH i 3arotibka moxytb dyxhe harpiBaTncn iid yac po60tn. He TopkaiTeCn HIX, DOKN BOHN He OXONOHytB.
Q. Пееваяп, сбь Вентляции OTbOpn 6yln 3axdN BiIbHmTu ChTmN.у pa3i notpe6n nouchitbix M'koIO zuITKOIO.3a6JIOKOBaHI BeHTnlaui Hi OTbOpn MoKyTb npu3BecTN Do neperpiBaHHa TanoKoJKeHHa IHcTpymeHa.
R. Heraio Bumkhitb ihctpmeh, kuo Cbepno 3actprrno. Bydte roTOBI do BucOKoTo peaKTUBHO MOMHTy, kN moKe BuKNIKAtu BiDauy. Cbepno 3actprae, KOJI eJeKtpoiHCTpymeH nIDaETbcn HabaHTaxKeHHIO a60 BOHO 3aTnCKaETbcB B 3arotIBci. Bumkhitb eJeKtpoiHCTpymeH. Ocna6Te CbePINO.
S. Heraиho Bumkhitb ihctpyment, kkuo nic yac po60tn Bac notyp6ybaann iHsi oco6n, kki 3auiuB p60oy 3ohy. Ipeed Tn JIK NOKnaCTn IHctpyment, doyekaaiTecb nofo nobHOi 3ynHkn.
T. He nepeBTOMIOIteCb. PObItb peryIaRHi nepeBn, 0o6 3OcePeIHTncb Ha po6OtI Ta MATN IOBnKoHTpOJIb HAd IHCTpyMeHToM.
U. BukopinCTOByIe TiIbKn Ti akymyIaTOPn/3apArdHi npncTpoi, 0o Bka3aHI BTexHicHi CneuNphiIaQii. IpOHTaTe Bci nonepeJxehnH, IHcTpyKcII, O3HaIOMTeCS 3 IJIocTpaIaIMn Ta TEXHICHMn XapaKTepNCtIKaMn, Jki DoJaIObCra Do 3apArdHO npncTpoI Ta aKymyIaTopa.
3MEHSEHHBnBvBbPAcTAty
Дя 3meншени Влпуну symу ta Bi6paцii obmexte yac po6otn, BnKopncTObUyTe peXIMNpo6OTn 3 HnzbKIM pIBhem symu Ta Bi6paцii, a TAKOJHaJaRaTe 3ac6Oni IndNbIduyalbHoro 3axncty.
Bi3bmitb do BiDoma HactynHe, 06 3BecTu Do MIniMMy pN3nKn BnNBBy Bi6paui Ta uMy:
- BnKOpncToBvIe MaunHy TiIbKn BiINOBiIDHO do II npu3HaueHHa Ta ciEi
2. ПравILA TEXHIKи БЕЗКИ
iHCTpykci.
B.Переконайтесь,ю Maшина 3нходпьсу rapHomу саHi i rapHo 06cnyroBytbcry.
C. BnKOpNCToBvIe npaBnIbHe npIaIdI y IHCTpyMeHTa i nepeKoHaITeCb, 30 BOHO 3NaXOuTbCry rapHOMy cTaHi.
D. MiunToPmaite iNCTpyMeHT 3a pyuKn/NoBepxHIO 3axOpJIeHHn.
E. 06cnyrobyte uei nhtpymert 3riH0 3 ciEIO iNctpykciEIO Ta rapHo 3mauyte noro (y pa3i notpe6n).
F. ПлануITE сбій робочи графік, уь ви падку вплNBу високоі Bi6paцii Bn MaII 6iJIbSeЧ acy Ha BiДПоунHok.
G.При ТрИВалOMу ВИКОРИСТАнHi iHCTpyMeHTa Ha KOPINCTyBaAч DiE BiOpaIЯka MoJKe BvKJIlnKaTn ZilI pyd yMOB, CπIbHO BIDOMnx Jc CnHDPOM Bi6paQIIpyK.HanpIKLad, 6iIIOb naIbci, a TAKOX cneuΦiUHe 3axBOPIOBaHHa, HAnpIKLad, TyHeIbHm CInHDPOM 3an'AcTka. 3o6 3MeHsITn Zei prn BvKOpIcTAHHi iHCTpyMeHTa, 3aBXKnHaJaRte 3axNCHpyKaBUNI ta TprMaIte pykB TenJI.

ПОЕРДЖЕHH! ПOTрибно ВизначNTи 3axODи 6e3nekn ДяЗхиctу КориctуВача Н основи OцIHК NiДаВанн He6e3neciу ФakTNuHnx yMoBax BnKopNCTAHн (3OrIaNy Ha Bci etanu робочоцИкny, taki як уac, пotяromЯkorO iNchtpyment ВUMKHeHni, i npotяromЯkorO BiN npaцюС вхлосту НdoJaTOKdoЧасу 3anyCsKy).
Птуміта:
BukopncTahn iHux iHctpymeHTiB 3MeHunTB 3aRaIbHn p6ooh yac BukopncTahn ybOro iHctpymeHTa.
3BcIb do mHIMyMy pN3NK BnNBy Bi6paui. 3ABKdN BnKOpNCToBvIte roCTpi pi3ci, CBePdNa Ta fpe3n.
- 06cnyrobynte uei iHCTpymEnT 3riIHO 3 zuio iHCTpyKciEIO Ta rapHo 3MauiyTe Ioro (y pa3i notpe6n).
- YHnKaIte BnKOpNCTaHHI INCTpymeHTa pni TempepaTypi 10 ^ C a6o MeHSe. IpaHyIe cBi npo6OuH rpaΦiK, i6o6 noUnpTn BnKOpNCTaHHI INCTpymeHTa 3 BnCOKOIO Bi6paCiEIO Ha deKeINbKa DHiB.
2. ПРавILA TEXHIKи BE3ПЕКИ
3AJIuIshKOBI PN3IKN
Habitb, kuo BV BnKOpncToBye Te npOyKT y BiDnOBiHocTi 3 ycima BmOramn 6e3neKn, 3aIIuAIObTcR nOTenCiiHi pn3KN oTpMaHnra TpaBM Ta noKoJxHeB. y 3B'ay3Ky 3 KOHCTpyKciEIO Ta dN3aHOM IHCTpymeHTa MoKyTb BHNKHyTu Taki 3arpo3N:
A.Шкода здоров'ю Вbacлідок Biбраці, якшо Maшина ВикорпстовуETься пotingROM Trпвалого поюусячу abo упразьгьтбся He aDEКВаTHO a60 obcnyroBOyETbCSЯ He haleЖнIM YHOM.
B. TpaBMn i nooKoJxHHe MaHa uepe3 3naMaHe npIaJa a6o paTobn cnIByap o npixObahi 6'ekTu nID qac ekCnPyataii.
C. He6e3neka OtpmaHnHa TpaBMn i IpoIkoJxehnMaHaYepe3 BiIiTaOuN npedMeTu a6o HnaleXHe npilaadJa IHcTpymenta.
PONEPEJXEHH! LcE npOyKT nId Yac pOBOTn CTBOPIOE eNEKTPOMaHITHe nOE! Lc E noIe MoKe 3a neBHNx O6CTaBN BCTyNaTn B KOHΦJIkT 3 aKTUBHMn a6o naCusbHmM imPnHaTatAm! Ipeep ekCnPyataciio IHCTpyMeNTa dJa 3HNXeHH Pn3Nky cepNo3Hnx a60 CMEpTeJbHnx TpaBM Mn paDmO OC6am 3 MeDnUHMn IMPiHaTatAm OTpImaTn KOhCyNbTaciio y CBORO liKapra i BInpO6Hnka MeDnUHorO imPnHaTAtY!
3. ONMC
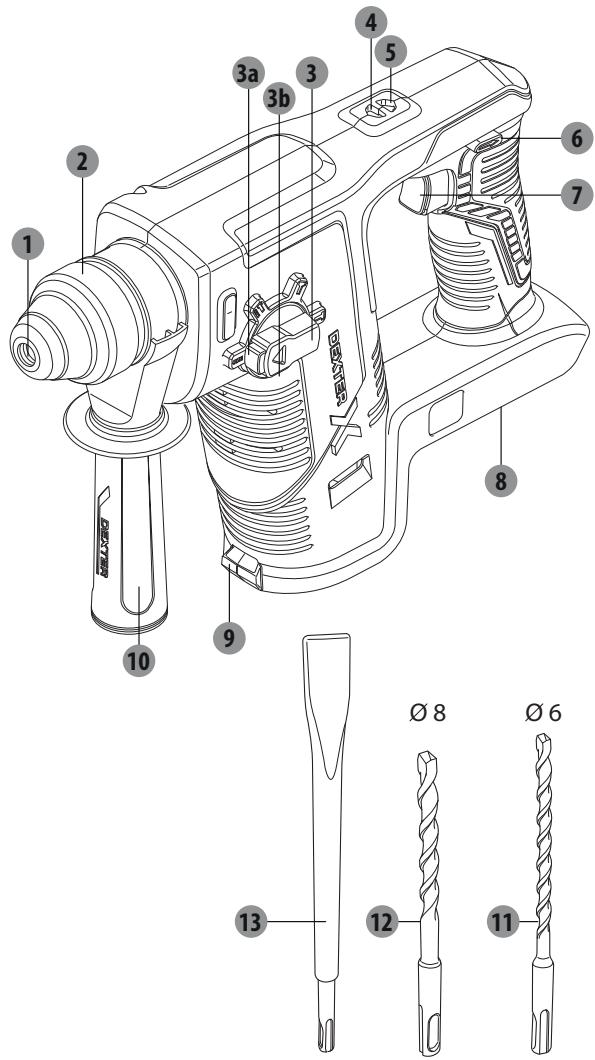
1 Tpimau npnilaand SDS-plus
2 Ctonopha Btynka
3Перемнкач рекимов
a. Конка розблOKувань
6. Иддаця ТрUNKТнka
4 IIndkaucia o6eptanHnBnpaBO
5 InDnkaia 06epTaHHB BInBo
6 IpepeMkaHapmkyoepTaHHa
7 Ipezmkauch ON/OFF
8 Tpmaayakymyantopa
9 Po6oue niicbiyuBaHHa
10 DoaTkoBa pyuKa
11 Hacaika dans Kaiminha 6 MM
12 HacákaДЯКaminH8 MM
13 Плоске зубимо
4. TEXHIYI DAHI
He 3miHIOte Ta He MoiΦiKyIe DoaTkoBy pyuKy. He BnKOpncTObyTe
5. EKCIJIYATAUIA
eNeKtpoiHCTpyMeHT, AkaIO DoaTkoBA pyKa NooKoJxHeA.
HANAHTYBAHHI WBNIKOCTI / WBNIKICTb ydAPIB
WBnKicTb/WBnKicTb yapib yBimKHeHOro eNeKTpOiHcTpymeHTa MoxHa peryIIOBaTN B3anExKncti BiD Cnly TnCKy Ha nepeMnKaU ON/OFF.
Jerke hatnckanha nepemkaue ON/OFF nepemkae iHcptymeHT ha Hn3bky wBnKicTB/WBnKicTb ydapib. PoidaBwn TnCK ha nepemkaue niDbnuye wBnKicTB/WBnKicTb ydapib.
CBEPJIINH
Cbeplntu B depebni, MaTepiJax, CXoxnx Ha depeBHy, PnaCTnky a6o MeTani MoXHa 3 BInkopcTaHnM BiNobiHoro 6e3KIOUOBOr o a6o KIOUOBOr CbePnlIbHOro NaTpOHa 3 aAnTepom SDS-PLUS (He noctaacTbcra).
1.Дokладаite Hanexky cnny noaqui Ta WbvnKicTB o6eTahnHa 3anexHo BiJ XapaKTePncTnK Cbeprna Ta MaTepiany, lo CbeprnTbcB. Benuka cnna noaqui nepeBaHTaXnTb eNeKtpoiHcTpymENT, NowkoOntB CbeprNo ueep3 nepepiB, 3Hn3ntb eFeKTHBHCtB CbeprDInHHa Ta 36IbshuTb pN3NK BtpaTI KOHTpOIO. Jkso ce notpi6HO, 3BeprHITbc 3a npaoo do CneuaianictB no CbeprnAm.
2. PeryIaRHO nepeBipraIte cTah CBePdla Ta doaTkOBoi pyuKn nepei i nD qac po60Tu, npHne6xIDHOCTi 3amHITb a6o nepeCTaTE.
3. Поверніт bе ретима ржимь дя роботу ржимi «Бeздарно CBepdniHЯ» Ta BCTaBTe 6e3KlnuOBoN a60 KlnuOBoN natoPOn 3 aadantepom SDS-PLUS y natpoN SDS-PLUS.
4. Bctabte BiinobiDIO CbePINO B 6e3KlOuOBIN a60 KlnOuOBIN naTPOH.
5. Пек поатуков роботи вдзанчт точу CBердлпнг, сбό ункут з icкob3уваньнho
5. EKCIJIYATAUIA
Cbepe.
- 3aBxJn TpImaTe IHCTpMEnT nepneHdNkUyIepHO ToUci CBepDInHH. JaKIo TpIMaTN IHCTpMEnT NiKytOM, CBePINO MoKe 3iCKOB3HyTu n a60 3aCtprTn.
- 3aBxdi cnoataky noCTaBe KInHmK CBepnBa B ToUky, Aky nOtpi6Ho npocBepdntu, a NotIM BMnKaIte iHCTpyMeHT.
- Дя Севедирия влары abo Meani ВИКОПСТОВУITE MeTANeBE CBEPINO. KOnI NOTPI6HOB, BИКОПСТОВUITE OXONODKByBaJIbHe MaCTINLO,ЯKe MoxHa PnD6aTu y CBOFO DInepa.
YDAPHE CBEPJIHHA
Ppumitka:
- Pinnuino Boe rna He MypoBaHn Cn iD CbePdNt B ydpHOMy pexKmi Ha MaKcImaIbHi WbUkOcTi. OHaK, y nepsi KjIbKa cekynd CbePdIO MoXe BiXnJIaTcNc BiOpirHaIbHorO, 6axaHOrO nOJoxKeHHra BhaCInIOK iiUpay. Uio6 yHKnHyTu cBoro, BnKopncTOByTe NoiToBxOBn peXmHa nepeMnKaau ON/OFF, nokn kiHnKcbepnA He 6yde HadiHo cnDITn B 3arotIBci.
-
Bydte oocbno nllbHi, koi CBepdnte pIITky. Udphe cBepdInn MoKe noikodtn pIIITky! BkOpncToByte CneiaJIbHe cBepdIO 3 6e3yapHm peKIMOM, 0o6 cNoaTky IpocBepdntu PIIITky! IOTIM nepEMKHITb Ha ydpHn peXIM dIcBepdInHH aegnn a60 beToHy 3a pIITkoIO.
-
Perynphno nepeBipnTe cTah CbePna Ta doaTKoBOi pyKn nepei i nid qac po60tn, npn Heo6xndocti 3amHt b a6o nepeCTabte.
- Поверніт bперемькч ржимь дя роботу ржимi «Бezударе CBердінг» ta BCTaBte hacаду дя камину y natpoH SDS-PLUS.
- 3aBxJn TpImaTe IHCTpMEnT nepneHdkyIapno ToUci CBepdInHH. JaKIo TpIMaTN IHCTpMEnT NiKytOM, CBePINO MoKe 3iCKOB3HyTu n a60 3aCtprTn.
- 3aBxdi cnoatKy noCTaBe KInHmK CBepDnBa B ToUky, Aky nOtpi6Ho npocBepdIHTn, a NotIM BMkaiTe iHcTpymEnT.
IOBBAHH
- Perynphno nepeBipriye cTah CbePna Ta doaTKoBOi pyuKn nepei i nid yac po60tN, npn Heo6xinocti 3amihitb a6o nepeCTabte.
- Поверніт bпемькay ржимь дя роботу ржимi «Довбань» ta Bставе 3у6иоу naTPoH SDS-PLUS.
3.Длбсвоeірьиберіть BiinnoBiHne 3y6nlo SDS-Plus. - Koli notpi6ha 6iIbwa cunu ydapy, BnKOpncToBvIte KoPoiue 3y6nlo.
- BiɪdʒaHTe IiɪHIO IOB6aHЯ, KɔnI BAM NpTpi6Ho IOB6aTH ΜTpObɪN.
5. EKCIJIYATAUIA
Kuio Bnpi6 nookjxhen a6o Mae dekeTn, He BnKOpncToByte Ioro Ta nobepHItb Ioro do Hau6nXyOrO Maar3Hy.
LcE Bvpi6 npn3naeHm TilbKn dIy BnKOpncTaHHa HbIKpntomy Nobitpi. He BnKOpncTOByte Ioro BCEpeuHi 6ydiBn 3a K0dHnx 6cbTaNH.
LcE Bnip6 MoKHa nepeMicHTn BCEpaHny 6yDIBni IuIe nicToro, kB H NocToB Dbi rOunHn nicra octaHHbOro BVkOpNCtAHna.
EAN code:3276007563863
Kayincizik TexHnKacbI GoBihwa HcaynbIK.KykbIKtbIK HopMaJap
KeknHaHr T3IeKtprkAn 3nnJaHc Ko., JTo No.150 B3HbLyH Poad, IOnCnHb TayH, HAnxu DInCTprkT, L3aCnH, YK33JH, KbTai
Imnoptep/IpodabeU/Oprhaaun, PnHmHaOuJpneTeH3nn NO KaueCTBy npOyKUnB Pecny6bnke Kaasxctan:TOO «JIepya MepeJen Kaasxctan/. 050000, Pecny6bnka Kaasxctan, r. AInMaTbI, yN. KyHaebA, d. 77, BLC «PARK VIEW», 6 tazk, oΦnc N° 07.
IIMnpTayb/ CaTyb/ Ka3akCTan Pecny6nKacbHa EaHim Cana6b 6oBbHsa Hapa3blbIKTapdb Ka6blJdaiTbH yibM:
Cpok cnjxkb5 nT/Kb3MeT Mep3iM: 5Xbln
Cektekti Mihdtti pactaydb tlan eetih taayapnap yuhi ceptnfkaattbH /deknapaunraHH KwipMecIH Jepya Mepeh nkyehin h aknapat baHaBH anyfa bona db DaTa Np6nKauHnHCTpyKlu/HcckaybIKbH jaoPnAHaFah yaBtB:09/2019
PaiDanaHy HcayIbIFH MyKnT OkBn IbI IbH3 XeHe 6epiIreH eceptnepepiYCTaHbH3. EHHMMeh, naDaIaHy KJbIMeH XeHE Kayinc3dIK TexHNKacbIHnHYckaynapbIme TaHbCIn IbHy ySiH, ocbi naDanaHy HcyKayIbIKTapbH niDaIaNbHbI3. Ocbi naDaIaHy HcyaynapbH bolaawkTa naDaIaHy ySiH Kayinc3 xepde caKaTahbI3.
BENITIEP

PaindanaHy HcyckaynbfbH MkyrT OkbHbI3

OcbKayin TypaIbI ecepy KpbIfBIFA He backa MylIkTepre 3akbIM Keenyi TypaJIbI Hemece dehe JapakaTbHa eKenyi MymKiH eKehIH ecepeTi.

KopfahbI I Ke3iJipik Taftin JypiH3

KyNaK KopFaHbIcBn KmiHj3

KopfahbIaK KInM KInJxypHiz

KopfaHbIC KONFa6bIH KIniH3

OpaHbIM 0aHaHaN KOpFaTbIH MaCKaHbTaFbHb3

HIM KONdaHbICTaBf lyepoNaIbIK DnpeKTbIbIapra ca KeJeI JxHe ocbl DnpeKTbIbIapra caiKeCTiKti 6aFanay adici opbIHdIbl.

Eypa3nJaIbIK cəJIkeCTIK 6eJIrici.

Wee TaH6acbI KaTeRe XapatYbI 6iInipei.
UP20
Ömşéşan: Tek Sterwins UP20, Lexman UP20 Üçehne Dexter UP20 KþpblfblapbImeH yIneCIMdi

Byn eHmHIn KOnDaHbIcTaFbYkpaHa texHnKaIbIepeXeNepiHe caikec KeNetiHdi TpyaBb6enri.
MA3MYHbl
- Dexter nepΦopαTopbIbIh MaKcaTbI KoJIaHbIcBi
- Kayinci3ik TexHnikacbHbH HycKaynapbl
- Cnattamacbi
- TexHnKaJIbIK DepeKTeP
- Páñandaña
- TexHnKaIbIk Kbl3MeT KepeTeY
7.AkayIbIKapDbIxIO - Kopshafrah optahtb Koprahb3
- Keriiniiik
10.Белiktep tisiMi 6oBbHua erKei-TeKeJi KepiHc - EK caikectik deknapaunrcbi
1. DEXTER ПЕРФОРATOPьIHьИМAKCATTы KОДАньICы
Ocbi eHimdi catbIn anFaHbHb3fa paKMeT. Ocbi naJaIaIHy HcckayapbH Okbln WbIfbHb3 XeHe 6oJaaKaTa naiDaIaNHy yuHcakTaN KOBbHb3.
3NeKtp KypaIbI SDS-Plus 6actneKtepimEn JxabIbIKTanfHan JxFaIaNda 6eToHdbI, kipniuTi
Xhe TactbI coknabI 6yprblay XHe XeHIn Kecy JxMbICTapbl yuiH apHaIraH. OJ
COhIMe H katap aafTbI, afaIka YKcac MATEpnaIapDbI, nlaCTMaCCaHbIXe He MeTaIdbI
6yprblay JxMbICTapbl yuiH KocbIMwa KjITci3 / KjTTi 6yprblauNbIH KbICbIHbI naJaIaHy
Ke3Inde XapaMdbI.
OpaybIHTAH 5bIFapFAn COH, eHIMHiKepeK-JkapaTapbIme 6ipre (6ap 6oJca) 6ytih EkeHdiirHe Ke3 JeTeKi3iH3. Erep eHim 3aKbIMdaJIraH 6oJca HeMece Ke3 KeIReH aKaynapbI 6ap 6oJca, OHb I naJaHaHa6aHb3 XeHe dInlepiH3re KaTapbHbI3.
Ocbl Kypanblb 6aca bip aadamfa 6epcehi3, ocbi naiaaany HscaynblfnbH 6pire 6epiniz.
Bi3diH Xa6dbIbIMbI3 KOMMepuJIbIK, Cayda Hemece OHePKcInTik MaKCaTTapMeH naJdanaHyra apHaJImaFaHbIH eCKepiH3. Kypblrbl KOMMepuJIbIK, Cayda, OHePKcInTik Hemece YKcac MaKcaTTapDa naJdanaHblnca, 6i3diH Kenilirim3 e3 KywiH XOyIbI.
Kayinc3ik MAKcaTbHda 16 xacka deiHri 6baIaIap MeH jacTap, coHdai-ak ocbl naJaIahHy HcayIapbIMeH TaHbC eMec aadamnap ocbl eHimdi naIaIaHa aIMaJdb. Φn3IkabIK KHe akbl-oi Kaibleti WekTeyli adamap eHimdi TEK JayaantbI tyIFaHbN KaIaFalaaybI MeH NcKaybl BoBHua naIaIaHa anAdbl.
2. KAYINCI3IK TEXHnKAcbIHbIH HYCKAYAPbl
3JEkTP KYPALbIHbIH KAYINC13dI I BOHbIHWA XAJINbI ECKEPTUJIEP

ECKEPTY: Ocbl 3neKtp KypaJIbImeH 6ipre 6epiIReH 6apblk Kayincizdk TexHnKaCbIHbIH eCKeTpJePiH, HcKaynapbl, cypeTtepdi XHe TexHnKaJIbIK CInaTTamApbl Okbln WbIfbIHbI3. TEmHeKePcTeIReH 6apblk HcKaynapblOpblHaMay caJaapbHaH 3neKtp TORbIHbN CoFbyl, opt WbIFybl XHe/Hemece aybIP JapaKaT Opbln Anybl MymKiH.
Baplbik eckeptylep MeH HycKaynapbI b6oanaKaTakapay ywiin caktan KOnbIbI3. Eckeptylepderi "aKeTpKpaJIb" TepMNHI 3JeKTp JenicHeH XMybIC ICTeITIH (cbIMdbI) Hemece 6atapeMeH XMybIC ICTeHTIH (cbIMcbl3) 3JeKTp KpaJIbH 6ilDipedi.
XyMbIC OPHbIHbIH KAYINCI3IITI
A.ЖуMbIC opHbI Ta3a epi JxapbIK 6onybl KaKeT.ЖуMbIC opHbIHn JIac Hemece KapaHfbl 6onybl OKbIC OKnfalapdbH naiDa 6onybHa ce6en 6oJaBl.
B. 3JIeKtp KypaIapbIh TytAhnfbiW cyMbIKtBiKTap, ra3dap Hemece WAn CnAeTbI 3aTTap 6oJatbIH JApbIbIC Kayni 6ap optanapda naJaIaanH6aHbI3. 3JIeKtp KypaIapbI bIwHdbI Hemece TytInDi TytAhnblpybl MymKIN yUkBiHnap 5bIfapaIbl.
C.Злект Куральп паданган Ke3de, Балалap MeH 6eRde aamdap aIshaK TpybI KaXeT. Baska Horpere anaHday caIapbIHan KypaIdbI backapa anMaJ KanybIHb3 MymkIn.
3JIeKTP JYIeJIePIH IaIJaIahyIaFbI KAYINCI3IiK TEXHnKAcbl
- Θлкг Кралыньи, ашалары розTkara сайкес кени Кожет. Ашалы ew yaКытta оз reapпehi3.Ешkaндай adanterpшtenсельдерин ќеру ТУБИКТалган олкг КралдapbIMeHбірп naДаланбаньi3. Θз reapлmeren ашалap мен сэйкес Kejetih розTkалар олкгтTOrblh COfY KAYnIH a3aTadbl.
B. Kúbípnap, pándaTOpnap, rα3 pJIHTanapbIXeHéToHa3bITkbIHTap
2. KAYINCI3IK TEXHUNKACbIHbIH HYCKAYAPbl
CnKtI Jxepre TynbIKTaJFaH 3aTTapra DeHeHi3di Tnri36eHi3. DeHeHi3 Jxepre TynbIKTaJFaH 3aTTapMeH XaHaCCa, 3JIeKTp TOrblB1H CORY KAYPi apTaDbI.
C. ΘηκTp KγραπdapbH XaHbIpdaH XθHe bɪfαπdah CaKtaHbI3. ΘηκTp KγρaβbHa cy κipce, ΘηκTp TOrbHbH, COfy kayni apTaNbI.
D.CbIMDbI TeK OPHbIMeH naJaIaNbIHbI3. 3JNEKTp KypaIbIHbIH CbIMbIH OHbl TAcBImaJIay, TapTy Hemece Kyat KezIHeH axbIpaTy ywiH naJaIaNbHaB13. CbIMdbI XOFapbl TemnepaTypaHa, MaIdaH, 0TKip WETTePden Hemece XblXkbIMaJIb 6eJIWeKTEpeDen aIshaK YCTaHbI3. 3aKbIMdaIaNfAH Hemece 5aTackaH CbIMdAp 3JNEKTp TOBbIHbIH COFy KayPiN apTTbIpaIbI.
E. ΕηκTp KypaIbIH danaDa naIdaIaNfH Ke3De, daJaDa naIdaIaNyFa JapaMdbI y3apTKbIi CbIMdbI naIdaIaNbIHbI3. DaIanda naIdaIaNyFa apHaIraH cbIMdbI naIdaIaNfHdA, ΕηκTp TOrbIHbIH COFy KayPi a3aIdbI.
F. bɪnfran Jæpde 3neKtp Kypalbɪn NaɪdaɪaHaɪry Tpya Keɪnce, KopraHbɪctbl eɪpiy KypbɪnflbɪcBIMeH (KΘK) Kopraɪnfran Jæ6dɪkTbɪ NaɪdaɪaHaɪbɪhɪz. KΘK KypbɪnflbɪcBɪN NaɪdaɪaHaɪfədla, 3neKtp Tɒrɪbɪhɪ COfY kayni a3aɪdbl.
XEKE KAYINCI3IK
- Θекгт Кралын падаанган Ke3de abai 60льнbl3, ic-эpeketiH3re 6aibntbIbIKneH Kapan, 3eIH KOblnbl3. Wapwan TypcaHbI3 He mece eciptki, iWIMdk He dApi-dApMeK Ka6blndarH 60laHbI3, 3eNEKg KpalbH naidanah6aHbI3. 3eNEKtr KpalaDapbH падаанfah Ke3de 3eIH KoMay caIapbHaH JKeke aybp JapaKaT aIyblH3 MymkIn.
B.Keke KopraHbIC Xa6dbIbIH naJaIaNbIbI3. KopraHbIC Kezindipirih yHemi TaBIn Kypin3. ShaHHaN KopraTbIH MaCKa, CbIPraHaMaIbIH apHaBI aK-KmIM, Bepi KaCKa Hemece ecty MyWeciN KopraTbIH KypaI CNkTbI KopraHbIC Xa6dbIbIH cAneKec KaFdaIapDa naJaIaNHaFaHnda XeKe JapaKaT any Kayni a3aJbI.
C. ΘηκTp KυραβιHbɪn ἀδαίcbɪ3da icode KοςβιNγbɪna Jɔθ δερmeɪz. Kyat Kε3iNe JɔhE/Hemece δaTapeɪfa Kocnac 6yþbɪn, KυραДbɪ JxɪHamaɪ He TácbɪMaJdAmai Tyþɪn, aYbIcTbIpBɪn-KOCKbIuTbɪn ᵠwɪpyni Kǔnde 6ɔŋybɪna Kε3 Jætki3iH3. ΘηκTp KυραДapbɪn aYbIcTbIpBɪn-KOCKbIuShHa N yCTaɪ TácbɪMaJdA y Hemece aYbIcTbIpBɪn-
2. KAYINCI3IK TEXHNIKACbIHbIH HYCKAYAPbl
KOCKbIsh KOCyIbI KyIe KyaTTaHDbIpy caJIapbIHaH OKblc OKIFaJIapOpbIH aNybl MymKiH.
D. ΘneKtp KypaIbIH icKe Kocnac 6ypbIH, peTteriW KInTTeP MeH COMbIHdbI 6ypaIbIH KInTTePdi aIbIN TaCTaHbI3. ΘneKtp KypaIbIHbIH aHanaTbIH 6eJIirHde 6ekityNi Kynde KaIfAH peTteriW KInT Hemece COMbIHdbI 6ypaIbIH KInT DeHe JkapaKaTbIH aKeenyi MymkIH.
E. KypaJra Kaapan KaTbI YMTbImaHbI3. YHemi TpaKtbl KaIbInTa TypbIHbI3 XeHe Tene-TeHdik CaKTahbI3. Byn Ke3deiCOK XafDaIapda 3JIeKTP KypaBbIH DypbIC bAckapyfMa MymKiHdIK bepeDi.
F. Tnicti Typde KniHin3. KeH KInM KInMeH3 Hemece aWekey TaKNaHbI3. WauBbHbI3dbI, KmiH3di XaHe KOfRa6bHbI3dbI XblXbImaIbI 6eJWeKTepeH anWak yCTaHbI3.KeH KInM, aWekey Hemece Y3bIH Wau XblXbJIbMaJIbI 6eJWeKTepre iINIHN KaNybl MymKIN.
G.KypaIapMeH 6ipre waH copy XeHe wan HxnHay Kyneci KaTamaCbI3 etince, OnapdbIH Dypbc JAnFaHbIN, naJaHaNbIaTbIHbHa Ke3 XeTKi3iH3. WaHcOpfbIHTapDbI naJaHaHy waHaKaTbICTbI KayInTePdi a3aITaDbI.
3JIeKTP KYPaJIbIH PAnIaJIaHy XHe OFAH KYTIM KOpCETY
- ΜηεκTp KypaIbHa apTbIK KxKTeMe TycipMei3. KymbcIbHbI3 ywiN dypbc 3JεκTp KypaIbIH naJaIaNbHbI3. Dypbc 3JεκTp KypaIbI e3iH, apHaBbI XbIJdAmdbfblHda KymbcIcbI eDeyip TImDi epi Kayinc3 Tpyde opbIHdaIbI.
B. AbyicTbipbIn-KockbIuBcKocblMaHTbH XeHe eUneTIn 3JeKtp KypaBn H naJaIaNb6aHbI3. AybcTbipbIn-KockbIw apKbIbI backapblmaTbH Ke3 KeJIreH 3JeKTp KypaBbI KayiNTi XeHe OhBi XeHDey KaXeT.
C. PeTtey apekeTepin opbHday, KepeK-xapaKaTpdbI aybICTbipy Hemece KyaT KypaIapbIH CaTaydah 6ypbIH uTeNCEJIbdi Kyat Ke3iHen XHe/Hemece 6atapehbl 3KeKtp KypaJIbIHAn aXbIpaTbHbI3. MyHdai cakTBk UpaIapbI 3JeKtp KypaJIbIHKe3deKcOK icke Kocblny KayniH a3aITadbl.
D. NaɪdənaɪhɒmɪnTbɪH 3neKtp KypaɪdapbɪH 6anaɪapɒbɪH
Kɔnbɪ Xeɪtneɪtɪŋ Xeρnde caKtaɪbɪʒ XəHe 3neKtp KypaɪbɪMeH
Hemece Ocbl HúckaylʌpMeh TaHbɪc Emec aʌdʌmʌpra
Kypaɪdɒbɪ Naɪdaɪaɪhyra pykcat 6epmɛhiʒ. 3neKtp KypaɪdapbɪH
2. KAYINCI3IJK TEXHNIKACbIHbIH HYCKAYJAPbl
KaTbIKTbIPbIJMaFAH naJaIaHybJIap KOnJaHcA, Kayin TeHeJI.
E. ΘηκTp KypaДapbIHa TexHnKaIbIK Kbl3MeT KepCetiH3. XblJXbIMaIbI 6eJIweKTePdiH KnaObIH Hemece WataCybIH, 6eJIweKTePdiH 6y3blIybiH IN He MexaHnKaIbIK KypaDapdbIH JxMbICbHa ocep etyi MyMkiH 6apbIK JaFdaIbI TeKcepH3. ΘηκTp KypaIbI 3aKbIMdaIca, Obl naiDaIaHap aIbIHdA XeHdeH3. KeNTereH OKbIC OkfAJaIap 3eKtp KypaDapbHa TnICTI TypIe TexHnKaIbIK KbIMET KepCetneY caIaDpaIHan OpbIH aIaNbl.
F. Keckiw KypaapanapdbI eTKip XeHe Ta3a Kynde yCTaHbI3. Tnicti Typde TexHnKaJIbIK KbI3MeT KepcetIinReH WeTTepi eTKip KeckiW Kypaapanap 6yriin KaImaNdbI XeHe OnapdbI backapy OanB0naDbI.
G.Kymbic KaFdaJnapbIH XaHe opbIHday KaXeT KymbICTbl Ha3apra aIa OtbpBIn, 3JeKtp KypaBbH, KepeK-JapaKTapdbI XaHe KypaJIb6actneKTePIH XaHe T.6.Ocbl HycKaynapra Caikec NaJaIaNbHbIB3.3JeKTP KypaBbH TaFaMbIDaIFAH MaKCaTbIHah Baca MaKcaTTapda NaJaIaNay OcepineH Kayinti KaFdaJ opbIH aIybl MymKiH.
БАТAPЕ КУРалын Пайдалиу XэHE OFAH KYTIM KОPCETY
- Tek eHdipywi ycbIHfAH 3aprTaBli Kypan apKbIbI 3apraTahbl3. Batape 6nOrbHbH 6enrili 6ip TpyHe apHaJFaH 3apraTafblkpaIbI backa Typderi 6atape 6nOrbImeH naJaIaHy ePT kayPiH TydbIpbyMymKiH.
B.Злект КураздарынTek apнайьжасалган 6aТаразь Блokтарымен падаланынbI3.Ke3 KeIген backa 6aTapeяларды пайдалиу жарakat hemecе орт kayин Тудьру мymкIH.
C. BaTape naiDanaHbIma KAtKaH Ke3De, Ohbl 6ip KJIeMMaHaBacKacbHa KocbIybuHa Ce6en 6onybl MymKiH KaRa3KbICTbIPfbliTap, TnbiHdAp, KiTTep, WereNep, 6ypaHaIapCnAKTbI 6acka Da YcaK MetaJI 3aTTapDaH aIshaK yCTaHbI3.BaTape KJIeMMaIapbIHbIn, BiPte TyIbIKTaIybl KyiIn KaIyFa Hemece ept 7bIfybuHa ce6en 6onybl MymKiH.
D.KoJaCbI3 XaFdaJnapda 6atapeydaH cyBikTBiK aFBIn KeTyi MymKin, OHbl DeHeHizre Turi36eH3. Erep abaincb13da Tnin Ketce, Cymen Waihbi3. Erep cyBikTBiK K03re Tnin Ketce, KocbIMwa MeuHHaJIbIK KEMek aJIbHbI3. BatapeydaH wblkKaH cyBikTBiK TiTipKeHyre Hemece Kyin KaLyra ceBen 6Olybl MymKin.
2. KAYINCI3IK TEXHnKAcbIHbIH HYCKAYAPbl
KbI3MET KOPCETY
- ΘηκTp KypaBHa Kbl3MeT KepcTy XyMbIcbH 6iNikTi MaMaH TeK TynHycKa 6eIweKtePdi naidanahbIn JxacaybI Tnic. Byn ΘηκTp KypaBbl Kayinc3diriHin CaKTaNyBH KaMTamacbI 3 eTeDi.
IEPΦOPATOP KAYINCI3ДIIGI BOYbIHUSA ECKEPTUIEP
- Kyaaka apHaIraH KopraHbIe KypaIbIH TaIbIbI3. IyblIbIe, acepI ecty kabineTinH 6y3blNyibaHa eKeJyIMMKiH.
B.KypaImen 6ipre XabktaJfAn 6oIca, KocbIMwa Tytka(nap) Dbl naJaHaHbHb13. KypaIbI backapa aImay deHe JapakatbHa eKeJyIMyMkiH.
C.ЖуmbICTbI opbHday 6apbICbIHda, 3neKtp KypaJIbIH OKwaJHaHfAH KapMay 6eTepiH eTaHbI3, 6yJ XaFdaJa KeckiW KepeK-JapaK Hemece 6ekITkiX JacbIPbIH CbIMFa TIn KeTyi MymKiH. KeckiW KepeK-JapaK KepHeyJI cBIMfa XaJFaHca, 3neKtp KypaJIbIHbH aMbIK MeaJIb 6eJIkTePiHde KepHey NaJa 6OlybI MymKiH, HETnKeciHde OepaTopDbI TOK COfybl MymKiH.
D.ЖуMbIC aMaMaFbIHda XacbIpbH 3NeKtp XeJIJIepiH anbIKTay ywiH, Tnicti DeTeKTopnapDbI NaIaIaNbHbI3 Hemece KEMek any ywiH xepriNikTi 3HeprnmaHem Xa6DbIKTay KOMnaHraCbHa xa6apNacbHbI3. 3NeKtp XeJIinepiH KOImEH YcTaCaHbI3, 6yJ eptke XaHE TOKtbIH COfYbIH aKeIyIMyMKIH. Ra3 Ky6bIPbIHbIH 3aKbIMDaHybl XapbIbICKa aKeIyIMyMKIH. Cy Ky6bIPbIHbIH TecIJyIMyJIKTIH 3aKbIMDaNyblHa Hemece TOKtbIH COfYbIH aKeIyIMyMKIH.
E. KocbIMwa TyTKaHbI MbIKTan 6ekITin, XyMbIC Ke3iHde KypblfBbHb Eki KOJIbIHbI36eH MbIKtan YCTaHbI3 XaHe YHemI TypakTb KaJIbINTa TpybIn, Tene-TeHdiKTI caKTaHbI3. KypblfBf Eki KOJMeH Kayinci3 backapblnaDbI.
F. Θнделетин 6уньIMыб 6ekITiH3. Θнделетин 6уньIMыб 6okmeh 6ekITkeHSe, KbICbIш КурblfblapMeH Hemece KbICpaKpeH 6ekityeAndeKaYa kayinci3 6oJaBl.
G.Arau, MetaII, Kepamika XeHe PnactMaCCaHbI COKKbcI3 6yprblay yuiH, coHaan-ak 6ypaHdaHbI 6ypan Kipri3y yuih SDS-Plus 6actneKTepi JOK KypaIap KOJaHaBlaIaIbI (MbCaJIbI, uINHHdpNIk apTKbl IImeri 6ap 6yprblay 6actneKTepi). Byn KypaIap yuiH kInTcI3 nATPOH Hemece 6yprblay naTPOH KaKeT.
H.3aKbIMdaJFaH ⅢaHHaH KOpFaTbIH KaKaNTbI Depey
2. KAYINCI3IK TEXHnikAcbIHbIH HYCKAYAPbl
aybictbipbHb3. 1aHaHaN KOpFaNTbIH KaKNaK XyMbIC 6apbcbHa 6ypfblaydAn naJa 6oJFaH 7aHbIH KypaI yCTaBIsbHa eHyiHe aHTapNbIKTaN Keepri KeItipedi. KypaIbI caJFaH Ke3de, 1aHaHaN KOpFaNTbIH KaKNaKTbIH 3aKbIMdaJMaFahbHa Ha3ap aydpbHb3.
I. KopfacbH xa6bHdapbl, a7aTbH Ke6bp Typnepi, MnhepaJdap XHe MeTaN CnAeKTB MaTePnaJdapD an BonFaH shan adam DeHCayIbIFbHa 3INH Tnri3yI MymKIn, anleprnJIbIK peakunJnap TydbipBn, TbIHbIC XoJdApbHbH INΦeKUJapbHa XHe/ Hemece KATEpJI icik apybHa eKeNyi MymKIn. KypambHa ac6ecT 6ap MaTePnaJdapbl TEk MaMaHdap eHdei anadbl.
MymkiHdiirHwe, MaTePnaIFa KOnaJIbI ShaH, ShbIFapy JxynecIH KOnDaHbIHbI3.
KymbocOpbIHJkaKcbiJanKeIeTeiH3.
-P2 cy3riciHderi pecnnpaTopdbI KNUO ycbHbJaDbI.
HndeneTIN MaTePnAanap ywiH e3 eniHizderi Tnicri epexeepdi CaKaTaHbI3.
J. XyMbIC opHbIHda ShaHHbIH XHaJIybIH 6oIdbIpMaHbI3. ShaH OHaI TyTaHybl MymKiH.
K.Бургылай КeзИд eбурьланаТын MaTeрnaIДa e3eKTiH / bурьлay bactneriHIn KbICbIbIn Kanyblx Nki Ke3deCedi.Бурьl b6yрьлay bactneriHIn aHaHaNcBlnda aHaHnyFa TbIPbIcAbl, HtNKeCiHde 6akblaybHbI3dAn ShbIFIn KeTyI bIKTImaJ. Byn SDS b6yprbcbl kayinci iiniCy mexAHn3MHe ne. Erep ci3 b6yprbHbEki KOnbHbI36en MblkTan YCTan TybIn, KbICbIbIn KaNydaH TybIHdaFah anfAlWkbl COKKblapfa Kapcbl TypcaHbI3 FaHa, Byn CaKaTHDbIPbIw TOKTaTkbIIM MexAHn3M icke KocblBIn, XeTeKTI b6yprbIay bactneriHe DeiH TOKTaTadbl. Byn eTe KyaTTbl b6yprbl BoJIFaHDbIKTah, Byn COKKblap aITapNbIKTaKUHTI.
L. EUSHKAUAH 6yprbIaydbI e3eKTeH Hemece 6yprbIHbIH KbICbIN KaJraH KyiHne 6actaHaB13.
M.ByprbHbI yctay ywiH DEHEHI3DI CO35AHbI3. NbIK 6nIKTiriHeH HeMece Ti3e 6niKTirIHeH TEmeH 6ypfblamaHbI3, ce6ebi 6ypfbl 6epiK YCTaJIMaIbI.
N. Eškašan Hýckaçaynbíkta KépcetínreH MaKcImaIdbI MÖlùsēpdeH yIken TecikTepdi 6yprbIJaMaHbI3.
O.Kepek-JapaKTap MeH Xa6dbIbTapDbH Dypbc 6ekitJireH eki peTeKcepHiz3. KypalDbH eH JyKTemeci3 CbiHaK pexMihderi Kbicka
2. KAYINCI3IK TEXHnKAcbIHbIH HYCKAYAPbl
Mep3im iwiHderi JxMbICbI akaylbIKtapbIH aHbIKTayFa KEmekTeceDi.
P. Xymbic 6apbcihda 6ypfbinay 6actneri, natpoh xhe HndeJIeTIH 6yIbIM oTe bICTbIK 6onybl MymKIn. CaJIkbIHdaFaHra DeIN OHAPRA KOJ TURi36ehi3.
Q.Aya JeIeTeKlIeTpEiH yHemi 6eReImereHHe XHe Ta3a eKeHHe Ke3 XeTki3iH3. KaXeT 6oJca, OnapbI JxMCAK KblIaKneH Ta3aJaHbI3. BiTeJIreH aya JeIeTeKlIeTpE iEHIMH, KbI3bIN KeTyiHe XHe 3aKbIMdaJybHa eKeJIeI.
R. BypfbInay 6actneri KbcicblbIn KaIraH Ke3de, 3Jektp KypalbIn 6ipden Ewipin3. Kepi cokkbInapdbI TydbIpbyI MymKIn Jxofapbl aHaany MOMeHTiHIn peakunacbHa DaBH 60nbHb3. 3JekTp KypalbHa 7amaan TbIC JyK TycKeHne Hemece 0HdJeTIn 6yNbIMda Kbcbln KaIraHda, 6ypfbInay 6actneri KaXaBn KaJaDbI. 3JekTp KypalbIn eWipin3. BypfbInay 6actneri 6ocatblb3.
S. Kymbic ictereh Ke3de 6aacka aamdap Kymbc aMaraHa Kipin, Ma3aHbI3dbI KaWbIpca, Depey eHimDi oWipiHi3. KypanDbI KoMaC 6ypbIH, OHbIH TOJIbIK TOKTafAHbIH KYTIHI3.
T. TbIM Kei Jxmbic icTeMeHi3. 3eHIN KOybln Jxmbic icTeY XHe eHIMDi TOJIbK backapy yuH, TypaKtBi TypeJy3iNic Xacan TypbHbI3.
U.Tek TexHnKaIbIK CnnaTtAmada KepceTinreH 6aTapeHbI/ 3apAdTaBbIbI TaiaDnAhnBbIHbI3.3apAdTaBbIwneH XHe 6bTaape 6nOrbIme 6ipre 6epiRe H 6apBik Kayinci3dk eckepTuJepiN, HcKaynapDbI, cypETtePdi XHe TexHnKaIbIK CnnaTtAmalapDbI OKbl NbIFbIHbI3.
ДИПЛ XэHE Уды A3AИТу
Uy Xhe dipin sbibcibHbIn acepiH a3aHTy ywiH xmbic icTey yaKbITbIH a3aNTbIHbI3, TEmH dipIN XHe TEmH WY xmbic peXHMdepH naJaHaHBiHbI3 XHe Xeke KopFaHbIC Xa6dbfbIH KniHi3.
Dipin Xhe uy acepiHn kayin bapbHsa a3aHTy yuHn keleci Mocelnepei Ha3apra aIbHbI3:
ECKEPTY! OnepaTopdbI Kopray MaKcaTbIHda HaKTbI KOndaHy KaFdaBbIHDaTbI Dipin OcepHde 6onydbI 6baranay Heri3iHne (KypaIbIH eWipyJI yaKbITbIMeH icKe Kocblny yaKbITbIHa KocbIMsa 6oc Jypic Ke3eHi CNaKTbI 6apNbIK JyMbIC iTeY uNKJIdepH eCkepe OTbIPbIN) JeKe Kayinci3dIK wapaIapbIH aHbIKTaHbI3.
Eckeptne:
- Backa Kypaapanapdbi NaiaDanaHy naiaDanaHybInapdbIH, Ocbi Kypaapana JkaanbI KyMbIC ICTey yaKbITbIH a3aTadbl.
- DipinDIn ecep etyIeH TbyIHdaaTbIH Kayinti 6apbIHwa a3aHTyFa KemeKteCedi. OPAINbIM eTKip YfblaftbIHTap, bypblnap MeH xy3depi naJdanaHbIbI3.
Kypanfa ocbl Hcyckaynapra caikec KyTim KepceTin, KaXeT JepnepiH MaJlaHbI3.
KypaIapdb1 10^ Hemece OanTtemeH TemnepaTypada naIaIah6aHb3. Kymblc keCTehi3di Xofapbl dipin KypaIbH naIdaIahydbI 6ipHeWe KyHre co3y ysiH JocnapHaHb3.
2. KAYINCI3IJK TEXHNIKACbIHbIH HYCKAYJAPbl
KAJIbIK KAYINTEP
Бул онимdi 6aplbik kayincizdk taanTapbHa cənKec naДансаныздд, карakT any MeH 3aKbIMdaHydbIH bIKTmAln kayintepi 6oJadI. MbiHa tayekeldep ocbl eHimHIn Kypblmbi MeH dN3aHbHa KaTbICTbI naJa 6Olybl MYMkiH:
A. ΘHIM y3ak yakbl 60bI NaIdaIaHaBlnFaH Hemece Tnicti Type6aKbIaHaBarAH XeHe DpybIC TexHnKaIbIK KbI3MeT KepcTeJImereH XaFdaIa DiipIN SwIfbcBHaH DeHCayNbIKKa 3mH TneDi.
B.ПаДанану Ke3iHde cblHraH KOHbIpMaIapdAn Hemece abaCbI3da Ke3deckeH JAcbIpbH HbICaHdApdAn 6OlaTbH JapaKaTtap JxHe JxKe MeHswikke TneTIn 3aJal.
C. Terictey Ke3iHne YuAtbH 3aTtap Hemece 3JKeKtp KypaIbI KepeKxapaKTapbHbH NaHap 6OlybHaH TybHaN TbBnXapaKaTtap XHe MeHsiKke TneIH 3aIaI.
ECKEPTY! Ocbl eHIM JyMbIC Ke3iHne 3JIeKTPMaHHTIK epicTi shbIrapaI! Ocbl epic 6eIriI biip jxafdaJnapda 6enCehdi Hemece 6eITapan MeuNHaJIbIK NMPLaHTaTTapFa KeDEpri KeTIpyi MymKiH! AybIP Hemece Ka3aJIbI japaKaT aIy KAYIN h a3aHTy yWIn MeuNHaJIbIK NMPLaHTaTTapBi bap aAdmDap ocbl eHIMdi naJaIaNHydAn 6ypbIH dApirepMeH Hemece MeuNHaJIbIK NMPLaHTat 0HdIpUicIMeH KeHecken XeH!
3.CNATTAMACbI

SDS-Plus Kypal yctarblbl
2 TokTaTbIi TJIke
3 PexnMa TaHday TeTiri a. Byfattan Wbifapy Tymeci b. Yw 6ypbltbl Kepcetkiu
4 OH Jxak aHany Kepcetkii
5 Con jak aHajny KepcetKiwi
6 AHaJaMaJIbI aybICTbIPbIN-KOCKbII
Kocy/ewipy aybicTbipBn-Kockblwbl
8 BaTape 6IorbIn ycTaBfBII
9 Xymbc wambl
10 KocbIMwa TtTKa
11 Tac 6actneK 6 MM
12 Tac 6actneK 8 MM
13 Jannak kecki
4. TEXHnKAJIbIK DEPEKTEP
| Ytrici | 20VRH2-17.11 |
| Homina déképneу: | 18 B TT 20 B mακc. TT |
| Homina dékβжылдамыfbl | 1400 MmH-1 |
| Cokksjжылдамыfbl | 0-4500 bpm |
| CokksjэheprnЯсbl | 1.7J |
| Kypal yctaftbll | SDS-Plus |
| Makc. bþrfaɪnay dinametpi | |
| Betoῦda (шыршьк bþrfaɪmeh) | Ø 16 MM |
| Araúsh | Ø 20 MM |
| Calmafbl | 2 Kr |
| Батарегларmen уйlecimdīniri | 2.0Ah : 20BA2-20.2/20BA2-20.2XXX 2.5Ah: 20VBA2-25.1/20VBA2-25.1XXX 4.0Ah: 20BA2-40.1/20BA2-40.1XXX 5.0Ah: 20VBA2-50.1/20VBA2-50.1XXX |
| Зарадтавш куралдамен уйlecimdīniri | 20CH2-3A.2/20CH2-3A.2XXX 20VCH1-3A.1/20VCH1-3A.1XXX 20VCH2-6A.1/20VCH2-6A.1XXX |
| Колдану ушин коршаган opta tempepatуразы: | 10-30 °C |
| Зарадтay ушин коршаган opta tempepatуразы: | Батарегнын/зарадтавш куралдын нүскayлыктарын Каралыз |
| Дыбыстык kысын Deигей LpA | 93 дБ (A) |
| Дыбыстык куат Deигей LWA | 101 дБ(A) |
| К ayытku koэффциентi pA, KWA | 3 дБ(A) |
| Дирідін яалпы мәні: a_h, HD | 7,82 M/c² (соксясы bsyрfuянay рекимінн HERIЗRI TUTKacbl) |
| a_h, HD | 5,61 M/c² (соксясы рекимінн HERI3RI TUTKacbl) |
| К ayытku koэффциentsi | 1,5 M/c² |
4. TEXHnKAJIbIK DEPEKTEP

ECKEPTY!

KypbIJIbIMeH Kymbcic icTeReHde, apKaaHaN KynakKa apHaIraH KopraHbIw KypaIbIH KnIH3.
MamidienreH dipinjxannb mHepi MeH mJIMdeIReH wu ysbfcihn MHepei cTahdapTbI cbHaK aDici boBHwa eHne OHb KpaIaPdb6ip-6ipMeH caIbictby uhi naiDanahyfa 6oana EN 60745-2-6).Onap 6ip Kpaanb6ackacbme H caNbictby uhi xhe acepi anbH ana 6araay uui naiDanaHbny MyMKH.
ECKEPTY! 3NeKtp KypaIbHbIH NaKTb KoIJaHbICb Ke3iHderi Dipin XHe WBy WbIFbcbl KypaIbI naIaIaNy eDiCTepine, eCipece eHdelenTIn 6yBIM TpyiHe 6aIIaHbCTbM aImIeIReH MHaNepDen E3reWe bonyb MyMKiH.
KoIaHbIH NaTbI KaIaBbIaBbI ecepDi 6araiay HerizHde onepaToPbI Kopray yuH kayinciDik WapanapbIH aHbKTay KaKeT (6apbIK Kymblc icTey uKJIdepH, MbICaN, Kypan eWipyI JxHe KocbIMwa Kymblc icTeMeiTH yaBlITbI eCkepe OTbIPbIN).
5. Пайдалану
1.Барлбik Бешевский opamhaн nbifapbIn, teric, bepiK beTke kOyblbI3.
2. 6ap 6oJca, 6apIbI opay MaTePnAJaIbpI MeH JeKTI3y KpyblfblnapBIn anblTacTaHbI3.
3. XeTki3iInreH Kpyambl ToIbIK XeHe 3aKbIMdaImaHaBHa Ke3 XeTki3iH3. BeJIWeKTepi KOK Hemece 3akbIMdaIraH 6oNca, eHIMdi NaIdanaHa6BaH3 XeHe dInepre xa6apnacbHb3. ToIbIK eMeC Hemece 3akbIMdaIraH eHIMdi NaIdaIaHy aadMdap XeHe Mylrik yuH kayinti 6oNabi.
4. Xnay jhe naDanahy wih 6apbik kepek-xapaTapdbH jhe KpaanapdbH 6apbHa Ke3 JeTkizhi3.OfAH Tniicti JKeke KopraHbc Ka6dbIbi Kipei.

ECKEPTY! Paɪdənəhy aɪdɒbɪnɒdə Θɪm Tɒlɒfɪbɪmɛh XɪnHaɪyɒbɪ Kepek! Xaɪptɒlənʌ XɪnHaɪrfaH Hemece 3aʊbɪmʌdɑnfaH bənlɪeKætepmɛh XɪnHaɪrfaH eɪmɒi nai dəlaɪnʌbɒbɪ 3! Xɪnay yɪsɪn KɔpfaHbɪc Kɔlfa6bɪn Kniŋ Jxʊpiɪiʒ XəHe XɪnHay KeɪHnde eɪmɒi Teric, 6epi k 6eTke Koɪbɪhɒi3.
Kaamdbik Kypactbipy HcykaynapbH opbHdaHb3 JxHe eHIMdi OHaH KypaTbipy yuiH BN3yaJIbI HcKayIbI peTIHne 6epiReH cpeTTepi KOJHaHbIHbI3!
ECKEPTY! KypbIbI JxHe opam 6aIaIapdbIOnbIHbIbIbIeMec!
BaIaIapdbH, pOJIeTNIJEN pAKeTIpeIMeH, IpaKaTpMeH XHe KIIiKeHTaI 6eJIweKTePmEn O'HaBbHa 6oNMaIDb! BvI MaTePnAIDapMeH THyHbIFy Kayni 6ap!
DAHbIHDbIK
3NeKtp KypalbImeH JyMbIc icTeY (MbICaIb, KbI3MeT KepCETy, KypaIbI b aybIcTbipy, t.6.) anDbIHda 3NeKtp KypaIbIHan 6batapeHbI aIbIN TaCTaHbI3. TacbIMaNay XHe CaTAY yIiH de 6batapeHbI aIbIN TaCTaHbI3. Kocy/ewipy aybICTbIPbIN-Kockblu b abaiCbI3Da 6acblbIn Ketce, japaKaT any KayPi TybIHdaibl.
БАТAPЕ BЛОГын 3APЯДТAY
TexnkaIbIK cunattamada KepceTIJIReH 3apdTaBbI KwpaIap MeH 6batape 6NOKTapbIH (3neKtp KpaIbIMeH 6ipre 6epimei) rHa KOJaHaBbIb. Tek ocbI 3apdTaBbI KwpaIap MeH 6batape 6NOKTapbI 6ip-6iphe XeHe 3neKtp KpaIbHa CcIKeC KeNei. 3apdTaBbI KwpaI MeH 6batape 6NOrbHbH HycKaynapbIH opbHaHbI.
Eckenep: Byn aknapat ci3re anbiktama yuH 6epinre. TOnbIfpaK, 3apraTafblk KpaJIbIH HcCKayIbIFbIH OkbIH3.
KOCbIMUa TYTKAHbIXHAY

ECKEPTY! KypbIbIMeH aTkapblaTbIH 6apJIbIK KMyMbICTap YwIH KocbIMwa TtKaHbI (10) npdaBIM MbIKtan 6eKiTy KaKeT.

KocbIMwa TTKaFa eWkaHdai e3repicTepe Hri36eH3. 3aKbIMdaHFaH KEMekuI TTKaMeH 3neKTP KpaIbIH NaIdaNaHydbi KaJfactbIpMaHbI3.
5. Пайдалану
- KocbIMua TtYkAhlbIH CaNHaCbIH aHAnDbipfbl CaNHaCbHa TypaHaIb3.
- MbIKtan 6ekity yuHIN KocbIMua TytKaHbI caFAT tINImEN bpaHbI3.
- KocbIMua TytKaHbI dYpbIC KyIe KeIITipy YUH, anDbImeH 6ocaty UuH KocbIMua TytKaHbI caFtiniHe KapcbI bpaHbI.
- Θρ Κολίηρ aπόνβιΗς κοςθμΜα τυτκαῦς Μβκτήσε δεκτίγιδε.
BYPfBIJAY BACTNEI/YHfBIJAFbiU

ECKEPTY! ΘpKaIaH MaKCaTTbI NaIdaIaHyfA cOKeC 6yPbI 6actNeKTePi naiDaIaHbIHbI3!

Byrbnay bactneKepin catbn any xeHe naDanahy KeiHcOcb eHMHiTExHnKaIbIK tananTapbIH eCepHiz («TexHnKaIbIK DepeKTeP» 6eImH KapaHb3)!
PAnpoH MeH 6yPbI XMyBICTaH KeiIH eTe bICTBk 6OlybIMyMKIH, cAINbIHdAmaiBHHa onapDbXnHaMaHbI3/6eJIWeKTEMeHiz!
SDS-plus 6yprfbinay KypanapbIn cany
- TokTaTbIi TeJIkeHi apTkA TapTbI,OpHbIHda yCTaHbI3.
- SDS-Plus 6yprblay 6actneriH/yhfblaftbIsh SDs-Plus kypan yctafblbHa caIbIb3. Kehecep:SDS-Plus 6yprblay 6actneriHApTkbI ysbH caImac 6ypbH, OHbI Ta3aIahB3 XeHE a3dAn MaJlnAhB3.
- Ohbl tonblfmeH kipri3y yuiH, kipictipy MeH aHaany Ko3raIbIcBn 6ipikTipin, iHic opHbH Ta6blb13.
- TokTakbIw TefKeHl 6ocatbn, 6yfbI 6actneriH/HyfbIaftbIhMbIKtan 6eKITireHIn TekcepH3. ByfbI 6actneriH/YHfbIaftbIh NaTPoHda KylbIInay Kepek XHe OHbl Taptbn, 5bIfapy MymkH emec.
SDS-plus 6yprfbay KypaIapbIn anbin Tacay:
- TokTaTbIi TeJIkeHi apTkA TapTbI,OpHbIHa yCTaHbI3.
2.БурфынayбactneriH/zhfbinaftbIaIbI,SDS-Plus KypaI yctafblbHaH TapTbIn 乌fapblH3.
PEXKIM TAHDAY TETIPI

ECKEPTY! Pexim napametpneipn Ehim ewiipin, Tolbfbmeh
TOKtafah Ke3de fana e3reptiH3! Opkawah
pexim TaHay TeTiri MaKcaTTbI naIaIaNHyf aNlaHbICtbl Dypbc Kyire KeTipinreHHe
Ke3 JeTki3iH3! ΘHIMdi aybIcTBipbl-KoCKblUneH Ke3 KeIreH apaIbIK Kynde naJaIaNbHa6aHbI3!
- Kyybntb ayu Tymecin 6acbln, yw 6ypbtlb KepceTkiTuH KaKetTI JxMbcpeKmHi TaHbAcbHa Tpya KeTeIHdeeTin peKIM TaHday TeTirH 6ypabI3.
- KIyIbIITbI aUy TymeciH bocatbIn, pexm TaHday TeTiriH, KIyIbIITay yHKuYcbl KocblraHbIH TeKcepH3.
5. Пайдалиу
AHHAJMAJIbI AYbICTbIPblN-KOCKblI
KypbIbI ToKtFaHAn Ke3De FaHa aHaNMaJIb aybCTbIPbIN-KCKblITbI cKe KcOblHbI3.
AinHnMaIbI ayBtbpIn-KockblI KpyblfblHbI aHaNly 6aftblH e3repTy yuH INaHbIJaIbI. DeTeHMeH, bI apekETTI Kocy/eWipy ayBtbpIn-KockblI KocyblI Ke3De opBHday MymkiH emc.
Oh xakka aHaIbIpy: Bypflay XeHe coknbl 6yprblay yuiH, aHaImaIbI aybICTbplI-KOCKblTbTIpeIreHue coJxakka nTepiH3.
Kocy/ewipy aybictbipbn-Kockblblb Kocblbl, MOTOP yMbIC icTeN TpyfAn Ke3e, OH JkaKa aHnDbyp Kepcetkiu Jkacbl Tyci JaBkneH JkaHaDbI.
CoJ xakka aHnabpy: Bocaty yui, aHaMaIbI aybICTbIPbIN-KockblTbI tipenreHwe OH kaka nTepiH3.
Kocy/ouipy aybICTbipIn-KOCKblBIO KOCblBn, MOTOP JxMblc icTeTn TypfaH Ke3de, coJxKaKa aHaanblpy KepceTkiu Ki3fblT capbl TcytI XapblNeH XaHaDbI.
BATAPER BJIOIbI
Tek Tynhucakbl ycbihbJfah nHTn-NOHdb6aTape 6noBt HneKtp KypalnbHbH TaKaTawacbHaKepeTilreH KepeMeH naDanaHbHb3. Baca 6aTapeapapdb
5. Пайдалану
naindaanhy aam japaKaTbHa Hemece eptTIH uBIFyBaHa eKeyI yMkH.
- Batapea 6norbiH cany yuiH, OHBI opHykKaHra deiH xHe MbyKtan 6ekitireHre deiH yCTaFbIuKa cbIPbITbIHbI3.
- Batape 6norbH anbIn tacay yuH, 6atape 6norbHdafbI 6ocaty tyMecIH 6acbl, 6atape 6norbH 6bIfapbl anbHb3.
EckepTnepe: Byan aknapat ci3re anbiktama yuiiH bepiireh. KocbIMwa aknapaTTb6atape 6nOrbIHn HcCKayIbIFbIHaH OKblb3.
KOCY/OLLIUPY
- KypblfnbHb icke Kocy yuH, aybcIbipbn-KockbluTb6acbHb3 da, yctan TypbHb3.
Kocy/ewipy aybictbipyIN-KOCKbIbIa3an Hemece TOnbIbIMeH bAcblfAH Ke3Je, KyaT 1wambl XaHaIbI XaHe XapbIK XeTKiNkci3 BoIFaH Ke3Je, Xymbcic AmafbH XapbIKTaHbIpYf MymkiHdk bepeidi.
- KypbInfbHbIe iWiyuH, Kocy/eWiyp aybictbipbn-KockbluBn 6ocatbHbI3.
TEmeH TeMnepaTpapa 3Jektp KpaIbI 6enriri yaKbITtAH KeIH fHa 6anFaHbIH / cokkbHbIH TOblk KyatbHa JeTei. KyaTbI yHemDey ysiH 3Jektp KpaIbIH TEK OHJI naJaIaNHaHnda KocblbI3.
Eckertne: Kayincizik MaKcTaBHa Kocy/ewipy aybICTbIPbIN-KOCKblbH KyTbINTay MymkiH emec; oJ xMbIC bapbcHda bacybl bonyl kepek.
XbJIДAMdbIKTbI /COKkbI XbJIДAMdbIFbIH OPHATY
Kocblfah 3neKtp KpaIbHbI XblIaMdbIfbI/cOKKbl XblJdAmdbIfbI KOCy/ewipy aybICTbIPbIN-KocbluHbIH HeWe pet 6acblfHaBHa 6aJIaNaHbICTbE3repYi MymKIn.
Kocy/ewipy aybICTbIPBn-KOCKblBHH XeHJI bacy XbIJaAMdbIKTbIH/COKkbl XbJIJaAMdbIFbIHbHI TEmHeJeYi TynbPaDb. AybcTbIPBn-KOCKblTbOaH epi bacy XbJIJaAMdbIKTbI/cOKkbl XbJIJaAMdbIFbIH apTbPabbl.
BYPbIAY
AraaTbI, aaraika kca MaTePnAnIapDbI, nIacTMaCCaHbI HeMece MeTaanDbI 6yprblaydbI SDS-PLUS aanaTepi (6epimei) 6ap caikec kiTTci3 / kiTTi 6yprblay natpohI KEMeImeh Xacayfa 60anaBl.
- Bypfnay 6actneriHc nataTamaIapbHa Jhe 6yprfaHaTaH MaTePnIFa
6aIIaNbictb Dpybc 6epnic Kywi MeH aHany Xblndamlbfbn KOndaHbHb3. Bepnic
KuhiH TBIM KEN 6onybl 3neKtp KypalbHbH ShAmadah Tbc XkykTeNyIHe, Kb3bIn
KeTyDIn cAnpaBihan 6yprfbnay 6actneriH 3akbImaIbYbHa, 6yprflay TmimdiniH
TemehdeYiHe JHe 6akblaydbx Xofanty KayniH HXorapbIaybHa eKeJeDi. KaXet
6oIca, 6yprflay 6actneriHm MAmabHh HKeHc aIbHb3. - BaCTneKTIH XaHE KocbIMUa TtKaHbIH KyIN JyIeNl TypDe TeKcepIn Otbpblb3, erep KaKET 6oNca, KaTAt oPHaTbHb3 HEmece ayBtbpblb3.
- KypblfHb «Cokkbcb36yprBjay» kymbc pexmime opHaTy yuHJxHe kijTc3 / kijTTi 6yprBjay natpohih SDS-PLUS aanantepimen 6ipre SDS-PLUS natpohha caNy yuH
5. Пайдалану
pexim TaHday TetiriH 6ypbih3.
- Cənkek Keletin 6yprbIay 6actneriK iJIITc3 /KiTI 6yprbIay naTpoHbHa 6ekitHiz.
5.БурftsaybactneriHc bIpfnKeTyIe xon 6epmey yuHxMbic aIdbHda 6yprfJay HyKTeciH 6ekitih3. - ΘΗΜΙ ἀράβανΜ δύρβλιηλαθυήκερ περπενικύγρικεγταῦς.Οῦς Σύρβιδα τόγτα δύρβλιηλαθνίστους.
- Θрkaшан 6byfblbH yIbH 6ipiHsi 6byfblnHaTaBn HyKTe TikeNei KoiBn, coaH KeiH eHiMi icke Kocblb3.
8.ПпactMaccabHjKHeMeTaNbIbypfbInayyuiHMeTaNdAnKacanfah6ypfbInay 6actnerIH KOnDaHbIHb3.KaKeT6oNa,caNKbIHdaTkblMaNdbiKoJdaHbIHb3,Ohbl dJIepin3deHanaIaIacbl3.
COKIJIbI BYPfBIAY
eckeptne:
-
Herizihne, tac maternnapbHJXofapbl XblamblkTa coknabl 6yprblay pekmihne 6yprblay kaxet. Derehmeh, anfaaikbl 6iphewe cekynlta 6yprblay 6actneri 6aifahbln epekeTIHe 6aJIaHbIcTb 6bactankb KyHHeAH ybiTKb MyMKIH. Byfah kon 6epmey ysiH 6yprblay 6actneriHIn yu bEHDipinTeH 6yblma KaKcb 6ekitilreHne Kocy/ewipy aybcIbIpbIN-KockblbHa h cepny pekmim kondaHbIb3.
2.ПлNTКАРДы 6урБИALY Ke3iHde epeKHe Ha3ap aydApbIbI3.COKTANbl 6урБИALY ПЛNTKAFa 3akBIM KeNTipyI MymKIN! AAnDbIMeH PIINTKahBIs 6урБIaay yuHcKpNlAYФyHKUЯCBIn KOnJaH6a,6урБIaay pexkimi 6ap apHaJIbI PIINTKAs 6урБICbH KOnJaHbHbI3! CodaH KeiH PIINTKAPabH apTBHdaFbI KipniU/ 6etOH yuHcKpNaBIs 6урБIaay peXmIne aybCbHbI3. -
Bactnektin XeHekocbIMua TtkaHbH KyiH KyHJI type TeKcepin OtbpbHb3,erep KaKet 60Ica, KaTApHaTbHb3 HeMece aybCTbPbHb3.
- KypbIJIbHbI «COKbIMeH COKpIaIbI bypfJIay» JyMbIC pexMImE opHaTy yuHJxHe TaC 6actneriHSDS-PLUS natpohBaHa cany yuH pexmTaHday TeTirih 6ypbIHb3.
- ΘHiMДi apdaiBIM 6yfbIaHaTaBH Jxepre nepneHnkyIpy xCTaHbI. OHJI 6ypbIuTa YcTay 6yfbIay bactnerHH cbipfBN KETYH HEmece KbICBJIN KaJyBH TYdbpybIM MyMKH.
- Θрkaшан 6byfblbH yIbH 6ipHni 6byfblnHaTaBn HyKTe TikeNei KOnbln, coaH KeiH eHimDi icke Kocblb3.
YHfblAY
- BactnektiXeHe KocbIMUa TyTKaHbIH KyiH KyjEJI Tpye TeKcepin Otbpbl3, erep KaKet 60nca, KaTAt oPHaTbHbI3 HeMece ayBCTbpbl3.
- KypbIJIbIHbI YHbIay» XyMbIC pexIMHe opHaTy yuiH xHe yHbIaBbIbTbI SDS-PLUS natoPohbHa canyuuih peXm TaHday Tetirih 6ypbHb3.
- Kypblfblhbl3ra cnekec keletin SDS-Plus yHfblaflbwh TaHaBla3.
- YIken COKbI KUJI Kaxet 6onFaHJa, KbICa YHfBJIaFbIITbI KonDaHbIb3.
- Hayaanbby yhfbinaydbx xocnaparah Ke3de, yhfbinay 6abfItbH 6enrineH3.
- トてトはトトトトトトトトトトトトトトトトトトトトトトトトトトトトトトトトトトトトトトトトトトトトトトトトトトトトトトトトト
5. Пайдалану
YHfblAY KYNIH Θ3IPEPTY
- Kocy/ewipy aybIcTbIpbIN-KocKbluHbI 6OcaTy apKblbI KypblfBihI eWipiH3 XaHe TOnblfImEH TOkTaHaJka KyTIH3.
- KypblfblhlbYHfbIay KyiH e3repty" XyMbIC pexmIhe opHaTy ywiH pexm TaHday Teirih 6ypblh3.
- Kypblfblhki kajkettki Kyire 6py ywiH Heri3ri TyTKaHbI KeHe KocbIMwa TyTKaHbI MbIKTAN YCTAhbl3.
- Kypblfblb «YHflay» kMbIc peximHe kaTApHaTy ysiH pexim TaHday teTiriH 6ypblhbl3.
- Kocy/ewipy aybCTbipbn-KOCKblbH 6acy apkblbYHfbIay XyMbICbH XaIrafctbipbHb3.
PANDAHAYDAH KEIH
- ΘHimdi eWipin, OHbIH ToJIbIFImeH TOKtaFaHbIH KytIi3, 6aTape 6nOrbIH axkbipatbHbI3, cyblHbI3, 6ypfbInay 6actnerIH anbl TactaHbI3 XkHe T.6.
- TemeHnde CINaTaNFaHdai EhIMDi TEKcepH3, Ta3aNaHb3 XeHe CaKTaHb3.
6. TEXHnKajbIK KbI3MET KOpCETY

KOPUJAFAH OPTAHBI KOPFAY
3NeKtpnik eHIMdepDIn KaIbIKTapbIH TypMbICTbIK KObIcKa Tactayfa 60ImaIbI.
EyponanbIK batapeaIapra KaTbICbI dIpeKtNIBaF aKmKec, akaybl 6ap Hemece naIaHaBfAH batape 6IOkTAPbIH/6batapeaIapdb6JleK XINH, KOp7aFaH optara 3nH KeTIpMeTIn JxOJImeH KObICKa Tactay kaxket. Kdere JXapaTyfa apHaIah apNaIbI meKemEnep 6oJca, KpaIbI kDeere JXapaTbIHb3. Kdere JXapaty 6oBbHwa keHec any yuH jxepriikTi ekinetti oprAnDaPFA Hemece cayda opHbHa xabapacbIHb3. Obl KOp7aHaH optara kepi ecepH Tnir36ey yuH kaHTa eHneiH iHemece 6eIseKTei. Batape 6Iorbl/
6atapeaIapdbH KypambHa kaYinTi 3aTtap 6oNaTbIHbIKTaH, Onap KopwaH opTa MeH aam DeHcayIbIFbHa KaYin TEHdipy MyMKH.
9. KENJIJIK
KIPICNE
Ocbl eHimdi TaHaTaHaBbIb3Fa paKMet. HImdepdi K06aay XHe daBbHday 6apbcihda 6i3 nainanhybInapdbIH kaxeTTJIkTepiH KaHaFaTTaHbIpaTbIH KofapbI canaHbI KaMTamacbI3 ety yuHin bapbIK Kyw-kiirepim3di caambl3.
MAHbI3dbI! OCbl ΘHIMDI IAIIAJAHY AIIbIHDA OCbl HYCKAYJIKTbI OKbIIN bIbIHbI3, HEI3TI KAYINC13IK ECKEPTUJIPEPIH KAPAHBi3 XΘHE M¥KJRTCAKTAHbI3.
Opambih aushaohcH eHimdi Kypactbipy ywiKkxti 6apnbik 3neMeHTepdn XnHaKaTakamtbIraHbHa Ke3 keTki3reH JeH.
Erep 3aKbIMdaIraH Hemece 6ip3 akaynapb6ap 6oIca, Obl naiIanaHaBbI3 XHe EHN dyKeHRe KaITapbIbI3.
OcbI eHIM cbIpTtA rHa naIdaIaHyra apHaIFaH JHe eH JxafDaIa FImapat iHiHne naIdaIaNbIIMaybl Tnic.
ΘHIMДI FIMapat iùiHe KOIO YUH COHfbl peT NaɪdaɪaHfAH COH eKI cfaTka cbɪPTTa Kaɪdɪbɪpy KepEK.
Ctbn anfahbHb3fa paKMeT. Bi3dH eHmDi uriririrH3re naDanaHbHb3.
PiknpinH3i OHnH yKeHH Be6-CaTbHda KyaHa-KyHa Ka6blnAaMbI3.
Kenilik
Dexter xhe UP20 0Himdepi eH Kofapfb DIY cana cTaHdapTTapbHa caikec Keenei. bi3 catbn aIbIHfah KyHHen 6actan DEXTER ohimie (KypalbHa) 60 aIbIK keinik kxhe UP20 0Himdepine (3apraTafbiu nen 6aTaper) 36 aIbIK keinik ycbHAmbl. Byk eninik tybHndaybi Mymkih 6aplbk MaTePnAnBik kHe 0Hnpictik akaynapfa KonlaHbIaNbI. AdaMaIapFa XHe/Hemec MaTePnAnDapFkaTbcTIkeNe Hemece KaHama Ke3 KeIReH CnnaTTaftbe EkaHdaan pI kappaBfl WaaBIMap MymkiH emec.
ΘHIM cIbHIN KAIrAn XaIaIaIa 6poUHaopaIbI aKayIbIKTapIbI XOIO (McSeIeep MeH WeiMdep) 6etIH KapaHbI3; erep Mocene IeWIIImCe, ci3re eH XaKbH OphanackaH dyKeHne Tekcepin3.
DykehiH3 Mocenehi Weyu yuih ekahanda kbl anmaybTic.
Kehney Xane 6eikertaybctbyp bactankkkeniDik y3aKtbfbH zaptnai.
KanbntbTo3yduH HeMece eHimdi KaTe XoImeH naDanaHydaT TybHaFaH 3aKbIMdap Kenilik aCbHa H ZaTnAdbI. Onapra, coBbIme KaTAP To3fAH Kayinci3dk AxxbpaTkblbl JHe KO3rAANTkblTAp KaTaDbI.
Benrini bip endep yin aaybikwa keninikwapartabibn bp eekndirin cckepiiz.
KydikTeHReh JxafdaaJa DnyKeHHj3e TeKcepiHj3.
Ha3ap aydpabIyby Ttic KeniJikke KaTbIcTb IaFBIMap yuiH TMeHderinep Tanan etinei:
Catabn anydbI dennedTIn KxkattbKepcTeY
BeniKTeP yuiHui TapanneH JxHeDmEreHin XaHe/HemCe aybIcTbIpbJMaHaBIn KepCetY.
Macele KaIbInTbTo3yDaH TybHdAmaraHbH dJIenJeY.
Introducerea Burghielor SDS-plus:
Please read the operating instruction carefully and observe the notes given. Use these operating instructions to familiarise yourself with the product, the proper use and the safety instructions. Keep these operating instructions in a safe place for future uses.
SYMBOLS
| Read instruction manual carefully |
| This danger notice warns of damage to the appliance or others properties, or may cause physical injuries. |
| Wear safety glasses |
| Wear ear protection |
| Wear safety shoes |
| Wear protective gloves |
| Wear a dust mask |
| The product complies with the applicable European directives and an evaluation method of conformity for these directives was done. |
| Eurasian conformity work. |
| Wee symbol for recycling operation. |
| Universal: compatible only with Sterwins UP20, Lexman UP20, and Dexter UP20 |
| Conformity marking that product comply with applicable Ukraine technical regulations. |
CONTENTS
- Intended use of Dexter Cordless rotary hammer
- Safety instructions
- Description
- Technical data
- Operation
- Maintenance
- Trouble shooting
- Protect our environment
- Warranty
- Exploded view with part list
- EC Declaration of conformity
1. INTENDED USE OF DEXTER ROTARY HAMMER
Thank you for purchasing this product. Please read through these operating instructions and keep them for future reference.
The power tool is intended for hammer drilling and light-duty chiselling work into concrete, brick and stone when equipped with SDS-Plus bits. It is also suitable for coarse drilling operations into wood, wood similar materials, plastic and metal when using an optional keyless / keyed drill chuck.
After unwrapping the packing, make sure that the product is complete with its accessories (if any). If the product is damaged or has any defect, please do not use it and bring back it to your dealer.
If you give this tool to another people, please give him also this instruction manual.
Please note that our equipment has not been designed for use in commercial, trade or industrial applications. Our warranty will be voided if the machine is used in commercial, trade or industrial businesses or for equivalent purposes.
For safety reasons, children and young people under the age of 16, as well as people not familiar with these operating instructions, may not use this product. Persons with reduced physical or mental abilities may use the product only if they are supervised or instructed by a responsible person.
2. SAFETY INSTRUCTIONS
GENERAL POWER TOOL SAFETY WARNINGS

WARNING: Read all safety warnings, instructions, illustrations and specifications provided with this product. Failure to follow all instructions listed below may result in electric shock, fire and/or serious injury.
Save all warnings and instructions for future reference. The term «power tool» in the warnings refers to your mains-operated (corded) power tool or battery-operated (cordless) power tool.
WORK AREA SAFETY
A. Keep work area clean and well lit. Cluttered or dark areas invite accidents.
B. Do not operate power tools in explosive atmospheres, such as in the presence of flammable liquids, gases or dust. Power tools create sparks which may ignite the dust or fumes.
C. Keep children and bystanders away while operating a power tool. Distractions can cause you to lose control.
ELECTRICAL SAFETY
A. Power tool plugs must match the outlet. Never modify the plug in any way. Do not use any adapter plugs with earthed (grounded) power tools. Unmodified plugs and matching outlets will reduce risk of electric shock.
B. Avoid body contact with earthed or grounded surfaces, such as pipes, radiators, ranges and refrigerators. There is an increased risk of electric shock if your body is earthed or grounded.
C. Do not expose power tools to rain or wet conditions. Water entering a power tool will increase the risk of electric shock.
D. Do not abuse the cord. Never use the cord for carrying, pulling
2. SAFETY INSTRUCTIONS
or unplugging the power tool. Keep cord away from heat, oil, sharp edges or moving parts. Damaged or entangled cords increase the risk of electric shock.
E. When operating a power tool outdoors, use an extension cord suitable for outdoor use. Use of a cord suitable for outdoor use reduces the risk of electric shock.
F. If operating a power tool in a damp location is unavoidable, use a residual current device (RCD) protected supply. Use of an RCD reduces the risk of electric shock.
PERSONAL SAFETY
A. Stay alert, watch what you are doing and use common sense when operating a power tool. Do not use a power tool while you are tired or under the influence of drugs, alcohol or medication. A moment of inattention while operating power tools may result in serious personal injury.
B. Use personal protective equipment. Always wear eye protection. Protective equipment such as dust mask, non-skid safety shoes, hard hat, or hearing protection used for appropriate conditions will reduce personal injuries.
C. Prevent unintentional starting. Ensure the switch is in the off-position before connecting to power source and/or battery pack, picking up or carrying the tool. Carrying power tools with your finger on the switch or energising power tools that have the switch on invites accidents.
D. Remove any adjusting key or wrench before turning the power tool on. A wrench or a key left attached to a rotating part of the power tool may result in personal injury.
E. Do not overreach. Keep proper footing and balance at all times. This enables better control of the power tool in unexpected situations.
F. Dress properly. Do not wear loose clothing or jewellery. Keep your hair, clothing and gloves away from moving parts. Loose clothes, jewellery or long hair can be caught in moving parts.
2. SAFETY INSTRUCTIONS
G. If devices are provided for the connection of dust extraction and collection facilities, ensure these are connected and properly used. Use of dust collection can reduce dust-related hazards.
H. Do not let familiarity gained from frequent use of tools allow you to become complacent and ignore tool safety principles. A careless action can cause severe injury within a fraction of a second.
POWER TOOL USE AND CARE
A. Do not force the power tool. Use the correct power tool for your application. The correct power tool will do the job better and safer at the rate for which it was designed.
B. Do not use the power tool if the switch does not turn it on and off. Any power tool that cannot be controlled with the switch is dangerous and must be repaired.
C. Disconnect the plug from the power source and/or the battery pack from the power tool before making any adjustments, changing accessories, or storing power tools. Such preventive safety measures reduce the risk of starting the power tool accidentally.
D. Store idle power tools out of the reach of children and do not allow persons unfamiliar with the power tool or these instructions to operate the power tool. Power tools are dangerous in the hands of untrained users.
E. Maintain power tools and accessories. Check for misalignment or binding of moving parts, breakage of parts and any other condition that may affect the power tool's operation. If damaged, have the power tool repaired before use. Many accidents are caused by poorly maintained power tools.
F. Keep cutting tools sharp and clean. Properly maintained cutting tools with sharp cutting edges are less likely to bind and are easier to control.
G.Use the power tool, accessories and tool bits etc. in accordance with these instructions, taking into account the
2. SAFETY INSTRUCTIONS
working conditions and the work to be performed. Use of the power tool for operations different from those intended could result in a hazardous situation.
H. Keep handles and grasping surfaces dry, clean and free from oil and grease. Slippery handles and grasping surfaces do not allow for safe handling and control of the tool in unexpected situations.
BATTERY TOOL USE AND CARE
A. Recharge only with the charger specified by the manufacturer. A charger that is suitable for one type of battery pack may create a risk of fire when used with another battery pack.
B. Use power tools only with specifically designated battery packs. Use of any other battery packs may create a risk of injury and fire.
C. When battery pack is not in use, keep it away from other metal objects, like paper clips, coins, keys, nails, screws or other small metal objects, that can make a connection from one terminal to another. Shorting the battery terminals together may cause burns or a fire.
D. Under abusive conditions, liquid may be ejected from the battery; avoid contact. If contact accidentally occurs, flush with water. If liquid contacts eyes, additionally seek medical help. Liquid ejected from the battery may cause irritation or burns.
E. Do not use a battery pack or tool that is damaged or modified. Damaged or modified batteries may exhibit unpredictable behaviour resulting in fire, explosion or risk of injury.
F. Do not expose a battery pack or tool to fire or excessive temperature. Exposure to fire or temperature above 130^ may cause explosion.
G. Follow all charging instructions and do not charge the battery pack or tool outside the temperature range specified in the instructions. Charging improperly or at temperatures outside the specified range may damage the battery and increase the risk of fire.
2. SAFETY INSTRUCTIONS
SERVICE
A. Have your power tool serviced by a qualified repair person using only identical replacement parts. This will ensure that the safety of the power tool is maintained.
B. Never service damaged battery packs. Service of battery packs should only be performed by the manufacturer or authorized service providers.
HAMMER SAFETY WARNINGS
1) Safety instructions for all operations
a) Wear ear protectors. Exposure to noise can cause hearing loss.
b) Use auxiliary handle(s), if supplied with the tool. Loss of control can cause personal injury.
c) Brace the tool properly before use. This tool produces a high output torque and without properly bracing the tool during operation, loss of control may occur resulting in personal injury.
d) Hold the power tool by insulated gripping surfaces, when performing an operation where the cutting accessory or fastener may contact hidden wiring. Cutting accessory and fastener contacting a "live" wire may make exposed metal parts of the power tool "live" and could give the operator an electric shock.
2) Safety instructions when using long drill bits with rotary hammers
a) Always start drilling at low speed and with the bit tip in contact with the workpiece. At higher speeds, the bit is likely to bend if allowed to rotate freely without contacting the workpiece, resulting in personal injury.
b) Apply pressure only in direct line with the bit and do not apply excessive pressure. Bits can bend, causing breakage or loss of control, resulting in personal injury.
c) Use appropriate detectors to determine if utility lines are
2. SAFETY INSTRUCTIONS
hidden in the work area or call the local utility company for assistance. Contact with electric lines can lead to fire and electric shock. Damaging a gas line can lead to explosion. Penetrating a water line causes property damage or may cause an electric shock.
d) Firmly tighten the auxiliary handle, hold the machine firmly with both hands while working and keep proper footing and balance at all times. The machine is securely guided with both hands.
e) Secure the workpiece. A workpiece clamped with clamping devices or in a vice is held more secure than by hand.
f) For drilling without impact in wood, metal, ceramic and plastic as well as for screw driving, tools without SDS-plus are used (e.g., drill bits with cylindrical shank). For these tools, a keyless chuck or a key type drill chuck are required.
g) Replace a damaged dust protection cap immediately. The dust protection cap largely prevents the penetration of drilling dust into the tool holder during operation. When inserting the tool, pay attention that the dust protection cap is not damaged.
h) Dust from materials such as lead-containing coatings, some wood types, minerals and metal can be harmful to one's health and cause allergic reactions, lead to respiratory infections and/or cancer. Materials containing asbestos may only be worked by specialists.
- As far as possible, use a dust extraction system suitable for the material.
- Provide for good ventilation of the working place.
- It is recommended to wear a P2 filter-class respirator.
Observe the relevant regulations in your country for the materials to be worked.
i) Prevent dust accumulation at the workplace. Dust can easily ignite.
j) When drilling it is common that the core / drill bit jams in the material being drilled. This will result in the drill trying to rotate around the drill bit and potentially come out of your grip. This SDS Drill has a safety clutch mechanism. This safety clutch mechanism will be activated and stop the drive to the drill bit BUT only if you resist the
2. SAFETY INSTRUCTIONS
initial forces caused by the jamming by securely holding the drill with both hands. As this is a very powerful drill these forces are significant.
k) NEVER Start the drill with the core or drill jammed in position.
I) DO NOT stretch to hold the drill. Do not drill above shoulder height or below Knee height, as the drill cannot be securely held.
m) Never drill holes that are above the declared maximum size in the manual.
n) Double check that the accessories and attachments are properly fixed. A short-time testing running in no-load condition will be helpful to identify the problems.
o) The drill bit, chuck and the work piece can be very hot while working. Do not touch them before they have cooled down.
p) Ensure that the air vents are always unobstructed and clear. Clean them if necessary with a soft brush. Restricted air vents may lead to overheating and damage the product.
q) Switch off the power tool immediately when the drill bit jams. Be prepared for high reaction torque that can cause kickback. The drill bit jams when: the power tool is subject to overload or it becomes wedged in the workpiece. Switch the power tool off. Loosen the drill bit.
r) Switch the product off immediately if you are disturbed while working by other people entering the working area. Always let the product come to complete stop before putting it down.
s) Do not overwork yourself. Take regular breaks to ensure you can concentrate on the work and have full control over the product.
t) Only use the battery/charger specified in the technical specification. Read all safety warnings, instructions, illustrations and specifications provided with the charger and battery pack.
VIBRATION AND NOISE REDUCTION
To reduce the impact of noise and vibration emission, limit the time of operation, use low-vibration and low-noise operating modes as well as wear personal protective equipment.
Take the following points into account to minimize the vibration and noise
2. SAFETY INSTRUCTIONS
exposure risks:
A. Only use the product as intended by its design and these instructions.
B. Ensure that the product is in good condition and well maintained.
C. Use correct attachments for the product and ensure they are in good condition.
D. Keep tight grip on the handles/grip surface.
E. Maintain this product in accordance with these instructions and keep it well lubricated (where appropriate).
F. Plan your work schedule to spread any high vibration tool use across a longer period of time.
G. Prolonged use of the product exposes the user to vibrations that can cause a range of conditions collectively known as hand-arm vibration syndrome. (HAVS) e.g. fingers going white; as well as specific diseases such as carpal tunnel syndrome. To reduce this risk when using the product, always wear protective gloves and keep your hands warm.
2. SAFETY INSTRUCTIONS

WARNING! Identify safety measures to protect the operator that are based on an estimation of exposure in the actual conditions of use (taking account of all parts of the operating cycle such as the times when the tool is switched off and when it is running idle in addition to the trigger time).
Note:
- The use of other tools will reduce the users' total working period on this tool.
- Helping to minimise your vibration exposure risk. ALWAYS use sharp chisels, drills and blades.
- Maintain this tool in accordance with these instructions and keep well lubricated (where appropriate).
- Avoid using tools in temperatures of 10^ or less. Plan your work schedule to spread any high vibration tool use across a number of days.
RESIDUAL RISKS
Even if you are operating this product in accordance with all the safety requirements, potential risks of injury and damage remain. The following dangers can arise in connection with the structure and design of this product:
A. Health defects resulting from vibration emission if the product is being used over long periods of time or not adequately managed and properly maintained.
B. Injuries and damage to property due to broken attachments or the sudden impact of hidden objects during use.
C. Danger of injury and property damage caused by flying objects or poor power tool accessories.
WARNING! This product produces an electromagnetic field during operation! This field may under some circumstances interfere with active or passive medical implants! To reduce the risk of serious or fatal injury, we recommend persons with medical implants to consult their doctor and the medical implant manufacturer before operating this product!
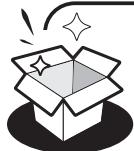
3.DESCRIPTION

SDS-plus tool holder
Locking sleeve
3 Mode selector a. Unlocking button b. Triangle indicatio
4 Indicator for right rotation
Indicator for left rotation
6 Rotational direction switch
7 On/off switch
Holder for battery pack
9 Work lamp
10 Auxiliary handle
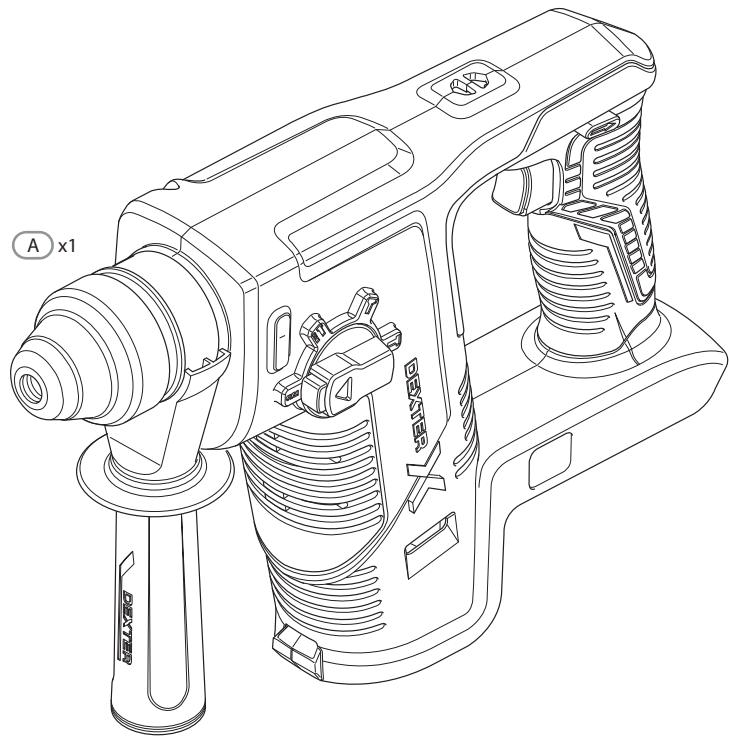
11 Stone bit 6mm
12 Stone bit 8mm
13 Flat chisel
4. TECHNICAL DATA
| Model | 20VRH2-17.11 |
| Rated voltage: | 18V d.c. 20V Max d.c. |
| Rated speed | 1400 min-1 |
| Impact rate | 0-4500 bpm |
| Impact energy | 1.7J |
| Tool holder | SDS-Plus |
| Max. drilling diameter | |
| In concrete (with twist drill) | Ø 16mm |
| In wood | Ø 20 mm |
| Weight | 2 kg |
| Compatibilities with batteries | 2.0Ah : 20BA2-20.2/20BA2-20.2XXX 2.5Ah: 20VBA2-25.1/20VBA2-25.1XXX 4.0Ah: 20BA2-40.1/20BA2-40.1XXX 5.0Ah: 20VBA2-50.1/20VBA2-50.1XXX |
| Compatibilities with chargers | 20CH2-3A.2/20CH2-3A.2XXX 20VCH1-3A.1/20VCH1-3A.1XXX 20VCH2-6A.1/20VCH2-6A.1XXX |
| Ambient temperature for use: | 10-30 °C |
| Ambient temperature for charging: | See instruction manuals of battery/charger |
| Sound pressure level LpA | 93 dB(A) |
| Sound power level LWA | 101 dB(A) |
| Uncertainty KpA, KwA | 3 dB(A) |
| Vibration total value: ah' HD | 7.82 m/s2 (main handle Hammer drilling mode) |
| ah' HD | 5.61 m/s2 (main handle Hammer mode) |
| Uncertainty K | 1.5 m/s2 |
4. TECHNICAL DATA

WARNING!

Always wear ear protectors, when you are operating this machine.
The declared vibration total values and the declared noise emission values have been measured in accordance with a standard test method (EN 60745-2-6). They may be used for comparing one tool with another and in a preliminary assessment of exposure.
WARNING! The vibration and noise emissions during actual use of the power tool can differ from the declared values depending on the ways in which the tool is used especially what kind of workpiece is processed.
It is necessary to identify safety measures to protect the operator that are based on an estimation of exposure in the actual conditions of use (taking account of all parts of the operating cycle such as the times when the tool is switched off and when it is running idle in addition to the trigger time).
5.OPERATION
- Unpack all parts and lay them on a flat, stable surface.
- Remove all packing materials and shipping devices, if applicable.
- Make sure the delivery contents are complete and free of any damage. If you find that parts are missing or show damage, do not use the product but contact your dealer. Using an incomplete or damaged product represents a hazard to people and property.
- Ensure that you have all the accessories and tools needed for assembly and operation. This also includes suitable personal protective equipment.


WARNING! The product must be fully assembled before operation! Do not use a product that is only partly assembled or assembled with damaged parts!
Wear protective gloves for this assembly work and always lay the product on a flat and stable surface while assembling.
Follow the assembly instructions step-by-step and use the pictures provided as a visual guide to easily assemble the product!
WARNING! The device and the packaging are not children's toys!
Children must not play with plastic bags, sheets and small parts. There is a danger of choking and suffocation!
PREPARATION
Remove the battery from the power tool before carrying out work on the power tool (e.g. maintenance, changing tool, etc.). The battery should also be removed for transport and storage. There is risk of injury from unintentionally pressing the on/off switch.
CHARGING THE BATTERY PACK
Use only the chargers and battery packs (not provided with the power tool) listed in the technical specifications. Only these chargers and battery packs are matched with each other and with your power tool. Follow the instruction manuals of the charger and/or battery pack.
Notes: This is information for your reference. For details, pls. read the instruction of the charger.
ASSEMBLING OF AUXILIARY HANDLE


WARNING! For all work with the machine, the auxiliary handle (10) must always be firmly mounted.
Do not make any changes or modifications to the auxiliary handle. Do not continue to use the power tool when the auxiliary handle is damaged.
5. OPERATION
- Align the ring of auxiliary handle to the spindle collar.
- Turn the auxiliary handle clockwise to firmly clamp it.
- For adjusting the auxiliary handle to appropriate position, firstly turn the auxiliary handle anti-clockwise to loosen it.
- Firmly clamp the auxiliary handle before each use.
DRILL BIT/CHISEL

WARNING! Always use drill bits according to the intended use!
Observe the technical requirements of this product (see section Technical data) when purchasing and using drill bits!

The chuck and drill bits can be very hot after working, do not assemble/disassemble them before cooling down!
Inserting SDS-plus Drilling Tools:
- Pull the Locking sleeve backward and hold it in position.
- Insert the SDS-Plus drill bit/chisel into SDS-Plus tool holder. Tips: clean and lightly grease the shank end of the SDS-Plus drill bit before inserting.
- To insert it completely until stop, combine the inserting and rotational motion and find the engaged position.
- Release the locking sleeve and check that the drill bit/chisel is securely fastened. The drill bit/ chisel should be locked in the chuck and shall not be possible to be pulled out.
Removing SDS-plus Drilling Tools:
- Pull the Locking sleeve backward and hold it in position.
- Take firmly drill bit / chisel and pull it out from SDS-Plus tool holder.
MODE SELECTOR

WARNING! Only change the mode settings when the product is switched off and has come to a complete stop! Always ensure that the mode selector is adjusted to the correct position depending on the intended operation! Do not use the product with the switch in any intermediate position!
- Press the unlocking button and turn the mode selector, so that the triangle indication is aligned with the desired operation mode symbol.
- Release the unlocking button and ensure that locking function of the mode selector is engaged.
5. OPERATION
| Mode selector | Operation mode |
| Drilling without impact. e.g. for drilling in wood, steel, plasterboard by using an optional keyless / keyed drill chuck (not provided). | |
| Hammer drilling with impact. | |
| Changing the chisel position. | |
| Chiselling. |
ROTATIONAL DIRECTION SWITCH
Actuate the rotational direction switch only when the machine is at a standstill.
The rotational direction switch is used to reverse the rotational direction of the machine. However, this is not possible with the On/off switch actuated.
Right Rotation: For drilling and hammer drilling, push the rotational direction switch left to the stop.
The indicator for right rotation lights up with green light when the On/off switch is actuated and the motor is running.
Left Rotation: For loosening, press the rotational direction switch right to the stop.
The indicator for left rotation lights up with orange light when the On/off switch is actuated and the motor is running.
BATTERY PACK
Use only original recommended lithium-ion battery pack with the voltage stated on the type plate of your power tool. Using other batteries can lead to injuries and pose a fire hazard.
- To insert the battery pack, slide it into the holder of until it is engaged and securely locked in position.
5. OPERATION
- To remove the battery pack, press the release button on the battery pack and pull out the battery pack.
Notes: This is information for your reference. For details, pls. read the instruction of the battery pack.
SWITCHING ON/OFF
- To start the machine, press the On/off switch and keep it pressed.
The power light lights up when the On/off switch is slightly or completely pressed, and allows the work area to be illuminated when lighting conditions are insufficient. - To switch off the machine, release the On/off switch.
For low temperatures, the power tool reaches the full hammer / impact capacity only after a certain time. To save energy, only switch the power tool on when using it.
Note: For safety reasons, the On/off switch cannot be locked; it must remain pressed during the entire operation.
SETTING THE SPEED / IMPACT RATE
The speed/impact rate of the switched on power tool can be variably adjusted, depending on how far the On/off switch is pressed.
Light pressure on the On/off switch results in low speed/impact rate. Further pressure on the switch increases the speed/impact rate.
DRILLING
Drilling into wood, wood similar materials, plastic or metal could be applied by means of a suitable keyless / keyed drill chuck with SDS-PLUS adapter (not provided).
- Apply proper feeding force and rotation speed depending on drill bit characteristics and material to be drilled. Too big feeding force will overload the power tool, damage the drill bit due to overheating, decrease drilling effectiveness and increase the risk of loss of control. Ask a drill bit specialist for advice if necessary.
- Check the bit and auxiliary handle status regularly before and during work, refit or replace it if necessary.
- Turn the mode selector to set the machine to the operation mode "Drilling without impact" and insert the keyless / keyed drill chuck with SDS-PLUS adapter into the SDS-PLUS chuck.
- Attach a suitable drill bit to the keyless / keyed drill chuck.
- Punch the drilling point before operation in order to avoid slipping of the drill bit.
- Always hold the product perpendicular to the point to be drilled. Holding it at an angle may cause slipping or jamming of the drill bit.
- Always place the drill tip directly on the point to be drilled first and then switch the product on.
5. OPERATION
- Use a metal drill bit for drilling into plastic and metal. Where necessary, use a cooling lubricant that is available at your specialist dealer.
HAMMER DRILLING
NOTE:
- In principle, masonry should be drilled in hammer drilling mode with maximum speed. However, in the first few seconds, the drill bit may deviate from the original desired position due to the hammer action. To avoid this, use inching mode to the On/off switch until the drill bit tip is well seated in workpiece.
-
Pay special care when drilling tiles. Hammer drilling can damage the tile! Use special tile drill bit with drill mode without hammer function to drill through the tile first! Then switch to hammer drilling mode for the brick/concrete behind the tile.
-
Check the bit and auxiliary handle status regularly before and during work, refit or replace it if necessary.
- Turn the mode selector to set the machine to the operation mode "Hammer drilling with impact" and insert the stone bit into the SDS-PLUS chuck.
- Always hold the product perpendicular to the point to be drilled. Holding it at an angle may cause slipping or jamming of the drill bit.
- Always place the drill tip directly on the point to be drilled first and then switch the product on.
CHISELLING
- Check the bit and auxiliary handle status regularly before and during work, refit or replace it if necessary.
- Turn the mode selector to set the machine to the operation mode "Chiselling" and insert the chisel into the SDS-PLUS chuck.
- Choose a suitable SDS-Plus chisel for your application.
- Use shorter chisel when a big striking power is required.
- Mark the chiselling route when you plan to chisel slots.
- Start near the edge and then proceed towards the inside.
CHANGING THE CHISELLING POSITION
- Switch off the machine by releasing of On/off switch and wait until a complete stop.
- Turn the mode selector to set the machine to the operation mode "Changing the chisel position".
5. OPERATION
- Firmly grasping the main handle and auxiliary handle to turn the machine to an appropriate position.
- Turn the mode selector to set the machine to the operation mode "Chiselling" again.
- Continue the chiselling work by pressing On/off switch.
AFTER USE
- Switch the product off, wait for complete stop, disconnect the battery pack, let it cool down and remove the drill bits, etc.
- Check, clean and store the product as described below.
6. MAINTENANCE

WARNING! Always switch the product off, disconnect the product from the battery and let the product cool down before performing inspection, maintenance and cleaning work! Only perform care and maintenance work according to these instructions! All further works must be performed by a qualified specialist!
- Remove the battery from the power tool before carrying out work on the power tool (e.g. maintenance, changing tool, etc.). The battery should also be removed for transport and storage. There is risk of injury from unintentionally pressing the on/off switch.
- To ensure safe and efficient operation, always keep the power tool and the ventilation slots clean.
- Clean the product with a dry cloth. Use a brush for areas that are hard to reach.
- If the power tool becomes very dirty, this can lead to serious faults. Remove stubborn dirt with high pressure air (max. 3 bar).
- Check for worn or damaged parts. Replace worn parts as necessary or contact an authorised service centre for repair before using the product again.
7. TROUBLESHOOTING
Suspected malfunctions are often due to causes that the users can fix themselves. Therefore check the product using this section. In most cases the problem can be solved quickly.

WARNING! Only perform the steps described within these instructions! All further inspection, maintenance and repair work must be performed by an authorised service centre or a similarly qualified specialist if you cannot solve the problem yourself!
| Problems | Probable causes | Corrective action |
| 1. Product does not start | 1. 1. Bad connection to battery pack 1. 2. The battery is not charged | 1. 1. Re-insert the battery pack 1. 2. Charge the battery |
| 2. Product does not reach full power | 2. 1. Power source (e.g. generator) has too low voltage 2. 2. Air vents are blocked | 2. 1. Connect to another power source 2. 2. Clean the air vents |
| 3. Unsatisfactory results | 3. 1. Drill bit / chisel is dull/damaged 3. 2. Drill bit / chisel not suitable for work piece materiall | 3. 1. Replace with new one 3. 2. Use proper drill bit / chisel |
| 4. Excessive vibration or noise | 4. 1. Drill bit is dull/damaged | 4. 1. Replace with a new one |
STORAGE
- Switch the product off and disconnect it from the power supply.
- Clean the product as described above.
- Store the product and its accessories in a dark, dry, frost-free, well-ventilated place.
- Always store the product in a place that is inaccessible to children. The ideal storage temperature is between 10^ and 30^ .
- We recommend using the original package for storage or covering the product with a suitable cloth or enclosure to protect it against dust.
TRANPORT
- Switch the product off and disconnect it from the power supply. Remove the drill bit / chisel if applicable.
- Protect the product from any heavy impact or strong vibrations which may occur during transportation in vehicles.
- Secure the product to prevent it from slipping or falling over.
8. PROTECT OUR ENVIRONMENT

The packaging consists of environmentally friendly material. It can be disposed of in the local recycling containers.

CAUTION! This product has been marked with a symbol relating to removing electric and electronic waste. This means that this product shall not be discarded with household waste but that it shall be returned to a collection system which conforms to the European WEEE Directive. Contact your local authorities or stocks for advice on recycling. It will then be recycled or dismantled in order to reduce the impact on the environment. Electric and electronic equipment can be hazardous for the environment and for human health since they contain hazardous substances.

Do not dispose of batteries in your normal household waste!
ENVIRONMENTAL PROTECTION
Waste electrical products must not be disposed of with household waste. According to the European Battery Directive, defective or used battery packs/batteries, must be collected separately and disposed of in an environmentally correct manner. Please recycle where facilities exist. Check with your local authorities or retailer for recycling advice. It will then be recycled or dismantled in order to reduce the impact on the environment. Battery pack/ batteries can be hazardous for the environment and for human health since they contain hazardous substances.
9. WARRANTY
PREFACE
Thank you for choosing this product. Upon designing and manufacturing our products, we place all of our efforts into ensuring an excellent quality that meets the needs of the users.
IMPORTANT! PLEASE READ THIS MANUAL BEFORE USING THIS PRODUCT, FOLLOW THE BASIC SAFETY WARNINGS WITHIN, AND KEEP IT CAREFULLY.
As soon as you open the packaging, we recommend that you check to ensure that all elements required for assembly of the product have been included.
If the product is damaged or has some defects, please do not use it, and bring it back to the nearest store.
This product is intended for outdoor use only, and must not be used inside a building under any circumstances.
This product can be placed inside a building only after having rested for two hours after the last use. We thank you for your business and hope that you will be totally satisfied upon using our product. We will be happy to receive all of your remarks on our online store web site.
Warranty
Dexter & UP20 products are designed to the highest DIY quality standards. We offer a 60-month warranty for DEXTER product (tool), and a 36-month warranty of UP20 products (charger & battery).
from the date of purchase. This warranty applies to all material and manufacturing defects which may arise.
No further claims are possible, of whatever nature, direct or indirect, relating to people and/or materials.
In the event of a breakdown, please refer first to the troubleshooting page (problems and solutions) in the brochure; if the problem persists, please check with the nearest store.
Your store shall spare no effort in resolving the issue.
Repairs and change of parts do not extend the duration of the initial warranty.
Breakdowns resulting from normal wear and tear or from improper use of the product are not covered by the warranty. This includes, among others, the switches, the safety circuit breaker and the motors, in case of wear.
Please note that there are specific warranty terms for certain countries.
In case of doubt, please check with your point of sale.
For claims relating to the warranty to be taken into account, the following is required:
Providing proof of purchase
- That no repairs and/or change of parts have been performed by a third party.
- That the issue is not a matter of normal wear and tear.
- That required maintenance and repair works have been performed correctly.
- That no deterioration has taken place as a result of incorrect setting of the carburetor.
- That there has been no forcing, improper handling, unauthorised use, or accidents
- That no deterioration has taken place due to overheating, resulting from clogging of the ventilator block.
10. EXPLODED VIEW WITH PART LIST
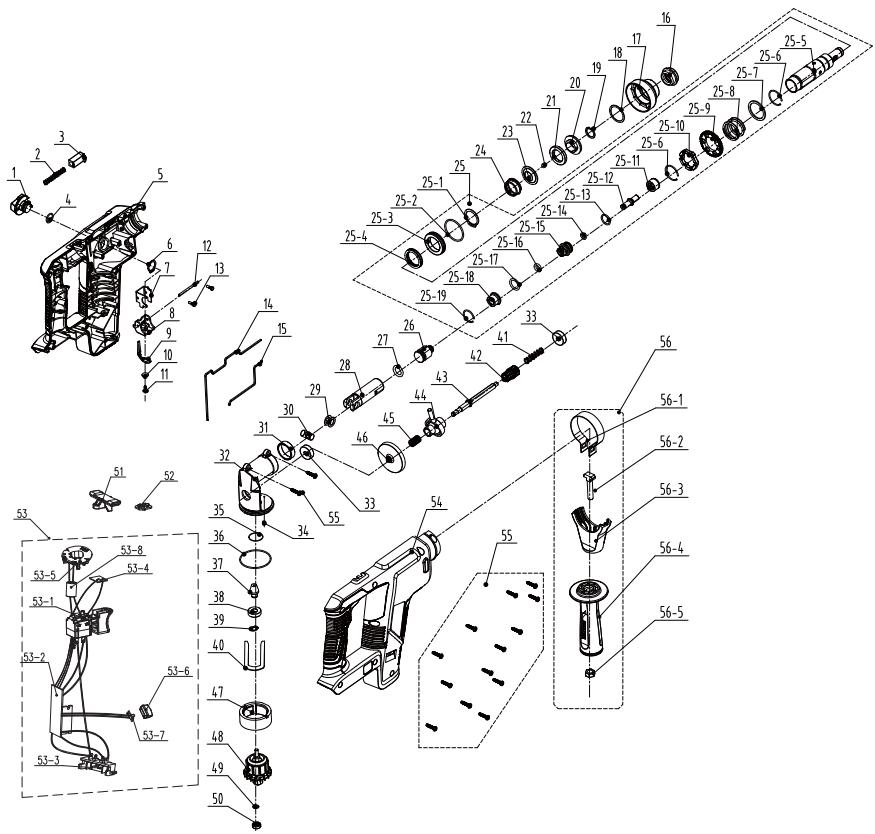
10. EXPLODED VIEW WITH PART LIST
| POS | DESCRIPTION |
| 1 | Knob |
| 4 | O-ring |
| 2 | Knob spring |
| 3 | Button |
| 5 | Cabinet |
| 6 | Shaft circlip |
| 7 | Dial block |
| 8 | Fixed seat |
| 9 | Torsion spring |
| 10 | Flat Washers |
| 11 | Screw ST3*8 |
| 12 | Cylindrical pin |
| 13 | Screw ST3*12 |
| 14 | Seal ring |
| 15 | Seal ring |
| 16 | Rubber stopper |
| 17 | Cover |
| 18 | Flat Washers |
| 19 | Shaft circlip |
| 20 | End cap |
| 21 | Gasket B |
| 22 | Steel ball |
| 23 | Collar |
| 24 | Spring |
| 25 | Cylinder assembly |
| 25.1 | Shaft circlip |
| 25.2 | O-ring |
| 25.3 | Bearing |
| 25.4 | Oil seal |
| 25.5 | Cylinder |
| POS | DESCRIPTION |
| 25.6 | Shaft wire retaining ring |
| 25.7 | Flat Washers |
| 25.8 | Compressed spring |
| 25.9 | Gear |
| 25.10 | Trip plate |
| 25.11 | Buffer sleeve |
| 25.12 | Impact rod |
| 25.13 | O-ring |
| 25.14 | O-ring |
| 25.15 | Fixed ring |
| 25.16 | O-ring |
| 25.17 | O-ring |
| 25.18 | Connector |
| 25.19 | Hole wire retaining ring |
| 26 | Hammer |
| 27 | O-ring |
| 28 | Piston |
| 29 | Flat Washers |
| 30 | Piston pin |
| 31 | Bushing |
| 32 | Support |
| 34 | Wool felt |
| 35 | O-ring |
| 36 | O-ring |
| 37 | Gear |
| 38 | Bearing |
| 39 | Shaft circlip |
| 48 | Rotor assembly |
| 49 | Washer |
| POS | DESCRIPTION |
| 50 | Bearing |
| 40 | Pad |
| 33 | Bearing |
| 41 | Compressed spring |
| 42 | Gear |
| 43 | Axis |
| 44 | Rocker bearing |
| 45 | Needle bearing |
| 46 | Gear |
| 47 | Stator assembly |
| 51 | Pole |
| 52 | Lampshade |
| 53 | Electronic component |
| 53.1 | Trigger switch |
| 53.2 | SMT component |
| 53.3 | Bracket assembly |
| 53.4 | SMT component |
| 53.5 | Brush holder assembly |
| 53.6 | lampshade |
| 53.7 | LED |
| 53.8 | Magnetic ring |
| 54 | Cabinet |
| 55 | Screw ST4*16 |
| 56 | Handle assembly |
| 56.1 | Shrapnel |
| 56.2 | T-screw |
| 56.3 | Handle cover |
| 56.4 | Handle |
| 56.5 | Nut |
808055-EANCode:3276007563863 IndustrialType Design Reference:20VRH2-17.11
DEXTER
SN SSSSS XX DDMMYY nn PPPPPP (SN: Serial No., SSSSSS : Supplier code, XX : Production line ID, DDMMYY: Production date, nn: number of version of product, PPPPPP : Incremental number)
808055-EAN Code:3276007563863 Industrial Type Design Reference: 20VRH2-17.11
Marca del prodotto|Marka produktu|Mápka προίντος|Marcà a produsului:
DEXTER
Codistica del numero多位|Codokowanie numero umru seryjene|Kudokomirion|opiaxpoi apqIqoi|Cod de numero多位
SN SSSSS XX DDMMYY nn PPPPPP (SN: Serial No., SSSSSS : Supplier code, XX : Production line ID, DDMMYY: Production date, nn: number of version of product, PPPPPP : Incremental number)
2014_30_EU_AMC
Chemical magnetism:completely
[In] [In] [In] [In] [In] [In] [In] [In] [In] [In] [In] [In] [In] [In] [In] [In] [In] [In] [In] [In] [In] [In] [In] [In] [In] [In] [In] [In] [In] [In] [In] [In] [In] [In] [in]
ENIEC55014-1:2021 ENIEC55014-2:2021
2011_65_EU_RoHS Restrizione di sostanza pericolose delle apparettache
eletriche)Ograncizene bianie piezecziepynchastubanti w sprzeciage
elektzyczmny)(Tlpiopriopuoc tpiikivbuvuuv ouovnzt 6r ktpkioo
EtoIamoio)Restriconaare substantior periculose in echipamente
elecrite
RoHS Directive (EU) 2015/863 amending 2011/65/EU IEC 62321-2:2021
IEC 62321-1:2013
IEC 62321-3-1:2013
IEC 62321-5:2013
JEC 62321-4:2013+A1:2017
IEC 62321-7-1:2015
IEC 62321-7-2:2017
ISO 17075-1:2017
IEC 62321-6:2015
IEC 62321-8:2017
EN IEC 63000:2018
Compilato, firmato in vena e periconto di (Orcapownano, podipsozo w. 1267-2003; Urenpoyra) yoi xi (Ovovoro) [Compilato, semiatr. de qn. In numelere]
Eric LEMOINE International Project Quality Leader
Lagoon e data del raslisco[Data wyadnia i moyen]Torroc kran npocpovita [Exo00m]
Ronchin France
17/11/2022
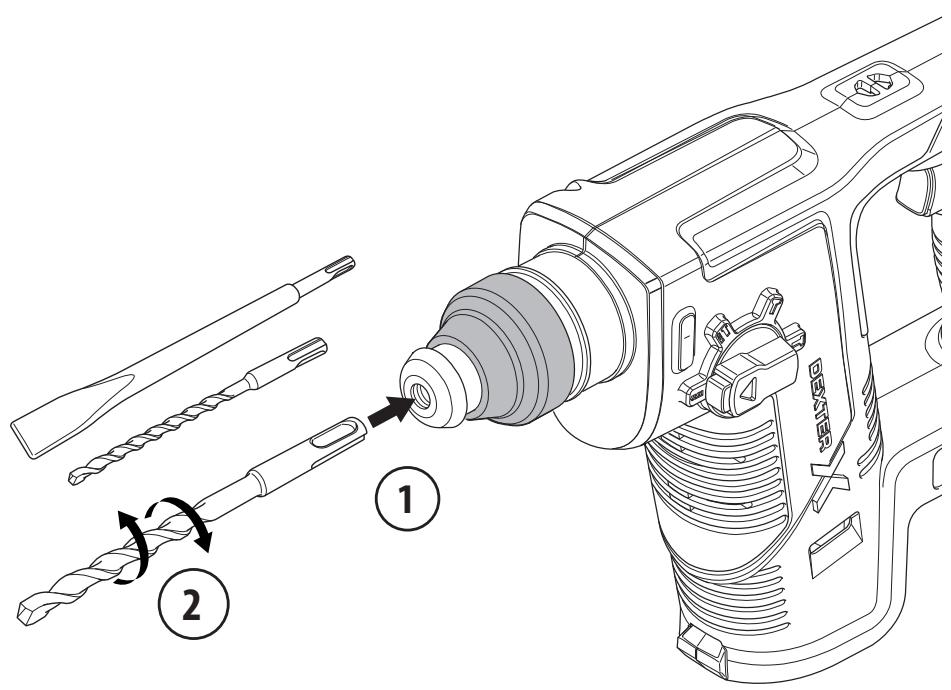
1
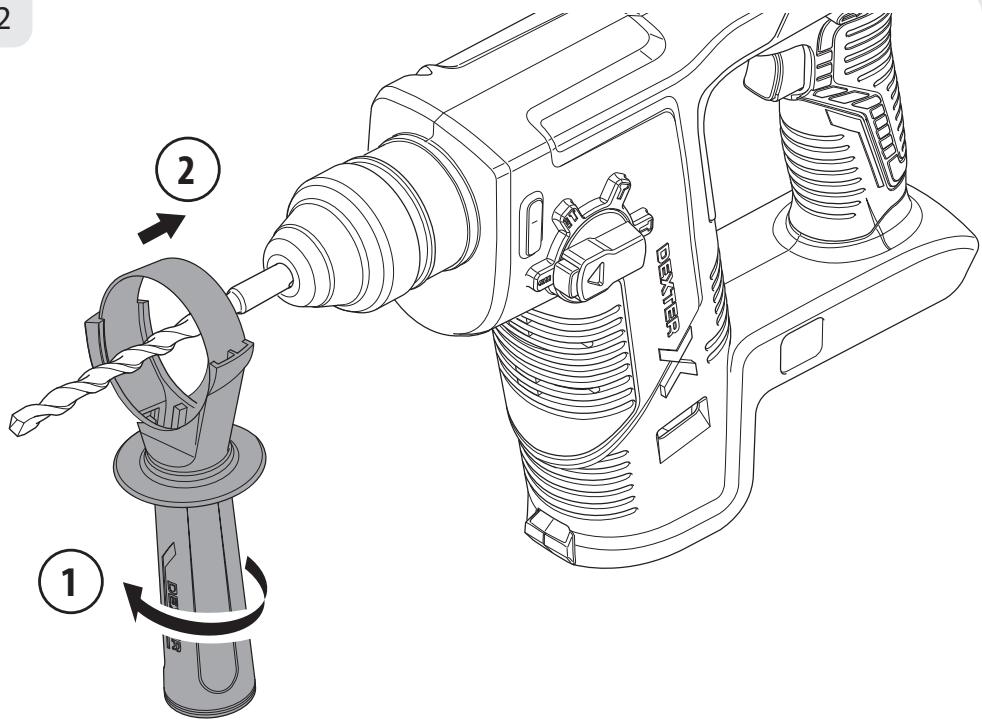
2
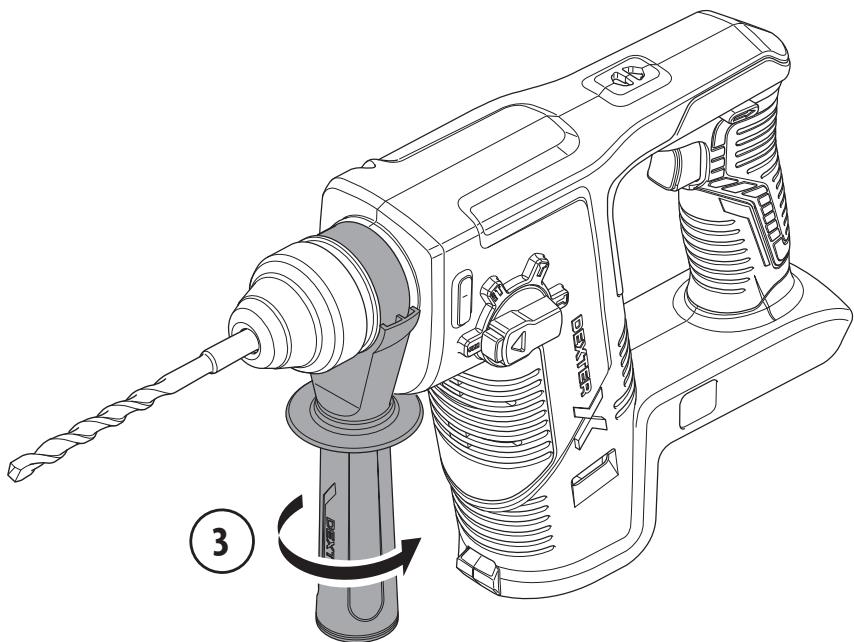
3
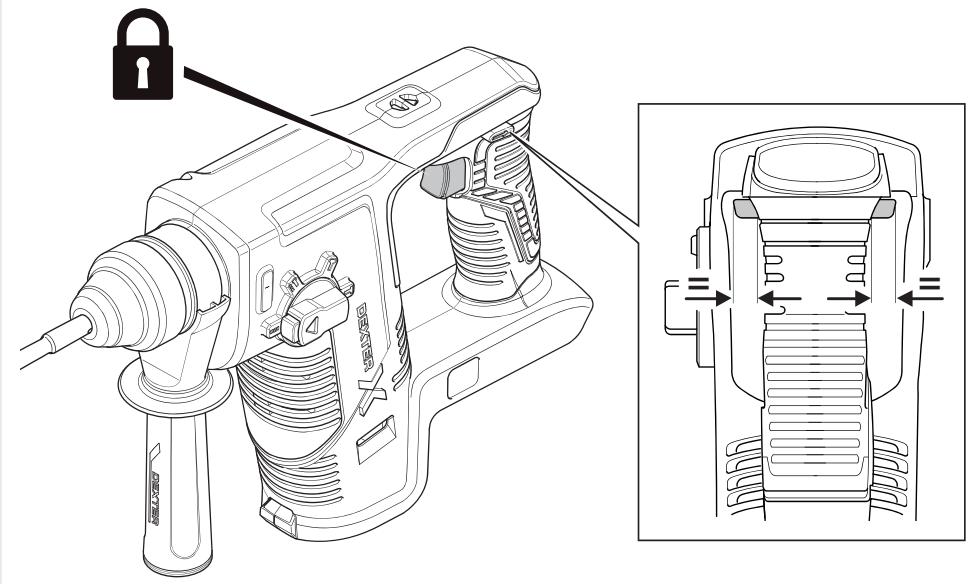
4
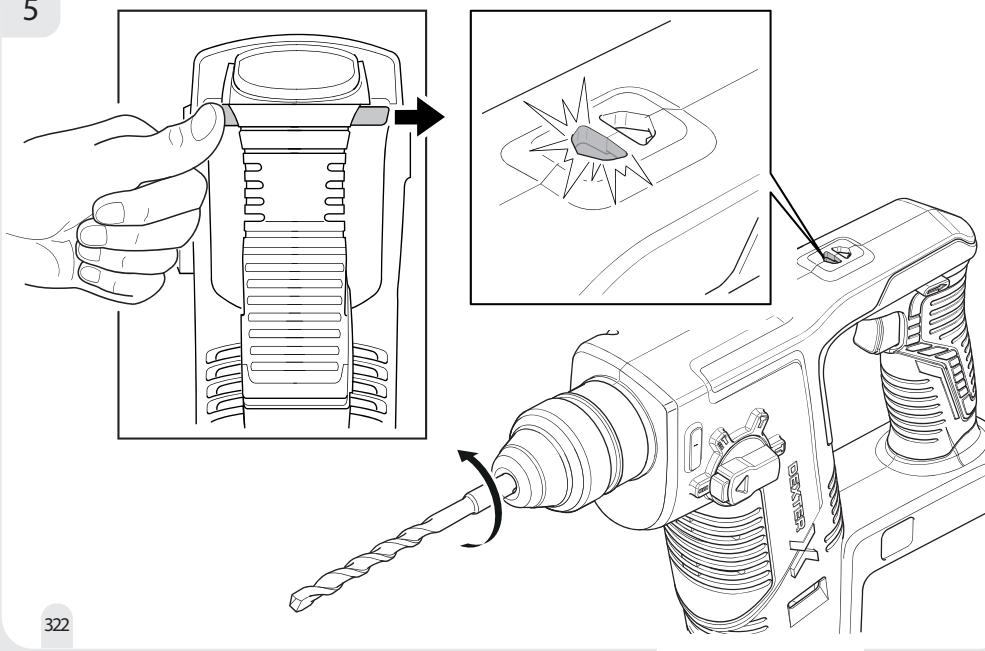
5
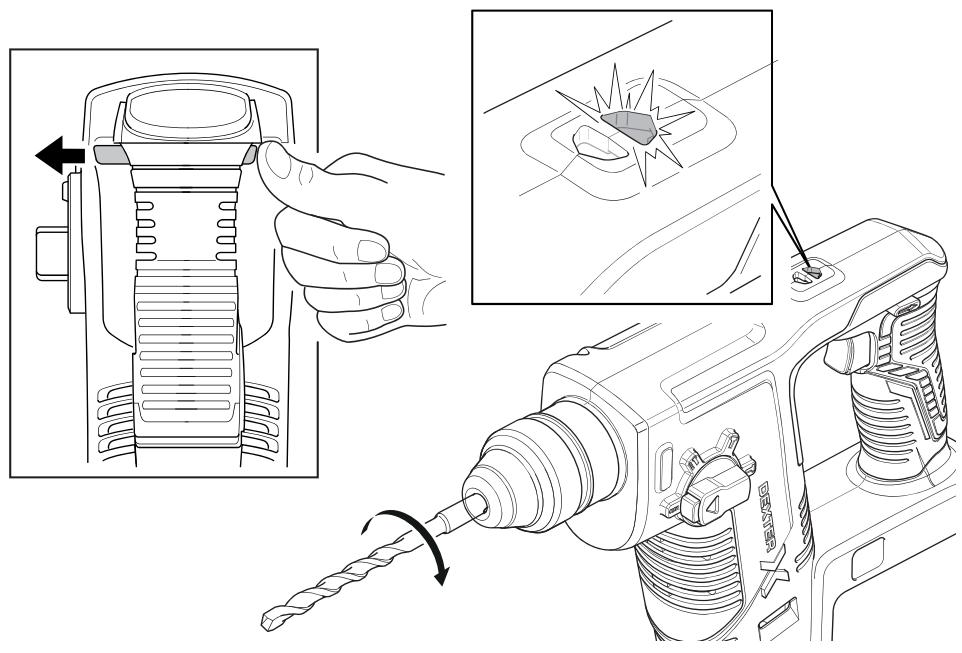
6

7
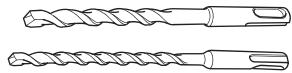
1
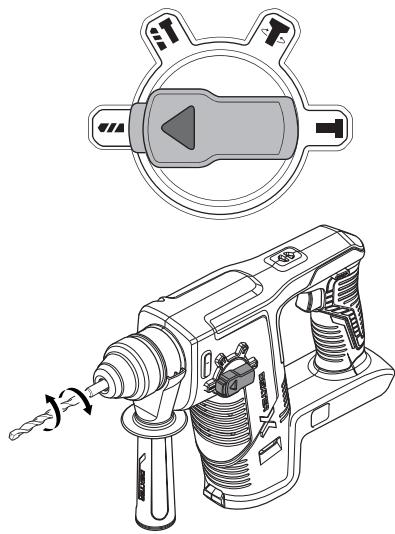
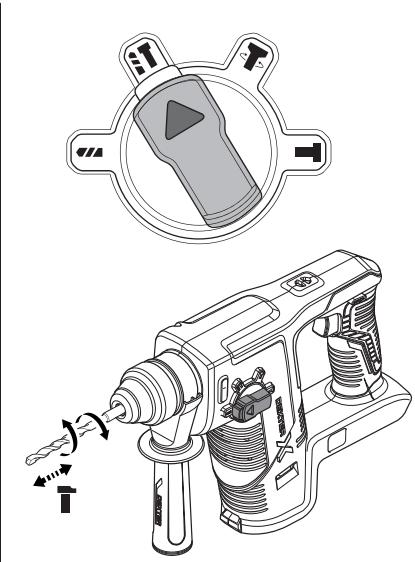

2
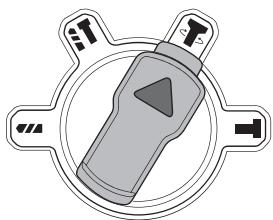
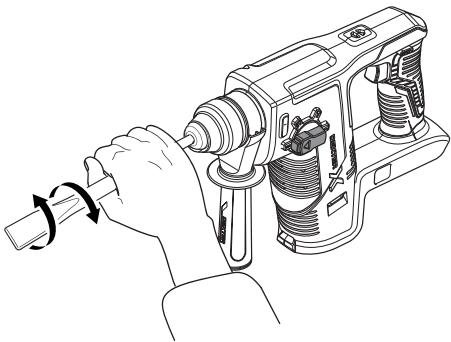
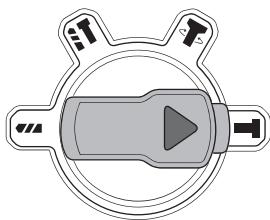
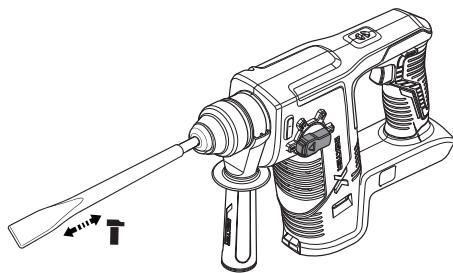

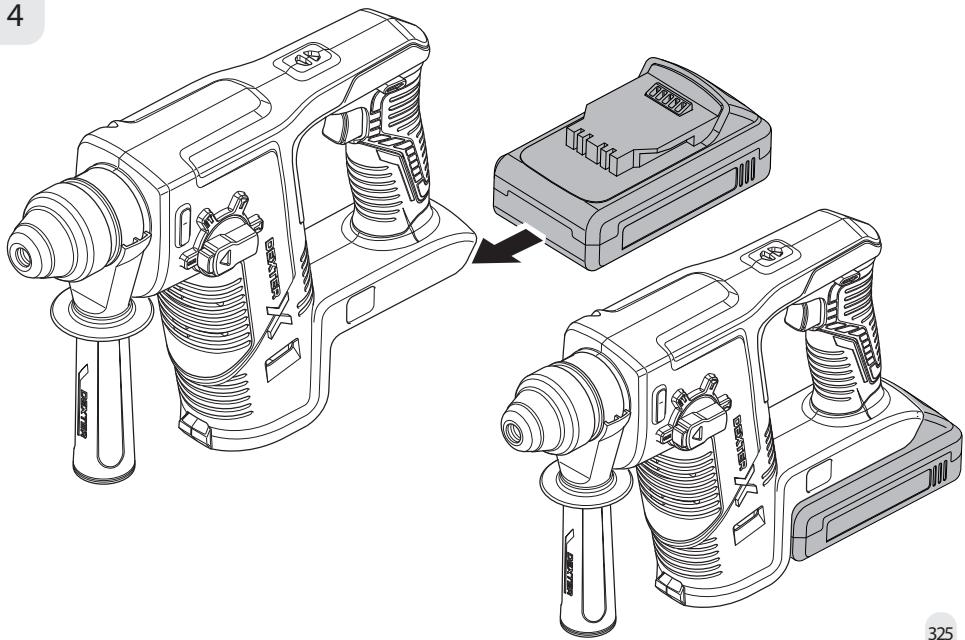
4
FR Machine Garantie 5 ans, batterie garantie 3 ans, chargeur Garantie 3 ans
ES *Máquina garantía 5 años, batería garantía 3 años, cargador garantía 3 años
PT Maquina 5 anos de garantia, bateria 3 anos de garantia, corregador 3 anos de garantia
IT Macchina 5 anni di garanzia, batteria 3 anni di garanzia, caricabatterie 3 anni di garanzia
EL *Mnxavn 5 xpovia eyyunon, mnatapia 3 xpovia eyyunon, oopriotnic 3 xpovia eyyunon
PL *Maszyna 5 lat gwarancji, bateria 3 lata gwarancji, ladowarka 3 lata gwarancji
RU fapaHTnHa MaMInHy 5Iet, rapaHTnHa aKKyMnyTOp 3 rOda, rapaHTnHa zapAInHoe yctPoIcTB0 3 rOda
K7 *MaunhaHbI h keninjiri 5 KbIn, akymyIaTOpdbH keninjiri 3 KbIn, zapraTaFbIbThikeninjiri 3 KbIn
UA *rapahtia ha maunhy 5 pokib, rapahtia ha akymyraTop 3 pOKn, rapahtia ha 3apdHni npctpi 3 pOKn
RO Masina 5 ani garantie, baterie 3 ani garantie, incarcator 3 ani garantie
EN Machine 5-year guarantee, battery 3-year guarantee, charger 3-year guarantee
Made In China/
CdeJanao B Kntae/
KbITaJaXacalfah


*Machine Garantie 5 ans, batterie garantie 3 ans, chargeur Garantie 3 ans / Maquina garantia 5 afois, batteria garanta 3 aos, cargaradora 3 afois / Maquina 5 anos de garantia, batteria 3 anos de garantia, carregador 3 anos de garantia / Machina 5 anni de garantia, batteria 3 anni de garantia, caricabatterie 3 anni de garantia / MxynvI 5 xpvO yuvnO uptarotia 3 xpvO yuvnO oprotirc3 xpvO yuvnO / Maszyna 5 lat gwarancj, Batteria 3 lata gwarancj, ladowarka 3 lata gwarancj / TapaTnH MaauNHY 5 net, rapaTnH A kAkyMnyrtoP 3 roda, rapaTnH Ha zapAIOHOy cypTOBxo 3 roda / TapaTnH MaauNHY 5 POK8, rapaTnH A kAkyMnyrtoP 3 pOK, rapaTnH Ia zapAIOHO npIcrpTnI 3 pOK / MaauNHNbHN KeinjInI 5 KJIn, AkyMnyrToPbDh KENjInI 3 KJIn, ZapAITBaIshTuH KeinjInI 3 KJIn / Masina 5 ani garantie, baterie 3 ani garantie, incaraor / Machine 5-year guarantee, battery 3-year guarantee, charger 3-year guarantee
Adeo Services
135 rue Sadi Carnot-CS 00001 59790-RONCHIN-France
IMMTOPT:Top (Lejepa Mepercy Kwaika),04201 Kwaipa, M.Kwib,Byn. FonpaRHa 17A, +380 44 498 46 00.
Imnpotrep npiMaE npTeH3iB iDnCnoXhauWbUoOToTobay, a TAKOK npOBoDMHTIy oRo pEMOT, TeKHyHe I rApantHIne 0cbNyOBByBaHHA
Bovn6hkn:TOB:AeOBeCepBce3.C.A.,Byun.CaI Kapko,CS 00001,59790PonHeuE,hAnpua
Hmnpotrep/Ipodoabeue/OpraHn3aunia,ynolnoMoohcHnn HnnmHAtts nptepenm no KocTeby Toppa B P00:000 "JEPVA MEPIHEN BOCTOKo," 141031, PoCcnA, MocKobckrae O60n, r. MtBntuNc, OctauKOBKoe WoocOe, d.1
Imported by Aedo South Africa (PTY) LTD/T/A Leroy Merlin, Hosted in Leroy Merlin Fourways Store 35 Roos Street, Witkoppen Ext 97, Sandton, 2191 Johannesburg, Gauteng, South Africa
Tel: +27 10 493 8000 Email: contact@leroymerlin.co.za
Nmnpotrayu/Caruty/ Ka3akctan
Pecny6bnkacbIy hEn hM canabys
60bnHua Napar3bIbKrtarpdKab6bJnaidtbnYbIM:
050000, Ka3akctan Tepcny6bnkacbIy, Anmaty k, K, KnaeeB
keuee, 77 yv,
Nmnpotre / Pprodaeue / OrpHaiaea, npHmHaaoaoua
pnetehnMo noKeCTBY pOxDykuBn B Pepy6bnk
Ka3kctan:TOO
Pepy6bnkA Ka3kctan, A nMaty, ny.Kyaaba, d, 77,
EL
- BEZPIECZENSTWO W MIEJSCU PRACY
- IIOIROTOBKA
- 3APJDAKKYMJTOPHO BATAPEI
- 5.3KcPJIyATAUIA
- YCTAHOBKA BCIIOMOTATEJIbHOI PYKOKTKI
- CBEPIO/3yBnIO
- HACTPOIKA CKOPOCTN BPAUSEHN I CNJIby YDAPA
- CBEPJIEHNE
- INDIBIyAJIbHA TEXHIKA 6E3NEKNI
- ПРавILA TEXHIKи BE3ПЕКИ
- BVKOPNUCTAHN T A D OΓλД 3A EJEKTPOIHCTPYMEHTOM
- ПРавида TEXHIКи БЕЗПЕКИ
- BNUKOPUCTAHNA D0IJI3A AKYMylrTOPHIM IHCTPYMEHTOM
- ПРавILA TEXHIKи Б3пЕКи
- OBCJYTOBYAHH
- PONPEJXEHNA OIOO B3NEKN PPN PO60TI 3 BIDBIHMMOJOTKOM
- 3MEHSEHHBnBvBbPAcTAty
- ПравILA TEXHIKи БЕЗКИ
- Птуміта:
- 3AJIuIshKOBI PN3IKN
- ONMC
- TEXHIYI DAHI
- EKCIJIYATAUIA
- HANAHTYBAHHI WBNIKOCTI / WBNIKICTb ydAPIB
- CBEPJIINH
- YDAPHE CBEPJIHHA
- Ppumitka:
- IOBBAHH
- Kayincizik TexHnKacbI GoBihwa HcaynbIK.KykbIKtbIK HopMaJap
- BENITIEP
- MA3MYHbl
- DEXTER ПЕРФОРATOPьIHьИМAKCATTы KОДАньICы
- KAYINCI3IK TEXHnKAcbIHbIH HYCKAYAPbl
- 3JEkTP KYPALbIHbIH KAYINC13dI I BOHbIHWA XAJINbI ECKEPTUJIEP
- XyMbIC OPHbIHbIH KAYINCI3IITI
- 3JIeKTP JYIeJIePIH IaIJaIahyIaFbI KAYINCI3IiK TEXHnKAcbl
- KAYINCI3IK TEXHUNKACbIHbIH HYCKAYAPbl
- XEKE KAYINCI3IK
- KAYINCI3IK TEXHNIKACbIHbIH HYCKAYAPbl
- 3JIeKTP KYPaJIbIH PAnIaJIaHy XHe OFAH KYTIM KOpCETY
- KAYINCI3IJK TEXHNIKACbIHbIH HYCKAYJAPbl
- БАТAPЕ КУРалын Пайдалиу XэHE OFAH KYTIM KОPCETY
- KbI3MET KOPCETY
- IEPΦOPATOP KAYINCI3ДIIGI BOYbIHUSA ECKEPTUIEP
- ДИПЛ XэHE Уды A3AИТу
- Eckeptne:
- KAJIbIK KAYINTEP
- 3.CNATTAMACbI
- TEXHnKAJIbIK DEPEKTEP
- ECKEPTY!
- Пайдалану
- DAHbIHDbIK
- БАТAPЕ BЛОГын 3APЯДТAY
- KOCbIMUa TYTKAHbIXHAY
- BYPfBIJAY BACTNEI/YHfBIJAFbiU
- SDS-plus 6yprfbinay KypanapbIn cany
- SDS-plus 6yprfbay KypaIapbIn anbin Tacay:
- PEXKIM TAHDAY TETIPI
- Пайдалиу
- AHHAJMAJIbI AYbICTbIPblN-KOCKblI
- BATAPER BJIOIbI
- KOCY/OLLIUPY
- XbJIДAMdbIKTbI /COKkbI XbJIДAMdbIFbIH OPHATY
- BYPbIAY
- COKIJIbI BYPfBIAY
- YHfblAY
- YHfblAY KYNIH Θ3IPEPTY
- PANDAHAYDAH KEIH
- TEXHnKajbIK KbI3MET KOpCETY
- KOPUJAFAH OPTAHBI KOPFAY
- KENJIJIK
- KIPICNE
- Kenilik
- Introducerea Burghielor SDS-plus:
- SYMBOLS
- CONTENTS
- INTENDED USE OF DEXTER ROTARY HAMMER
- SAFETY INSTRUCTIONS
- GENERAL POWER TOOL SAFETY WARNINGS
- WORK AREA SAFETY
- ELECTRICAL SAFETY
- PERSONAL SAFETY
- POWER TOOL USE AND CARE
- BATTERY TOOL USE AND CARE
- SERVICE
- HAMMER SAFETY WARNINGS
- VIBRATION AND NOISE REDUCTION
- Note:
- RESIDUAL RISKS
- 3.DESCRIPTION
- TECHNICAL DATA
- WARNING!
- Always wear ear protectors, when you are operating this machine.
- 5.OPERATION
- PREPARATION
- CHARGING THE BATTERY PACK
- ASSEMBLING OF AUXILIARY HANDLE
- OPERATION
- DRILL BIT/CHISEL
- Inserting SDS-plus Drilling Tools:
- Removing SDS-plus Drilling Tools:
- MODE SELECTOR
- ROTATIONAL DIRECTION SWITCH
- BATTERY PACK
- SWITCHING ON/OFF
- SETTING THE SPEED / IMPACT RATE
- DRILLING
- HAMMER DRILLING
- CHISELLING
- CHANGING THE CHISELLING POSITION
- AFTER USE
- MAINTENANCE
- TROUBLESHOOTING
- STORAGE
- TRANPORT
- PROTECT OUR ENVIRONMENT
- ENVIRONMENTAL PROTECTION
- WARRANTY
- PREFACE
- IMPORTANT! PLEASE READ THIS MANUAL BEFORE USING THIS PRODUCT, FOLLOW THE BASIC SAFETY WARNINGS WITHIN, AND KEEP IT CAREFULLY.
- Warranty
- EXPLODED VIEW WITH PART LIST
- DEXTER
- Adeo Services
Brand : DEXTER
Model : 20VRH2-17.11
Category : Rotary hammer