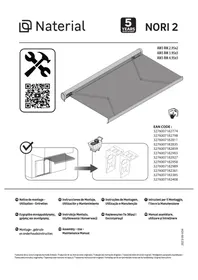
USER MANUAL NORI 2 LED NATERIAL
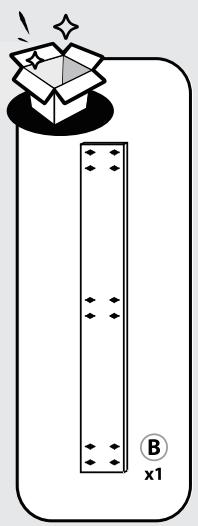
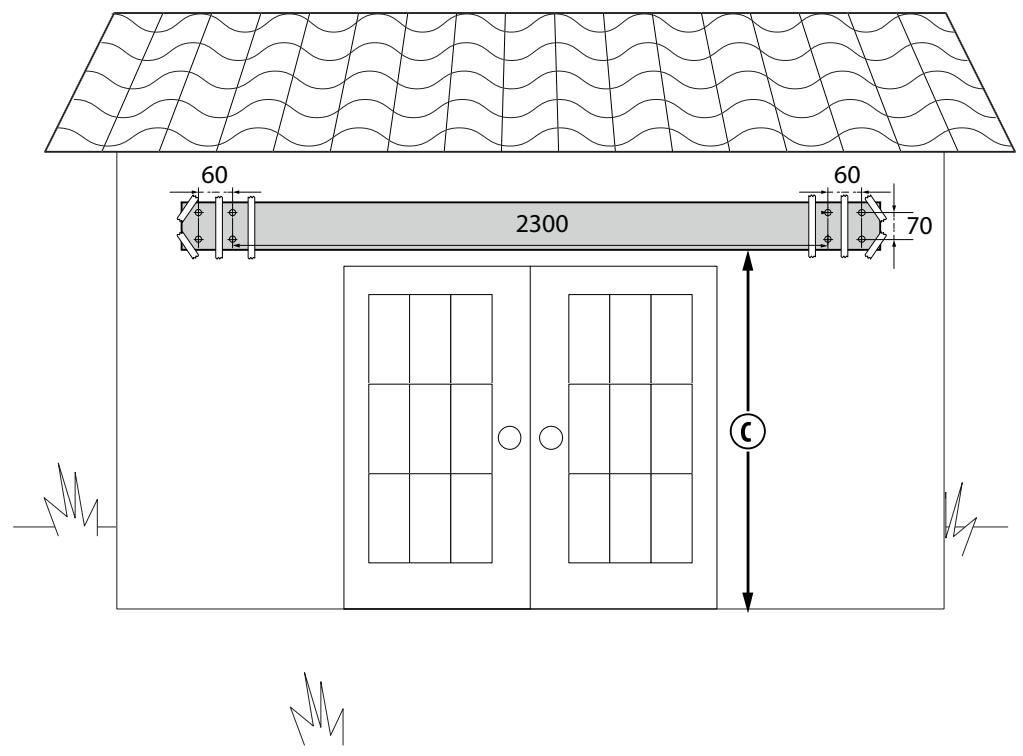
(295x200 cm) x2
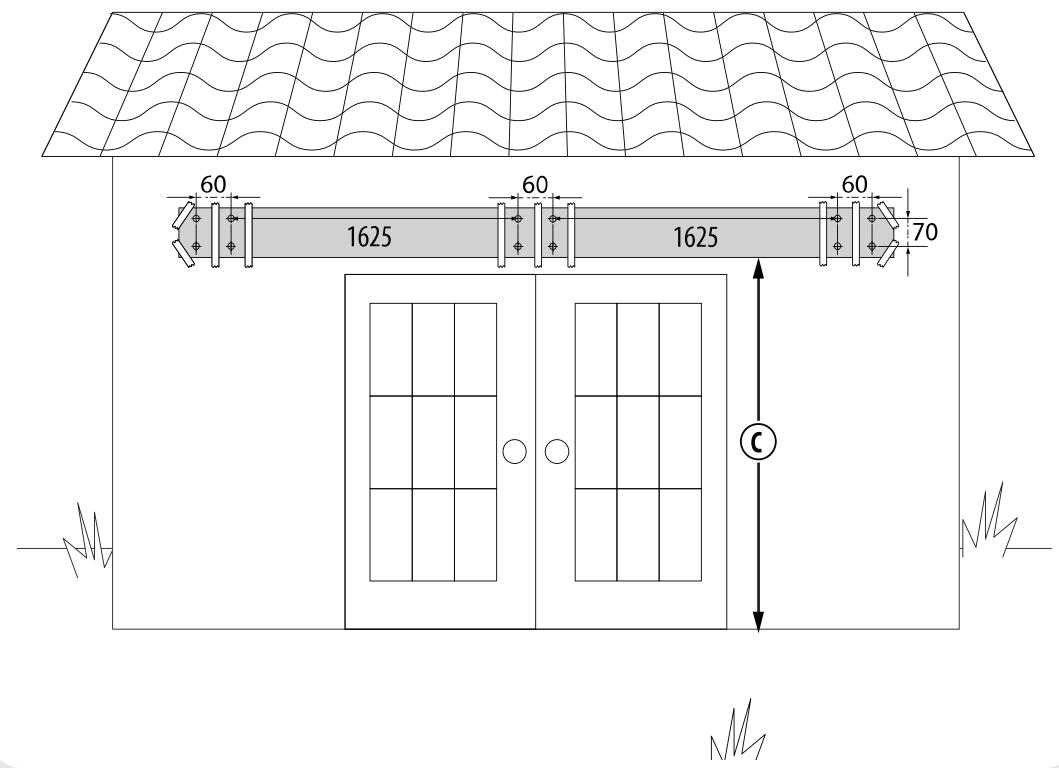
(395x300 cm) x3
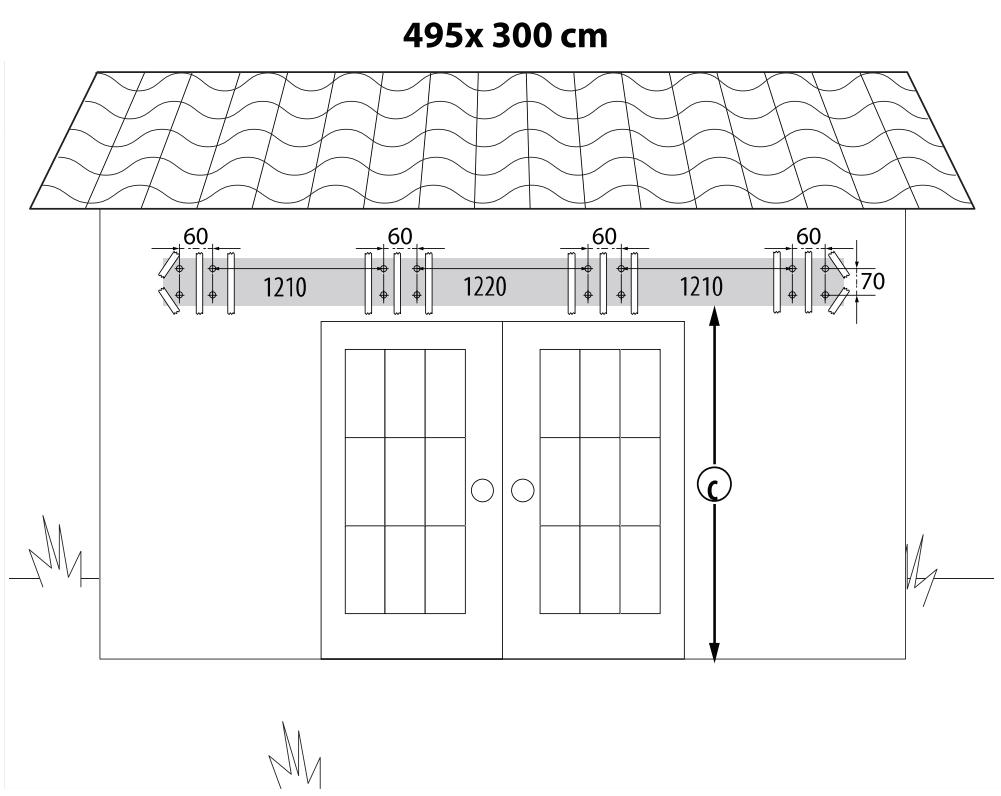
(495x300 cm) x4
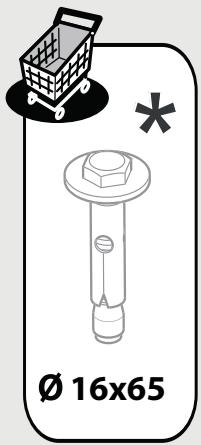
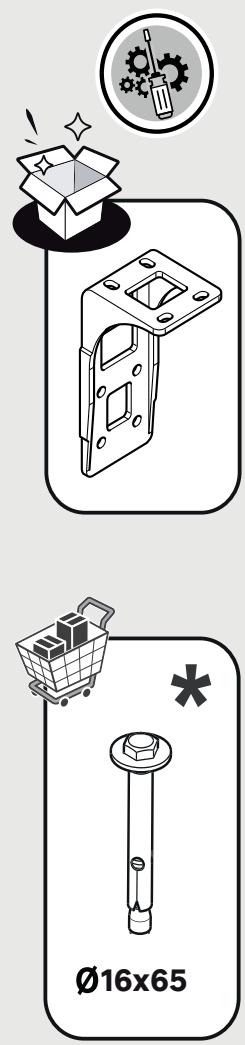
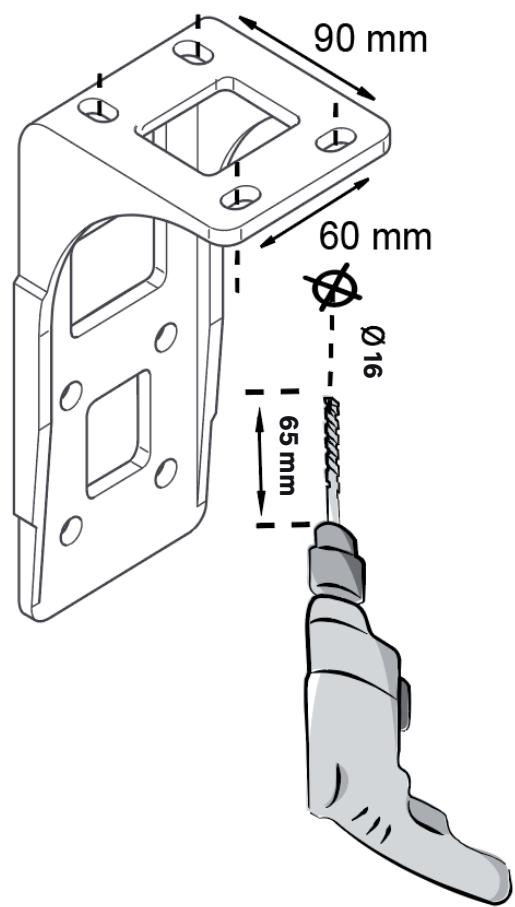
016x65
(295x200 cm) x8
(395x300 cm) x12
(495x300 cm) x16

(295×200 cm) × 2
(395x300 cm) x3
(495x300 cm) x4
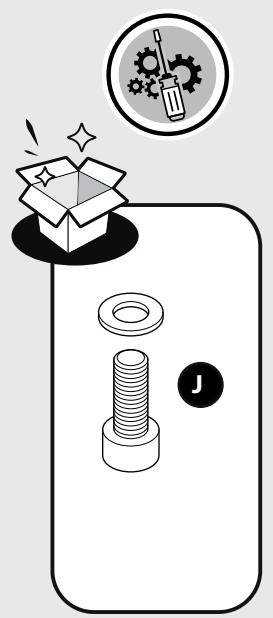
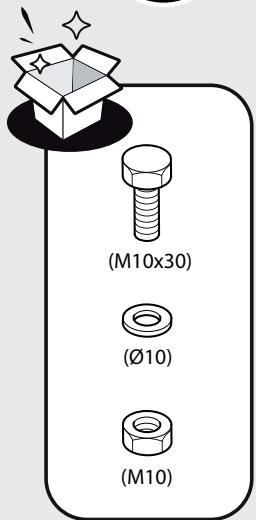
(M12x30)

(295x200 cm) x8
(395x300 cm) x12
(495x300 cm) x16


(012)
(295x200 cm) x8
(395x300 cm) x12
(495× 300cm)× 16


(M12)

(295x200 cm) x8
(395x300 cm) x12
(495x300 cm) x16

Montage / Montaje / Montagem / Montaggio / Συναρμολόγηση / Montaż / C6opka / MoHTaЖдay / 36ipka / Montaj / Montagem / Assembly

98-107→109-111

Utilisation / Utilização / Utilização / Uso / Xpônô / Užytkowanie / Исторьогане / Палдаману / Викорисанна / Utilizare / Utilização / Use

108-116

Entretien / Mantenimiento / Manutenção / Manutenzione / Συντήρηση / Konserwacea / УхοД / Т电商калык Ксызмет Керсetime / Доград / intreşinere / Manutenção / Maintenance

112 115 / 117 120
ES/ADVERTENCIA:
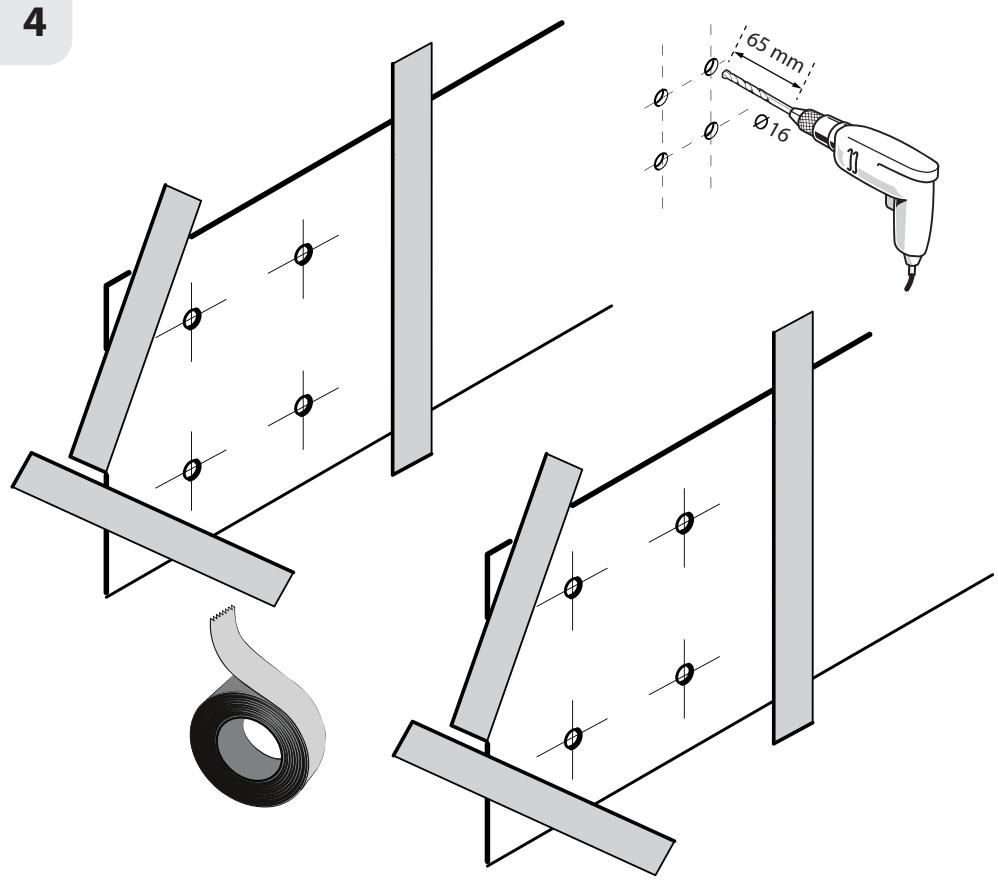
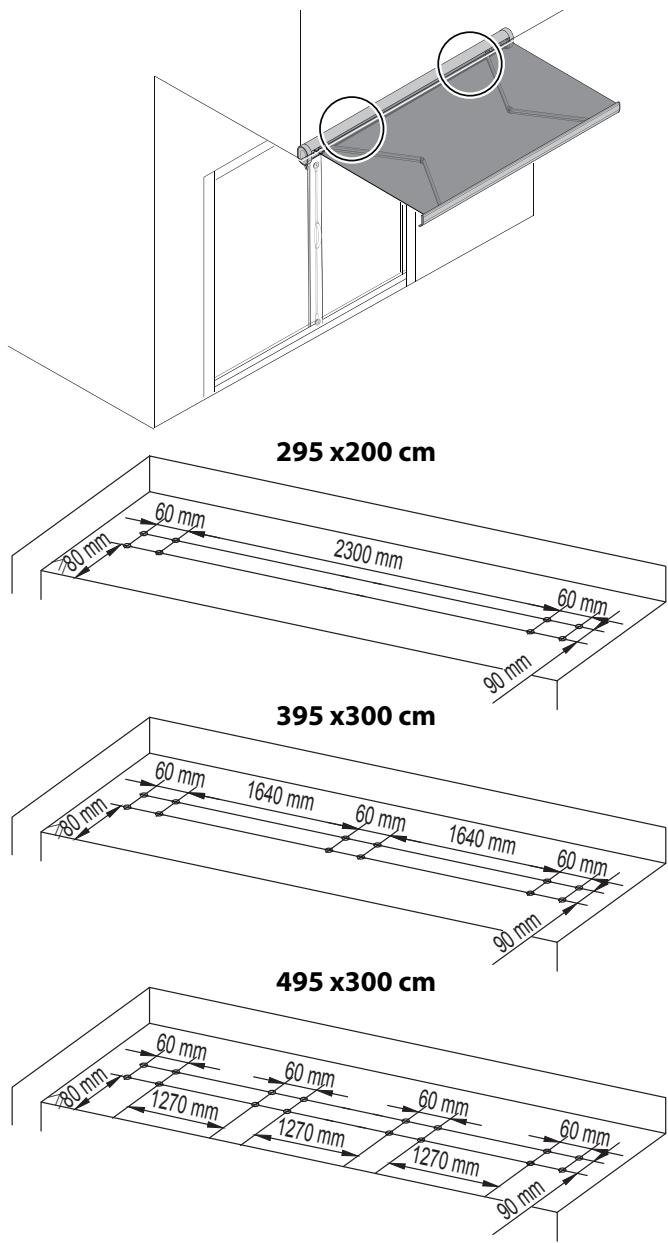
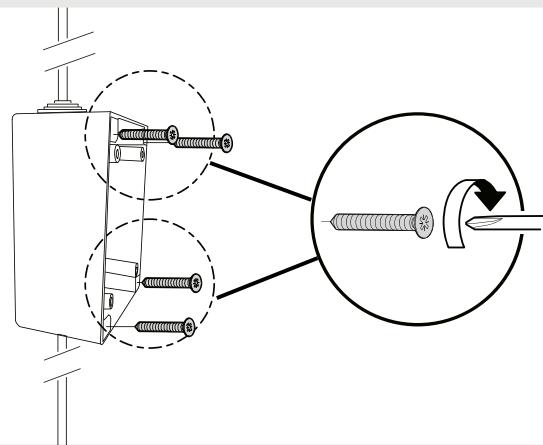
To avoid any risk of toppling, this furniture item/object must be securely attached to the ceiling. Improper installation can result in the furniture/ object falling and cause serious injuries to people. In case of a doubt regarding the installation, ask for advice from a specialised sales assistant or contact a professional.
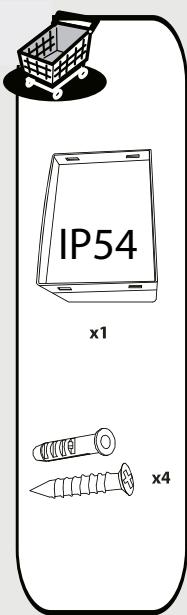
- Use screws, washers and plugs suited to the type of material of your wall. These are not included. To obtain advice on the screws and fittings suited to your wall, ask a specialised sales assistant.

ATTENTION! VEUILLEZ LIRE CE MANUEL D'UTILISATION AVANT Toute INSTALLATION ET UTILISATION DE CE PRODUIT.
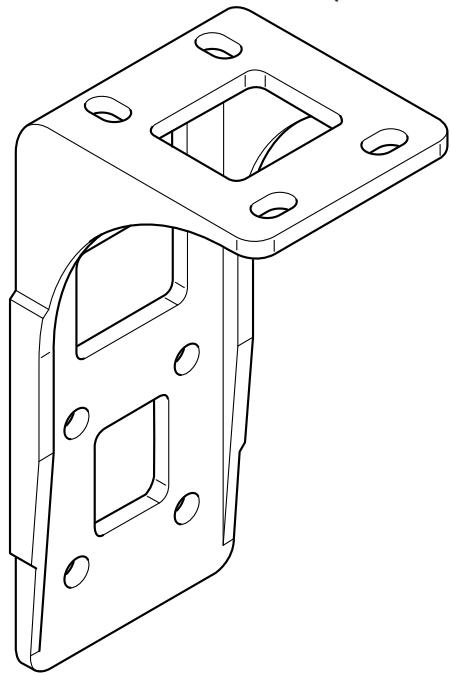
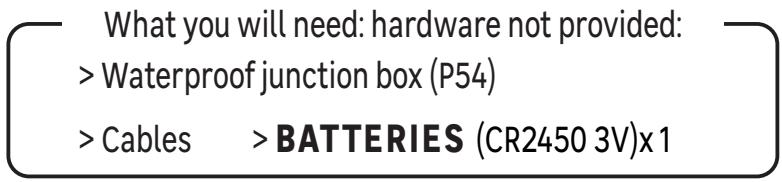
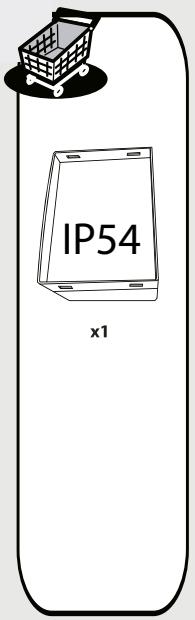
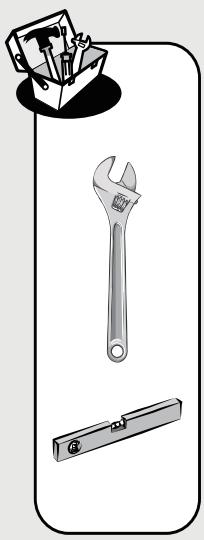
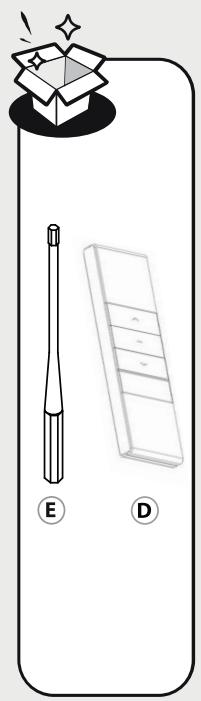
Material Needed: Material nomerican.
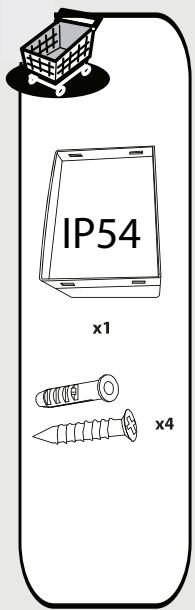
Cajas de superficie estancas (IP54)
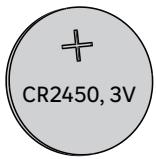
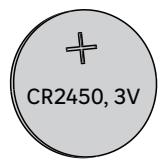
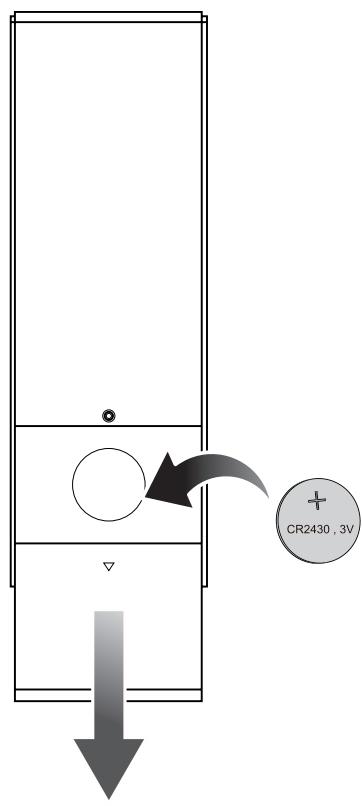
Cables > PILAS (CR2450 3V)x1
Hikon He BCTaHOBJIouTe Ioro Ha BnCOTi i B BiTPraHnx Micx, OckilbKn
COHcE3axnCHN KO3nPOK MOKe Bnactn i TpaBmByaTn IIOeI.
Micce fikcaiBaWoI aBToMaTnK: ce Micce IOBHHO d03BOJrTaN aBTOMaTnCi
BNOBNIHOBaTI CNrHaJI, 306 3a6e3PneHTM MaKcIMMaIbHy UyTINBicTb eIeMeHtA KepyBaHHa
He BnKOpncToBvIte Ioro B Micx 3 Bi6paiziam a6o imnybcamn.
y pa3i BnKopncTaNHЯ 6IOKy ynpaBlinHЯ: eNeKtpoHHa KapTa NOBInHa 6yTu 3akpiInHeHa y BepTKaJIbHe nOJxKeHЯ i 3axNtEHa BiD HeNoToDi.
UcTaHOBKa MoKe IpoBOnITnCHeNpOphiCioHaIaMn 3a yMOBn IpaBnJIbHOrO
IOTpIMaHnI iHCTpyKcii. IprBnHKHeHNI np6IeM NiJ uac cKlaJaHn 3BepHiTbcra 3a DOpOMOrOIO KOBAJIΦIKOBaHOrO φaxiBzra.
He 3miHIOIte npicTpI HiaKIM qINHOM!
Hikon He BIDKpNBaIte eIeKtpoHn6bok ynpabInHHa (aHylIOBaHnra paHTii].
Hikon He BnKopncToBvIte akcecyapn, kI He peKomeHdyIOTBcBnPo6NkOM.BoHmOjyTb IpeicTaBIAr3aRpo3y 6e3neci KOpncTyBaayi MoJyTb NoUkoDHTn npncTpi.
BnKOpncToByIe TIlbKn opriHaJIeTaJI Ta akcecyapn.
He BiiShaTe HiOro Ha paMy a6o cKlaadHi IiKTi, TaK JaK Habic MoKe Bnactn i npu3BecTu do TpaBMn a6o 3aNoDiTn N0UKOJxEHHy.
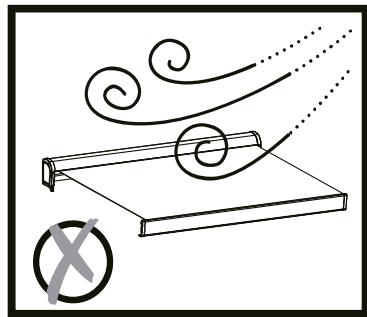
He BnKopncToBvIte ue npnilad npn HecnpnTlNBHX nOOrHnx yMOBaX. JaKIo 1wBnDkicTb
BITpy cnIbHiIe BiTepe 2 KIacy (>38km / ) ,3rOpHiTb MapKi3y.
Hikon He BnKopncToBvTe npnaB DoOoi DiHi.
He BnKOpncToBvIe Ioro B Micx 3 BnCOKoIO TempepaTpoIO, TaKnx Jk CTiHn 6iJI neeu.
EkcpnyataiB 3mOBux yMOBX MOKe POnKoJNTn HABIC.
3aIIiIte doctaTHbO BilbHOro Miczra HABKOLO Habicy niD yac 3roptaHHa60 po3roptaHHa.
He po3paIIOte rpiIb-6ap6ekIO i He cmaKTe pID HabicOM i He po3paIIOte BOroHb npuy 3 HAcICOM
IpeBiprTe Mapki3y KoxnHi 3 Micarci, 06 nepekoHaTncs, 0o Bc KpInneHn3aTyrTi i Bnpi6 He noKoJxehn.
Yacto napeBipraIte yctaHOBky Ha HeCTiKicTb i 03HaKn 3Hocy a6o NooKoJKeHNy Ka6eJIb i npjxHn. He BnKOpncToBynte, kUso nOTpe6yeTbcra peMOHT a6o HanaTuBaHHn.
Hikoli He BnKopncToBvIte NoIkoJKeHn IprncTpi! BiD'EdHaIe TpncTpiB iD JxpeHa JxBHeHra 3BepHITbcra do NoCTaaybHnKa, kUo BIn NIOkOJKeHn. KUo Hc6xIDHn peMOHT a60 peruIIOBaHN, He BnKopncToBvIte MapKi3y 6e3 KOhcyIbTaicii faxIBzra.
He pddabaTe 6aTaapei BnInBy ekCTpeMaIbHnx TempepaTyp. He BCtahOBJIouTe nylbT DK Ha HarpBaHi. Bntik akymyIaTopHOI KncIoTI MoKe npu3BeCTn Do nOuKoJxHnR. 3amHIOte Bci BnKOpNCaHI 6aTaapeiTbKn 6aTaapeMn TOrO Jx TnPy.
Оьерекно! Heбeзпека Вибуху! Hikоли He BCtabлгіte 6aTapeiy 3ВорOTHomу habрмку.
JaKuo 6aTaapei npotikauTb, BndaJIITb ix 3a doNOMOIO TKaHINH 3 6aTaapeHOro BiDcIKy.
Ytni3yIte 6aTapeiyy BiINOBiHocTi 3aKoHOJaBcIMN BmOramn. JkUO aKymJrTopHa KscIOTA pOTeKla, yHnKaITe KOHTaKTy 3i UKipOu, OcIMMa Ta CIn3OBIMN 06OJOhKaMn.
HeraHNo npomnTe ypaXeHi dIJIaHKn nicJy 3 KcNToIO BEnNKoIO KJIbKicTIOI BOi. 3BepHiTbcra do Iikapra.
BnMiTb po3pIaJxHcI 6aTaepi 3 npIbTa DK. BnMiTb 6aTaepi 3 npIbTa DK, kKIO Bn He 6yJeTe BnKOpNCTOBvBaTu NOrO pPOTaROM TpNBaIoro Yacy.
X1 3amHa 6atapei
3axnCT BiT TeNIOBOrO nepeBaHTaJKeHn:
IbnuH nepexoDntb B pexkM 3axncty BiT TeNIOBOrO nepeBaHTaJKeHn niCna 2
noCJIIOBHNx po3rOpTaHb i 3rOpTaHb.
7. PEGYJIIOBAHNAI INI 3MIHI NylbTA DINCTAHCIHORO KEPYBAHHA
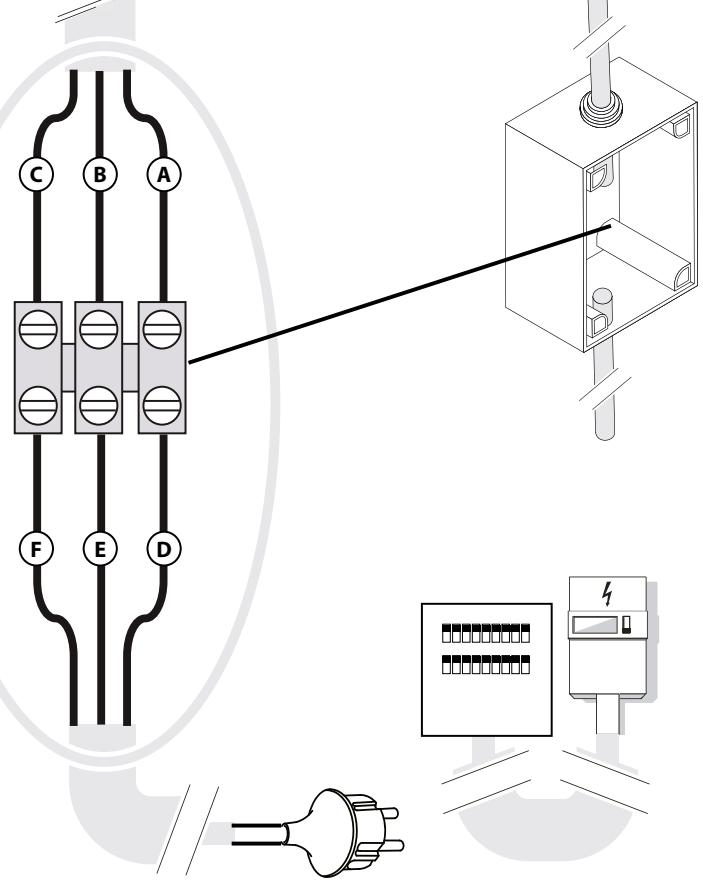
Kpok 1:ПiДroTuYIte iHTepfeIc 3 6lOKOM JxNvBLeHn8 230B, cNoaTKy BmKHiTb JxNvBLeHn8. NotIM pIiKJIouiTB KOpuHBeI ta cHi eJeKtpuHni dpoTn DvBHyHa do iHTepfeIcy 3 6lOKOM JxNvBLeHn8 (a6o Do eJeKtpuHoro Ka6eHIO DvBHyHa, PdKJIoueHOrO Do nAHeI JxNvBLeHn8, cNoaTkY BmKHyBShn JxNvBLeHn8).
Kpok 2: BnMItb KoHTpOlep i 3aIIuIitb akymyIaTOp Ha micci, iHdYkTnBnH iHnKaTOp 6yde ropitn. JAKIo BIn He 6ynde BCTaHOBHeN, iHdYkTnBn H iHnKaTOp He ropITme. He notpi6Ho 3akPbBaTn KpIuKU aKymyJIaTOp aDOKu KoDyBaHHr He 6ynde ycPiUH0 3aBepSeHo.
Kpok 3:ПрпставTe Buxo nopuy 3 Говкю DBnHyHa, a NOTIM yBIMKHiTbЖИВлeHЯВ Tnxomy Miczi (do yBIMKHeHЯЖИВлeHЯ BOHO NOBInHO 6yTu BIMKHeHm 6iMbIe 10 cekuHД).ToDi BV nOUYeTeчTKn,TxN i KOpOTkN 3ByK «Дi».Lc pe iD TBepdJxye, zu o ce PpaUcE do6pe. JkIo 3ByK He npolyHab, pOtpi6Ho nepeBiprTu PiDKlUoyehn Ka6eIIO a6oЖИВлeHЯ.
Kpok 4:1. CnoaTkU 3HaIiTb KhoNkU «P2» y rHizI dIy aKymyITopa. 2. PnictaBTe Byxo npoyu 3 rOIOBkoIO DvIgYHa B TnxOMy Miczi, a NotIM HaTncHITb KhoNkU «P2» 2 pa3n nocPiIb. OndnochOBn PoUyeTe Tnxn i KopOTkn 3ByK «Di-DrI|.
Kpok 5:ПисяЗвуку «Дi-Дi» HaTиСнiTb i TprIMaIte KHONky «ВiДКрИТN» пOTЯгOM 3 ceKунд, a NOTIM BiДпстITb ii.Оdночасno 3 HaTиСКаHHam KHONKN «ВiДКрИТN» Bn ПОчeTe PocJIIDOBHnKOpoTКИЗВУК «Дi-Дi ---». Lc e OзHAчaE, lo BiДБуВaETbCS KODyBaHHЯ ДВИГУнa.
Kpok 6:1. IpeBipTe, uN DnBHyN npaioe. 2. Jkso DnBHyN npaioe, HATNCiTb i yTpmyte KhoNky «3akpnTu» pOToTOM 3 cekyHd. Jkso DnBHyN o6epTaεTbcS B IpOTnJIeXHOMy HaPpAMKy, Jk npHaTnCKaHHI KHOKn «BiDKnPTu», ce O3Naaye, LIO DnBHyN MOKe IpaIOBaTN B HopMaJIbHOMy peXmMi. (Jkso DnBHyN BiIMOBIAEcbS O6epTaTnCS, NOTPi6Ho BiDpeYIbHbATN Ioro TpaHnue 3NaueHnI POtUxHocTi. (INB. MeTOd peYIbOBAHnI rpaHnHOrO 3NaueHnI POtUxHocTi DnBHyHa)).
8. 3ACTEPEXEHHЯ
Ybara: 3aBepiItb nporpaMy hacTroKn dIy BCix eIeKtpuHnx KOMnoHeNTiB, Iio6 Bam He
IOBeIoc3HOByHaIaIToBvBaTIN DBNrHyN.
KopncTyBaucho OndHouacHO BiDpeRyIIOBAtn OndHy MeKu TIlbKn B OndHomy HaprMky, He peRyIIOte Dbi pyuKn OndHouacHO.
He TnchItb CnIbHo Ha KhoIKN, 6yIb IaCKa, NepeBipTe KInCeBn BmNkaU 3a DoIOMOIO npIbTa DK, pO6JIaHn POnOBnHy ZnKny 3a pa3 Do Heo6xIDHOrO HanaStyBaHN.
3ACTEPEXEHH
3aMiHa i yctaHOBka 6aTapei IOBHHI BnKOHyBaTncb DOpocnIM.
BnIMtB 3HOseHi 6aTa pei 3 daHoro Bnpo6y.
He pindabaai Te 6aTaapei BpInBy BOHMOxTyIpoTeKTH a6o BN6yXHyTN.
He 3amikaTe KOHTaKTn 6aTapei.
He 3miuye Te capi 6ata pei 3 HOBIMN.
He BnKOpncTObuYte akymyIaTOpHi 6aTapei B daHomy BnpoBi.
He nepezapraJkaIte 6aTapei, kI He e 3apxuBaHIMN.
BukopncToByte Tijbkn peKomeHdoBaHi TnPi 6aTapei.
36epiraTe ue npodyKT B HeodocTyHOMy dIteMicci.
BukndaTe 6aTapei TIlbKn B Micci yTnI3aCi.
- ПОПЕДЖЕНЯ: пиВID NOВИнен 6уТи BIDКЛюЧENи BID ДжЕрELаЖИВLEHЯпдчacУшЕнHA,TEXHICHOrO O6CnyROByBaHNi I npN 3amHi DeTaNeI
06cnyroByBaHHa
Ipepe ouHnHnM nepekoHaTecra, 0 Mapki3a 3aikcoBaHa IiNbHO i HadiHNo.
OuNCTiB MeTaeBi NOBepxHi Habicy 3JIerKa B0IOrO TkaHINHOJ.
OuNCTITb NylbT DnCTaHciHOro KepyBaHHia HactiHne KpInIeHHra 3JerKa BOnorIO TKAHNHOJ.
BntpItb cmtT3 TkaHnHHOro NOKpTT3a DOnOMOIO cyXOI M'koITKahHH, KOJI HaBic 6pydHn a60 KOn BIn He 6yde BnKOpNCtOBvBaTncr npOTraGM TpNBaIoro yacy.
He BnKOpncToBvIte abpa3nBHi YnCTaqi 3ac06n, taKi Jximikatn, 6eH3oJ a6o cnprt.
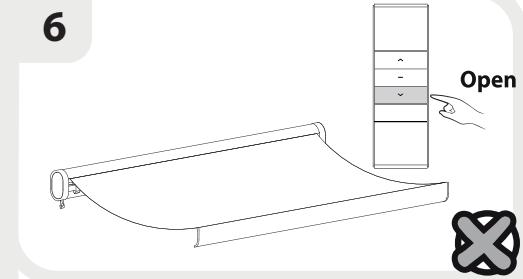
He 3roptaIte HaBic, KOJI N BiH MOKpN.
- Пи hamokahhi ocuyiTB TkaHe pOKpTTB B po3KpTOMy BnIJI.
BumkaTe JKBLeHn, KOnn Habic He BnKOpncTOByeTbcra Ipotrrom TpNBaIoro Yacy.
9. ΓΑΡΑΤΙχ
WARNING: Important safety instructions. It is important for the safety of persons to follow these instructions. Save these instructions.

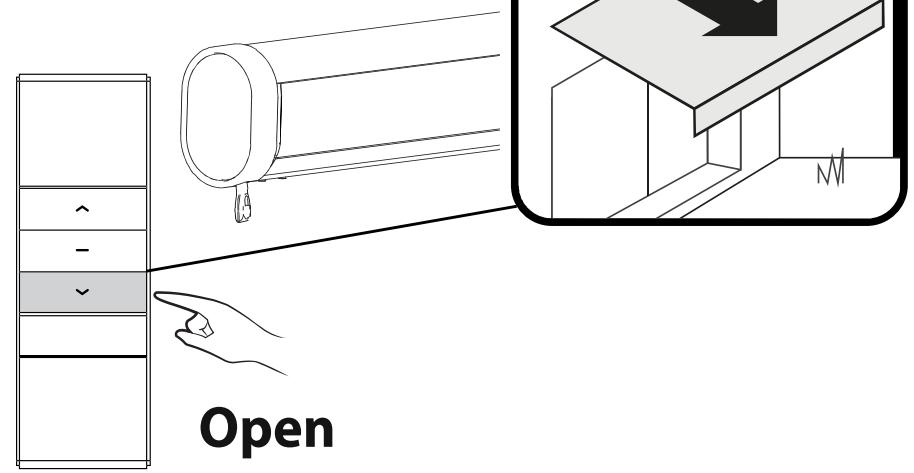
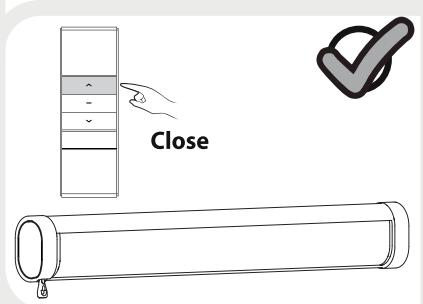
Before opening the awning, make sure all the fixing bolts and security devices are properly installed and tightened.
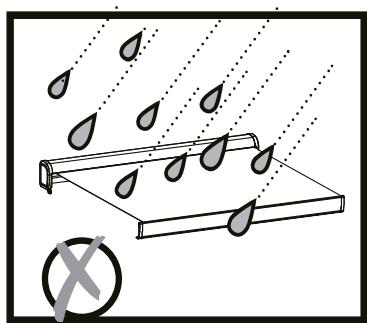
Always close the awning during rainy days, windy days or the awning is not in use.
Failed to observe the instruction may lead to material and constructional damage of the awning.
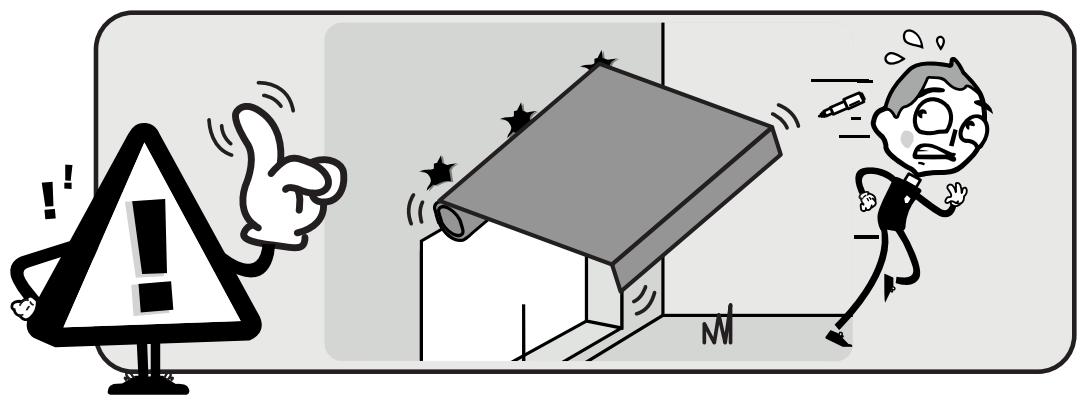
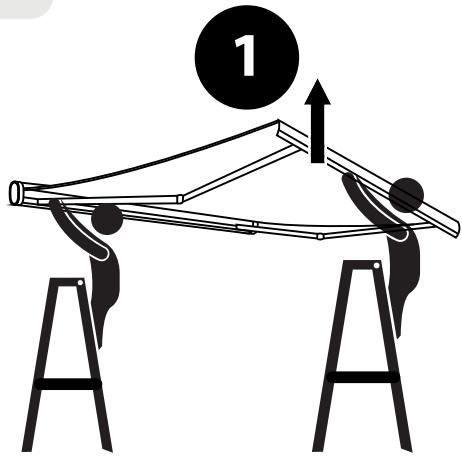
The folding arms of the awning are under tension and can cause damage and injury when they are open up suddenly.
Never try to disassemble the awning or repair the awning by yourself. Consult a competent technician for help.
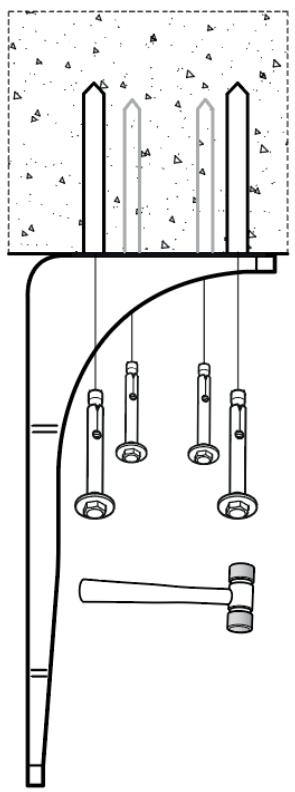
Hazardous upprotected moving parts of the drive shall be installed higher than 2.5 ~m above the floor or other level that could provide access to it.
Do not allow children to play with fixed controls. Keep remote controls away from children; Frequently examine the installation for imbalance and signs of wear or damage to cables and springs. Do not use if repair or adjustment is necessary; please take all necessary precautions when use manual override device since an open roller-shutter may full down quickly due to weakened or broken springs. Please do not use motor for any opening/closing operations beyond the assigned number of cycles (3000 times).
If the supply cord is damaged, it must be replaced by the manufacturer, its service agent or similarly qualified persons in order to avoid a hazard.
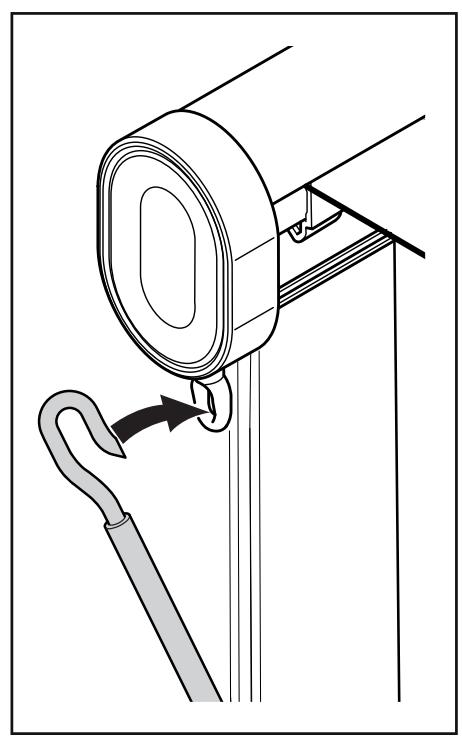
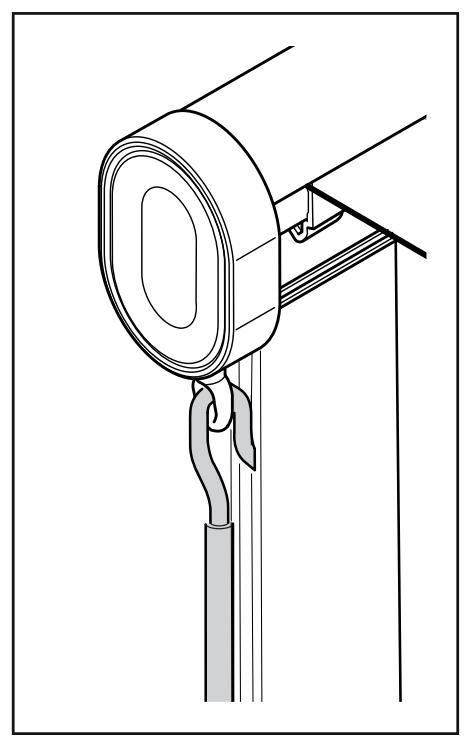
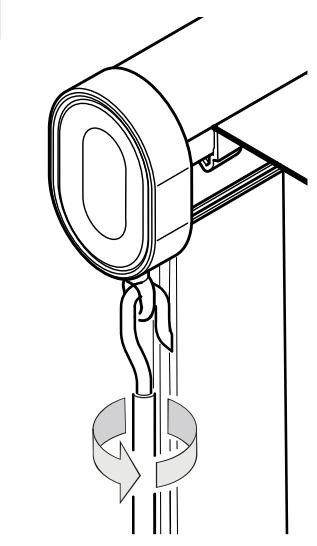
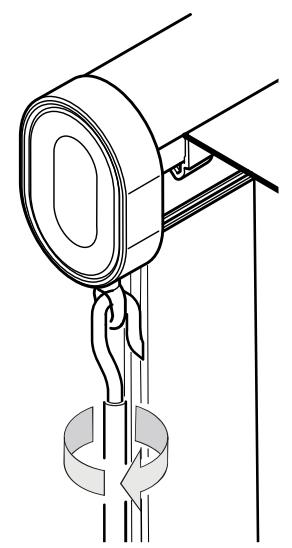
details on how to use the manual release.
WARNING: the drive shall be disconnected from its power source during cleaning, maintenance and when replacing parts.
This appliance is not intend for use by person (include children) with reduced physical, sensory or mental capabilities or lack of experience and knowledge. unless they have been given supervision or instruction concerning use of the awning by a person responsible for their safety. children should be supervised to ensure that they do not play with the appliance or the remote control.
This appliance incorporates an earth connection for functional purposes only.
WARNING: Important safety instructions. please follow all the instructions because a faulty setup may result in serious injuries.
A horizontal distance of at least 0,4 ~m is to
be maintained between the fully unrolled driven part and any permanent object.Before installing the appliance, remove the unnecessary cord and disable any equipment not needed for power operation.
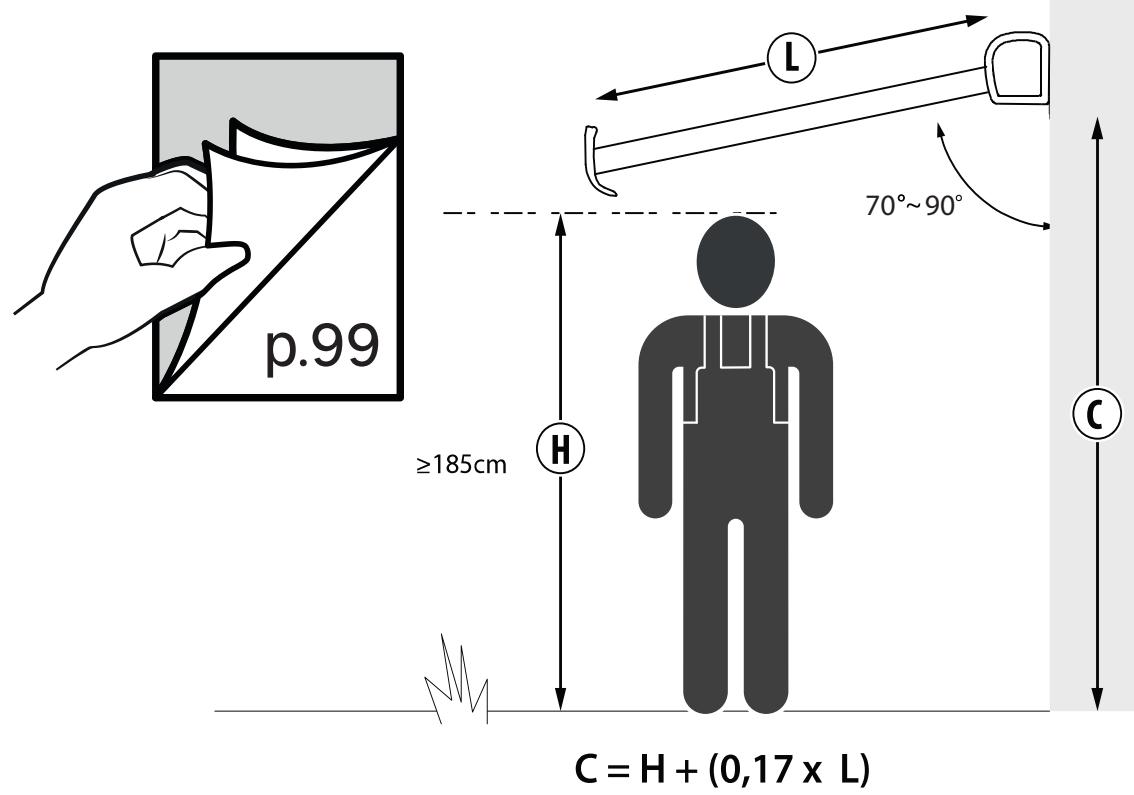
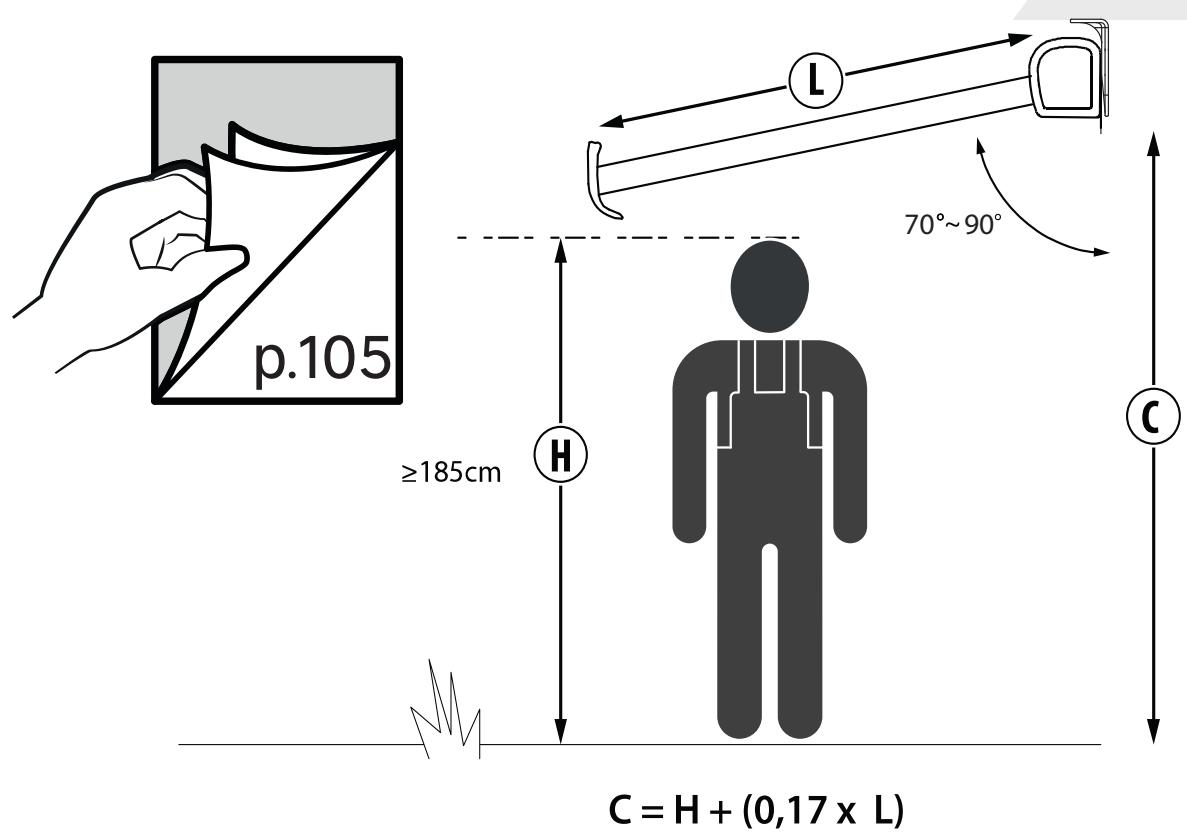
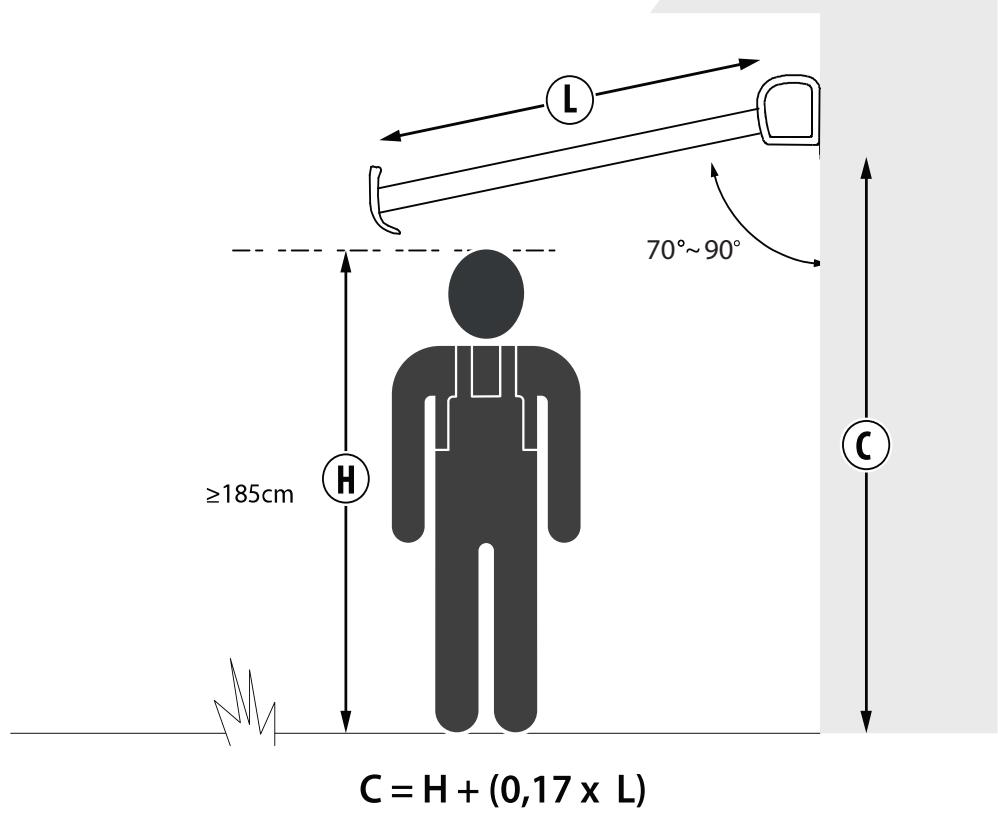
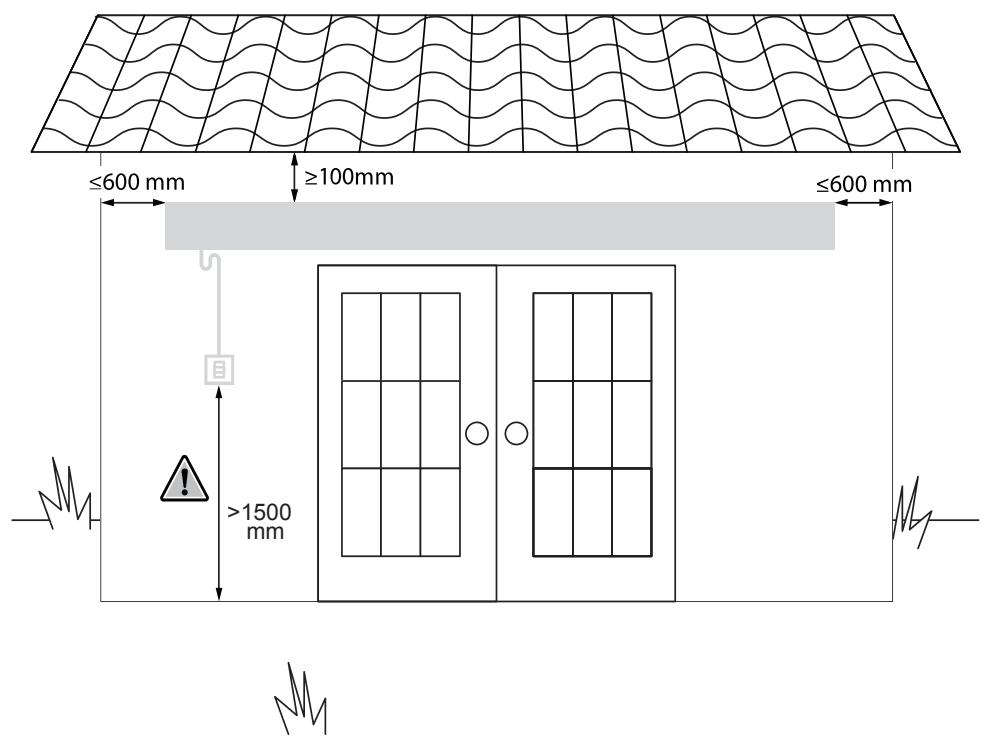
The actuating member of a biased-off switch is to be located within direct sight of the driven part but away from moving parts. It is to be installed at a minimum height of 1,5m and not accessible to the public.
Install the actuating member of a manual release at a height less than 1,8 ~m
1. GENERAL
WARNING: Important safety instructions. Please follow all the instructions because a faulty setup may result in serious injuries.
Follow all safety instructions to avoid damage through improper use! Follow all warning notices on the appliance.
Keep this instruction manual for future use. Should this appliance be passed on to a third party, this instruction manual must be included.
Use this appliance only for its intended use.
No responsibility is accepted for damage resulting from improper use or non-compliance with these Instructions.
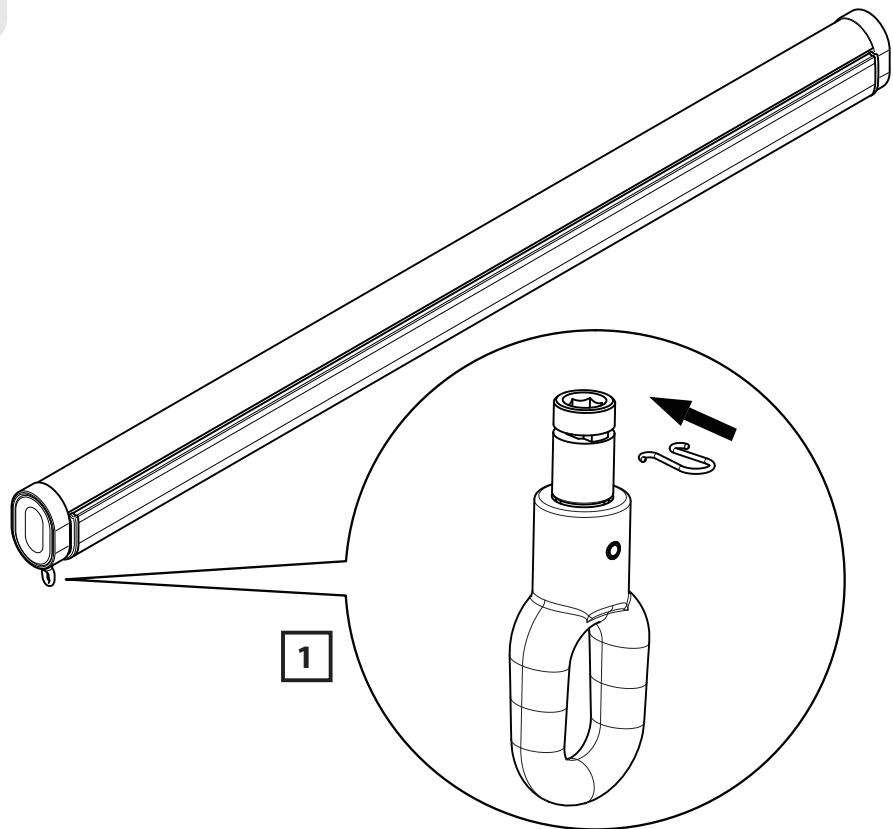
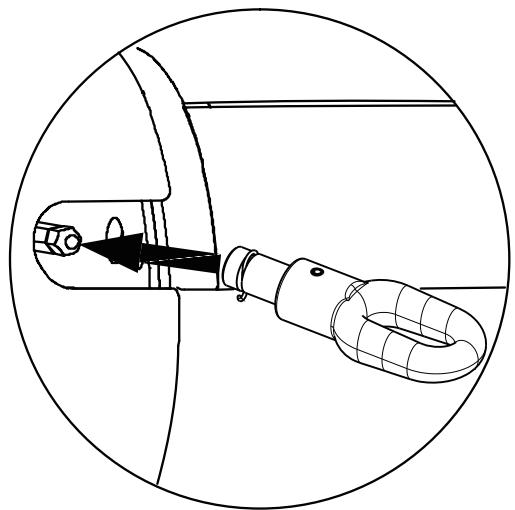
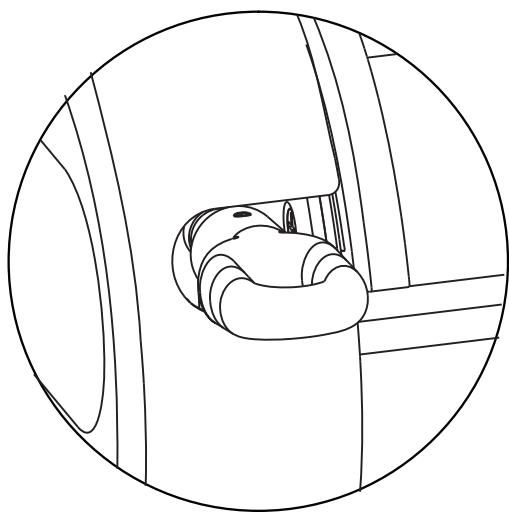
2. ASSEMBLY
The installation must be conform to the regulation of the country.
A horizontal distance of at least 0.4m is to be maintained between fully unrolled driven part and any permanent object.
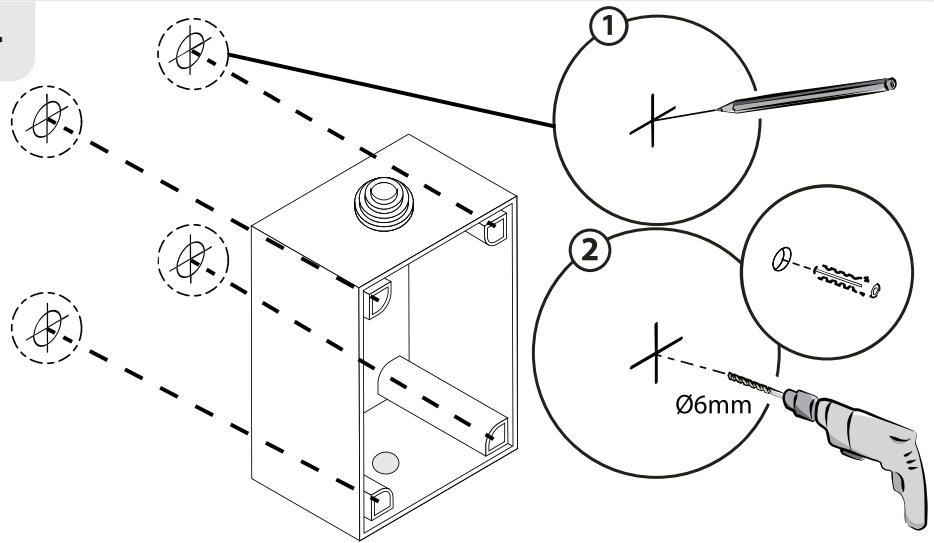
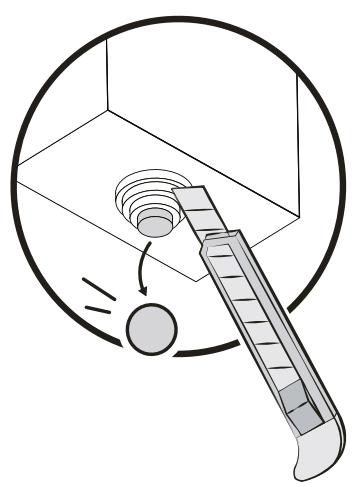
Means for disconnection having a contact separation in all poles must be incorporated in the fixed wiring in accordance with the wiring rules.
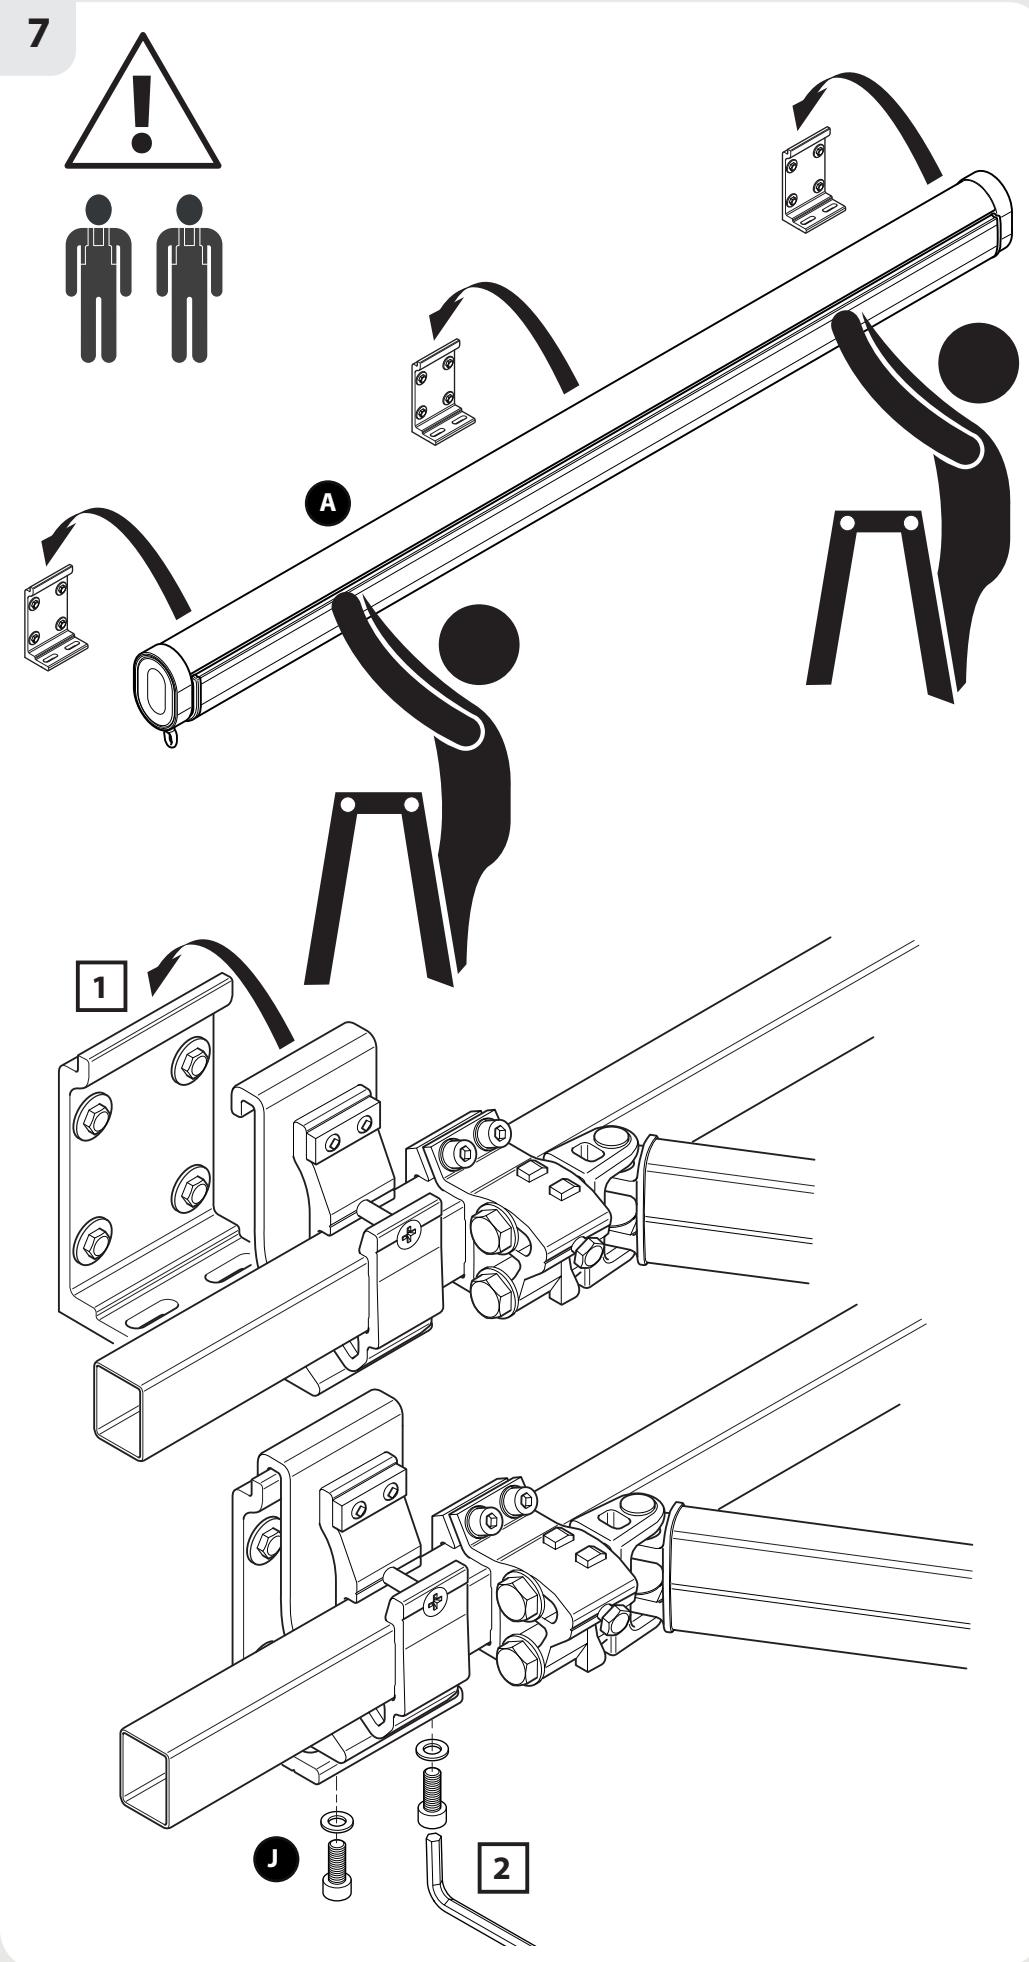
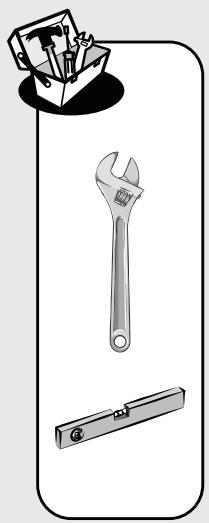
When you are ready to unpack and assemble the awning, make sure that you have the appropriate tools, sufficient operators (3 persons are suggested) and space, and a clean and dry area to perform the installation.
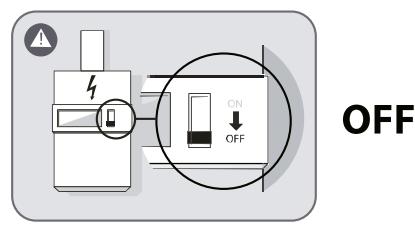
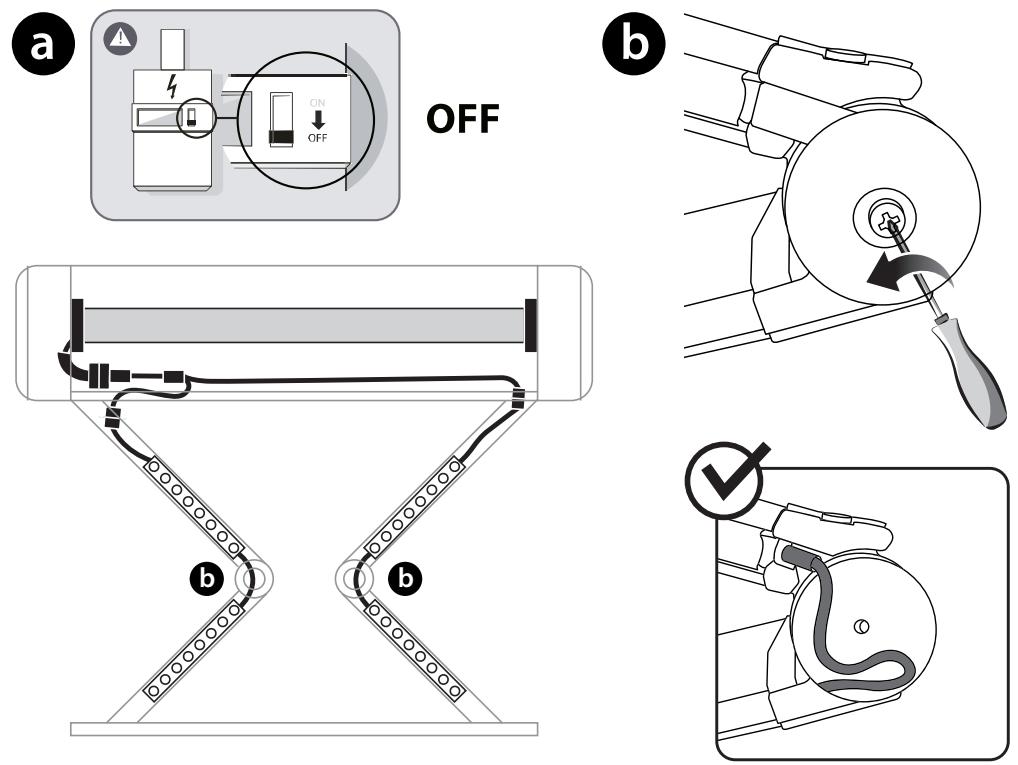
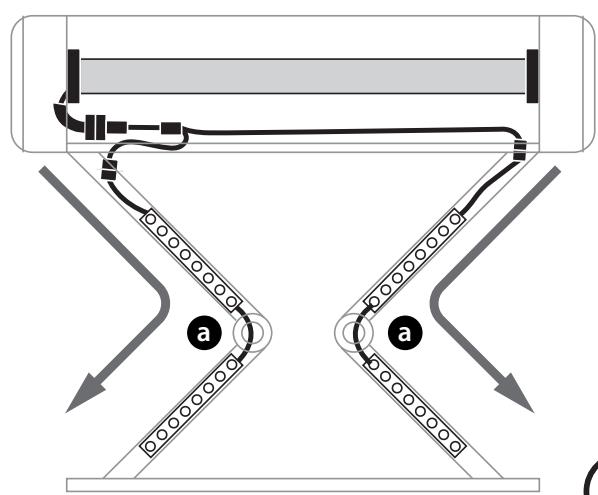
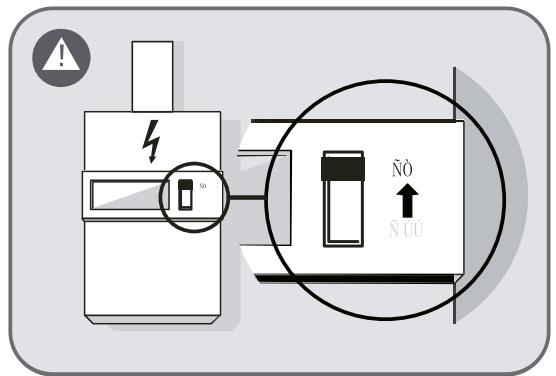
Switch the power off before cable installation.
Before installing the product, remove the unnecessary cord and disable any equipment not needed for power operation.
Choosing a safe location
Never install it in high and windy places, as the sunshade may drop and hurt people. The location for mounting your automation device: this location must allow for the automation device to pick up the signals easily to ensure maximum sensitivity of the command box.
Do not use it in places that have vibrations or impulses.
In case of use of a command box, the electronics board must be set vertically and sheltered from the weather.
The installation can be made by non-professionals assuming the instruction is followed correctly. Should you have any trouble during assembly, please consult a qualified person for help.
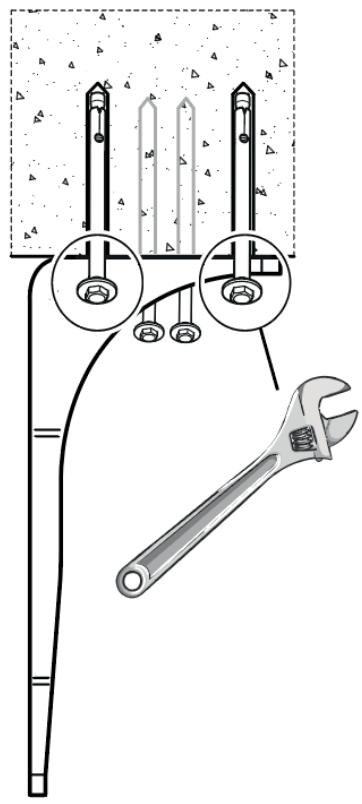
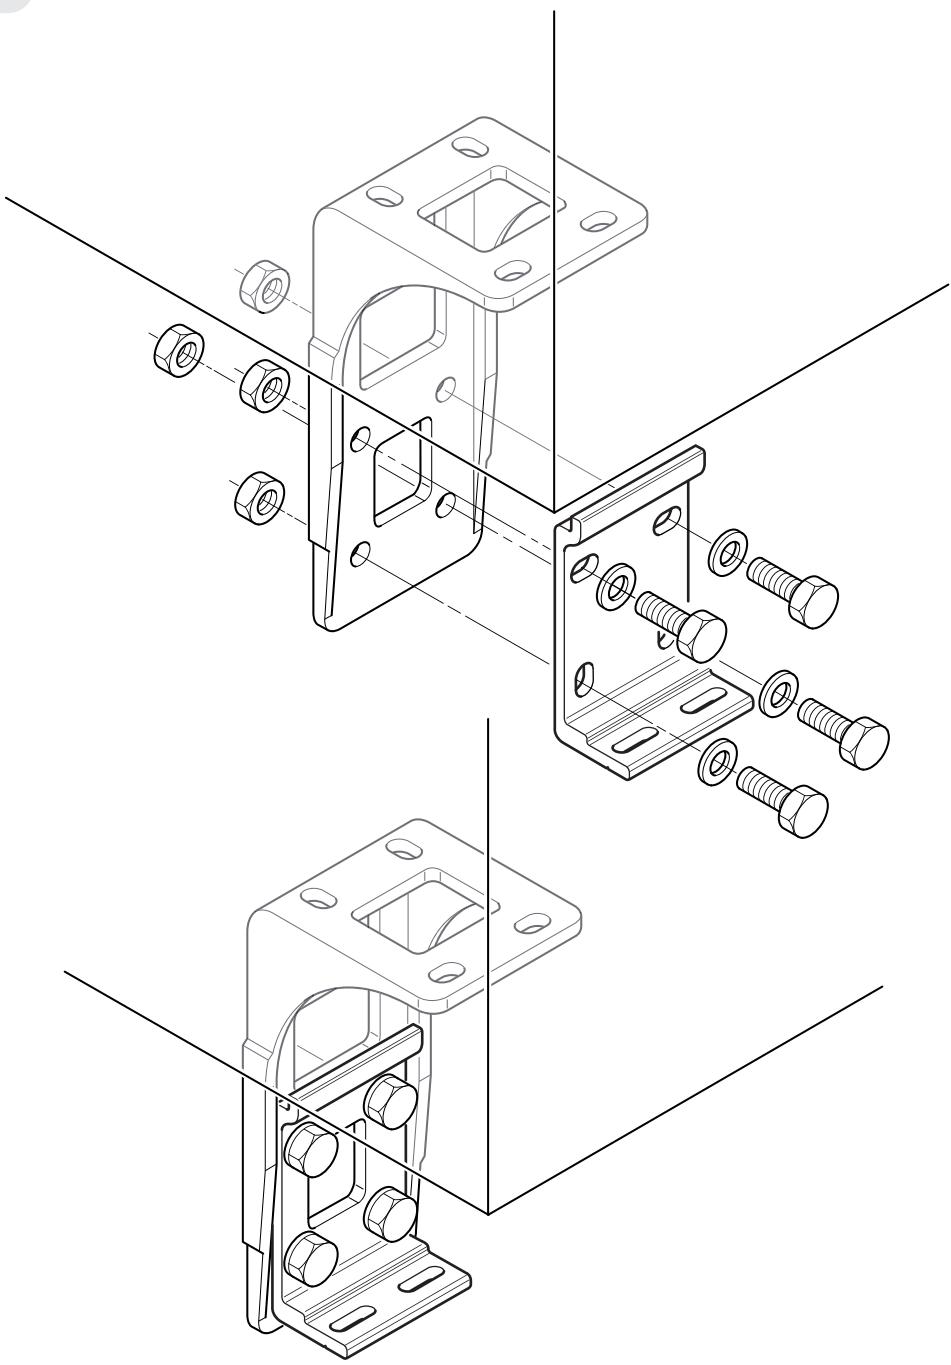
Please use all the screws and nuts correctly during installation as it is very dangerous if you leave it loose.
Be careful with your fingers around moving parts of the product during installation.
3. ELECTRICAL SAFETY
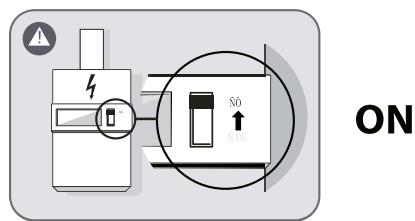
CAUTION: The installation must be conform to the regulation of the country. For your safety, please make sure that the electric current is switched off before carrying out any setup or connection operation.
Before connecting the appliance to the power supply, check that the power supply voltage and current rating corresponds with the power supply details shown on the appliance rating label.
A readily accessible disconnect device must be incorporated in the fixed wiring in compliance with setup regulations.
Danger of electric shock! Do not attempt to repair the appliance yourself. In case of malfunction, repairs are to be conducted by qualified personnel only.
The modification of the design or configuration of the equipment without consulting the manufacturer or his authorized representative may create a dangerous situation.
The power cable for this motor can only be replaced with the same type of cable supplied by the motor manufacturer.
If the supply cord is damaged, it must be replaced by the manufacturer, its service agent or similarly qualified persons in order to avoid a hazard.
Foran inspection or maintenance of the electrical parts, the external blind shall be disconnected from the energy supply in a reliable way.
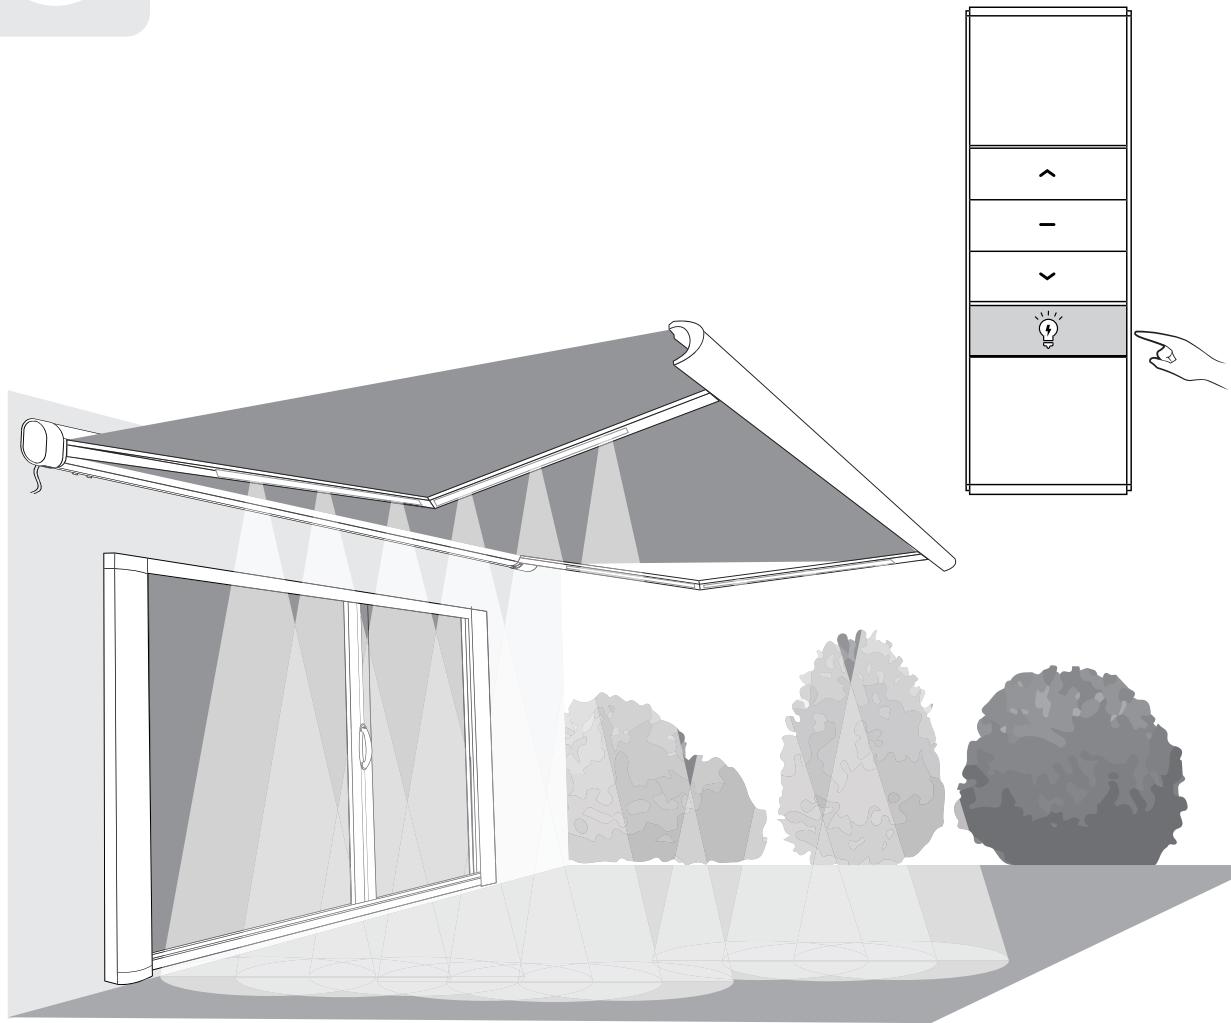
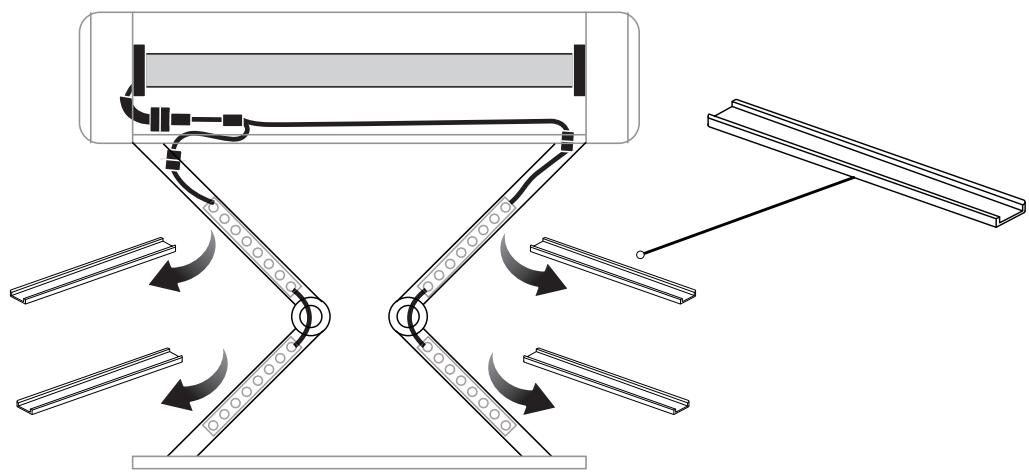
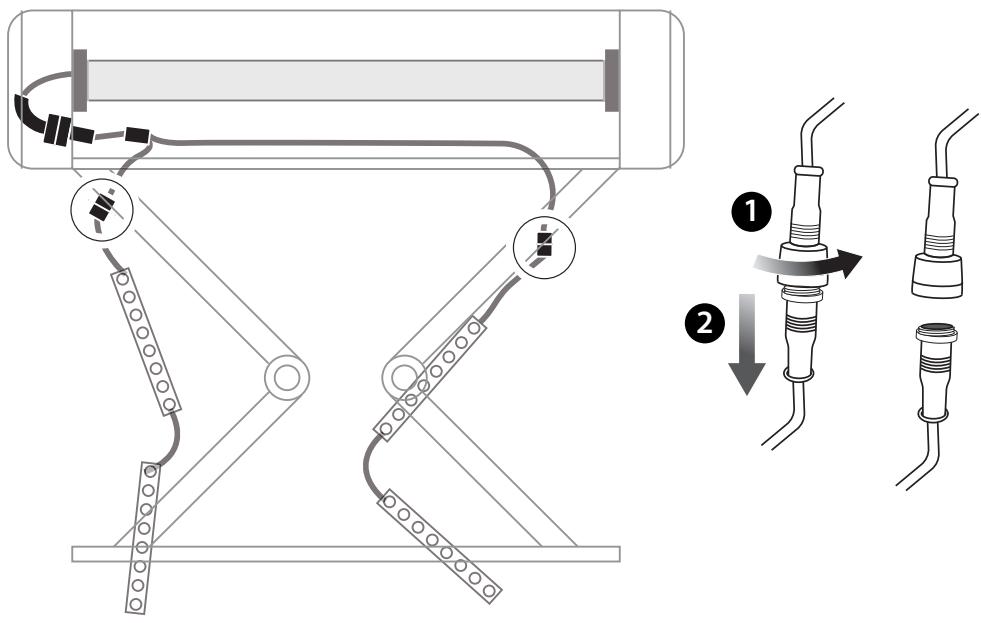
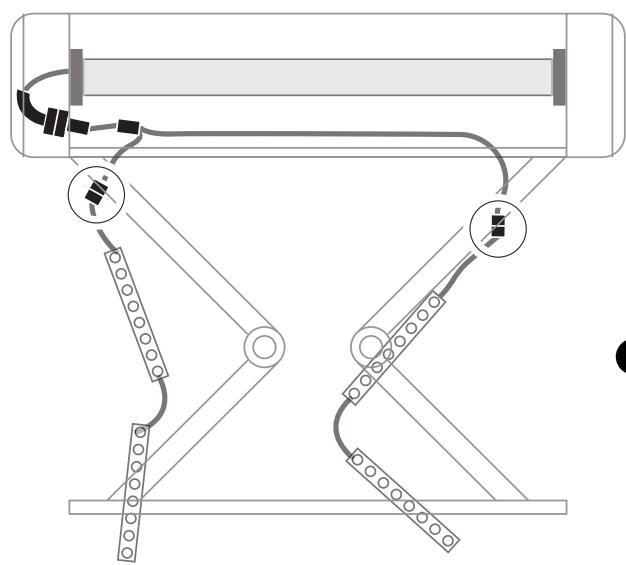
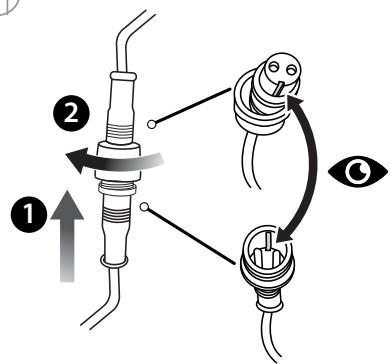
This product contains lights sources of energy efficiency class F Light sources can be replaced following procedure page 108
4. USE
Max. load for non-retractable parts: 800Pa
Do not modify the appliance in any way!
Never open the electronic command box (this will void the warranty).
Never use accessories which are not recommended by the manufacturer. They could pose a safety risk to the user and might damage the appliance. Only use original parts and accessories.
Do not hang anything on the frame or on the folding arms as the awning may fall down and cause damage or personal injury.
Do not use this appliance in adverse weather conditions. If wind speeds are stronger than a class 2 wind (>38km / h) , retract the awning.
Never use the appliance on rainy days.
Do not use it in places of high temperature such as walls near furnaces.
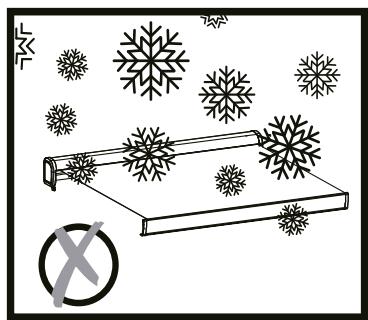
The operation in frosty conditions may damage the awning.
Save enough free space around the awning while rolling or unrolling.
Do not barbecue under the awning or ignite a fire near to the awning.
Check the awning every 3 months to ensure all fixing are tightened and no damage on the products.
Frequently examine the installation for imbalance and signs of wear or damage to cables and springs. Do not use if repair or adjustment is necessary.
Never use a damaged appliance! Disconnect the appliance from the power supply and contact your supplier if it is damaged.
Unless advised to the contrary by a technician, do not attempt to use the awning if repair or adjustment is needed.
Take care when operating the manual release with the external blind retracted since it may fall rapidly due to weak or broken springs.
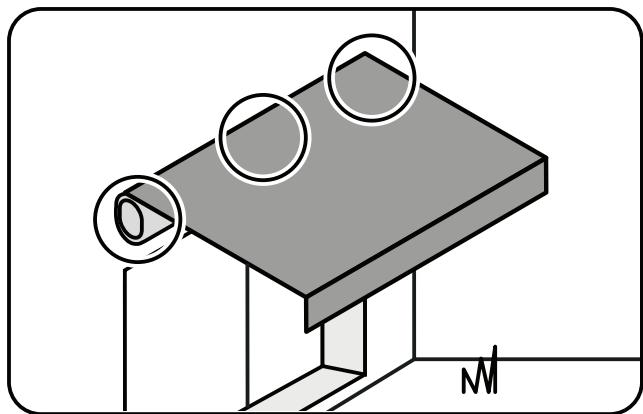
Watch the moving shutter and keep people away until the shutter is completely closed.
Take care when operating the manual release with the external blind retracted since it may fall rapidly due to weak or broken springs.
Please do not use the motor for any opening/dosing operations beyond the assigned number of cycles (3000 times).
Do not operate the awning when maintenance, such as window cleaning, is being carried out in the vicinity.
Disconnect the awning from the supply when maintenance, such as window cleaning, is being carried out in the vicinity.
5. PROTECTION OF CHILDREN
Do not allow children to play with fixed controls. Keep remote controls away from children.
The awning is not Intended for use by persons (including children) with reduced
physical, sensory or mental capabilities, or lack of experience and knowledge, unless they have been given supervision or instruction concerning use of the awning by a person responsible for their safety.
Children should be supervised to ensure that they do not play with the appliance.
6. BATTERIES IF REMOTE CONTROL
Danger of explosion! The batteries may not be charged or re-activated by other means, disassembled, thrown into fire, or short-circuited.
- Do not expose batteries to extreme temperatures. Do not place the remote control on heaters.
- Leaked battery add can cause damages.
Replace all used batteries with the same type only.
Attention! Danger of explosion! Never insert batteries inversely.
If batteries should leak, remove them with a cloth from the battery compartment.
Dispose of batteries according to the regulations. If battery acid has leaked avoid contact to skin, eyes and mucous membranes. Rinse affected areas immediately after contact with the acid and wash with plenty of clean water. Visit a physician.
Swallowed batteries are lethal. Keep batteries out of reach of children and pets. Immediately ask for medical assistance if a battery is swallowed.
Remove exhausted batteries from the remote control. Remove the batteries from the remote control, if you will not use it for an extended period of time.
X1 Changing batteries
Overheat protection:
The motor will automatically go into overheat-protection mode after two consecutive extending (down) and retracting (up) operations
Conform to:
2014/53/EU-2014/30/EU-2014/35/EU-2006/42/EC

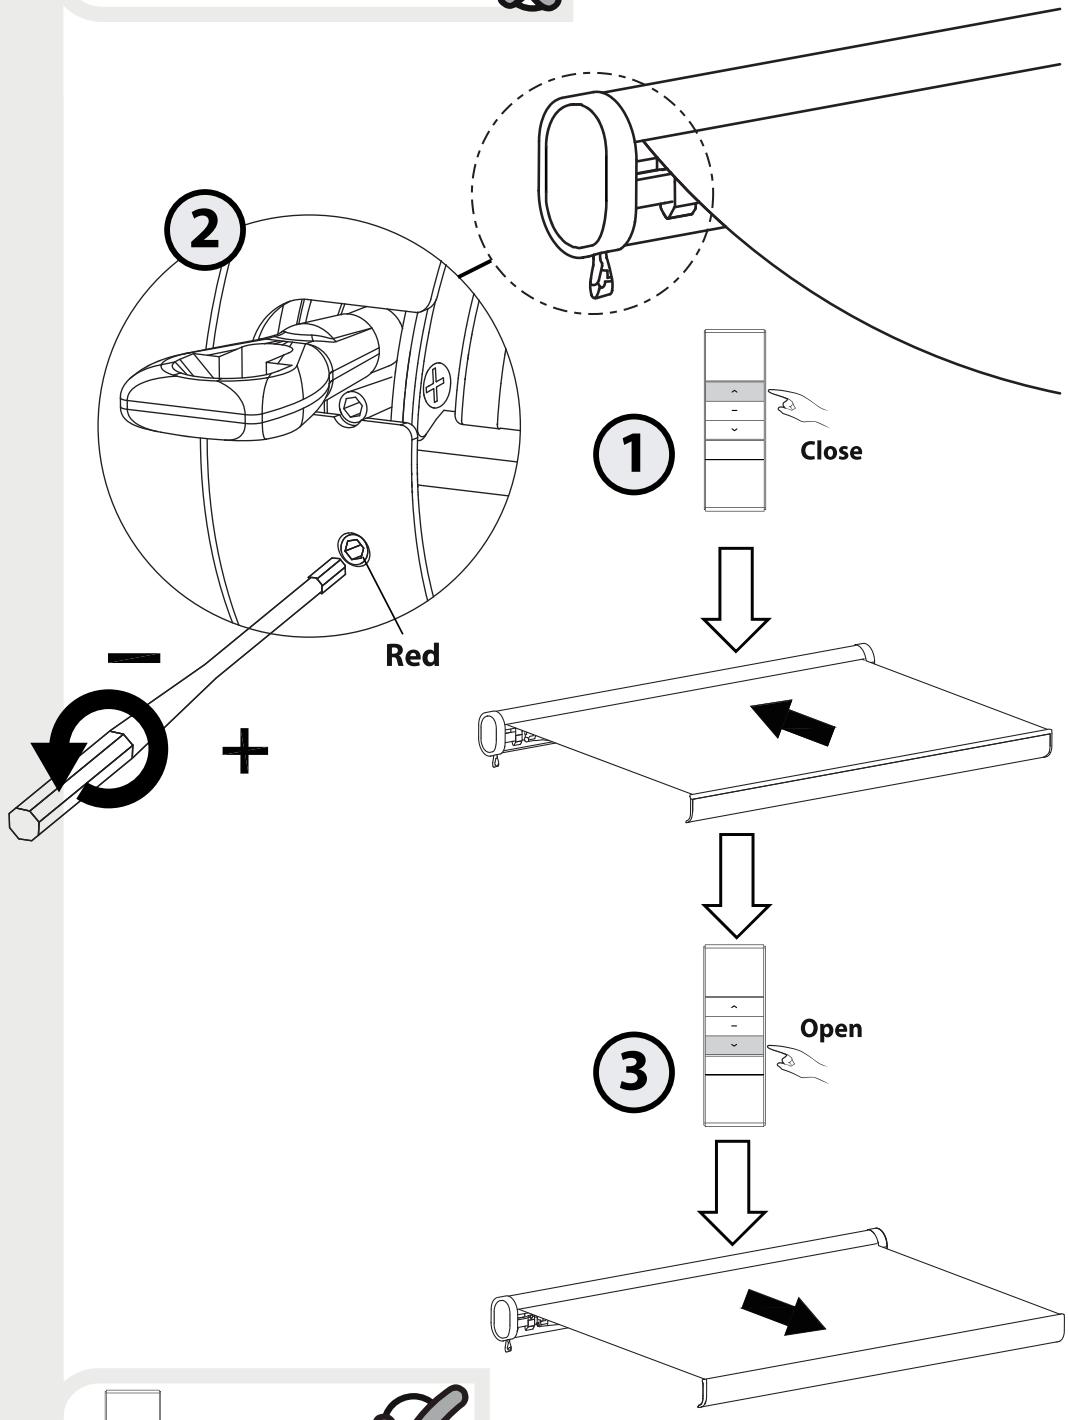
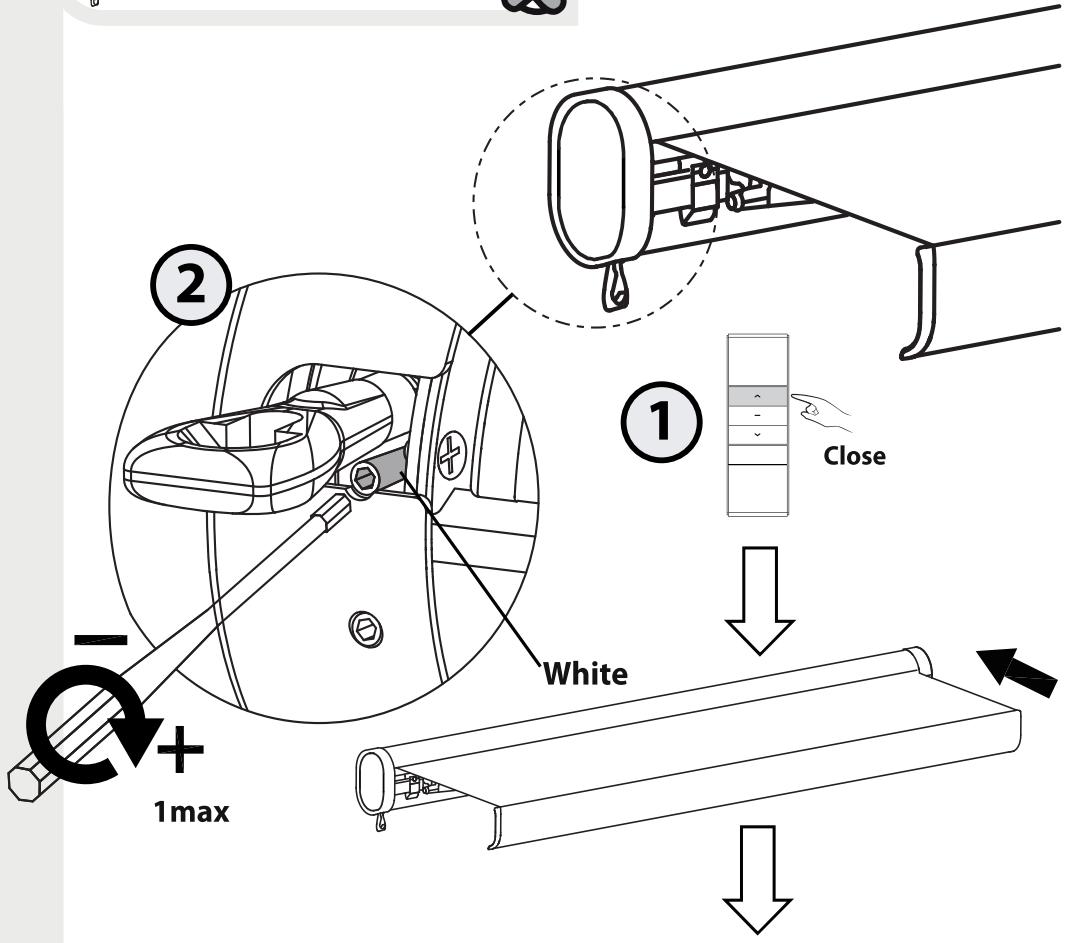
7. ADJUSTMENT WHEN CHANGING THE REMOTE CONTROL
Step 1: Prepare a power interface of 230V , turn off the power firstly. Then connect brown and blue electric cords of motor to the power interface (Or with electric cord of motor plugged in a power panel, but firstly need to cut the power off).
Step 2: Take out the controller and keep the battery in place, the inductor light will be on. If not in place, the inductor light will not be on. No need to cover the battery lid before well-coding.
Step 3: Keep ear close to the head of motor and then turn on the power under a quite environment (before turn on the power it must be off more than 10 seconds), Then at the same time, you will hear a clear but small and short sound «Di». This shows it work well. If without
that sound, you need to check the cord-connecting or the power.
Step 4:1. Find «P2» button in the battery slot firstly 2. Keep ear near to the head of motor under quite environment and then press «P2» button 2 times successively. At the same time you will hear «Di-Di», small and more shorter.
Step 5: After the sound of «Di-Di», press «Open» button for 3 seconds and then release, you will hear successive short sound of «Di-Di---» at the same time when you press the «open» button. That means motor-coding works
Step 6: 1. Check whether motor is working. 2. If motor is on the work, press «close» button for 3 seconds. If motor turns in the contrary direction as when opening «open» button. It means motor can work normally. (If motor refuse to turn, then it needs to adjust its limit. (See Method for adjusting motor limit)).
8. WARNING
Attention: Well finish the setting program already for all electric items, final client no need adjust the motor again.
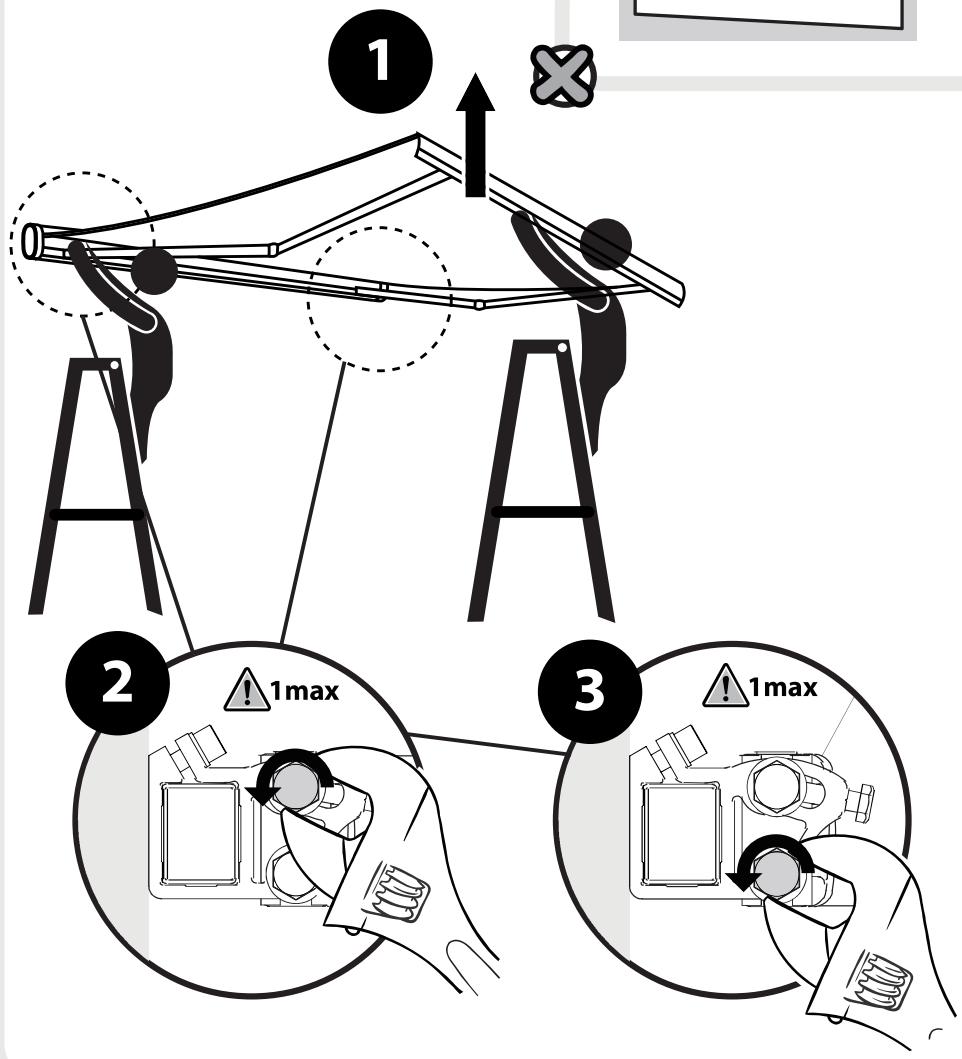
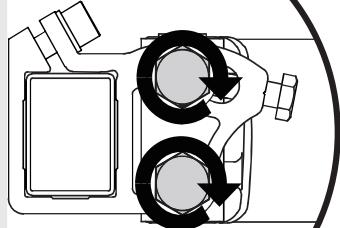
The user can adjust the limit of one direction at one time, do not adjust two knobs at the same time.
Do not turn knobs fiercely, please check the limit with remote control per revolute about half cycle, and check if the setting you satisfied.
WARNING
- The replacement and installation of batteries must be done by an adult.
- Remove the worn out batteries of this product.
- Do not expose the batteries to fire, they may leak or explode.
- Do not short-circuit the battery terminals.
- Do not mix old batteries with new ones.
- Do not use rechargeable batteries in this product.
- Do not recharge batteries that are not rechargeable.
- Use only the recommended type of batteries.
- Keep this product away from the reach of children.
- Dispose off the batteries only in a recycling place.
- The drive shall be disconnected from its power source during cleaning, maintenance and when replacing parts.
- WARNING: the drive shall be disconnected from its power source during cleaning, maintenance and when replacing parts.
Maintenance
Check to make sure that the awning is fixed tightly and securely before cleaning.
- Clean the metal surfaces of the awning with a slightly damp cloth.
- Clean the remote control and wall mount base with a slightly damp cloth.
- Wipe off debris from the fabric cover using a dry, soft cloth when the awning is not clean or when it is not used for longer period of time.
- Do not use any abrasive cleansers like chemicals, benzene or alcohol.
- Do not roll-in the awning when wet.
- Dry the fabric cover naturally when it is wet.
- Turn off the power when the awning is not used for a longer period of time.
9. WARRANTY
Canvas and frame 5-year warranty and motor 3-year warranty.
10. TECHNICAL SPECIFICATIONS
| Supply Voltage and Current: | 230V~50Hz, 0.89A |
| Nominal power: | 219W |
| Rotation speed: | 12/min |
| Torque: | 50Nm |
| Evaluated cycle number: | 2 |
| Protection class: | IPX4 |
| Model of the engine: | Dooya DM45RD-50/12 |
| Model of the remote control: | DC1600A |
| Maximum RF Transmit Power: | -7.71dBm |
| Transmitting Frequency (MHz): | 433.88MHz |
| Protection against electric shock: | Class I |
| Emission sound pressure level | <70 db(A) |
| AW3 RM 2.95x2 | Acrylic fabric 2780mmx2200mm |
| AW3 RM 3.95x3 | Acrylic fabric 3780mmx3200mm |
| AW3 RM 4.95x3 | Acrylic fabric 4780mmx3200mm |
| LED Characteristics | Not dimmable, non directional light |
| Useful luminous flux use | 540 lumen |
| Color temperature | 6500 K |
| Lifetime | 50000 hours |
| On-mode power PON | 4,8 W |
| CRI (color rendering index) | 80 |
11. DISPOSAL AND RECYCLING
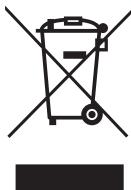
This product is equipped with the sign for separate collection and sorting of waste electrical and electronic equipment (WEEE). This means that when this type of product is processed and dismantled, it must comply with the requirements of European Directive 2012/19/EU, to reduce the negative impact on the environment. For more information, contact your local or regional authorities.
Electronic products that have not been separately collected and sorted, may be dangerous for the environment and human health due to the presence of harmful substances.
12. CE DECLARATION
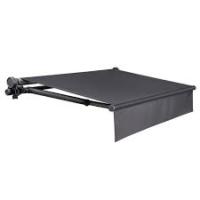
Awning NORI 2 Motorized With LED
Industrial Type Design Reference: AW3 RML
Product Brand|Marque Produkt|Producto de marca|Marca do produits|
NATERIAL
Serial number coding or batch number [Codificatio du numero de série ou de lot [Codificatio del numero de série]Codificatio do numero de série]
XXXXXX YY WW (XXXXXXXX: Last six number of PO; XX : Year nb ; XX : Week nb)
IEC 6232-8:2017 EN/IEC 63000:2017
2009_125 ECO DESIGN EcoDesign|Eco-Conception||Concepcion ecologica
(EU) 2019/2020
(EU) 2021/341
(EU) 2019/2015
(EU) 2021/340
Awning NORI 2 Motorized With LED
Riferimento del prodotto|Referencje produktu|Avaporap tpiolovroq|ReferiTà produsi|
82752793;82752765;82752769;82752771;82752760;82752763;82752741;82752751
Industrial Type Design Reference: AW3 RML
Marcadel prodotto|Marka produktu|MapkaTpoiovtoc|Marcàprodusului:
NATERIAL
EN301489-1V2.2.3:2019 EN201489-1V2.2.3:2019
International Project Quality Leader
Complato, firmato in vece e perconto di|Opracowano, podpisano w imieniu|Σvuroxδηκε, utroovapαγι γι και εξ Σομοτος Complatil, semneta di si In numele]
Luogo e data del rilascio|Data wydia i giorni|Tomoc kcn nepouymia&doanc
Ronchin France
09/06/2023
| CE |
| ADEO SERVICES 135 RUE SADI CARNOT CS00001
59790 RONCHIN FRANCE
Made in CHINA 23 |
| EN 13561:2004+A1:2008
EN 13561:2015 |
| AW3 RML 2.95x2 |
| Résistance au vent / Resistência al viento / Resistência ao vento / Resistência al vento / Avóektúkô σον αέρα / Odpornoósć na obciañenie wiatrem /
Conpoitnbelenhe BeTPy / Onip bITpy / Rezistentá la vêt /Желdenen Koprǎn TBH / Wind resisitance : Class 2 |
| Utilisation extérieur dans des bâtiments et d'autres travaux de construction /
Utilização exterior en edificios yotirosetrabajos de construccion / Utilização exterior em edificios e otheras obras de construcão/Useo esterno in cantieri edil o di altre tipo /Eξωτερικό χρηση σε κίρία καλ Λοίπα καταοκευαθικό εργα /Zastosowanie na zewnatrz w budynkach i w innych obiektach budowlanych/Hapuykhoe Incpònb3OBaHNHe prir 3dAnHyrnx i npdyrHx CTpOInTeNbHbIX pa6Otax /3OBHiiHNe BIVKOpNCTaHnPrn 6byiBnTx Ta iHsiNx 6byiBeNbx p6OToX /
Utilizare externa in cladiri.si alte lucrāri de constructie/FImapaT iSiinDe xhene De baska Koprblbc JxMblcIcTBPbDcaSbPTKbI KolldAnHy /External use in buildings and other construction works |
| DOP N° : B104419-0005-ADEO-20 |
| CE |
| ADEO SERVICES 135 RUE SADI CARNOT CS00001
59790 RONCHIN FRANCE
Made in CHINA 23 |
| EN 13561:2004+A1:2008
EN 13561:2015 |
| AW3 RML 3.95x2 |
| Résistance au vent / Resistencia al viento / Resistência ao vento / Resistência al
vento / Avhεκτικό Οον αέρα / Odpornoçoć na obciañenie wiatrem /
ConpoTnBLeHne Bétopy / Onip Bītopy / Rezistenta la vêt /Желdenн Кортах/ Wind resisitance : Class 2 |
| Utilisation extérieur dans des bâtiments et d'autres travaux de construction /
Utilização exterior en edificios yotirosetrados de construccion / Utilização
exterior em edificios e outras obras de construcão /Uso esterno in cantieri edil o
di alto tipo /Eξωτερικό χρηση σε κίρία καλοίπα καταοκευαούτικα ἔργα /Zast-
sowanie na zewnabrz w budynkach i w innych obiektach budowlanych
/Hapuykhoe IncpònbZobAHne prni 3dānayx i npугнх CTpOnteMbHyx pa6otax
/3OBniiHNe BnKOpncSTaHnny prni 6bduBnIx Ta iHnix 6bduBnIX p6oToax /
Utilizare externă în clàdiriși alte lucrãri de construcţie /FmApat iùnÎnde xəHe
De 6acka Kþrpblc JxymbIcTaPbIHda cbɪptkbl Koɪdʌny /External use in buildings
and other construction works |
| DOP N° : B104419-0005-ADE0-20 |
| AW3 RML 4.95x3 |
| Résistance au vent / Resistencia al viento / Resistência ao vento / Resistência al
vento / Avóektukh στον αέρα / Odpornoćsć na obciañenie wiatrem /
Conpoṭnámène Bétrpy / Onip Bītrpy / Reziencenta la vêt / Ленин Коргайтейн /
Wind résistance : Class 2 |
| Utilisation extérieur dans des bâtiments et d'autres travaux de construction /
Utilização exterior en edificios yotirosetrados de construccion / Utilização
exterior em edificios e outras obras de construção /Uso esterno in cantieri edil o
di alto tipo /Eşωtερικ hρηση σε κτίρια καλλοίκεμαστία ἔργα /Zast-
sowanie na zewnătrz w budynkach i w innych obiektach budowlanych
/Hapuykhoe nçoplòbztobānne pni 3dànánx i npугнх CTpòntelbnyx paθotax
/3OBHiiùNH ÉBKKOPiúCTaHŋn pni 6ydiñIbNx Ta iHùnIX 6ydiBènbHnx poθotax /
Utilizare externaîn cládirì sì alte lucrái de construcţie /Fímapat iùsinde jæne
De bɑcka Kþrblc JęMbɪc Târpblɪda cþirrkbl Koɪdány /External use in buildings
and other construction works |
| DOP N° : B104419-0005-ADE0-20 |

1
2
3-1
295 x200 cm
3-2
395 × 300 cm


4

5


6
1
2

1

2
3

4
1
2

1
2

3
4

5
6
7
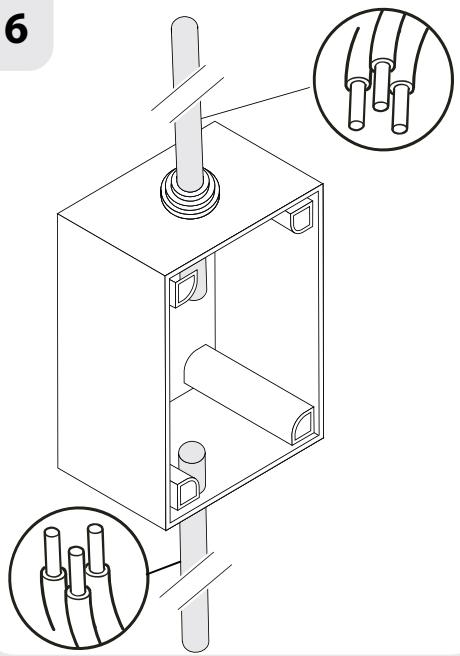
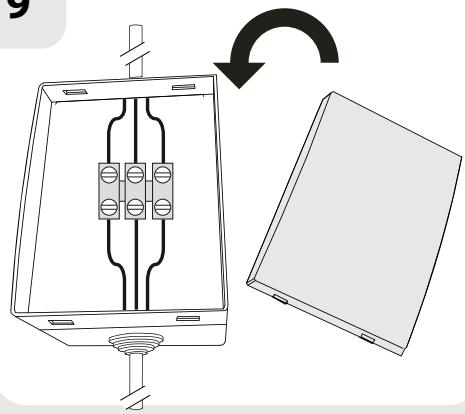
| Black | Direction 01 |
| Yellow and green | Earth |
| Blue | Neutral |
| Brown | Direction 02 |
| Yellow and green | Earth |
| Brown | Live |
| Blue | Neutral |


8
9
10
11


1
2

3
4

5

2
1max


1
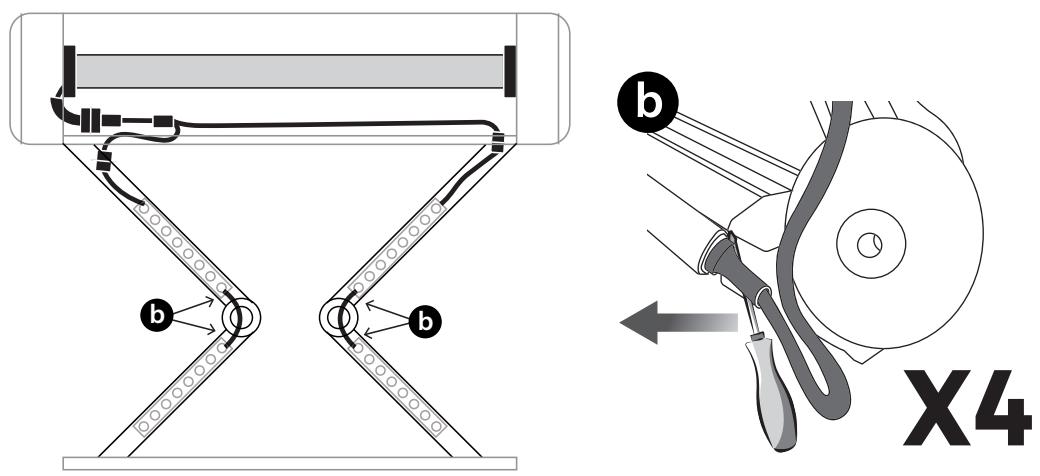
Remplacement des LED/ Sustitucion de los LED/Substitucao dos LED/Sostituzione del LED/AvtikataotaoLED/Wymiana LED/3amHa cBtIoioJnoI lamnn/Inlocuire LED/3aMeHa CBetoIOIOHn lamMbI/JKapbIKdoTbI 1aMdbI aybICTbpy/ Substitucao dos LED/LED replacement
2
5
6
a
ON


Made in China
- Garantie 5 ans / 5 años de garantía I Garantia de 5 años / Garanzia 5 Anni / Eyyúnŋn 5 ετών / Gwarancja 5-letnia / Γαραπίσιρε 5 pokίν / Garantiei 5 ani / 5aar garantie / 5-years guaranteee
ADEO Services -135 Rue Sadi Carnot - CS 00001
59790 RONCHIN - France
UBA Bnpo6HnK:TOB "Adeo CepBice3 C.A.,Byn.CaJi KapHo,CS 00001,59790 PoHnHeN,ΦpaHnIa.
ImnopTep:TOB "Ipeya Meplen UkpaiaH", 04201 YkpaiaH, M.KnIB,ByN. POnlaH7A +380 44 498 46 00.ImnopTep pInmae npTeH3ii BID CnOxNBAuH ⅢOIO TOBapy,a TAKoK npBOODntb IIOPOEMOT,TEXHHeI rapaHTiNe HeocIyROBYaHH
7A Imported by Adeo South Africa (PTY) LTD T/A Leroy Merlin - Leroy Merlin Greenstone Store - Corner Blackrock Street and Stoneridge Drive, Greenstone Park Ext 2, Edenvale, 1610 Johannesburg, Gauteng, South Africa - Tel: +27 10 493 5170 - Email : lmza.Quality@leroymerlin.co.za